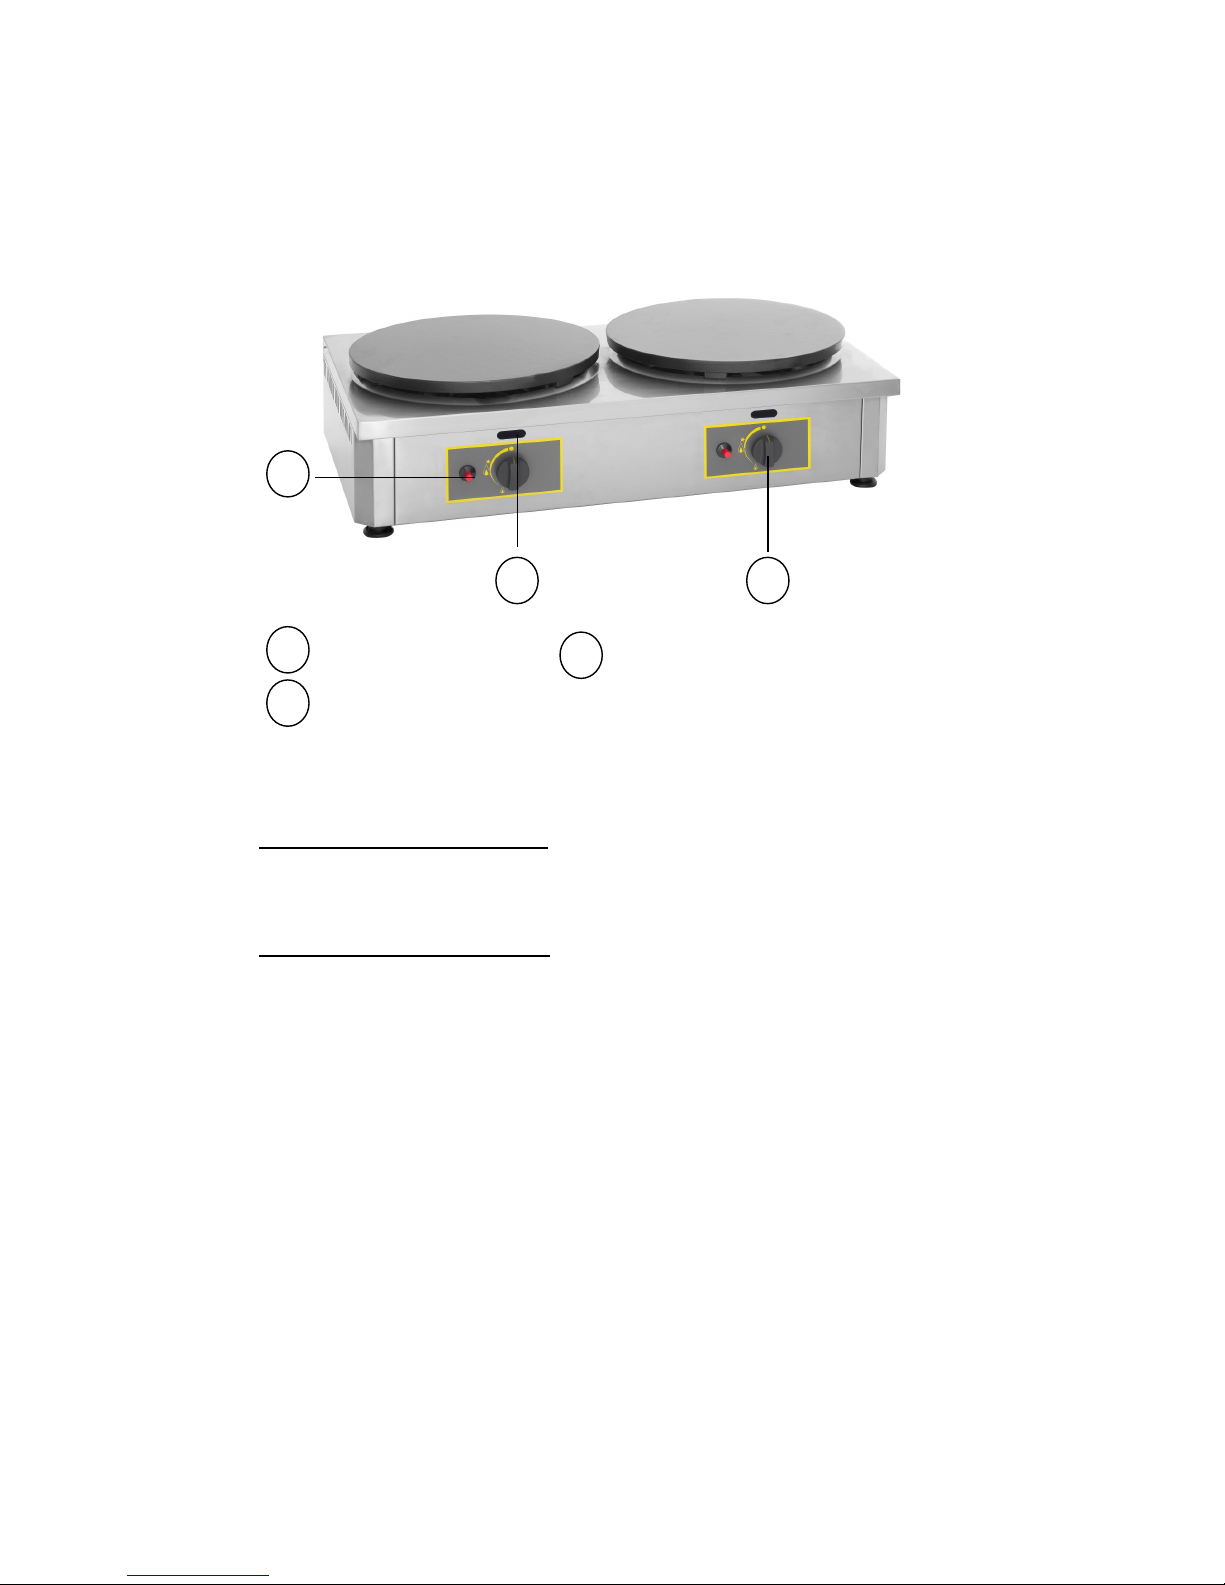
Roller Grill CSG 400 Operation manual

NOTICE D’INSTALLATION ET D’UTILISATION
CREPIERES GAZ
INSTRUCTIONS FOR USE AND INSTALLATION
GAS CREPE MACHINES
CSG 350 / CSG 400 / CDG 350 / CDG 400
Fabrication française
Fabrication françaiseFabrication française
Fabrication française
Made in France
Made in FranceMade in France
Made in France
Octobre 2016


CREPIERES GAZ
CSG 350 / CSG 400 / CDG 350 / CDG 400
Félicitations pour l’acquisition de cet appareil de cuisson haut de gamme fabriqué en
France. Vous ave choisi un appareil qui allie les meilleures qualités techniques à un
grand confort d’utilisation. Nous vous souhaitons la plus grande satisfaction.
1 CONSIGNES DE SECURITE
Veuillez respecter scrupuleusement ces consignes pour évi-
ter tout risque d’incendie, de brûlure ou autres blessures et
dommages. Lors de l’utilisation de cet appareil, des précau-
tions fondamentales de sécurité doivent toujours être obser-
vées, telles que
- Ne laisser jamais l’appareil fonctionner sans surveil-
lance.
- Tenir compte du mode d’emploi à conserver systémati-
quement avec l’appareil.
- Installer toujours l’appareil en respectant les consignes.
Une distance de 10 cm minimum avec la cloison ou le
mur est nécessaire.
- Cet appareil est destiné à une utilisation en extérieur et
intérieur dans un local aéré ou sous une hotte.
- Protéger l’appareil de la lumière directe du soleil, du
gel et de l’humidité.
- Ne laisser pas l’appareil à la portée des enfants ou des
personnes infirmes sans surveillance.
- Ne déplacer jamais l’appareil lorsqu’il est en fonction-
nement ou lorsque la surface de cuisson est encore
chaude. 3

- Veiller à ce que seule une personne initiée se serve de
l’appareil.
- Ne pas toucher les surfaces chaudes de l’appareil. La
température des surfaces chaudes peut être très élevée
lorsque l’appareil est en marche. Utiliser toujours les
boutons de commande.
- Ne pas utiliser l’appareil pour d’autres fonctions que
l’utilisation déterminée.
- Ne pas laisser le tuyau ou flexible (acheté séparément
en magasin spécialisé) au contact de surfaces chaudes.
- L’appareil ne doit pas être utilisé à proximité de maté-
riaux combustibles.
- Durant l’utilisation, prendre soin de ne pas obstruer les
ouïes de ventilation de l’appareil.
- Ne pas plier ou pincer le tuyau ou flexible.
- Confier les réparations uniquement à une personne qua-
lifiée.
- Utiliser uniquement des pièces de rechange d’origine.
- En fin de cuisson, pour nettoyer l’appareil, ne pas ou-
blier de couper l’arrivée du gaz.
2. CONTENU DU CARTON D’EMBALLAGE
Appareil : Une crêpière
Accessoires: - Un té de répartition de la pâte.
- Une pochette plastique avec les injecteurs Ga Naturel.
- La présente notice.
4

Cf. vue éclatée détaillée des CSG 350/CSG 400/CDG 350/CDG 400 en fin de docu-
ment.
3. CONFORMITE D’UTILISATION
Utiliser l’appareil pour cuire des crêpes moelleuses et dorées, des galettes au sarra-
sin, blinis...
4. MODE DE FONCTIONNEMENT
Cette crêpière est une plaque de cuisson robuste en fonte émaillée. La forte épais-
seur du disque et son dessin spécifique assure une excellente homogénéité et stabi-
lité de la température.
Par sa surface lisse, la plaque assure un transfert direct de la chaleur vers l’aliment à
cuire, sans perte de chaleur au centre comme en périphérie grâce au brûleur en
étoile qui couvre ainsi toute la surface de cuisson.
Pour allumer et préchauffer la plaque, il suffit d’appuyer sur la manette du robinet (n°
3 sur la photo) en face de la position étoile pendant quelques secondes et sur le pie-
o (n°1 sur la photo) à plusieurs reprises si nécessaire.
Si le pie o (n°1 sur la photo) ne génère plus le train d’étincelles nécessaire, il est
possible d’utiliser un allume ga ou une longue allumette en l’approchant du trou
oblong (n°2 sur la photo) et en maintenant appuyé la manette (n°3 sur la photo) face
à la position étoile comme indiqué précédemment.
5
Bouton d’allumage piezo Ouverture pour allumage avec allumette
Bouton de réglage de puissance
1
3
2
1
23

Pendant la cuisson, la température peut être régulée grâce au bouton de commande
(n°3 sur la photo) de grande flamme à petite flamme afin d’éviter le phénomène de sur-
cuisson. Si la crêpe colle, c’est que la crêpière est trop chaude, il faut alors diminuer la
puissance.
Un thermocouple de sécurité coupe l’alimentation en ga en cas d’extinction du brûleur.
Le débit réduit de l’appareil est préréglé en usine, il ne doit pas être modifié. Cette ex-
tinction peut notamment se produire en cas de vent important. Dans ce cas particulier,
il suffit de renouveler les procédures d’allumage décrites ci-dessus.
5. FONCTIONNEMENT / MANIPULATION
a) I stallatio /Mo tage :
- Déballer soigneusement l’appareil de son carton.
- Placer la crêpière sur une surface plane et résistante à la chaleur.
- Ne jamais placer l’appareil près d’un mur ou d’une cloison fait de matériaux com-
bustibles même s’il est très bien isolé.
- Une distance de 10 cm minimum avec la cloison ou le mur est nécessaire.
b) Première mise e service :
Avant la première utilisation.
Ôter la graisse de protection anti corrosion à l’aide d’un détergent et d’une éponge hu-
mide.
Lors de la première utilisation.
Graisser votre plaque avec de l’huile alimentaire.
Faire préchauffer la crêpière pendant environ 15 minutes.
Une fois le préchauffage effectué, régler la puissance grâce au bouton de commande
(n°3 sur la photo).
Premier nettoyage
Nettoyer l’appareil avant la première utilisation. (cf. 6 Nettoyage)
Raccordement gaz
Les appareils fonctionnent aux ga suivants : Butane G30, Propane G31, Ga naturel
G20/G25. Les appareils sont livrés d’origine avec un injecteur Butane/Propane corres-
pondant à la catégorie II2E+3+. Le raccordement se fait par un filetage 3/8.
Le débit calorifique de l’appareil est de CSG 350 / CSG 400 3.2 Kw
CDG 350 / CDG 400 6.4 Kw
6

Pour une utilisation en Ga naturel, changer les injecteurs, ils sont livrés dans une
pochette plastique dans l’emballage.
Raccorder l’appareil à la canalisation d’amenée de ga en interposant une vanne de
barrage permettant d’isoler l’appareil du reste de l’installation.
Vérifier la pression d’alimentation, lorsque tous les brûleurs sont allumés, à l’aide
d’un manomètre. Celle-ci doit être égale aux indications de la plaque signalétique.
Le débit d’air neuf requis pour l’alimentation en air de combustion est de :
- CSG 350 / CSG 400 7.2 m3/h
- CDG 350 / CDG 400 14.4 m3/h
Conditions générales d’installation
L’installation et l’entretien de l’appareil doivent être effectués conformément aux
textes réglementaires et règles de l’art en vigueur, notamment :
Prescriptions générales
Pour tous les appareils :
Article GZ Installation aux ga combustibles et hydrocarbures liquéfiés.
Ensuite, suivant l’usage :
Article CH Chauffage, ventilation, réfrigération
Conditionnement d’air et production de vapeur d’eau chaude sanitaire.
Article GC Installation d’appareils destinés à la restauration
Prescriptions particulières à chaque type d’établissements recevant du public.
Importa t : Ne jamais modifier le diamètre des i jecteurs.
7

8
Tableau de catégorie de ga , selon le pays de destination de l’appareil.
N° d’injecteur Gaz Pressions Diamètre
Injecteur n°1 G30 / G31 Butane/Propane 28-30/37 90/100
Injecteur n°2 G30 / G31 Butane/Propane 50 85/100
Injecteur n°3 G20 / G25 Gaz naturel 20-25 135/100
Injecteur n°4 G25 Gaz naturel 25 135/100
Injecteur n°5 G25 Gaz naturel 20 135/100
Injecteur n°6 G31 Propane 50 85/100
Pays de destination Catégorie Gaz Pressions Diamètre
d’injecteur
France/Luxembourg II2E+3+
II2E+3B/P
G20/G25
G30/G31
G20/G25
G30/G31
20/25
28-30/37
20/25
50
135
90
135
85
Allemagne II2E+3B/P
G20 /G25
G30/G31
20
50
135
85
Autriche II2H3B/P G20
G30/G31
20
50
135
85
Belgique I3+
I2E
G30/G31
G20/G25
28-30/37
20/25
90
135
Suède/Danemark/Finlande
II2H3B/P G20
G30/G31
20
28-30/30
135
90
Espagne II2H3+
II2H3P
G20
G30/G31
G20
G31
20
28-30/37
20
50
135
90
135
85
Pays-Bas II2L3B/P
II2L3P
G25
G30/G31
G25
G31
25
28-30/37
25
50
135
90
135
85
Norvège I3B/P G30/G31 28-30/30 90
Islande/Grèce/Royaume-
Uni/Italie/Portugal
II2H3+
G20
G30/G31
20
28-30/37
135
90
Pologne II2E3P G20/25
G31
20
37
135
90

Réglage d’air
Les injecteurs ont été conçus afin d’éviter tous réglages d’air et ce quelque soit le type
de ga utilisé.
c) Utilisatio de l’appareil :
Eléments de commande et affichage
Allumage
1. Appuyer pendant quelques secondes sur le bouton (n°3 sur la photo) en face de
la position étoile.
2. Appuyer sur le pie o (n°1 sur la photo) pour allumer le brûleur.
3. Maintenir le robinet (n°3 sur la photo) appuyé pendant encore plusieurs secondes.
4. Le brûleur reste alors allumé et il est désormais possible d’augmenter la puis-
sance en tournant la manette de ga (n°3 sur la photo).
Huiler la plaque avant chaque cuisson.
Réglage de la température
Une fois le brûleur allumé ; régler l’appareil à la puissance souhaitée en tournant
le bouton de commande (n°3 sur la photo).
Il ’est pas écessaire de laisser l’appareil allumé à plei régime. Il faut adapter
la température aux produits à cuire pour limiter la co sommatio de gaz.
Arrêt de l’appareil
- Positionner chaque bouton de commande (n°3 sur la photo) sur 0 : l’appareil est
entièrement éteint.
- Fermer l’alimentation en ga .
- Laisser refroidir l’appareil.
- Nettoyer l’appareil. (cf. 6. Nettoyage)
Commande/Affichage Fonction
Piezo
(n°1 sur la photo)
Allume l’appareil (simultanément avec le bouton de réglage)
Bouton de réglage
(n°3 sur la photo)
Allume l’appareil (bouton appuyé simultanément avec le piezo)
Règle la puissance (petite flamme = faible puissance, grande
flamme = forte puissance)
Ouverture
(n°2 sur la photo)
Peut remplacer le piezo et permet ainsi d’allumer l’appareil à
l’aide d’une longue allumette ou d’un allume gaz
(simultanément avec le bouton de réglage maintenu appuyé
quelques secondes)
9

d) Pa e/Réparatio :
En cas de panne ou de pièce endommagée, veuille faire appel à votre service
après vente et confier toute opération technique à une personne qualifiée.
Lorsque vous contacte le service entretien de votre Distributeur ou de votre maga-
sin, donne -lui la référence complète de votre appareil (désignation commerciale,
type et numéro de série). Ces renseignements figurent sur la plaque signalétique
visible à l’arrière de l’appareil.
6. NETTOYAGE ET MAINTENANCE
Couper l’alimentation en ga .
- Laisser refroidir complètement l’appareil avant toute intervention technique ou de
nettoyage.
- Nettoyer l’appareil régulièrement après chaque utilisation car la calamine issue de
la cuisson du sucre et de la pâte s’accumule très rapidement, elle crée une pellicule
sur la plaque qui nuit à la qualité de la cuisson.
- Pour le nettoyage, utiliser uniquement des produits d’entretien légèrement abrasifs,
de l’eau savonneuse ou du liquide vaisselle.
- Sécher l’appareil avec un chiffon doux et propre.
- Ne jamais nettoyer l’appareil sous un jet d’eau, les infiltrations risqueraient de l’en-
dommager de façon irrémédiable.
- Nettoyer régulièrement les parois externes de votre appareil à l’aide d’eau chaude,
de liquide vaisselle : éviter les éponges abrasives. Rince votre appareil à l’aide
d’une éponge humide.
- Il est préférable de bien graisser la plaque afin de la protéger de toute oxydation
lors d’une non-utilisation prolongée.
- Nous vous recommandons fortement de conserver l’appareil à l’abri de l’humidité.
7. CARACTERISTIQUES TECHNIQUES
10
Modèles CSG 350
Dimensions e -
ternes mm
450x485x240
Poids 20 Kg
Puissance 3200 W
Nombre de brû-
leurs
1
CSG 400
450x485x240
23 Kg
3200 W
1
CDG 350
860x485x240
39 Kg
6400 W
2
CDG 400
860x485x240
44 Kg
6400 W
2

8. GARANTIE
Conditions de garantie
La garantie qui s’applique sur tout appareil est la garantie commerciale du distributeur
ou du revendeur. Veuille contacter le magasin où vous ave acheté votre appareil pour
en connaître les conditions précises.
La garantie n’octroie aucun droit à des dommages et intérêts.
Les dispositions qui suivent ne sont pas exclusives du bénéfice de la garantie légale
prévue par les articles 1641 et suivants du Code Civil relatifs aux défauts et vices ca-
chés.
Clauses d’exclusio de la gara tie
Mauvaise i stallatio et mauvais e tretie , otamme t s’ils e respecte t pas les
régleme tatio s e vigueur ou les i structio s figura t da s ce ma uel d’utilisa-
tio .
Ne peuvent bénéficier de la garantie les réparations nécessitées par suite de fausses
manœuvres, d’usage inapproprié, de négligences ou de surcharges de l’appareil, ainsi
que celles résultant d’installations défectueuses.
Les dégâts dus à des chocs, des intempéries ne sont pas couverts par la garantie. Le
matériel voyage aux risques de l’utilisateur ; en cas de livraison par transporteur, le des-
tinataire doit émettre des réserves vis-à-vis du transporteur à la livraison de l’appareil.
La garantie prend fin en cas d’intervention, de réparation, de modification par des per-
sonnes non qualifiées, ou d’utilisation à des fins inappropriées.
11

GAS CREPE MACHINES
CSG 350 / CSG 400 / CDG 350 / CDG 400
Congratulations for the acquisition of this upmarket appliance made in France. You
chose an appliance which alloys the best technical qualities with a big user-
friendliness. We wish you the biggest contentment
1. SECURITY INSTRUCTIONS
Please respect these instructions scrupulously to avoid any
risk of fire, scald or other wounds and damage. During the
use of this appliance, fundamental circumspection of secu-
rity must always be noticed, such as
- Never leave the machine working without any watching.
- Take into account the instructions to be systematically
kept with the appliance.
- Install the appliance always in instructions respect. A 10
cm distance minimum with the partition or the wall is
necessary.
- This appliance is marked out for outside use or inside use
in a well ventilated room or under a cooker hood.
- Protect the appliance from direct light of the sun, frost
and humidity.
- Never leave the appliance within the reach of children or
disabled persons without surveillance.
- Never move the appliance when it is working or when
the surfaces of cooking are still hot.
- Ensure that only trained personnel operate the appliance.
- Do not touch the hot surfaces of the appliance. The tem-
perature of the hot surfaces can be very important when
the appliance is working.
12

Always use control knobs.
- Do not use the appliance for other functions than deter-
mined use.
- Do not leave the pipe or hose (purchased separately
from a specialised shop) in the contact of hot surfaces.
- The appliance should not be used close to combustible
materials.
- During use, look after not to obstruct hearings of aera-
tion of the appliance.
- Do not bend or clip the pipe or hose.
- Entrust compensations only to a skilled person.
- Use only spare parts of origin.
- At the end of cooking, before cleaning the appliance, do
not forget to disconnect the gas inlet.
2. CONTENTS OF CARDBOARD PACKAGING
Device: A crepe machine
Accessories: - A wooden crepe rake
- A set of natural gas injectors
- The present note
Pie o knob Opening for lighting with a matchstick
Power control knob
2
1
3
13
2
1
3

See exploded view for CSG 350/CSG 400/CDG 350/CDG 400 at the end of the do-
cument.
3. CONFORMITY OF USE
Use the device only to cook crepes, pancakes, buckwheat cakes...
4. WAY OF FUNCTIONING
This crepe machine is a strong cooktop in enamelled cast iron. The strong thickness
of the plate and its specific drawing ensure an excellent homogeneity and a stability
of the temperature. The plate’s smooth surface provides direct heat transfer to the
food being cooked, without heat loss at the centre as in the periphery thanks to star-
shaped burner that covers the entire cooking surface.
To turn on and preheat the plate, just switch on the burner by pressing on the power
control knob (n°3 on picture) opposite the star position for a few seconds and on the
pie o (n°1 on picture) several times if required.
If the pie o (n°1 on picture) no longer generates the required series of sparks, you
can use a gas lighter or a long matchstick by holding it near the oblong hole (n°2 on
picture) and keeping the knob pressed (n°3 on picture) facing the star position as
indicated above.
While cooking, the temperature can be regulated using the control knob (n°3 on pic-
ture) from high flame to low flame in order to avoid over-cooking. If the crepe sticks,
it is because the crepe machine is too warm, it is then necessary to reduce the pow-
er.
A safety thermocouple cuts the gas supply if the burner is extinguished. The low
flame of the appliance is pre-adjusted in the factory, it must not be changed. This
extinction can mainly occur when there is a lot of wind. In this particular case, just
repeat the switching-on procedures described on previous page.
5. FUNCTIONING / HANDLING
a) I stallatio /Assembly:
- Unpack carefully the machine from its packaging.
- Place the device on a plane and heatproof surface.
- Never place the device near a wall or near a partition makes of combustible materi-
als even if it is very well isolated.
- A distance of minimum 10 cm with the partition or the wall is necessary.
b) First starti g:
Before the first use, remove the anti-corrosion protection fat with a cleaner and a wet
sponge.
14

During the first use, grease your plate with oil and preheat the crepe machine during
about 15 min. Once preheating is finished, set the power on the wished temperature
thanks to the power control knob (n°3 on picture)
First cleaning
Clean the device before the first use. (See 6 Cleaning)
Gas connection
The appliances run on the following gases: Butane G30, Propane G31, Natural gas
G20/G25. The appliances are originally delivered with a Butane/Propane injector corre-
sponding to the category II2E+3+. The connection is made thanks to a thread 3/8.
The heat release rate of the appliance is CSG 350 / CSG 400 3.2 Kw
CDG 350 / CDG 400 6.4 Kw
For a use in natural gas, change the injectors. They are delivered in a small plastic bag
placed in the package.
Connect the appliance to the gas supply pipe, interposing a stop valve which enables
the appliance to be insulated from the rest of the installation.
Check the supply pressure using a manometer when the burner is lit. It must be equal
to the indications on the rating plate.
The fresh air flow required for combustion air supply is:
- CSG 350 / CSG 400 7.2 m3/h
- CDG 350 / CDG 400 14.4 m3/h
General conditions of installation
The installation and maintenance of the appliance must be carried out in compliance
with the statutory texts and good practices in force, mainly:
General specifications
For all appliances:
Article GZ Installation with combustible gases and liquefied hydrocarbons.
Then, according to use:
Article CH Heating, ventilation, refrigeration
Air conditioning and domestic hot water steam generation.
Article GC Installation of appliances to be used for catering
Specific provisions for each type of establishment to which the public is admitted
(hospitals, shops, etcQ)
15

Importa t: Never cha ge the diameter of the i jectors.
Gas category table, accordi g to the cou try of desti atio of the applia ce.
Injector N° Gas Pressures Diameter
Injector n°1 G30 / G31 Butane/Propane 28-30/37 90/100
Injector n°2 G30 / G31 Butane/Propane 50 85/100
Injector n°3 G20 / G25 Natural gas 20-25 135/100
Injector n°4 G25 Natural gas 25 135/100
Injector n°5 G25 Natural gas 20 135/100
Injector n°6 G31 Propane 50 85/100
Air adjustment
Injectors were conceived to avoid any air adjustments and that whatever the gas you
use.
Country of destination Category Gas Pressures Diameter of injector
France/Luxembourg II2E+3+
II2E+3B/P
G20/G25
G30/G31
G20/G25
G30/G31
20/25
28-30/37
20/25
50
135
90
135
85
Germany II2E+3B/P
G20 /G25
G30/G31
20
50
135
85
Austria II2H3B/P G20
G30/G31
20
50
135
85
Belgium I3+
I2E
G30/G31
G20/G25
28-30/37
20/25
90
135
Sweden, Denmark,
Finland
II2H3B/P G20
G30/G31
20
28-30/30
135
90
Spain II2H3+
II2H3P
G20
G30/G31
G20
G31
20
28-30/37
20
50
135
90
135
85
Netherlands II2L3B/P
II2L3P
G25
G30/G31
G25
G31
25
28-30/37
25
50
135
90
135
85
Norway I3B/P G30/G31 28-30/30 90
Iceland/Greece/United
Kingdom/Italy/Portugal
II2H3+
G20
G30/G31
20
28-30/37
135
90
Poland II2E3P G20/25
G31
20
37
135
90
16

c) Use of device :
Elements of command and display
S itching-on
Press the power control knob (n°3 on picture) opposite the star position for a few
seconds.
Press on the pie o (n°1 on picture) to light the burner.
Keep the control knob (n°3 on picture) pressed for some more seconds.
The burner then remains lit and it is now possible to increase the power by turning
the power control knob (n°3 on picture).
Grease the plate before each cooking.
Temperature setting
Once the burner is lit; set the appliance to the desired power by turning the control
knob (n°3 on picture).
It is ot ecessary to leave the device switched o at full power. It is ecessary
to adapt the temperature to products to be cooked to limit the gas co sumptio .
Stopping the appliance
Set each control knob (n°3 on picture) to 0: the appliance is completely switched-
off.
Cut the gas supply
Let the device cool.
Clean the appliance. (See 6. Cleaning)
d) Breakdow / repair:
In case of breakdown or of damaged part, please call your after-sales service and
confide any technical operation to qualified person.
When you contact the after-sales service of your distributor or your store, give him the
complete reference of your device (commercial name, type and serial number). This
information appears on the visible descriptive plate behind the device.
Command/Display Function
Piezo
(n°1 on picture)
Switches on the appliance (simultaneously with the power control
knob)
Power control knob
(n°3 on picture)
Switches on the appliance (knob pressed simultaneously with pie-
zo)
Controls power (low flame = low power, high flame = high power)
Opening
(n° 2 on picture)
Can replace the piezo and thus helps to switch on the appliance
using a large matchstick or a gas lighter (simultaneously with the
power control knob kept pressed for a few seconds)
17

6 CLEANING AND MAINTENANCE
- Cut the gas supply.
- Let cool completely the device before any technical intervention or cleaning.
- Clean your crepe machine regularly after each use to avoid phenomenon of cala-
mine coming the cooking of the sugar and from some dough which accumulates very
quickly, and creates a film on the plate which harms in the quality of the cooking.
- For cleaning, only use non-abrasive products, clean regularly the external walls of
your device with warm water and wash liquid: avoid the abrasive towelling. Rinse your
device with a wet sponge. Dry it with a soft cloth
- Never clean the device under a water jet, the infiltrations would risk to damage it in a
irreparable way.
- During a prolonged non-use, we recommend you strongly to keep the device shield-
ed from the humidity and to grease the plate.
7. TECHNICAL SPECIFICATIONS
8. GUARANTEE
Co ditio s of guara tee
The guarantee applicable to any device is the commercial guarantee of the distributor
or the retailer. Please contact the store where you bought your device to know the
precise conditions.
The guarantee grants no right for damages.
The dispositions which follow are not exclusive of the profit of the legal guarantee
planned by articles 1641 and following ones of the Civil code relative to the defects
and the latent defects.
Exclusio clauses of the guara tee
Bad i stallatio a d bad mai te a ce, i particular if they do ot respect cur-
re t regulatio s or i structio s appeari g i this user guide.
Cannot benefit from the guarantee the repairs required as a result of false operations,
of inappropriate use, of carelessness or of excess loads of the device, as well as
those resulting from variations of the power supply, over tension or from defective in-
stallations.
Models CSG 350
Outside dimensions
mm
450x485x240
Weight 20 Kg
Power 3200 W
No of burners 1
CSG 400
450x485x240
23 Kg
3200 W
1
CDG 350
860x485x240
39 Kg
6400 W
2
CDG 400
860x485x240
44 Kg
6400 W
2
18

The damage due to shocks, bad weather is not flatware by the guarantee. The materi-
al travels at the risks of the user; in case of delivery by carrier, the consignee has to
have reservations towards the carrier before any delivery of the device.
The guarantee comes to an end in case of intervention, of repair, of modification by no
qualified persons, or of use in inappropriate purposes.
19

20
This manual suits for next models
3
Table of contents
Languages:
Other Roller Grill Kitchen Appliance manuals

Roller Grill
Roller Grill PZ 430 D Operation manual

Roller Grill
Roller Grill CFG 400 Operation manual

Roller Grill
Roller Grill CFE 400 Operation manual

Roller Grill
Roller Grill 901 G Operation manual

Roller Grill
Roller Grill RBE80Q Operation manual

Roller Grill
Roller Grill PZ 430 S Operation manual

Roller Grill
Roller Grill CVE 400 Operation manual

Roller Grill
Roller Grill RBG 80 Operation manual

Roller Grill
Roller Grill CSE 350 Operation manual

Roller Grill
Roller Grill RBE 80 Operation manual