manuals.online logo
Brands
  1. Home
  2. •
  3. Brands
  4. •
  5. Roltechnik
  6. •
  7. Bathroom Fixture
  8. •
  9. Roltechnik TAHITI-M User manual

Roltechnik TAHITI-M User manual

LITÝMRAMOR*POUREDMARBLE*GUSSMARMOR*LIATYMRAMOR*
MÜMÁRVÁNY*LYDYTAS MARMURAS
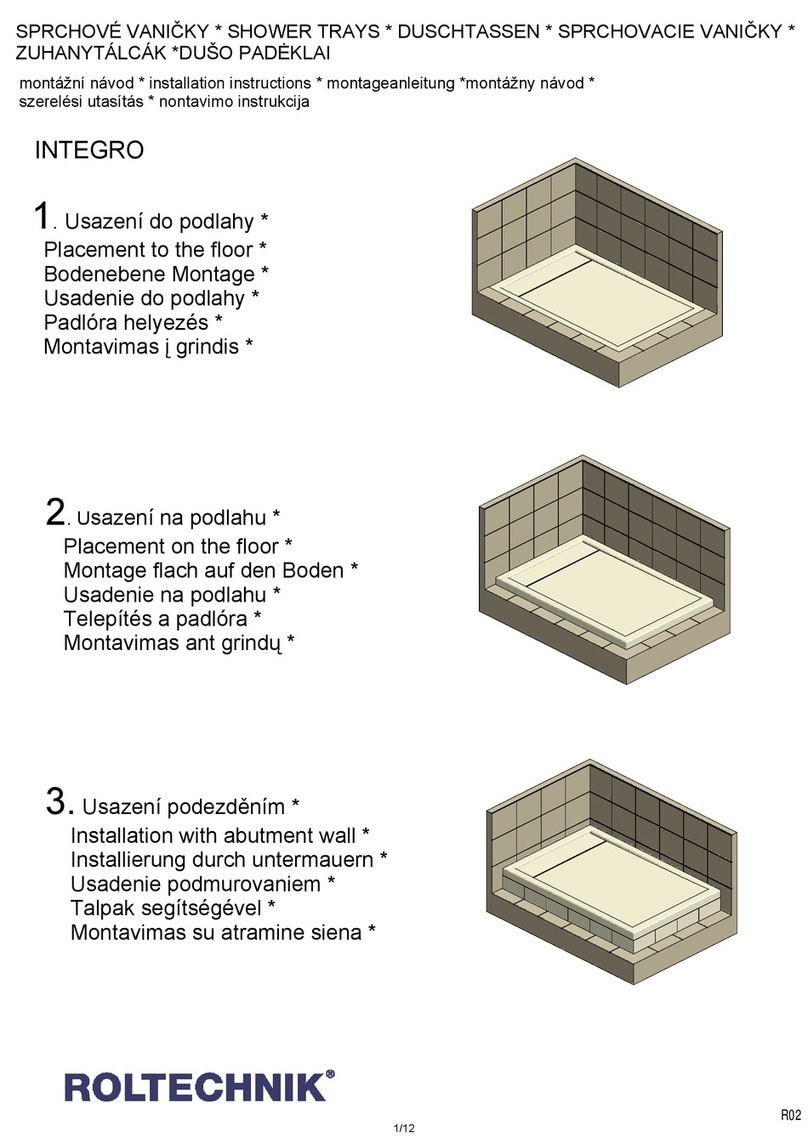
1. Usazenídopodlahy*
Placement tothefloor*
Bodenebene Montage*
Usadeniedopodlahy*
Padlórahelyezés*
Montavimas grindis*
2. Usazení napodlahu *
Placement onthefloor*
Montageflachauf den Boden*
Usadenienapodlahu *
Telepítésapadlóra*
Montavimasant grindų*
3. Usazení podezděnímspomocí nožiček*
Installationwithfeet *
Montage aufdieFüssendurchuntermauern*
Usadeniepodmurovaniemapomocounožiček*
Talpaksegítségével*
Montavimassukojomisapmūrijant *
4. Usazení spomocí panelu*
Installationwithpanel*
Montageauf dieFüssenund mit Schürze*
Usadeniespomocoupanelu*
Panelsegítsegével*
Montavimassukojomisirpanele*
SPRCHOVÉVANIČKY *SHOWERTRAYS *DUSCHTASSEN*SPRCHOVACIEVANIČKY *
ZUHANYTÁLCÁK *DUŠO PADĖKLAI
montážnínávod*installation instructions*montageanleitung *montážnynávod*
szerelésiutasítás*nontavimoinstrukcija
1/12
R02
Nářadí potřebnépromontáž*
Necessatytools*
NötigeWerkzeuge*
Potrebnénáradie*
Szükségesszerszámok*
Reikalingi rankiai*
17 22
2/12
x
y
R550
b
a
y
x
a
b
R550
x
y
a
b
b
a
x
y
n
90
n
90
n
90
n90
(mm) xyabt
TAHITI-M800x800
RONDO800x800 800 800 170 170 301.
2. 30190190900900
TAHITI-M900x900
RONDO900x900
3. TAHITI-M1000x1000
RONDO1000x1000 1000 1000 260 260 30
4. MACAO-M800x800
QUADRO 800x800 170 170 30800800
900 900 30190 190
MACAO-M900x900
QUADRO 900x900
5.
6. 900 30150 450
1500
Model1.;2. Model3.
Model4.;5. Model6.
c
520
620
520
620
-
-
Model
WalkIN1500x900
3/12
Model:
1.;2.
Model:
3.
Model:
4.;5.
Model:
6.
4/12
stavebnípřipravenost *constructionpreparation*Aufbau-Vorbereitung*
stavebnápripravenostˇ*abeépítéselökészítettsége *statybinisparengimas
1. Usazenído podlahy*
Placement tothe floor*
Bodenebene Montage *
Usadeniedopodlahy*
Padlórahelyezés*
Montavimas grindis*
Model:
1.;2;4.;5. Model:
3.
Model:
6.
5/12
stavební připravenost *constructionpreparation*Aufbau-Vorbereitung *
stavebná pripravenostˇ*abeépítéselökészítettsége*statybinisparengimas
2.Usazenína podlahu*
Placement onthefloor*
Montageflachauf denBoden *
Usadeniena podlahu *
Telepítésapadlóra*
Montavimasant grindų*
Model:
1.;2.;3.;4.;5.;6.
6/12
stavební připravenost *constructionpreparation*Aufbau-Vorbereitung *
stavebnápripravenostˇ*abeépítéselökészítettsége*statybinisparengimas
3.Usazenípodezděnímspomocínožiček*
Installationwithfeet *
MontageaufdieFüssen durchuntermauern*
Usadeniepodmurovaniemapomocounožiček*
Talpaksegítségével*
Montavimassukojomisapmūrijant *
4. Usazení spomocípanelu*
Installationwithpanel*
Montageauf dieFüssenund mit Schürze*
Usadeniespomocou panelu*
Panelsegítsegével*
Montavimassukojomisirpanele*
A
C
D
E
B
A
C
D
E
B
SILICONE
1.
7/12
n40
3Min SILICONE
! M8x12!
A
C
D
E
B
A
C
D
E
B
2.
SILICONE
8/12
n40
! M8x12!
SILICONE
A
B
C D
E
A
C
D
E
B
3.
min80-max110
MAX35
40
n
SILICONE
SILICONE
9/12
40n/n50
Min3
A
B
B
C
D E
F
A
B
C
D
E
F
4.
95-98
40
n
MAX45
SILICONE
10/12
40n/n50
Pozor!!! - p ikoupi výrobkuap edjehoinstalacíjej pečlivěp ekontrolujte, zda není mechanicky nebojiným
způsobempoškozen.Po instalaci jižnebudebránohledna poškozenítohototypu.
•Sprchovou vaničkuinstalujtedopředemstavebněpřipraveného prostoru.Obkladproveďtevždy pod úroveň
okrajevaničky. Vaničkynikdyneusazujtezpůsobempevného zazdění (tj. lepení obkladůažpo instalaci vaničky do
připravenéhoprostoru).Výrobek musí být vyjímatelný (směremvzhůru) beznásilných stavebníchzásahů!!!
Attention!!! –Priortheinstallationof theproduct,checkthe product carefullyformechanical damages. After
installation claimsrelated withmechanicaldamage will notbe accepted.
•Install the showertray tothe prepared area. Performthe tiling always tothelevelof theedgeof theshower tray.
Donotinstall the product inawayof fi xed installation (gluing thetilesafterthe installation of theshower tray). The
product has tobe removable(inupwarddirection)withoutany constructionimpacts!!
Pozor!!! - prikúpe výrobku apred inštaláciouvýrobok starostlivo prekontrolujte či niejemechanicky alebo
inýmspôsobompoškodený.Po nainštalovaní výrobku,vprípade poškodenia, užnebudeuznanáreklamácia
navýrobok.
• Sprchovúvaničku inštalujtedovopredstavebnepripraveného priestoru. Obklad urobtevždy pod úroveňokraja
vaničky.Vaničku nikdy neosádzajtespôsobompevného zamurovania(tj.lepenieobkladu ažpo inštalácii vaničky do
pripraveného priestoru). Výrobokmusí byťvyberateľný(smeromhore) bez násilných stavebných zásahov!!!
Figyelem!!! –aterméket avásárlásakorésazinstalláláselőtt alaposan ellenőrizzük, ellenőrizzük, hogy
nincs-erajtamechanikus sérülés, vagyegyéb károsodás. Azinstallálásutánaz ilyen típusúhiányosságokat
aforgalmazó, semagyártónemtudjafi gyelembevenni.
•Azuhanyozó tálcátaz építészetilegelőreelőkészített helyeninstalláljuk. Aburkolatot mindenesetben atálcaszéle
alárakjuk le.Atálcákat soha ne telepítsükszilárdfalazásosmódszerrel (azaz. Aburkolatotcsupánatálca telepítése
utánrögzítsükragasztóval). Aterméknekkivehetőnekkell lennie(felfeléirányban), mégpedigerőszakos beavatkozás
nélkül!!!
11/12
Achtung!!! - beimEinkauf von demProdukt undvorderMontage bitteüberprüfenob esnicht beschädigt ist.
NachderMontage wirddiesnicht mehralsReklamationsgrund anerkannt.
-installierenSiedieDuschtasse nur ineinenvorgerichteten Raum. FliesenSienur unter den Rand vonderDuschtasse.
NiemalsdieDuschtassefestinstallieren(fliesen nach deren Montage). DasProdukt soll ohne gewaltigen
Baueinsätzeherausnehmbar bleiben.
Dėmesio!!! Pirkdami irmontuodamigaminįatidžiaipatikrinkite,arnėramechaniniųarkitųjopažeidimų.
Sumontavus gaminį, pretenzijos dėl gaminionebepriimamos.
•Dušo padėkląmontuokiteišankstoparengtojevietoje(šispadėklasturibūti montuojamasant paruoštųgrindų).
Apvadai turi būti padėklokraštolygio.Niekada tvirtai nemūrykitepadėklopriesienų(t. y. apvadųklijavimasjau
montavuspadėkląparuoštąvietą). Gaminys turėtųišsimontuoti (kryptimi viršų) nenaudojant didelėsstatybinėsjėgos!!!
12/12
Roltechnika.s.; CzechRepublic, 56933Třebařov160,
tel.:+420461 324301, fax:+420 461324297,
http//:www.roltechnik.com; e-mail: objednavky@roltechnik.cz

This manual suits for next models

3

Other Roltechnik Bathroom Fixture manuals
Roltechnik 8610030 User manual

Roltechnik

Roltechnik 8610030 User manual
Roltechnik ALABAMA-SUNNY User manual

Roltechnik

Roltechnik ALABAMA-SUNNY User manual

Roltechnik ROUND BLACK User manual

Roltechnik

Roltechnik ROUND BLACK User manual

Roltechnik VIKI LUX User manual

Roltechnik

Roltechnik VIKI LUX User manual

Roltechnik LLR 900 User manual

Roltechnik

Roltechnik LLR 900 User manual

Roltechnik iSanita PXR2N User manual

Roltechnik

Roltechnik iSanita PXR2N User manual

Roltechnik INTEGRO User manual

Roltechnik

Roltechnik INTEGRO User manual

Roltechnik EXCLUSIVE FLAT ROUND User manual

Roltechnik

Roltechnik EXCLUSIVE FLAT ROUND User manual

Popular Bathroom Fixture manuals by other brands

Franke SANW SANW215 Installation and operating instructions

Franke

Franke SANW SANW215 Installation and operating instructions

Coram Showers PREMIER manual

Coram Showers

Coram Showers PREMIER manual

Gessi FASCINO 48821 installation instructions

Gessi

Gessi FASCINO 48821 installation instructions

LOOOX CLOSED CL1 Installation advice

LOOOX

LOOOX CLOSED CL1 Installation advice

Glacier bay FARRINGTON 20173-0710H Use and care guide

Glacier bay

Glacier bay FARRINGTON 20173-0710H Use and care guide

Triton OMNICARE ULTRA CINCULT09W manual

Triton

Triton OMNICARE ULTRA CINCULT09W manual

Hans Grohe Rainmaker 28412180 Instructions for use/assembly instructions

Hans Grohe

Hans Grohe Rainmaker 28412180 Instructions for use/assembly instructions

Hans Grohe Raindance Select Showerpipe 27286000 Instructions for use/assembly instructions

Hans Grohe

Hans Grohe Raindance Select Showerpipe 27286000 Instructions for use/assembly instructions

Bristan W CL C 1 quick start guide

Bristan

Bristan W CL C 1 quick start guide

Toto TC392V Installation instructions manual

Toto

Toto TC392V Installation instructions manual

Tapwell Tvm 2200 installation instructions

Tapwell

Tapwell Tvm 2200 installation instructions

Hans Grohe Croma 280 Air 1jet 26220 Series Assembly instructions

Hans Grohe

Hans Grohe Croma 280 Air 1jet 26220 Series Assembly instructions

Lefroy Brooks CW-1020 Installation, operating,  & maintenance instructions

Lefroy Brooks

Lefroy Brooks CW-1020 Installation, operating, & maintenance instructions

Gessi 48112 manual

Gessi

Gessi 48112 manual

Glacier bay 20203-9010H Use and care guide

Glacier bay

Glacier bay 20203-9010H Use and care guide

Brizo Siderna T66T080-PC manual

Brizo

Brizo Siderna T66T080-PC manual

Hans Grohe Raindance Select 2jet 27283000 Instructions for use/assembly instructions

Hans Grohe

Hans Grohe Raindance Select 2jet 27283000 Instructions for use/assembly instructions

abi SOLA 13329 quick start guide

abi

abi SOLA 13329 quick start guide

manuals.online logo
manuals.online logoBrands
  • About & Mission
  • Contact us
  • Privacy Policy
  • Terms and Conditions

Copyright 2025 Manuals.Online. All Rights Reserved.