Rompa 21011 User manual

1. Product Name
Multi-Child Swing
2. Product Code
21011
3. Colour
Colours may vary.
4. Brief Description
Provides vestibular stimulation
5. Contents
2 x short impact protector (head piece) A
2 x short aluminium tube B
2 x long impact protector (side piece) C
2 x long aluminium tube D
1 x large plastic pouch with lying surface netting:
25 short straps in blue, violet or red E1
11 long straps in white or silver E2
4 x ropes F

1 x small plastic pouch G:
4 x screws
4 x eight-link adjustments
2 x rings
Allen keys (1 x large; 1 x small)
You will require a screw driver for assembly of the swing
You will also require an appropriate suspension system such as Hanging Brackets or an
appropriate frame.
6. Snoezelen® Stimulations
Vestibular
7. Best Use
With an appropriate suspension system, away from obstacles.
8. Compatible ROMPA® Products
Please note that a suspension system, Safety Rotational Device, Safety Snap, Height
Adjustment System etc. are not included but are available from ROMPA®.
21928 Hanging Bracket
21570 Safety Snap
21590 Locking Safety Snap
21548, 21607, 21546 Height Adjustment System
21559 Safety Rotational Device
ROMPA® offer a range of Sensory Integration suspension products such as swings, gliders,
nets, bolsters etc. Please visit www.rompa.com for details about our full range.

9. Starting Up
Assemble the swing and attach the ropes.
Hang the swing from an appropriate frame/suspension system and adjust the ropes.
10. Detailed Description
With plenty of room to share –up to 4 children or 2 adults and 2 children. For indoor and
outdoor use. Height-adjustable ropes (1.8 –2m). With impact guard on all sides.
Weatherproof, machine-washable cover. Light-weight aluminium frame. Colours may vary.
Working load: 200kg (440lbs)
11. Safety
Always supervise the use of this product.
This product is not a toy –it is intended to be used by a suitably qualified person.
Do not exceed the working load of 200kg (440lbs).
Use in an area free of obstacles –allow plenty of space below, in front and behind
the swing –see Installation below.
Use all appropriate safety accessories e.g. mats of an appropriate thickness on the
floor and walls if indoors; sand, fall-protection tiles or mats outdoors; helmets etc.
If using the swing with infants under 3 years old, use an appropriate safety belt or an
adult should hold the infant securely.
This product is not a toy. Any activity involving motion, height, or rotation may cause
serious injury. This product is intended for use under the supervision of trained
professionals.
12. Technical Specification
Size: 136 x 66cm
CE: tested under EC directive 93/42/EWG
Materials: webbing –hard-wearing plastic fibre
Frame –soft, impact-protection plastic which meets requirements for
therapeutic equipment

13. Installation

Installation continued
1. Assemble the swing and attach the ropes as shown above. Firstly, lay out all the parts
as shown below:
2. Thread the long straps onto one of the short tubes B. Open the short impact protector
a little. Working carefully from one end mount the short tube into the short impact
protector.
Take care not to let the straps get trapped in between the tube and the impact
protector.
3. Push the long tubes D into place in the short impact protector until the safety pins
click into place. Using the large Allen key, tighten the screws and screw caps into the
holes on each side until the corners are closed. Now thread the short tubes onto the
long tubes.
4. Use an appropriate suspension system. If in any doubt about suspending the swing,
seek advice from a suitably qualified structural engineer or architect.

5. Weave the straps together to create the webbing. Weave the long straps through the
short ones alternatively –up-down-up-down; then down-up-down-up for the
neighbouring strap. Use all the straps supplied. Make sure the straps are not twisted.
Make sure the webbing is even.
6. Thread the long straps into the second short tube. Open the second short impact
protector A a little. Carefully mount the short tube into the short impact protector.
At the same time, carefully push the long tubes D into place in the short impact
protector until the safety pins click into place. Tighten the screws and screw caps into
the holes on each side by using the large Allen key (~ 15Nm) until the corners are
closed.
Take care not to let the straps get trapped in between the tube and the impact
protector
7. Finish the webbing and swing platform assembly by pushing the long impact
protectors over the long tubes.
8. Attach the ropes: fasten one end of each rope pair to the long end of the swing using
the lock nuts attached to the ropes. Fasten the safety screws tightly (max. 5Nm)
using the small Allen key.
If you are suspending the swing from an outdoor frame, make sure the frame is
capable of holding the swing in motion with up to 4 children or 2 adults and 2 children
on it.
Make sure the frame is securely fixed to the ground.

Installation continued
If you are suspending the swing from a ceiling, make sure the ceiling is stable, level and use
appropriate suspension points such as ROMPA®’s Hanging Brackets (see Compatible ROMPA®
Products above). If suspended from a beam, this should be at least 12 x 12cm. Use bolts at
least M10 x 14cm.
The swing may be suspended from one, two or four suspension points (two is probably best).
When the swing is being secured to the ceiling via two or four points the mountings must
have a minimum load carrying strength of at least 4kN (~400kg) per drilled hole. When the
swing is being secured to the ceiling via only one mounting, this must have a minimum load
carrying strength of at least 8kN (~800kg).
9. Install out of direct sunlight to avoid heat/sun damage to the swing.
10. The suspension height should be between 1.8 and 2.8m (6 to 9’).
11. Allow 2m (7’) in front and behind the swing, taking into account the full arc of the
swing motion.
12. Allow a minimum distance of 80cm (30”) between the swing and any other stationary
products (e.g. side bars of a frame).
13. Allow a minimum distance of 70cm (27”) between the swing and any other swinging
products (e.g. a neighbouring swing).
14. Allow a minimum distance of 40cm (15”) between the swing corners and the floor.
15. If using two or four suspension points, the best place to locate the suspension points
is 10 - 20cm (4 –8”) beyond the swing i.e. to the left and right of the long sides. The
space from the mounting points should not under cut the width of the swing (fall
inside the width of the swing).
16. Use both rings to suspend the swing.

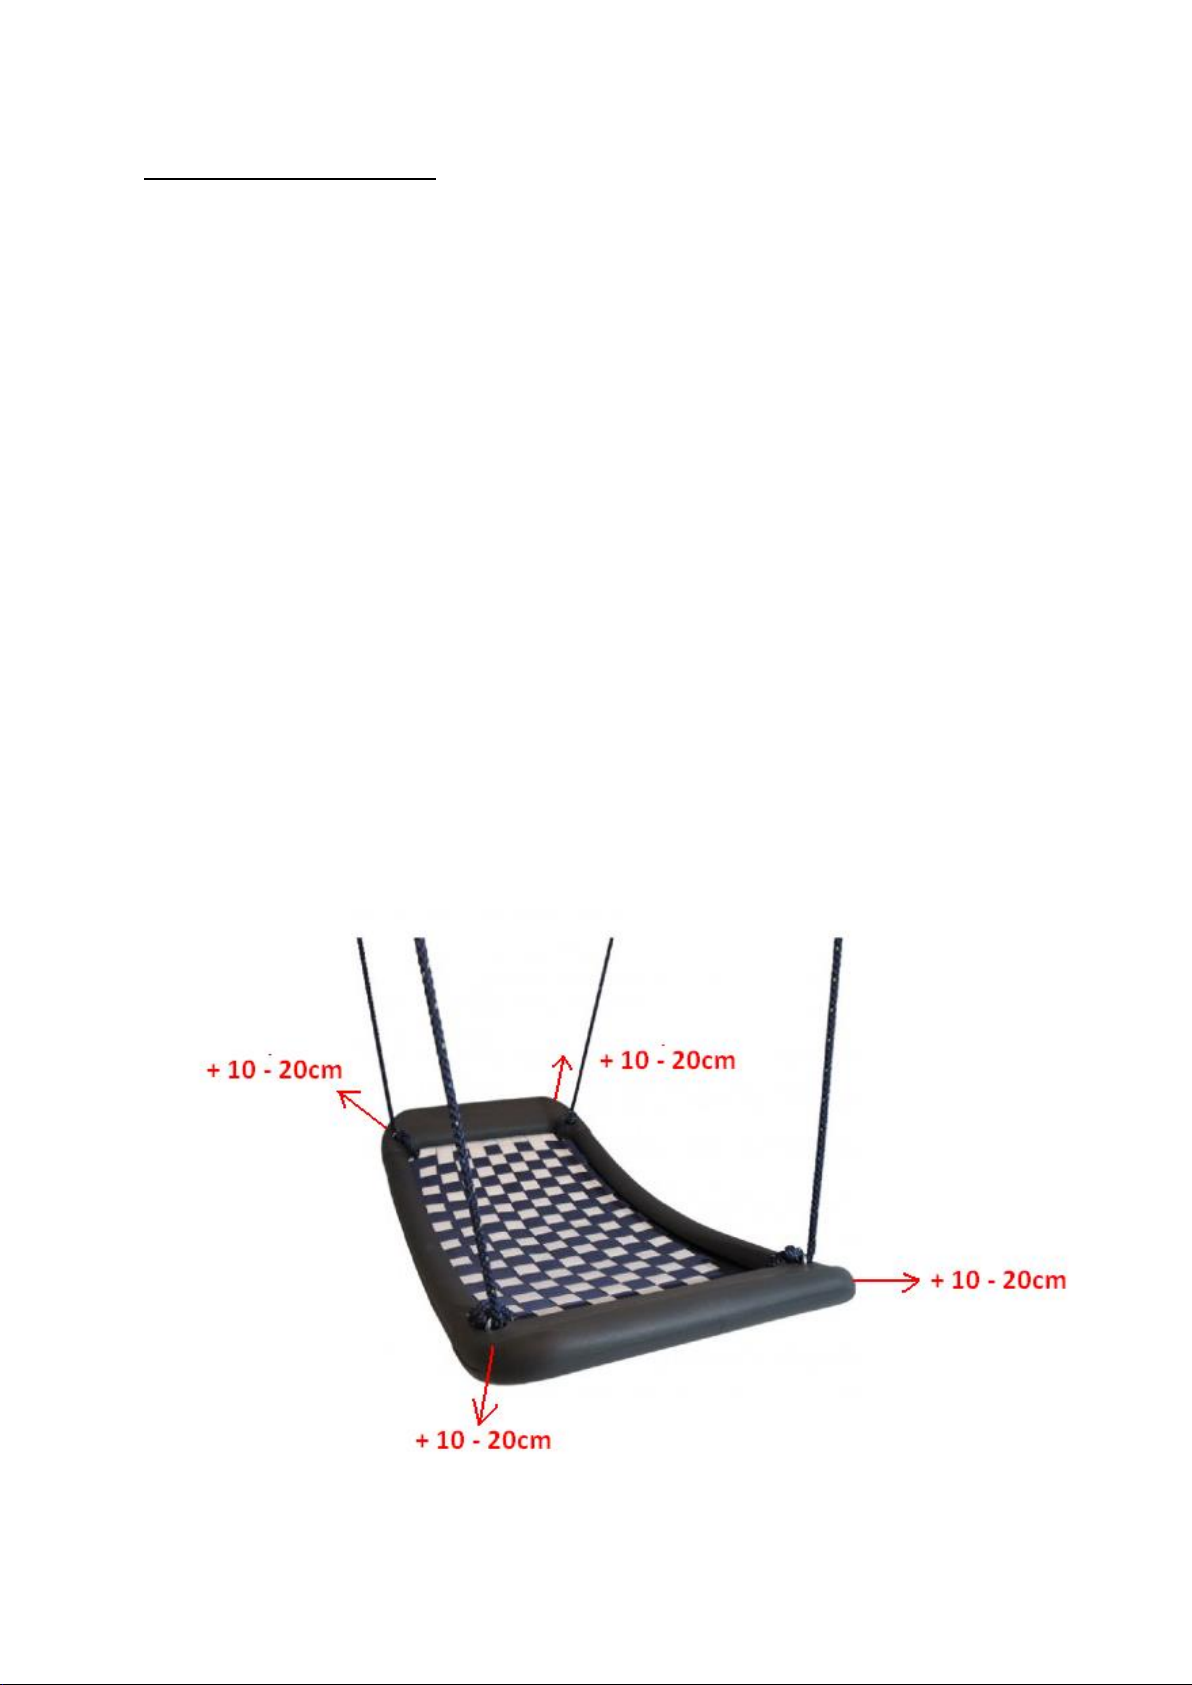
17. Each rope can be shortened as required. Pushing the rope shortening mechanism
upwards will lengthen the rope. Pulling the rope shortening mechanism downwards
will shorten the rope. Make sure that all four ropes are adjusted to the same length.
Unequal lengths will cause the swing to move with irregular movements. Make sure
there is nothing on the swing when adjusting the ropes.
14. Care and Maintenance
Regularly check the Swing and all its component parts for signs of wear and tear In
particular, check the suspension system, the ropes, the webbing and the frame.
Replacement parts are available should they become worn or damaged. Please
contact ROMPA®.
Check that all screw and nut connections are tight. If a lock nut of the ropes is
damaged, a whole new set of ropes will be required. Damage to the rope casing itself
(coloured fibres) will not compromise the safety of the swing.
If the impact bars (frame) are damaged (e.g. cracked), these will need to be replaced.
If the swing is outdoors, there is an increased risk of moisture damage.
Check the corners of the metal frame for a perfect fit. There should never be a
distance of more than 2mm between the elements. Re-tighten the screws and bolts
as required, using the Allen key supplied. If the frame becomes warped or worn
unevenly, the two parallel parts will need to be replaced.
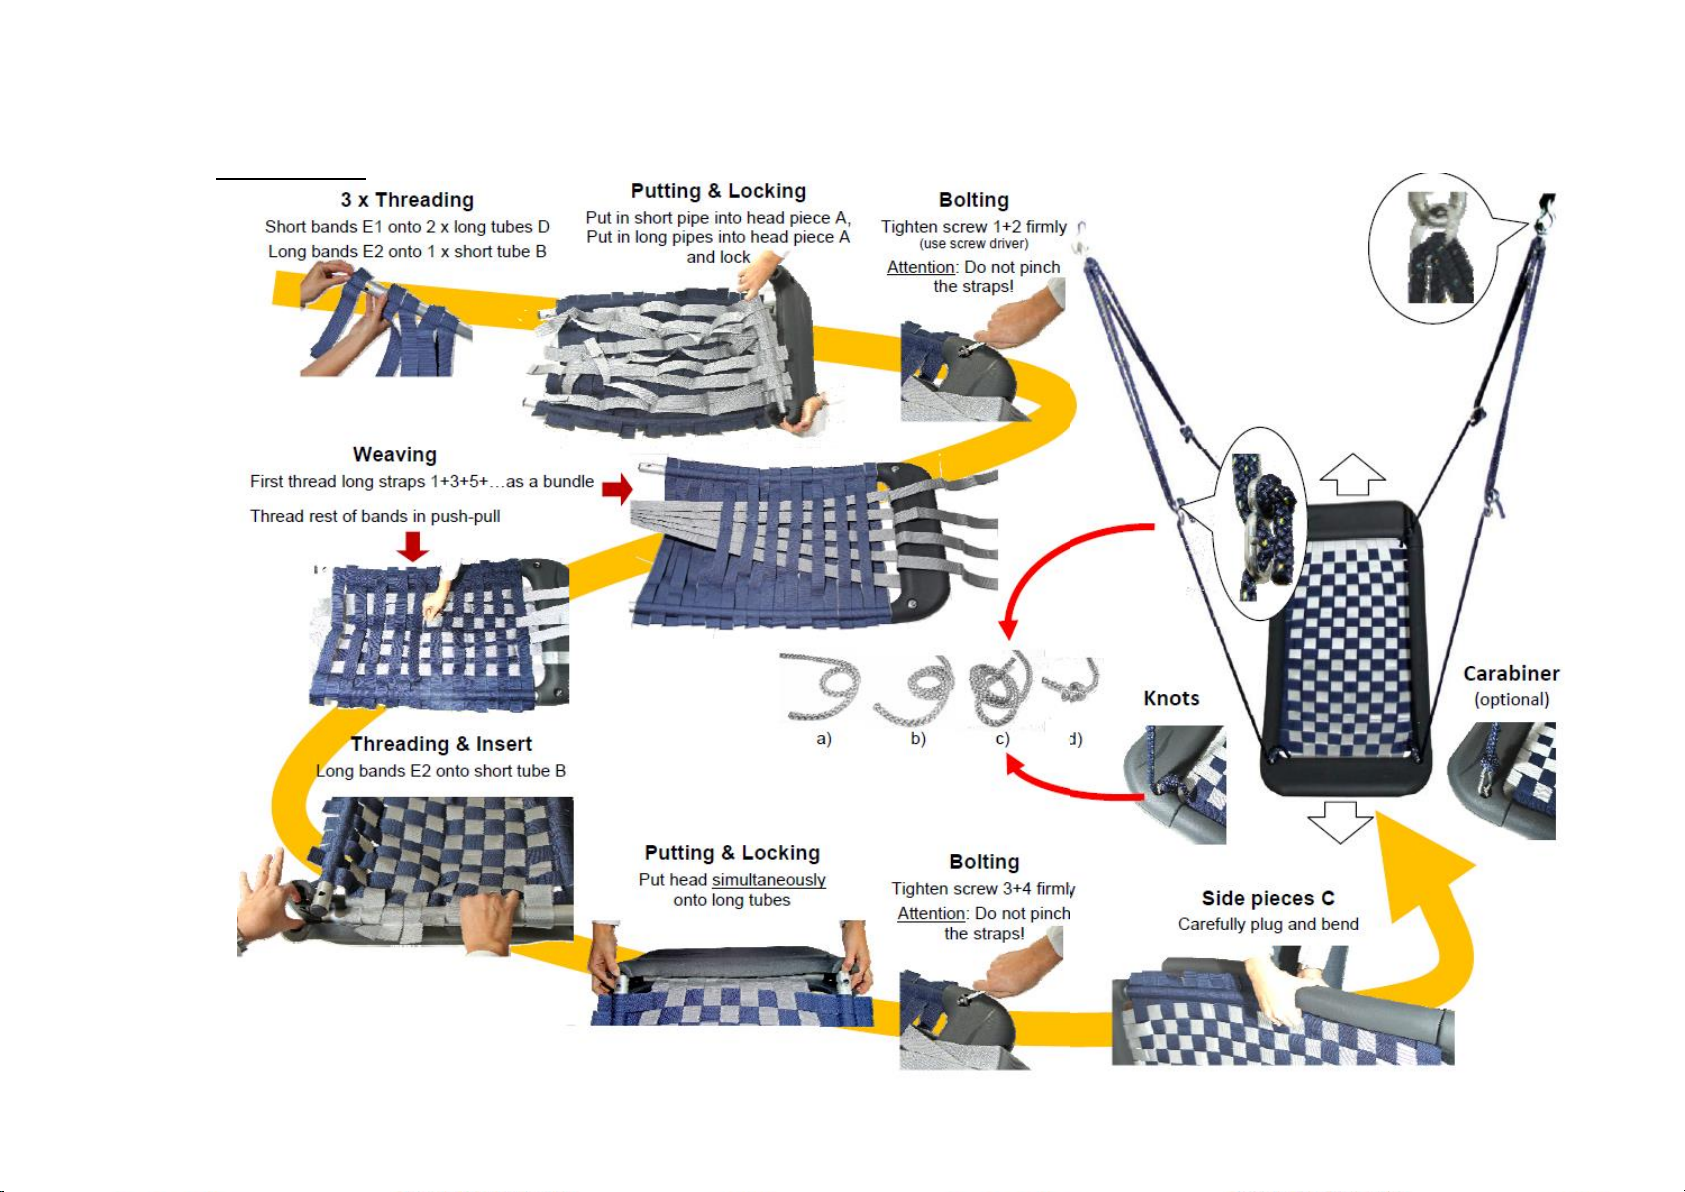
If the webbing is damaged (tears, defects etc), dismantle the swing and replace the
defective strap.
Use the swing with care. Do not jump on the outer parts of the frame or put extreme
loads on just one section of the swing. Balance out loads and get onto the swing with
care.
Store in a clean, dry place when not in use.
Wipe the swing frame down (outer protection bars) with a soft, slightly damp cloth.
You may use a mild soap or disinfectant but avoid bleach, solvents and abrasive
cleaning products. Do not steam cleaners or jet washers or similar devices.
Sponge-clean the webbing with a soft cloth or sponge and a mild disinfectant solution.
Should the webbing become extremely dirty, disassemble the swing (reversing the
assembly instructions). The webbing strips can be washed in their entirety or in
individual strips. Hand- or machine-wash at 30° or 40°C.

If the swing is suspended outside, we recommend that it is taken inside for the winter
–avoid frost, extended periods of rain and extreme cold. Your swing is likely to last
much longer if it is kept as dry as possible (to avoid corrosion). The high-quality impact
protection parts of the swing will be damaged by extreme weather (below 5°C), and
notably frost. Ideally, use the swing under some sort of weather-resistant cover/roof.
Keep the swing away from extreme heat, direct sunlight, open flames and fire.
To best protect the impact bars of the frame, store and transport the swing on its side.
Keep the swing away from sharp and pointed objects such as knives, scissors etc.
15. Troubleshooting
Not applicable
Further copies of these instructions can be downloaded at www.rompa.com
We hope you find our instructions invaluable. If you have any suggestions for improving
them further your comments will be greatly received –please contact us at
MULTI-CHILD SWING 21011, March 2016
Copyright ROMPA® Ltd
Table of contents
Other Rompa Baby Swing manuals

Rompa
Rompa 15631 User manual

Rompa
Rompa TheraGym 21566 User manual

Rompa
Rompa 21893 User manual

Rompa
Rompa 21577 User manual

Rompa
Rompa Theragym 21599 User manual

Rompa
Rompa 20530 User manual

Rompa
Rompa TheraGym Sling Swing User manual

Rompa
Rompa 21773 User manual

Rompa
Rompa Ultimate T Swing User manual

Rompa
Rompa Theragym 21549 User manual