manuals.online logo
Brands
  1. Home
  2. •
  3. Brands
  4. •
  5. Roscoe Medical
  6. •
  7. Medical Equipment
  8. •
  9. Roscoe Medical ROS-OBT User manual

Roscoe Medical ROS-OBT User manual

Deluxe Overbed Table
PARTS LIST
1. Table Top
2. Column Assembly
3. Release Handle
4.
1
/4" #20 Bolt
& Nut (1 Each)
5. Mounting Bracket
6.
1
/4” Washer & #12
1
/4”
Bolt (2 Each)
7. H-Base
8. Caster With Lock (2)
9. Caster (2)
10. Bolt Sleeve
11. Bolt Plate
12.
3
/8" #18 UNF Bolt (2)
13.
1
/4" #20 Bolt (Black)
14.
1
/4" #10 Bolt (Chrome)
15. Trip Rod,
1
/4” x 20½”
(Located Inside #2)
Item #: ROS-OBT
This Overbed Table utilizes a high-tension spring loaded
mechanism to raise the table. DO NOT remove #13 Black Screw
and replace with #14 Chrome Screw until table is fully assembled.
DO NOT over tighten bolts, screws or use power tools when
assembling this product.
Please follow all instructions and warnings to avoid hazardous
situations that can result in property damage and/or patient/
resident/staff/caregiver injury and/or death.
Inspect the product for damage and loose hardware before
each use. DO NOT use the product if it appears to be damaged
or unstable and DO NOT modify the product in any way.
This product is designed for use as a movable patient/resident
table top surface for reading, eating, or keeping small personal
items such as glasses, telephone or books, within easy reach.
This product is designed for indoor use ONLY and within close
proximity of skilled caregivers. It is not designed to hold
electrical items (such as televisions, computer monitors, coffee
pots, etc.) and should not be used near open ames and
excessive heat.
Maximum weight limitation for this product is 50 lbs. (22 kg.);
weight should be evenly distributed over the table top surface
while at the lowest usable height to help maintain a stable
condition.
CAUTION
DO NOT overload this product, as that could result in breakage,
as well as damage to property and/or serious injury. Use ONLY
as directed for its intended use. This product should NOT be
used as a sleep surface, walker, mobility aid; or to assist a
person in walking, sitting down, standing up; or to prevent or
brace a person’s fall; or to help transport persons or items.
1. To raise top to desired height, squeeze the Release Handle (3)
and apply light pressure upward at any point under table.
2. To lower, squeeze Release Handle (3) and push down on the
column side to the desired height.
3. CAUTION
DO NOT put pressure on table top end that is opposite the
column. Release the Release Handle (3) and table top will lock
into place.
The overbed table may be cleaned with the damp, soft cloth using
warm (~100°F) water and a mild, non-abrasive detergent. Allow the
table to dry completely before use.
The Roscoe Overbed Table has been designed to provide years of
service when used as indicated. To ensure user safety, the lifting
mechanism should be tested for smooth operation and castor locks
checked weekly. Every month, all bolts and fasteners must be
checked and tightened where loose. Worn or missing parts MUST
be replaced, contact your dealer or Compass Health Brands for
replacement parts.
This warranty is solely for the benet of the original consumer
purchaser.
This device was built to exacting standards and carefully inspected
prior to shipment. Your Roscoe brand product is warranted to be
free of defects in materials and workmanship for a period of one
year. If within such warranty period, the product proves defective,
the product will be repaired or replaced, at the option of Roscoe
Medical. This warranty does not cover device failure due to owner
misuse or negligence, or normal wear and tear. If you have a
question about your Roscoe product or this warranty, please
contact an authorized Roscoe Dealer.
INTENDED USE
OPERATION INSTRUCTIONS
CLEANING AND CARE
MAINTENANCE
ONE YEAR WARRANTY
Compass Health Brands
6753 Engle Road
Middleburg Heights, Ohio 44130
www.compasshealthbrands.com
WARNINGS & PRECAUTIONS
WARNING: READ THIS ENTIRE USER GUIDE,
INCLUDING WARNINGS, BEFORE PRODUCT ASSEMBLY.
WHEN ASSEMBLING THE TABLETOP, ENSURE THAT THE
TRIP ROD AND COLUMN ASSEMBLY ARE POSITIONED AWAY
FROM YOUR PERSON.
42_ROS-OBT_03 ©2022
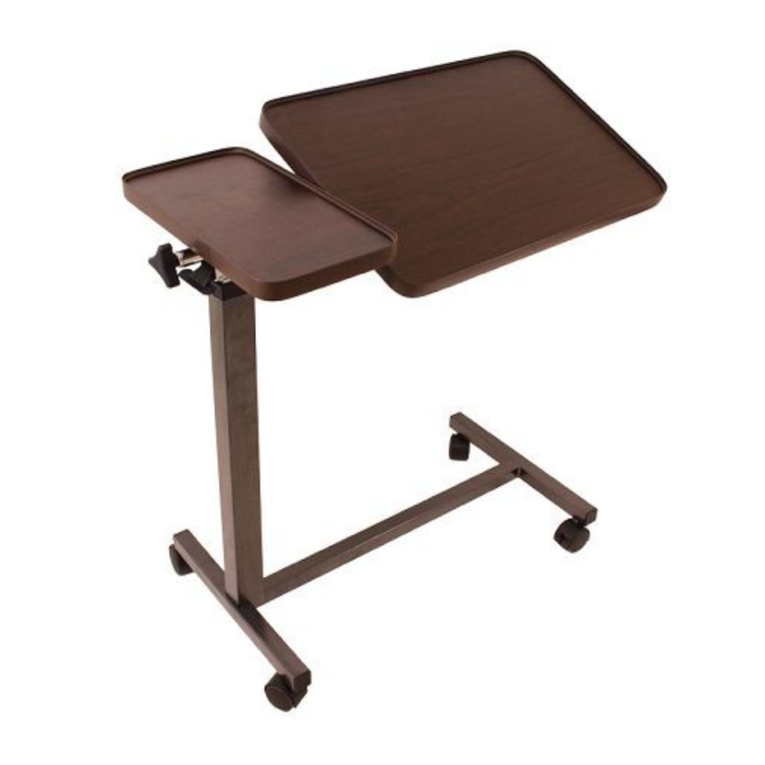
FIG. 7
Remove 12
Insert 13
FIG. 8
Remove
(13)
Insert
(14)
Fig. 9 Fig. 10
ASSEMBLY INSTRUCTIONS
1. Remove contents from packaging and lay table top (1)
upside down on at surface with Mounting Bracket (5)
facing upward. See Fig. 2.
2. Take the Column Assembly (2) and place Release Handle (3)
on top of Trip Rod (7) which needs to be inside the
Column Assembly before it is secured with Bolt and Nut (4)
See Fig. 3.
3. While holding the Release Handle (3) securely in place on
top of the Trip Rod (not shown), ip the Column Assembly (2)
upside down and insert it into the table top Mounting
Bracket (5) as shown in Fig. 4
4.
Align horizontal hole in tabletop Mounting Bracket (5) with
horizontal hole in Column Assembly (2) and hole through
Release Handle (3). Insert Bolt (4) into horizontal hole & secure
with Nut (4). Tighten with adjustable wrench. See Fig. 5.
5. Install two ¼" Washers and #12 ¼" Bolts (6) through the
vertical holes in the Mounting Bracket (5) and into the
threaded holes in Column Assembly (2) as shown in Fig. 6.
6. Install two Casters with Lock (8) into H-Base (7). Install two
Casters (9) into base opposite Column Assembly base (2).
See Fig. 7.
7. Install two Bolt Sleeves (10) into the upside down
H-Base (7) and then position the two ³/8" #18 UNF Bolts
(12) through the Bolt Plate (11) and into the Bolt Sleeves
(10). Position the H-Base (7) over the Column Assembly (2)
and thread bolts into the bottom of and tighten using an
adjustable wrench. See Fig. 8
8. Turn the table upright and stand on Casters.
9. CAUTION:
FOR SAFETY — DO NOT REMOVE BLACK SCREW (13)
ON COLUMN ASSEMBLY (2) UNTIL THE TABLE IS FULLY
ASSEMBLED AND STANDING IN UPRIGHT POSITION.
AFTER REMOVING BLACK SCREW, REPLACE WITH
CHROME SCREW (14) INCLUDED IN HARDWARE
PACKAGE. THE BOTTOM CHROME SCREW WITH
THE “DO NOT REMOVE” LABEL SHOULD NEVER BE
REMOVED AS IT WILL DAMAGE THE UNIT AND VOID
YOUR WARRANTY. ALSO PLEASE TAKE CAUTION AS THE
TABLE TOP MAY SPRING UPWARD UPON REMOVAL OF
THE BLACK SCREW.
This step MUST be completed last to prevent damage to
the spring loaded mechanism. Remove the Black Screw (13)
in the Column Assembly (16) labeled “REMOVE AFTER
ASSEMBLY” and replace it with the Chrome Screw (14)
contained in hardware package. Do not remove the Chrome
Screw labeled “DO NOT REMOVE”. See Fig. 9 and Fig. 10.
ROS-OBT Hardware Blister Card & Tools - Fig. 1
Tools Required:
- Adjustable wrench
- Philips and at head
screwdriver
Fig. 1
Fig. 2
ASSEMBLY INSTRUCTIONS (con’t) ASSEMBLY INSTRUCTIONS (con’t)
Note: Trip Rod (7) is contained inside the column
and shown here for reference.
Fig. 3
Fig. 6
Fig. 7
Fig.8
12
11
10
2
7
Fig. 4
3
Fig. 5 5

Other Roscoe Medical Medical Equipment manuals

Roscoe Medical TENS 7000 User manual

Roscoe Medical

Roscoe Medical TENS 7000 User manual

Roscoe Medical InTENSity Micro Combo User manual

Roscoe Medical

Roscoe Medical InTENSity Micro Combo User manual

Roscoe Medical RMI-POX4C User manual

Roscoe Medical

Roscoe Medical RMI-POX4C User manual

Roscoe Medical Quattro 2.5 User manual

Roscoe Medical

Roscoe Medical Quattro 2.5 User manual

Roscoe Medical CGA-540 User manual

Roscoe Medical

Roscoe Medical CGA-540 User manual

Roscoe Medical InTENSity Twin Stim IV User manual

Roscoe Medical

Roscoe Medical InTENSity Twin Stim IV User manual

Roscoe Medical ASP-ROS User manual

Roscoe Medical

Roscoe Medical ASP-ROS User manual

Roscoe Medical OBT-TILT User manual

Roscoe Medical

Roscoe Medical OBT-TILT User manual

Roscoe Medical TWIN STIM IV User manual

Roscoe Medical

Roscoe Medical TWIN STIM IV User manual

Roscoe Medical GN3278 User manual

Roscoe Medical

Roscoe Medical GN3278 User manual

Roscoe Medical Ultra 5 User manual

Roscoe Medical

Roscoe Medical Ultra 5 User manual

Roscoe Medical 50004 User manual

Roscoe Medical

Roscoe Medical 50004 User manual

Roscoe Medical SoundCare Plus User manual

Roscoe Medical

Roscoe Medical SoundCare Plus User manual

Roscoe Medical TENS 7000 To Go User manual

Roscoe Medical

Roscoe Medical TENS 7000 To Go User manual

Roscoe Medical INTENSITY 10 User manual

Roscoe Medical

Roscoe Medical INTENSITY 10 User manual

Roscoe Medical OBT-TILT User manual

Roscoe Medical

Roscoe Medical OBT-TILT User manual

Popular Medical Equipment manuals by other brands

Itamar Medical WatchPAT Operation manual

Itamar Medical

Itamar Medical WatchPAT Operation manual

PROTEOR 1P650 KNEE Assembling and adjustment instructions

PROTEOR

PROTEOR 1P650 KNEE Assembling and adjustment instructions

Liberate Medical VentFree user manual

Liberate Medical

Liberate Medical VentFree user manual

Dicarre DA20 user guide

Dicarre

Dicarre DA20 user guide

Stryker Medical M Series Operation manual

Stryker Medical

Stryker Medical M Series Operation manual

Invacare ScanBed 750 user manual

Invacare

Invacare ScanBed 750 user manual

Getinge Arjohuntleigh Nimbus 3 Professional Instructions for use

Getinge

Getinge Arjohuntleigh Nimbus 3 Professional Instructions for use

Mettler Electronics Sonicator 730 Maintenance manual

Mettler Electronics

Mettler Electronics Sonicator 730 Maintenance manual

Pressalit Care R1100 Mounting instruction

Pressalit Care

Pressalit Care R1100 Mounting instruction

Denas MS DENAS-T operating manual

Denas MS

Denas MS DENAS-T operating manual

bort medical ActiveColor quick guide

bort medical

bort medical ActiveColor quick guide

AccuVein AV400 user manual

AccuVein

AccuVein AV400 user manual

agiliti NP Trio user manual

agiliti

agiliti NP Trio user manual

Rocket Medical Rocket Digital Oocyte Aspiration Pump Service manual

Rocket Medical

Rocket Medical Rocket Digital Oocyte Aspiration Pump Service manual

Monteris Medical Neuroblate Instructions for use

Monteris Medical

Monteris Medical Neuroblate Instructions for use

Otto Block 8E33 7 manual

Otto Block

Otto Block 8E33 7 manual

ADVANCED HOME CARE Helios Guide

ADVANCED HOME CARE

ADVANCED HOME CARE Helios Guide

NeuLog NUL-208 Guide

NeuLog

NeuLog NUL-208 Guide

manuals.online logo
manuals.online logoBrands
  • About & Mission
  • Contact us
  • Privacy Policy
  • Terms and Conditions

Copyright 2025 Manuals.Online. All Rights Reserved.