manuals.online logo
Brands
  1. Home
  2. •
  3. Brands
  4. •
  5. ROTOR
  6. •
  7. Bicycle Accessories
  8. •
  9. ROTOR Q-Ring Safety guide

ROTOR Q-Ring Safety guide

ROTOR
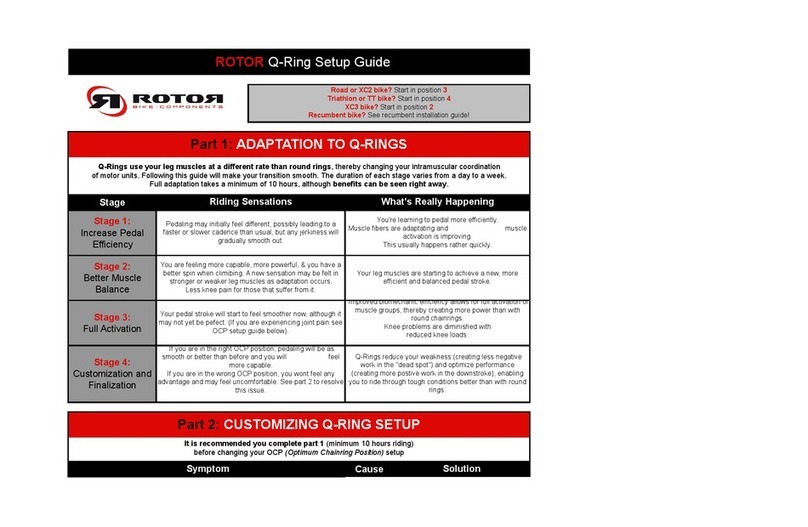
Q-Ring starter's guide:
Part 1
ADAPTATION PHASES
Transition from Round rings to Q-Rings.
Q-Rings use a your leg muscles at a different rate than round rings. This muscle balance change is why it is important to follow this guide, which will make your transition
smooth. Please do not install the Q-Rings until you have read sections 1- of this document entirely. The time spent in each phase varies from a few days to a week;
depending on the cyclist. Some phases pass faster than others. Adaptation takes a minimum of 500km (road) / 200km (MTB)
Pedalling may feel different, leading to a faster or slower cadence than usual. You may notice an initial jerkiness, which will smooth out
after the first few kilometers (high revs may be choppy for a while). Maintain the same gear combinations as usual. Do not push yourself too
hard. Avoid focusing on a “perfect spin”: this means your legs will try to make Q-Rings round which they are not. Simply focus on pushing the
pedals and allow yourself time to adapt to the Q-Rings healthier, performance enhancing pedal stroke.
Phase 1:
Brain Training
Q-Rings’ improved biomechanic efficiency spreads leg muscle loads more evenly than normal chainrings, reducing knee problems and
Adaptation phase Characteristics of phase
Q-RING ADAPTATION PHASES GUIDE
It is recommended you complete the first 3 adaptation phases before changing your chainring's OCP setting
Road or XC2 bike? Start in position 3
Triathlon or TT bike? Start in position 4
XC3 bike? Start in position 2
Recumbent bike? See recumbent installation guide!
INNOVATION
+
TECHNOLOGY
+
COMPETITION
www
.rotorbike.
com
Phase 2:
Easy riding
Q-Rings’ improved biomechanic efficiency spreads leg muscle loads more evenly than normal chainrings, reducing knee problems and
making your muscles work together at different rates than with round chainrings. You may notice that your weaker inner leg muscles are
being pushed harder to maintain an effort level that feels normal. Do not panic: keep on building baseline Km’s without exerting yourself too much,
developing said muscles without overloading them. (Even if you feel more powerful, try to resist the temptation to go all out).
Phase 3:
Muscle adaptation
You may feel a strange sensation in your stronger leg muscles because they are not being loaded as heavily as usual. This is a normal
continuation of the feeling you had in phase 2: your weaker muscles are equalizing in strength and taking on more work. Continue riding as usual
and this feeling will fade away. If you rode hard last week these developing muscles may be fatigued: masage, stretch and step the effort down a
notch for a few days. Your pedal stroke with be smoother now. If something doesn’t feel “quite right” keep on riding the Q-Rings until your muscle
adaptation has finalized (unless you are experiencing joint pain: see part two and contact us in this case).
Phase 4:
Finalization and
Customization
Your leg muscles will now have achieved a new, healthier balance. Because Q-Rings reduce your weakness and optimize gearing
according to your legs immediate capacity, you will now ride through tough conditions more capably than you could before. If you are in
the right OCP position, your spin will be as smooth as before (or better) and your heart rate may be lower than usual. Your legs and knees will likely
feel fresher at the end of rides. If you are still experiencing problems, you can now adapt the position of your chainring to optimize your Q-
Rings' position for your riding style on your bike. The aim here is to help you find your ideal setting in an analytical manner: In doing so it is
important to let your legs, heart rate and effort level speak, not your preconceptions (which can cause you to set your rings up incorrectly).
Do not adjust OCP positions before finishing phaze 3 / If you are comfortable on one chainring but not the other, this will be solved with OCP settings
ROTOR
Q-Ring starter's guide:
Part 2
OPTIMUM CHAINRING POSITION
Chainring setup guide
Cause Solution Cause
Adjust one position at a time, and test results before re-adjusting
It feels as if you are pedalling in a vacuum
It feels as if there is not enough drivetrain resistance to pedal against
Pedalling power comes too late in downstroke (too low)
Your pedals seem to arrive too low too fast
Your pedals shoot through the power zone and become bogged down below
You are only comfortable when pedalling slower than usual
The only way to pedal comfortably is to ride a smaller cog than usual
You sit further forward on your saddle than usual to pedal comfortably
Reduce OCP
number by
only 1 step
from current
position:
5 -> 4.
4 -> 3.
3 -> 2.
It is not possible to set up Q-Rings to achieve an effect (power, spin, etc): Only to make your bike work for you!
Road or XC2 bike? Start in position 3
Triathlon or TT bike? Start in position 4
XC3 bike? Start in position 2
Recumbent bike? See recumbent installation guide!
Your
brain
and / or
legs are
not yet
used to
riding
with
Q-Rings
Problem situation:
If you dont have pedalling problems you are in the right position!
A successful change in position will give immediate improvement.
Have you ridden 500 Road or 200 MTB KM on Q's?
NO
YES
Solution
Keep riding
until you
have
finished
stages
1 to 3
of the
adaptation
phazes
You are
arriving at
the
maximum
chainring
diameter too
late (OCP
number too
You sit further forward on your saddle than usual to pedal comfortably
It is comfortable to pedal standing but not when sitting
Pain at the back of the leg behind the knee that you haven't had before
Cruising is easy but accelerations and speed pulses are difficult
Early resistance growth prevents you from pedalling smoothly
Too much pedalling resistance early, which disappears too soon
You can't reach your power zone on time
Your pedals seem to resist entering the power zone
You feel stuck too high for too long
You attempt to pedal faster than usual to be comfortable
The only way to pedal comfortably is to ride a larger cog than usual
You sit further back on your saddle than usual to pedal comfortably
It is comfortable to pedal seated but not when standing
Pain at the front of the knee that you haven't had before
INNOVATION
+
TECHNOLOGY
+
COMPETITION
www
.rotorbike.
com
Different bikes may need different OCP positions / Adjacent chainrings may need different positions / Change OCP one step & retest before adjusting again / XC3 rings only have 3 positions / XC2 rings only have positions 2-
You are
arriving at the
maximum
chainring
diameter too
soon (OCP
number too
small)
Increase OCP
number by
only 1 step
from current
position:
1 -> 2.
2 -> 3.
3 -> 4.
4 -> 5.
3 -> 2.
2 -> 1.
Your
brain
and / or
legs are
not yet
used to
riding
with
Q-Rings
Keep riding
until you
have
finished
stages
1 to 3
of the
adaptation
phases
See "yes" solution -->
Q-Rings
phazes
See "yes" solution -->
number too
large)

Other manuals for Q-Ring

3

Other ROTOR Bicycle Accessories manuals

ROTOR ALDHU 3D Plus User manual

ROTOR

ROTOR ALDHU 3D Plus User manual

ROTOR BB1-MTB User manual

ROTOR

ROTOR BB1-MTB User manual

ROTOR TRACK BSA User manual

ROTOR

ROTOR TRACK BSA User manual

ROTOR ALDHU ROAD User manual

ROTOR

ROTOR ALDHU ROAD User manual

ROTOR PressFit 4624-MTB-R User manual

ROTOR

ROTOR PressFit 4624-MTB-R User manual

ROTOR ALDHU 3D Plus User manual

ROTOR

ROTOR ALDHU 3D Plus User manual

ROTOR Q-Ring User manual

ROTOR

ROTOR Q-Ring User manual

ROTOR ITA30 User manual

ROTOR

ROTOR ITA30 User manual

ROTOR UNO User manual

ROTOR

ROTOR UNO User manual

ROTOR INspider ALDHU24 User manual

ROTOR

ROTOR INspider ALDHU24 User manual

ROTOR KAPIC MTB ETOR User manual

ROTOR

ROTOR KAPIC MTB ETOR User manual

ROTOR Q-Ring User manual

ROTOR

ROTOR Q-Ring User manual

ROTOR BSA30 User manual

ROTOR

ROTOR BSA30 User manual

ROTOR BB1-ROAD User manual

ROTOR

ROTOR BB1-ROAD User manual

ROTOR Brose MAG Compatible eCranks User manual

ROTOR

ROTOR Brose MAG Compatible eCranks User manual

ROTOR Q-Ring User manual

ROTOR

ROTOR Q-Ring User manual

ROTOR PressFit 4630 User manual

ROTOR

ROTOR PressFit 4630 User manual

Popular Bicycle Accessories manuals by other brands

SKS Germany AIRCHECKER 10001 manual

SKS Germany

SKS Germany AIRCHECKER 10001 manual

Tout Terrain Mule manual

Tout Terrain

Tout Terrain Mule manual

Nathan AP Pro Assembly and set-up guide

Nathan

Nathan AP Pro Assembly and set-up guide

Cateye CC-TR200DW (V2c) product manual

Cateye

Cateye CC-TR200DW (V2c) product manual

Bontrager Aerobar Race Lite owner's manual

Bontrager

Bontrager Aerobar Race Lite owner's manual

Marzocchi Bomber 2001 instruction manual

Marzocchi

Marzocchi Bomber 2001 instruction manual

Bosch 0 275 031 instructions

Bosch

Bosch 0 275 031 instructions

Speedict Mercury user guide

Speedict

Speedict Mercury user guide

K2 Bike k2 bikes owner's manual

K2 Bike

K2 Bike k2 bikes owner's manual

Hama 00178253 operating instructions

Hama

Hama 00178253 operating instructions

Biketec AG 500085 instruction manual

Biketec AG

Biketec AG 500085 instruction manual

Shimano SM-SH51 user manual

Shimano

Shimano SM-SH51 user manual

Fox 34 Float 29 manual

Fox

Fox 34 Float 29 manual

Vetta RT255 manual

Vetta

Vetta RT255 manual

SAILI MOTOR LCD-SW900 instructions

SAILI MOTOR

SAILI MOTOR LCD-SW900 instructions

Cateye PADRONE SMART user guide

Cateye

Cateye PADRONE SMART user guide

EcoSpeed Electric Mid-Drive Installation and assembly instructions

EcoSpeed

EcoSpeed Electric Mid-Drive Installation and assembly instructions

Xiyuan XY-B02 user guide

Xiyuan

Xiyuan XY-B02 user guide

manuals.online logo
manuals.online logoBrands
  • About & Mission
  • Contact us
  • Privacy Policy
  • Terms and Conditions

Copyright 2025 Manuals.Online. All Rights Reserved.