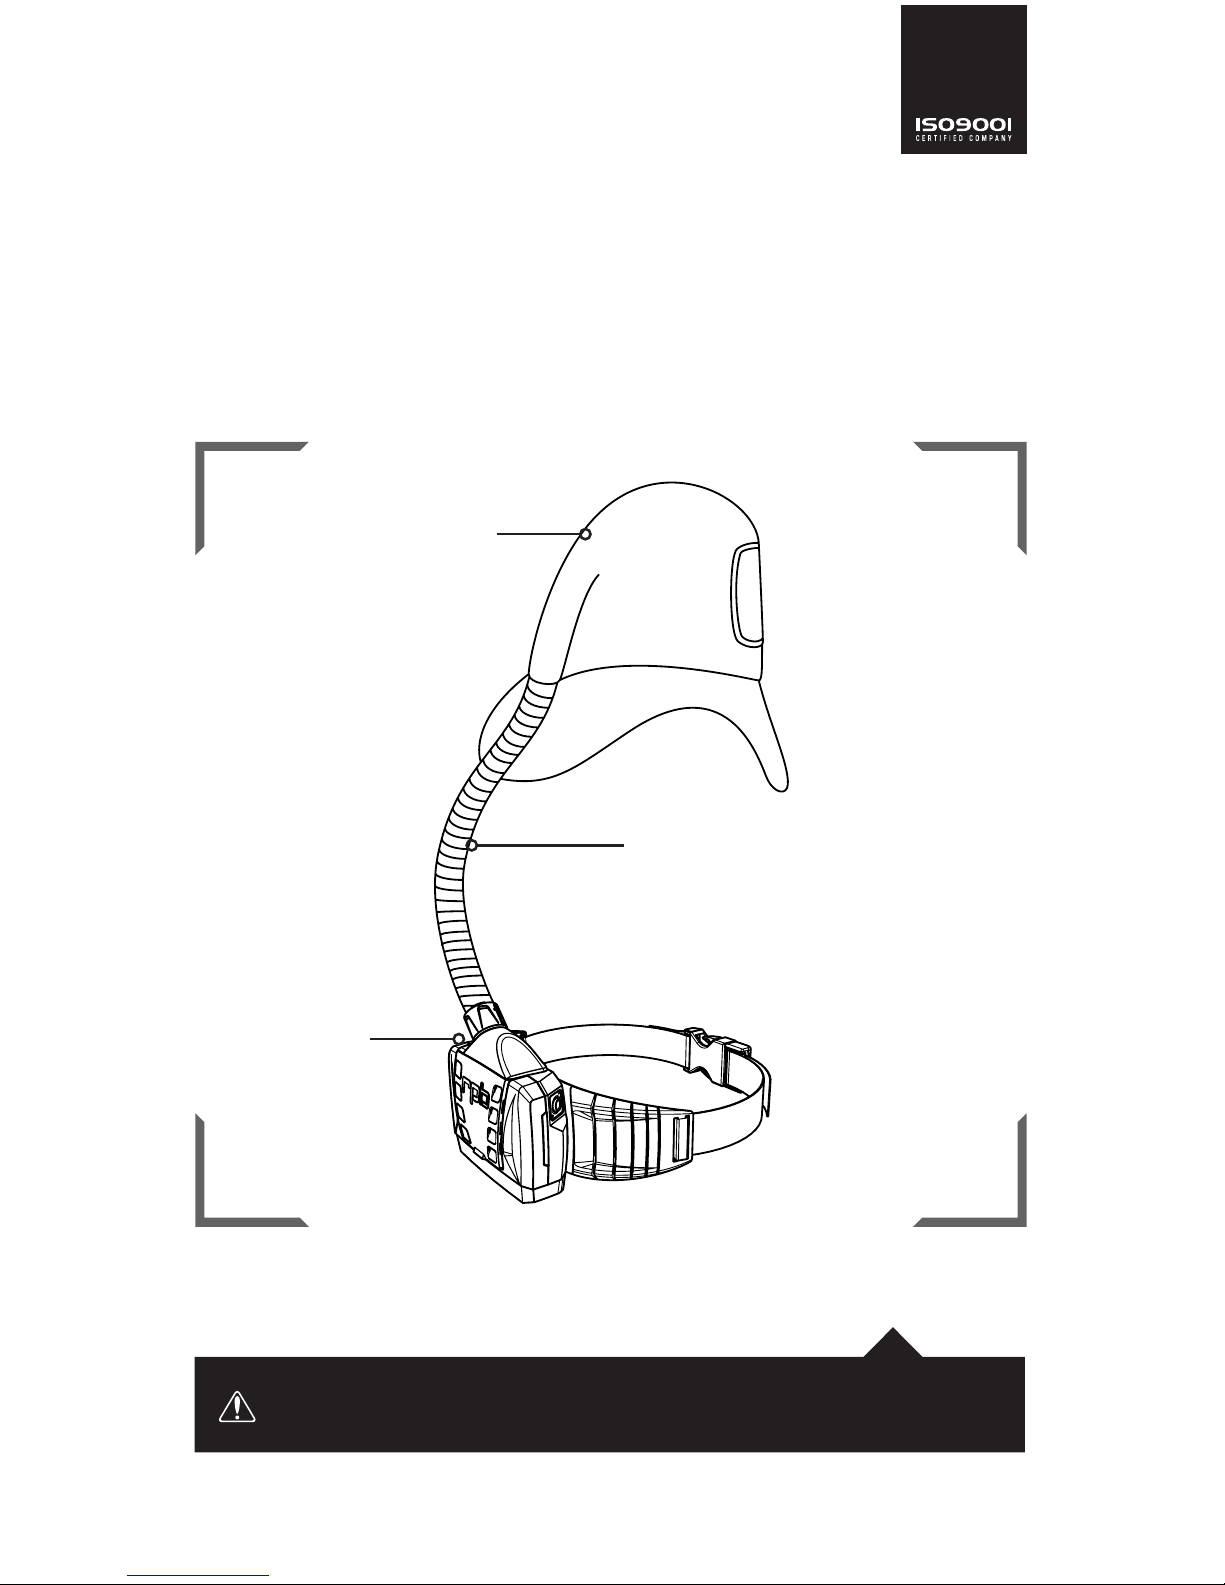
RPB PX4 AIR PAPR User manual

0194
INSTRUCTION MANUAL
PX4 AIR PAPR
®

2
PX4 AIR PAPR
®
INTRODUCTION 3
PAPR COMPONENT CONCEPT 5
WARNINGS 6
RESPIRATOR OPERATIONS 8
PAPR SETUP AND USE 10
APPARATUS CLASSIFICATION AND PROTECTION FACTOR 19
RESPIRATOR OPERATIONS (CONTINUED) 20
PRODUCT SPECIFICATIONS AND DATA 22
TROUBLE SHOOTING 23
PARTS AND ACCESSORIES 24
PARTS LIST 25
INSTRUCTIONS IN SPANISH 26
INSTRUCTIONS IN GERMAN 42
INSTRUCTIONS IN FRENCH 59
INSTRUCTIONS IN ITALIAN 75
CONTENTS
RPB®SAFETY GLOBAL HEADQUARTERS
2807 Samoset Rd, Royal Oak, MI 48073, USA.
T: 1-866-494-4599 F: 1-866-494-4509 E: sales.us@rpbsafety.com rpbsafety.com
RPB®SAFETY ASIA PACIFIC HEADQUARTERS
652 Halswell Junction Road, Hornby South 8042 New Zealand.
T: +64-3-357-1761 F: +64-3-357-1763 E: sales.nz@rpbsafety.com rpbsafety.com
RPB®, Advancing Your Safety, Nova®, Nova 3®, PX4 AIR®Radex®, Zytec®and Z-LINK®are
registered trademarks of RPB®Safety LLC
For technical assistance contact our Customer Service Department at 1-866-494-4599 or
email: customerservice@rpbsafety.com
FORM #: 7.20.526
REV: 3
Read all instructions and warnings before using this product.
Keep this manual for future reference.

3
INTRODUCTION
The RPB®PX4 AIR®is approved in the
following congurations, 03-911 to EN 12941:
1998 + A1: 2003 + A2: 2008 as a Powered
Air Purifying Respirator Fan Unit only when
used in conjunction with the following
Respirators:
Nova 3®Respirator - (EN 12941: 1998 +
A1: 2003 + A2: 2008 TH3 P R SL)
Z3® Welding Respirator - (EN12941: 1998
+ A1: 2003 + A2: 2008 TH2 P R SL)
Z-LINK®Respirator - (EN 12941: 1998 + A1:
2003 + A2: 2008 TH2 P R SL)
T-LINK®Respirator - (EN 12941: 1998 +
A2: 2008 TH2 P R SL)
The RPB®PX4 AIR®is approved with the
following lter cartridges:
03-985 High Efciency (HE) Filter
03-995 Organic Vapor/Acid Gas/High
Efciency (OV/AG/HE) Cartridge
This Respirator System is intended to be
used only in conjunction with an “Organised
Respiratory Protection Program” which
complies with the Requirements of National
and Local Governments.
The RPB®PX4 AIR®belt mounted assembly
consists of a motor/blower unit, high
efciency lter, waist belt and lithium ion
battery pack. The motor/blower unit draws
ambient air through its high efciency
lter and supplies air to the headgear via a
breathing tube. The blower unit is equipped
with automatic ow control; the motor speed
is monitored and regulated during operation
to compensate for the charge state of the
battery pack and the increasing level of
airow resistance caused by lter blocking.
Should the airow fall below the minimum
ow rate an audible alarm will sound and the
fan indicator light bar will turn red and ash
on the control panel. The user should leave
the work area immediately should this occur.
In like manner, the Battery indicator bar will
turn red and sound the audible alarm when
the battery has approximately 10 -15 minutes
of charge left, to give sufcient warning to the
wearer that the power will shut off soon.
When selecting a Powered Air Purifying
Respirator (PAPR), the following factors need
to be considered:
1. Possible occurrence of explosive
atmosphere.
2. Types of pollutants.
3. Concentrations.
4. Intensity of work.
5. All other protective requirements other
than respiratory.
All risk analysis should be carried out by a
person trained to make suitable decisions on
these matters.
The RPB®PX4 AIR®has been designed
for use in atmospheres that are NOT
IMMEDIATELY DANGEROUS TO LIFE OR
HEALTH (IDLH).
The RPB®PX4 AIR®03-911 are approved
to EN 12941: 1998 + A1: 2003 + A2: 2008
TH2/TH3 P R SL for use in environments
where hazards are known and characterized
and oxygen deciency is not present. It
is only approved in the congurations
indicated on page 4 of the manual. Refer
to the Instruction Manual provided with
the appropriate RPB®Respirators for more
information.

4
PX4 AIR PAPR
®
Note: the EN 12941: 1998 + A1: 2003 + A2:
2008 standard is a requirement for loose
tting respirators such as helmets and face
shields (03-911) and the 12942: 1998 + A1:
2004 + A2: 2008 standard is a requirement
for tight tting respirators such as full face
masks and half face masks (03-912 Low
Flow). For more information on the respirator
refer to the specic Respirators User
Instruction Manual.
SERVICE LIFE OF HE FILTER,
PREFILTER AND SPARK ARRESTOR
The HE lter should be replaced if the airow
alarm is activated, or the ow indicator
reading falls below the 6cfm (170 slpm) for
the 03-911 and 4.2cfm (120 slpm) for 03-912
minimum airow. The HE lter should also
be replaced if there is damage to the lter
media, such as a tear or puncture, etc… or the
lter media becomes wet. The PX4 AIR®is
approved to only be used with genuine RPB®
lter cartridges.
The OV/AG/HE cartridge should be replaced
after each use or if any of the above HE lter
conditions apply.
The Prelter is recommended to be replaced
when it is dirty or damaged or at the same
time as the HE Filter. The Spark Arrestor
should be replaced if it becomes damaged or
clogged with debris.
WARRANTY
All RPB® products are covered by a
manufactures warranty of 3 months. The
manufacturer warranty covers defects in
material, workmanship and does not cover
damage caused by misuse or abuse. RPB®’s
only obligation and your exclusive remedy
shall be to repair, replace or refund the
purchase price of such parts or products
upon the presentation of proof of purchase.
Maximum liability is in no case to exceed the
value of the RPB® Product involved.
APPROVAL
The RPB®PX4 AIR®meets the requirements
of the European Community Directive
89/686/EEC, (Personal Protective
Equipment Device).
The RPB®PX4 AIR®is approved as an
EN12941: 1998 + A1: 2003 + A2: 2008
TH2/TH3 P R SL Respirator by:
Apave Sudeurope SAS (0082)
8 rue Jean-Jacques Vernazza
CS 60193
13322 Marseille Cedex 16
France
Under Article 10 and the quality systems
are approved under Article 11b by INSPEC
International (0194)
Salford University Business Park
56 Leslie Hough Way
Salford M6 6AJ
United Kingdom
INTRODUCTION CONTINUED

5
PAPR COMPONENT CONCEPT
The RPB®PX4 AIR®is part 3 of the 3 main components that constitute a respirator (Note the
T100®has been used in the below diagram as an example):
1. Respirator Hood
2. Breathing Tube Assembly
3. Air Supply
FIGURE 1.1
WARNING! Failure to use genuine parts and components that are part of the approved
respirator assembly will void the approval of the entire respirator assembly.

6
PX4 AIR PAPR
®
WARNINGS!
1. Do not use this respirator until you
have been trained in the respirators’
use, maintenance and limitations by
a qualied individual (appointed by
your employer) who has extensive
knowledge of the RPB®PX4 AIR®.
2. Before using this respirator ensure your
employer has determined that airborne
contaminant concentrations do not
exceed those allowed by applicable
National and Local Government
regulations and recommendations
for Power Air Purifying Respirator.
Government law requires that the
employer measures and monitors
airborne contaminant levels in the work
area.
3. DO NOT WEAR this respirator if any of
the following conditions exist:
Atmosphere is immediately
dangerous to life or health.
You CAN NOT escape without the aid
of the respirator.
Atmosphere contains less than 19.5%
Oxygen.
Work area is poorly ventilated.
Contaminants are in excess of
regulations or recommendations.
4. Do not modify or alter this respirator.
Use only parts and components that are
part of the EN12941: 1998 + A1: 2003
+ A2: 2008 TH2/TH3 P R SL approved
respirator assembly. The use of non
RPB®parts voids the EN 12941: 1998
+ A1: 2003 + A2: 2008 TH2/TH3 P
R SL approval of the entire respirator
assembly.
5. Inspect all components daily for signs
of damage or wear that may reduce the
level of protection originally provided.
6. Do not wear this respirator until you
have passed a complete physical
exam, maybe including a lung X-ray
conducted by qualied medical
personnel.
7. Improper use of this respirator may
cause injury or death. Improper use
may also cause life threatening
delayed lung disease such as silicosis,
pneumoconiosis or asbestosis.
8. This respirator, when properly tted and
used, signicantly reduces but does not
completely eliminate the breathing of
contaminants by the respirator wearer.
9. DO NOT use this respirator in poorly
ventilated areas or conned spaces
unless the area is well ventilated and
that the contaminant concentrations
are below those recommended for this
respirator. Follow all procedures for
conned space entry, operation and
exit as dened in applicable National
and Local Government regulations and
recommendations.
10. The RPB®PX4 AIR®PAPR is not
intrinsically safe. Do not use in
ammable or explosive atmospheres.
Doing so may result in serious injury or
death.
11. Always correctly use and maintain
the lithium ion battery packs. Failure
to do so may cause re or explosion or
could adversely affect the respirator
performance and result in injury,
sickness or death.
Do not charge batteries with

7
unapproved chargers, in enclosed
cabinets without ventilation, in
hazardous locations, or near sources
of high heat.
Do not immerse in water or other
liquids.
Do not use, charge, or store
batteries outside the recommended
temperature limits.
12. LEAVE WORK AREA IMMEDIATELY IF:
Any respirator component becomes
damaged.
Airow stops or slows down.
Breathing becomes difcult
You become dizzy, nauseous, too hot,
too cold, or ill.
Vision is impaired.
When the Warning Alarm Sounds.
13. The materials that the respirator is made
of may create static electricity under
low humidity. For more information
on this, please call our Customer Care
Team on 1-866-494-4599 or visit
rpbsafety.com.
14. For information on the Respirators’ head
protection properties i.e. EN397, please
refer to the respective Respirator’s
Instruction Manual.
15. For information on the Respirators’
hearing protection properties i.e.
EN352, please refer to the respective
Respirator’s Instruction Manual.
16. For information on the Respirators’ eye
protection properties i.e. EN166, please
refer to the respective Respirator’s
Instruction Manual.
17. Incorrect use could be dangerous.
Caution should be taken for the
possibility of looped hoses and/or
cables becoming caught up.
18. At very high work rates the pressure
in the device may become negative at
peak inhalation ow.
19. Power off state gives little or no
respiratory protection and this is
considered an abnormal situation. In
the power off state a rapid build-up of
carbon dioxide and depletion of oxygen
within the hood may occur.
20. DO NOT attach the lters directly to
the headtop. Only attach the lters to
the PX4 AIR®unit as described in the
instructions in this manual.

8
PX4 AIR PAPR
®
RESPIRATOR OPERATIONS
UNPACKING
Inspect the package contents for shipping
damage and ensure all components are
present. The product should be inspected
before each use following the procedures in
the inspection and cleaning section of this
Instruction Manual.
BATTERY PACK
The battery pack must be inspected before
each time it is charged. If there are any cracks
or evidence of damage to the case do not
charge the battery pack. All batteries must
be disposed of in a correct and responsible
manner, in accordance with local government
ordinances.
Before using the RPB®PX4 AIR®make sure
that the battery is fully charged, as per the
following instruction steps on page 10.
Note: For problems with the Battery Pack,
see the Trouble Shooting section on Page 23.
HIGH EFFICIENCY (HE) FILTER
Use the HE lter in atmospheres that
contain only solid or liquid particulates,
such as dusts, mists, fumes, asbestos, and
radionuclides.
Before unpacking the 03-985 HE lter make
sure that the sealed plastic packaging is still
intact. Once the seal is broken the lter is
exposed to the environment and may become
contaminated. Before inserting the lter make
sure that the following points are checked:
1. Check the Fan unit is switched off and
the fan is not running before opening the
Door.
2. Inspect the lter for tears or any sign of
damage to the lter media.
3. Inspect the seal on the back side of
the lter is clean and free of cuts or
distortions.
OV/AG/HE FILTER
Use the OV/AG/HE (Organic Vapor/Acidic
Gasses/High Efciency) combination
cartridge (03-995) in atmospheres that
may contain organic vapors and gases, such
as solvents, and acidic vapors and gases.
Some of these gases and vapors include
sulphur dioxide, chlorine, hydrogen chloride,
hydrogen uoride, chlorine dioxide and
organic vapors.
EQUIPMENT MARKING
The RPB®PX4 AIR® and its lters are marked
in accordance with the EN 12941: 1998 + A1:
2003 + A2: 2008 TH2/TH3 P R SL.
TH1, TH2, and TH3 – Indicate the class
designation for complete device.
P, R, and SL – reusable Particle Filter against
liquid and solid particles.
A1, B1, E1 and A2 Gas Filter class designation
(Note: the “A”, “B” and “E” indicates that the
lter provides protection against organic.
Inorganic and acid gases, as per the standard
and the number following the letter indicates
the lter capacity).
Note: See Table 1.1 on page 19 for details on
the lter selection.
There are two models of the PX4 AIR®:
03-911 - Standard air ow - light gray fan
cover
03-912 - Low ow model for tight tting
respirators - Dark Gray fan cover and model
label on back.
WARNING! Markings on the lter for other

9
standards should not be confused with the
EN 12941 standard markings.
Each lter cartridge has a label on it with a
spot for recording the date and time that the
new cartridge was installed. Using a pen or
permanent marker, write the date and time
the new cartridge was installed into the PX4
AIR®PAPR.
MARKINGS AND SYMBOLS ON THE
EQUIPMENT
- Read all instructions before
use.
Li-Ion - Lithium Polymer Batteries.
- Batteries shall be disposed
of as electronic waste.
- Recycle
- RoHS compliant.
ALARMS AND DEVICE
WARNINGS
FILTER BLOCKAGE
A pulsing alarm sounds when the airow
to the hood falls below the minimum
requirement of 170slpm (180slpm Nominal)
for 03-911 and 120slpm (130slpm Nominal)
for 03-912 more than 5-10 seconds in
duration.
BATTERY LEVEL
A pulsing alarm sounds when approximately
10-15 minutes of charge is left in the battery.
Power the unit off and remove the battery
(in a safe area) and place on the charger. If
you have a second battery you can connect
it to the device to continue operation. The
continuous alarm will also sound if the
battery is overheating.
Alarm volume is 85 dBA at 4” (104mm).
Note: When the alarm sounds it is
recommended that you leave the work area
immediately. Once outside of the work area
power the unit down and resolve the problem.
When the alarm sounds there will be a
vibration activated as well. This will help
notify the operator of the warning even in
noisy environments or when using hearing
protection.

10
PX4 AIR PAPR
®
PAPR SETUPAND USE
To remove the battery from the charging
station, press the release latch on the bottom of
the battery and lift the battery from the station.
Fit the battery to the charging station by
connecting the left side and rotate the battery
down and latch into place.
Follow the indicators from left to right on the
front of the charging station to know the status
of the charge process. The triangle warning
light will indicate if there is problem charging.
When all three lights display green, the battery
is fully charged.
Connect the power pack to the charging
station. Connect the power pack to the mains
electrical source (110 - 240v), charging will
begin.
CHARGING THE BATTERY PACK
FIGURE 2.1 FIGURE 2.2
FIGURE 2.3 FIGURE 2.4

11
The battery has a power capacity indicator
showing the level of charge from 20% to 100%,
press the test button to reveal the result.
Now attach the battery to the RPB®PX4 AIR®
by connecting the left hand edge to the base
of the unit and rotate up into position, making
sure that the latch snaps into place.
FIGURE 2.5 FIGURE 2.6

12
PX4 AIR PAPR
®
Mount the 03-985 HE Filter into the door, note
the logo on the front of the lter should be to
the bottom.
Slide the door on to the hinge block on the right
side of the fan unit as you face it, rotate the
door to the left and latch in place.
FIGURE 3.3 FIGURE 3.4
Check your environments. For use in
environments with sparks or molten metal,
use the 03-982 spark arrester in front of the
03-981 prelter. This will reduce the risk of re.
A 03-981 prelter is mounted in front of the
03-985 HE lter to prolong the life of the Filter.
HIGH EFFICIENCY FILTER
FIGURE 3.1 FIGURE 3.2
PAPR SETUPAND USE CONTINUED

13
1.
2.
TO REPLACE THE HE FILTER
Make sure the 03-911 fan unit is switched off
before attempting to open the door. (Note:
Press and hold button to power off.)
(1.) Depress the latch, (2.) rotate the door to the
right and lift the door off the latch.
FIGURE 4.1
FIGURE 4.2
Remove the 03-985 lter from the door and
dispose of it in a suitable way. (Note: treat the
old lter with care as the contaminants on the
outside of the lter may be dangerous to your
health).
Install the new replacement 03-985 lter
as per Fig 3.3 and 3.4. Inspect the 03-981
prelter and replace as needed.
FIGURE 4.3 FIGURE 4.4

14
PX4 AIR PAPR
®
TO INSTALL/REPLACE THE OV/AG/HE FILTER
Make sure the 03-911 fan unit is switched off
before installing a new lter. Only install a new,
unused 03-995 lter cartridge. Slide the tow
tabs on the right side of the lter into the slots
on the PX4 AIR®.
Rotate the cartridge down until the latch clicks
into place.
FIGURE 4.5 FIGURE 4.6
Place the prelter and, if needed, the spark
arrestor. Use the spark arrestor in situations
there may be sparks, such as welding and
grinding.
Attach the front cover by pressing it onto the
front of the cartridge until it clicks into place
after the cartridge has been installed onto the
PX4 AIR®.
FIGURE 4.7 FIGURE 4.8
SPECIAL OR CRITICAL USERS INSTRUCTIONS
When using the PX4 AIR®with an 03-995 Gas Cartridge, it must only be running on
Speed 1 (170slpm).
PAPR SETUPAND USE CONTINUED

15
Now take the bayonet end, insert the
connection into the PX4 AIR®and make sure
the 2 small pegs line up with the slots in the
PX4 AIR®outlet.
Twist the breathing tube to the right a ¼ turn
to lock into position. Make sure that it is fully
locked in position.
FIGURE 5.3
FIGURE 5.4
BREATHING TUBE
Select the exible breathing tube that suits
your respirator (check the tting connects to
your respirator type). Ensure that the seal is in
place.
Take the end that ts to the respirator and
connect it securely.
FIGURE 5.1
FIGURE 5.2

16
PX4 AIR PAPR
®
The power button is on the right of the unit as
you look at the front of the PX4 AIR®. POWER
ON: Press and hold the power button (for
about 1 second). Note the unit will always start
up in the low speed setting and should reach
nominal ow within 5-10 seconds. Allow the
unit to warm up for 5 minutes or until the ow
meter (04-091) is in the safe range before use.
POWER ON/OFF BUTTON AND SPEED CONTROL
FIGURE 6.1
POWER OFF: Press and hold the power button
(for about 1 second) and the unit will turn off.
FIGURE 6.4
When the battery is out of charge the top row
of lights will ash red and the alarm will sound.
Immediately return to a safe environment and
remove the respirator and change/charge the
battery.
The top row of green lights indicate the charge
of the battery. 3 lights is fully charged. 1 light
means the battery is getting low. When it is
time to change or charge the battery, there will
be 1 light ashing alternately green and red.
FIGURE 6.2
FIGURE 6.3
PAPR SETUPAND USE CONTINUED

17
Normal - Speed 1
Mild Blockage - Speed 1
Moderate Blockage - Speed 1
Heavy Blockage - Speed 1
Blocked - Speed 1
cannot be achieved
Normal - Speed 2
Mild Blockage - Speed 2
Moderate Blockage - Speed 2
Heavy Blockage - Speed 2
cannot be achieved
Blocked - Speed 1
cannot be achieved
Speed ~ 170 slpm (03-911)
120 slpm (03-912)
Speed ~ 210 slpm (03-911)
135 slpm (03-912)
Normal - Speed 3
Mild Blockage - Speed 3
Moderate Blockage - Speed 3
cannot be achieved
Heavy Blockage - Speed 2
cannot be achieved
Blocked - Speed 1
cannot be achieved
Speed ~ 240 slpm (03-911)
150 slpm (03-912)
Speed 1 - 170 slpm (03-911)
[120 slpm (03-912)]
Speed 2 - 210 slpm (03-911)
[135 slpm (03-912)]
Speed 3 - 240 slpm (03-911)
[150 slpm (03-912)]
FAN SPEED AND AIR BLOCKAGE INDICATION
OPERATION LEGEND
Speed Settings: Cycle through the 3 speed
settings by pressing the power button. Each
button press will advance through these speed
settings.
The blue lights indicate the selected fan speed. The red lights indicate the level of blockage. When
the lights ash red and blue, the selected fan speed cannot be reached, but sufcient air supply
(170slpm 03-911, 120slpm 03-912) can still be reached. When 3 lights ash red, the alarm will
sound indicating insufcient air supply is being produced. Return to a safe environment and check
the lter and/or the airway for blockage. If the lter is contaminated, replace with a new cartridge.
FIGURE 6.5
FIGURE 6.6

18
PX4 AIR PAPR
®
Thread the belt through the support in a left to
right ow when looking at the front of the PX4
AIR®.
Choose the appropriate belt for the working
environment; (07-765 polyethylene belt and
buckle {standard} or 07-765-FR Nomex®
belt and buckle {welding and high heat
applications}).
BELTAND SUPPORTATTACHMENT
FIGURE 7.1 FIGURE 7.2
Take the loose end of the Belt and thread from
behind through the outer slot (slot furthest out
from the PX4 AIR®) in the left support and then
back through the inner slot (Closest to the PX4
AIR®).
FIGURE 7.3
Thread the belt through the belt loop so that it
passes between the loops and the support.
FIGURE 7.4
PAPR SETUPAND USE CONTINUED

19
European Device
Classication
APPARATUS
MODEL
NOMINAL
PROTECTION
FACTOR
PARTICULATE
FILTER 03-985
COMBINED
PARTICULATE
AND OV/AG
FILTER 03-995
EN 12941 TH3 NOVA 3 500 X X
EN 12941 TH2 Z3 50 X X
EN 12941 TH2 Z-LINK 500 X X
EN 12941 TH2 T-LINK 500 X X
APPARATUS CLASSIFICATION AND PROTECTION FACTOR TABLE 1.1
Thread the belt through the inner slot from the
back and then back through the outer slot.
Now thread the clip end of the buckle on to the
belt and pull to the desired length.
FIGURE 7.5 FIGURE 7.6

20
PX4 AIR PAPR
®
RESPIRATOR OPERATIONS CONTINUED
INSPECTION, DISINFECTING AND
CLEANING
Before each use, the unit should be inspected
for the following points. This helps to
determine that the unit is operating as it was
designed and it is suitably protecting the
operator:
1. PX4 AIR®PAPR SYSTEM: Make a
visual inspection of the entire unit, which
includes the motor housing, lter door
and door cover, lter and pre-lters,
battery, belt and breathing tube. Also
inspect that the correct hood or face
pieces is attached.
2. BATTERY PACK: Check that the battery
has a full charge (see the battery test
strip on the top of the battery, Fig 2.5)
to conrm that there is sufcient charge
for the work period that you need to
accomplish. Make sure that the battery is
securely tted to the PX4 AIR®PAPR.
3. BREATHING TUBE: Inspect the breathing
tube completely, looking for splits and
cracks in the tube, the ttings are held
securely in the tube and that the O-ring
is in place on the bayonet tting that
inserts into the PX4 AIR®. Make sure that
the breathing tube ts rmly into the PX4
AIR®unit and seals without any leaks
around the connection.
See Fig 5.3 and 5.4
4. HE FILTER: Inspect the lter casing for
cracks and distortions that will affect the
seal to the PX4 AIR®unit. Inspect the
lter paper and the seal carefully for any
of the following defects; dirt, cuts and
tears, distortions or indentations. The
seal can be wiped clean with a damp
cloth to remove dirt particles, (do not use
solvents or detergents.) The HE lter
paper must not be cleaned or submersed
in water at any time. Damage to the HE
lter paper will affect its ability to lter
the air and could expose users to harmful
environments. All damaged lters,
pre-lters and spark arresters must be
replaced before using the PX4 AIR®.
5. OV/AG/HE FILTER: Do not clean and
reuse the 03-995 lter. This lter is
one-time use only. Dispose of properly
according to government regulations
depending the contaminants it may have
been exposed to.
6. AIRFLOW METER: Check the ball in the
04-091 airow meter is moving freely.
Insert the ow meter into the outlet of
the PX4 AIR®and rotate ¼ turn to lock in
place so that it is sitting vertical. Turn on
the PX4 AIR®and let the air stabilize over
a 30 second period. With the meter still
in the vertical position check that the ball
is sitting above the minimum ow rate
marker.
WARNING! Do not use the PX4 AIR®if
the meter does not reach the minimum
FIGURE 8.1
Other manuals for PX4 AIR PAPR
1
Table of contents
Languages:
Other RPB Respiratory Product manuals