Ryobi R36BTY2 User manual

FRONT PAGE
R36BTY2
R36BTY4
R36BTY5

IMPORTANT!
It is essential that you read the instructions in this manual
before assembling, operating, and maintaining the
product.
Subject to technical modication.
Safety, performance, and dependability have been given top
priority in the design of your battery pack.
SAFETY INSTRUCTIONS
Always mention the model number when communicating
with RYOBI in regards to battery packs. The R36BTY2,
R36BTY4, and R36BTY5 battery packs is for RYOBI 36V
cordless products only. Refer to the Operator’s Manual
provided with the product.
WARNING! Read all safety warnings and all instructions.
Failure to follow the warnings and instructions may result in
electric shock, re and/or serious injury.
Save all warnings and instructions for future reference.
■Battery tools do not have to be plugged into an
electrical outlet. Therefore, they are always in
operating condition. Be aware of possible hazards
when not using your battery tool or when changing
accessories. Follow this rule to reduce the risk of
electric shock, fire, or serious personal injury.
■Do not place battery tools or their battery packs
near fire or heat. Follow this rule to reduce the risk of
personal injury.
■Do not crush, drop or damage the battery pack. Do
not use a battery pack or charger that has been
dropped or has received a sharp blow. Properly
dispose of a dropped or damaged battery immediately.
■Do not charge a battery tool in a damp or wet
location. Follow this rule to reduce the risk of electric
shock.
■Charge a battery tool in a location where the temperature
is more than 10°C but less than 25°C. To reduce the risk
of serious personal injury, do not store the battery tool
outside or in vehicles.
■Under extreme usage or temperature conditions,
battery leakage may occur. If the liquid comes
in contact with the skin, wash immediately with
soap and water, then neutralize with lemon juice
or vinegar. If liquid gets into your eyes, flush them
with clean water for at least 10 minutes, then seek
immediate medical attention. Follow this rule to
reduce the risk of serious personal injury.
■Save these instructions. Refer to them frequently and
use them to instruct others who may use this product.
If you loan someone this product, loan them these
instructions also to prevent misuse of the product and
possible injury.
BATTERY TOOL USE AND CARE
■Recharge only with the charger specified by the
manufacturer. A charger that is suitable for one type
of battery pack may create a risk of fire when used with
another battery pack.
■Use battery tools only with specifically designated
battery packs. Use of any other battery packs may
create a risk of injury and fire.
■When the battery pack is not in use, keep it away
from other metal objects, like paper clips, coins,
keys, nails, screws or other small metal objects,
that can make a connection from one terminal to
another. Shorting the battery terminals together may
cause burns or a fire.
ADDITIONAL BATTERY SAFETY WARNINGS
WARNING! To reduce the risk of re, personal injury,
and product damage due to a short circuit, never immerse
your tool, battery pack or charger in uid or allow uid to
ow inside them. Corrosive or conductive uids, such
as seawater, certain industrial chemicals, and bleach or
bleach-containing products, etc., can cause a short circuit.
TRANSPORTING LITHIUM BATTERIES
Transport the battery in accordance with local and national
provisions and regulations.
Follow all special requirements on packaging and labelling
when transporting batteries by a third party. Ensure that
no batteries can come in contact with other batteries
or conductive materials while in transport by protecting
exposed connectors with insulating, non-conductive caps or
tape. Do not transport batteries that are cracked or leaking.
Check with the forwarding company for further advice.
SPECIFICATIONS
Battery pack
R36BTY2 R36BTY4 R36BTY5
Nominal voltage
36 V 36 V 36 V
Compatible
charger
BCL3617S, BCL3617U, BCL3620S,
BCL3660F, BCL3650F, BCL3620
Battery capacity
2.0 Ah 4.0 Ah 5.0 Ah
Charger input
220 - 240 V, 50Hz AC only
Maximum
charging time
(BCL3617S)
80 minutes 160
minutes
200
minutes
Quick recharge
(BCL3617S)
60%
45 minutes 96 minutes 120
minutes
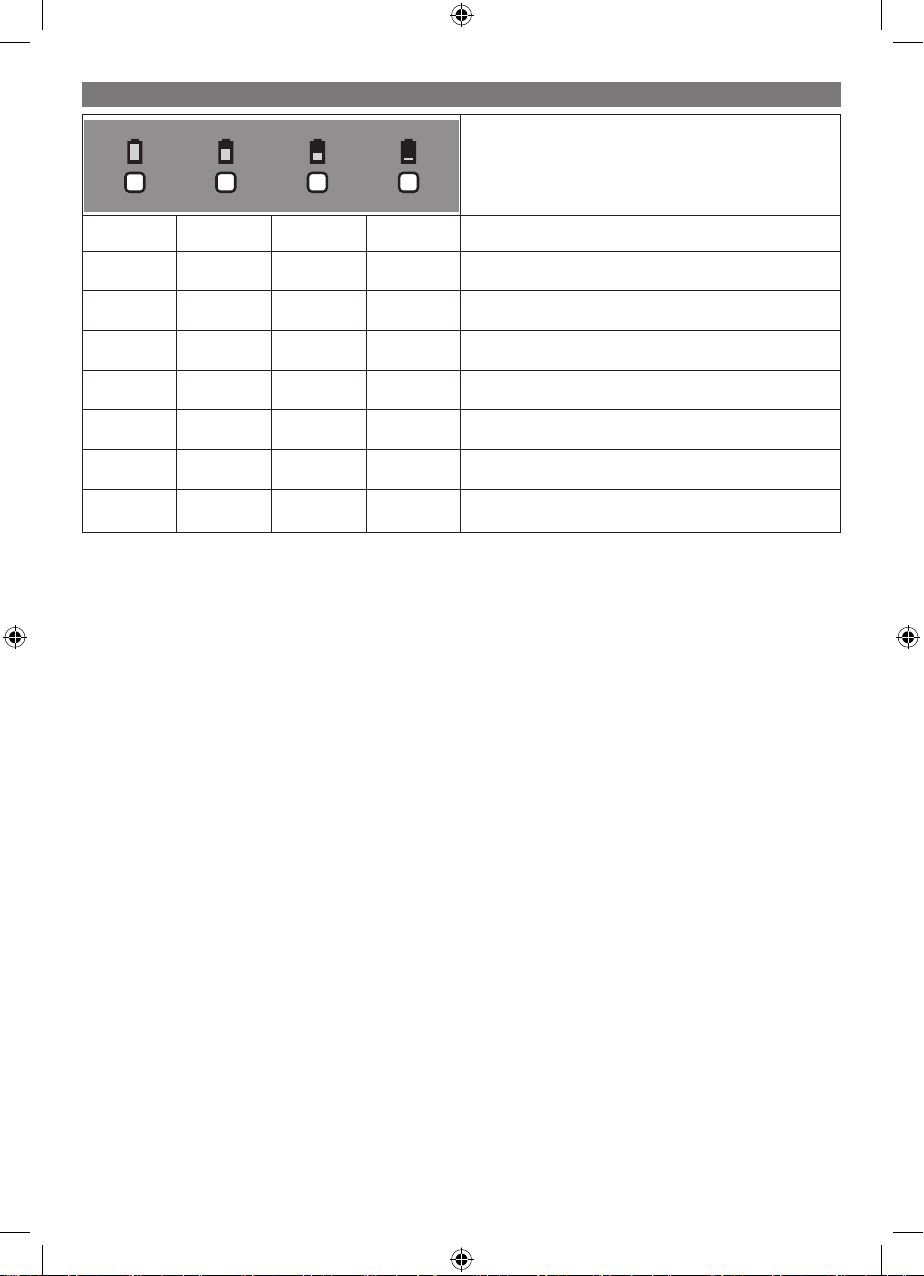
BATTERY PACK FEATURES
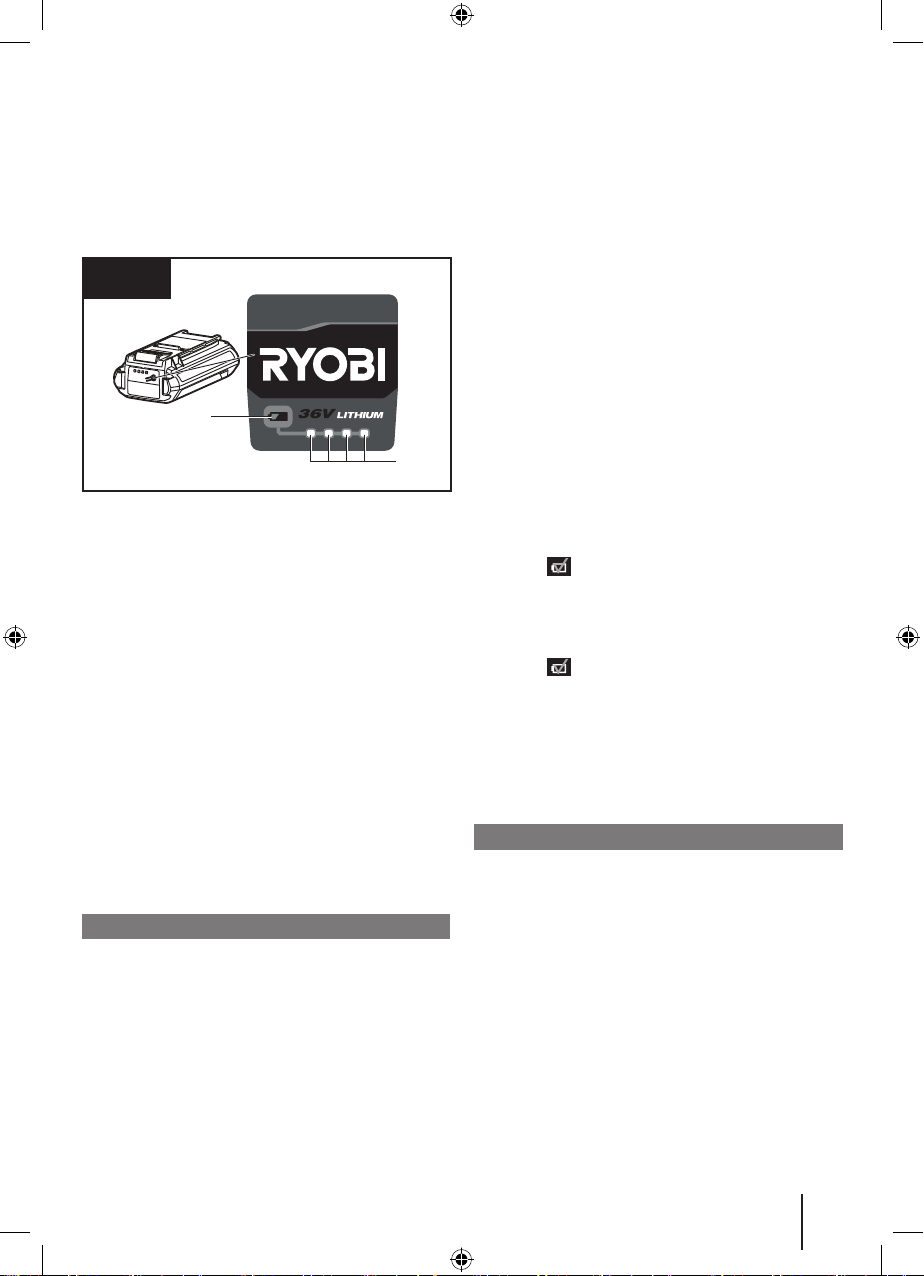
FUEL GAUGE
See Fig. 1
To display the amount of charge left in the battery, press the
fuel gauge button.
■If four LEDs glow green, the battery pack is fully charged.
The battery pack capacity is between 75%–100%.
■If three LEDs glow green and one is off, the battery pack
capacity is between 50%–75%.
■If two LEDs glow green and other two are off, the battery
pack capacity is between 25%–50%.
2
Original Instructions

contacts in the charger. Make sure that the latch of the
battery pack clicks into place.
4. When batteries become fully charged, unplug the
charger from the power supply and remove the battery
pack. Press the latch of the battery pack to remove the
battery pack from the charger.
■Do not place the charger and battery pack in an area of
extreme heat or cold. They work best at normal room
temperature.
NOTE: The charger and battery pack should be placed in a
location where the temperature is more than 10°C but less
than 38°C.
■The battery pack becomes slightly warm to the touch
while charging. This is normal and does not indicate a
problem.
■After charging is complete, the charger green LED
remains on for approximately 5 to 10 minutes and then
turns off.
NOTE: LED indicators on chargers may vary. Refer to
the operator’s manual provided with the product.
■If the battery pack has been removed from the charger
or the charger has been removed from the power supply,
the battery pack indicator LED turns off after a few
seconds.
CHARGING A HOT BATTERY PACK
If the battery pack is above normal temperature range, the
LED of the icon turns on or ashes. When the battery
pack cools down to below 45°C, the charger automatically
begins fast charge mode.
CHARGING A COOL BATTERY PACK
If the battery pack is below normal temperature range, the
LED of the icon turns on or ashes. When the battery
warms to a temperature of more than 5°C, the charger
automatically begins charge mode.
COLD WEATHER OPERATION
The lithium-ion battery pack can be used in temperatures
down to –10°C. Put the battery pack on a tool and use the
tool in a light-duty application. After about a minute, the pack
will have warmed up and begin operating normally.
MAINTENANCE AND STORAGE
RYOBI battery packs have been designed to provide
maximum trouble-free life. However, like all batteries, they
will eventually wear out. Do not disassemble battery pack
and attempt to replace the battery cells. Handling of these
batteries, especially when wearing rings and jewelry, could
result in a serious burn.
To obtain the longest possible battery life, follow these
storage instructions
■Remove the battery pack from the charger it is fully
charged and ready for use. For battery pack storage
longer than 30 days:
●Store the battery pack where the temperature is
below 38°C and away from moisture.
●Store battery packs in a 30%–50% charged
condition.
●Every six months of storage, run battery with a tool
until cut off by pack’s program control. Then charge
the pack as normal.
■If only one LED glows green and others are off, the
battery pack capacity is lower than 25%. In this case,
the battery pack can be used as usual until automatically
turned off by the control program.
■If only one LED glows green but battery pack can not
release power, the battery pack needs to be charged.
As the battery pack ages, the accuracy of the dierent LED
indicators may change. Use the percentages as a guide
only.
2
1
1. Fuel gauge button
2. LED
BATTERY PROTECTION FEATURES
RYOBI 36V lithium-ion battery packs are designed with
features that protect the lithium-ion cells and maximise
battery life. If the tool stops during use, it may be caused
by the following:
■The maximum current draw of the battery pack has been
exceeded, causing it to automatically stop powering the
tool. Release and pull the trigger or remove and reinstall
the battery pack to reset the tool.
■Excessive temperatures can cause the battery to stop
powering the tool. If the battery pack is too warm, allow
it to cool down.
If the tool still does not work, the battery may not be
suciently charged. Recharge the battery.
NOTE: The battery pack LED indicator will not work if the
battery protection feature has caused the battery pack
to stop powering the tool. Release and pull the trigger or
remove and reinstall the battery pack. Check the fuel gauge
if the battery pack LED indicator has resumed normal
function.
CHARGING THE BATTERY PACK
Battery packs are shipped in a low charge condition. Charge
them until the green LED on the front of the charger stops
ashing and stays solid green.
Use a battery pack only with the recommended charger. If
the charger does not charge the battery pack under normal
circumstances, contact an authorised service centre for
related advice.
1. Connect the charger to the power supply. Make sure
that the power supply is the normal household voltage,
220–240 V AC, 50 Hz.
2. Slide the battery pack along the groove of the charger.
3. Press down on the battery pack to make sure that the
contacts on the battery pack engage properly with
Fig.1
3
Original Instructions

BATTERY PACK REMOVAL AND PREPARATION FOR
RECYCLING
To preserve natural resources, recycle or dispose of
batteries properly.
This product contains lithium-ion batteries. Local regulations
may prohibit disposal of lithium-Ion batteries in ordinary
trash.
Consult your local waste authority for information regarding
available recycling or disposal options.
WARNING! Upon removal, cover the battery pack’s
terminals with heavy-duty adhesive tape. Do not attempt
to destroy or disassemble battery pack or remove any of
its components. Lithium-ion batteries must be recycled or
disposed of properly. Never touch both terminals with metal
objects or body parts as short circuit may result. Keep
battery packs away from children. Failure to comply with
these warnings could result in re and/or serious injury.
SYMBOLS
Safety alert
Read the instructions carefully before
using the product.
Recycle lithium-ion batteries
Regulatory Compliance Mark (RCM).
The product meets applicable regulatory
requirements.
Waste electrical products should not
be disposed of with household waste.
Recycle where facilities exist. Check
with your local authority or retailer for
recycling advice.
20210906v1
4
Original Instructions

BATTERY PACK LED INDICATION DESCRIPTIONS
Status
O O O Flashing Charging: The battery pack capacity is lower than 25%.
O O Flashing On Charging: The battery pack capacity is between 25% and 50%.
O Flashing On On Charging: The battery pack capacity is between 50% and 75%.
Flashing On On On Charging: The battery pack capacity is between 75% and 100%.
On On On On Fully charged
O O O O One minute after full charge, all LEDs on the battery are o, charger
LED is on with green color.
Flashing O O Flashing Over temperature protection; remove the battery and allow it to cool
down.
O Flashing Flashing O Overload protection; release and pull the trigger or remove and
reinstall the battery pack to reset the tool.
If your battery shows any LED sequence other than what is in the table, contact RYOBI online at Ryobi.com.au for Australia
or Ryobi.co.nz for New Zealand.


BACK PAGE
Imported by:
Techtronic Industries Australia Pty Ltd
31 Gilby Road, Mount Waverley, VIC 3149
Melbourne, Australia
Techtronic Industries N.Z. Limited
Unit C, 70 Business Parade South,
Highbrook, Auckland 2013, New Zealand
RYOBI is a trade mark of Ryobi Limited, and is used under license.
© 2021 Techtronic Cordless GP.
960012035-01
This manual suits for next models
2
Table of contents
Other Ryobi Batteries Pack manuals