Ryobi RC254O User manual

ORIGINAL INSTRUCTIONS
Petrol Cultivator
RC254O

Important!
It is essential that you read the instructions in this manual before assembling,
operating, and maintaining the product.
Subject to technical modification.

1
Safety, performance, and dependability have been given
top priority in the design of your petrol cultivator
INTENDED USE
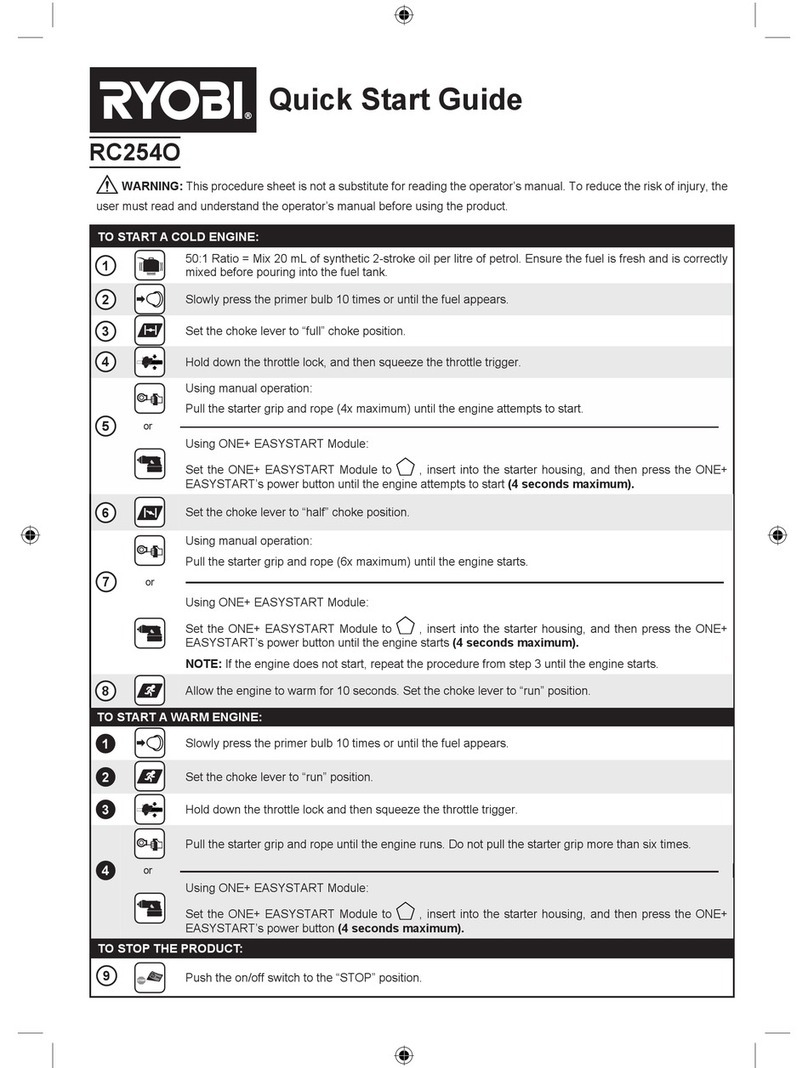
The product is only intended for use outdoors by a standing
operator walking with the product. For safety reasons,
the product must be adequately controlled by using two-
handed operation at all times.
The product is designed for cultivating or loosening soil
in an open domestic garden area. The maximum working
depth of the product is 19.68 cm.
The product should never be operated with the wheels off
the ground. It should not be ridden on. The product should
only be used as described in this manual and should not be
used for any other purpose.
WARNING
When using the product, the safety rules must be
followed. For your own safety and that of bystanders,
please read these instructions before operating the
product. Please keep the instructions safe for later use.
GENERAL SAFETY WARNINGS
WARNING
Read all safety warnings and all instructions. Failure
to follow the warnings and instructions may result in
electric shock, re and/or serious injury.
Save all warnings and instructions for future reference.
TRAINING
■Read, understand, and follow all instructions on the
machine and in the manual(s) before starting. Be
thoroughly familiar with the controls and the proper use
of the equipment. Know how to stop the machine and
disengage the controls quickly.
■Never allow children to operate the equipment. Never
allow adults to operate the equipment without proper
instruction.
■Keep the area of operation clear of all persons,
particularly small children, and pets.
PREPARATION
■Thoroughly inspect the area where the equipment is to
be used and remove all foreign objects.
■Disengage all clutches and shift into neutral before
starting the engine (motor).
■Do not operate in shorts or open toed shoes. Wear
proper Personal Protective Equipment (PPE) at all
times, such as gloves, proper footwear, and eye
protection.
■Safe handling of gasoline:
●Extinguish all cigarettes, cigars, pipes, and other
sources of ignition.
●Use only an approved gasoline container.
●Never remove gas cap or add fuel with the engine
running.
●Allow engine to cool before refueling.
●Never refuel the machine indoors.
●Never store the machine or fuel container where
there is an open flame, spark, or pilot light such as
on a water heater or on other appliances.
●Never fill containers inside a vehicle or on a truck
or trailer bed with a plastic liner. Always place
containers on the ground away from your vehicle
before filling.
●Remove gas powered equipment from the truck
or trailer and refuel it on the ground. If this is not
possible, then refuel such equipment with a portable
container, rather than from a gasoline dispenser
nozzle.
●Keep the nozzle in contact with the rim of the fuel
tank or container opening at all times until fueling
is complete. Do not use a nozzle lock open device.
●If fuel is spilled on clothing, change clothing
immediately.
●Never overfill fuel tank. Replace gas cap and
tighten securely.
●If fuel is spilled, do not attempt to start the engine
but move the machine away from the area of
spillage and avoid creating any source of ignition
until fuel vapors have dissipated.
■Use extension cords and receptacles as specied by
the manufacturer for all machines with electric drive
motors or electric starting motors.
■Never attempt to make any adjustments while the
engine (motor) is running (except where specically
recommended by the manufacturer).
OPERATION
■Do not allow hands, feet, or other body parts or clothing
near the rotating tines or any other moving part. The
tines begin to rotate once the engine/motor is started
and the activating device is engaged. The tines may
momentarily rotate after the activating device is
released.
■Exercise extreme caution when crossing gravel
surfaces. Stay alert for hidden hazards or traffic.
■After striking a foreign object, stop the engine (motor),
remove the wire from the spark plug (or disconnect
the cord for electric products), thoroughly inspect the
machine for any damage, and repair the damage before
restarting and operating the machine.
■Exercise caution to avoid slipping or falling.
■If the machine should start to vibrate abnormally, stop
the engine (motor) and check immediately for the
cause. Vibration is generally a warning sign of trouble.
■Stop the engine (motor) when leaving the operating
position, before unclogging the tines, and when making
any repairs, adjustments, and inspections.
■Stop the engine (motor) when leaving the machine
unattended.
■Before cleaning, repairing, or inspecting, shut off the
engine and make certain all moving parts have stopped.
Disconnect the spark plug wire, and keep the wire away
from the plug to prevent accidental starting. Disconnect
the cord on electric motors.
■Do not operate the engine in a confined space where
dangerous carbon monoxide fumes can collect.
■Never operate the machine without proper shields and
guards or other safety protective devices in place.
■Do not overload the machine capacity by attempting to
till or cultivate too deep at too fast a rate.
■Never operate the machine at high transport speeds on
hard or slippery surfaces.
■Never allow bystanders near the machine, especially
small children.

2
■Use only attachments and accessories approved by the
manufacturer of the machine (such as wheel weights,
counterweights, and the like).
■Never operate the tiller without good visibility or light.
■Be careful when tilling in hard ground. The tines may
catch in the ground and propel the tiller forward. If this
occurs, let go of the handlebars and do not restrain the
machine.
■Use extreme caution when reversing or pulling the
machine towards you. To avoid getting pinned against
a structure, ensure adequate distance before reversing
near a wall or fence. For machines with powered
reverse drive capability, familiarize yourself with the
operation of the Emergency Stop Control. It provides
a secondary means of stopping power to the tines and
wheel drive in an emergency.
■Do not change the engine governor settings or over
speed the engine.
■Start the engine or switch on the motor carefully
according to instructions and with feet away from the
tines.
■Never pick up or carry a machine while the engine
(motor) is running.
■Do not operate the tiller while under the influence of
alcohol or drugs.
■Powered walk-behind tiller work is strenuous. You
must be in good physical condition and mentally alert.
If you have any condition that might be aggravated
by strenuous work, check with your doctor before
operating a powered walk-behind tiller.
MAINTENANCE AND STORAGE
■Keep machine, attachments, and accessories in safe
working condition.
■Check shear bolts, engine mounting bolts, and other
bolts at frequent intervals for proper tightness to be sure
the equipment is in safe working condition.
■Never store the machine with fuel in the fuel tank inside
a building where ignition sources are present, such
as hot water and space heaters, clothes dryers, and
the like. Allow the engine to cool before storing in any
enclosure.
■Always refer to the operator’s manual for important
details if the tiller is to be stored for an extended period.
■If the fuel tank has to be drained, do this outdoors.
■Follow manufacturer’s recommendations for safe
loading, unloading, transport, and storage of machine.
CULTIVATOR SAFETY WARNINGS
■Wear a face filter in dusty conditions to reduce the risk
of injury associated with the inhalation of dust.
■Never pick up or carry the product while the motor is
running.
■Do not operate the product near underground electric
cables, telephone lines, pipes, or hoses.
■Use the product only in daylight or good artificial light.
■Do not walk backwards when using the product.
■Do not use the product near drop-offs, ditches,
excessively steep slopes, or embankments. Poor
footing could cause a slip-and-fall accident.
■Exercise extreme caution when working on difficult
soil. If the soil is very hard, water a few days before
cultivation.
■Avoid working the soil when soggy or wet. Wait a day or
two after heavy rain for the ground to dry.
■Keep hands and feet away from the rotating tines at
all times and especially when switching on the motor.
■Beware of objects thrown by the rotating tines. Clear
debris like small stones, gravel, and other foreign
objects from the work area before starting operation.
Wires or string may become entangled with the rotating
tines.
■Beware, the tines continue to rotate after the motor is
switched off.
■Always ensure that ventilation openings are kept clear
of debris.
■Make sure that all the protective devices are fitted and
in good condition.
■Do not modify the product in any way as this may
increase the risk of injury to yourself or others.
CAUTION
The product may bounce upward and/or jump forward
if the tines strike extremely hard packed soil, frozen
ground, or buried obstacles such as large stones, roots,
and stumps.
CAUTION
Before moving the product from one area to another,
switch off the motor, and wait for the tines to come to a
complete stop. Be careful not to let the tines touch the
ground while moving the product. The tines, as well as
the product itself, may be damaged even if the motor is
switched off.
OPERATING TIPS
■To reduce the risk of injury from contact with the moving
parts or from thrown objects, the operator must stand
behind the handlebar. Never stand to the side or forward
of the handlebars while the product is in operation.
■Always wear eye protection. Always wear non-slip
safety footwear when operating the product.
■While the product will cut and help clear underground
vegetation and roots, the tines could become tangled
in heavy vegetation or stubble above ground. Clear the
area to be cultivated with a brushcutter or other similar
means and prepare the ground by removing any large
debris, such as stones, bricks, and metal poles from
the surface.
■Keeping hands and feet away from the tines, start the
motor with the tines slightly above the ground surface
by pressing the switch lock followed by the on/off
switch. While securely holding the handlebars, lower
the tines onto the ground. The product may try to pull
itself forward at this point depending upon the hardness
of the ground. Resist the pull of the product to go
forward, and the tines should start to bury themselves
into the ground. If they do not, use a reverse-and-
forward (about 20 cm is sufficient) or a slight rocking-
up-and-down motion of the handlebar to assist the tines
to get to their working depth.
■You may alter the depth in the ground of the tines by
moving the wheels closer to or further from the tines.
Once the tines are in the ground to the depth required,
slowly move the product forward, letting the motor do
the work. If the tines strike some object too hard to move
or cut, the product may raise its height as the tines try to
pass over the obstruction. Stop the product and allow
3
the tines to cease all movement before attempting to
investigate or remove the obstruction.
■If the ground to be cultivated is hard or dry, it is better
to water the ground, but do not soak it completely and
allow time for the water to penetrate the ground and for

the excess to drain away before attempting to cultivate.
TRANSPORTATION AND STORAGE
■Stop the product and make sure that all moving parts
have come to a complete stop. Allow the product to cool
down before storing or transporting.
■Clean all foreign materials from the product. Store the
product in a cool, dry, and well-ventilated place that
is inaccessible to children. Keep away from corrosive
agents such as garden chemicals and de-icing salts.
Do not store outdoors.
■Wipe the tines with oil or spray them with silicone
lubricant to prevent rusting. Beware of sharp or
damaged edges on tines.
■Oil all visible moving parts. Do not remove the motor
cover.
■For transportation in a vehicle, secure the product
against movement or falling to prevent injury to persons
or damage to the product.
MAINTENANCE
WARNING
Use only original manufacturer’s replacement parts,
accessories and attachments. Failure to do so can
cause possible injury, poor performance, and may void
your warranty.
WARNING
Servicing requires extreme care and knowledge
and should be performed only by a qualied service
technician. For service, we suggest you take the product
to the nearest authorised service centre. When servicing,
use only identical replacement parts.
WARNING
Do not at any time let brake uids, gasoline, petroleum-
based products, or penetrating oils come in contact with
plastic parts. They contain chemicals that can damage,
weaken, or destroy plastic.
WARNING
The tines are sharp. Use caution and wear heavy-duty
gloves when tting, replacing, cleaning, or checking bolt
security.
■Switch off and make sure all moving parts have come
to a complete stop before conducting any maintenance
or cleaning work.
■Check all nuts, bolts, and screws at frequent intervals
for proper tightness to ensure the product is in safe
working condition.
■Never store the product with petrol in the tank inside
a building where fumes may reach an open flame or
spark.
■Allow engine to cool before storing in any enclosure.
■To reduce the fire hazard, keep the engine, silencer,
battery compartment or petrol storage area free of
grass, leaves or excessive grease.
■Replace worn or damaged parts for safety.
■You may only make adjustments or repairs described
in this manual. For other repairs, contact the authorised
service centre.
■If the fuel tank has to be drained, do this outdoors.
■Avoid using solvents when cleaning plastic parts. Most
plastics are susceptible to damage from various types
of commercial solvents and may be damaged by their
use. Use clean cloths to remove dirt, dust, oil, or grease.
■After each use, clean the body and handles of the
product with a soft, dry cloth, and clean the debris from
the tines with a stiff brush.
■Only the parts shown on the replacement part list are
intended to be repaired or replaced by the customer.
RESIDUAL RISKS
Even when the product is used as prescribed, it is still
impossible to completely eliminate certain residual risk
factors. The following hazards may arise in use and the
operator should pay special attention to avoid the following:
■Injury caused by vibration
–Always use the right tool for the job. Use designated
handles and restrict working time and exposure.
■Injury caused by noise
–Exposure to noise can cause hearing injury. Wear
ear protection and limit exposure.
■Injury from contact with the tines
■Injury caused by thrown objects.
RISK REDUCTION
It has been reported that vibrations from handheld tools
may contribute to a condition called Raynaud’s Syndrome.
Symptoms may include tingling, numbness and blanching
of the ngers, usually apparent upon exposure to cold.
Hereditary factors, exposure to cold and dampness, diet,
smoking, and work practices are all thought to contribute
to the development of the these symptoms. There are
measures that can be taken by the operator to possibly
reduce the effects of vibration:
■Keep your body warm in cold weather. When
operating the unit, wear gloves to keep the hands and
wrists warm. It is reported that cold weather is a major
factor contributing to Raynaud’s Syndrome.
■After each period of operation, exercise to increase
blood circulation.
■Take frequent work breaks. Limit the amount of
exposure per day.
If you experience any of the symptoms of this condition,
immediately discontinue use and see your physician.
WARNING
Injuries may be caused, or aggravated, by prolonged
use of a tool. When using any tool for prolonged periods,
take regular breaks.
WHAT’S IN THE BOX
■Cultivator attachment x1
■Petrol powerhead x1
■Handle x1

4
■Lubricant x1
■Wrench x2
■Felt washer x2
■Hitch pin x2
■Tiller shield guard x1
■Bolt x4
■Nut x4
■Outer tine A x1
■Inner tine B x1
■Inner tine C x1
■Outer tine D x1
■Harness x1
■Operator’s manual x1
SYMBOLS ON THE PRODUCT
Safety alert
Read and understand all instructions
before operating the product, follow all
warnings and safety instructions.
Beware of thrown or ying objects.
Keep all bystanders, especially children
and pets, at least 15 m away from the
operating area.
Keep feet and hands away from
rotating tines.
Wear ear protection.
Wear eye protection.
Do not expose to rain or damp
condition.
The product is not intended for use
with a toothed saw type blade.
Warning! Hot surface.
Primer bulb.
“FULL” choke position.
"HALF" choke position.
“RUN” position.
Allow the engine to run for 10 seconds.
Pull the starter grip until the engine
starts.
Squeeze trigger.
Press the primer bulb 10 times.
86.7 dB(A)
Per ANSI B175.2
Guaranteed sound pressure level.
Waste electrical products should not
be disposed of with household waste.
Please recycle where facilities exist.
Check with your local authority or
retailer for recycling advice.
Regulatory Compliance Mark (RCM).
Product meets applicable regulatory
requirements.
SYMBOLS IN THIS MANUAL
Parts or accessories sold separately
Note
Warning
The following signal words and meanings are intended to
explain the levels of risk associated with this product.
DANGER
Indicates an imminently hazardous situation, which, if
not avoided, will result in death or serious injury.
WARNING
Indicates a potentially hazardous situation, which, if not
avoided, could result in death or serious injury.
CAUTION
Indicates a potentially hazardous situation, which, if not
avoided, may result in minor or moderate injury.
CAUTION
Without safety alert symbol
Indicates a situation that may result in property damage.

5
WHAT’S IN THE BOX
x 2
x 4
x 1
x 1
x 4
x 1
A
BCD
x 1 x 1
x 1
x 1 x 1
x 1
x 1
x 2

6
KNOW YOUR PRODUCT
12 3
4
5
6
7
8
9
15
16
17
19
18
20
21
22
10
11
12
13
14
1. Starter grip
2. Primer bulb
3. E-starter housing
4. Fuel cap
5. Muffler
6. Spark plug
7. Spark arrestor
8. Air filter
9. Hitch pin
10. Felt washer
11. Shield
12. Gear box
13. Outer tine
14. Inner tine
15. Lower shaft
16. Handle knob
17. Handle
18. Hanger cap
19. Switch button
20. Throttle trigger
21. Trigger lock
22. Choke lever

7
1
2
1
2
3
4
32
1
DC
1
23
A
B
4
1 3 52 4 6
GETTING STARTED GETTING STARTED GETTING STARTED GETTING STARTED
ABC
D
A
B
C
D
4
1
2
3
(50 : 1)
50 : 1 / 2%
10 11
Use synthetic 2-stroke lubricant only. Do not use automotive
lubricant or 2-stroke outboard lubricant. Mix 2% synthetic 2-stroke
lubricant into the petrol. This is a 50:1 ratio.
Loosen the fuel cap. Remove the fuel cap. Carefully pour fuel
mixture into the tank. Avoid spillage. Immediately replace fuel cap
and hand tighten.
1
2
1
23
7 8
Attach the lower shaft. Tighten the knob securely. Install the D-handle.
9
Attach the shoulder strap.
Always wear safety goggles or safety glasses with side
shields when operating the product. Failure to do so could
result in objects being thrown into your eyes resulting in
possible serious injury.
Release the hook. Install the metal cover. Place tine B on the tine shaft to the right of the gear box.
The stamped side of the tine should face away from the
gear box. Place a felt washer on the tine shaft. Place the
outer tine labeled A on the right side of the tine shaft. The
stamped side should face in toward tine B. To secure the
tines to the tine shaft, insert the hitch pin into the holes
located on the side of the tine shaft.
Install and tighten the screw onto the metal cover. Place tine C on the tine shaft to the left of the gear box. The
stamped side of the tine should face away from the gear
box. Place a felt washer on the tine shaft. Place the outer
tine labeled D on the left side of the tine shaft. The stamped
side should face in toward tine C. To secure the tines to the
tine shaft, insert the hitch pin into the holes located on the
side of the tine shaft.
NOTE: The unit will not operate properly if the tines are installed incorrectly.

8

9
OVERVIEW
p.11 p.12
p.15 p.17
p.13
Starting a cold engine Starting a warm engine Starting a cold engine by
e-starter
Starting a warm engine by
e-starter Four-tine operation

10
OVERVIEW
p.19
p.22
p.21
p.23
Cleaning the tines Replacing the spark plug
Cleaning the air filter Storing the cultivator

11
STARTING PROCEDURE
x10
12
4x
VI
1
2
3
1
2
6x
VI
1
2
3
4
3
12
4
STARTING A COLD ENGINE
1. Lay the product on the ground. Ensure
that the cutting means will not contact
anything when it starts to rotate. Press
the primer bulb 10 times.
NOTE: After the 7th press, the fuel
should be visible in the primer bulb. If
not, continue pressing until the fuel is
visible.
Set the choke lever to choke position.
2. Hold down the throttle lock and then
squeeze the throttle trigger completely
and pull the starter grip until the engine
attempts to start. Do not pull the starter
grip more than 4 times. Keep the throttle
trigger squeezed completely through
step 4.
3. Set the choke lever to choke position.
Pull the starter grip until the engine
starts. Do not pull the starter grip more
than 6 times.
NOTE: If the engine does not start,
repeat the procedure from setting the
choke lever to choke position.
4. Allow the engine to run for 10 seconds,
then set the choke lever to position.
44
66

12
STARTING PROCEDURE
x10
12
6x
VI
1
2
3
1
2
STARTING A WARM ENGINE
1. Lay the product on the ground. Ensure
the cutting means will not contact
anything when it starts to rotate. Press
the primer bulb 10 times. Set the choke
lever to position.
2. Hold down the throttle lock and then
squeeze the throttle trigger completely
and pull the starter grip until the engine
starts. Do not pull the starter grip more
than 6 times.
NOTE: If the engine does not start
by following this procedure, follow
the Starting a Cold Engine procedure
section in this manual.
If the engine still fails to start, see the
solution instruction for the “Flooded
engine” in the “Troubleshooting” section
of this manual.
66

13
STARTING PROCEDURE
2
x10
1
2
1
3
STARTING A COLD ENGINE BY ELEC-
TRICAL STARTER
1. Install the starter bit into the electrical
starter with the pentagon bit facing
outside. Push the F/R button to the left
until the pentagon symbol shows on the
F/R button.
2. Insert the battery pack into the electrical
starter until it clicks into place.
WARNING: Keep your hands away from
the starter bit to avoid injury.
3. Lay the product on the ground. Ensure
that the cutting means does not come in
contact with anything. Press the primer
bulb 10 times.
NOTE: After the 7th press, the fuel
should be visible in the primer bulb. If
not, continue pressing until the fuel is
visible.
Set the choke lever to choke position.
1
2
1

14
STARTING PROCEDURE
1
2
4s
VI
4s
VI
4
3
4
1
2
6
1
2
7
1
2
3
4s
VI
4s
VI
4
5
4. Hold down the throttle lock and then
squeeze the throttle trigger completely
with your left hand and keep the throttle
trigger squeezed completely through
steps 6.
Hold the product with one hand and use
your other hand to insert the starter drive
shaft into the engine starter housing.
Make sure the starter bit is properly
engaged.
Press and hold the electrical starter
switch button until the engine attempts to
start. Do not press the electrical starter
for more than 4 seconds.
5. Set the choke lever to choke
position.
Hold down the throttle lock and then
squeeze the throttle trigger.
Press and hold the electrical starter
switch button until the engine starts. Do
not press the electrical starter for more
than 4 seconds.
NOTE: If the engine does not start,
repeat the procedure from setting the
choke lever to choke position. Do not
repeat the procedure more than 1 time.
If the engine still fails to start, see the
solution instruction for the “Flooded
engine” in the “Troubleshooting” section
of this manual.
6. Allow the engine to run for 10 seconds,
and then set the lever to position.
7. Hold down the throttle lock and then
squeeze the throttle trigger to start using
the product.

15
STARTING PROCEDURE
x10
12
2
3
STARTING A WARM ENGINE BY ELEC-
TRICAL STARTER
1. Install the starter bit into the electrical
starter with the pentagon bit facing
outside. Push the F/R button to the left
until the pentagon symbol shows on the
F/R button.
2. Insert the battery pack into the electrical
starter until it clicks into place.
WARNING: Keep your hands away from
the starter bit to avoid injury.
3. Lay the product on the ground and make
sure that the cutting means does not
come in contact with anything. Press the
primer bulb 10 times.
Set the choke lever to position.
1
2
1

16
STARTING PROCEDURE
1
2
3
4s
VI
4s
VI
4
4
1
2
5
4. Hold down the throttle lock and then
squeeze the throttle trigger completely
with your left hand and keep the throttle
trigger squeezed completely. Hold the
product with one hand and use your
other hand to insert the starter drive
shaft into the engine starter housing.
Make sure the starter bit is properly
engaged.
NOTE: If the engine does not start,
repeat the procedure from setting the
choke lever to choke position. Do not
repeat the procedure more than 1 time.
If the engine still fails to start, follow
the Starting a Cold Engine procedure
section in this manual.
If the engine does not start after
following the Starting a Cold Engine
procedure, see the solution instruction
for the “Flooded engine” in the
“Troubleshooting” section in this manual.
5. Hold down the throttle lock and then
squeeze the throttle trigger to start using
the product.

17
OPERATION
FOUR-TINE OPERATION
WARNING: Keep hands and feet away from
the rotating tines at all times.
CAUTION: The product must be adequately
controlled by using two-handed operation at
all times.
1. Hold down the throttle lock and then
squeeze the throttle trigger to start using
the product.
2. Pull and/or push the cultivator while it is
digging in the soil’s surface.
1
2
1
2

18
OPERATION
NOTE: For cultivating ease and safety,
use a forward and backward motion when
using the product.
Other manuals for RC254O
2
Table of contents
Other Ryobi Tiller manuals

Ryobi
Ryobi RY18ST25A User manual

Ryobi
Ryobi Expand-it AqTT04G User manual

Ryobi
Ryobi R36XCLV10 User manual

Ryobi
Ryobi R18CLV120 User manual

Ryobi
Ryobi 410R User manual

Ryobi
Ryobi RCP254G User manual

Ryobi
Ryobi RY36BCX30A-140 User manual

Ryobi
Ryobi RCV36 User manual

Ryobi
Ryobi RY36PP25A User manual

Ryobi
Ryobi RY15550 User manual