S.E.A. Group SE-RDA User manual
SE-RDA User Instructions 100507-03 B
Copyright © 2021 The S.E.A. Group 1
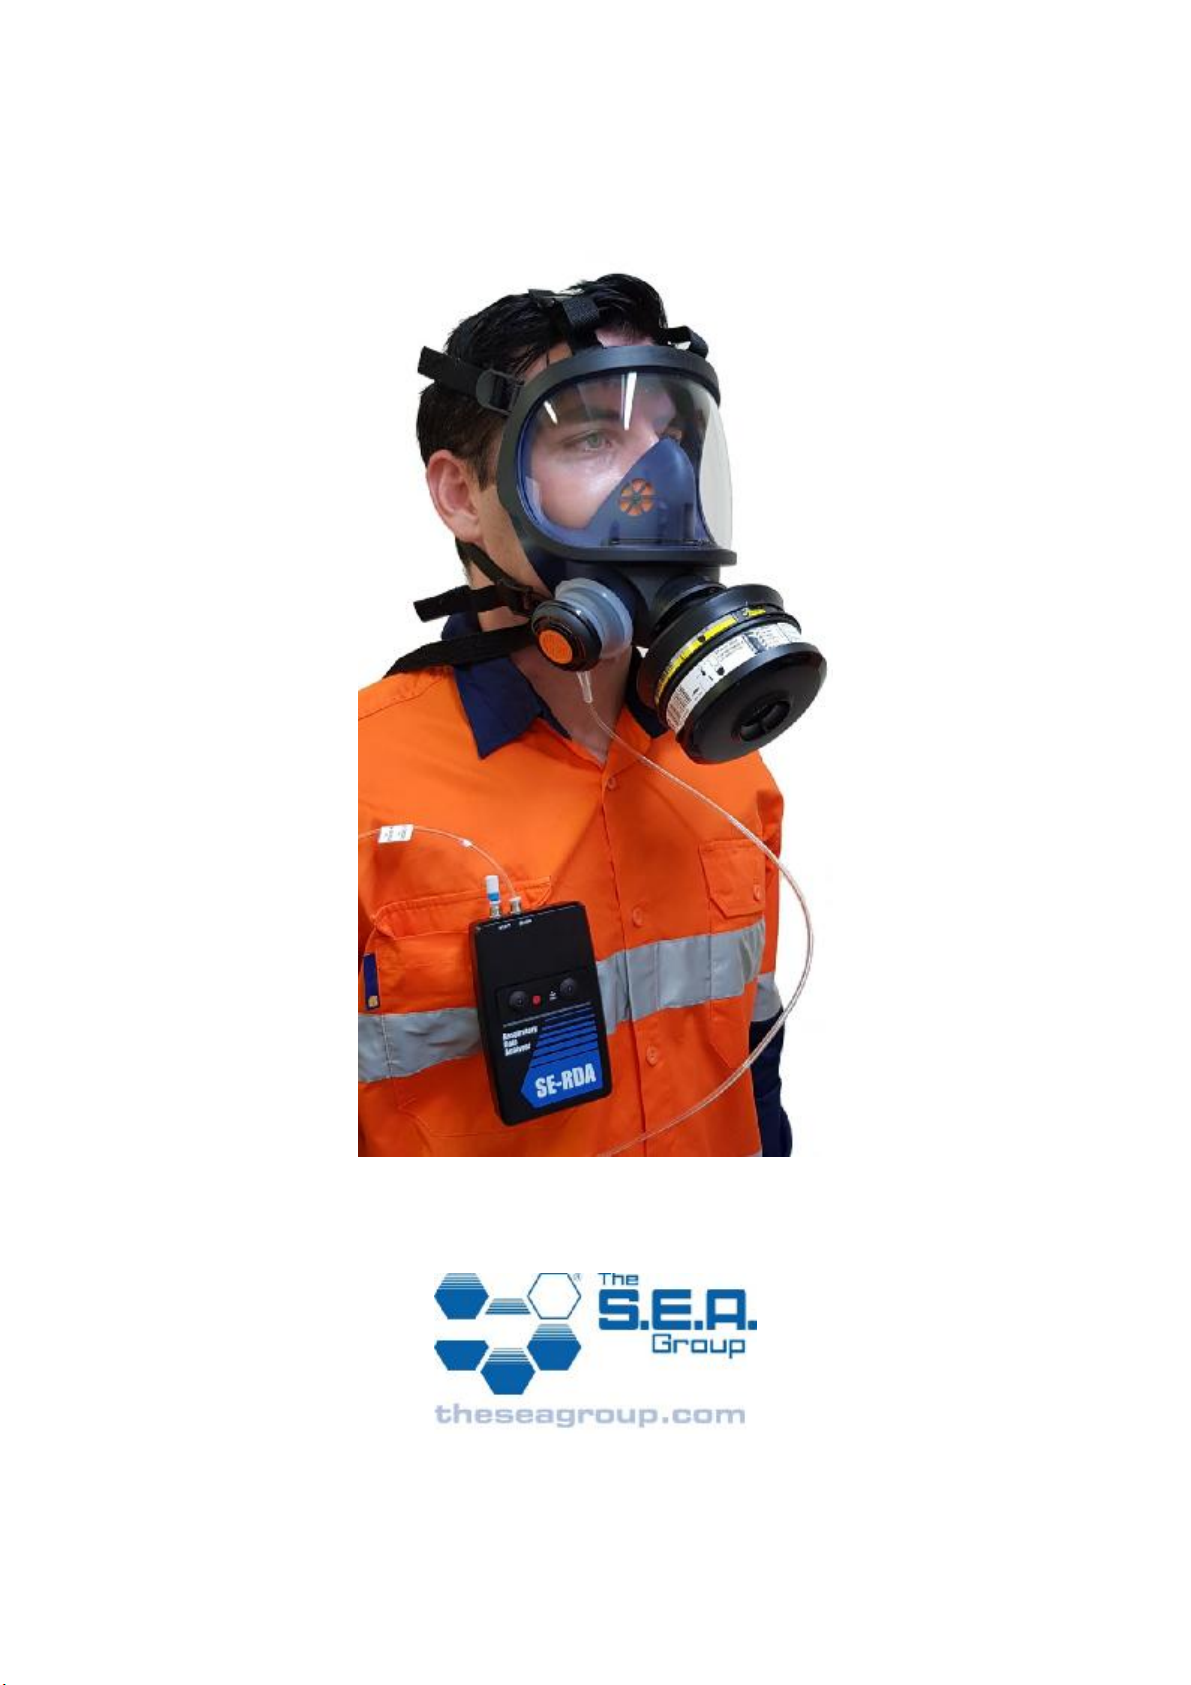
Respiratory data analyser
SE-RDA
User instructions
100507-03 B

SE-RDA User Instructions 100507-03 B
Copyright © 2021 The S.E.A. Group 2
Table of contents
Respiratory data analyser
SE-RDA
............................................................................................. 1
User instructions.............................................................................................................................. 1
Table of contents................................................................................................................................ 2
Description ......................................................................................................................................... 2
Principle of operation.......................................................................................................................... 2
Unpacking .......................................................................................................................................... 3
Components....................................................................................................................................... 4
Operation functions ............................................................................................................................ 6
Operation of the SE-RDA................................................................................................................. 10
Decontamination and cleaning......................................................................................................... 13
Packing and storage......................................................................................................................... 14
Calibration ........................................................................................................................................ 14
SE-RDA PC software....................................................................................................................... 15
Using the SE-RDA software............................................................................................................. 21
Real-time graph mode...................................................................................................................... 29
Description
The SE-RDA Respiratory Data Analyser is a portable instrument for recording and
analysing real-time flow rate and mask pressure data for unassisted filtering respirators
in real use situations in the workplace, for durations up to a full shift.
The SE-RDA may be used to provide information on the suitability of assisted filtering
respirators in particular work environments, and to assess the adequacy of the positive
pressure air delivery rate in those environments.
The SE-RDA unit is supplied with a detachable adapter designed for use with Sundström
SR100 half-mask and SR200 full-face respirators.
Principle of operation
The SE-RDA unit is connected to a respirator via the SR100/200 adapter fitted in place of
one of the respirator’s exhalation valves. The SE-RDA unit measures and records
pressure in the breathing zone of the respirator via the pressure tube. Pressure data is
then downloaded to a computer. Using the pressure-flow characteristics of the
precalibrated filter and exhalation valve, the SE-RDA software converts pressure data to
breathing data. The breathing data may then be analysed in various ways using the SE-
RDA software.

SE-RDA User Instructions 100507-03 B
Copyright © 2021 The S.E.A. Group 3
Unpacking
The SE-RDA is supplied in its own carry case, which contains:
1. SE-RDA unit with a disposable vent port filter fitted
2. SR100/200 adapter with pressure tube
3. USB data cable
4. Sanitising face-wipe
5. Three AAA batteries (nonrechargeable)
6. USB flash drive containing installation files for SE-RDA PC software for use on
Windows PCs
7. Spare vent port filter
8. Screwdriver for battery cover fastener
9. User instructions
1
2
3
4
9
5
6
7
8
SE-RDA User Instructions 100507-03 B
Copyright © 2021 The S.E.A. Group 4
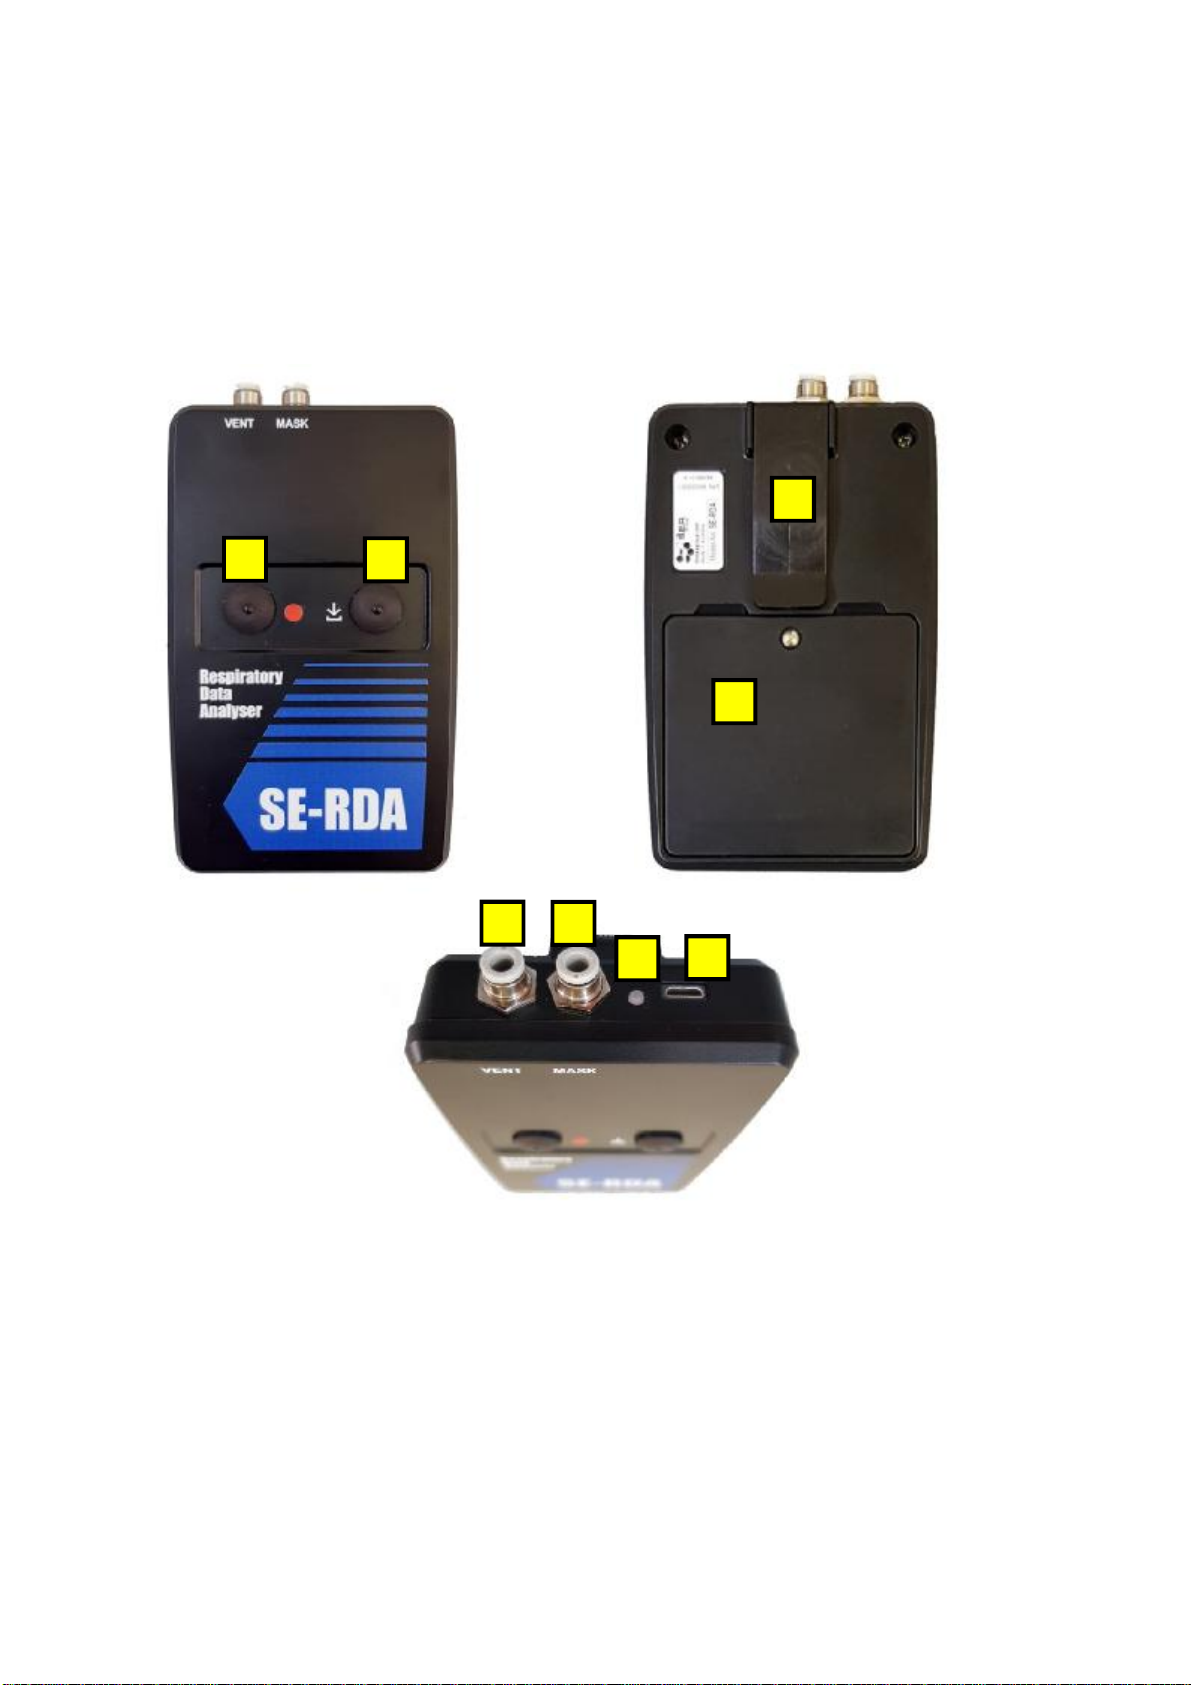
Components
SE-RDA unit
The SE-RDA unit is a small, portable, battery-powered data logging device. It may be
hand-held, pocket-mounted or belt-mounted. It is resistant to dust and water and is
suitable for use in industrial environments. The unit will run for at least ten hours on
fresh batteries.
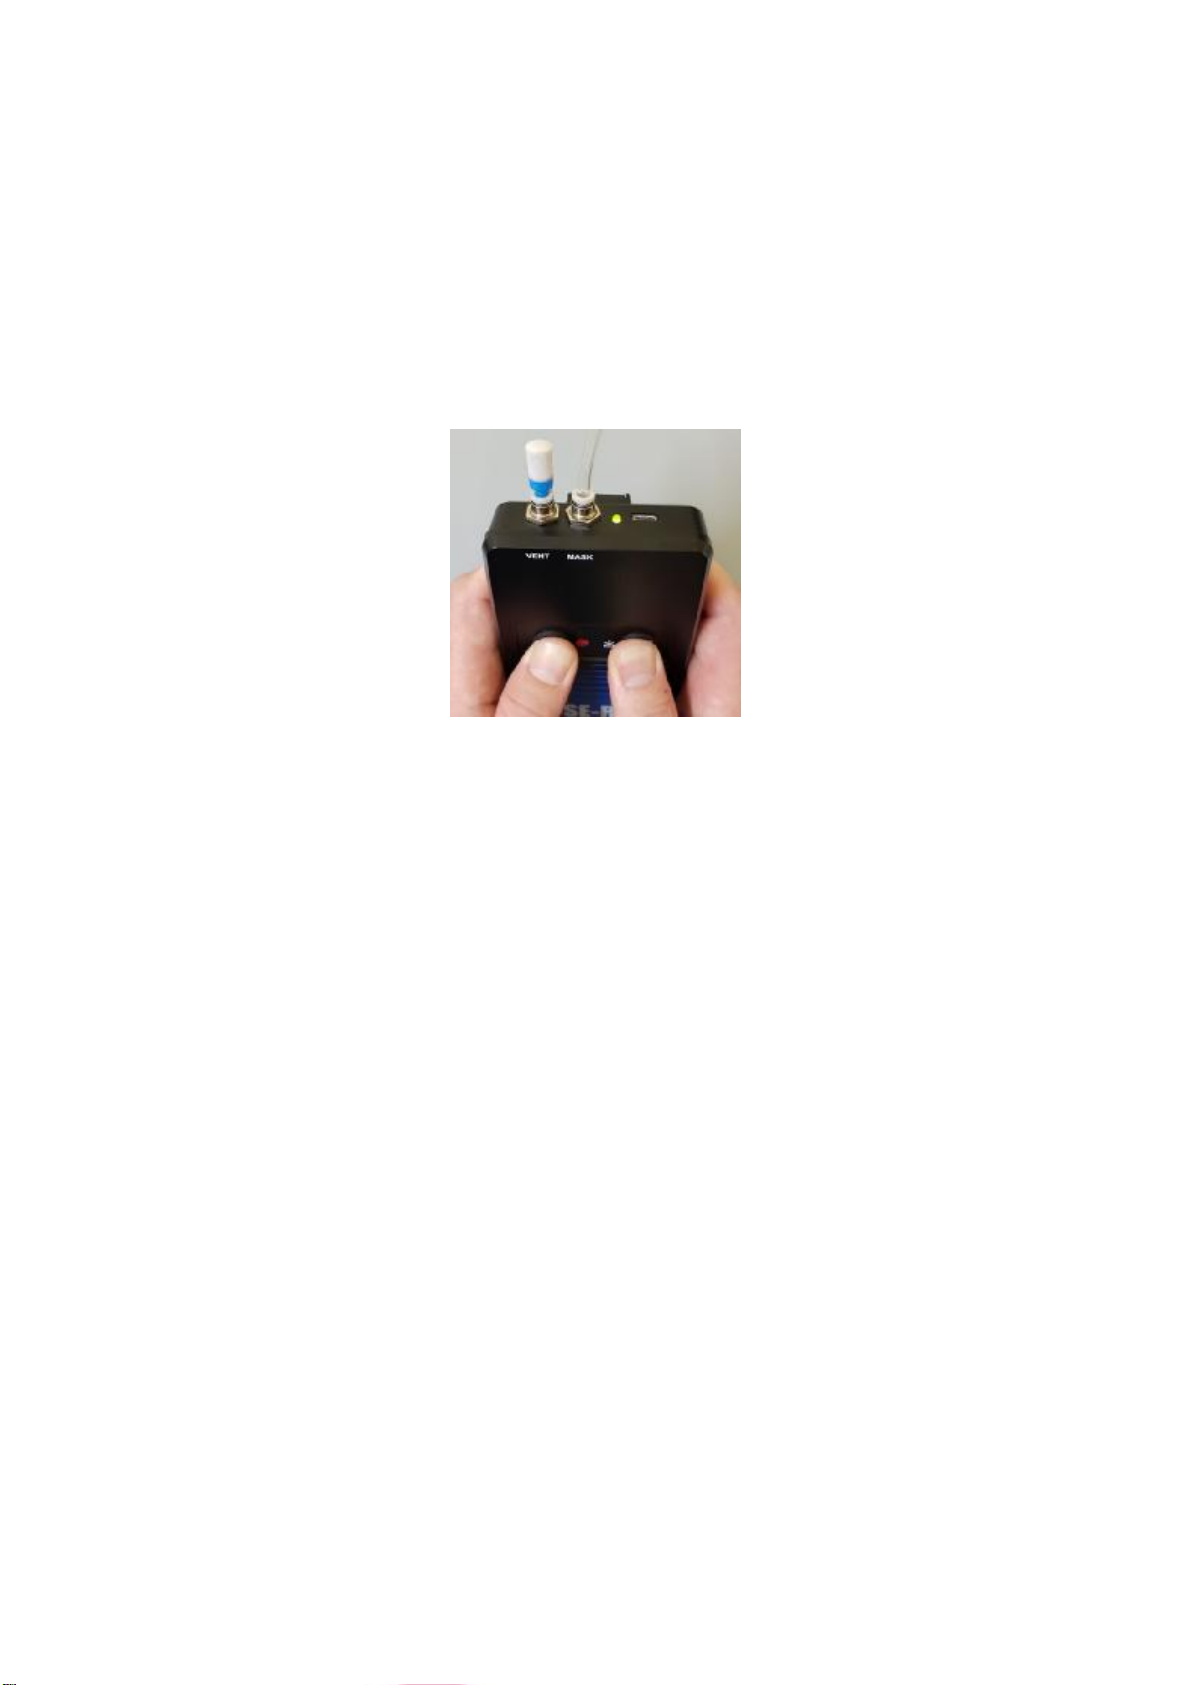
1. RECORD button
2. FUNCTION button
3. VENT port
4. MASK port
5. LED indicator
6. Micro-B USB port
7. Sealed battery compartment lid
8. Pocket clip
8
1
2
7
3
4
5
6
SE-RDA User Instructions 100507-03 B
Copyright © 2021 The S.E.A. Group 5
Precalibrated filter set
Each precalibrated filter set (supplied separately) consists of a P3 particulate filter or a
combination gas/particulate filter, including prefilter. The precalibrated filter sets are real
filters approved for use with the Sundström SR100 and SR200 respirators.
The air flow resistance characteristic of each filter set has been accurately measured in
the factory. The flow parameters Aneg and Bneg are marked on each filter set. The SE-
RDA software uses these parameters to convert the recorded mask pressure data to
inhalation flow.
Important
Each filter set may be used for a single shift only. The prefilter must always be
fitted during use. Using the SE-RDA without the prefilter will invalidate the filter
calibration and cause inaccurate flow rate measurement. Do not disassemble the
filter sets, or replace a filter in the set. If the filters are tampered with or
damaged, the filter parameters may no longer be valid.
SR100/200 adapter with pressure tube
The SE-RDA is supplied with an adapter which is suitable only for Sundström SR100 and
SR200 respirators. The adapter connects the breathing zone of the respirator to the
MASK port on the SE-RDA unit.
Each SR100/200 adapter is supplied precalibrated. It is marked with a serial number and
two filter parameters, Apos and Bpos. During exhalation, the SE-RDA logs the pressure
drop across the exhalation valve. The parameters are used to convert the pressure drop
to exhalation flow rate.
Important
Do not disassemble or tamper with the SR100/200 adapter. Doing so may
invalidate the parameters, resulting in inaccurate flow rate results.
Note: The exhalation valve has lower air resistance and less predictable air/flow
characteristic than the filters, therefore the accuracy of exhalation flow measurement will
typically be lower than for inhalation, especially at lower breathing rates.
SR100 and SR200 respirators
Any Sundström SR100 half-mask or SR200 full-face respirator may be used with the SE-
RDA, provided it is properly maintained, in good working order and used in accordance
with the user instructions.
Warning
The SR100/200 adapter’s pressure tube must be connected to the SE-RDA MASK
port AT ALL TIMES during use of the respirator. If the pressure tube is open to
the air it will provide a direct leakage path from the environment into the
breathing zone, resulting in reduced or no breathing protection.

SE-RDA User Instructions 100507-03 B
Copyright © 2021 The S.E.A. Group 6
Operation functions
Preparation for use
1. Fit or replace the batteries.
2. Check that the vent port filter is fitted to the VENT port of the SE-RDA unit, and
that it is clean and dry. Fit or replace the vent port filter as necessary. If the unit
has been decontaminated, the vent port filter must be replaced before use as it
may have become clogged during decontamination. A clogged vent port filter will
cause measurement errors.
3. Check that the transparent pressure tube is clear of kinks and obstructions. In
particular, check for the presence of water inside the tube inside the adapter.
Obstructions will cause measurement errors.
1. Ensure the wearer has been fit-tested for the type of respirator to be worn.
2. Ensure the respirator is clean and sanitised, and is fully functional.
3. Attach the SR100/200 adapter to the respirator.
4. Connect the pressure tube of the SR100/200 adapter to the SE-RDA unit.
The SE-RDA is ready for use.

SE-RDA User Instructions 100507-03 B
Copyright © 2021 The S.E.A. Group 7
Fit or replace the batteries
Before using the SE-RDA in a workplace test, new batteries should be fitted. High-quality
batteries (e.g.: Duracell or Energizer) are recommended to ensure long duration.
1. Unscrew and remove the battery cover on the rear of the SE-RDA using the
screwdriver supplied.
2. Wipe away any moisture or dust that may be present around the lip of the
battery compartment and cover. Check that the cover gasket is in place and in
good condition.
3. Remove the three batteries (if fitted).
4. Insert new AAA batteries, ensuring correct polarity as indicated inside the battery
compartment.
5. Refit the battery cover and fasten the screw. Tighten screw firmly, taking care not
to overtighten.
Note: Do not leave batteries in the SE-RDA unit for extended periods as they may leak
and cause permanent damage to the unit.
Undoing battery cover screw Removing battery cover Replacing batteries
SE-RDA User Instructions 100507-03 B
Copyright © 2021 The S.E.A. Group 8
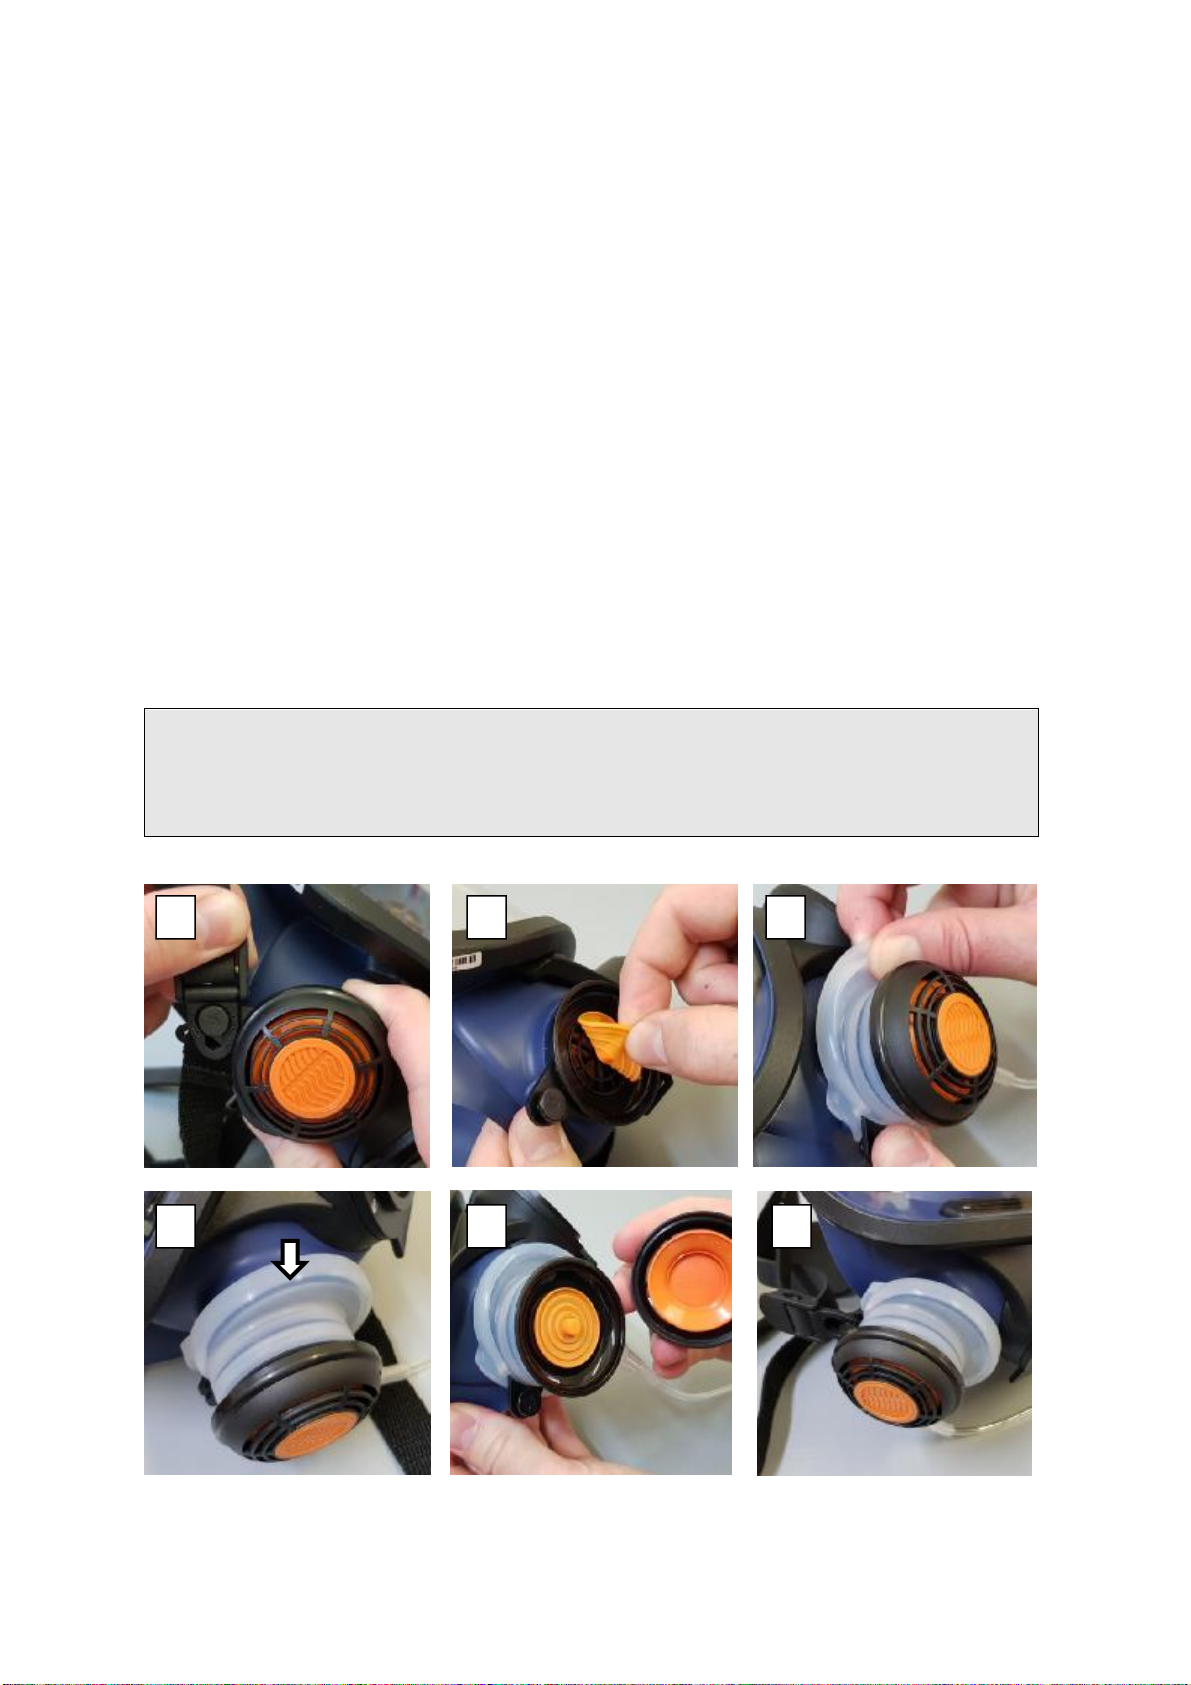
Attach or detach the SR100/200 adapter
To attach the SR100/200 adapter to the respirator
1.
(SR200 only) Disconnect the head harness and neck strap from the right-side
exhalation valve housing.
2.
Remove the exhalation valve cover and exhalation valve disc from the respirator.
Put them aside for refitting after the test.
3.
Fit the silicone adapter over the exhalation valve housing.
4.
Check that the adapter is properly seated all the way around – the rim of the
housing should be visible through the silicone.
5.
Remove the exhalation valve cover from the adapter and check that the
exhalation valve disc is in place and properly seated. This is essential to ensure
safe operation of the respirator while the SE-RDA is fitted. Refit the cover.
6.
(SR200 only) Reattach the head harness and neck strap.
7.
Connect the pressure tube to the MASK port on the SE-RDA unit.
8.
Perform a respirator fit check as per the respirator user instructions.
Warning
Incorrect fitting of the SR100/200 adapter may result in reduced or no breathing
protection!
1
2
3
4
5
6

SE-RDA User Instructions 100507-03 B
Copyright © 2021 The S.E.A. Group 9
To detach the SR100/200 adapter
1. Follow the reverse of the procedure described above.
Warning
It is essential to ensure the respirator’s exhalation valve is refitted correctly. Failure
to correctly fit the exhalation valve will result in reduced or no breathing protection!
Connect or disconnect the pressure tube or vent port filter
The pressure tube (MASK port) and vent port filter (VENT port) attach to the push-in
connectors on the SE-RDA unit.
To connect:
1. Insert the tube or filter shank into the connector and push firmly until it stops.
2. Pull gently to check it is secure.
To disconnect:
1. Press down on the connector’s locking collar and pull out the tube or filter.
Note: Before reinserting, check the condition of the end of the pressure tube or the
shank of the filter. If there are signs of distortion or damage, cut the end of the tube off
clean and square, or replace the filter.
Inserting pressure tube Releasing pressure tube Releasing vent filter

SE-RDA User Instructions 100507-03 B
Copyright © 2021 The S.E.A. Group 10
Operation of the SE-RDA
1. Set the SE-RDA to STANDBY.
2. Set the SE-RDA to RECORD. Wait until the steady RED LED changes to blinking
RED (about 50 sec). Do not disturb the unit during this warm-up period.
3. Don the respirator and SE-RDA.
4. Perform the workplace tasks. The wearer should keep in mind:
a. Perform the tasks as per the normal routine.
b. Take care not to snag or kink the pressure tube. Periodically check the
pressure tube.
c. Periodically check that the LED is blinking RED (recording).
d. Protect the unit from extreme environmental conditions (e.g.: hard
knocks, extreme heat).
e. Leave the SE-RDA in RECORD mode even during breaks and when the
respirator has been doffed temporarily.
5. When the workplace test is completed, doff the respirator.
6. Turn the SE-RDA OFF.
Important
If the SE-RDA is inadvertently turned off during a test, the recorded data must be
downloaded to a PC before resuming the test. When recording is next started, all
recorded data in the SE-RDA unit will be overwritten.
NOTE: It is recommended, but not essential, to start recording before donning the
respirator. This results in a steady, zero-pressure trace at the start of the logged data,
which is useful later on when analysing the data. See section Vertical offset correction.

SE-RDA User Instructions 100507-03 B
Copyright © 2021 The S.E.A. Group 11
SE-RDA operation sequence
SE-RDA User Instructions 100507-03 B
Copyright © 2021 The S.E.A. Group 12
Set the SE-RDA to STANDBY
With the SE-RDA OFF:
1. Press and hold RECORD and FUNCTION buttons simultaneously until the LED
lights steady GREEN (about 3 seconds).
2. Release the buttons. The LED flashes orange.
The SE-RDA is now in STANDBY mode. It is NOT recording.
If recording has not been started within about 10 minutes of setting to STANDBY, the
unit will turn itself OFF automatically. To restart, repeat the turn-on process.
Setting the SE-RDA to STANDBY
Set the SE-RDA to RECORD
With the SE-RDA in STANDBY mode:
1. Press and hold the RECORD button (for about 3 seconds) until the LED lights
steady red. The SE-RDA is WARMING UP. The SE_RDA is recording but should not
be donned or used during this time.
2. After about 50 seconds, the LED begins flashing RED. The SE-RDA is RECORDING
and is ready for use.
The SE-RDA can record for at least ten hours with fresh batteries.
Note: Each time recording is started, all previously recorded data in the unit will be
overwritten. Always ensure that any valuable data has been downloaded before starting
recording.
Note: Do not turn off the SE-RDA at any time during the recording process, even while
resting or when the respirator is not being worn. If the unit is inadvertently turned off
during use, download the logged data before restarting recording to prevent it being
overwritten.
Note: The recorded data remains stored in the unit even if the batteries are removed.
Don the respirator and SE-RDA
1. Hang the respirator around the neck using the neck strap (SR200) or head
harness (SR100).
2. Attach the SE-RDA unit securely to the body, either:
a. in a shirt pocket, or
b. mounted on a waist belt using the SEA mounting bracket (model no. HSE)

SE-RDA User Instructions 100507-03 B
Copyright © 2021 The S.E.A. Group 13
3. Ensure that the vent port filter is open to the air and not covered by clothing.
4. Don the respirator as per the respirator user instructions.
5. Position the pressure tube close to the body to minimise snagging hazard. The
tube may be tucked inside clothing. Ensure that the tube is free of kinks.
Mounting SE-RDA unit Pocket mounted Waist-belt mounted
Download the data
Downloading the data is described in the paragraph “To download data from the SE-RDA
unit to the PC” on page 23 of this document.
Turn the SE-RDA OFF
Press and hold RECORD and FUNCTION buttons simultaneously. Hold buttons for about 3
seconds until the LED goes out. Release buttons. Make sure LED is out.
Decontamination and cleaning
After working in a contaminated environment, the SE-RDA unit, adapter and respirator
may require decontamination to prevent contamination of clean areas and prevent
contamination of and/or injury to the user and other personnel.
Decontamination procedures should be developed as part of the organisation’s respirator
program and should be appropriate to the hazards involved.
When decontaminating, consider the following:
•The SE-RDA is water-resistant. It is NOT waterproof. Never submerge the unit in
water.
•Do not remove the respirator from the face nor disconnect the SR100/200
adapter from the unit during decontamination.
•After removing the respirator, do not allow direct water streams inside the
facepiece. Water may enter the opening of the pressure tube and affect
measurement accuracy.
•The vent port filter should always be replaced after decontamination in a shower.
•During decontamination, water may collect under the lip of the battery cover.
When removing the battery cover after decontamination, take care to wipe away
excess water and prevent it from entering the battery chamber.

SE-RDA User Instructions 100507-03 B
Copyright © 2021 The S.E.A. Group 14
•When cleaning the SE-RDA unit, wipe down with a damp cloth. Do not use
solvents or abrasives.
Pressure tube and vent port
It is essential that the pressure tube remains free of obstructions, and that the vent port
filter is clean and unblocked. Blockages or resistances in either will result in incorrect
pressure measurement and flow rate calculations.
Moisture can sometimes enter the opening of the pressure tube inside the respirator due
to build-up of exhaled moisture or as a result of cleaning. After use and cleaning, inspect
the clear pressure tube for signs of moisture inside the tube.
If moisture is present:
1. First disconnect the pressure tube from the SE-RDA unit.
2. Using an aerosol air duster, blow dry air through the tube from the end furthest
from the contamination, until it is cleared.
3. If the contamination cannot be cleared, the SR100/200 adapter must be replaced.
Important
NEVER use compressed air to clean MASK or VENT ports on the SE-RDA unit.
Never use compressed air to clean the vent filter or pressure tube while still
connected to the SE-RDA unit. Permanent damage to the internal pressure
sensor may result.
Packing and storage
After cleaning, repack the components into the carry case. Before packing, ensure that
all parts are dry.
When coiling up the pressure tube, take care not to cause sharp bends or kinks.
Remove the batteries from the unit prior to repacking if it may be unused for extended
periods, as battery leakage may cause permanent damage to the unit.
It is recommended to store the SE-RDA in its carry case in a cool, dry place, away from
direct sunlight and sources of vibration.
Calibration
The SE-RDA is supplied factory-calibrated.
To verify accurate operation of the SE-RDA, the user may perform a static pressure
measurement test, by applying a static pressure to the mask port and comparing the
measured pressure with a reference manometer. Take care not to apply more than 20
cm H2O to the mask port as damage to the pressure sensor may result. For further
information see section Real-time graph mode.
Measurement uncertainty
Pressure: ±0.15 mbar, 95% confidence

SE-RDA User Instructions 100507-03 B
Copyright © 2021 The S.E.A. Group 15
SE-RDA PC software
The SE-RDA PC software, when installed on a Windows PC, allows the user to:
-download log files from the SE-RDA unit, view and save them
-open and view saved log files
-view charts of measured pressure for the whole log duration
-view pressure or flow rate for any selected data segment
-interpret a range of information from the logs, including:
oinstantaneous flow rates
ominute volumes for a selected segment
oair volumes that occurred within selectable flow rate limits
owork of breathing
-save data logs as Comma Separated Value (csv) files
Installation of the software consists of:
1. Installing the USB driver
2. Installing the software
3. Obtain the port number from the driver
To install the USB driver
The USB driver creates a virtual COM (serial) port using a USB port on the computer.
1. Open Windows Device Manager. The easiest way is to click the Windows Start
button, type “device manager” in the search field and press Enter.

SE-RDA User Instructions 100507-03 B
Copyright © 2021 The S.E.A. Group 16
2. With the supplied USB cable, connect a USB port on the PC to the USB port on
the SE-RDA unit.
a. If “Ports” now appears in the list, click to open it. In the example below, a
USB to UART bridge port exists, and is configured as port “COM3”.
The PC recognises the SE-RDA unit and is ready to communicate with it.
Go to the next step: “To install the SE-RDA software (Windows PC only)”
in page 19.
b. If “Ports” item does not appear, the USB to UART bridge controller should
appear elsewhere (In the example below it appears under “Other
Devices”) as shown on the picture below. Please note the exclamation
mark at the beginning of the line.

SE-RDA User Instructions 100507-03 B
Copyright © 2021 The S.E.A. Group 17
c.
Right click on it and select Properties. In the example below, it confirms
that the driver is not installed.
d.
Follow the steps below to install the USB driver. The installation
executable files for the USB driver are provided on the USB flash drive
supplied with the SE-RDA.
To install the USB driver:
i.
First, ensure that the currently logged in user has Administrator
privileges (necessary for Windows 10).
ii.
Connect the USB flash drive to a USB port on the PC.
iii.
Open the root folder on the USB flash drive.
iv.
Double-click on the file:
CP210xVCPInstaller_x64.exe (64 bit computers)
or
CP210xVCPInstaller_x86.exe (32 bit computers)
Note: Drivers are updated from time to time. If the installation
process below is unsuccessful, it may be that the driver provided is
obsolete. In this case it is recommended to download an up-to-date
driver from www.silabs.com

SE-RDA User Instructions 100507-03 B
Copyright © 2021 The S.E.A. Group 18
v. Accept any operating system permissions that are required to run
the software. The installer window will appear:
vi. Click “Next.”
vii. Accept the licence agreement and click “Next.” The driver will
install:
viii. Click “Finish.”
ix. With the supplied USB cable connect a USB port on the computer to
the USB port on the SE-RDA unit.
x. Open the Device Manager and check that the COM port is present,
as described in steps 1 and 2 above.
xi. Take note of the COM port number. In this example it is COM3.

SE-RDA User Instructions 100507-03 B
Copyright © 2021 The S.E.A. Group 19
To install the SE-RDA software (Windows PC only)
The installation files are provided on the USB flash drive supplied with the SE-RDA.
1. Open the root folder on the USB flash drive.
2. For a new installation double-click on the file:
PressureLoggerVxxx-Installer.zip
Alternatively, to upgrade an existing installation to a new version double-click on:
PressureLoggerVxxx-InstallerNoRuntime.zip
Note: In place of “xxx” will be the current version number of the file.
3. Double-click on the file setup.exe. If setup does not initiate, extract the zipped
files to a storage location and run setup.exe from there. The installer window will
appear:
4. Click “Next.” The Destination Folder dialog will appear:
SE-RDA User Instructions 100507-03 B
Copyright © 2021 The S.E.A. Group 20
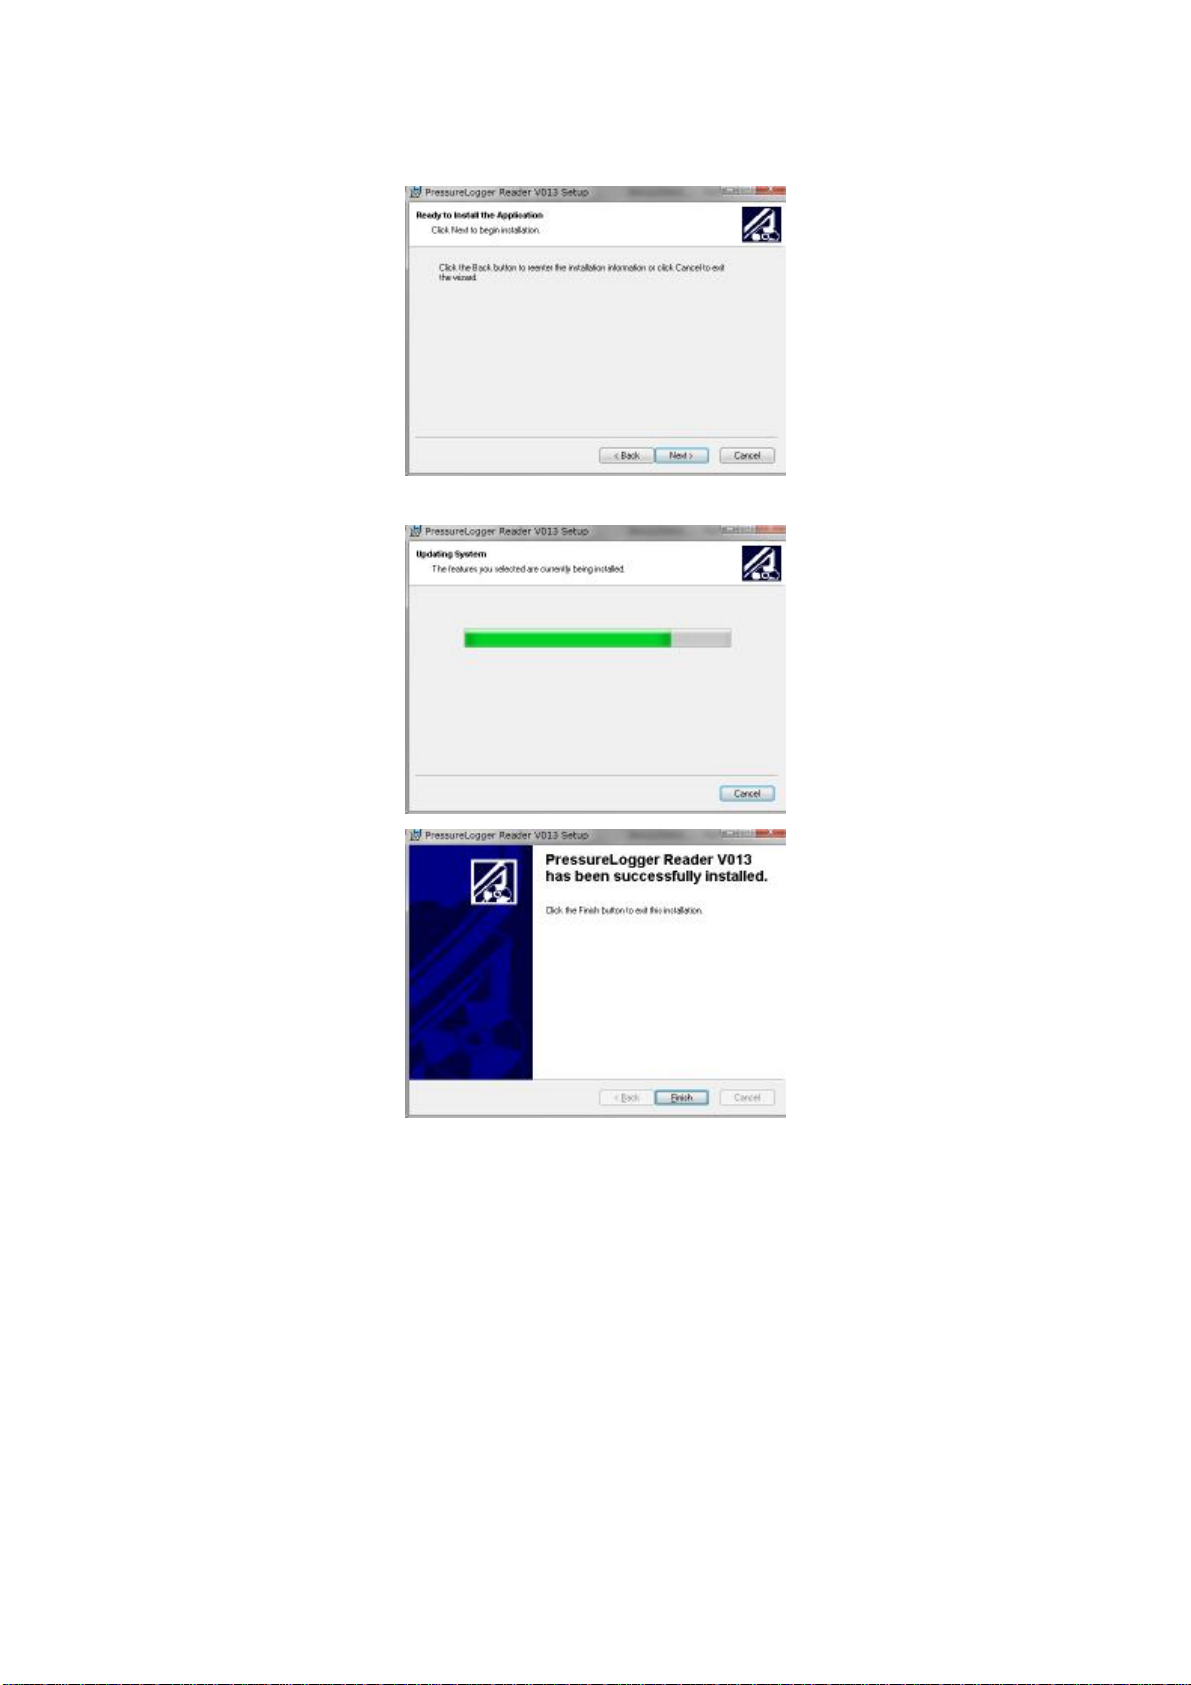
5. Select a new location or click “Next” to accept the default location. The Ready to
Install dialog will appear:
6. Click “Next.” The installation will commence:
7. When the installation is complete, click “Finish.”
Table of contents
Other S.E.A. Group Respiratory Product manuals


