Flaem RF7 Dual Speed Plus User manual

ITALIANO
pag. 3
ENGLISH
pg. 7
FRANÇAIS
pag. 11
NEDERLANDS
pag. 15
DEUTSCH
pag. 19
ESPAÑOL
pág. 23
РУССКИЙ
стр. 27
POLSKI
pag. 32
ΕΛΛΗΝΙΚΑ
σελ. 37
41
Manuale istruzioni d’uso del nebulizzatore“RF7 Dual Speed Plus”con selettore di velocità e sistema valvolare
Instruction manual of the nebulizer “RF7 Dual Speed Plus”with speed selector and valve system
Mode d’emploi du nébuliseur “RF7 Dual Speed Plus”avec sélecteur de vitesse et système à valve
Gebruiksaanwijzing voor de verstuiver“RF7 Dual Speed Plus”met snelheidsregelaar en ventielsysteem
Bedienungsanleitung des Zerstäubers“RF7 Dual Speed Plus”mit Geschwindigkeitswahlschalter und
Ventilsystem
Manual de instrucciones de uso del nebulizador“RF7 Dual Speed Plus”con selector de velocidad y
sistema de válvulas
Инструкция по эксплуатации небулайзера“RF7 Dual Speed Plus”с переключателем скоростей и
клапанной системой
Podręcznik instrukcji obsługi nebulizatora“RF7 Dual Speed Plus”z regulatorem prędkości i systemem
Εγχειρίδιο οδηγιών χρήσης του εκνεφωτή “RF7 Dual Speed Plus”με επιλογέα ταχύτητας και σύστημα
βαλβίδων
FLAEM NUOVA S.p.A. - Via Colli Storici, 221
25015 S. Martino della Battaglia - (BS) – ITALY
www.aem.it
N
O
N
-
A
L
L
E
R
G
I
C
M
A
T
E
R
I
A
L
B
I
O
C
O
M
P
A
T
I
B
L
E

2
SCHEMA DI COLLEGAMENTO
ASSEMBLY DIAGRAM
SCHÉMA DE CONNEXION
AANSLUITSCHEMA
ANSCHLUSSSCHEMA
ESQUEMA DE CONEXIÓN
СХЕМА СБОРКИ
SCHEMAT POŁĄCZENIA
ΣΧΕΔΙΑΓΡΑΜΜΑ ΣΥΝΔΕΣΗΣ
11.1
11.2
11.3
11.4
11
1
2
3
4
5
6
7
11
98
8
10

3
AMPOLLA PER AEROSOLTERAPIA
Siamo lieti per l’acquisto da Voi eettuato e Vi ringraziamo per la Vostra ducia. Il nostro
obiettivo è la piena soddisfazione dei Nostri clienti orendo loro prodotti all’avanguardia
nel trattamento delle malattie delle vie respiratorie. Leggete attentamente queste
istruzioni e conservatele per consultazioni future. Utilizzate l’accessorio solo come
descritto nel presente manuale. Questo è un dispositivo medico atto a nebulizzare
e somministrare farmaci prescritti o raccomandati dal Vs. medico. Vi ricordiamo che
l’intera gamma di prodotti
Flaem è visibile nel sito internet www.aem.it
ACCESSORI COMPATIBILI
1 Nasale pediatrico
2 Nasale adulto
3 Mascherina pediatrica
4 Mascherina adulto
5 Boccaglio con valvola
6 Nasale non invasivo
7 Set neonatale
(vedi manuale istruzioni d’uso dello stesso)
8 Comando manuale di nebulizzazione
9 Connettore
10 Tubo di collegamento da 1 o 2 m
NEBULIZZATORE
11 Nebulizzatore RF7 Dual Speed Plus
11.1 - Parte inferiore superiore
11.2 - Ugello
11.3 - Parte superiore
11.4 - Selettore di velocità con valvola
AVVERTENZE IMPORTANTI
- Questo è un dispositivo medico (Conforme alla dir. 93/42/CEE) e deve essere utilizzato
con farmaci prescritti o raccomandati dal Vs. medico. Prima di utilizzare gli accessori con-
sultate il manuale istruzioni d’uso dell’apparecchio. E’importante che il paziente legga e
comprenda le informazioni per l’uso. Contattate il Vs. rivenditore o centro di assistenza
per qualsiasi domanda.
- E’consigliabile sostituire l’ampolla ogni 6 mesi negli utilizzi intensivi (o prima se l’ampol-
la è ostruita) per garantire sempre la massima ecacia terapeutica.
- In presenza di bambini e di persone non autosucienti,
il nebulizzatore
deve essere uti-
lizzato sotto la stretta supervisione di un adulto che abbia letto il presente manuale.
- Alcuni componenti del nebulizzatore hanno dimensioni tanto piccole da poter essere
inghiottite dai bambini; conservate quindi il nebulizzatore fuori dalla portata dei bambi-
ni.
ITALIANO
ISTRUZIONI D’USO
Prima di ogni utilizzo, lavatevi accuratamente le mani e pulite il vostro apparecchio
come descritto nel paragrafo “PULIZIA SANIFICAZIONE DISINFEZIONE STERILIZZA-
ZIONE”.
L’ampolla e gli accessori sono per solo uso personale onde evitare eventuali rischi di
infezione da contagio.
Durante l’applicazione è consigliato proteggersi adeguatamente da eventuali gocciola-
menti.
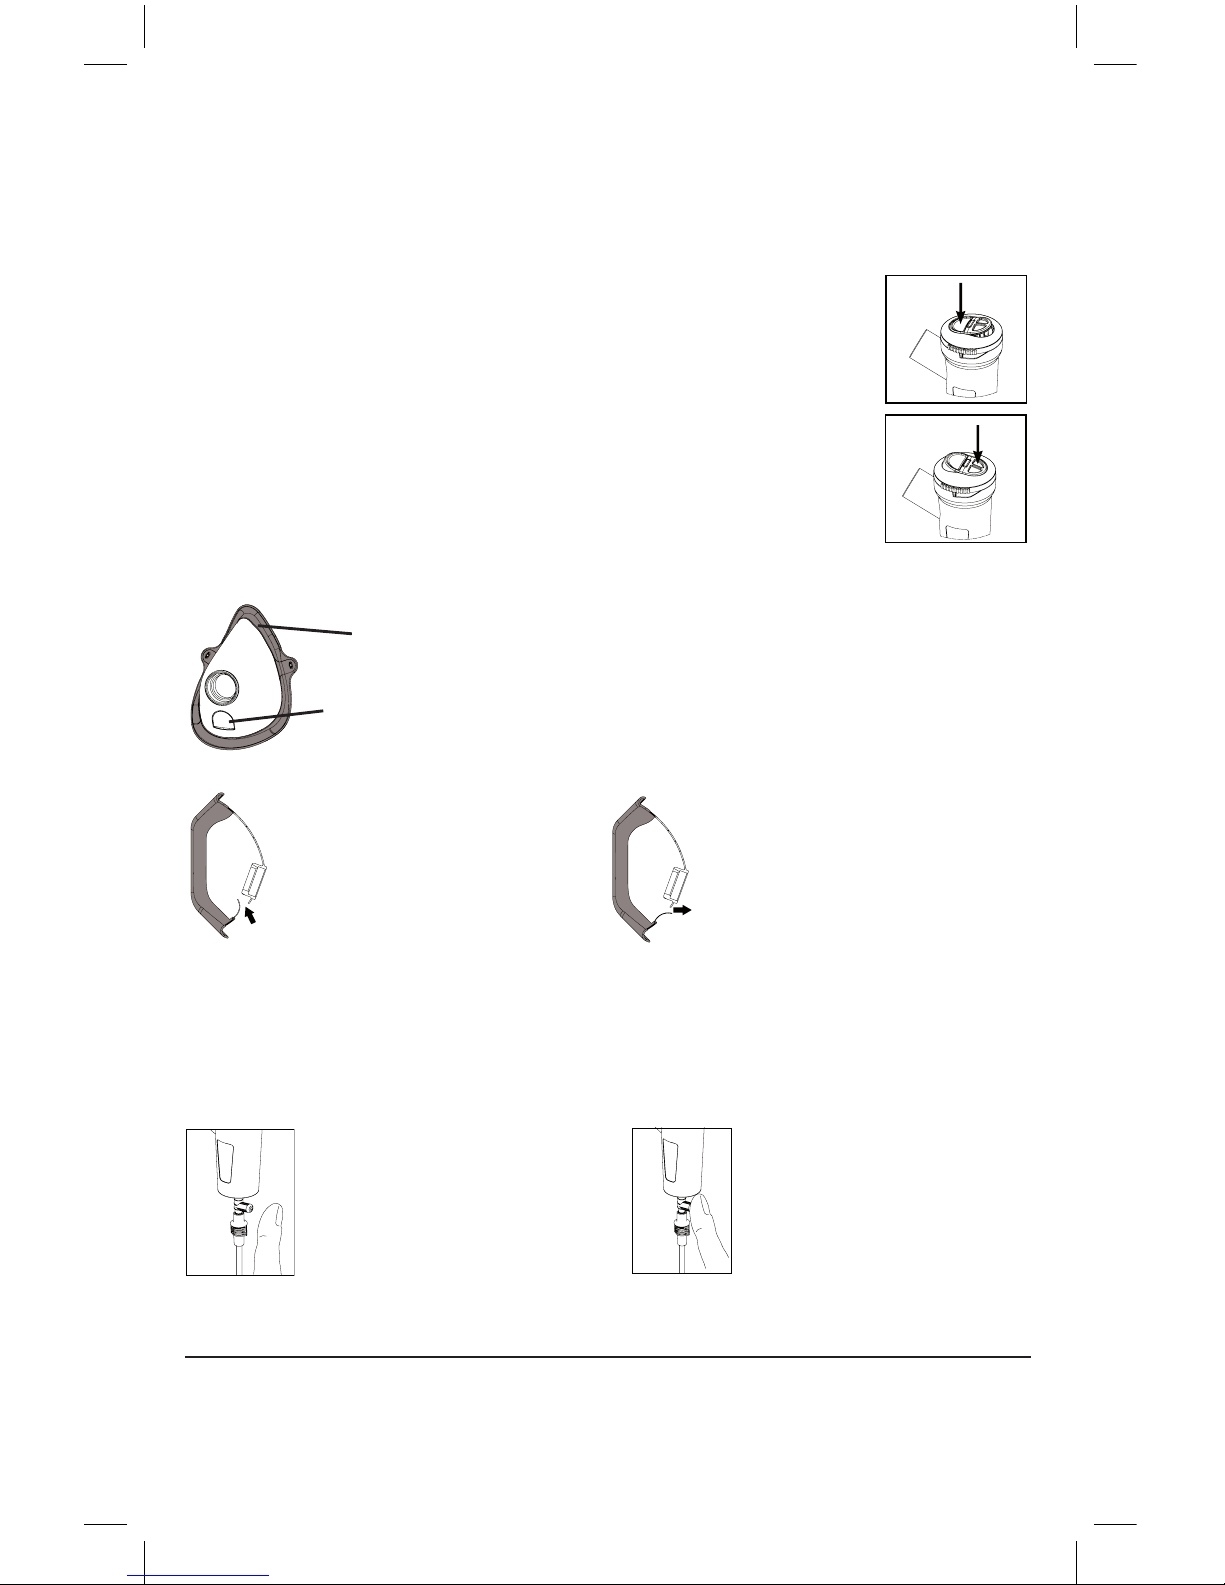
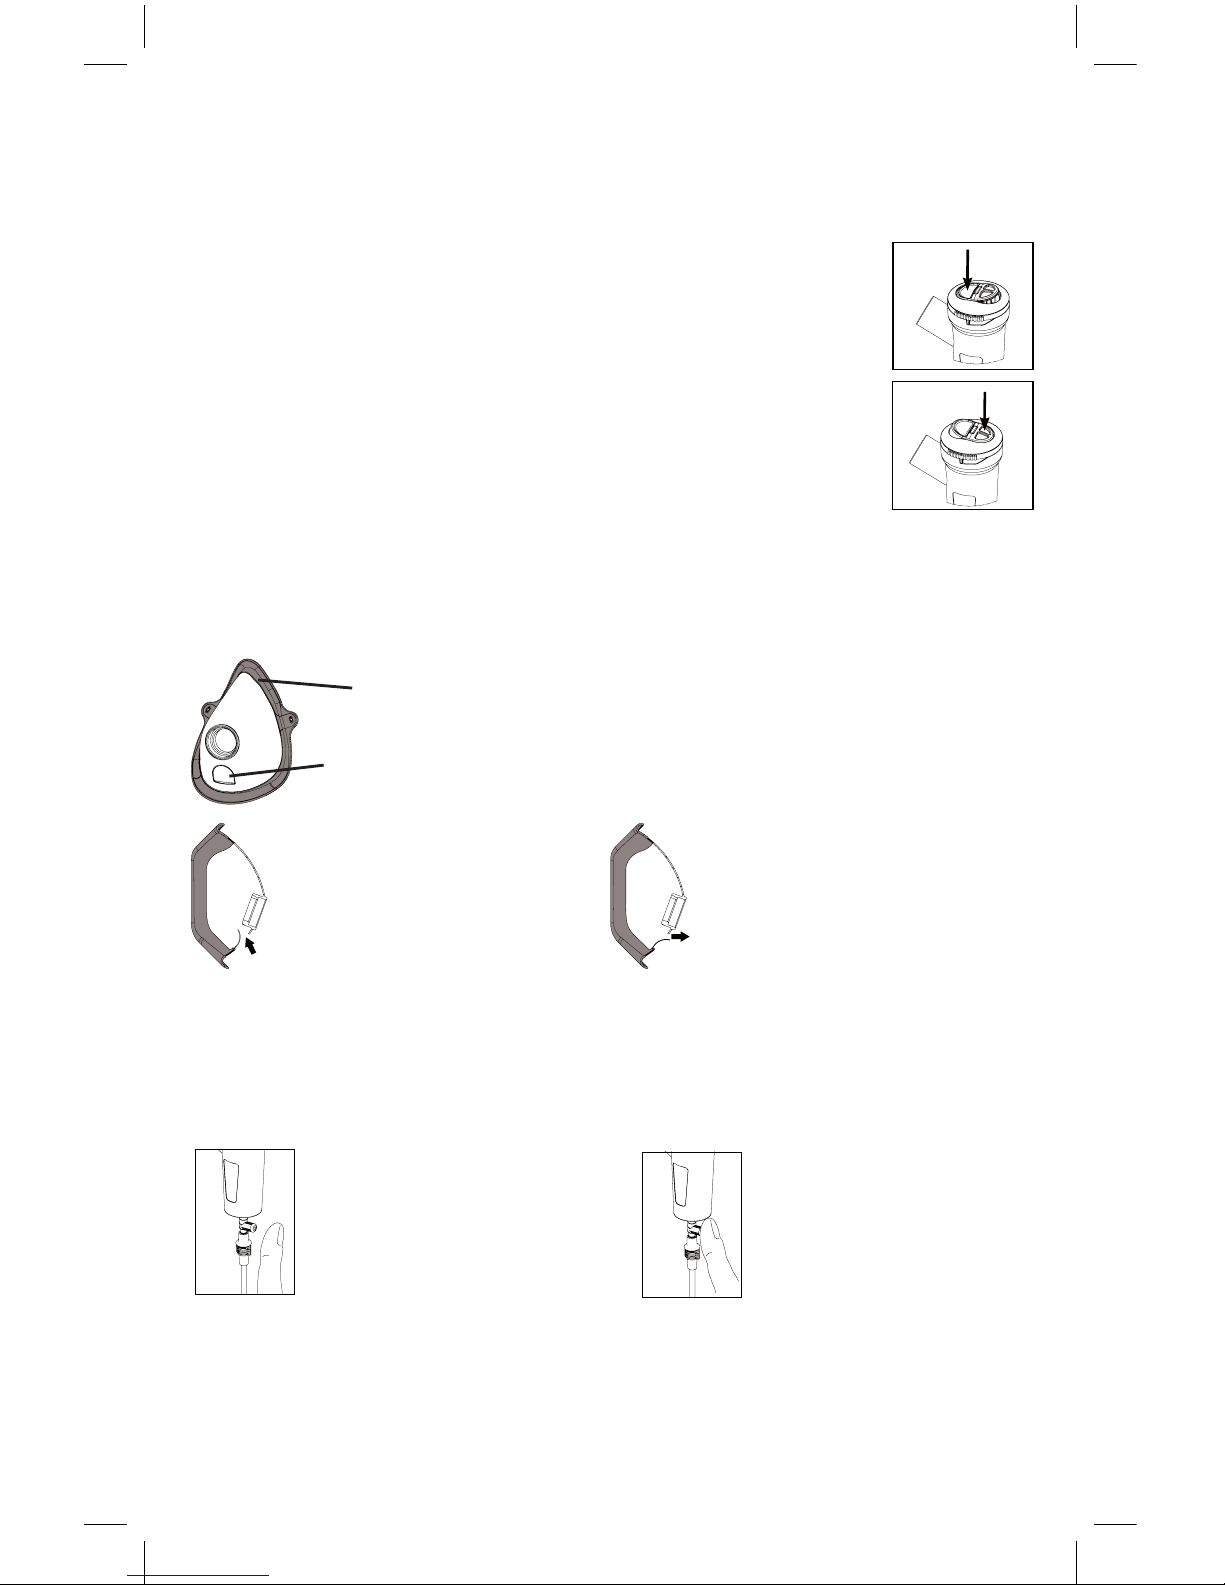
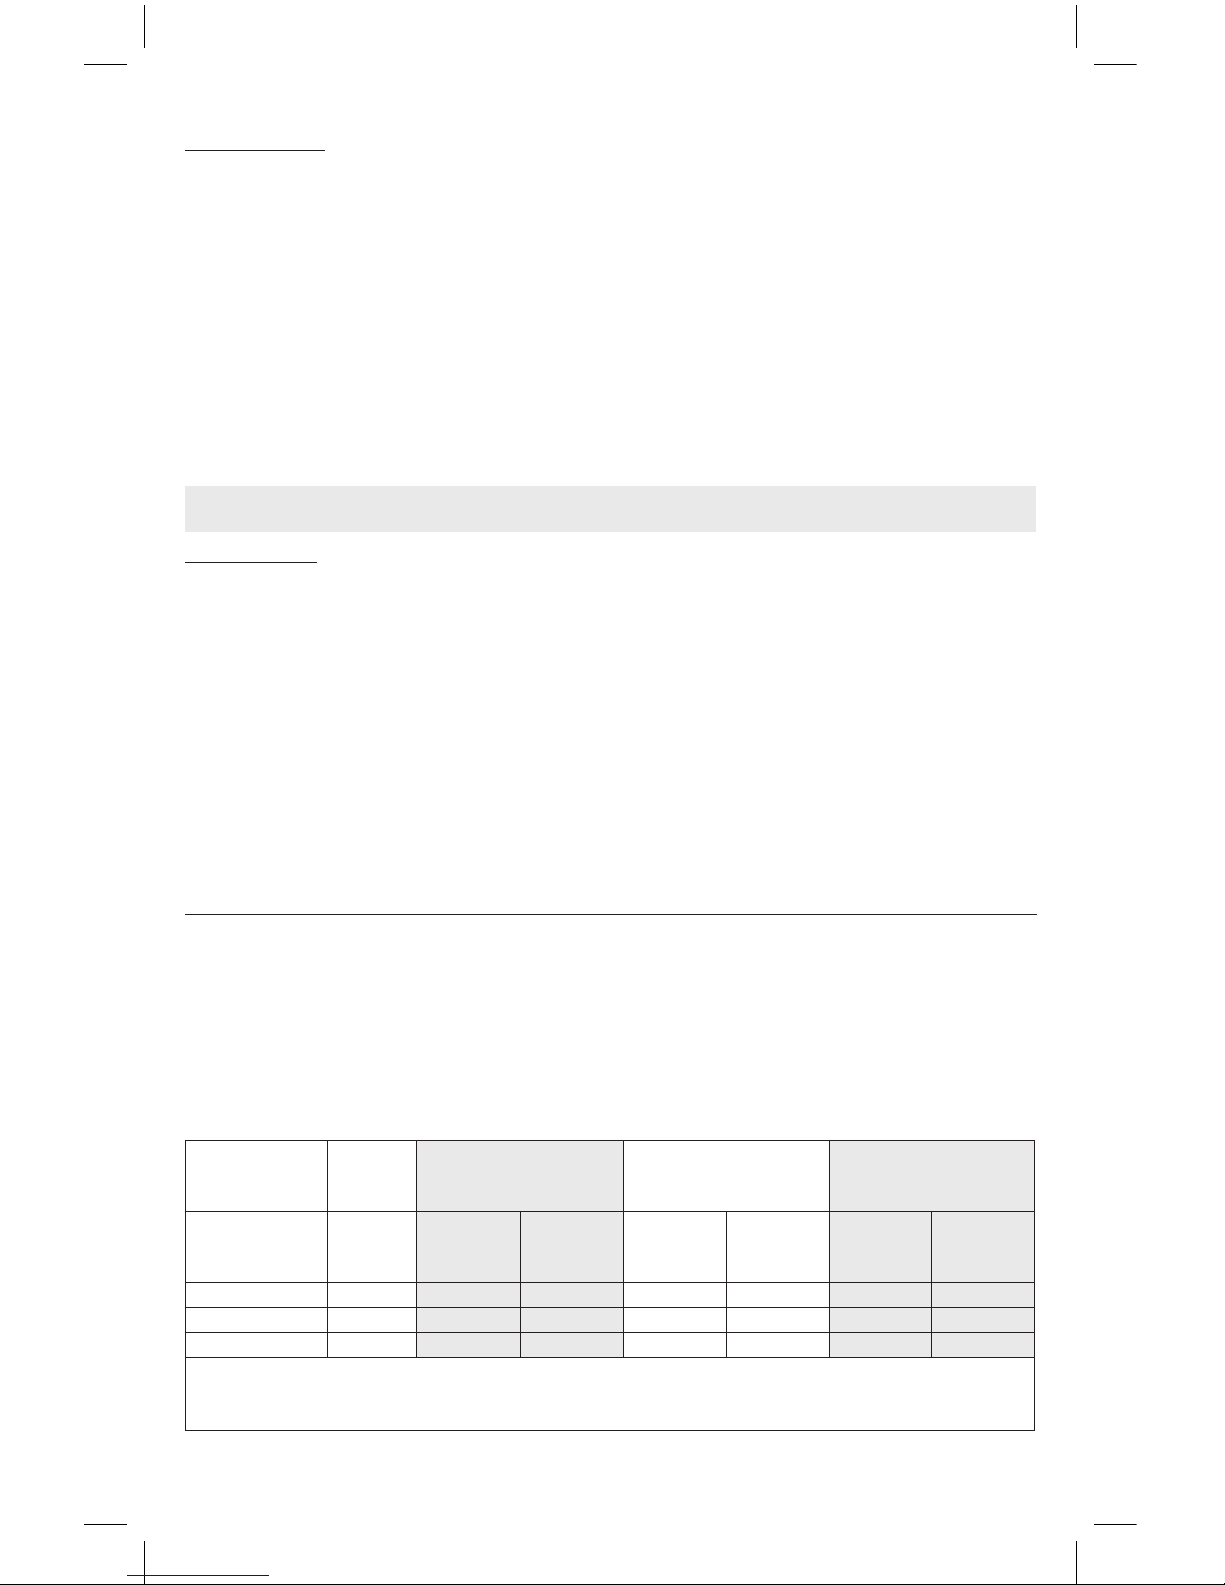
1. Inserite l’ugello (11.2) nella parte superiore (11.3) premendo come indicato dalle 2 frecce
nello “Schema di collegamento” nel punto 11. Inserite il Selettore di velocità con valvola
(11.4) nella parte superiore (11.3) come indicato nello“Schema di collegamento”nel pun-
to 11.
2. Versate il medicinale prescritto dal medico nella parte inferiore (11.1). Chiudete il nebu-
lizzatore ruotando la parte superiore (11.3) in senso orario.
3. Collegate gli accessori come indicato nello “Schema di collegamento”. Sedetevi como-
damente tenendo in mano il nebulizzatore, appoggiate il boccaglio alla bocca oppure
utilizzate il nasale la mascherina o il set neonatale.
4. Mettete in funzione l’apparecchio (vedi manuale istruzioni d’uso dello stesso). Inspirate
dolcemente a fondo; si consiglia dopo l’inspirazione di trattenere il respiro per un istante
in modo che le goccioline di aerosol inalate possano depositarsi. Espirate poi lentamen-
te.
5. Terminata l’applicazione, spegnete l’apparecchio
ATTENZIONE: Se dopo la seduta terapeutica si forma un evidente deposito di umidità all’in-
4
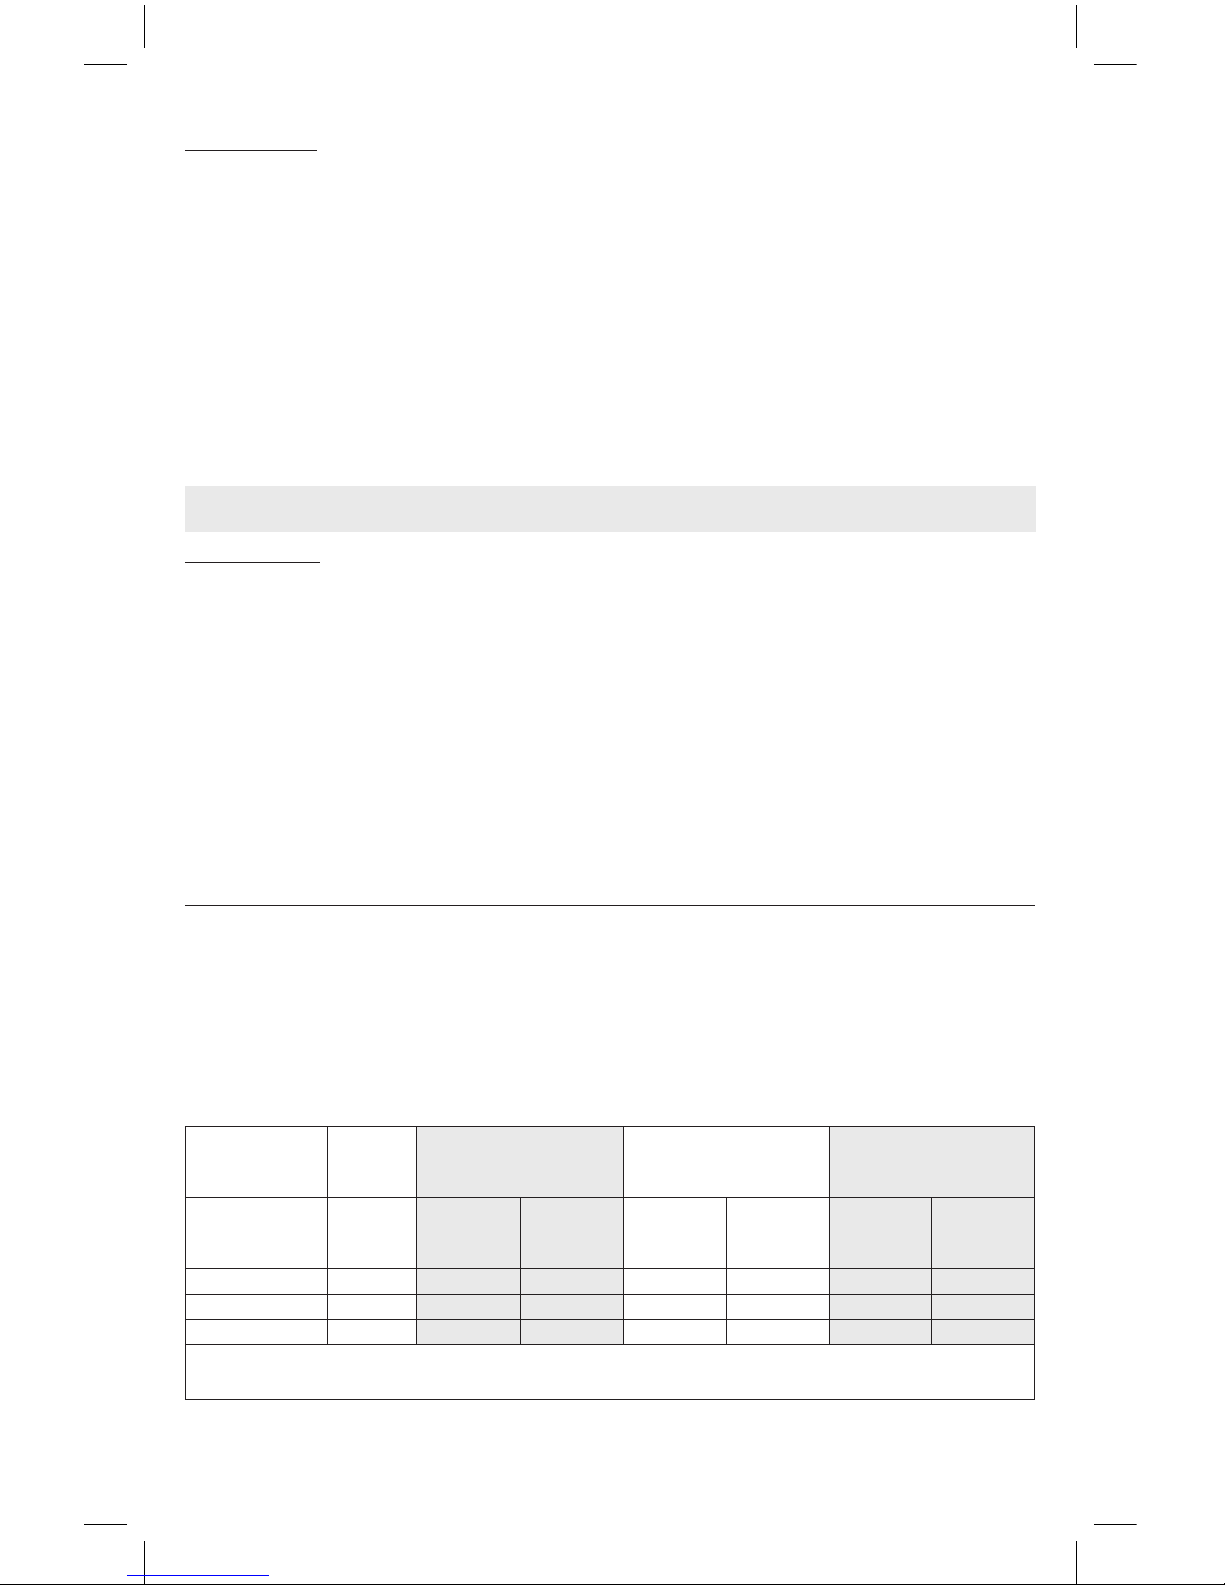
MASCHERINE SOFTTOUCH
Le mascherine SoftTouch hanno il bordo esterno re-
alizzato in morbido materiale biocompatibile che
garantisce un’ottima aderenza al viso, e sono inoltre
dotate dell’innovativo Limitatore di Dispersione.
Questi caratteristici elementi che ci contraddistinguo-
no, consentono una maggiore sedimentazione del far-
maco nel paziente, ed anche in questo caso ne limita
la dispersione.
Nella fase inspiratoria la linguet-
ta che funge da Limitatore di
Dispersione, si piega verso l’in-
terno della mascherina
Nella fase espiratoria la linguetta,
che funge da Limitatore di Di-
spersione, si piega verso l’esterno
della mascherina.
Morbido
materiale
biocompatibile
Limitatore di
Dispersione
MODI D’USO DEL NEBULIZZATORE“RF7 DUAL SPEED PLUS”CON SELETTORE DIVE
LOCITÀ E SISTEMA VALVOLARE
E’professionale, rapido, indicato per la somministrazione di tutti i tipi di farmaci, compresi
quelli più costosi, anche in pazienti con patologie croniche. Grazie alle geometrie dei
condotti interni del nebulizzatore RF7 Dual Speed Plus, si è ottenuta una
granulometria indicata e attiva per la cura sino alle basse vie respiratorie.
Per rendere più veloce la terapia inalatoria posizionate il selettore di
velocità con valvola (11.4) premendo con un dito sulla scritta MAX.
Questa congurazione è adatta anche all’utilizzo dei nasali 1, 2.
Per rendere più ecace la terapia inalatoria posizione il selettore di
velocità con valvola (11.4) premendo con un dito sul lato opposto
alla scritta Max, in questo caso otterrete un’acquisizione ottimale del
farmaco riducendo al minimo la dispersione dello stesso nell’ambiente
circostante, grazie al sistema valvolare di cui l’ampolla, il boccaglio, la
mascherina sono dotate.
UTILIZZO DEL COMANDO MANUALE DI NEBULIZZAZIONE
Per ottenere una nebulizzazione continua si consiglia di non applicare il comando manuale
di nebulizzazione (8), soprattutto in caso di bambini o persone non autosucienti. Il co-
mando manuale di nebulizzazione è utile per limitare la dispersione del farmaco nell’am-
biente circostante.
Per attivare la nebulizzazione, tappate con
un dito il foro del comando ma-
nuale di nebulizzazione (8) ed
inspirate dolcemente a fondo;
si consiglia dopo l’inspirazione
di trattenere il respiro per un
istante in modo che le goccio-
line di aerosol inalate possano
depositarsi,
nel frattempo, per disattivare la nebuliz-
zazione, togliete il dito dal
foro del comando manuale di
nebulizzazione così facendo si
evita lo spreco di farmaco, ot-
timizzandone l’acquisizione.
Espirate poi lentamente.
terno del tubo (10), staccate il tubo dal nebulizzatore ed asciugatelo con la ventilazione del
compressore stesso; questa azione evita possibili proliferazioni di mue all’interno del tubo.
MAX
PULIZIA SANIFICAZIONE DISINFEZIONE STERILIZZAZIONE
Spegnete l’apparecchio prima di ogni operazione di pulizia e scollegate il cavo di rete dalla
presa.
APPARECCHIO ED ESTERNO DEL TUBO
Utilizzate solo un panno inumidito con detergente antibatterico (non abrasivo e privo di
solventi di qualsiasi natura).

5
ACCESSORI
Aprite il nebulizzatore ruotando la parte superiore (11.3) in senso antiorario, staccate
l’ugello (11.2) dalla parte superiore (11.3) premendo come indicato dalle 2 frecce nello
“Schema di collegamento” nel punto 11.
Procedete quindi in base alle istruzioni di seguito riportate .
PULIZIA IN AMBIENTE DOMESTICO - SANIFICAZIONE E DISINFEZIONE
SANIFICAZIONE
Prima e dopo ogni utilizzo, sanicate l’ampolla e gli accessori scegliendo uno dei metodi
come di seguito descritto.
metodo A: Sanicate gli accessori 1-2-3-4-5-6-8-9-11.1-11.2-11.3-11.4 sotto acqua calda
potabile (circa 40°C) con detergente delicato per piatti (non abrasivo).
metodo B: Sanicate gli accessori 1-2-3-4-5-6-8-9-11.1-11.2-11.3-11.4 in lavastoviglie
con ciclo a caldo.
metodo C: Sanicate gli accessori 1-2-3-4-5-6-8-9-11.1-11.2-11.3-11.4 mediante
immersione in una soluzione con il 50% di acqua ed il 50% di aceto bianco, inne
risciacquate abbondantemente con acqua calda potabile (circa 40°C).
Se volete eseguire anche la pulizia per DISINFEZIONE saltate al paragrafo DISINFEZIONE.
Dopo aver sanicato gli accessori scuoteteli energicamente ed adagiateli su un tovagliolo
di carta, oppure in alternativa asciugateli con un getto d’aria calda (per esempio
asciugacapelli).
DISINFEZIONE
Dopo aver sanicato l’ampolla e gli accessori, disinfettateli scegliendo uno dei metodi
come di seguito descritto.
metodo A: Gli accessori disinfettabili sono 1-2-3-4-5-6-8-9-11.1-11.2-11.3-11.4.
Procurarsi un disinfettante di tipo clorossidante elettrolitico (principio attivo: ipoclorito di
sodio), specico per disinfezione reperibile in tutte le farmacie.
Esecuzione:
- Riempire un contenitore di dimensioni adatte a contenere tutti i singoli componenti da
disinfettare con una soluzione a base di acqua potabile e di disinfettante, rispettando le
proporzioni indicate sulla confezione del disinfettante stesso.
- Immergere completamente ogni singolo componente nella soluzione, avendo cura di
evitare la formazione di bolle d’aria a contatto con i componenti. Lasciare i componenti
immersi per il periodo di tempo indicato sulla confezione del disinfettante, e associato
alla concentrazione scelta per la preparazione della soluzione.
- Recuperare i componenti disinfettati e risciacquarli abbondantemente con acqua
potabile tiepida.
- Smaltire la soluzione secondo le indicazioni fornite dal produttore del disinfettante.
metodo B: Disinfettate gli accessori 1-2-5-6-8-9-11.1-11.2-11.3-11.4 mediante bollitura
in acqua per 20 minuti; utilizzare acqua demineralizzata o distillata per evitare depositi
calcarei.
metodo C: Disinfettate gli accessori 1-2-5-6-8-9-11.1-11.2-11.3-11.4 con uno
sterilizzatore a caldo per biberon del tipo a vapore (non a microonde). Eseguite il processo
seguendo fedelmente le istruzioni dello sterilizzatore. Anché la disinfezione sia ecace
scegliete uno sterilizzatore con un ciclo operativo di almeno 6 minuti.
Dopo aver disinfettato gli accessori scuoteteli energicamente ed adagiateli su un
tovagliolo di carta, oppure in alternativa asciugateli con un getto d’aria calda (per
esempio asciugacapelli).
PULIZIA IN AMBIENTE CLINICO O OSPEDALIERO - DISINFEZIONE E STERILIZZAZIONE
Prima di essere disinfettati o sterilizzati sanicate l’ampolla e gli accessori scegliendo uno
dei metodi come di seguito descritto.
metodo A: Sanicate gli accessori 1-2-3-4-5-6-8-9-11.1-11.2-11.3-11.4 sotto acqua calda
potabile (circa 40°C) con detergente delicato per piatti (non abrasivo).
metodo B: Sanicate gli accessori 1-2-3-4-5-6-8-9-11.1-11.2-11.3-11.4 in lavastoviglie
con ciclo a caldo.

6
Ampolla RF7 Dual Speed Plus
Condizioni d’esercizio:
Temperatura: min 10°C; max 40°C
Umidità aria: min 10%; max 95%
Pressione atmosferica: min 69KPa; max 106KPa
Conforme alla direttiva 93/42 CEE
Capacità minima farmaco: 2 ml
Capacità massima farmaco: 8 ml
Condizioni di stoccaggio:
Temperatura: min -25°C; max 70°C
Umidità aria: min 10%; max 95%
Pressione atmosferica: min 69KPa; max 106KPa
PARTI APPLICATE
Parti applicate di tipo BF sono:
accessori paziente (1,2,3,4,5,6,7)
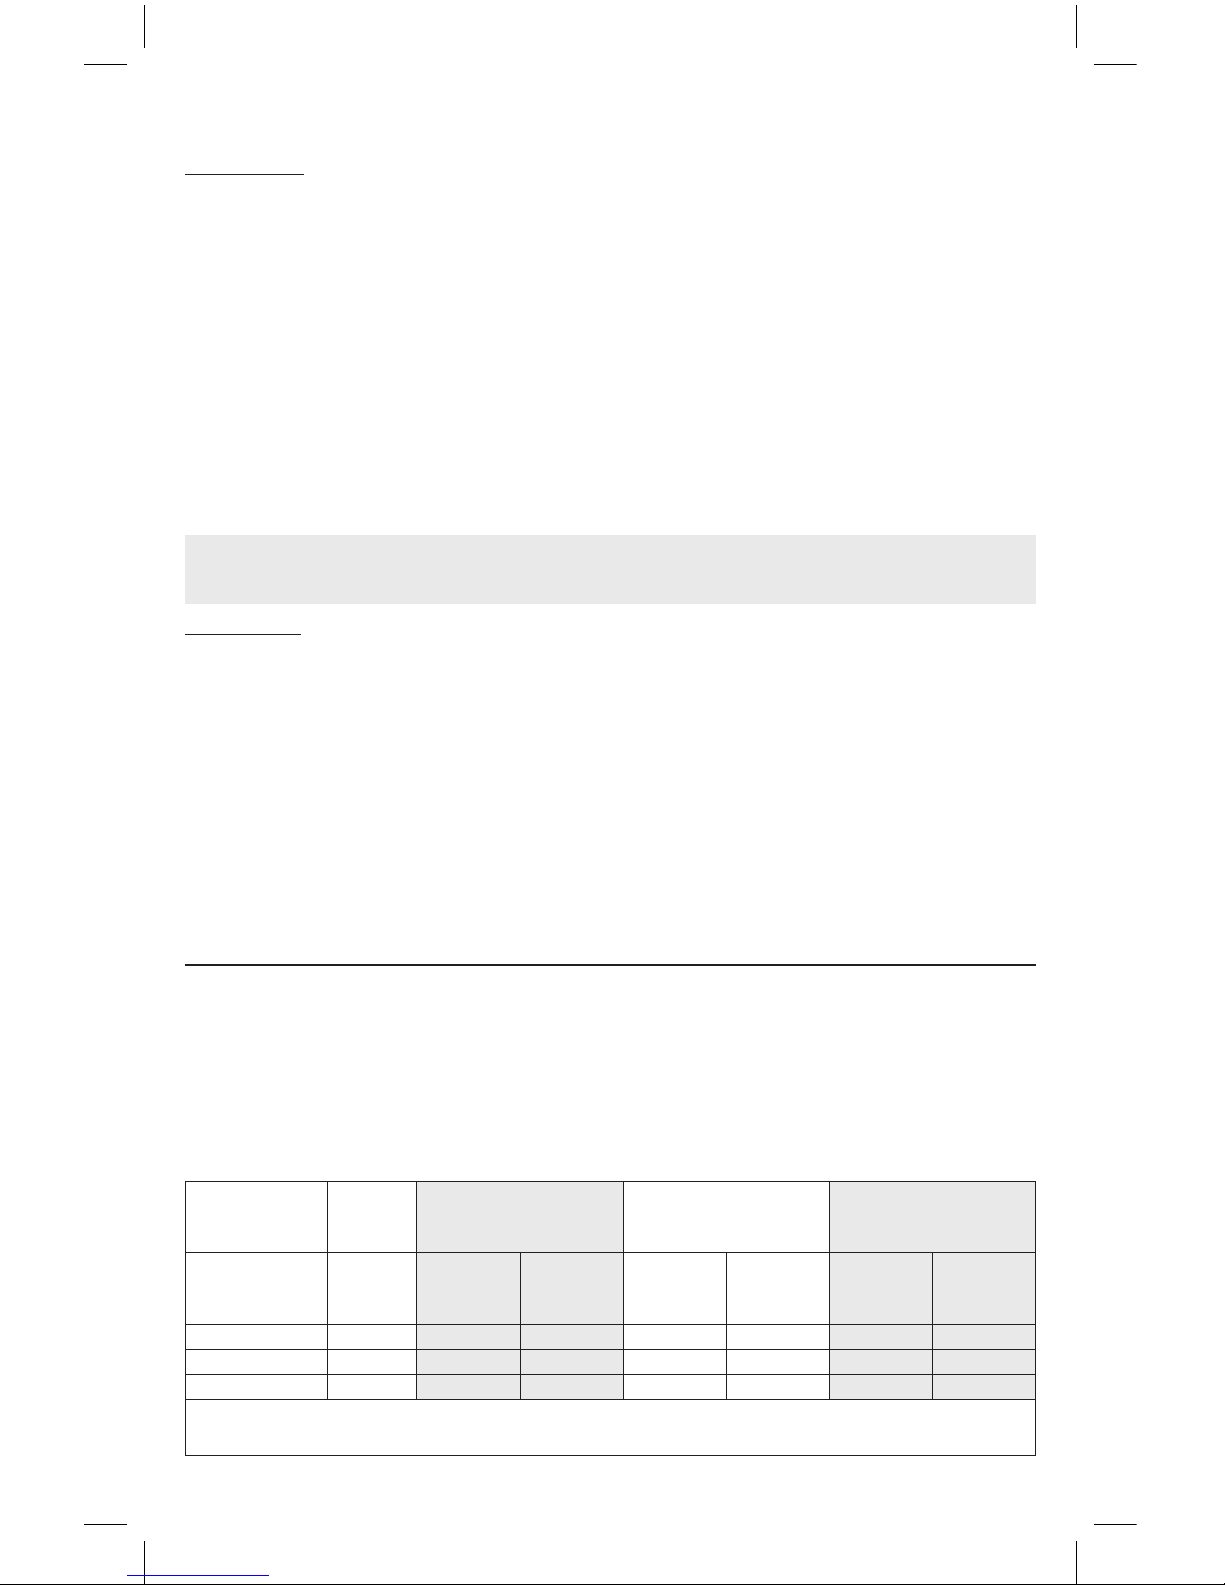
(2) MMAD (μm)
(2) FRAZIONE
RESPIRABILE
< 5 μm (FPF) %
(1) EROGAZIONE
ml/min
Famiglia
compressori
FLAEM
Pressione
Min
Con
valvola Max Min
Con
valvola Max Min
Con
valvola Max
Portatili 0,75 bar 2,95 2,44 74,7 80,7 0,18 0,42
F700/F1000 1,00 bar 2,72 2,53 77,8 79,6 0,23 0,53
F2000 1,40 bar 2,21 2,38 84,2 81,5 0,29 0,65
(1) dati rilevati secondo procedura interna Flaem I29-P07.5 (2) Caratterizzazione in vitro certicata da TÜV Rheinland LGA Products GmbH-
Germany in conformità al nuovo Standard Europeo per apparecchi da aerosolterapia, Norma EN 13544-1, ANNEX CC. Maggiori dettagli sono
disponibili a richiesta.
CARATTERISTICHE TECNICHE
DISINFEZIONE
Gli accessori disinfettabili sono 1-2-3-4-5-6-8-9-11.1-11.2-11.3-11.4.
Procurarsi un disinfettante di tipo clorossidante elettrolitico (principio attivo: ipoclorito di
sodio), specico per disinfezione reperibile in tutte le farmacie.
Esecuzione:
- Riempire un contenitore di dimensioni adatte a contenere tutti i singoli componenti da
disinfettare con una soluzione a base di acqua potabile e di disinfettante, rispettando le
proporzioni indicate sulla confezione del disinfettante stesso.
- Immergere completamente ogni singolo componente nella soluzione, avendo cura di
evitare la formazione di bolle d’aria a contatto con i componenti. Lasciare i componenti
immersi per il periodo di tempo indicato sulla confezione del disinfettante, e associato
alla concentrazione scelta per la preparazione della soluzione.
- Recuperare i componenti disinfettati e risciacquarli abbondantemente con acqua
potabile tiepida.
- Smaltire la soluzione secondo le indicazioni fornite dal produttore del disinfettante.
Se volete eseguire anche la STERILIZZAZIONE saltate al paragrafo STERILIZZAZIONE
Dopo aver disinfettato gli accessori scuoteteli energicamente ed adagiateli su un
tovagliolo di carta, oppure in alternativa asciugateli con un getto d’aria calda (per
esempio asciugacapelli).
STERILIZZAZIONE
Gli accessori sterilizzabili sono 1-2-5-6-9-11.1-11.2-11.3-11.4.
Apparecchiatura: Sterilizzatore a vapore con vuoto frazionato e sovrapressione conforme
alla norma EN 13060.
Esecuzione: Confezionare ogni singolo componente da trattare in sistema o imballaggio
a barriera sterile conforme alla norma EN 11607. Inserire i componenti imballati nello
sterilizzatore a vapore. Eseguire il ciclo di sterilizzazione rispettando le istruzioni d’uso
dell’apparecchiatura selezionando una temperatura di 134°C e un tempo di 10 minuti
primi.
Conservazione: Conservare i componenti sterilizzati come da istruzioni d’uso del sistema
o imballaggio a barriera sterile,scelti.
La procedura di sterilizzazione convalidata in conformità alla ISO 17665-1.
Per la “PULIZIA SANIFICAZIONE DISINFEZIONE STERILIZZAZIONE” degli accessori 7
fate riferimento al manuale d’uso degli stessi.

7
ENGLISH
AEROSOL THERAPY NEBULIZER
Congratulations on your purchase and thank you for choosing our unit.
Our goal is to fully satisfy customers by oering them cutting-edge systems for the treat-
ment of respiratory tract ailments.
Carefully read this instruction manual and store it for future reference. Only use the
accessories as described in this manual. This is a medical device intended to nebu-
lize and administer medications prescribed or recommended by a doctor. Visit our
Internet site www.aem.it to view the whole range of Flaem products.
ACCESSORIES THAT CAN BE USED
WITH THIS NEBULIZER
1 Pediatric nasal prong
2. Adult nasal prong
3. Pediatric face mask
4. Adult face mask
5. Mouthpiece with valve
6. Non-invasive nasal prong
7. Baby mask set (see its instruction manual)
8. Nebulization manual control
9. Connector
10. 1 or 2 m Connection hose
NEBULIZER
11 RF7 Dual Speed Plus Nebulizer
11.1 - Lower part
11.2 - Nozzle
11.3 - Upper part
11.4 - Speed selector with valve system
WARNINGS
- This is a medical device (compliant with Dir. 93/42/EEC) and may only be used with
medication prescribed or recommended by a doctor. Before using the accessories, con-
sult the instruction manual of the device. It is important that the patient reads and
understands the information on how to use the device and the nebulizer. Contact your
retailer or nearest service center for any questions.
- When used very frequently, we recommend that the nebuliser be replaced every 6
months (or earlier if it becomes clogged), in order to guarantee the maximum thera-
peutic eect.
- Children and disabled persons should always use the nebulizer under strict supervision
of an adult who has read this manual.
- The nebulizer contains small parts that may be swallowed by children; keep therefore
the nebulizer out of the reach of children
OPERATING INSTRUCTIONS
Before each utilisation, wash your hands accurately and clean the device as described
in the paragraph“CLEANING, SANITISATION, DISINFECTION AND STERILISATION”.
The nebuliser cup and accessories are for personal use only to avoid potential risks of
transmitting infection.
During application it is advisable to suitably protect yourself from any dripping.
1. Insert the nozzle (11.2) in the upper part (11.3) pressing as shown by the 2 arrows in the
"Connection diagram" in point 11. Insert the Speed selector with valve (11.4) in the upper
part (11.3) as shown in the "Connection diagram" in point 11.
2. Pour the medication prescribed by the doctor into the lower part (11.1). Close the nebu-
liser by turning the upper part (11.3) clockwise.
3. Connect the accessories as shown in the “Assembly diagram”. Sit down in a comfortable
position holding the nebulizer in your hand, place the mouthpiece over your mouth or
use the nasal prong, the face mask, or the Baby mask set.
4. Start the device (see its instruction manual). Inhale gently and deeply; after inspiration
we recommend to hold your breath for a moment in order to allow inhaled aerosol drop-
lets to deposit. Then, exhale slowly.
5. Upon completing application, switch o the device and unplug it.
ATTENTION: If after the therapy session an evident deposit of moisture forms within the
pipe (10), detach the pipe from the nebuliser and dry it with the very ventilation from the
compressor; this operation prevents possible blooms of mould inside the pipe.

8
SOFTTOUCH FACE MASKS
During inspiration the vent
bends inwards. During expiration the vent bends
outwards.
The new SoftTouch Masks feature an adaptive edge made
of a soft biocompatible material ensuring an excellent
adherence to the face and a Dispersion Limiting Vent.
These innovations, which make them stand out from the
rest, allow increased sedimentation of medication in the
lungs and reduced dispersion into the air.
Soft
biocompatible
material
Dispersion
Limiting Vent
HOWTO USETHE“RF7 DUAL SPEED PLUS”NEBULIZER WITH SPEED SELECTOR AND
VALVE
The nebulizer is professional fast and suitable for the administration of
all types of drugs, including the most expensive ones, also in patients
with chronic diseases. The geometry of the internal ducts of the RF7 Dual
Speed Plus nebulizer ensures the ideal particle size providing eective
treatment right down to the lower airways.
To make inhalation therapy faster, press with your nger on the MAX
marking on the speed selector with valve system (11.4).This conguration
is also suited for the use of nasal prongs 1, 2.
To make inhalation therapy more eective press with your nger on the
speed selector with valve system (11.4) opposite the MAX marking. In this
way the valve systems in the nebulizer, in the mouthpiece and in the mask
will ensure optimal medication delivery to the lower respiratory tract,
limiting dispersion of medication into the environment.
USE OF NEBULIZATION MANUAL CONTROL
To achieve continuous nebulisation action you should not use the manual nebulisation
control (8), especially in the case of children or persons with reduced physical, sensory, or
mental capabilities. The manual nebulisation control is useful for limiting dispersion of the
medication in the surrounding environment.
To start nebulizing close with a nger the
hole of the nebulizer manual
control (8) and breathe in gen-
tly; we recommend to hold your
breath for a moment so that the
inhaled aerosol droplets can be
deposited,
meanwhile, to disable nebulizing, remove
your nger from the hole of
the nebulizer manual control
to avoid the waste of drug, op-
timizing its acquisition. Then
exhale slowly.
MAX

9
CLEANING, SANITISATION, DISINFECTION, STERILISATION
Switch o the device before any cleaning procedure and unplug the power cable from the socket.
DEVICE AND TUBING EXTERIOR
Use only a damp cloth with antibacterial soap (non-abrasive and with no solvents of any sort).
ACCESSORIES
Open the nebuliser by turning the upper part (11.3) anticlockwise, remove the nozzle (11.2)
from the upper part (11.3) by pressing as shown by the 2 arrows in the "Connection diagram"
in point 11.
Then proceed according to the following instructions.
CLEANING AT HOME - SANITISATION AND DISINFECTION
SANITISATION
Before and after each use, sanitise the nebuliser cup and the accessories, choosing one of the
methods described below.
method A: Sanitise accessories 1-2-3-4-5-6-8-9-11.1-11.2-11.3-11.4 under potable hot
water (approximately 40°C) with a gentle, non abrasive dish detergent.
method B: Sanitise accessories 1-2-3-4-5-6-8-9-11.1-11.2-11.3-11.4 in the dishwasher with
a hot cycle.
method C: Sanitise accessories 1-2-3-4-5-6-8-9-11.1-11.2-11.3-11.4 by immersing them in
a solution of 50% water and 50% white vinegar, then rinse thoroughly under potable hot
water (approximately 40°C).
If you want to also perform the cleaning for DISINFECTION, jump to the DISINFECTION
paragraph.
After having sanitised the accessories, shake them vigorously and place them on a paper
towel. Alternatively, dry them with a jet of hot air (for example, a hair dryer).
DISINFECTION
After sanitising the nebuliser cup and the accessories, disinfect them choosing one of the
methods described below.
method A: Accessories 1-2-3-4-5-6-8-9-11.1-11.2-11.3-11.4 can be disinfected.
The disinfectant must be an electrolytic chloroxidizer (active principle: sodium hypochlorite)
specic for disinfecting, which is available in any pharmacy.
Implementation:
- Fill a container big enough to hold all of the parts to disinfect with a solution of potable
water and disinfectant, according to the proportions indicated on the packaging of the
disinfectant.
- Completely immerse each part in the solution, taking care to avoid the formation of air
bubbles on the parts. Leave the parts immersed for the amount of time indicated on the
packaging of the disinfectant associated with the concentration chosen for the solution.
- Remove the disinfected parts and rinse abundantly with warm potable water.
- Dispose of the solution following the instructions provided by the disinfectant
manufacturer.
method B: Sanitise the accessories 1-2-5-6-8-9-11.1-11.2-11.3-11.4 by boiling them in
water for 20 minutes; use demineralised or distilled water to prevent calcium deposits.
method C: Sanitise the accessories 1-2-5-6-8-9-11.1-11.2-11.3-11.4 with a hot steam
steriliser for baby-bottle (not the microwave type). Perform the process faithfully following
the instructions of the steriliser. To ensure that the disinfection is eective, choose a steriliser
with an operating cycle of at least 6 minutes.
After having disinfected the accessories, shake them vigorously and place them on a paper
towel. Alternatively, dry them with a jet of hot air (for example, from a hair dryer).
CLEANING IN A CLINICAL OR HOSPITAL SETTING - DISINFECTION AND STERILISATION
Before disinfection or sterilisation, sanitise the nebuliser cup and the accessories, choosing
one of the methods described below.
method A: Sanitise accessories 1-2-3-4-5-6-8-9-11.1-11.2-11.3-11.4 under potable hot
water (approximately 40°C) with a gentle, non abrasive dish detergent.
method B: Sanitise accessories 1-2-3-4-5-6-8-9-11.1-11.2-11.3-11.4 in the dishwasher with
10
a hot cycle.
DISINFECTION
Accessories 1-2-3-4-5-6-8-9-11.1-11.2-11.3-11.4. can be disinfected.
The disinfectant must be an electrolytic chloroxidizer (active principle: sodium hypochlorite)
specic for disinfecting, which is available in any pharmacy.
Implementation:
- Fill a container big enough to hold all of the parts to disinfect with a solution of potable
water and disinfectant, according to the proportions indicated on the packaging of the
disinfectant.
- Completely immerse each part in the solution, taking care to avoid the formation of air
bubbles on the parts. Leave the parts immersed for the amount of time indicated on the
packaging of the disinfectant associated with the concentration chosen for the solution.
- Remove the disinfected parts and rinse abundantly with warm potable water.
- Dispose of the solution following the instructions provided by the disinfectant
manufacturer.
If you want to also perform the STERILISATION, jump to the STERILISATION paragraph.
After having disinfected the accessories, shake them vigorously and place them on a paper
towel. Alternatively, dry them with a jet of hot air (for example, from a hair dryer).
STERILISATION
Accessories 1-2-5-6-9-11.1-11.2-11.3-11.4 can be sterilised.
Device: Fractionated vacuum overpressure steam steriliser in accordance with EN 13060.
Implementation: Wrap every single part to be treated with a sterile barrier system or
packaging in accordance with Norm EN 11607. Place the packed components in the steam
steriliser. Run the sterilisation cycle according to the operating instructions of the device by
selecting a temperature of 134°C and a time of 10 minutes rst.
Storage: Store the sterilised parts as per the instructions for use of either the sterile barrier
system or packaging.
The sterilisation procedure is validated in its conformity to ISO 17665-1.
For the
CLEANING, SANITISATION, DISINFECTION, STERILISATION
of accessories 7
follow the instructions in the instruction manual.
RF7 Dual Speed Plus Nebulizer
Operating conditions:
Temperature: min 10°C; max 40°C
Air humidity: min 10%; max 95%
Atmospheric pressure: min 69KPa; max 106KPa
In compliance with 93/42/EEC Directive
Minimum ll volume: 2 ml
Maximum ll volume: 8 ml
Storage conditions:
Temperature: min -25°C; max 70°C
Air humidity: min 10%; max 95%
Atmospheric pressure: min 69KPa; max 106KPa
APPLIED PARTS
The applied parts of type BF are:
patient accessories (1,2,3,4,5,6,7)
(2) MMAD (μm)
(2) BREATHABLE
FRACTION
< 5 μm (FPF) %
(1) DELIVERY ml/min
FLAEM com-
pressor range Pressure Min
With
valve Max Min
With
valve Max Min
With
valve Max
Portable 0.75 bar 2.95 2.44 74.7 80.7 0.18 0.42
F700/F1000 1.00 bar 2.72 2.53 77.8 79.6 0.23 0.53
F2000 1.40 bar 2.21 2.38 84.2 81.5 0.29 0.65
(1) Data shown is in accordance with Flaem Nuova internal procedure I29-P07.5.
In vitro testing(1) certied by TÜV Rheinland LGA Products GmbH – Germany in compliance with the European
Standard EN 13544-1 ANNEX CC for nebulizing systems. More details are available on request.
TECHNICAL SPECIFICATIONS

11
FRANÇAIS
NÉBULISEUR POUR AÉROSOLTHÉRAPIE
Félicitations pour votre achat et merci pour avoir choisi notre produit.
Notre objectif est de satisfaire complètement nos clients en leur orant des produits
à l’avant-garde dans le traitement des maladies des voies respiratoires. Lisez
attentivement ces instructions et conservez-les pour de futures consultations.
Utilisez les accessoires uniquement comme décrit dans ce mode d’emploi. Il
s’agit d’un dispositif médical destiné à nébuliser et administrer des médicaments
prescrits ou recommandés par un médecin.
Visitez notre site Internet www.aem.it pour voir la gamme complète des produits
Flaem.
ACCESSOIRES QUI PEUVENT ÊTRE UTILISÉS
AVEC CE NÉBULISEUR
1 Embout nasal pédiatrique
2 Embout nasal adulte
3 Masque pédiatrique
4 Masque adulte
5 Embout buccal avec valve
6 Embout nasal non invasif
7 Set masque bébé (voir son mode d’emploi)
8 Commande manuelle de nébulisation
9 Connecteur
10 Tuyau de connexion de 1 ou 2 m
NÉBULISEUR
11 Nébuliseur RF7 Dual Speed Plus
11.1 - Partie inférieure
11.2 - Busette
11.3 - Partie supérieure
11.4 - Sélecteur de vitesse avec soupape
PRECAUTIONS IMPORTANTES
- Il s’agit d’un dispositif médical (Conforme à la Directive 93/42/CE) et il doit être utilisé
avec des médicaments prescrits et recommandés par un médecin. Avant d’utiliser les
accessoires, consultez le mode d’emploi de l’appareil. Il est important que le patient lise
et comprenne les instructions concernant l’utilisation de l’appareil et du nébuliseur.
Contactez votre revendeur ou votre centre d’assistance pour toute question.
- Dans le cas d’utilisation fréquente, on conseille de remplacer le nébuliseur tous les 6
mois (ou avant si le nébuliseur est obstrué) an de garantir l’ecacité thérapeutique
maximale.
- Les enfants et les personnes non auto susantes devraient utiliser le nébuliseur seule-
ment sous l’étroite supervision d’un adulte qui a lu ce mode d’emploi.
- Le nébuliseur inclus des parties très petites qui peuvent être avalées par les enfants;
conservez donc le nébuliseur hors de la portée des enfants.
INSTRUCTIONS POUR L'EMPLOI
Avant chaque utilisation, se laver soigneusement les mains et nettoyer l'appareil,
comme décrit au paragraphe « NETTOYAGE, ASSAINISSEMENT, DÉSINFECTION, STÉ-
RILISATION ».
L'ampoule et les accessoires sont uniquement à usage personnel an d'éviter les
risques éventuels d'infection par contagion.
Lors de l'application, il est conseillé de se protéger de façon appropriée contre les écoule-
ments éventuels.
1. Insérer la buse (11.2) dans la partie supérieure (11.3) en appuyant comme indiqué
par les 2 èches sur le « Schéma de connexion » au point 11. Insérer le sélecteur de
vitesse à valve (11.4) dans la partie supérieure (11.3) comme indiqué sur le « Schéma de
connexion » au point 11.
2. Versez le médicament prescrit dans la partie inférieure (11.3). Fermez le nébuliseur en
tournant la partie supérieure (11.1) dans le sens des aiguilles d’une montre.
3. Connectez les accessoires comme indiqué dans le “Schéma de Connexion”. Asseyez-
vous confortablement, prenez le nébuliseur dans la main, portez l’embout buccal à la
bouche ou bien utilisez l’embout nasal, le masque ou le set masque bébé.
4. Allumez l’appareil (voir son mode d’emploi). Inspirez doucement à fond ; après l’inspi-
ration, on conseille de retenir la respiration un instant an que les gouttes d’aérosol
inhalées puissent se déposer. Ensuite expirez lentement.
5. Une fois l’application terminée, éteignez l’appareil.
ATTENTION: Si, après la séance thérapeutique, un dépôt d'humidité se forme à l'intérieur
12
MASQUES SOFTTOUCH
Les masques SoftTouch sont dotés d’un bord en
matériau souple biocompatible qui garantit
une excellente adhérence au visage et d’une fente
pour limiter la dispersion du médicament qui
permettent une plus grande sédimentation du
médicament dans les poumons tout en limitant sa
dispersion dans l’air.
Durant la phase d’inspiration,
la fente se plie à l’intérieur du
masque
Durant la phase d’expiration,
la fente se plie à l’extérieur du
masque
Matériau souple
biocompatible
Fente limitative
de dispersion
EMPLOI DU NÉBULISEUR“RF7 DUAL SPEED PLUS”AVEC SÉLECTEUR DE VITESSE ET
SYSTÈME À VALVE
Ce nébuliseur est professionnel, rapide, indiqué pour l’administration de
tous les types de médicaments, y compris ceux les plus chers, même à ces
patients qui sourent de pathologies chroniques.
La géométrie des conduits internes du nébuliseur RF7 Dual Speed Plus
garantit la dimension des particules idéale pour un traitement ecace
jusqu’aux basses voies respiratoires.
An de rendre la thérapie par inhalation plus rapide, appuyez avec le
doigt sur l’inscription MAX du sélecteur de vitesse avec soupape (11.4).
Cette conguration est également appropriée pour l’utilisation des
embouts nasaux 1, 2.
An de rendre la thérapie par inhalation plus ecace, appuyez avec le
doigt sur la partie opposée à l’inscription MAX du sélecteur de vitesse
avec soupape (11.4).
Dans ce cas, le système à valve dont le nébuliseur, l’embout buccal et le masque sont
dotés, permet d’obtenir l’administration optimale du médicament jusqu’aux basses voies
respiratoires, tout en réduisant la dispersion du médicament dans l’environnement.
UTILISATION DE LA COMMANDE MANUELLE DE NEBULISATION
Pour obtenir une nebulisation continue il est conseille de ne pas appliquer la commande
manuelle de nebulisation (8), surtout avec des enfants ou des personnes qui ne sont pas
autonomes. La commande manuelle de nebulisation est utile an de limiter la dispersion
du medicament dans l’environnement.
Pour activer la vaporisation, boucher le trou
de la commande manuelle de
vaporisation (8) avec un doigt et
inspirer doucement à fond; on
conseille, après avoir inspiré, de
retenir sa respiration un instant
an que les gouttes d’aérosol
inhalées puissent se déposer ;
pour désactiver la vaporisation, retirer
le doigt du trou de la com-
mande manuelle de vapo-
risation; on évite ainsi de
gaspiller le médicament et
on optimise son acquisition.
Ensuite, expirer lentement.
du tube (10), détacher le tube du nébuliseur pour le sécher avec la ventilation du compres-
seur ; cette opération permet d'éviter la prolifération de moisissures à l'intérieur du tube.
MAX

13
NETTOYAGE, ASSAINISSEMENT, DÉSINFECTION, STÉRILISATION
Éteindre l'appareil avant toute opération de nettoyage et débrancher le câble de réseau de la prise.
APPAREIL ET EXTÉRIEUR DU TUBE
Utiliser uniquement un chion imbibé de détergent antibactérien (non abrasif et sans aucun
solvant).
ACCESSOIRES
Ouvrir le nébuliseur en tournant la partie supérieure (11.3) dans le sens d'une aiguille d'une
montre, détacher la buse (11.2) de la partie supérieure (11.3) en appuyant comme indiqué par
les 2 èches sur le « Schéma de connexion » au point 11.
Procéder ainsi en respectant les instructions rapportées ci-dessous.
NETTOYAGE EN ENVIRONNEMENT DOMESTIQUE - ASSAINISSEMENT ET DÉSINFECTION
ASSAINISSEMENT
Avant et après chaque utilisation, assainir l'ampoule et les accessoires en choisissant l'une des
méthodes décrites ci-après.
méthode A : Laver les accessoires
1-2-3-4-5-6-8-9-11.1-11.2-11.3-11.4
sous l'eau chaude
potable (à environ 40°) avec un détergent délicat pour la vaisselle (non abrasif).
méthode B : Laver les accessoires
1-2-3-4-5-6-8-9-11.1-11.2-11.3-11.4
en lave-vaisselle sur
le cycle chaud.
méthode C : Laver les accessoires
1-2-3-4-5-6-8-9-11.1-11.2-11.3-11.4
en les plongeant dans
un mélange d'eau à 50% et 50% de vinaigre blanc ; rincer ensuite abondamment avec de l'eau
chaude potable (à environ 40°).
Si l'on désire également DÉSINFECTER, suivre les indications du paragraphe DÉSINFECTION.
Après avoir assaini les accessoires, les secouer énergiquement et les poser sur une serviette
en papier ou les faire sécher au moyen d'un jet d'air chaud (par exemple, sèche-cheveux).
DÉSINFECTION
Après avoir lavé l'ampoule et les accessoires, les désinfecter en choisissant l'une des méthodes
décrites ci-après.
méthode A : Les accessoires qu'il est possible de désinfecter sont
1-2-3-4-5-6-8-9-11.1-11.2-
11.3-11.4.
Utiliser un désinfectant du type chlore électrolytique (principe actif : hypochlorite
de sodium), spécique pour la désinfection et disponible dans toutes les pharmacies.
Exécution :
- Remplir un récipient dont les dimensions sont adaptées à contenir chaque composant à
désinfecter avec une solution à base d'eau potable et de désinfectant, en respectant les
doses indiquées sur l'emballage du désinfectant.
- Immerger complètement chaque composant dans la solution, en prenant soin d'éviter la
formation de bulles d'air en contact avec les composants. Laisser les composants immergés
pendant la durée indiquée sur l'emballage du désinfectant et associée à la concentration
choisie pour la préparation de la solution.
- Retirer les composants désinfectés et les rincer abondamment à l'eau potable tiède.
- Éliminer la solution selon les indications fournies par le fabricant du désinfectant.
méthode B : Désinfecter les accessoires
1-2-5-6-8-9-11.1-11.2-11.3-11.4
en faisant bouillir
dans de l'eau pendant 20 minutes ; utiliser de l'eau déminéralisée ou distillée pour éviter tout
dépôt de calcaire.
méthode C : Désinfecter les accessoires
1-2-5-6-8-9-11.1-11.2-11.3-11.4
avec un stérilisateur
à chaud pour biberon du type à vapeur (pas à micro-ondes). Respecter à la lettre les instructions
du stérilisateur. Pour une désinfection ecace, choisir un stérilisateur avec un cycle de
fonctionnement d'au moins 6 minutes.
Une fois que les accessoires sont désinfectés, les secouer énergiquement et les poser sur une
serviette en papier ou les faire sécher au moyen d'un jet d'air chaud (par exemple, sèche-cheveux).
NETTOYAGE EN ENVIRONNEMENT CLINIQUE OU HOSPITALIER - DÉSINFECTION ET
STÉRILISATION
Avant de désinfecter ou stériliser, laver l'ampoule et les accessoires en choisissant l'une des
méthodes décrites ci-après.
méthode A : Laver les accessoires
1-2-3-4-5-6-8-9-11.1-11.2-11.3-11.4
sous l'eau chaude
potable (à environ 40°) avec un détergent délicat pour la vaisselle (non abrasif).
méthode B : Laver les accessoires
1-2-3-4-5-6-8-9-11.1-11.2-11.3-11.4
en lave-vaisselle sur
14
Nébuliseur RF7 Dual Speed Plus
Conditions de fonctionnement:
Température: min 10°C; max 40°C
Humidité air: min 10%; max 95%
Pression atmosphérique: min 69KPa; max 106KPa
Conforme à la Directive 93/42CE
Capacité de remplissage min: 2 ml
Capacité de remplissage max: 8 ml
Conditions de stockage:
Température: min -25°C; max 70°C
Humidité air: min 10%; max 95%
Pression atmosphérique: min 69KPa; max 106KPa
PARTIES APPLIQUÉES
Les parties appliquées de type BF sont:
accessoires patient (1,2,3,4,5,6,7)
(2) MMAD (μm)
(2) FRACTION
RESPIRABLE
< 5 μm (FPF) %
(1) DÉBIT ml/min
Famille
compresseurs
FLAEM Pression Min
Avec
valve Max Min
Avec
valve Max Min
Avec
valve Max
Portable 0,75 bar 2,95 2,44 74,7 80,7 0,18 0,42
F700/F1000 1,00 bar 2,72 2,53 77,8 79,6 0,23 0,53
F2000 1,40 bar 2,21 2,38 84,2 81,5 0,29 0,65
(1) données mesurées selon la procédure interne de Flaem Nuova Nr. I29-P07.5
(2) données mesurées selon la procédure de caractérisation in vitro certiée par TÜV Rheinland LGA Products
GmbH– Allemagne conformément au nouveau Standard Européen Nr. EN 13544-1, ANNEXE CC pour les appareils
d’aérosolthérapie. Des détails supplémentaires sont disponibles sur demande.
le cycle chaud.
DÉSINFECTION
Les accessoires qu'il est possible de désinfecter sont
1-2-3-4-5-6-8-9-11.1-11.2-11.3-11.4.
Utiliser un désinfectant du type chlore électrolytique (principe actif : hypochlorite de sodium),
spécique pour la désinfection et disponible dans toutes les pharmacies.
Exécution :
- Remplir un récipient dont les dimensions sont adaptées à contenir chaque composant à
désinfecter avec une solution à base d'eau potable et de désinfectant, en respectant les
doses indiquées sur l'emballage du désinfectant.
- Immerger complètement chaque composant dans la solution, en prenant soin d'éviter la
formation de bulles d'air en contact avec les composants. Laisser les composants immergés
pendant la durée indiquée sur l'emballage du désinfectant et associée à la concentration
choisie pour la préparation de la solution.
- Retirer les composants désinfectés et les rincer abondamment à l'eau potable tiède.
- Éliminer la solution selon les indications fournies par le fabricant du désinfectant.
Si vous désirez aussi STÉRILISER suivre les instructions du paragraphe STÉRILISATION
Après avoir désinfecté les accessoires, les secouer énergiquement et les poser sur une serviette
en papier ou les faire sécher au moyen d'un jet d'air chaud (par exemple, sèche-cheveux).
STÉRILISATION
Les accessoires qu'il est possible de désinfecter sont
1-2-5-6-9-11.1-11.2-11.3-11.4
.
Appareil : Stérilisateur à vapeur à vide fractionné et surpression conforme à la norme EN 13060.
Exécution : Emballer chaque composant à traiter en système ou emballage à barrière stérile
conforme à la norme EN 11607. Introduire les composants emballés dans le stérilisateur à
vapeur. Eectuer le cycle de stérilisation en respectant le mode d'emploi de l'appareil et en
sélectionnant une température de 134°C et une durée de 10 minutes.
Conservation : Conserver les composants stérilisés comme indiqué par les instructions
d'utilisation du système ou emballage à barrière stérile.
La procédure de stérilisation est validée conformément au règlement ISO 17665-1.
Pour le NETTOYAGE, ASSAINISSEMENT, DÉSINFECTION, STÉRILISATION des accessoires 7
reportez-vous à leur mode d’emploi.
CARACTERISTIQUES TECHNIQUES

15
NEDERLANDS
AMPUL VOOR AEROSOL THERAPIE
We danken u voor uw aankoop en uw vertrouwen in ons product. Het is ons doel onze
klanten tevreden te stellen door hen vooruitstrevende producten op het gebied van
behandeling van luchtwegproblemen te bieden. Lees deze instructies aandachtig en
bewaar ze voor latere raadpleging. Gebruik de accessoire alleen zoals beschreven
in deze handleiding. Dit is een medisch apparaat voor verneveling en toediening
van medicijnen die zijn voorgeschreven of aangeraden door uw arts. Het volledige
productaanbod van Flaem is te zien op de website www.aem.it
COMPATIBELE ACCESSOIRES
1 Neusinhalator voor kinderen
2 Neusinhalator voor volwassenen
3 Masker voor kinderen
4 Masker voor volwassenen
5 Mondstuk met ventiel
6 Niet-invasieve neusinhalator
7 Set voor pasgeborenen
(zie bijbehorende instructiehandleiding)
8 Handmatige bediening vernevelaar
9 Aansluiting
10 Verbindingsbuis van 1 of 2 m
VERNEVELAAR
11 Vernevelaar RF7 Dual Speed Plus
11.1 - Onderkant
11.2 - Sproeier
11.3 - Bovenkant
11.4 - Snelheidsschakelaar ventiel met
LET OP
- Dit is een medisch apparaat (conform de richtlijn 93/42/CEE) en moet worden gebruikt
met door uw arts voorge schreven of aangeraden medicijnen. Raadpleeg eerst de ge-
bruiksaanwijzing van het apparaat, voordat u de accessoires gebruikt. De patiënt dient
voor gebruik de informatie te lezen en te begrijpen. Neem bij vragen contact op met
uw verkoper of de klantenservice.
- Het wordt aangeraden de ampul bij intensief gebruik iedere 6 maanden te vervangen
(of eerder als de ampul is geblokkeerd) om altijd de maximale therapeutische werking
te garanderen.
- Bij kinderen en niet zelfstandige volwassenen dient het apparaat te worden gebruikt
onder supervisie van een volwassene die de huidige handleiding heeft gelezen.
- Enkele onderdelen van het apparaat zijn zo klein dat ze ingeslikt kunnen worden door
kinderen: bewaar het apparaat daarom buiten het bereik van kinderen.
GEBRUIKSINSTRUCTIES
Vóór ieder gebruik moet u zorgvuldig uw handen wassen en het apparaat reinigen,
zoals beschreven in de paragraaf “REINIGING, SANERING, DESINFECTIE en STERILI-
SATIE”.
De ampul en de accessoires zijn uitsluitend voor persoonlijk gebruik, om elk risico
van infecties en besmetting te voorkomen.
Tijdens de behandeling is het aanbevolen om zich tegen eventuele druppels te bescher-
men.
1. Plaats het spruitstuk (11.2) op het bovendeel (11.3) en druk zoals aangeduid door de pij-
len in het “Aansluitschema” in punt 11. Plaats de snelheidsschakelaar met ventiel (11.4)
op het bovendeel (11.3), zoals aangeduid in het“Aansluitschema”in punt 11.
2. Giet de door de arts voorgeschreven medicatie in de onderkant (11.3). Sluit de verneve-
laar door bovenkant (11.1) met de klok mee te draaien.
3. Sluit de accessoires aan zoals aangeven in het “Aansluitschema”. Ga comfortabel zitten
en hou de vernevelaar in uw hand, plaats het mondstuk aan uw mond of gebruik de
neusinhalator, het masker of de set voor pasgeborenen.
4. Zet het apparaat in werking (zie de bijbehorende instructiehandleiding). Adem rustig en
diep in; hou de adem even in na inhalatie, zodat de aerosoldruppels hun werk kunnen
doen. Adem daarna langzaam uit.
5. Zet het toestel na de behandeling uit en haal de stekker uit het stopcontact.
LET OP: Wanneer er zich na de therapeutische sessie een duidelijke afzetting van vocht
in de slang (10) vormt, moet u de slang van de vernevelaar loskoppelen en drogen met
behulp van de ventilatie van de compressor; dit voorkomt de mogelijke ontwikkeling van
schimmels in de slang.

16
SOFTTOUCH MASKERS
De SoftTouch maskers hebben een buitenrand van
zacht biocompatibel materiaal dat een optimale
aansluiting op het gezicht garandeert. De maskers zijn
daarnaast voorzien van een innovatieve Dispersie
Begrenzer. Deze onderscheidende eigenschappen
maken een betere sedimentatie van het medicijn in
de patiënt mogelijk en beperken ook in dit geval de
verspreiding.
In de inhalatiefase vouwt het
lipje, dat dient als Dispersie
Begrenzer, naar de binnenkant
van het masker.
In de exhalatiefase vouwt het lipje,
dat dient als Dispersie Begrenzer,
naar de buitenkant van het masker.
Zacht materiaal
biocompatibel
Dispersie
Begrenze
Activeer de vernevelaar door de opening
van de handmatige bediening
(8) met een vinger af te sluiten
en adem langzaam diep in. We
raden u aan om de adem een
aantal tellen in te houden zodat
de aerosoldruppels zich kunnen
afzetten,
Deactiveer ondertussen de verneveling
door uw vinger van e opening
van de handmatige bediening
te halen, zodat u geen genees-
middel verspilt en u de ver-
werving zoveel mogelijk op-
timaliseert. Adem vervolgens
langzaam uit.
GEBRUIK VAN DE HANDMATIGE BESTURING VAN DE VERNEVELAAR
Voor een constante verneveling wordt aangeraden niet de handmatige besturing voor
de vernevelaar (8) te gebruiken, vooral in het geval van kinderen en niet zelfstandige
volwassenen. De handmatige besturing van de verneveling is nuttig om de verspreiding
van de medicatie in de omgeving te beperken.
MANIEREN OM DE VERNEVELAAR “RF7 DUAL SPEED PLUS” MET SNELHEIDSSCH
KELAAR EN VENTIELSYSTEEM TE GEBRUIKEN
Het is een professioneel, snel en aangeraden product voor het toedienen
van alle soorten medicatie, inclusief de meest dure, en tevens geschikt
voor patiënten met chronische aandoeningen. Dankzij de geometrie van
de interne kanalen van de vernevelaar RF7 Dual Speed Plus, komt er een
actieve korrelverdeling tot stand die zelfs bijdraagt aan het genezen van
de diepe luchtwegen.
Om de inhalatietherapie te versnellen kunt u de snelheidsschakelaar
(11.4) instellen door met een vinger op de tekst MAX te drukken. Deze
instelling is ook geschikt voor het gebruik van de neusinhalatoren 1, 2.
Om de inhalatietherapie nog doeltreender te maken, verandert u de
snelheid door met een vinger op de kant tegenover het opschrift MAX
te drukken. U verkrijgt zo een optimale verwerving van het medicijn,
doordat de verspreiding hiervan in de omgeving wordt verminderd
dankzij het ventielsysteem waarmee de ampul, het mondstuk en het
masker zijn uitgerust.
MAX

17
REINIGING, SANERING, DESINFECTIE EN STERILISATIE
Schakel het apparaat uit vóór elke reinigingsbeurt en ontkoppel de netkabel.
APPARAAT EN BUITENKANT VAN DE BUIS
Gebruik alleen een doek, bevochtigd met een antibacterieel reinigingsmiddel (niet schurend
en zonder solventen).
ACCESSOIRES
Open de vernevelaar door het bovendeel (11.3) linksom te draaien, verwijder het mondstuk
(11.2) van het bovendeel (11.3) door te drukken, zoals aangeduid door de 2 pijlen in het“Aan-
sluitschema”van punt 11.
Vervolg op basis van de onderstaande insstructies
REINIGING THUIS - SANERING EN DESINFECTIE
SANERING
Saneer de ampul en de accessoires met een van de hierna beschreven methoden voor en na
elk gebruik.
methode A: Saneer de accessoires 1-2-3-4-5-6-8-9-11.1-11.2-11.3-11.4 onder warm kraan-
water (circa 40°C) met behulp van een mild afwasmiddel (niet schurend).
methode B: De accessoires 1-2-3-4-5-6-8-9-11.1-11.2-11.3-11.4 in de vaatwasser saneren
met warme cyclus.
methode C: De accessoires 1-2-3-4-5-6-8-9-11.1-11.2-11.3-11.4 saneren door ze onder te
dompelen in een oplossing van 50% water en 50% witte azijn, vervolgens overvloedig spoe-
len met warm kraanwater (circa 40°C).
Ga rechtstreeks naar de paragraaf DISINFECTIE als u naast de reiniging ook de DISINFECTIE
wenst uit te voeren.
Na het saneren van de accessoires, het water er goed afschudden en ze op keukenpapier leg-
gen. Ze kunnen ook met warme lucht worden gedroogd (met een haardroger bij voorbeeld).
DESINFECTIE
Na het saneren de ampul en de accessoires met een van de hierna beschreven methoden
ontsmetten.
methode A: De accessoires die u kunt desinfecteren zijn
1-2-3-4-5-6-8-9-11.1-11.2-11.3-11.4
.
Het te gebruiken ontsmettingsmiddel is geëlektrolyseerd bleekwater (werkzame stof: natri-
umhypochloriet), speciek voor de desinfectie en verkrijgbaar bij de apotheek.
Uitvoering:
- Vul een recipiënt met geschikte afmetingen - om alle afzonderlijk te desinfecteren onder-
delen te bevatten - met een oplossing op basis van leidingwater en een desinfectans en
neem hierbij de verhouding in acht die op de verpakking van het desinfectans staat.
- Dompel elk afzonderlijk onderdeel volledig in de oplossing en zorg ervoor dat geen lucht-
bellen op de onderdelen worden gevormd. Op de verpakking van het desinfectans staat
hoe lang de onderdelen ondergedompeld moeten blijven, afhankelijk van de concentratie
die voor de bereiding van de oplossing gekozen is.
- Haal na het verstrijken van de correcte tijd de onderdelen uit de oplossing en spoel ze
overvloedig met lauw leidingwater.
- Verwijder de oplossing volgens de aanwijzingen van de fabrikant van het desinfectans.
methode B: Ontsmet de accessoires 1-2-5-6-8-9-11.1-11.2-11.3-11.4 door ze 20 minuten
in water te koken; gebruik gedemineraliseerd of gedistilleerd water om kalkvorming te voor-
komen.
methode C: Ontsmet de accessoires
1-2-5-6-8-9-11.1-11.2-11.3-11.4
warm met een stoom-
sterilisator voor babyessen (geen microgolf). Volg hierbij zorgvuldig de instructies van de ste-
rilisator. Voor een eciënte sterilisatie moet u kiezen voor een cyclus van minstens 6 minuten.
Na het desinfecteren van de accessoires moet u het water er krachtig afschudden en ze op
keukenpapier leggen. Ze kunnen ook met warme lucht worden gedroogd (bijvoorbeeld
met een haardroger).
REINIGING IN VERPLEEGINRICHTINGEN - DISINFECTIE EN STERILISATIE
Voor de ampul en de accessoires te ontsmetten, moeten ze gesaneerd worden met een van
de hierna beschreven methoden.
methode A: Saneer de accessoires 1-2-3-4-5-6-8-9-11.1-11.2-11.3-11.4 onder warm kraan-
water (circa 40°C) met behulp van een mild afwasmiddel (niet schurend).
18
methode B: Saneer de accessoires 1-2-3-4-5-6-8-9-11.1-11.2-11.3-11.4 in de vaatwasser
met warme cyclus.
DESINFECTIE
De accessoires die u kunt desinfecteren zijn 1-2-3-4-5-6-8-9-11.1-11.2-11.3-11.4.
Het te gebruiken ontsmettingsmiddel is geëlektrolyseerd bleekwater (werkzame stof: natri-
umhypochloriet), speciek voor de desinfectie en verkrijgbaar bij de apotheek.
Uitvoering:
- Vul een recipiënt met geschikte afmetingen - om alle afzonderlijk te desinfecteren onder-
delen te bevatten - met een oplossing op basis van leidingwater en een desinfectans en
neem hierbij de verhouding in acht die op de verpakking van het desinfectans staat.
- Dompel elk afzonderlijk onderdeel volledig in de oplossing en zorg ervoor dat geen lucht-
bellen op de onderdelen worden gevormd. Op de verpakking van het desinfectans staat
hoe lang de onderdelen ondergedompeld moeten blijven, afhankelijk van de concentratie
die voor de bereiding van de oplossing gekozen is.
- Haal na het verstrijken van de correcte tijd de onderdelen uit de oplossing en spoel ze
overvloedig met lauw leidingwater.
- Verwijder de oplossing volgens de aanwijzingen van de fabrikant van het desinfectans.
Ga rechtstreeks naar de paragraaf STERILISATIE als u tevens de STERILISATIE wenst uit te voeren
Na het desinfecteren van de accessoires moet u het water er krachtig afschudden en ze op
keukenpapier leggen. Ze kunnen ook met warme lucht worden gedroogd (bijvoorbeeld
met een haardroger).
STERILISATIE
De accessoires die u kunt desinfecteren zijn 1-2-5-6-9-11.1-11.2-11.3-11.4.
Apparatuur Stoomsterilisator met gefractioneerd vacuüm en overdruk conform de norm EN 13060.
Uitvoering: Verpak elk afzonderlijk onderdeel in een systeem of verpakking met steriele bar-
rière, conform de norm EN 11607. Doe de verpakte componenten in de stoomsterilisator.
Voer de sterilisatiecyclus uit volgens de gebruiksaanwijzingen van het apparaat en selecteer
een temperatuur van 134°C en een tijd van 10 minuten.
Bewaring: Bewaar de gesteriliseerde onderdelen zoals aangeduid wordt in de gebruiksin-
structies van het gekozen systeem of in de verpakking met steriele barrière.
De sterilisatieprocedure gevalideerd volgens ISO 17665-1.
Voor de
REINIGING, SANERING, DESINFECTIE EN STERILISATIE
van de accessoires 7,
raadpleeg de desbetreende gebruikershandleiding.
Ampul RF7 Dual Speed Plus
Gebruiksvoorwaarden:
Temperatuur: min 10°C; max 40°C
Luchtvochtigheid: min 10%; max 95%
Atmosferische druk: min 69KPa; max 106KPa
Conform de norm 93/42 CEE
Minimale capaciteit medicatie: 2 ml
Maximale capaciteit medicatie: 8 ml
Bewaarinstructies:
Temperatuur: min -25°C; max 70°C
Luchtvochtigheid: min 10%; max 95%
Atmosferische druk: min 69KPa; max 106KPa
GEBRUIKTE ONDERDELEN
Gebruikte onderdelen type BF:
accessoires patiënt (1,2,3,4,5,6,7)
(2) MMAD (μm)
(2) INHALEERBAAR
DEEL
< 5 μm (FPF) %
(1) DISTRIBUTIE ml/
min
Compres-
sor familie
FLAEM Druk Min Met
ventiel Max Min Met
ventiel Max Min Met
ventiel Max
Draagbaar 0,75 bar 2,95 2,44 74,7 80,7 0,18 0,42
F700/F1000 1,00 bar 2,72 2,53 77,8 79,6 0,23 0,53
F2000 1,40 bar 2,21 2,38 84,2 81,5 0,29 0,65
(1) relevante gegevens volgens interne procedure Flaem I29-P07.5 (2) Karakterisering in vitro gecerticeerd door TÜV
Rheinland LGA Products GmbH– Germany conform de nieuwe Europese Norm voor aerosoltherapie apparaten, Norm
EN 13544-1, ANNEX CC. Op verzoek is er meer informatie beschikbaar.
TECHNISCHE EIGENSCHAPPEN

19
DEUTSCH
ZERSTÄUBER FÜR AEROSOLTHERAPIE
Wir beglückwünschen Sie zu Ihrem Kauf und danken Ihnen für Ihr Vertrauen. Wir haben
es uns zum Ziel gesetzt, den Vorstellungen unserer Kunden gerecht zu werden und
moderne Produkte für die Behandlung von Atemwegserkrankungen anzubieten. Diese
Bedienungsanleitung aufmerksam durchlesen und sorgfältig aufbewahren, damit
sie auch zu einem späteren Zeitpunkt zu Rate gezogen werden kann. Das Gerät
nur entsprechend der Bedienungsanleitung verwenden. Es handelt sich um ein
Medizingerät zur Zerstäubung und Verabreichung von Medikamenten, die von dem
behandelnden Arzt verschrieben oder empfohlen wurden. Wir erinnern Sie daran, dass
Sie sich auf der Homepage www.aem.it über die gesamte Produktpalette von Flaem
informieren können.
PASSENDES ZUBEHÖR
1 Nasenstück für Kinder
2 Nasenstück für Erwachsene
3 Maske für Kinder
4 Maske für Erwachsene
5 Mundstück mit Ventil
6 Ein nicht einzuführendes Nasenstück
7 Baby-Set (siehe spezische Bedienungs-
anleitung)
8 Manuelle Vernebelungssteuerung
9 Verbindungsstück
10 Verbindungsschläuche
1m oder 2 m lang
ZERSTÄUBER
11 Zerstäuber RF7 Dual Speed Plus
11.1 - Unterteil
11.2 - Düse
11.3 - Oberteil
11.4 - Geschwindigkeitswahlschalter
WICHTIGE HINWEISE
- Es handelt sich um ein Medizingerät (in Konformität mit der Richtlinie 93/42/CEE) und
muss mit Medikamenten benutzt werden, die von Ihrem behandelnden Arzt verschrei-
ben oder empfohlen wurden. Vor der Verwendung von Zubehör muss man die Bedie-
nungsanleitung des Gerätes aufmerksam durchlesen. Es ist wichtig, dass der Patient die
Informationen zur Bedienung durchliest und versteht. Sollten Sie Fragen haben, wenden
Sie sich an den Wiederverkäufer oder an einen Kundendienst.
- Es ist empfehlenswert, bei intensiver Verwendung den Zerstäuber alle 6 Monate (oder
früher, sollte der Zerstäuber verstopft sein) auszutauschen, um stets eine optimale thera-
peutische Wirkung gewährleisten zu können.
- Kinder und Behinderte sollten den Zerstäuber nur unter Aufsicht eines Erwachsenen be-
nutzen, der diese Bedienungsanleitung gelesen hat.
- Einige Komponenten des Zerstäubers sind sehr klein und könnten von Kindern ver-
schluckt werden; den Zerstäuber außer Reichweite von Kindern aufbewahren.
BEDIENUNGSANLEITUNG
Vor jedem Gebrauch gründlich die Hände waschen und das Gerät wie im Absatz "REI-
NIGUNG, ENTKEIMUNG, DESINFEKTION und STERILISATION" beschrieben reinigen.
Ampulle und Zubehör sind nur für den persönlichen Gebrauch, um die Gefahr einer
Infektion durch Ansteckung zu vermeiden.
Es wird empfohlen, sich während der Anwendung gut gegen eventuelles Tropfen zu schützen.
1. Die Düse (11.2) oben (11.3) einfügen, indem Sie, wie von den zwei Pfeilen im "Anschluss-
schema" Abschnitt 11 gezeigt, drücken. Den Geschwindigkeitswahlschalter mit Ventil
(11.4) oben (11.3) einfügen, wie im "Anschlussplan" im Abschnitt 11 beschrieben.
2. Das vom Arzt verschriebene Medikament in das Unterteil (11.3) geben. Den Zerstäuber
durch Drehen des Oberteils (11.1) im Uhrzeigersinn, schließen.
3. Schließen Sie die Zubehörteile gemäß dem“Anschlussschema”an. Setzen Sie sich bequem
hin und halten Sie den Zerstäuber in der Hand, das Mundstück an den Mund führen, oder
das Nasenstück, die Maske oder das Baby-Set benutzen.
4. Schalten Sie das Gerät ein (siehe Bedienungsanleitung). Langsam tief einatmen; nach dem
Einatmen ist es empfehlenswert den Atem kurz anzuhalten, damit sich die eingeatmeten
Aerosol-Tröpfchen absetzen können. Dann langsam ausatmen.
5. Nach der Anwendung das Gerät ausschalten und den Netzstecker abziehen.
ACHTUNG: Sollte sich nach der Therapie eine deutliche Ablagerung von Feuchtigkeit im
Inneren des Schlauchs (10) bilden, ziehen Sie den Schlauch aus dem Sprühgerät und trock-

20
SOFTTOUCH MASKE
Die SoftTouch Masken haben eine Umrandung aus
weichem, biologisch abbaubarem Material, das
eine optimale Haftung auf dem Gesicht garantiert,
darüber hinaus sind sie auch mit dem neuartigen Zer-
stäubungsbegrenzer ausgestattet. Diese besonderen
charakteristischen Elemente ermöglichen eine höhere
Sedimentation des Arzneimittels in dem Patienten und
auch in diesem Fall wird die Zerstäubung begrenzt.
Bei der Einatmung biegt sich
das Zünglein, das den Zerstäu-
bungsbegrenzer darstellt, in
das Innere der Maske.
Bei der Ausatmung biegt sich das
Zünglein, das den Zerstäubungs-
begrenzer darstellt, aus der Maske
heraus.
Weiches
biologisch
abbaubares
Material
Zerstreuungs-
begrenzer.
VERWENDUNG DER MANUELLEN VERNEBELUNGSSTEUERUNG
Um eine kontinuierliche Vernebelung zu erhalten, ist es empfehlenswert, besonders im Fall
von Kindern oder Personen mit Behinderungen, die manuelle Vernebelungssteuerung (8)
nicht zu verwenden. Die manuelleVernebelungssteuerung ist nützlich, um die Zerstreuung
des Arzneimittels in die Umgebung einzuschränken.
Zur Aktivierung der Zerstäubung, mit einem
Finger die Önung der manu-
ellen Zerstäubungssteuerung
(8) zuhalten und sanft tief ein-
atmen; es wird empfohlen nach
dem Einatmen den Atem anzu-
halten, damit sich die eingeat-
meten Aerosoltröpfchen abset-
zen können
In der Zwischenzeit den Finger von dem
Loch der manuellen Vernebe-
lungssteuerung nehmen, um
das Heilmittel optimal auf-
nehmen zu können.
Dann langsam ausatmen.
VERWENDUNG DES ZERSTÄUBERS “RF7 DUAL SPEED PLUS” MIT GESCHWINDIG
KEITSWAHLSCHALTER UND VENTILSYSTEM
Der schnelle, professionelle Zerstäuber eignet sich für die Verabreichung
sämtlicher Arzneimittel, einschließlich der teuersten; auch für Patienten
mit chronischen Erkrankungen. Dank der Geometrie der Innenkanäle des
Zerstäubers RF7 Dual Speed Plus hat man eine Granulometrie erhalten,
die sich für die Behandlung bis in die unteren Atemwege eignet.
Um die Inhalationstherapie zu beschleunigen, den Geschwindigkeits-
wahlschalter (11.4) mit Druck mit dem Finger auf die Schrift MAX, ein-
stellen. Diese Konguration eignet sich auch zur Verwendung mit den
Nasenstücken 1, 2.
Um die Inhalationstherapie wirkungsvoller zu gestalten, den Geschwin-
digkeitswahlschalter (11.4) positionieren, hierzu mit einem Finger auf
die Seite gegenüber dem Schriftzug Max drücken. Durch das neuartige
Ventilsystem, mit dem der Zerstäuber, das Mundstück und die Maske aus-
gestattet ist, erhält man eine Optimierung der therapeutischen Wirkung
und eine Reduzierung des Medikamentenaustritts in die Umgebung.
nen Sie ihn mit dem Gebläse des Kompressors; diese Maßnahme vermeidet eine mögliche
Verbreitung von Schimmel im Schlauch.
MAX
REINIGUNG, ENTKEIMUNG, DESINFEKTION UND STERILISIERUNG
Schalten Sie vor jeder Reinigung das Gerät ab und ziehen Sie das Netzkabel aus der Steckdose.
GERÄT UND AUSSENSEITE DES SCHLAUCHS
Verwenden Sie nur ein mit antibakteriellem (nicht scheuerndem und lösungsmittelfreiem)
Reinigungsmittel befeuchtetes Tuch.
ZUBEHÖR
Den Zerstäuber önen, dazu den oberen Teil (11.3) entgegen dem Uhrzeigersinn drehen
und die Düse (11.2) vom oberen Teil (11.3) abnehmen, indem Sie, wie von den zwei Pfeilen
im "Anschlussschema" im Abschnitt 11 gezeigt, drücken.
Table of contents
Languages:
Other Flaem Respiratory Product manuals


