SAGEMCOM D800 Alium User manual

USER GUIDE

1
Recommendations and safety
instructions 6
Your base 8
Your handset 9
Getting started with the phone 10
the base 10
the handset 11
Battery installation 11
Charging the handset 12
Using the screen 13
Browsing through the desktop 13
Starting an application (“Facebook”, for example) 14
Accessing the list of applications 15
Adding a desktop shortcut 16
From the list of applications 16
From the desktop 17
Adding a Widget to the desktop 18
Moving a desktop item 19
Move an item on the same page 19
Move an item To another page 20
Using folders on the desktop 21
Create a folder 21
rename a folder 22
Add item in a folder 23
Removing an item from the desktop 24
Rotating your screen display 25
Changing the desktop background image 26
Using the status bar 27
Viewing the status bar 28
Using the favourites bar 29
Using the virtual keyboard 30
Entering text 31
Copying/cutting text 32
Pasting text 33
Communicating 34
Making an outside call 34
Using the touch keypad 34
Using the dialling widget 35
From the phonebook 36
Answering a call 37
Managing double calls 38
Answering a second call 38
Making a second call 39
Switching between calls 43
Ending one of the calls in progress 43
Setting up a three-party conference call 44
Options during a call 45
Adjusting the volume 47
Enabling/Disabling the mute mode 48
Enabling/Disabling the speakerphone mode 49
Managing additional handsets 50
Transferring a call to another handset 50
Intrusion 51
Calling a second handset 52
Ending calls 53

2
Managing your contacts 54
Adding a new contact 54
Managing your contacts 55
Exporting/importing the list of contacts 56
Exporting the list of contacts 56
Importing the list of contacts 57
Adding a contact to the list of favourites 58
Removing a contact from the list of favourites 59
Managing the call log 60
Viewing the list of calls 60
Managing calls 61
Deleting all the numbers from the log. 62
Using the WIFI 63
Accessing the WIFI menu 63
Enabling/Disabling the WiFi 64
Joining a WIFI network 65
Surfing on the web 67
Opening a web page 67
Zoom in/out on a web page 68
Using Opera mini 69
Access applications (or games) via Opera Mini 69
Install applications (or games) via Opera Mini 70
Using the camera 71
Enabling the camera 71
Switching between the photo mode and the video mode 72
Using the camera in photo mode 73
Configuring photo quality 73
Take a photo 74
Using the camera in video mode 75
Configuring the video recording quality 75
Restoring the video camera default setting 76
Recording a video clip 77
Viewing your media 78
Accessing the gallery 78
Your photo albums 79
Managing your albums 79
Viewing your photos 80
Managing your photos 81
Viewing your video clips 82
Managing your video clips 83
listening to your music 84
Accessing the music library 84
Managing your music folders 85
Managing your playlists 86
Creating playlists 86
Adding files to a playlist 87
Managing your playlists 88
Removing files from the playlist 88
Playing a music file 89
Structure of the “Settings“ menu 90
Configuring your handset 91
Accessing the handset settings 91
Pairing a handset with the base 92
Customizing the handset’s registration 93
Selecting the priority base 94
Picking up automatically 95
Hanging up automatically 95
Resetting the handset 96

3
Check the status of the internal storage memory /
Micro SD card 97
Uninstall an application 98
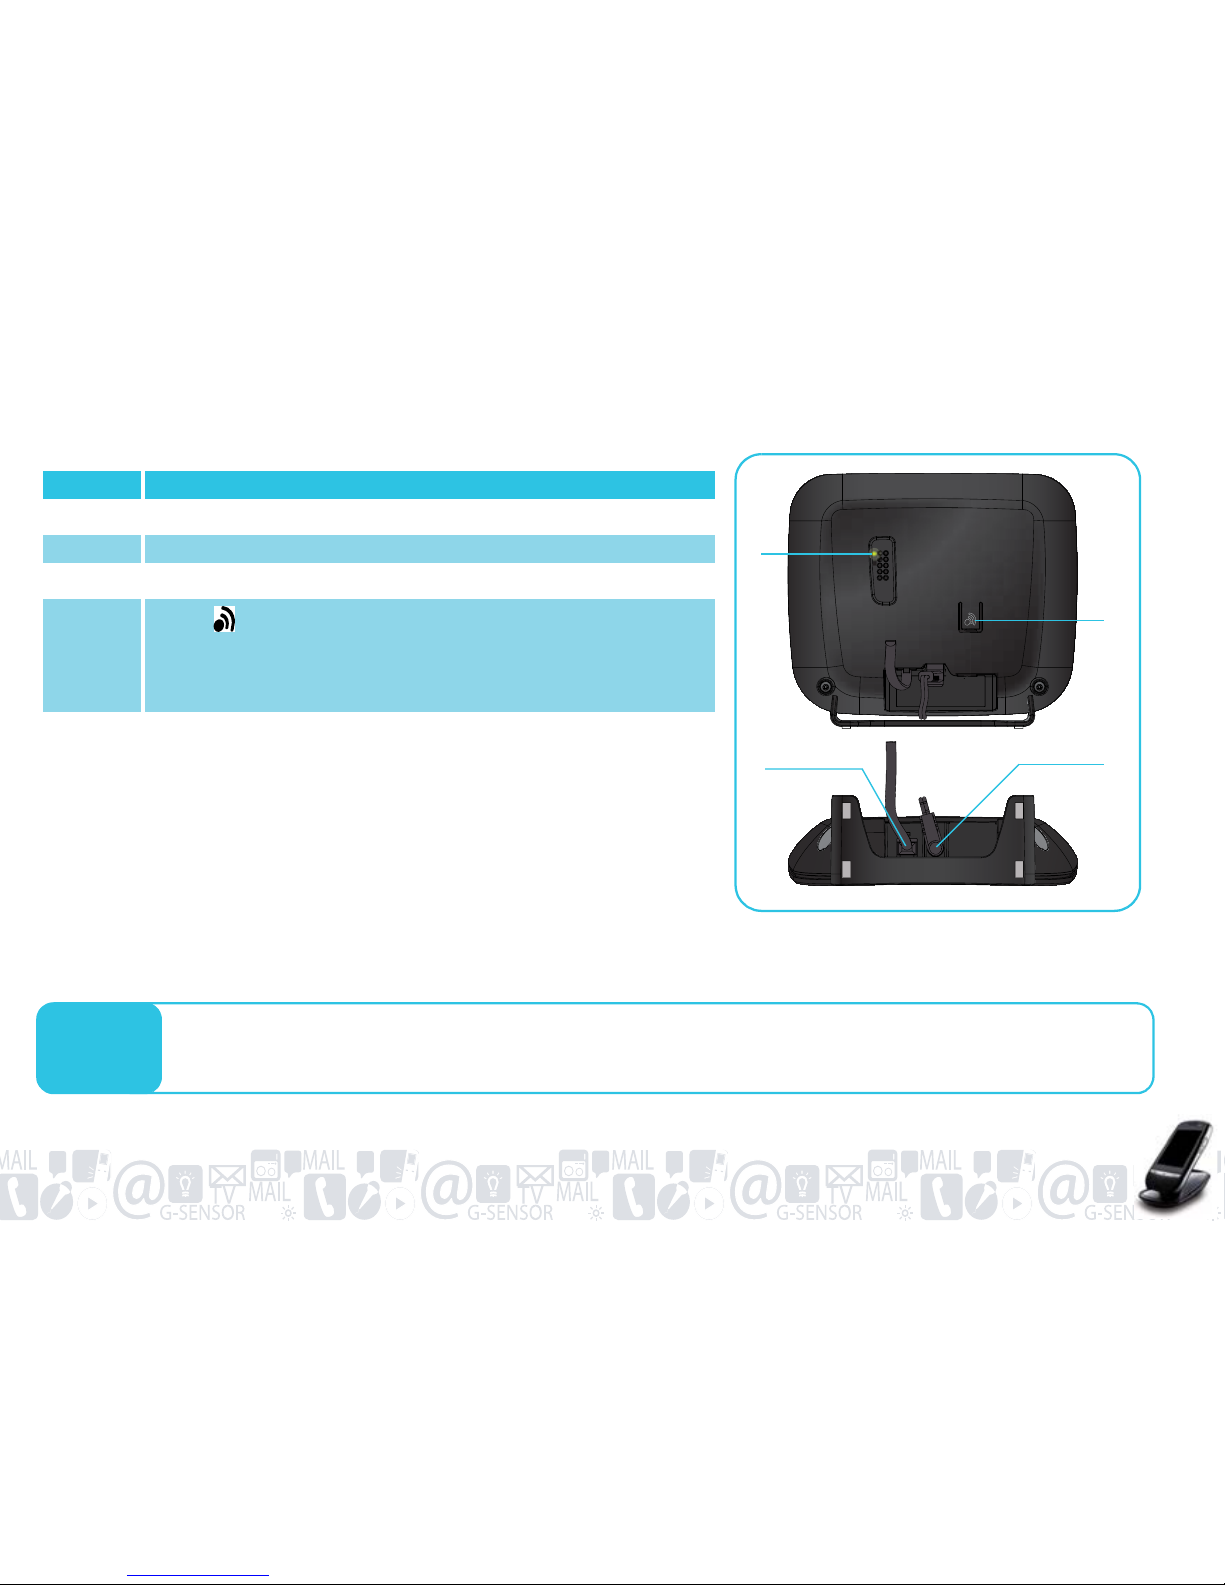
Configuring your Base 99
Accessing the base settings 99
Set the base to pairing mode 100
Unpairing a handset from the base 101
Changing the base PIN number 102
Resetting the base 103
Allow/Prevent the sharing of a call with another
handset 104
Defining banned calls (Parental Control) 105
Changing the network type 107
Changing the country 108
Changing the dialling type 109
Changing the flashing time 110
Defining the outside call prefix (PABX) 111
Configuring the date and time 112
Accessing the date and time setting 112
Enabling/disabling the automatic time updating mode 113
Changing the time 114
Set the time zone 115
Changing the date 116
Changing the time display format 117
Changing the date display format 117
Configuring the phone display 118
Changing the display language 118
Accessing the display setting 119
Adjusting the screen brightness 120
Enabling/disabling the screen rotation 121
Selecting screen animations 122
Configuring the screen sleep mode 122
Configuring the phone ring tone 123
Accessing the sound setting 123
Enabling/Disabling the silent mode 124
Adjusting the sound volume 125
Selecting the ring tone for outside calls 126
Selecting the ring tone for inside calls 127
Selecting the handset paging ring tone 128
Configuring audio alerts 129
Configuring the screen lock 130
Accessing the lock settings 130
Enabling locking 131
Enabling locking through a diagram 132
Enabling locking through a PIN number 134
Enabling locking through a password 135
Managing your messaging systems 136
listening to your new answering machine messages 136
Querying your answering machine remotely 138
Listening to your new service provider voicemail messages139
Configuring your messaging
systems 141
Configuring your answering machine 141
Accessing the answering machine settings 141
Enabling/disabling answering machine remote access 142
Changing the number of rings 144
Changing the message recording quality 145
Enabling/Disabling the answering machine mode 146
Disabling the answering machine 147
Saving a personal announcement 148

4
Listening to the answering machine announcement 150
Deleting a personal announcement 151
Changing the anonymous announcement language 152
Configuring your service provider voicemail number 153
Setting an alarm clock 154
Adding a new alarm 154
Customizing an alarm clock 156
Setting the alarm clock repetition 157
Setting the alarm clock ring tone 158
Enabling/disabling the vibrator when the alarm sounds 159
Changing the alarm name 159
Deleting an alarm clock 160
Enabling/Disabling an alarm clock 160
perform a search on the phone 161
Adding the desktop search widget 161
Configuring the search 162
Searching for an item 163
Using the agenda 164
Adding a reminder 164
Configuring the display 165
Connecting your handset
to a computer 166
Removing the micro-SD card 167
ENVIRONNEMENT 168
L’emballage 168
Les piles et batteries 168
Le produit 168
Guarantee 169
Terms and conditions for United Kingdom &
Ireland only 169

5
DEAR CUSTOMER,
You have just acquired a new generation Sagemcom telephone. Thank you for placing your confidence in us.
This product follows a strategy of continuous development. We reserve the right to make changes, modifications and improvements
without notice to the products described in this user guide.
To operate the device safely and easily, please read carefully the paragraph “Recommendations and safety instructions”, page 6.
he CE label confirms that the product complies with the 1999/5/EC regulations of the European Union Parliament
regarding wireless systems and telecommunications.
The declaration of compliance may be looked up on the www.sagemcom.com website section «Support» or can be
obtained from the following address :
Sagemcom Broadband SAS
250, route de l'Empereur
92848 Rueil-Malmaison Cedex - France

6
RECOMMENDATIONS AND SAFETY INSTRUCTIONS
For your personal safety, never place your handset on the charger cradle without the cover, or without the battery cover, you
could get an electric shock.
To avoid damaging your handset, only use the supplied battery. Insert the batteries in the handset battery compartment
respecting polarity.
At the end of its useful life, battery must be disposed of according to the recycling instructions presented in the «Environment»
section of this booklet.
To avoid damaging your hearing, do not listen with a high volume for extended periods.
Do not attempt to remove the screws or open the cover. Any internal element of the device can be repaired by the user.
Only use the supplied power adapter, connect it to the base socket according to the installation instructions provided in this
booklet and the indications on the identification label affixed to it (voltage, current, electric network frequency). As a safety
measure, you can use the power adaptors to cut off the 230V current in case of danger. They must be located near to the device,
and must be easily accessible.
Your telephone must not be installed in a humid room (wash room, bathroom, laundry room, kitchen, etc.) unless it is 1.50 m away
from a water point, or outside. Your telephone must be operated at temperatures ranging from 5°C to 45°C.
In areas where storms are frequent, we recommend that you protect your telephone line using a surge protection device against
overvoltages.
This equipment does not function in the case of an electric network shutdown: for the emergency calls, use a self-contained cord
telephone.

7
Your DECT telephone has an inside radio range of about 50 meters and up to 200 meters in open space. The immediate
presence of metal parts (of a television for example), or of any electric appliance may result in range reduction.
Zones without reception may appear owing to elements in the building. This can cause brief interruptions in the conversation,
caused by faulty transmission.
This product is intended to be connected to the public analogical telephone network of any British and Irish network operator.
Should you experience any problems, contact your nearest specialst dealer or the Sagemcom Support Team on 0845 0900 316.
Some sensitive medical equipment and safety equipment may be affected by the radio-frequency transmissions of your
telephone. In all cases, we ask that you respect the safety recommendations.
The anti-skid pads in the base and the handset do not leave traces on your furniture and ensure stability. However, Given the
diversity of lacquers and varnishes used by the furniture manufacturers, it cannot be excluded that traces is left on furniture
surface. Sagemcom Broadband SAS decline all responsibility in any such cases of damage.
Batteries must be disposed of in accordance with the instructions in the «Environment» chapter.

8
YOUR BASE
Indicator light operation:
•Steady for 10 seconds: base startup.
•Fast flashing: the base is in paging mode.
•Medium speed flashing: searching for equipment paired with the base.
•Slow flashing: communication in progress.
Key Description
1Indicator light
2Telephone wall outlet
3Power socket
4Button Paging/Pairing:
•Short press: paging of handsets
•Long press: pairing of handsets (refer to paragraph "Pairing a
handset with the base", page 92)
1
23
4
Note It is recommended to enable the mute ring tone to allow you to locate your handset when the mute mode is enabled
(refer to paragraph "Configuring audio alerts", page 129).

9
YOUR HANDSET
Key «Home»:
•press to return to the home
screen from any screen
•Hold down to display the last
launched applications
Key «Menu»:
•display the menu according to
the context of use
Key «Retour» :
•press to return to the previous screen /
close the virtual keypad / close the
menu of options
Key «ON/OFF/Stand-by»:
•OFF: hold down
•ON: hold down
•Stand-by: press to switch off the
screen / press to switch on the screen.
Key «Vol. +» : press to increase the volume
Key «Vol. -» : press to reduce the volume
Camera
Location of the microSD card
(already inserted)
Micro-USB socket
Connector of the charger cradle Jack socket (3.5 mm) for headphones

10
GETTING STARTED WITH THE PHONE
THE BASE
Take the base and turn it over:
1. Take the telephone connecting cord, plug the phone into its socket.
2. Connect the other end of the cord to the telephone wall outlet.
3. Take the power adapter. Connect the power adapter cord to the underside of
the base.
4. Connect the power adapter to the wall power socket.
Note Before making any connections, see the safety instructions located at the beginning of this manual.
Telephone
socket Gateway
OR
Phone
@
4
1
2
3

11
THE HANDSET
Battery installation
1. Insert the battery.
2. Fit the battery cover by engaging the top first,
then folding down the bottom until it is snapped fully home.
1450mAh
3.7V
1450mAh
3.7V
1
2
Caution To avoid explosion risks, only use the battery supplied in the pack.

12
Charging the handset
1. Connect the end of the power adapter cord to the power socket.
2. Connect the charger micro-USB plug to the phone connector.
OR
1. Connect the end of the power adapter cord to the power socket.
2. Connect the charger micro-USB plug to the charging base connector.
3. Place your handset on the charging base.
Perform a complete battery charging cycle (at least 15 hours).
Note The handset starts automatically after it is placed on the charger cradle or the micro connector is connected.
If the battery is completely discharged, put the handset on the charger cradle for at least 20 minutes.
Sagemcom
2
1
2
3
1
15H

13
USING THE SCREEN
BROWSING THROUGH THE DESKTOP
You can browse through the 5 pages of the extended desktop by swiping the screen to the right or left.
The icon indicates the desktop current page.
Note For greater comfort of use, remove the screen protective film.

14
STARTING AN APPLICATION (“FACEBOOK”, FOR EXAMPLE)
Place your
finger on the
desktop
1
Slide it to the
left or right
2
The next page is
displayed
Press the
corresponding icon

15
ACCESSING THE LIST OF APPLICATIONS
Press
The list of applications is
displayed

16
ADDING ADESKTOP SHORTCUT
There are two possible ways of adding a desktop shortcut.
From the list of applications
Keep your finger
pressed
Move the item to an empty
space and then release
The item is positioned in
the new location
The shortcut is
displayed on the
desktop
12
43

17
From the desktop
In an empty
space, press
with your finger
and hold down
The list of
options is
displayed.
12
Press
“Shortcuts“
3
Scroll down the
list of shortcuts
5
Go to
“Applications“
4Confirm
6

18
ADDING AWIDGET TO THE DESKTOP
A widget is an application that is used from the desktop. A numerical dialling pad is installed as the default widget.
The Widget is
added to the
desktop current
page.
In an empty
space, press with
your finger and
hold down
1
The list of
options is
displayed.
2Press
“Widgets“
3
Scroll down the
list of widgets
4
Confirm
5
Note If there is not enough space on the desktop where you want to add a Widget, remove desktop items or go to another
page.

19
MOVING ADESKTOP ITEM
You can move desktop items on the same page or to another page. These items can be shortcuts, Widgets or folders.
Move an item on the same page
The phone vibrates
and the selected item
can be moved.
The item is positioned in
the new location.
Keep your
finger
pressed.
1
Move the item to an
empty space and then
release.
2
Table of contents
Other SAGEMCOM Telephone manuals

SAGEMCOM
SAGEMCOM SIXTY User manual

SAGEMCOM
SAGEMCOM C120 ECO User manual

SAGEMCOM
SAGEMCOM SIXTY User manual

SAGEMCOM
SAGEMCOM D770 User manual

SAGEMCOM
SAGEMCOM C112 ECO User manual

SAGEMCOM
SAGEMCOM D790 User manual

SAGEMCOM
SAGEMCOM D790 User manual

SAGEMCOM
SAGEMCOM C96 User manual

SAGEMCOM
SAGEMCOM D750 User manual

SAGEMCOM
SAGEMCOM C95 User manual