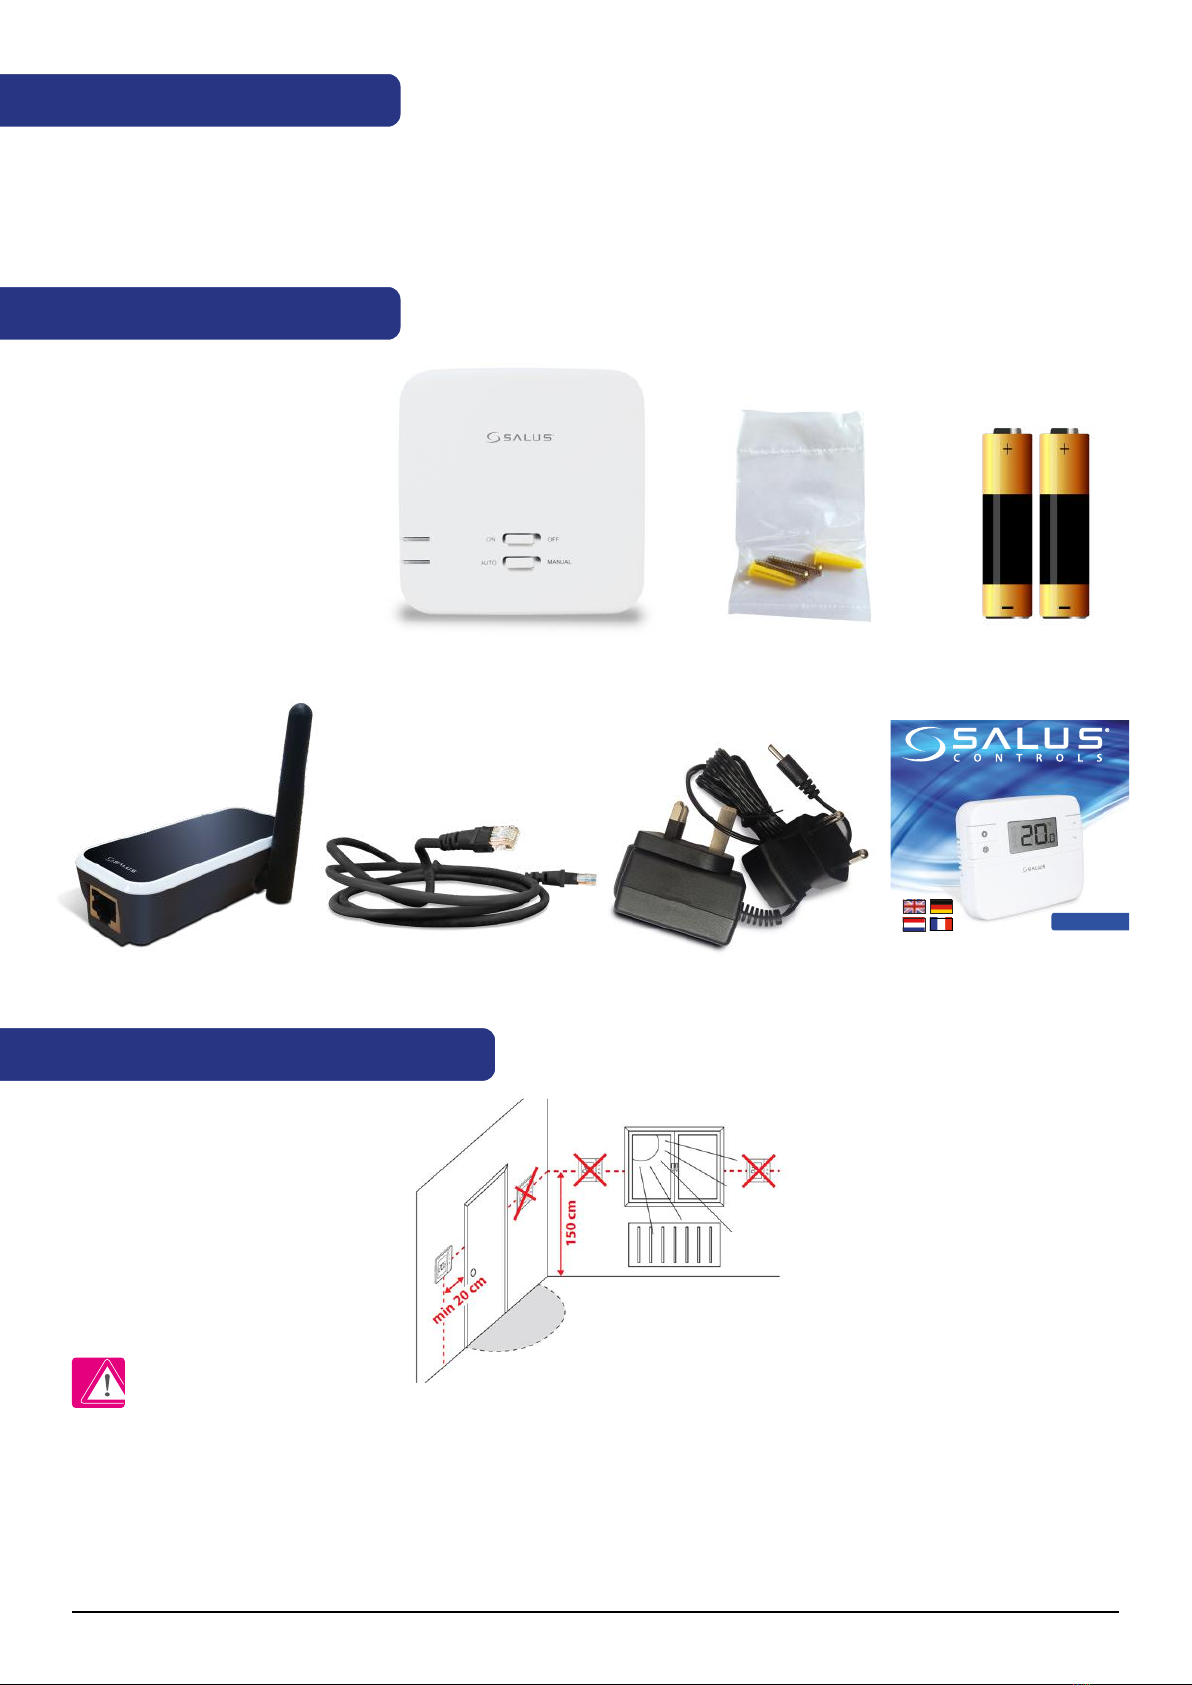
Salus RT310i User manual

RT310i THERMOSTAT - FULL USER MANUAL

Contents
02 RT310i Installation Manual
1.1 Product Compliance .......................................................................................................................3
1.2 Safety Information...........................................................................................................................3
1.3 Introduction .......................................................................................................................................4
1.4 Features ...............................................................................................................................................4
2. Overview.........................................................................................................................5
2.1 Box contents ......................................................................................................................................5
2.2 Proper thermostat location ..........................................................................................................5
2.3 Montage ..............................................................................................................................................6
2.3.1 RT310i thermostat battery insert..................................................................................6
2.3.2 Connecting the RXRT510 receiver................................................................................6
2.3.2.1 RXRT510 switch functions.................................................................................6
2.3.2.2 LED diodes indicators description..................................................................6
2.3.2.3 Receiver’s wall mounting...................................................................................8
2.3.2.4 Connection description......................................................................................8
2.3.4.5 Pairing with the thermostat procedure.......................................................9
2.3.4.6 Test Pairing Function.........................................................................................10
3. Before you start............................................................................................................11
3.1 LCD icons ..........................................................................................................................................11
3.2 Button functions ............................................................................................................................11
4. Registration in the app ................................................................................................13
5. Operations....................................................................................................................15
5.1 Thermostat’s interface in the app description ....................................................................15
5.2 Schedule settings ..........................................................................................................................17
5.3 Schedule mode ..............................................................................................................................18
5.4 Temporary or Permanent Override program mode..........................................................19
5.5 Frost Protection..............................................................................................................................20
5.6 Heat/Cool Mode.............................................................................................................................21
5.7 Holiday Mode..................................................................................................................................23
5.8 Distance Alerts................................................................................................................................23
6. Other functions ............................................................................................................24
6.1 LCD backlight..................................................................................................................................24
6.2 Low battery detection .................................................................................................................24
6.3 Temperatures outside operating range.................................................................................24
7. Operating in Oine Mode...........................................................................................25
7.1 Reviewing Setpoint Temperature via device.......................................................................25
7.2 Adjusting setpoint via device....................................................................................................25
8. Factory reset.................................................................................................................26
9. Removing the thermostat from the account (app)....................................................26
10. Technical info..............................................................................................................27
11. Warranty .....................................................................................................................28

1.1 Product Compliance
This product complies with the essential requirements and other relevant provisions of the following EU
Directives: 2014/30/EU, 2014/35/EU, 2014/53/EU and 2011/65/EU. The full text of the EU Declaration of
Conformity is available at the following internet address: www.saluslegal.com.
Always isolate the AC Mains supply before installing or working on any components that
require 230 VAC 50Hz supply.
RT310i Installation Manual 03
Care for the natural environment is of paramount importance to us. The awareness that we
manufacture electronic devices obliges us to dispose of used electronic components and
devices safely. Therefore the company has received a registration number issued by the Chief
Inspector for Environmental Protection. The crossed out symbol the trash can on the product
means that the product must not be disposed of with ordinary waste containers. Sorting waste
for recycling helps to protect the environment. It is the user’s responsibility to surrender used
equipment to a designated collection point for recycling waste from electrical and electronic
equipment.
• Before starting installation work and before using the product, read the entire manual.
• The information contained in the instructions is essential for proper functioning.
• To avoid accidents resulting in personal injury and material damage, please follow all safety precautions,
specified in this manual.
• The device should not be used by people with limited mental, sensory or mental abilities, without experience,
of insufficient knowledge as well as children.
• Do not use an unassembled device (eg without a cover).
• The device may only be opened by a qualified person.
• Keep electrical devices out of the reach of children and ensure that they do not play with it. Children should
not be left unattended. If necessary, disconnect the control system for the entire room.
• Do not leave the packaging, cabinet, or any loose parts of the device unattended, as they pose a risk to
children.
WARNING!
• Installation must be carried out by a qualified person with appropriate electrical qualifications in accordance
with standards and regulations in force in the given country and in the EU.
• Never try to connect the device other than as described in the manual.
• Before assembly, repair or maintenance as well as during any connection works it is absolutely necessary
disconnect the mains supply and make sure that the terminals and electric wires are not live.
• The device may not be exposed to extreme temperatures, strong vibrations or subjected to mechanical shock.
• The device should not be used in unfavorable environmental conditions or in rooms where there is a
concentration of flammable gases, fumes or dust.
WARNING!
• There may be additional protection requirements for the entire installation that the installer is responsible for
maintaining.
1.2 Safety Information

1.3 Introduction
A room thermostat simply switches the heating system on and off as necessary. It works by sensing the air
temperature, switching on the heating when the air temperature falls below the thermostat setting, and
switching it off once this set temperature has been reached.
The SALUS RT310i is a Smart phone controlled programmable thermostat. The RT310i thermostat will switch
your heating system on or off, as needed, in accordance with the temperature set by you, locally on the device
or remotely using the dedicated app.
Turning a room thermostat to a higher setting will not make the room heat up any faster. How quickly the room
heats up depends on the design of the heating system, for example, the size of boiler and radiators. Neither
does the setting affect how quickly the room cools down. Turning a room thermostat to a lower setting will
result in the room being controlled at a lower temperature, and saves energy.
The heating system will not work if a time switch or programmer has switched it off.
The way to set and use your room thermostat is to find the lowest temperature setting that you are comfortable
with, and then leave it alone to do its job. The best way to do this is to set the room thermostat to a low
temperature – say 18⁰C – and then turn it up by one degree each day until you are comfortable with the
temperature.
04 RT310i Installation Manual
1.4 Features
• Remote control via App
• 5/2 days or 24hrs programming flexibility via App
• Built-in start up programming for quick installation
• Frost protection
• Eco Mode
• Holiday Mode
• Large, easy to read LCD with blue backlight
• User friendly
• Stylish casing
• Geo Location
• Pre-paired from Factory
• RF Test Mode

iTG310
2. Overview
2.1 Box contents
2.2 Proper thermostat location
The RT310i is a stylish thermostat with easy readable LCD and a user-friendly interface. The Receiver is used
for wiring connections and heat on/off control. The thermostat provides the user interface and temperature
sensing / control. The two units are linked together by a Radio Frequency (RF) signal. The Gateway has a futuristic
design and helps connect your devices to the Internet, so that they can be controlled over the RT310i App on
your smart-phone.
RT310i thermostat 4x screws and plugs 2xAA batteries
ADSL Cable Quick Guide
RXRT510 receiver
Gateway Adaptor suitable
for UK and EU
RT310i Smartphone Controlled
Programmable Thermostat
Quick Guide
Head Oce
SALUS Controls plc
SALUS House
Dodworth Business Park South,
Whinby Road,
Dodworth, Barnsley S75 3SP, UK.
T: +44 (0) 1226 323961
E: sales@salus-tech.com
DE / NL / FR:
support@salus-controls.de
tel: +49 6108 8258515
DK: sales@salus-controls.dk
Tel: (+45) 53534499
UK: tech@salus-tech.com
tel: +44 (0) 1226 323961
For PDF Installation guide please go to
www.salus-manuals.com
www.salus-controls.com
SALUS Controls is a member of the Computime Group
Maintaining a policy of continuous product development SALUS Controls plc reserve the right to
change specification, design and materials of products listed in this brochure without prior notice.
EN App functions EN Frost ModeGE App Funktionen GE Frostschutz
FR Fonctions de l’Appli FR Le Mode Hors-gelNL App funties NL Vorst modus
EN Holiday Mode GE Urlaubsmodus
FR Le Mode Vacances NL Vakantie modus
EN Pairing Process GE Verbindungsmodus
FR Appairage NL Pairing proces
EN Testing Process GE Testmodus
FR Test NL Test proces
Holiday Mode
There are 3 program settings. 1. Schedule (7 days, 5-2 days and 24 hours),
2. Manual and 3. O.
Es gibt 3 Programmeinstellungen. 1. Programm ( 7Tage, 5-2 Tage und
24Stunden) 2. Manuell und 3. Aus.
Il y a 3 modes de réglages. 1. Programmation (7 jours, 5-2 jours et 24
heures) 2. Manuel et 3. Eteint
Er zijn 3 programmas beschikbaar 1. programma (7 dagen, 5-2 dagen en
24 uur) 2. handmatig en 3. uit
Schedule Mode
All
Set one schedule for the entire
week (each day the same).
Ein Programm für die ganze
Woche einstellen ( täglich das
gleiche)
Régler un programme pour
toute la semaine (chaque jour
indentique)
Programmeer voor de gehele
week (elke dag hetzelfde)
Set a schedule for the working
days and for the weekend.
Programm für Arbeitstage und
Wochenende einstellen.
Régler un programme pour
les jours ouvrés et pour le
weekend
Programmeer voor werkdagen
en voor het weekend
Set a daily schedule
(each day dierent).
Programm für Einzeltage
( jeden Tag unterschiedlich)
einstellen
Régler un programme
quotidien ( chaque jour
diérent)
Programmeer per dag
(iedere dag verschillend)
5/2 Individual
In Manual Mode you will permanently override
the schedule. Exit Manual Mode by switching to
Schedule or turning o the thermostat.
Im manuellen Modus wird das Programm
dauerhaft überschrieben. Verlassen Sie den
manuellen Modus indem Sie das Programm
aktivieren oder Ausschalten.
En Mode Manuel, vous gelez le programme.Quittez
le mode manuel en basculant sur Programmation
ou en éteignant le thermostat.
Handmatige kunt u van het programma afwijken.
Verlaat handmatig door programma te kiezen of
uit te schakelen.
If the internet connection is lost the thermostat will follow the schedule. If it was
in Frost Mode you can disable the Frost function from the device and continue
following the schedule (see Frost Mode section of the guide).
Wenn Sie die Internetverbindung verlieren wird das Thermostat seinem Programm
folgen. Wenn dieser im Frostschutz war kann dieses am Gerät deaktiviert werden
damit dieser dem Programm wieder folgt ( sehen Sie hierzu Frostschutz Modus in
der Anleitung)
Si la connection internet est interrompue, le thermostat suivra le programme. S’il
était en Mode Hors-gel, vous pouvez désactiver la fonction hors-gel et il suivra
alors le programme (voir la section Mode Hors-gel dans le guide).
Indien er geen internetverbinding is, dan volgt de thermostaat het programma.
U kunt de vorst modus verlaten als het daarop staat om het programma te volgen.
(zie vort modus in de handleiding)
Frost Mode Frost protection temperature can be set between 5.0C and
9.0C. To turn on Frost Mode activate O Mode or Holiday Mode via the App.
Frostschutz Temperatur kann zwischen 5 C bis 9 C eingestellt werden. Um
diesen zu aktiveiren wählen Sie Urlaubsmodus oder Aus über die App)
La température du Mode Hors-gel peut être réglée entre 5°C et 9°C. Pour
activer le Mode Hors-gel, activez le Mode Eteint ou Vacances via l’appli.
Vorst modus vorst protectie temperatuur kan worden gezet tussen 5.0°C en 9.0°C.
Om de vorst modus te activeren, kies O modus of vakantie modus via de App.
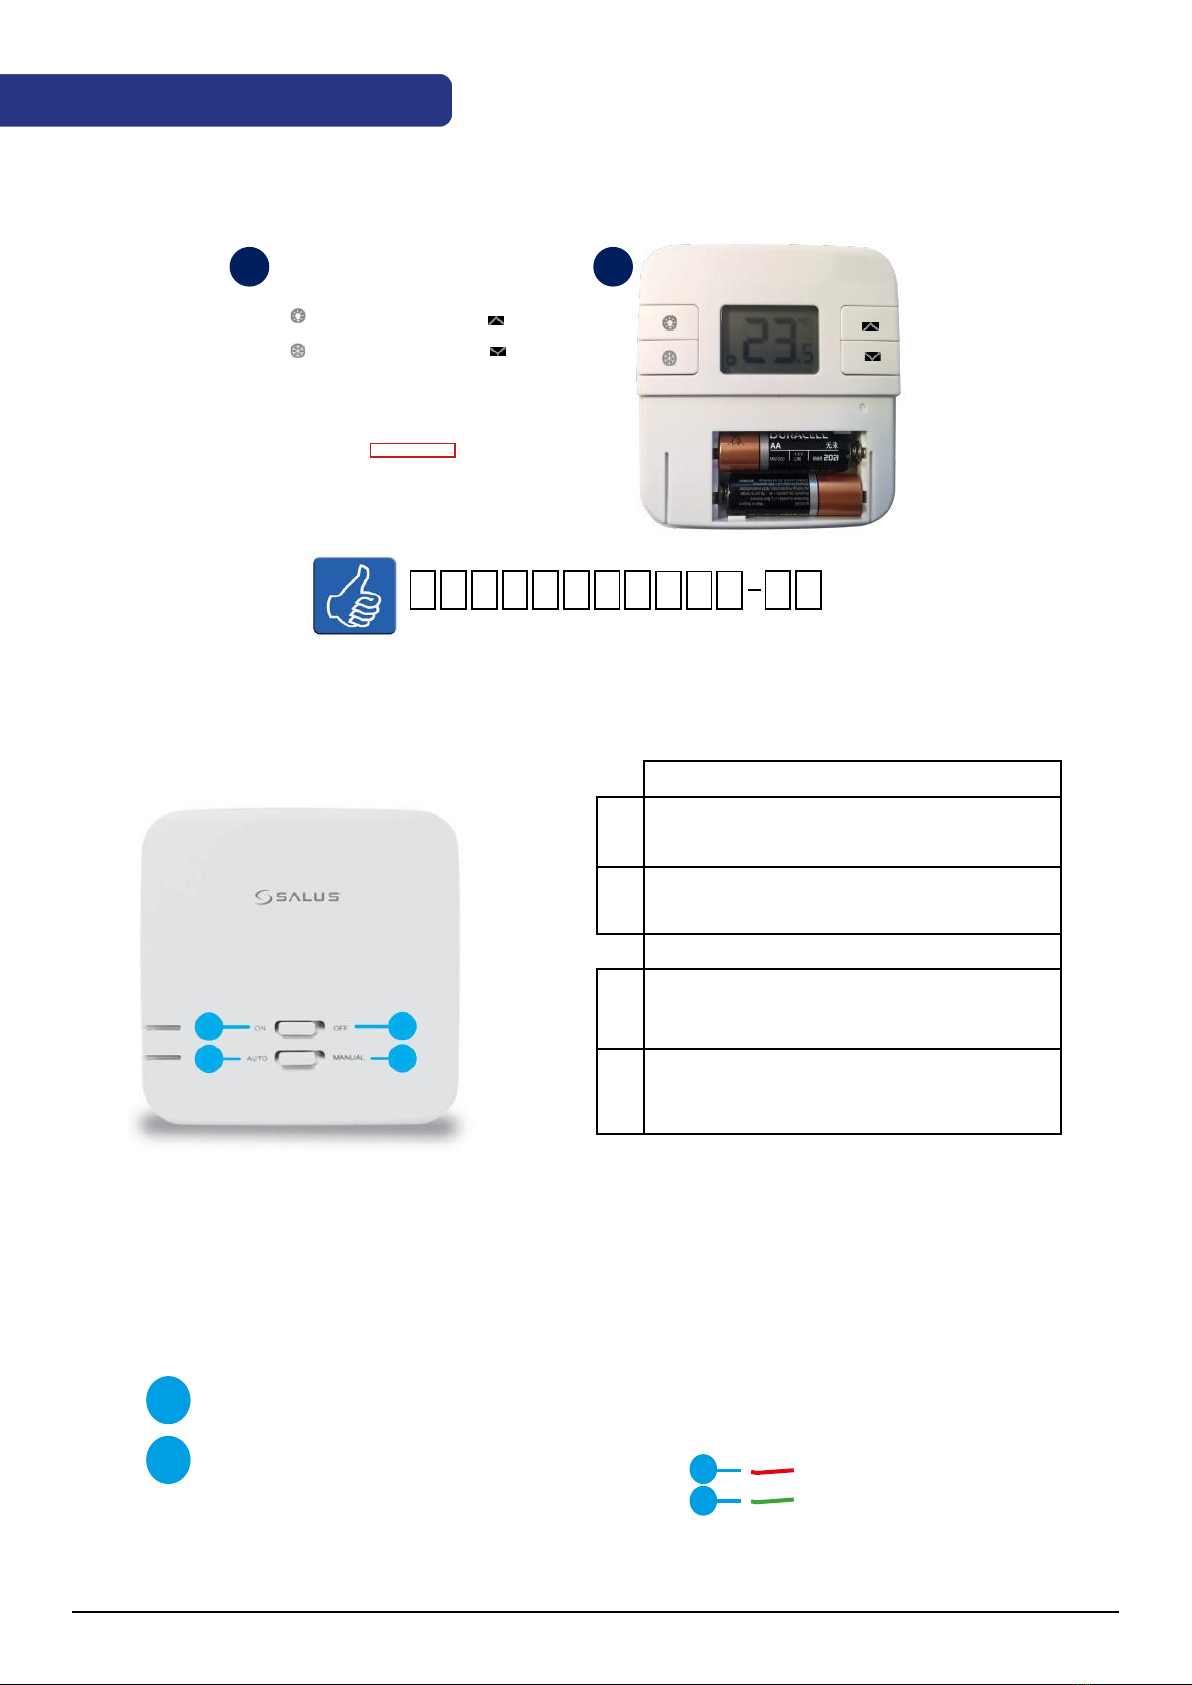
Frost Mode can also be de-activated or activated on the device, by pressing the
frost button once. Below are instructions for how to turn it ON/OFF.
Vorst modus kan ook worden gedeactiveerd of geactiveerd op het apparaat,
door de vorst knop in te drukken. Zie hieronder voor instructies. On/O.
Der Frostschutz kann auch über das Gerät aktiviert und deaktiviert werden, indem
sie die Frosttaste einmal betätigen. Unten sehen Sie wie An/Aus. gestellt wird.
Le Mode Hors-gel peut aussi être Desactivé ou Activé sur l’appareil en pressant sur
le boutton hors-gel. Les instructions expliquant comment l’Activer/Eteindre sont
expliquées plus bas.
ON
OFF
Holiday Mode Select the period for this function. Frost Mode temperature
will be activated during this period.
Urlaubsmodus, wählen Sie den Zeitraum für diese Funktion aus. Frostschtz
wird während diesem Zeitraum aktiviert.
Le Mode Vacances selectionne la période pour cette fonction. Le Mode
Hors-gel sera activé durant cette période.
Vakantie modus selecteer de periode voor deze functie. Vorst modus
temperatuur wordt geactiveerd gedurende deze periode.
After the Holiday Mode ends, the thermostat will follow the previous
setting (Schedule, Manual or O.)
Nachdem der Urlaubsmodus endet wird das Thermostat der vorheringen
Einstellung wieder folgen. ( Porgramm, Manuell oder Aus)
A la n de la période du Mode Vacances, le thermostat reprendra le réglage
précédent (Programmation, Manuel ou Eteint).
Nadat de vakantie modus eindigt, schakelt de thermostaat over op vorig
programma. (programma, handmatig of uit)
Pairing Process Press the button for 3 sec.Wait 9 min or if the red light goes
steady, press the pairing button again for 3 sec.
Pairing Vorgang, Drücken sie die Taste für 3 Sek. Warten Sie 9 min oder bis
das Rote Licht dauerhaft leuchtet, drücken Sie erneut die Pairing Taste für 3 Sek.
Appairage. Pressez le boutton pendant 3 sec. Attendre 9 min. ou si la lumière
rouge ne bouge pas, pressez à nouveau le boutton pendant 3 sec.
Pairing proces druk de knop 3 seconden in. Wacht 9 minuten of indien het
rode lampje brandt, druk de pairing knop nog eens 3 seconden in.
ON
AUTO
ON
AUTO
OFF
MANUAL
3S
3S
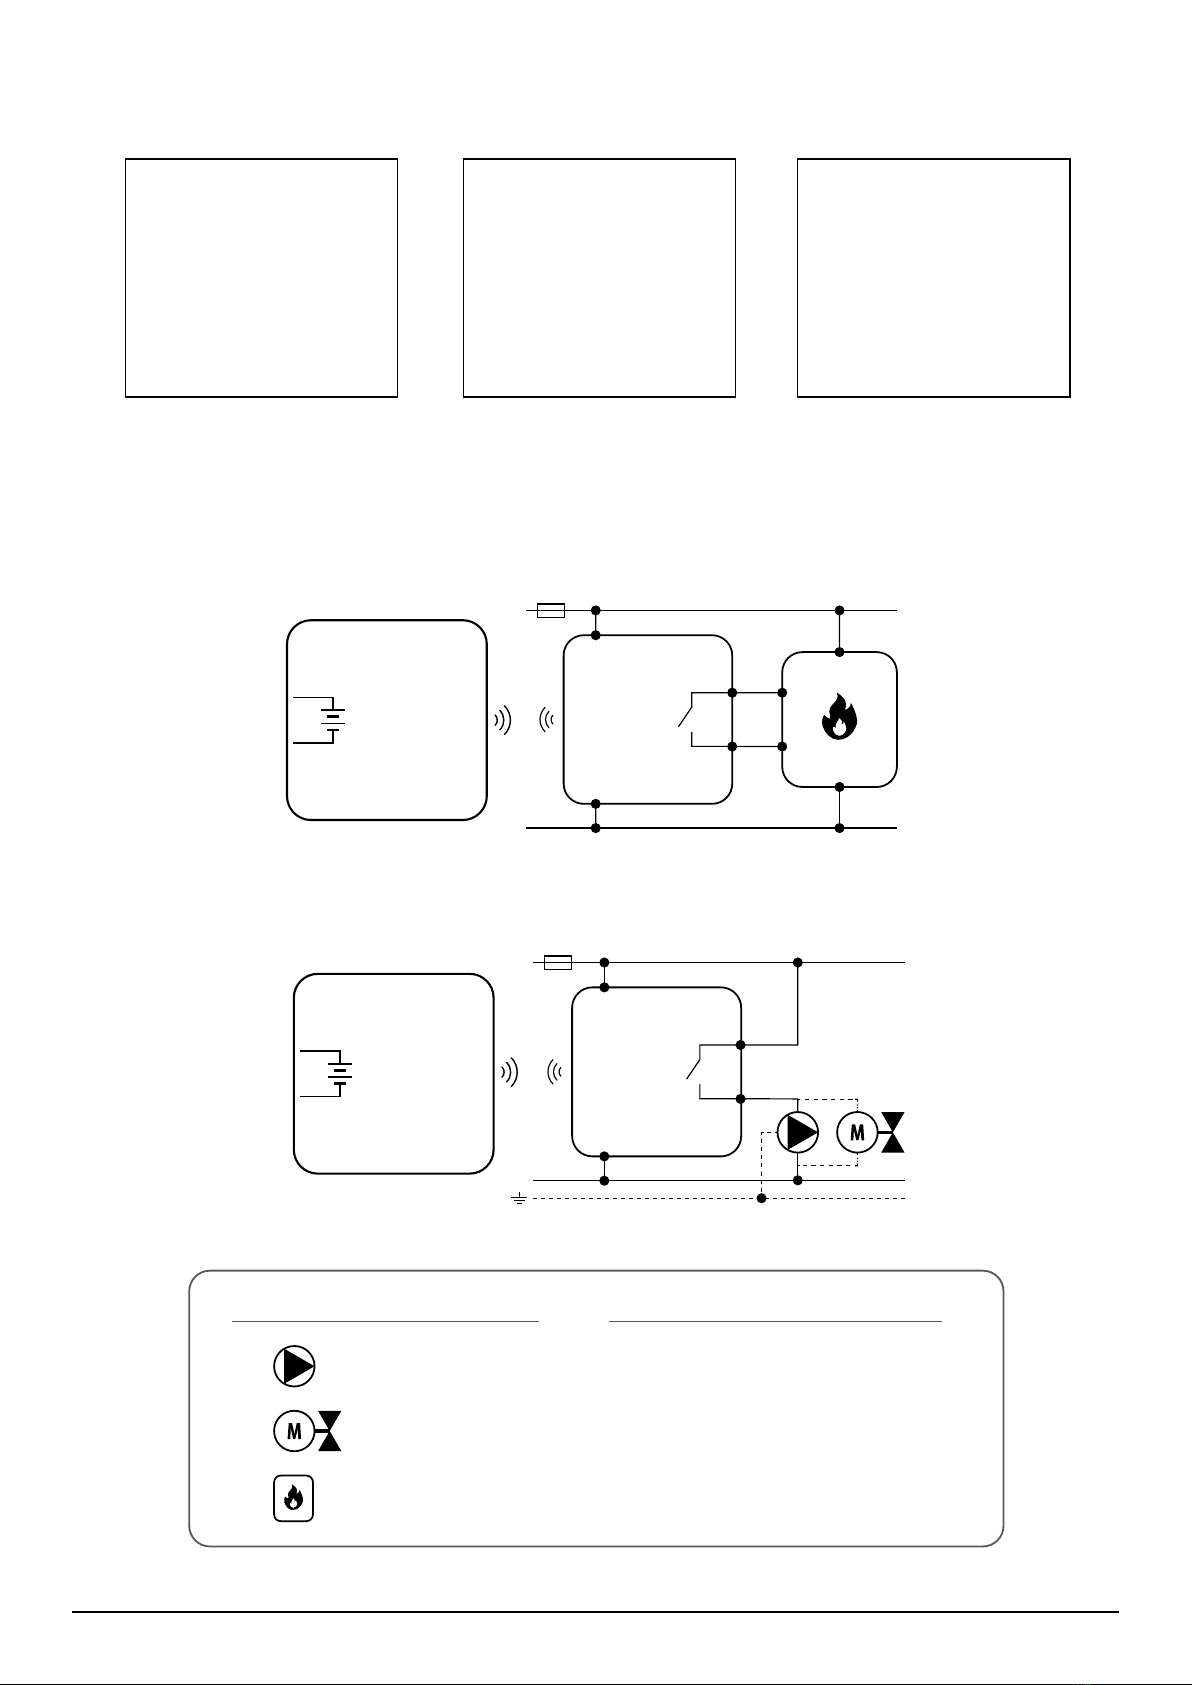
Testing Process Press the button once to test the connection. If the devices
are paired the ON and AUTO LEDs will both ash. You can wait 9 min for the
process to end or can press the button again to stop.
Test Vorgang, Drücken Sie die Taste einmal um die Verbindung zu testen.
Wenn die Geräte verbunden sind werden die LED bei ON und Auto aufblinken.
Sie können 9 Min warten bis der Vorgang beendet ist oder die Taste erneut
drücken um zu beenden.
Test. Pressez le boutton une fois pour tester la connection. Si les appareils
sont appairés, les LEDs ON et AUTO vont clignoter tous les deux. Vous pouvez
attendre 9 min. que le process s’achève ou vous pouvez presser le bouton à
nouveau pour le stopper.
Test proces, druk de knop eenmaal om de verbinding te testen. Indien de
apparaten verbonden zijn zal ON en AUTO LEDS knipperen. U kunt 9 minuten
wachten of het proces beëindigen door nogmaals op de knop te drukken.
ON
AUTO
OFF
MANUAL
ON
AUTO
OFF
MANUAL
TEST/PAIRING
TEST/PAIRING TEST/PAIRING
TEST/PAIRING
TEST/PAIRING TEST/PAIRING
RT310i Installation Manual 05
Please note:
The ideal position to thermostat mounting is about 1,5m under oor level far from heating or cooling
sources. Thermostat can’t be exposed to sunlight or any extreme conditions like for example draft.
Because of fire and explosion risk there is not allowed to use thermostat in atmosphere of explosive gases and
flammable liquids (eg coal dust). In case if any of listed dangers occur you have to use additional protection
measures – anti-dust and explosive gases (tight cover) or prevent their formation. Furthermore, thermostat
can’t be used in condensation of water vapor conditions and be exposed to water action.

06 RT310i Installation Manual
2.3 Montage
Before inserting the batteries, please make a note of your SRT number and register your device on the App.
2.3.1 RT310i thermostat battery insert
S R T
SRT00000000 - 00
1 2
2.3.2 Connecting the RXRT510 receiver
2.3.2.1 RXRT510 switch functions
2.3.2.2 LED diodes indicators description
2.
4.
3.
1.
TOP SWITCH
1. ON - Manual mode - receiver ON
2. OFF - Manual mode - receiver OFF
DOWN SWITCH
3. AUTO - Receiver works in AUTO mode
(according to the thermostat’s command)
4. MANUAL - Receiver works in manual
mode (according to the top switch)
The status of the RXRT510 receiver is
indicated by two LEDs. These are LEDs
with the following colors:
- red (upper),
- green (lower).
1
2
1
2

A detailed explanation of the meaning of the receiver LEDs can be found in the table below:
Description
The red LED lights up
The receiver is connected to the 230V power supply and is paired with a
thermostat.
The receiver can be thermostat-enabled if it is in automatic mode when the
lower switch is in the AUTO position.
The receiver can be started manually when the lower switch is in the MANUAL
position.
The red LED ashes
The receiver is in standby mode, i.e. it has not received a signal from the thermo-
stat within an hour. The set temperature on the thermostat was kept within the
hysteresis and for such a condition the thermostat does not send a heating signal,
because there is no such need.
(or)
The receiver is in pairing mode and is looking for a signal from the thermostat
(then you need to activate the pairing process in the thermostat).
(or)
The receiver was paired but lost communication with the thermostat due to out of
range or low battery in the thermostat. The receiver starts flashing after one hour
of time when it does not receive a signal from the thermostat.
The red LED is o The receiver is disconnected from the 230V power supply or the upper switch is in
the OFF position.
The green LED lights up
In automatic mode, the receiver received a heating signal from the thermostat.
The receiver was powered up in manual mode (upper ON switch, lower MANUAL
switch).
The green LED is o The receiver does not send a heating signal.
07 RT310i Installation Manual

08 RT310i Installation Manual
2.3.2.3 Receiver’s wall mounting
2.3.2.4 Connection description
Fit the front housing.
Press lightly
Fix the backplate to the wall Align the front housing
at the top edge.
or
Legend:
Pump
Boiler
Actuator
Symbols explanation
L, N - 230V AC powe supply
COM, NO - voltage-free outputs
eg. boiler connection
Boiler (boiler connection*) - contacts
in the boiler for connecting an ON / OFF
thermostat (according to the boiler manual)
L
AC 230V
COM
NO
NN
LL
N
RXRT510
L
AC 230V
N
COM
NO
RXRT510
N
L
MAX
16 (5) A
091FLR
091FLR
Fv
Fv
2
2
3V
3V
2 x AA
2 x AA 16 (5) A
BOILER CONNECTION*
RT310i
RT310i

RT310i Installation Manual 09
2.3.4.5 Pairing with the thermostat procedure
If you want to re-pair devices with
each other, make sure that the re-
ceiver is disconnected from the po-
wer supply and the switches on it
are in the AUTO and ON positions.
Then connect the receiver to the
power supply and wait for the red
diode to glow continuously.
MovethetopswitchtotheOFF
position and back to the ON
position with a quick motion.
The red LED will start blinking
to confirm that the receiver
has entered the pairing mode.
1 2 3
When the red diode on the re-
ceiver lights up continuously,
the devices have been paired
on a new frequency.
WARNING! If the red diode on the receiver has not stopped blinking after 10 minutes, repeat the
pairing process taking into account the distance between devices, obstacles and interference.
TEST / PAIRING
TEST / PAIRING
TEST / PAIRING
TEST / PAIRING
NOTE: RT310i THERMOSTAT IS ALREADY PAIRED WITH THE RECEIVER!
Pairing process can take up to
9 minutes.
Thermostat went back to the
main display.
Press and hold TEST / PAIRING
button for 3 seconds.
Once devices are successfully
paired, LED on the receiver will
go solid red. Press and hold TEST
/ PAIRING button for 3 seconds to
end the pairing process.
3 sec
3 sec
4
7
5
8
6

10 RT310i Installation Manual
2.3.4.6 Test Pairing Function
ON
AUTO
OFF
MANUAL
TEST/PAIRING TEST/PAIRING
ON
AUTO
OFF
MANUAL
TEST/PAIRING TEST/PAIRING
Press the “TEST/PAIRING” button once to test the connection between the thermostat and the receiver. If the
devices are paired the ON and AUTO LEDs will both flash. You can wait 9 minutes for the process to end or can
press the button again to stop.

RT310i Installation Manual 11
3. Before you start
3.1 LCD icons
3.2 Button functions
Heating Mode On
Cooling Mode On
ON when thermostat is connected
to the ITG310 gateway
Frost Protection On
Schedule Mode On
Manual Override
(Permanent/Temporary override)
ON when battery is weak
before battery life end
ON during RF signal
transmission to RX boiler
Holiday Mode On
Temperature display
Key Function
Turn on the LCD backlight
Turn On/Off the Frost Mode
Press to increase setpoint temperature, press and hold
to enter fast advance.
Press to decrease setpoint temperature, press and hold
to enter fast advance.
1. Press once to enter/exit in RF Test Mode
2. Hold for 3 seconds to enter/exit Pairing Mode
There are few user controls for the RT310i, making this thermostat very easy to operate. These controls are
shown below, along with a description of each of their functions. The temperature displayed on the LCD is the
current room temperature. All the buttons on the thermostat and receiver with a description are shown below.
Thermostat

12 RT310i Installation Manual
3.3. RT310i app
3.4 Connecting the iTG310 Gateway
Download the RT310i application, create an account and register the device. Follow the instructions in the app
to complete the installation.
Features available only in the app:
• HOLIDAY mode
• temperature change in frost protection mode
• energy saving mode (sets the lowest temperature in the schedule)
• creating a schedule
Intuitive interface. Built-in guide on how to
use the application.
You can easily modify your
schedule.
After connecting the
gateway, the red LED
should start flashing
When the gateway has
successfully connected to the
SALUS Controls server, the
green LED will light.
You can add multiple RT310i thermostats to one account.
If LED diode on the iTG310 Gateway is all the time red, please check your Internet connections, router settings
or contact your Internet provider. Make sure ports UDP 80 and TCP 80, 2165, 2155, 3155 are opened. In order to
connect iTG310 gateway to the Internet, several requirements have to be met:
1) iTG310 have to be connected to the LAN output of the router.
2) Internet providor cannot block any of the ports: UDP 80 or TCP 80,2165,2155,3155.
3) LAN output must have disabled PoE function (power over ethernet).
4) Internet router should be equipped with 10/100 Auto-Negotiation function (it mainly applies to fiber optic
or high speed Internet routers)
5) For some routers like AVM Fritzbox 79xx series standard (straight) Ethernet cable may not work. Please use
then cross-over Ethernet cable.
Please note:

13 RT310i Installation Manual
4. Registration in the app
Start the application
and then press the
REGISTER button to
create a new account.
Enter email and
password, tap Next.
Enter the code you
received via email.
Enter the SRT device
code and name your
thermostat (MAX 11
characters). Read and
accept the therms. Tap
Submit.
See chapter 3.4 for where to
find the device’s STA code.
When the battery icon is
green it means that the
thermostat is charged.If the
icon turns red, you should
replace the batteries.
The green dot means that
the thermostat is connected
to the app. When the dot
turns gray, then thermostat
has lost connection with
the app.
Name the device (MAX
11 characters) and tap
Save.
Fill all forms and tap
Next.
1
7
2 3 4
56
STA
SRT00000000 - 00
Your device appears on
the screen. Tap Edit to
rename it.

14 RT310i Installation Manual
Tap anywhere on tile to
enter the thermostat
interface.
The application will go
to the home screen.
To make it easier to start, go to the settings and select the “Tutorial” option. Take a look at the steps below:
8 9
Select the menu icon. Choose“Tutorial”. Follow the steps.
12 3
3
When the thermostat is connected to the App, the icon will appear on the App screen and the icon
will appear on the thermostat screen. Also, the hand icon will show on the thermostat LCD.

5. Operations
When you first enter the application, your home screen will display the room temperature, the set temperature
(it will operate based on the default set schedule). The thermostat will be operating in schedule mode. You can
easily control your thermostat using the application. By default, the thermostat operates in heating mode, that’s
why you will have the flame icon on the screen. You can now start setting the time zone, changing modes,
and adding schedules
Features available only on the App:
- Temperature format
- Clock format
- Time zone
- Daylight Saving Time
- Heating or Cooling Mode
- Temperature accuracy
- Display tolerance
- Temperature offset
- Optimized start
- Schedule/Manual/Off Mode
- Holiday Mode
- Frost Mode*
* Also available on the device
RT310i Installation Manual 15
Thermostat name
Temperature increase/decrease
RF Signal Strength
Menu button
Setpoint temperature
Heating/Cooling Mode
Room temperature
Schedule/Manual Mode
Frost Protection Mode
5.1 Thermostat’s interface in the app description

16 RT310i Installation Manual
Tap menu icon Go to settings Select temperature
format
Select clock format
Select time zone DST on/off Tap Save
After you adjust all
of your settings, tap
Save. The app will
then return to the
home screen where
you can start adding
programs.
1
5 6 7
2 33 4
Note: Time and date will be automatically added once you connected to the internet, based on your
geo-location. What you have to do manually, though, is to select your temperature format, clock format and
time zone. This can be easily done by following these steps:

17 RT310i Installation Manual
5.2 Schedule settings
With RT310i APP, you can easily set a schedule, see the steps below:
When programming the RT310i thermostat, we set 6 time intervals per day and we can set a different
temperature in each of the intervals. When programming individual time intervals, remember that you set the
start time of each program, e.g. by setting the program 1 time to 06:00, it means that the program will last from
06:00 to the program start time 2. Example for 4 temperature levels in 6 time intervals:
PROGRAM WEEKDAY (1 to 5) WEEKDAY (6 to 7)
MO-FRI SAT-SUN
1 Time 6:00 am Time 6:00 am
Setpoint Temp 21ºC Setpoint Temp 21ºC
2 Time 8:00 am Time 8:00 am
Setpoint Temp 14ºC Setpoint Temp 14ºC
3 Time 11:00 am Time 11:00 am
Setpoint Temp 21ºC Setpoint Temp 21ºC
4 Time 13:00 pm Time 13:00 pm
Setpoint Temp 14ºC Setpoint Temp 14ºC
5 Time 16:00 pm Time 16:00 pm
Setpoint Temp 21ºC Setpoint Temp 21ºC
6 Time 21:00 pm Time 21:00 pm
Setpoint Temp 14ºC Setpoint Temp 14ºC
PLEASE NOTE: When programming the RT310i thermostat, remember that we must use all 6 time intervals.
If we want to set only two temperature levels, we can set one temperature for the period from 1 to 5 and the
other for the 6th period.

RT310i Installation Manual 18
5.3 Schedule mode
You can switch from Manual Mode to Schedule Mode and start adjusting programs. That’s very easy to do
and you need to follow the next steps. Note that there are 3 types of scheduling available, with 6 time intervals per day.
• 5+2 (Mon-Fri same, Sat-Sun same)
• Each day individual
• All week the same
Tap schedule Tap Arrow Select Type: 5+2 All/Individual Tap first interval
Adjust temperature Tap Save Tap next time interval.Adjust time Follow the same procedure
You need to follow the same steps for all intervals and all days in order to set schedules for the weekend days. Also, you
can copy the schedules from one day to another, which comes very handy if you are setting your days individually. Please
see below to see how to copy the schedules from one day to another.
Select day Tap Copy Selected day will be
marked with blue. Tap
the day you want to
paste into
Tap Paste Schedule is saved
1
1
5 6 7 8 9
2
2
3
3
3a
3a
3b
4
4

19 RT310i Installation Manual
5.4 Temporary or Permanent Override program mode
Temporary Override
Normally thermostat is running in schedule mode.
Manual and schedule mode can only be changed in the App
In schedule mode , pressing UP or DOWN on the thermostat changes setpoint. This is Temporary Override.
You can also change the temperature directly from the App.
During Temporary Override, manually override setpoint will expire by next program forced by schedule.
During Temporary Override, Calendar & HAND icons are turned ON.
Via App Via device
Via deviceVia App
Temporary override mode Temporary override mode
Permanent Override
In manual mode, pressing UP or DOWN changes setpoint. This is Permanent Override.
You can also change the temperature directly from the App.
During Permanent Override, manually override setpoint will run forever, until schedule model is selected from
App again, or another temperature is set.
During Permanent Override, HAND icon is turned ON
Permanent override mode
TESTING/PAIRING
TESTING/PAIRING
TESTING/PAIRING
TESTING/PAIRING

RT310i Installation Manual 20
5.5 Frost Protection
Press FROST button to activate Frost Protection.
The Setpoint temperature is automatically set to frost setpoint to prevent pipes from frosting. If the room
temperature is lower than the frost setpoint, frost protection will be enabled.
Press FROST button again to de-activate Frost Protection.
Via App
Tap frost protection
mode button.
Thermostat is in the
frost protection mode.
Tap manual mode
button.
Thermostat is in the manual
mode (switched from frost
protection mode).
Frost Protection ON Frost Protection OFF
Frost Protection Setpoint
Tap menu icon. Go to Frost Protection. Adjust temperature.
Default is 5⁰C.
Tap Save.
You can adjust the Frost Protection setpoint using the App. The setpoint range is between 5-9 ⁰C
TESTING/PAIRINGTESTING/PAIRING
Actual room temperature Actual room temperature
Frost Mode activated
TESTING/PAIRINGTESTING/PAIRING
Frost Mode deactivated
Frost Protection ON Frost Protection OFF
1 1
2
1234
2
Other manuals for RT310i
2
Table of contents
Other Salus Thermostat manuals