manuals.online logo
Brands
  1. Home
  2. •
  3. Brands
  4. •
  5. SARMOG
  6. •
  7. Indoor Furnishing
  8. •
  9. SARMOG 728k User manual

SARMOG 728k User manual

Componenti / Elements
Art. 728k Scrivania L.120
Desk W.120
- Struttura materiale in truciolare nobilitato
- Mobile in kit
- Material structure in engineered wood
- Kit furniture
Misure / Measures
Dettagli / Details
73cm
73cm
120cm
Sp. 18mm
Pos.
Pezzi / Pcs
Descrizione / Description
1
1
Coperchio (1200 x 730 x 18mm)
Top (1200 x 730 x 18mm)
2
1
Fianco dx (712 x 728 x 18mm)
Rh Side (712 x 728 x 18mm)
3
1
Fianco sx (712 x 728 x 18mm)
Lh Side (712 x 728 x 18mm)
4
1
Tramezza (1161 x 400 x 18mm)
Partition Shelf (1161 x 400 x 18mm)
2
3
1
4
A
C
B
D
Istruzioni di montaggio / Assembly Instructions
Accessori / Equipment
Pos.
Pezzi / Pcs
Descrizione / Description
5
9
Perno per eccentrico
Cam bolt
6
9
Eccentrico
Cam
7
9
Tappino copri eccentrico
Cam covercap
8
4
Piedino
Foot
Posizionare i fianchi dx (2) e sx (3) su una superficie piana, con i fori rivolti verso
l’alto. Inserire i perni (5) e gli eccentrici (6) sui fianchi. Gli eccentrici vanno
inseriti con la freccia rivolta verso il bordo più vicino come mostrato in figura.
Avvitare i perni sino a fine corsa.
Place the rh side (2) and lh side (3) on a flat surface, with the holes facing
upwards. Insert the bolts (5) and the cams (6) on the sides. The cam must be
inserted with the arrow pointing toward the nearest edge as shown in the figure.
Screw the bolt until the end of the stroke.
Sistemare la tramezza (4) sul fianco sx (3), infilandolo sui perni per eccentrico
inseriti precedentemente.
Place the partition shelf (4) on the lh side (3), inserting it on bolts inserted
previously.
Posizionare la tramezza (4) su una superficie piana con i fori rivolti verso l’alto.
Inserire gli eccentrici (6) sulla tramezza. Gli eccentrici vanno inseriti con la
freccia rivolta verso il bordo più vicino, come mostrato in figura.
Place the partition shelf (4) on a flat surface with the holes facing upwards.
Insert the cams (6) on the partition shelf. The cam must be inserted with the
arrow pointing toward the nearest edge, as shown in the figure.
Sistemare ora il fianco dx (2) sulla tramezza (4), infilandolo con i perni per
eccentrico inseriti precedentemente.
Now place the rh side (2) on the partition shelf (4), inserting it with the bolts
inserted previously.
5
6
7
8
Istruzioni di montaggio / Assembly Instructions
E
G
M
I
F
H
L
N
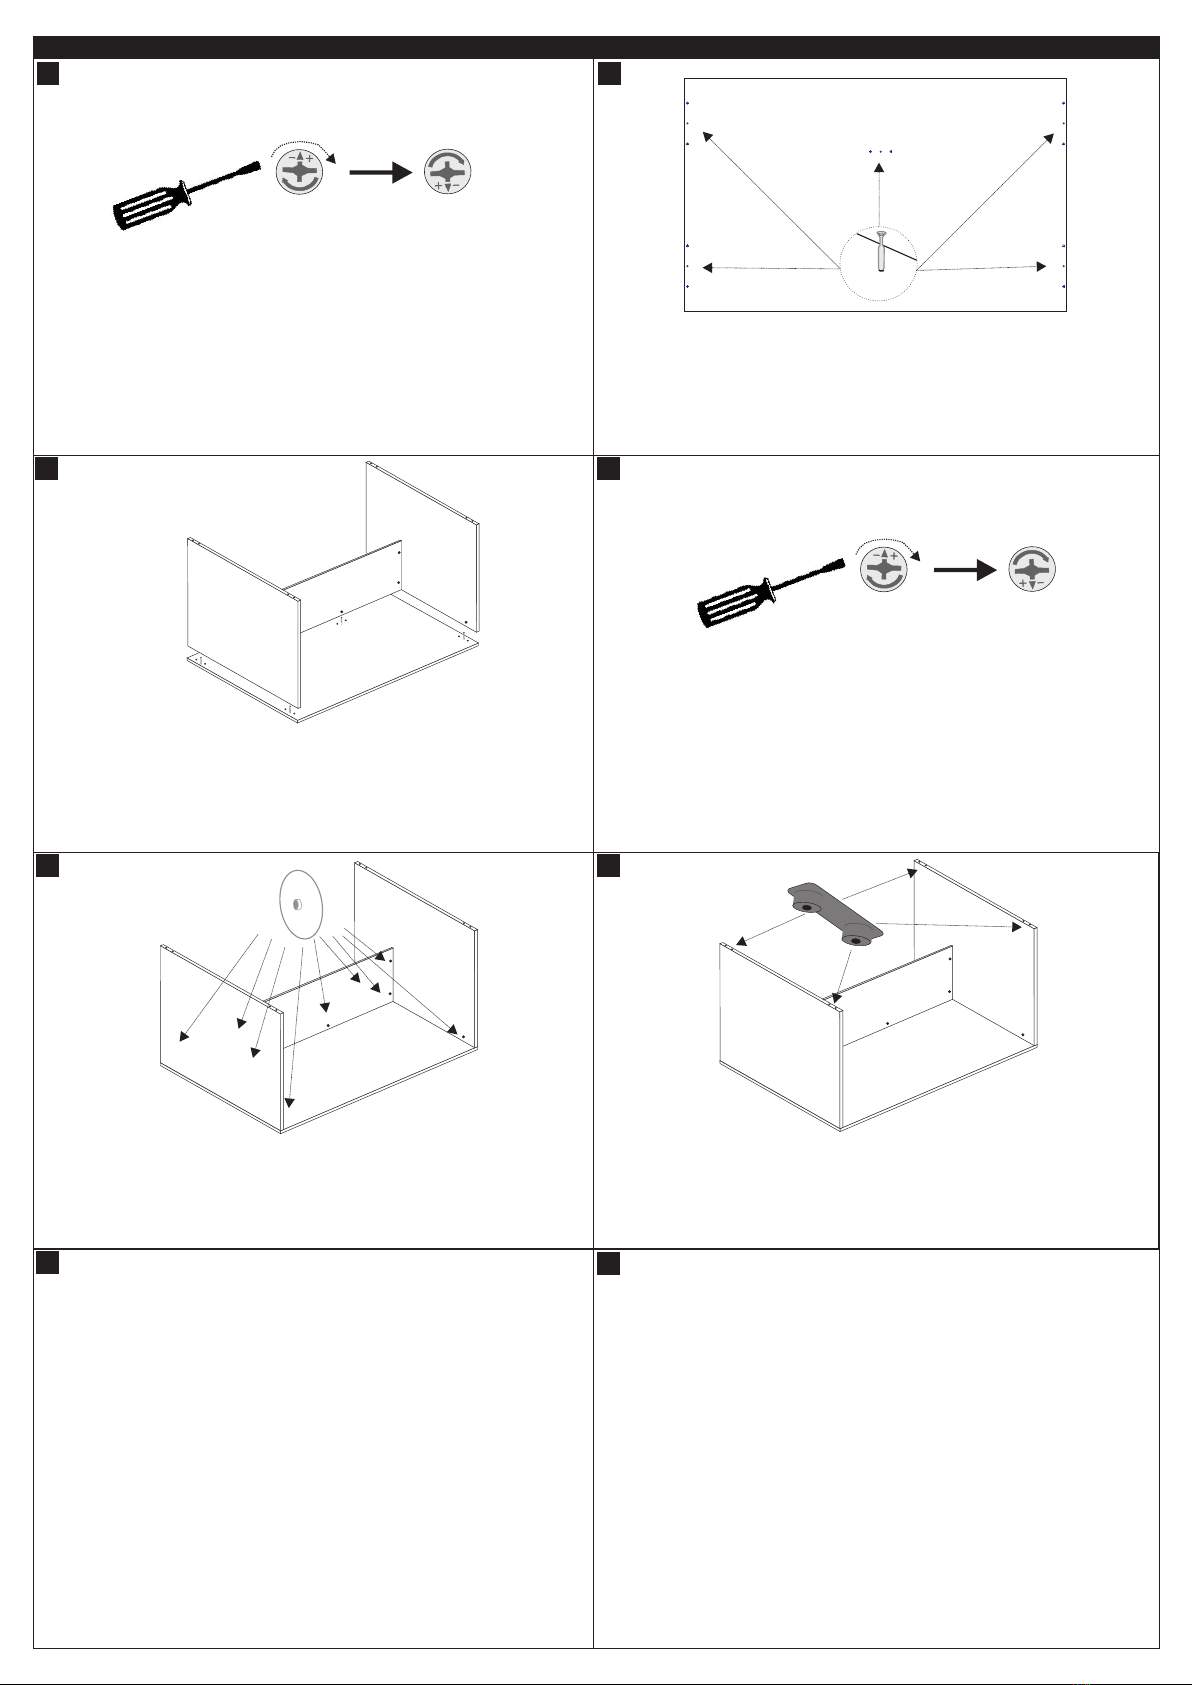
Coprire ora gli eccentrici (6), posizionati sui fianchi dx/sx (2 e 3) e sulla
tramezza (4) con i tappini (7).
Now cover the cams (6), positioned on the rh/lh sides (2 and 3) and the partition
shelf (4) with the cam covercap (7).
Sistemare ora il telaio così ottenuto, composto dai fianchi dx e sx (2 e 3) e dalla
tramezza (4), sul coperchio, infilandolo sui perni per eccentrico (5) inseriti
precedentemente.
Place now the chassis thus obtained, comprising the rh and lh sides (2 and 3)
and the partition shelf (4), on the top, inserting it on the bolts (5) inserted
previously.
Ruotare gli eccentrici (6) posizionati sulla tramezza (4) in senso orario in modo
da fissare la tramezza ai fianchi.
Rotate the cams (6) placed on the partition shelf (4) clockwise to secure the
partition shelf on the rh and lh sides.
Ruotare gli eccentrici (6) posizionati sulla tramezza (4) e fianchi dx/sx (2 e 3) in
senso orario in modo da fissare il coperchio alla tramezza ed ai fianchi.
Rotate the cams (6) placed on the partition shelf (4) and rh/lh sides (2 and 3)
clockwise to fix the top to the partition shelf and sides.
Posizionare il coperchio (1) su una superficie piana con i fori rivolti verso l’alto.
Inserire i perni per eccentrico sul coperchio. I perni vanno avvitati sino a fine
corsa.
Place the top (1) on a flat surface with the holes facing upwards. Insert the bolts
on the top. The bolts must be screw until the end of the stroke.
Inserire negli appositi fori posti sui fianchi, i piedini (8).
Insert in the holes located on the sides, the feet (8).
PRODOTTO
PRODUCT
COMPONENTI
COMPONENTS
TIPOLOGIA E MATERIALI PER
LA STRUTTURA
TYPOLOGY AND MATERIAL
FOR THE STRUCTURE
TIPOLOGIA E MATERIALI DI
RIVESTIMENTO, SUPERFICI
TYPOLOGY AND COATING
MATERIAL SURFACES
TIPOLOGIA E MATERIALI PER
I BORDI
TYPOLOGY AND MATERIAL
FOR THE EDGES
Scrivania
Desk
Fianchi
Sides
Truciolare nobiliato
Engineered wood
Carta impregnata con resine
melaminiche
Paper impregnated with
melanine resins
Carta impregnata con resine
termoplastiche e termoindurenti
o ABS
Paper impregnated with
thermoplastics and
thermosetting resins or ABS
Top
Base
Tramezza
Partition Shelf
ATTENZIONE
Se al momento dell’apertura della confezione dell’imballo si evidenziassero anomalie delle parti strutturali occorre contattare il
fornitore prima del suo utilizzo
WARNING
If at the time of the opening of the packaging, it yields anomalies of structural parts you need to contact the supplier before its use.
Scheda Prodotto / Product Sheet
ALTRE CARATTERISTICHE (EVENTUALI MATERIALI E
SOSTANZE CHE POSSONO ARRECARE DANNO ALL’UOMO E
ALL’AMBIENTE)
OTHER CHARACTERISTICS (ANY MATERIALS AND
SUBSTANCES THAT MAY CAUSE DAMAGE TO MAN, THINGS
AND THE ENVIROMENT)
USO
USE
PULIZIA
CLEANING
SMALTIMENTO
DISPOSAL
Materiale di classe E1: bassa emissione di formaldeide.
Questi pannelli possono essere utilizzati senza causare una
concentrazione di equilibrio nell’aria della camera di prova (definita
nella norma UNI EN 717-1) maggiore di 0,1 ppm, limite raccomandato
all’Organizzazione Mondiale della Sanità per gli ambienti di vita e
soggiorno.
Material class E1: low formaldehyde emissions
Class E1 panels can be used without causing an equilibrium
concentration in the air in the test chamber (defined in the UNI EN 717-
1) greater than 0.1 ppm, limit recommended by the World Health
Organization for life and living environments.
Mobile multiuso
Multiuse cabinet
Utilizzare panno inumidito con
alcool diluito o con prodotti per
la pulizia delle superfici lavabili,
purché privi di abrasivi e/o
solventi.
Use cloth moistened with
alcohol diluted or with cleaning
products for the washable
surfaces, if they are free of
abrasives and/or solvents
Al termine del ciclo di vita, il
prodotto può essere conferito
alla raccolta differenziata o
speciali piattaforme RSU
At the end of the life cycle the
product may be conferred on
the differentiated collection or
special platforms RSU

Other SARMOG Indoor Furnishing manuals

SARMOG 729k User manual

SARMOG

SARMOG 729k User manual

SARMOG Db270k User manual

SARMOG

SARMOG Db270k User manual

SARMOG 718k User manual

SARMOG

SARMOG 718k User manual

SARMOG 775 User manual

SARMOG

SARMOG 775 User manual

SARMOG Db625kdx User manual

SARMOG

SARMOG Db625kdx User manual

SARMOG Db802k User manual

SARMOG

SARMOG Db802k User manual

SARMOG Db808k User manual

SARMOG

SARMOG Db808k User manual

SARMOG Db359k User manual

SARMOG

SARMOG Db359k User manual

SARMOG 772 User manual

SARMOG

SARMOG 772 User manual

SARMOG 7034k User manual

SARMOG

SARMOG 7034k User manual

SARMOG 7076k User manual

SARMOG

SARMOG 7076k User manual

SARMOG Db774k User manual

SARMOG

SARMOG Db774k User manual

SARMOG 623 User manual

SARMOG

SARMOG 623 User manual

SARMOG Db804k User manual

SARMOG

SARMOG Db804k User manual

SARMOG Db805k User manual

SARMOG

SARMOG Db805k User manual

Popular Indoor Furnishing manuals by other brands

Radius STEHVERSION 1150a manual

Radius

Radius STEHVERSION 1150a manual

Morata 7074 Assembly instructions

Morata

Morata 7074 Assembly instructions

BRIGHT QJ-226CT Assembly instructions

BRIGHT

BRIGHT QJ-226CT Assembly instructions

Threshold TGTD42-3 Assembly instructions

Threshold

Threshold TGTD42-3 Assembly instructions

Furniture of America Gemma CM7303Q Assembly instructions

Furniture of America

Furniture of America Gemma CM7303Q Assembly instructions

Coaster 753397 Assembly instructions

Coaster

Coaster 753397 Assembly instructions

Hodedah HI4DR-G Assembly instructions

Hodedah

Hodedah HI4DR-G Assembly instructions

Allen + Roth 1412VA-60-201-925 quick start guide

Allen + Roth

Allen + Roth 1412VA-60-201-925 quick start guide

John Thomas VISTA OT-15E2 Assembly instructions

John Thomas

John Thomas VISTA OT-15E2 Assembly instructions

GABBY CLAIRMONT Assembly instruction

GABBY

GABBY CLAIRMONT Assembly instruction

Songmics VASAGLE LCR11 manual

Songmics

Songmics VASAGLE LCR11 manual

IKEA ANNONS instructions

IKEA

IKEA ANNONS instructions

Babies R' Us nextsteps manual

Babies R' Us

Babies R' Us nextsteps manual

Costway CB10477US manual

Costway

Costway CB10477US manual

Dunelm Lopez Double Door Wall Cabinet instructions

Dunelm

Dunelm Lopez Double Door Wall Cabinet instructions

JWA MARIAN 69568 Assembly instruction

JWA

JWA MARIAN 69568 Assembly instruction

Walker Edison BU48HNK Assembly instruction

Walker Edison

Walker Edison BU48HNK Assembly instruction

Flexsteel home W1047-860 manual

Flexsteel home

Flexsteel home W1047-860 manual

manuals.online logo
manuals.online logoBrands
  • About & Mission
  • Contact us
  • Privacy Policy
  • Terms and Conditions

Copyright 2025 Manuals.Online. All Rights Reserved.