SARMOG Db805k User manual

Mobile 4 cassetti
4-drawer unit
- Struttura materiale in truciolare nobilitato
- Maniglie e piedini verniciati cromo
satinato
- Guide cassetto in metallo
- Mobile in kit
- Material structure in engineered wood
- Chrome-plated feet and handles
- Metal drawer runners
- Kit furniture
Misure / Measures
Dettagli / Details
Componenti / Elements
Pos.
Pezzi / Pcs
Descrizione / Description
1
1
Coperchio - Top (1788 x 472 x 25mm)
2
1
Fianco dx - Rh Side (420 x 472 x 25mm)
3
1
Fianco sx - Lh Side (420 x 472 x 25mm)
4
1
Base (1788 x 472 x 25mm)
5
1
Tramezza - Partition Shelf (420 x 451 x 16mm)
6
1
Schiena - Backrest (872 x 437 x 3mm)
7
1
Schiena - Backrest (872 x 437 x 3mm)
8
1
Davanti dx - Rh Front Drawer (865 x 253 x 16mm)
9
1
Davanti sx - Lh Front Drawer (865 x 253 x 16mm)
10
1
Davanti dx - Rh Front Drawer (865 x 157 x 16mm)
11
1
Davanti sx - Lh Front Drawer (865 x 157 x 16mm)
12
2
Sponda Cass - Structure Drawer (834 x 400 x 14mm)
13
2
Sponda Cass - Structure Drawer (834 x 400 x 12mm)
14
4
Fondo Cassetto - Backrest Drawer (821 x 401 x 3mm)
813
9
11
14
8
10
12
Art. Db805k
47,2cm
2,3cm
47cm 49,3cm
178,8cm
Sp. 3mm
Schiena
Backrest
Sp. 25mm
86cm 86cm
42cm
Utile interno cassetti superiori:
Upper drawers usefull inside: h 13 - l 81 - p 38 cm
h 22 - l 81 - p 38 cm
Utile interno cassetti inferiori:
Lower drawers usefull inside:
2
1
3
Dx / Rh
4
5
6
7
Sx / Lh

CD
Istruzioni di montaggio / Assembly Instructions
Accessori / Equipment
Pos.
Pezzi / Pcs
Descrizione / Description
15
4
Maniglia
Handle
16
8
Vite 4x20
Screw 4x20
17
4
Guide cassetto
Drawer runners
18
8
Vite 6,3x13
Screw 6,3x13
19
8
Vite 6,3x9
Screw 6,3x9
20
24
Vite 3,5x20
Screw 3,5x20
21
6
Piedi
Feet
22
18
Vite 4,5x16
Screw 4,5x16
23
4
Colla
Glue
24
12
Perce per Eccentrico
Cam Bolt
25
4
Eccentrico sp. 16
Cam th. 16
26
8
Eccentrico sp. 25
Cam th. 25
27
12
Tappino Coprieccentrico
Cam Covercap
Per distinguere i cassetti sx dai dx: sul retro del fronte cassetto, controllare le
forature poste sui bordi. Se i fori più distanti dal bordo sono sulla destra, è un
cassetto dx, altrimenti è sx.
To distinguish the left from the right drawers; on the back of the drawer front,
check the holes on the edges. If the holes farthest from the edge are on the
right, it is a right drawer, otherwise it is left.
Avvitare i perni per eccentrico (24) nei fori su base (4) e coperchio (1). Avvitarli
sino a fine corsa. Inserire gli eccentrici sp.25 (26) nei fori posti su fianchi dx e sx
(2, 3) e gli eccentrici sp.16 (25) sulla tramezza (5), con la freccia rivolta verso il
bordo più vicino.
Screw the cam bolts (24) into the holes on the base (4) and the top (1). Screw
them up a t the end of the stroke. Insert the cams th.25 (26) into the holes on the
Rh and Lh sides (2,3) and the cams th.16 (25) into the holes on the partition side
(5), with the arrow pointing toward the nearest edge.
15 22
16 23
17 24
18 25
19 26
20 27
21
colla
AB
Distendere su un piano i davanti cassetto (8,9,10,11) e le sponde cassetto
(12,13), ed applicare la colla (23) nei punti indicati. Chiudere le sponde sui fondi
cassetto (14) con il lato colorato verso l’interno del cassetto, ed inserire i fianchi
della sponda nel davanti.
Lay out the fronts drawer (8,9,10,11) and the structures (12,13), and apply the
glue (23) where indicated. Close the structures on the drawer backrests (14)
with the colored side facing the inside of the drawer. Insert the structure side on
the front drawer.
Capovolgere il cassetto e fissare le guide cassetto (17) sui bordi dx e sx sul
fondo del cassetto con le viti 3,5x20 (20). Le guide vanno poste con le ruote
rivolte verso l’esterno e retro del cassetto.
Flip the drawer and fasten the drawer runners (17) on the right and left edges on
the bottom of the drawer with the screws 3,5x20 (20). The runners must be
placed with the wheels pointing outwards and back of the drawer.
Dx / Rh
Sx / Lh

Istruzioni di montaggio / Assembly Instructions
E
G
I
M
F
H
N
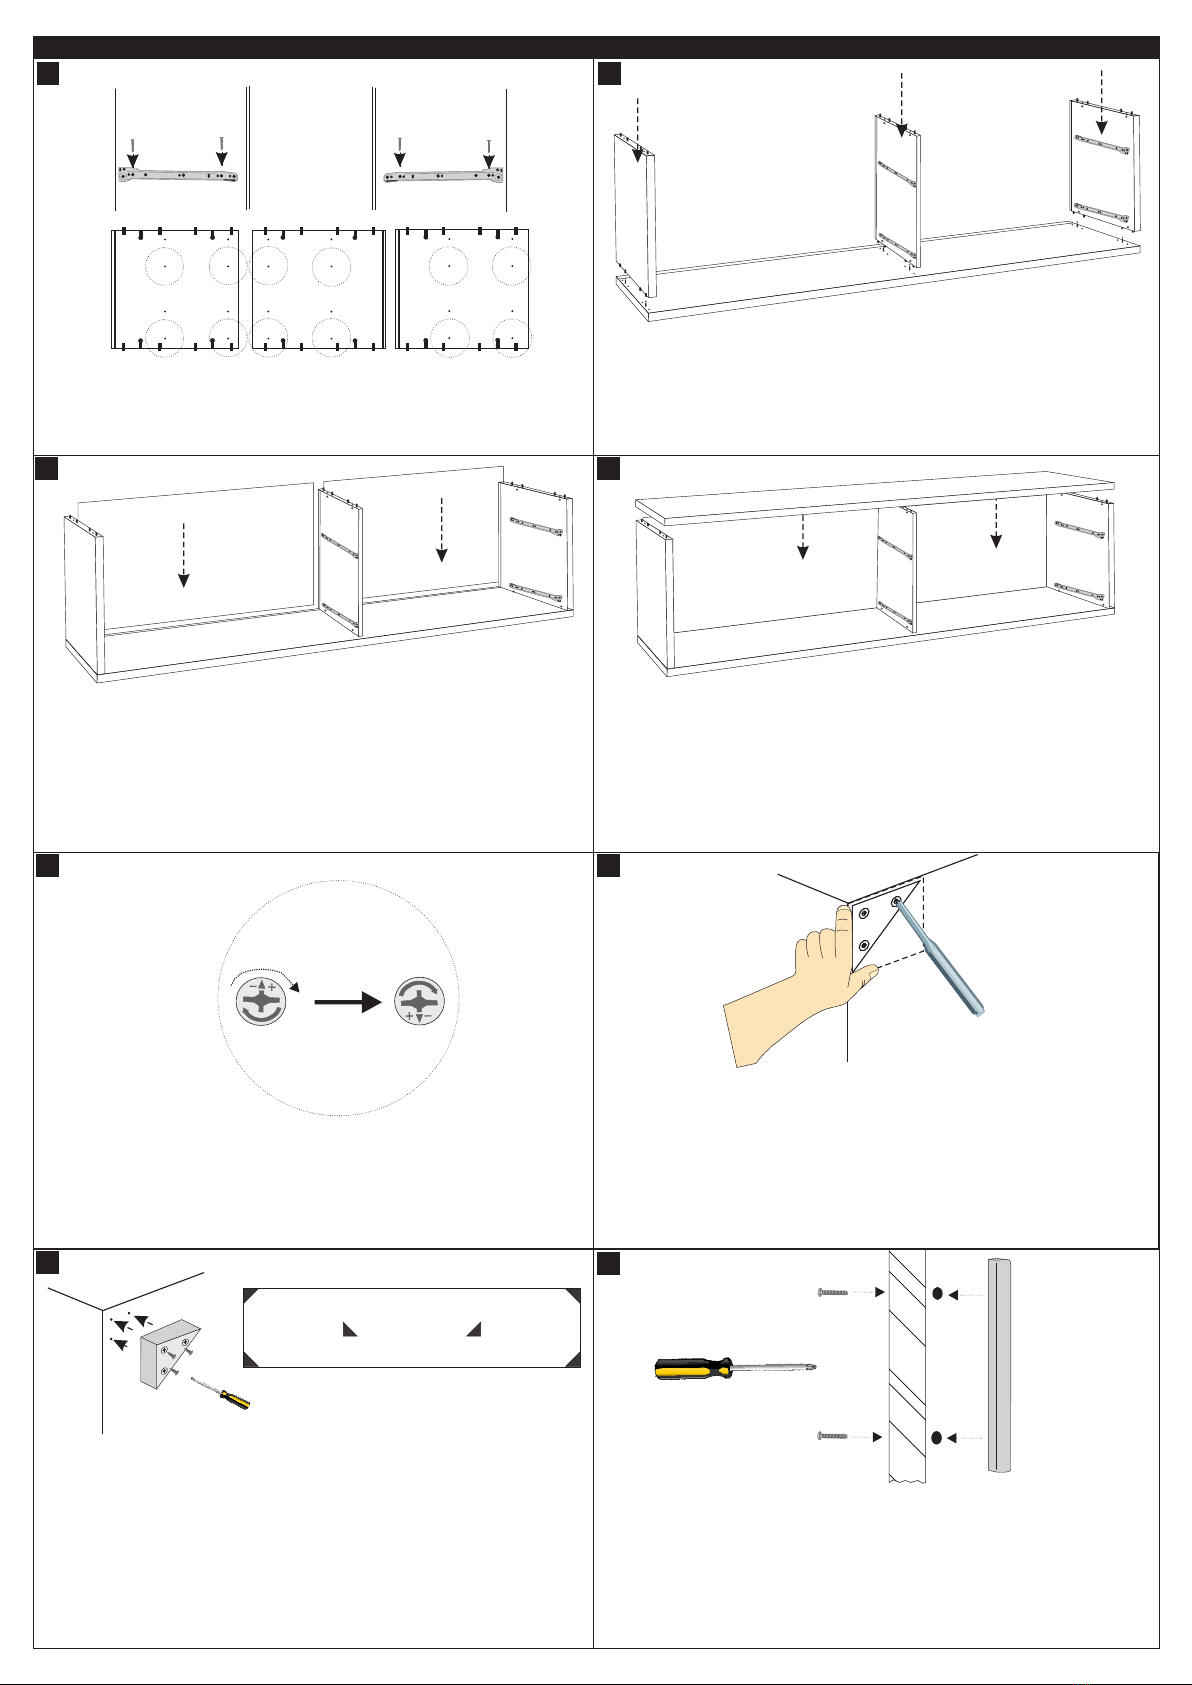
Ruotare ora in senso orario gli eccentrici (25,26) posti sui fianchi e sulla
tramezza. Coprire quindi gli eccentrici con i tappini (27).
Turn the cams (25,26) located on the sides and the partition side in a clockwise
direction. Cover now the cams with the caps (27).
Fissare le guide cassetto (17) sui fianchi dx e sx (2,3) con le viti 6,3x13 (18), e
sulla tramezza (5) con le viti 6,3x9 (19).
Fix the drawer runners (17) on the rh and lh sides (2,3) with screw 6,3x13 (18)
and on the partition side (5) with screw 6,3x9 (19).
Posizionare ora il piede (21) sui fori segnati sull’angolo della base. Fissare il
piede con le viti 4,5x16 (22) (3 viti per piede). Ripetere l’operazione sugli altri
angoli. I restanti piedi vanno inseriti centralmente sulla base.
Support the foot (21) on the holes marked on the corner of the base. Fix it using
screws 4,5x16 (22) (3 screws for foot). Repeat the operation on the other
corners. The remaining feet should be placed centrally on the base.
Sulla base, utilizzare la sagoma ritagliata precedentemente e posizionarla su
un angolo della base. Fare dei fori nei tre centri con un punteruolo per
agevolare la penetrazione delle viti. Ripetere l’operazione sugli altri angoli.
On the base, use the shape cropped previously and turning on the corners of
the base flush with the sides. Mark the holes in the three centers with an awl to
facilitate the penetration of the screws. Repeat the operation on the other
corners.
Chiudere il telaio così ottenuto con il coperchio (1) infilandolo nei rispettivi fori
posti sui fianchi e tramezza con i perni per eccentrico (24).
Close the frame thus obtained with the top (1) by inserting the cam bolts (24) in
the respective holes on the sides and partition.
Inserire ora le schiene (6,7) facendole scorrere nelle guide poste sui fianchi e
tramezza.
Insert the backrest (6,7) by sliding them into the guides located on the sides and
partition.
Appoggiare la base (4) su una superfice piana. Inserire la tramezza (5) ed i
fianchi (2,3), infilando i perni (24) nei rispettivi fori.
Put the base (4) on a flat surface. Insert the partition (5) and the sides (2,3), by
inserting it into the holes with the cam bolts (24).
Fissare ora le maniglie (15) sui cassetti con le viti 4x20 (16).
Fix now the handles (15) on the drawers with the screws 4x20 (16).
L
Fronte
Front
Retro
Rear

ATTENZIONE
Il mobile va appoggiato su superfici perfettamente piane ed addossato ad una parete. Se al momento dell’apertura della confezione
dell’imballo si evidenziassero anomalie delle parti strutturali occorre contattare il fornitore prima del suo utilizzo.
WARNING
The cabinet must be supported on surfaces perfectly flat and leaned against a wall. If at the time of the opening of the packaging, it
yields anomalies of structural parts you need to contact the supplier before its use.
Product Sheet
PRODOTTO
PRODUCT
COMPONENTI
COMPONENTS
TIPOLOGIA E MATERIALI PER
LA STRUTTURA
TYPOLOGY AND MATERIAL
FOR THE STRUCTURE
TIPOLOGIA E MATERIALI DI
RIVESTIMENTO SUPERFICI
TYPOLOGY AND COATING
MATERIAL SURFACES
TIPOLOGIA E MATERIALI PER
I BORDI
TYPOLOGY AND MATERIAL
FOR THE EDGES
Mobile multiuso
Multiuse cabinet
Fianchi e Tramezza
Sides and Partition Shelf
Truciolare nobilitato
Engineered wood
Carta impregnata come resine
melaminiche
Paper impregnated with
melanine resins
Carta impregnata con resine
termoplastiche e termoindurenti
o ABS
Paper impregnated with
thermoplastics and
thermosetting resins or ABS
Top
Base
Frontali
Front
Schiena
Backrest
Pannello fibrolegnoso
Panel wood fiber
Trattamento superficiale
idrofobizzante con paraffina
Surface treatment
hydrophobicizing with paraffin
Scheda Prodotto / Product Sheet
ALTRE CARATTERISTICHE
OTHER CHARACTERISTICS
USO
USE
PULIZIA
CLEANING
SMALTIMENTO
DISPOSAL
Materiale di classe E1: bassa emissione di formaldeide.
Questi pannelli possono essere utilizzati senza causare una
concentrazione di equilibrio nell’aria della camera di prova (definita
nella norma UNI EN 717-1) maggiore di 0,1 ppm, limite raccomandato
all’Organizzazione Mondiale della Sanità per gli ambienti di vita e
soggiorno.
Material class E1: low formaldehyde emissions
Class E1 panels can be used without causing an equilibrium
concentration in the air in the test chamber (defined in the UNI EN 717-
1) greater than 0.1 ppm, limit recommended by the World Health
Organization for life and living environments.
Mobile multiuso
Multiuse cabinet
Utilizzare panno inumidito con
alcool diluito o con prodotti per
la pulizia delle superfici lavabili,
purché privi di abrasivi e/o
solventi.
Use cloth moistened with
alcohol diluted or with cleaning
products for the washable
surfaces, if they are free of
abrasives and/or solvents
Al termine del ciclo di vita, il
prodotto può essere conferito
alla raccolta differenziata o
speciali piattaforme RSU
At the end of the life cycle the
product may be conferred on
the differentiated collection or
special platforms RSU
Via Pizzamiglia, 7
42016 S.Girolamo di Guastalla (RE) - Italy
www.sarmog.com
Web
E-mail
Tel
Fax
+39 0522 228058
+39 0522 228442
SARMOG s.r.l.
Other SARMOG Indoor Furnishing manuals
Popular Indoor Furnishing manuals by other brands

RTA
RTA Techni Mobili RTA-S07 Assembly instructions

Safavieh Furniture
Safavieh Furniture Bernard FOX8508 manual

Moen
Moen Glass Shelf YB9290 Technical specifications

Rauch
Rauch M1882 Assembly instructions

Naomi Home
Naomi Home 82600-04-00B Assembly instructions

Fresca
Fresca KINGSTON FVN2260 installation guide