manuals.online logo
Brands
  1. Home
  2. •
  3. Brands
  4. •
  5. SARMOG
  6. •
  7. Indoor Furnishing
  8. •
  9. SARMOG Db808k User manual

SARMOG Db808k User manual

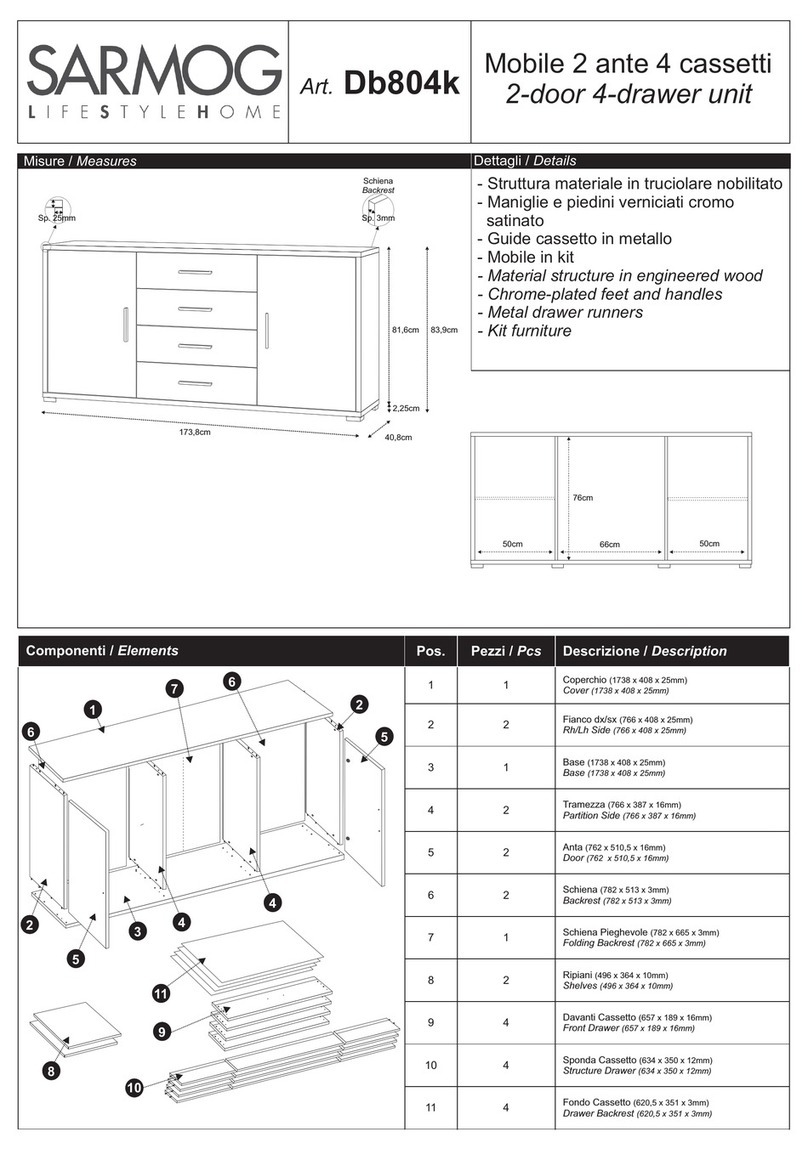
Mobile 4 ante 4 cassetti
4-door 4-drawer unit
Misure / Measures
Dettagli / Details
Componenti / Elements
40,8cm
203cm
84cm
Sp. 3mm
Schiena
Backrest
Sp. 25mm
76cm
64cm 64cm
66cm
Art. Db808k
- Struttura materiale in truciolare nobilitato
- Guide cassetto a rullo
- Maniglie e piedini verniciati cromo
satinato
- Mobile in kit
- Material structure in engineered wood
- Roller slides drawer
- Chrome-plated feet and handles
- Kit furniture
Utile cassetto
Usefull drawer
h.16 l.61 p.34cm
Pos.
Pezzi / Pcs
Descrizione / Description
1
2
Coperchio/Base (2030 x 408 x 25mm)
Cover/Base (2030 x 408 x 25mm)
2
2
Fianco dx/sx (766 x 408 x 25mm)
Rh/Lh Side (766 x 408 x 25mm)
3
2
Tramezza (766 x 387 x 16mm)
Partition Side (766 x 387 x 16mm)
4
1
Schiena Pieghevole A (782 x 665 x 3mm)
Folding Backrest A (782 x 665 x 3mm)
5
2
Schiena Pieghevole B (782 x 657 x 3mm)
Folding Backrest B (782 x 657 x 3mm)
6
4
Anta (762 x 327,5 x 16mm)
Door (762 x 327,5 x 16mm)
7
4
Davanti Cassetto (657 x 189 x 16mm)
Front Drawer (657 x 189 x 16mm)
8
4
Sponda Cassetto (634 x 350 x 140mm)
Drawer Structure (634 x 350 x 140mm)
9
4
Fondo Cassetto (620,5 x 351 x 3mm)
Drawer Backrest (620,5 x 351 x 3mm)
10
2
Ripiano A (642 x 364 x 10mm)
Shelf A (642 x 364 x 10mm)
11
1
Ripiano B (657 x 364 x 10mm) Usare per Db806
Shelf B (657 x 364 x 10mm) Usage for Db806
7
8
10
5
6
3
3
1
6
6
6
4
51
2
9
29
CD
Istruzioni di montaggio / Assembly Instructions
Accessori / Equipment
Pos.
Pezzi / Pcs
Descrizione / Description
12
4
Cerniera collo dritto - Full overlay hinge
13
4
Cerniera collo alto - Insert hinge
14
4
Guide cassetto a rullo - Roller slides drawerl
15
8
Maniglia - Handle
16
16
Vite 4x20 - Screw 4x20
17
6
Piedi - Feet
18
18
Vite 4,5x16 - Vite 4,5x16
19
8
Reggipiani - Support Shelf
20
16
Perno per Eccentrico - Cam Bolt
21
8
Eccentrico sp.16 - Cam th.16
22
8
Eccentrico sp.25 - Cam th.25
23
16
Tappini copri eccentrico - Cam covercap
24
4
Colle - Glue
25
24
Vite 3,5x20 - Screw 3,5x20
26
16
Vite Euro 6,3x13 - Euro screw 6,3x13
27
4
Fermaporta - Lockdoor
Avvitare i perni per eccentrico (20) nei fori su coperchio e base (1). Avvitarli sino
a fine corsa. Inserire i fermaporta (27).
Screw the cam bolts (20) into the holes on the cover and base (1), Rh side (4).
Screw them up at the end of the stroke. Insert the lockdoor (27).
Inserire gli eccentrici sp. 25 (22) nei fori posti sui fianchi (2). Gli eccentrici sp. 16
(21) sulle tramezze (3). Gli eccentrici vanno inseriti con la freccia rivolta verso il
bordo più vicino come mostrato in figura.
Insert the cams th. 25 (22) into the holes on the sides (2). The cams th. 16 (21)
on the partitions (3).The cams must be inserted with the arrow pointing toward
the nearest edge as shown in the figure.
12 20
19 27
15 23
14 22
13 21
16 24
17 25
18 26
colla
A
Distendere su un piano i davanti cassetto (7) e le sponde cassetto (8), ed
applicare la colla (24). Chiudere le sponde sui fondi cassetto (9) ed inserire i
fianchi delle sponde nei davanti.
Lay out the front drawer (7) and the shores (8), and apply the glue (24). Close
the structure drawer on the drawer backrest (9). Insert the shore side on the
front.
Capovolgere il cassetto e fissare le guide cassetto (14) sui bordi dx e sx sul
fondo del cassetto con le viti 3,5x20 (25). Le guide vanno poste con le ruote
rivolte verso l’esterno e retro del cassetto.
Flip the drawer and fasten the drawer runners (14) on the right and left edges on
the bottom of the drawer with the screws 3,5x20 (25). The runners must be
placed with the wheels pointing outwards and back of the drawer.
B
B
2 3 32
Istruzioni di montaggio / Assembly Instructions
E
G
I
M
F
H
N
Inserire le cerniere a collo alto (13) su 2 ante (6). Sulle restanti 2 ante inserire le
cerniere a collo dritto (12). Posizionare un anta con le cerniere a collo alto (13)
adiacente al fianco (2), con le viti della cerniera sui rispettivi fori sul fianco e
fissarle. Ripetere l’operazione sull’altro fianco con l’altra anta con le cerniere a
collo alto. Ripetere l’operazione precedente con le ante con le cerniere a collo
dritto (12) posizionate adiacenti alle tramezze (3) e fissatele.
Insert the hinges (13) on 2 doors (6). On the remaining 2 doors insert the ull
overlay hinges (12). Position a door with hinges (13) adjacent to the side (2) and
fasten them. Repeat thhe operation on the other side with the other door with
hinges (13). Repeat the previous operation with the doors with full overlay
hinges (12) positioned adjacent to the partitions (3) and fix them.
Aprire le schiene pieghevoli (4 e 5). Inserire le schiene sulla base (1), facendole
scorrere nelle apposite guide poste su fianchi (2) e tramezze (3). Chiudere il
telaio così ottenuto con il coperchio (1) infilandolo nei rispettivi fori posti sui
fianchi e tramezze con i perni per eccentrico (20). Attenzione: non rompere i
bordi alle estremità della fresata.
Open the folding backrests (4 and 5). Insert the backrests on the base (1), by
sliding them into the guides on sides (2)and partitions (3). Close the frame thus
obtained with the top (1) by inserting the cam bolts (20) in the respective holes
on the sides and partitions. Warning: do not break the edges at the ends of
the milled.
Fissare sulle tramezze (3) le guide cassetto (14) con le viti 6,3x13 (26).
Fix on partitions (3) the drawer runners (14) with the screw 6,3x13 (26).
Posizionare ora il piede (17) sui fori segnati sull’angolo della base. Fissare il
piede con le viti 4,5x16 (18) (3 viti per piede). Ripetere l’operazione sugli altri
angoli. I restanti piedi vanno inseriti centralmente sulla base.
Support the foot (17) on the holes marked on the corner of the base. Fix it using
screws 4,5x16 (18) (3 screws for foot). Repeat the operation on the other
corners. The remaining feet should be placed centrally on the base.
Ruotare gli eccentrici (21 e 22) posizionati sui fianchi (2) e sulle tramezze (3) in
senso orario in modo da fissare il coperchio e base alla tramezza ed ai fianchi.
Coprire gli eccentrici (21 e 22) con i tappini copriforo (23).
Rotate the cams (21 and 22) placed on sides (2) and partitions (3) clockwise to
fix the cover and the base to the partitions and sides. Cover the cams (21 and
22) with the cams covercap (23).
Appoggiare la base (1) su una superfice piana. Inserire le tramezze (3) ed i
fianchi (2), infilando i perni (20) nei rispettivi fori.
Put the base (3) on a flat surface. Insert the partitions (3) and the sides (2), by
inserting it into the holes with the cam bolts (20).
Inserire il ripiano inclinato (10) sui reggipiani (19) inseriti precedentemente sui
fianchi e tramezze. Se l’apertura/chiusura delle ante non è perfetta, è
necessario agire con il cacciavite sulla vite posta al centro delle cerniere,
avvitando e/o svitando leggermente. In relazione al senso di rotazione della
vite sulla cerniera, l’anta si avvicina o allontana dal fianco del mobile.
Slip now inclined shelf (10) above the supports (19) previously inserted on
sides and partitions. If the opening/closing of the doors is not perfect, it is
necessary to act with a screwdriver on the screw in the center of the doors
hinges, with short turn screwing/unscrewing. According to the direction with
which turns the screw of the hinge, the door is appoaching or farther away from
their side of cabinet.
L
Inserire i cassetti. Fissare ora le maniglie (15) sulle ante e cassetti con le viti
4x20 (16). I piedi possono essere fissati sulla base nella posizione che
desiderate. Utilizzare la sagoma ritagliata precedentemente e posizionarla su
un angolo della base. Fare dei fori nei centri con un punteruolo per agevolare la
penetrazione delle viti. Ripetere l’operazione sugli altri angoli.
Insert the drawers. Fix now the handles (15) on the doors and drawers with the
screws (16). You can fix the feet on the base at the positions that you
prefer. Use the shape cropped previously and turning on the corners of the
base flush with the sides. Mark the holes in the centers with an awl to facilitate
the penetration of the screws. Repeat the operation on the other corners.
Attenzione
Warning
Fronte
Front
Retro
Rear
Agire sulla base
Act on base
ATTENZIONE
ISe al momento dell’apertura della confezione dell’imballo si evidenziassero anomalie delle parti strutturali occorre contattare il
fornitore prima del suo utilizzo.
WARNING
If at the time of the opening of the packaging, it yields anomalies of structural parts you need to contact the supplier before its use.
Product Sheet
PRODOTTO
PRODUCT
COMPONENTI
COMPONENTS
TIPOLOGIA E MATERIALI PER
LA STRUTTURA
TYPOLOGY AND MATERIAL
FOR THE STRUCTURE
TIPOLOGIA E MATERIALI DI
RIVESTIMENTO SUPERFICI
TYPOLOGY AND COATING
MATERIAL SURFACES
TIPOLOGIA E MATERIALI PER
I BORDI
TYPOLOGY AND MATERIAL
FOR THE EDGES
Mobile multiuso
Multiuse cabinet
Fianchi e Tramezza
Sides and Partition Shelf
Truciolare nobilitato
Engineered wood
Carta impregnata come resine
melaminiche
Paper impregnated with
melanine resins
Carta impregnata con resine
termoplastiche e termoindurenti
o PVC
Paper impregnated with
thermoplastics and
thermosetting resins or PVC
Top
Base
Ante
Doors
Schiena
Backrest
Pannello fibrolegnoso
Panel wood fiber
Trattamento superficiale
idrofobizzante con paraffina
Surface treatment
hydrophobicizing with paraffin
Scheda Prodotto / Product Sheet
ALTRE CARATTERISTICHE
OTHER CHARACTERISTICS
USO
USE
PULIZIA
CLEANING
SMALTIMENTO
DISPOSAL
Materiale di classe E1: bassa emissione di formaldeide.
Questi pannelli possono essere utilizzati senza causare una
concentrazione di equilibrio nell’aria della camera di prova (definita
nella norma UNI EN 717-1) maggiore di 0,1 ppm, limite raccomandato
all’Organizzazione Mondiale della Sanità per gli ambienti di vita e
soggiorno.
Material class E1: low formaldehyde emissions
Class E1 panels can be used without causing an equilibrium
concentration in the air in the test chamber (defined in the UNI EN 717-
1) greater than 0.1 ppm, limit recommended by the World Health
Organization for life and living environments.
Mobile multiuso
Multiuse cabinet
Utilizzare panno inumidito con
alcool diluito o con prodotti per
la pulizia delle superfici lavabili,
purché privi di abrasivi e/o
solventi.
Use cloth moistened with
alcohol diluted or with cleaning
products for the washable
surfaces, if they are free of
abrasives and/or solvents
Al termine del ciclo di vita, il
prodotto può essere conferito
alla raccolta differenziata o
speciali piattaforme RSU
At the end of the life cycle the
product may be conferred on
the differentiated collection or
special platforms RSU
Via Pizzamiglia, 7
42016 S.Girolamo di Guastalla (RE) - Italy
www.sarmog.com
[email protected]
Web
E-mail
Tel
Fax
+39 0522 228058
+39 0522 228442
SARMOG s.r.l.

Other SARMOG Indoor Furnishing manuals

SARMOG 7076k User manual

SARMOG

SARMOG 7076k User manual

SARMOG 775 User manual

SARMOG

SARMOG 775 User manual

SARMOG 7034k User manual

SARMOG

SARMOG 7034k User manual

SARMOG Db270k User manual

SARMOG

SARMOG Db270k User manual

SARMOG Db802k User manual

SARMOG

SARMOG Db802k User manual

SARMOG Db625kdx User manual

SARMOG

SARMOG Db625kdx User manual

SARMOG 728k User manual

SARMOG

SARMOG 728k User manual

SARMOG 623 User manual

SARMOG

SARMOG 623 User manual

SARMOG 718k User manual

SARMOG

SARMOG 718k User manual

SARMOG 729k User manual

SARMOG

SARMOG 729k User manual

SARMOG Db805k User manual

SARMOG

SARMOG Db805k User manual

SARMOG Db359k User manual

SARMOG

SARMOG Db359k User manual

SARMOG 772 User manual

SARMOG

SARMOG 772 User manual

SARMOG Db804k User manual

SARMOG

SARMOG Db804k User manual

SARMOG Db774k User manual

SARMOG

SARMOG Db774k User manual

Popular Indoor Furnishing manuals by other brands

Homebase FREYA FOLDING SOFA BED instruction manual

Homebase

Homebase FREYA FOLDING SOFA BED instruction manual

mlmeble BEST 09 Assembly instructions

mlmeble

mlmeble BEST 09 Assembly instructions

Home Styles 5053-106 Assembly instruction

Home Styles

Home Styles 5053-106 Assembly instruction

Twin Star Home 26MM1066 instruction manual

Twin Star Home

Twin Star Home 26MM1066 instruction manual

Time4Sleep SEVILLE OTTOMAN manual

Time4Sleep

Time4Sleep SEVILLE OTTOMAN manual

Simpli Home Bedford AXCBED15-LGB manual

Simpli Home

Simpli Home Bedford AXCBED15-LGB manual

Home Styles 88 5053 22 quick start guide

Home Styles

Home Styles 88 5053 22 quick start guide

Home Styles 4511-95 manual

Home Styles

Home Styles 4511-95 manual

Child Craft F04302 manual

Child Craft

Child Craft F04302 manual

SouthShore 3050 Assembly instructions

SouthShore

SouthShore 3050 Assembly instructions

HAMPTON BAY SOMERSOUND 69-2314WH-474 Use and care guide

HAMPTON BAY

HAMPTON BAY SOMERSOUND 69-2314WH-474 Use and care guide

Simpli Home brooklyn+max WynclenHall AXCART17-FOG manual

Simpli Home

Simpli Home brooklyn+max WynclenHall AXCART17-FOG manual

Herman Miller Canvas Office Landscape FT420 instructions

Herman Miller

Herman Miller Canvas Office Landscape FT420 instructions

Room & Board ASPEN ROUND TABLE 36 ASSEMBLY INSTRUCTIONS & PRODUCT INFO

Room & Board

Room & Board ASPEN ROUND TABLE 36 ASSEMBLY INSTRUCTIONS & PRODUCT INFO

BREDABEDS HORIZONTAL MURPHY BED WITH TOP HUTCH Assembly instructions

BREDABEDS

BREDABEDS HORIZONTAL MURPHY BED WITH TOP HUTCH Assembly instructions

HAMPTON BAY ASHBY DS03ND Use and care guide

HAMPTON BAY

HAMPTON BAY ASHBY DS03ND Use and care guide

XROCKER CERBERUS MKII manual

XROCKER

XROCKER CERBERUS MKII manual

Simpli Home WyndenHall Brooklyn + Max AXCAMH72-WH manual

Simpli Home

Simpli Home WyndenHall Brooklyn + Max AXCAMH72-WH manual

manuals.online logo
manuals.online logoBrands
  • About & Mission
  • Contact us
  • Privacy Policy
  • Terms and Conditions

Copyright 2025 Manuals.Online. All Rights Reserved.