6 APS-612 SATEL
The used batteries must not be discarded, but should be disposed of in
accordance with the existing rules for environment protection.
The power supply should be permanently connected to the 230 VAC mains power. Before
you make the cabling, familiarize yourself with the electrical installation of the facility. Make
sure that the circuit you choose for powering will be always alive. The power circuit should be
protected with a proper safety device. The owner or user of the alarm system should be
instructed on how to disconnect the power supply from the mains (e.g. by indicating the
power circuit breaker).
As the emergency power source, use a 12 V sealed lead-acid battery or other 12 V battery
with similar charging characteristics. Match the battery capacity to the current consumption of
the connected devices. If the battery is to meet the requirements of the EN 50131 standard
for Grade 3 / Grade 2, read section “Standard requirements for battery”.
The minimum battery capacity must be 7 Ah. If the capacity is lower, the power supply
will report a trouble when the battery testing mode is started.
If there is no mains power and the battery voltage drops to 10.5 V, the power supply
will turn off to protect the battery against deep discharge and damage.
Before you proceed to installation, estimate the current consumption by all devices which are
to be powered from the APS-612 power supply. The sum of currents consumed by these
devices must not exceed 3 A.
1. Remove the cover of power supply terminals (Fig. 5).
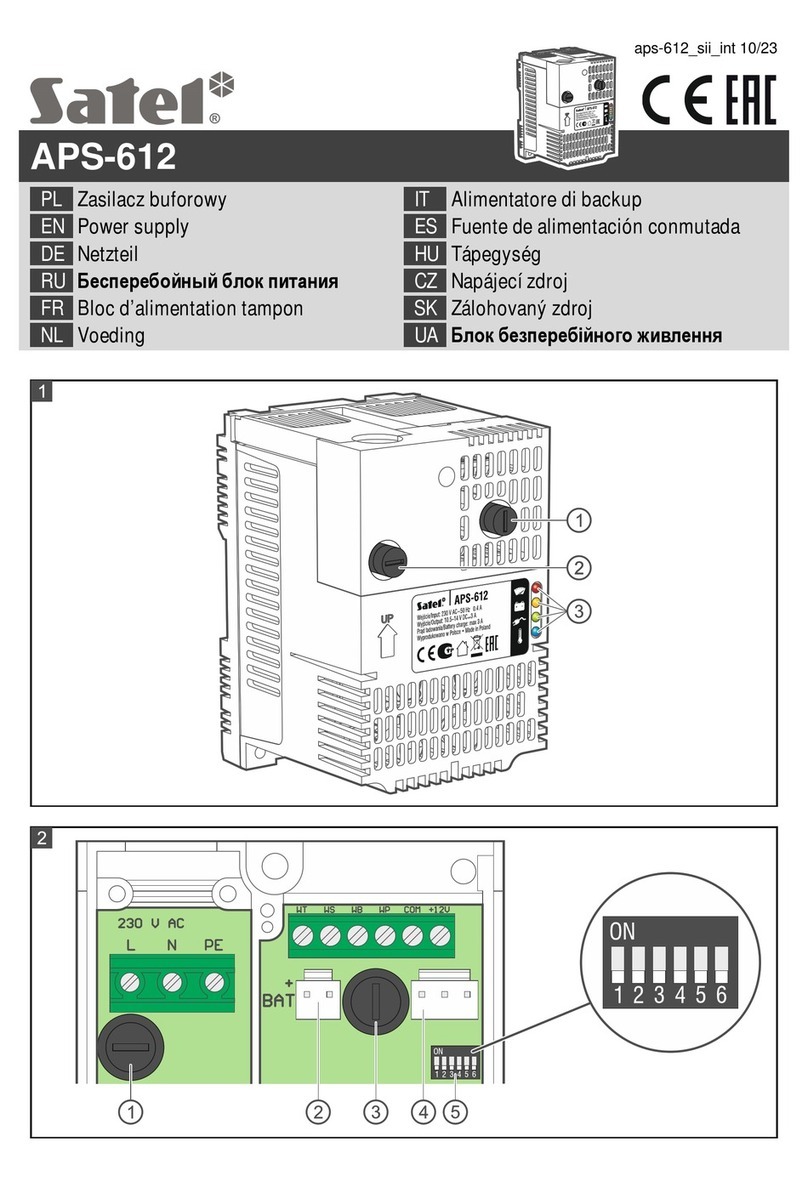
2. Use the DIP-switches (see Fig. 2) to configure the power supply.
3. If the connector for integration is to be used, connect to it the cable shown in Fig. 4
(Fig. 6).
4. If screw terminals are to be used for powering the devices, screw the wires to +12V and
COM terminals.
5. Connect the battery wires (Fig. 3) to the connector on the electronics board (Fig. 7).
6. You can connect e.g. LEDs to the trouble signaling outputs or you can connect these
outputs with control panel zones.
7. Run the 230 VAC power cable through the cable gland (Fig. 8).
8. Screw the 230 VAC power wires: phase conductor to L terminal, neutral conductor to N
terminal, and protective conductor to PE terminal (Fig. 9).
9. Screw the element fastening the 230 VAC power cable (Fig. 10).
10.Replace the cover of power supply terminals (Fig. 11) and fasten it with a screw (Fig. 12).
11.Connect the battery: battery positive to red wire, negative –to black.
12.Turn on 230 VAC power. When the AC power is present, the power supply will signal it
with a single beep sound and the LED turning ON.
If no LED is turned ON after powering on, this may suggest that the power output has
been shorted to common ground or there has been a voltage spike. The power supply
enters the emergency mode then.
