manuals.online logo
Brands
  1. Home
  2. •
  3. Brands
  4. •
  5. SATO
  6. •
  7. Printer
  8. •
  9. SATO MB200 User manual

SATO MB200 User manual

(HQ) SATO International Pte. Ltd.
(Japan) SATO Corporation
(Singapore) SATO Asia Pacific Pte. Ltd.
(Malaysia) SATO Auto-ID Malaysia Sdn. Bhd.
(Thailand) SATO Auto-ID (Thailand) Co., Ltd
(China) SATO Shanghai Co., Ltd
(USA) SATO America, Inc.
(Belgium) SATO Europe NV
(Germany) SATO Deutchland GmbH
(Poland) SATO Polska SP Z O.O.
(UK) SATO UK Ltd
(Holland) SATO Rotterdam Logistics Center
Factory :
(Malaysia) SATO Malaysia Electronics Manufacturing Sdn. Bhd.
(Malaysia) SATO Labelling Malaysia Electronics Sdn.Bhd.
Compact & Lightweight,
High Performance
MB200
Quick Guide
SATO Asia Pacific Pte. Ltd.
438A Alexandra Road
#05-01/02 Alexandra Technopark
Singapore 119967
Tel : (65) 6271 5300; Fax : (65) 6273 6011
Sales Hotline : (65) 6276 2722; Service Hotline : (65) 6273 6455
Email : sales@satoasiapacific.com
Website : www.satoworldwide.com
© Copyright 2003
SATO Asia Pacific Pte. Ltd.
Warning : This equipment complies with the requirements in Part 15 of FCC rules for a Class A
computing device. Operation of this equipment in a residential area may cause unacceptable
interference to radio and TV reception requiring the operator to take whatever steps necessary to
correct the interference.
All rights reserved. No part of this document may be reproduced or issued to third parties in
any form whatsoever without the express permission of SATO Asia Pacific Pte. Ltd. The
materials in this document are provided for general information and are subject to change
without notice. SATO Asia Pacific Pte. Ltd. assumes no responsibilities for any errors that may
appear.
SAP/MB200/QG/Jan05/02
MB200 Quick Guide Pg 15
Options
Battery Pack (one included)
To use as back-up.
Battery Charger
To recharge battery pack
AC Adapter for Printer
Use the adapter to supply power from a household electrical outlet (AC100-240V). Connect the
DC output jack of the adapter to the printer.
*Do not use thinner, benzene, or kerosene.
Shock Absorbing / Splash-proof Case (with shoulder belt)
Makes carrying the printer easier.
RS232C Cable
Connects the printer to the computers and handy terminals.
Interface Protector
Protects the RS232C plug from shock and pressure when carrying.
MB200 Quick Guide
PRINTER OVERVIEW
The SATO MB200 printer is compact and lightweight, combined with high
performances. Not only does this printer print barcodes clearly, it can also
enlarge and print various types of fonts and Kanji characters in a free layout.
MB200 is also excellent in durability, as it has been designed with the premises
of printing barcodes. Special considerations have also been taken so that the
printer can be easily maintained.
As a portable printer, MB200 can easily print and dispense labels to enable the
application of labels on-site.
This Quick Guide is an extract of the more common functions which you need
to start the printer running. For more advanced functions, please refer to the
Operator Manual.
MB200 Quick Guide Pg 1
Table of Contents
Installation ………………………………………………………………… 2
Installation ………………………………………………………... 2
Components ………………………………………………………. 3
Installing and Removing Battery Pack ………………………………….. 5
Using the AC Adapter …………………………………………………….. 6
Media Loading ……………………………………………………………. 7
Setting Labels ……………………………………………………. 7
Troubleshooting …………………………………………………………... 11
MB200 Specifications …………………………………………………….. 13
Options …………………………………………………………………….. 15
MB200 Quick Guide Pg 14
Item Details
Barcode JAN8/13, UPC-E/UPC-A, NW-7, CODE39,
CODE93., CODE128, INTERLEAVE 2 of 5
Two Dimension Code PDF 417, QR code
Function Key Print key
Feed Key
Indicator 1 LED indicator (with Green, Red, Orange lighting)
Noise Gauge Noise radiation: VCCI-A
Static withstanding pressure: Level 2
Protection Function Suspension of action upon detection of low level batteries
Impermeability Splash proof II (JIS) compliant (with the optional Shock
absorbing – splash proof case)
* Excludes when the printer is cabled
Environmental Conditions
(including battery) Operation temperature: 5 – 40ºC
Humidity: 25 – 80% (without condensation)
Storage Temperature: -5 – 45ºC
Humidity: 25 – 80% (without condensation)
excluding the label condition
Option Weak Radio Unit, Battery Charger, AC Adapter
(AC100V), Interface Protector, Shock Absorbing / Splash
Proof Case (with shoulder straps), RS232C Cable, Battery
Pack, Core-less Kit and Wireless Kit
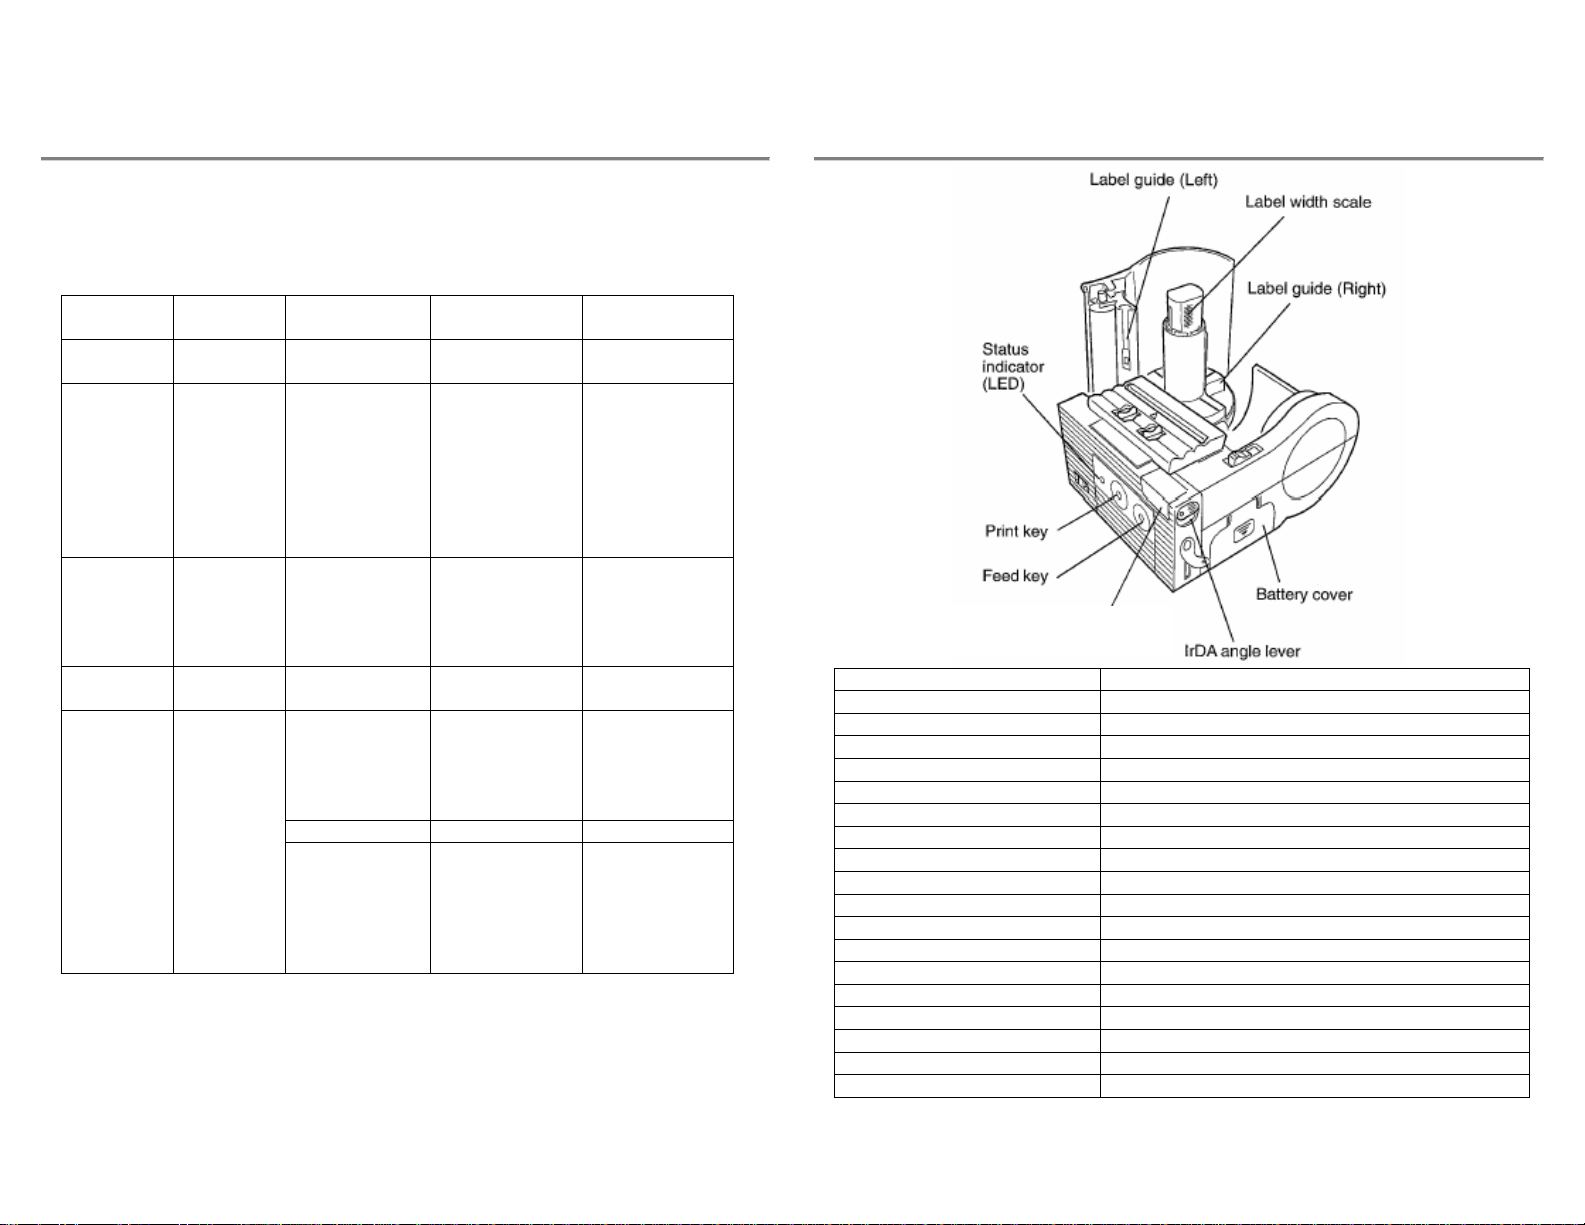
MB200 Quick Guide Pg 13
MB200 Specifications
Item Details
Method Thermal
Head Density 8 dots/mm
Maximum Printing Size Width 48mm x 160mm
Printing Speed Max. 62.5mm/sec (may vary from environment and
printing rate)
Size and Weight Printer: W94mm x D120mm x H64mm (excluding the
belt clip)
Weight: under 430g (with battery and without the
protector)
Power (Battery) Packet type (Lithium ion battery); 1500mAh (DC7.2V);
Able to print 2 rolls of thermal label (26m) with fully
charged battery in the Continuous mode. (Printing rate
under 30%)
Paper Thickness
Label Shape
Label Size
0.08mm – 0.18mm (always use specified labels)
Rolled paper, maximum outer diameter: 58mm
Width: 25.4 – 55mm (28.4 – 58mm)
Pitch: 13 – 160mm (16 – 163mm)
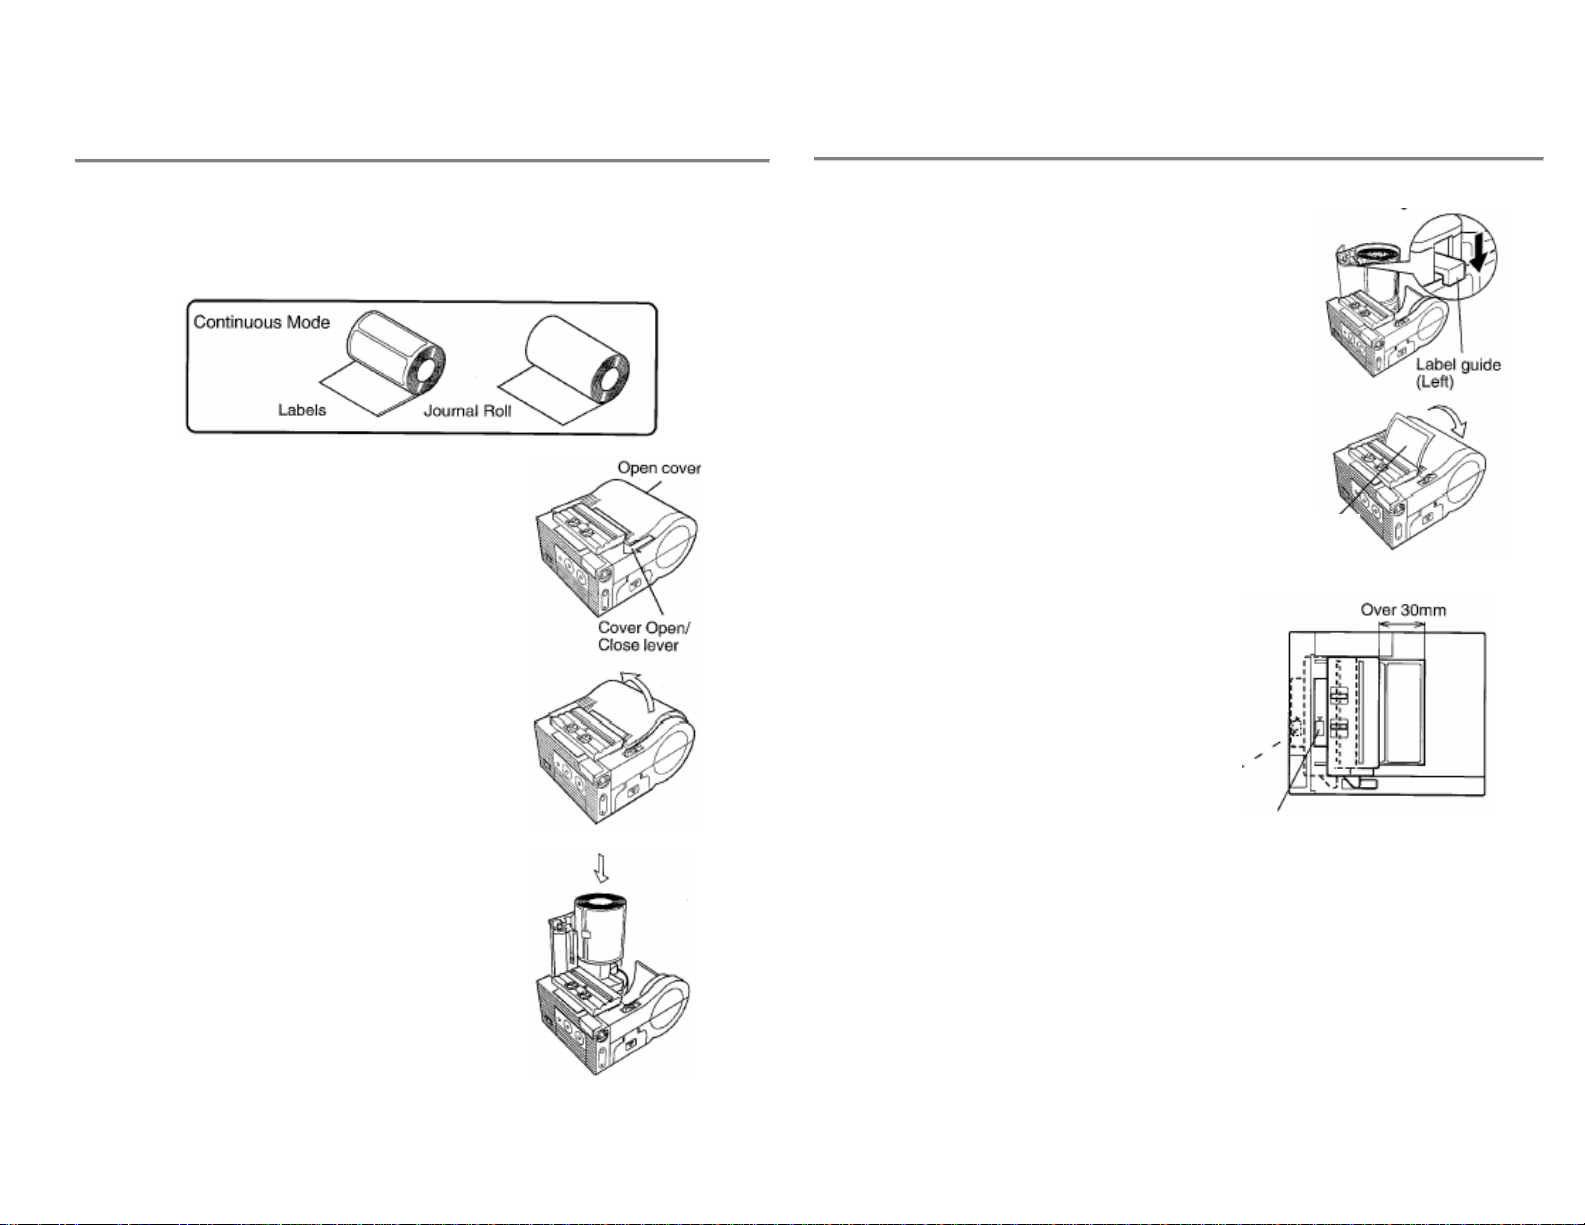
Printing Mode Continuous and Dispense
Self Diagnosing Function Head Check / Battery Check / Paper End
Head Open / Test Printing
Power Save Function In Sleep mode after 5 seconds without any operation, and
Auto Power Off mode after 5 minutes.
Interface
•RS232C }
•TTL }
•Wireless
•Optical Coupler
High density special connector
Weak radio unit (option)
IrDA (IrDA Standard Ver. 1.2 compliant.
Transmittal Distance: Max. 15 – 20cm)
Label Sensor Opaque Projector Sensor
Font Magnification x1 – 6
Character Rotation 0º , 90º , 180º , 270º
Font SATO standard font: x21, x22, x23,
Kanji 16 x 16, 22 x 22, 24 x 24 Kaku Gothic
(JIS First/Second standard)
MB200 Quick Guide Pg 2
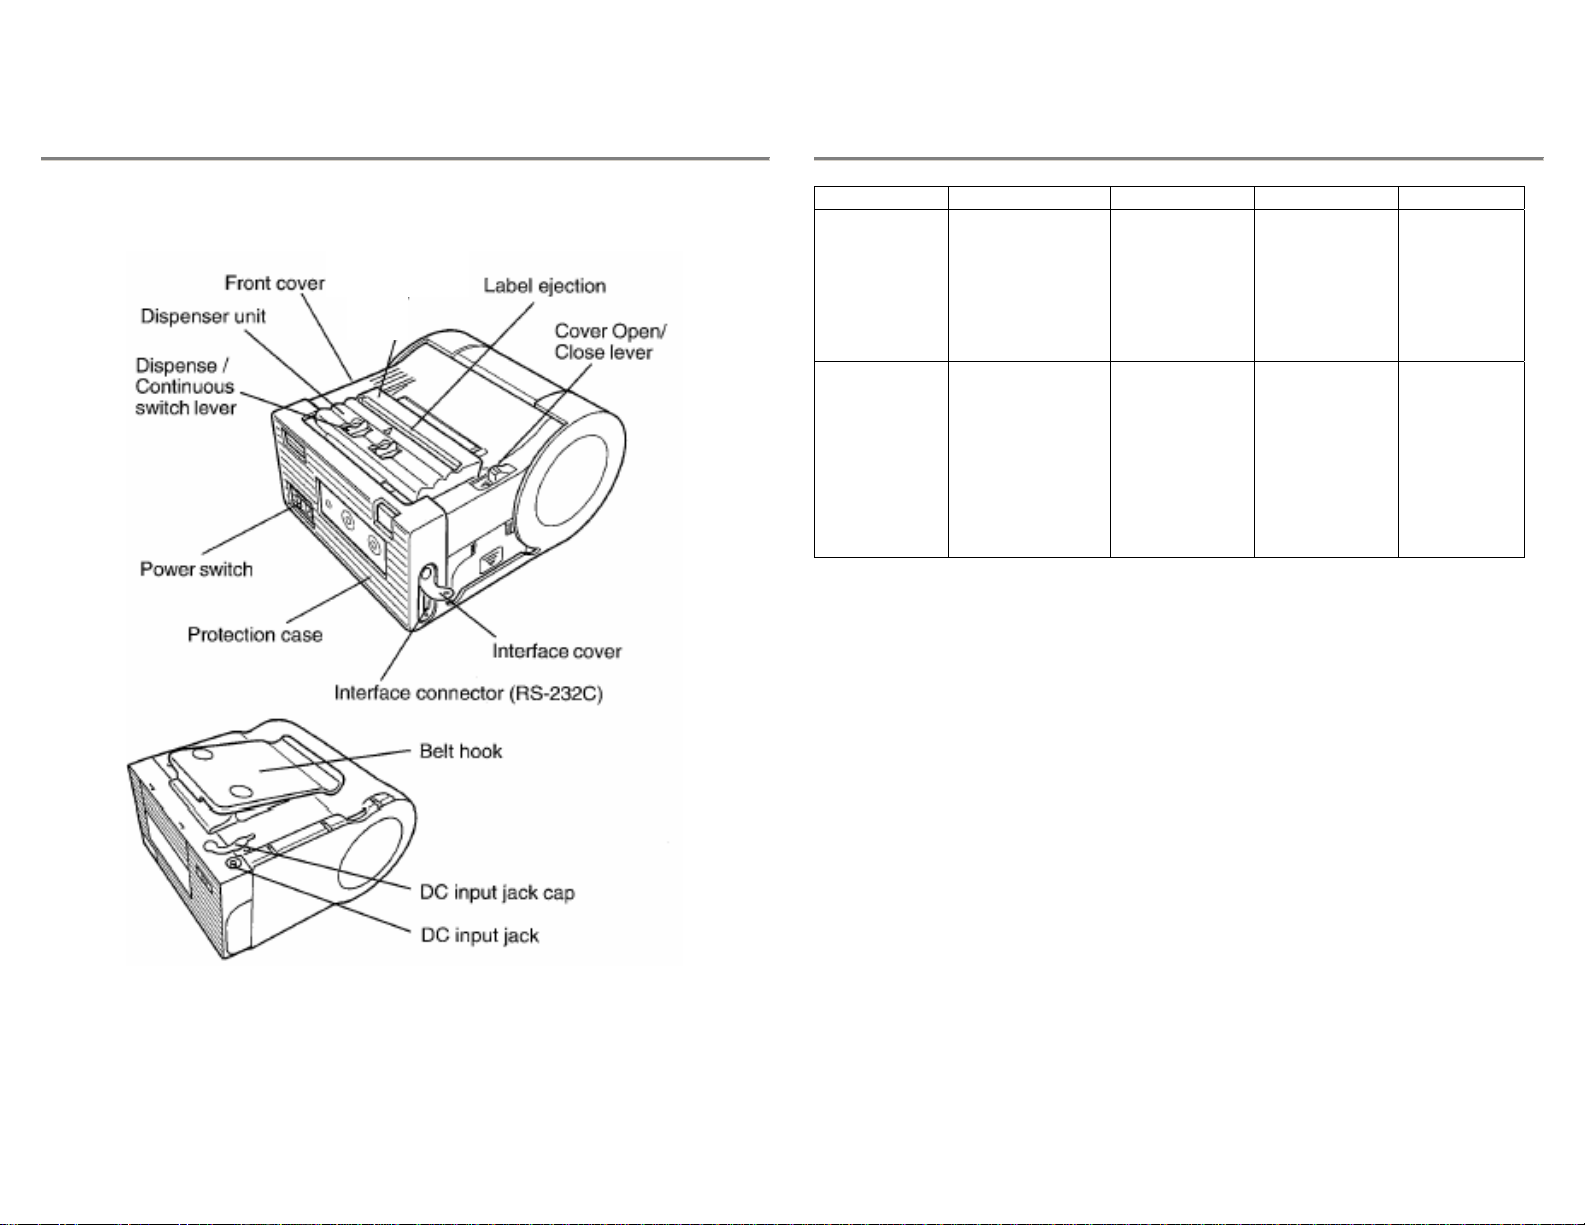
Installation
Remove the MB200 from its packing container. Check to make sure you have the following
accessory items:
Careful considerations must be given when selecting location of the printer, especially to
environmental considerations. To obtain optimum results from MB200, always try to avoid
operation locations influenced by:
•Direct or bright sunlight, as this will make the label sensor less responsive and may
cause the label to be sensed incorrectly.
•Locations which have extreme temperature, as this can create electrical problems on
the circuits in the printer.
•The installed location of the printer should be ideally be in areas free from dust,
humidity and sudden vibrations.
Consumables
Always use SATO labels in MB200 printer. The use of incorrect material may cause
malfunctions of the printer and void the printer warranty.
Warranty Card
Quick Guide
MB200 Quick Guide Pg 3
Components
MB200 Quick Guide Pg 12
Status (LED) Mode Details Cause Remedy
Green
(blinking) On-Line
(printing/receiving
data)
Buffer near full Approaching
the buffer quota Pause the
data
transmission
and wait till
the buffer is
empty before
trying again
Green/Orange
(blinking) On-Line Head
overheating
protection
function
Not an error.
The overheating
protection
function
activates when
the head
temperature
rises above
55ºC.
The function
will de-
activate when
the head
temperature
decreases to
50ºC.
*Consult your local dealer or Customer Service Centre.
MB200 Quick Guide Pg 11
Troubleshooting
The status of the printer is shown on the status indicator. To solve the problems, follow the
instructions in the table.
Status
(LED) Mode Details Cause Remedy
Orange All modes Low battery Battery is not
full Recharge the
battery
Red/Orange
(blinking) On-Line Buffer over 1. Received data
over the buffer
quota.
2. The protocol
between the
printer and host
does not match.
1. Adjust the
data amount at
the host side so
that it won’t
exceed the
buffering quota.
2. Match the
protocol.
Red After
turning on
the power
1. Program
error
2. FLASH
ROM error
FLASH ROM
reading/writing
error
1. Replace the
FLASH ROM*
2. Download the
firmware again*
Orange
(blinking) On-Line Head Error The print head is
damaged Replace the
head*
Open cover 1. Cover is not
locked
2. Cover micro
switch is not
working properly
1. Lock the
cover
2. Adjust the
micro switch*
Paper end Ran out of paper Set new label
Red
(blinking) On-Line
Sensor error 1. Sensor level is
not accurate
2. Sensor type
does not match
3. Label is
meandering
1. Adjust the
sensor level*
2. Adjust the
sensor type
3. Reset the label
MB200 Quick Guide Pg 4
Item Details
Interface Connector (RS232C) For the connection to a computer
Interface Cover Covers the interface connector
Front Cover Open this for setting labels
Cover Open/Close lever Opens and closes the front cover
IrDA Adjustment Lever Changes the angle of the IrDA receiving element
IrDA Filter (2 filters) Location of IrDA receiving element
Dispenser Unit Shift this when using the Dispense mode
Power Switch Slide to turn the power on/off
Battery Cover Insertion of battery pack
Belt Hooks Attaches the shoulder belt
Label Guide Adjust this to the label size being used
Label Ejection Collection point for printed labels
Label Width Scale Scale for measuring the width of label used
DC Input Jack Connection of the AC adapter
DC input Jack Cap Covers the DC input jack
Feed Key Press to feed labels
Print Key Press to set the printer to On-line or Off-line
STATUS indicator (LED) Indicates the status of the printer
IrDA filter (2 filters)
MB200 Quick Guide Pg 5
Installing and Removing Battery Pack
Remove the protection case.
1. Place your finger on the battery cover ribbed area, and
slide it as far as it will move in the direction of the
arrow.
2. After releasing the battery cover lock, open the battery
cover in the direction of the arrow.
3. Insert the battery pack. After that, take the above
procedure in reverse order to close the battery cover.
MB200 Quick Guide Pg 10
Changing Roll Width
1. Check the width of the roll. Set the label
guide scale to the width of the label, and slide
until it overlaps.
2. Roll the label guide clockwise and secure it in
position. When rolling, hold the place on the
label guide indicated in the illustration nearby.
Perform Steps 1 and 2 when changing label rolls.
MB200 Quick Guide Pg 9
First perform the previous Steps 1 to 5. (Continuous Mode)
1. Pick the Dispense/Continuous switch lever from both
sides, and slide the dispenser unit to the direction of
the arrow.
Leave more than 30mm of the label out for the
dispense mode.
Slide the dispenser unit until it is in place.
Always set the dispenser unit back to the
Continuous mode when opening/closing the cover.
MB200 Quick Guide Pg 6
Using the AC Adapter
Plug the specified AC adapter (optional) into the printer.
1. Take off the DC input jack cap and plug the AC
adapter into the DC input jack.
2. Plug the AC adapter into the outlet.
* Always turn off the printer when unplugging the AC adapter or DC output jack, or
when disconnecting the power source.
When turning off the printer, the status indicator lights up in green. Do not
disconnect the power source while this light is on. Always make sure the green
light is off when disconnecting the power supply.
* When the power source is disconnected while the green light is on, the data in the
printer memory may not be refreshed.
At the Continuous Mode (STD)
At the Dispense Mode (DSP)
MB200 Quick Guide Pg 7
Media Loading
Setting Labels
The method of setting the labels may vary depending on the print mode.
Remove the protection case.
1. Place your fingers on the open cover ribbed area,
and slide the cover Open/Close lever in the
direction of the arrow.
2. When the open cover pops open, fully open the
cover in the direction of the arrow.
3. Place the label roll on the spindle on the open
cover side. When inserting the label roll, make
sure to press down the label core to prevent the
labels from raveling out. When removing
remaining labels, insert your finger in the label
core and remove the label with the core to
prevent the labels from raveling out.
MB200 Quick Guide Pg 8
4. After peeling the leading tape on the roll, take the
leading edge of the first label of the roll and pull it
out from the label ejection via the platen roller.
Adjust the label guide (left) to the label size, and
pass the label underneath the label guides.
5. Place your fingers on the open cover ribbed area
and close the open cover.
This completes the setting of the labels when using the
Continuous mode.
Label set
position

Other manuals for MB200

4

Other SATO Printer manuals

SATO M-84Pro Series User manual

SATO

SATO M-84Pro Series User manual

SATO MB 200i User manual

SATO

SATO MB 200i User manual

SATO CL-408 Owner's manual

SATO

SATO CL-408 Owner's manual

SATO GT 410 User manual

SATO

SATO GT 410 User manual

SATO Argox CP Series User manual

SATO

SATO Argox CP Series User manual

SATO CL4NX RIDF User manual

SATO

SATO CL4NX RIDF User manual

SATO MN-4203 User manual

SATO

SATO MN-4203 User manual

SATO CL-408 User manual

SATO

SATO CL-408 User manual

SATO WS408DT User manual

SATO

SATO WS408DT User manual

SATO CT4-ex-RF User manual

SATO

SATO CT4-ex-RF User manual

SATO CT 400 User manual

SATO

SATO CT 400 User manual

SATO PW208NX User manual

SATO

SATO PW208NX User manual

SATO M-8490Se Series User manual

SATO

SATO M-8490Se Series User manual

SATO M-5900 User manual

SATO

SATO M-5900 User manual

SATO XL400e User manual

SATO

SATO XL400e User manual

SATO CX208 Operating instructions

SATO

SATO CX208 Operating instructions

SATO WS408DT User manual

SATO

SATO WS408DT User manual

SATO CL608e/CL612e User manual

SATO

SATO CL608e/CL612e User manual

SATO MB200/201i User manual

SATO

SATO MB200/201i User manual

SATO M8460S User manual

SATO

SATO M8460S User manual

SATO M-5900RV Use and care manual

SATO

SATO M-5900RV Use and care manual

SATO MB 200i User manual

SATO

SATO MB 200i User manual

SATO CL-408 Owner's manual

SATO

SATO CL-408 Owner's manual

SATO CT 400 Use and care manual

SATO

SATO CT 400 Use and care manual

Popular Printer manuals by other brands

Utax LP 3230 Service manual

Utax

Utax LP 3230 Service manual

Oki T400 user guide

Oki

Oki T400 user guide

Epson ActionLaser Plus user manual

Epson

Epson ActionLaser Plus user manual

IBM InfoColor 70 user guide

IBM

IBM InfoColor 70 user guide

SEWOO SLK-TL20X Series user manual

SEWOO

SEWOO SLK-TL20X Series user manual

Astro Machine ASTROJET 2650P quick start guide

Astro Machine

Astro Machine ASTROJET 2650P quick start guide

Konica Minolta Magicolor 2490 MF Parts guide

Konica Minolta

Konica Minolta Magicolor 2490 MF Parts guide

Oki C610dn Handy reference

Oki

Oki C610dn Handy reference

Avery Dennison AP4.4 user manual

Avery Dennison

Avery Dennison AP4.4 user manual

Epson SC-F7100 series user guide

Epson

Epson SC-F7100 series user guide

Printek Interceptor 800 Series Integrator's manual

Printek

Printek Interceptor 800 Series Integrator's manual

Canon imagePASS-A2 Service guide

Canon

Canon imagePASS-A2 Service guide

Jolimark bp-900kll user manual

Jolimark

Jolimark bp-900kll user manual

Epson Stylus 10000 Series user guide

Epson

Epson Stylus 10000 Series user guide

Dascom DP-540 Quick setup guide

Dascom

Dascom DP-540 Quick setup guide

SNBC BTP-M300 Programming manual

SNBC

SNBC BTP-M300 Programming manual

d.gen TELEIOS HEXA Operator's manual

d.gen

d.gen TELEIOS HEXA Operator's manual

Konica Minolta Magicolor 4650 brochure

Konica Minolta

Konica Minolta Magicolor 4650 brochure

manuals.online logo
manuals.online logoBrands
  • About & Mission
  • Contact us
  • Privacy Policy
  • Terms and Conditions

Copyright 2025 Manuals.Online. All Rights Reserved.