manuals.online logo
Brands
  1. Home
  2. •
  3. Brands
  4. •
  5. Savant
  6. •
  7. Touchscreen
  8. •
  9. Savant ITP-E5500V2x User manual

Savant ITP-E5500V2x User manual

Touch 5.5 in Control Screen V2 QRG | 009-2064-01 45 Perseverance Way, Hyannis, MA 02601
Copyright © Savant Systems, Inc | 221228 1 of 2 Savant.com | 508.683.2500
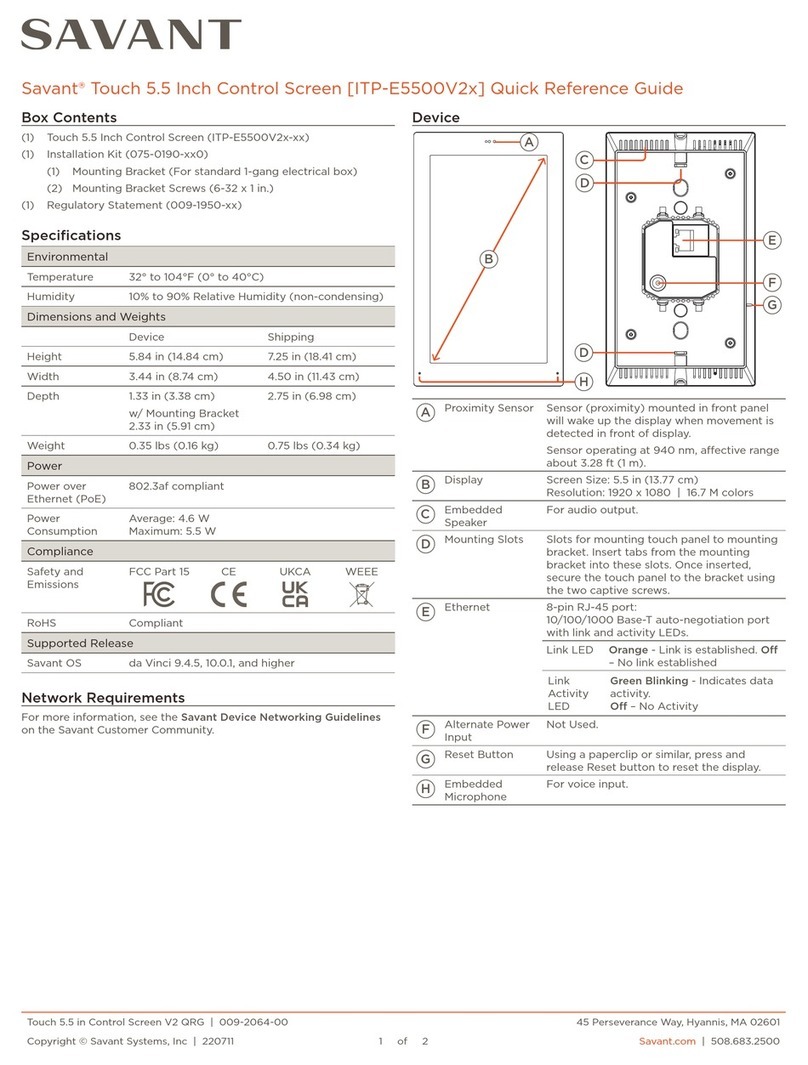
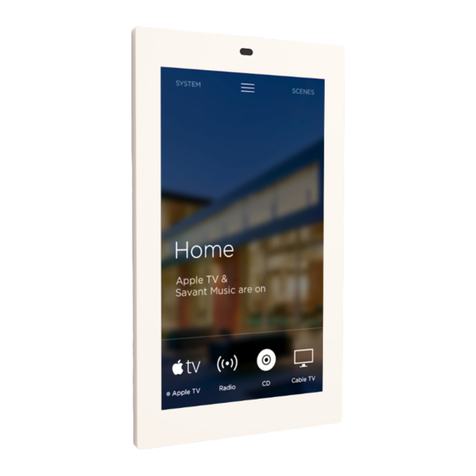
Savant® Touch 5.5 Inch Control Screen [ITP-E5500V2x] Quick Reference Guide
Box Contents
(1) Touch 5.5 Inch Control Screen (ITP-E5500V2x-xx)
(1) Installation Kit (075-0190-xx)
(1) Mounting Bracket (For standard 1-gang electrical box)
(2) Mounting Bracket Screws (6-32 x 1 in.)
(1) Regulatory Statement (009-1950-xx)
Specifications
Environmental
Temperature 32° to 104°F (0° to 40°C)
Humidity 10% to 90% Relative Humidity (non-condensing)
Dimensions and Weights
Device Shipping
Height 5.84 in (14.84 cm) 7.25 in (18.41 cm)
Width 3.44 in (8.74 cm) 4.50 in (11.43 cm)
Depth 1.33 in (3.38 cm)
w/ Mounting Bracket
2.33 in (5.91 cm)
2.75 in (6.98 cm)
Weight 0.35 lbs (0.16 kg) 0.75 lbs (0.34 kg)
Power
Power over
Ethernet (PoE)
802.3af compliant
Power
Consumption
Average: 4.6 W
Maximum: 5.5 W
Compliance
Safety and
Emissions
FCC Part 15 CE UKCA WEEE
RoHS Compliant
Supported Release
Savant OS da Vinci 9.4.5, 10.1.1, and higher
Network Requirements
For more information, see the Savant Device Networking Guidelines
on the Savant Customer Community.
Device
A
B
H
G
F
E
D
C
D
A
Proximity Sensor Sensor (proximity) mounted in front panel
will wake up the display when movement is
detected in front of display.
Sensor operating at 940 nm, aective range
about 3.28 ft (1 m).
B
Display Screen Size: 5.5 in (13.77 cm)
Resolution: 1920 x 1080 | 16.7 M colors
C
Embedded
Speaker
For audio output.
D
Mounting Slots Slots for mounting touch panel to mounting
bracket. Insert tabs from the mounting
bracket into these slots. Once inserted,
secure the touch panel to the bracket using
the two captive screws.
E
Ethernet 8-pin RJ-45 port:
10/100/1000 Base-T auto-negotiation port
with link and activity LEDs.
Link LED Orange - Link is established. O
– No link established
Link
Activity
LED
Green Blinking - Indicates data
activity.
O – No Activity
F
Alternate Power
Input
Not Used.
G
Reset Button Using a paperclip or similar, press and
release Reset button to reset the display.
H
Embedded
Microphone
For voice input.
Touch 5.5 in Control Screen V2 QRG | 009-2064-01 45 Perseverance Way, Hyannis, MA 02601
Copyright © Savant Systems, Inc | 221228 2 of 2 Savant.com | 508.683.2500
Installation
The Savant 5.5 inch Touch Control Screen is designed to be installed in
a single gang configuration.
IMPORTANT! Box should be oriented using the portrait format
(screw holes oriented at top and bottom).
Mount the Bracket
The Savant Touch Control Screen is designed to be mounted using
either a standard 1-gang electrical box or low voltage 1-gang bracket.
1. Mount a 1-gang standard electrical box or low voltage bracket to an
existing wall. Recommended height to center of box is between 57
and 65 inches (145 – 165 cm) above a finished floor.
1-gang
electrical box
1-gang low
voltage bracket
2. Secure the mounting bracket to the electrical box/bracket using
the two 6-32 x 1 inch screws provided. Position the touch panel
mounting tabs facing outward. See image below.
Tabs Face
Outward
Mounting
Bracket
Make Connections
Connect a Cat 5e/6/7 Ethernet cable (T568A, T568B) to the RJ-45
LAN/PoE port on rear of touch panel. See image below.
Local
Network
To LAN/PoE Port
(RJ-45)
To Router
(PoE)
IMPORTANT INFO!
–The touch screen is powered through the Ethernet cable. An
802.3af compliant PoE network router is required to power the
display.
–If a PoE network router is not available, a PoE network injector can
be used.
Secure Panel to Bracket
Once cables are connected to rear of touch panel, the panel can be
secured to the mounting bracket installed earlier.
1. Loosen the captive screws on the top and bottom of the touch
panel a few turns to allow the panel to slide into the mounting
bracket.
2. Insert the touch panel into the mounting bracket. Ensure the tabs
on the mounting bracket are inserted into the appropriate slots in
the touch panel.
3. Tighten the two captive screws to secure the touch panel to the
mounting bracket.
3
Loosen captive screws
(top and bottom)
Tighten captive screws
(top and bottom)
Slide touch panel
into slots in
mounting bracket
2
1
TIP! When installing, the proximity sensor located on the front of
the display should be positioned towards the top.
Apply Power
The ITP-E5500V2 touch panel is powered using PoE via Cat 5e/6/7
Ethernet cable. Connect one end of the Ethernet cable to a PoE
enabled network switch or router, and the other end to the data
connection on the back of the ITP. Once the connection is made,
the ITP will be powered on, and an IP address will be automatically
assigned via DHCP.
Once the ITP is powered and an IP address has been assigned, the
touch panel can be added to a RacePoint Blueprint® configuration. For
details, refer to the Savant Touch Control Screen Deployment Guide
(009-1475-xx), available on the Savant Customer Community.

This manual suits for next models

2

Other Savant Touchscreen manuals

Savant ITP-E5500V2 Series User manual

Savant

Savant ITP-E5500V2 Series User manual

Savant ITP-E5500-30 Series User manual

Savant

Savant ITP-E5500-30 Series User manual

Savant ITP-E8000x-30 User manual

Savant

Savant ITP-E8000x-30 User manual

Popular Touchscreen manuals by other brands

IDE Concept 4000 installation manual

IDE

IDE Concept 4000 installation manual

QOLSYS IQ PANEL installation manual

QOLSYS

QOLSYS IQ PANEL installation manual

Elo Touch Solutions B-Series Quick installation guide

Elo Touch Solutions

Elo Touch Solutions B-Series Quick installation guide

Elo TouchSystems 2639L Product dimensions

Elo TouchSystems

Elo TouchSystems 2639L Product dimensions

Legamaster Panorama PAN-10500 Quick setup guide

Legamaster

Legamaster Panorama PAN-10500 Quick setup guide

InTouch KIO-LITE-215P user manual

InTouch

InTouch KIO-LITE-215P user manual

Fireye NXD410TS installation guide

Fireye

Fireye NXD410TS installation guide

Winmate W10L100-PCH1-PoE user manual

Winmate

Winmate W10L100-PCH1-PoE user manual

Seedsware TM Series Product specification

Seedsware

Seedsware TM Series Product specification

Magenta Mondo TC Quick reference & setup guide

Magenta

Magenta Mondo TC Quick reference & setup guide

Matrix Orbital HTT Series Firmware Guide

Matrix Orbital

Matrix Orbital HTT Series Firmware Guide

MISURA M16TB user manual

MISURA

MISURA M16TB user manual

InTouch KIO430L-SLIM user manual

InTouch

InTouch KIO430L-SLIM user manual

Midco TCA203 user guide

Midco

Midco TCA203 user guide

Whadda WPI400 user manual

Whadda

Whadda WPI400 user manual

Casio QT-6100 product manual

Casio

Casio QT-6100 product manual

Zeta PREM1ER QUATRO installation manual

Zeta

Zeta PREM1ER QUATRO installation manual

CIAT DynaCIAT LG instruction manual

CIAT

CIAT DynaCIAT LG instruction manual

manuals.online logo
manuals.online logoBrands
  • About & Mission
  • Contact us
  • Privacy Policy
  • Terms and Conditions

Copyright 2025 Manuals.Online. All Rights Reserved.