SBS SBS-2500 User manual

Digital Hydrometer
SBS-2500 INSTRUCTION
MANUAL
^ƚŽƌĂŐĞĂƚƚĞƌLJ^LJƐƚĞŵƐ>>ͻ/ŶƐƚƌƵĐƚŝŽŶDĂŶƵĂůĨŽƌ^^ͲϮϱϬϬŝŐŝƚĂů,LJĚƌŽŵĞƚĞƌͻZĞǀϬϵͲϭϱ

Page 2
SBS-2500 Manual 09-15-TI2500
;ϮϲϮͿϳϬϯͲϱϴϬϬͻƚĞĐŚƐƵƉƉŽƌƚΛƐďƐďĂƚƚĞƌLJĐŽŵ
dĂďůĞŽĨŽŶƚĞŶƚƐ
1 Introduction ............................................................................................................................................................. 4
2 Safety Measures ....................................................................................................................................................... 4
3 Description of the Instrument ................................................................................................................................. 5
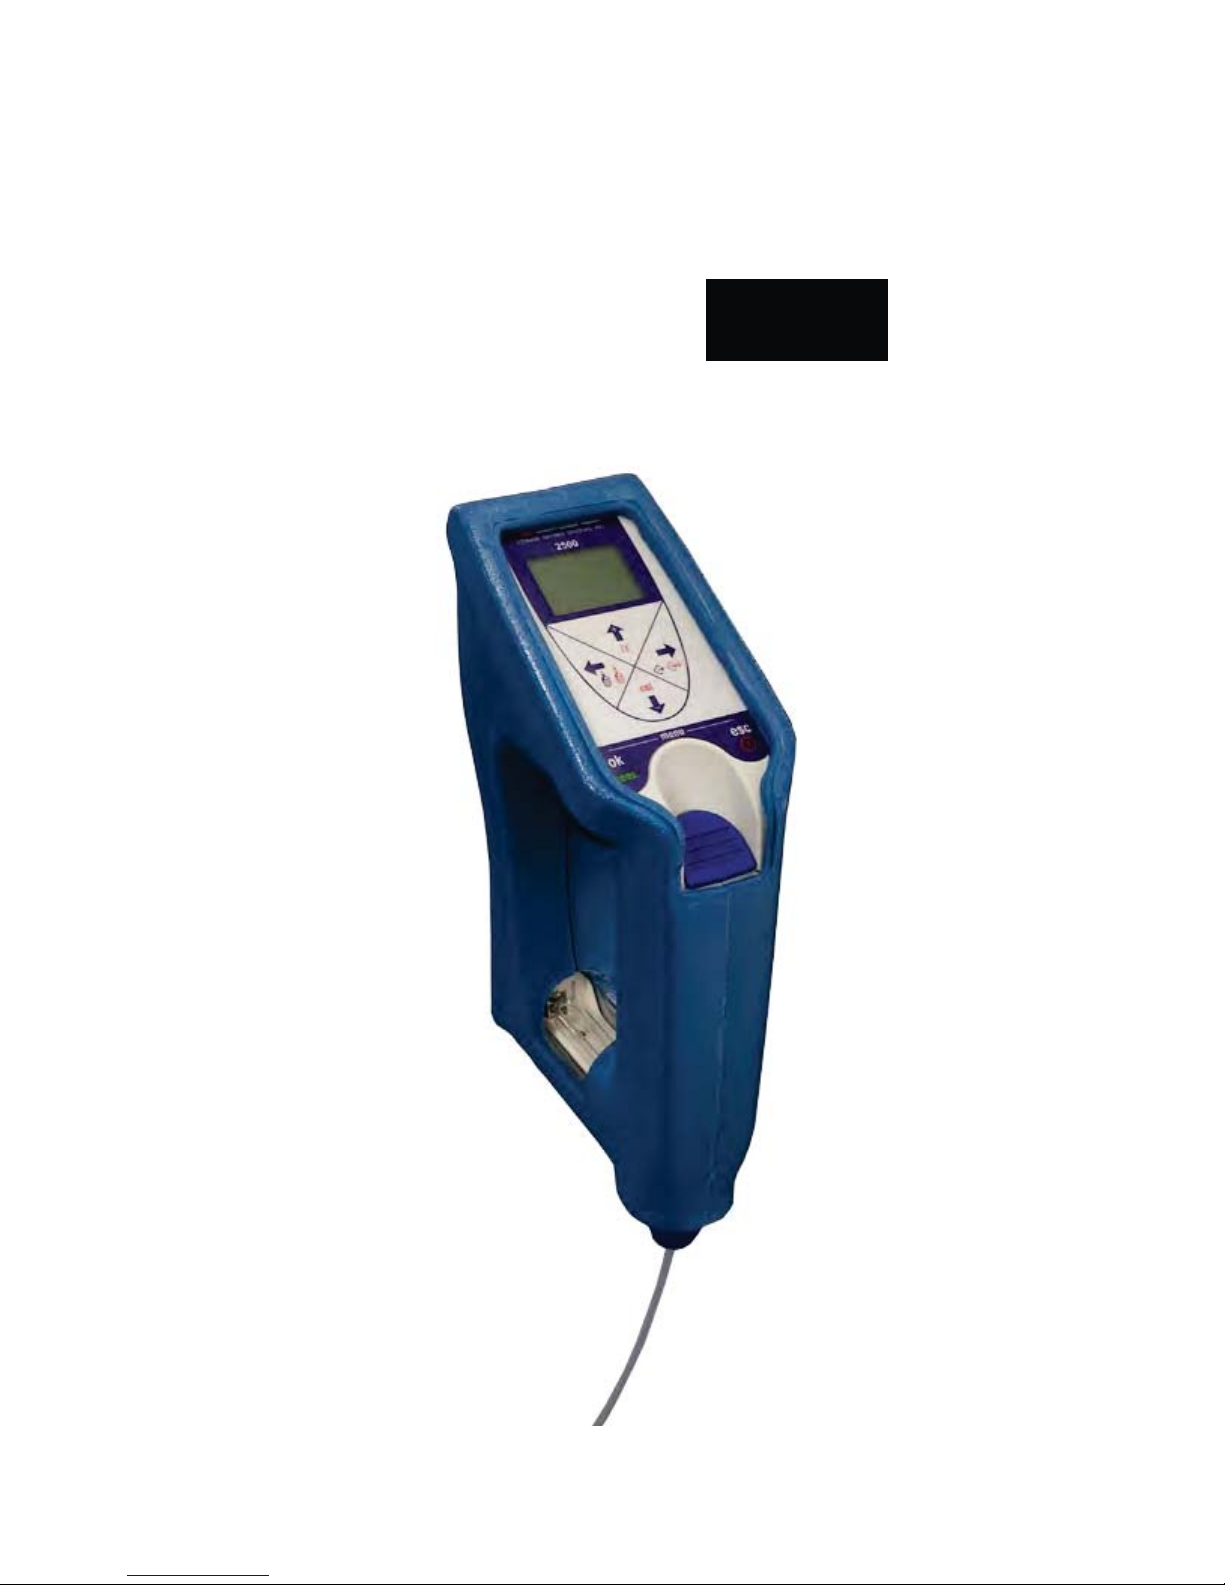
3.1 SBS-2500 .................................................................................................................................................................. 5
3.2 Display ...................................................................................................................................................................... 5
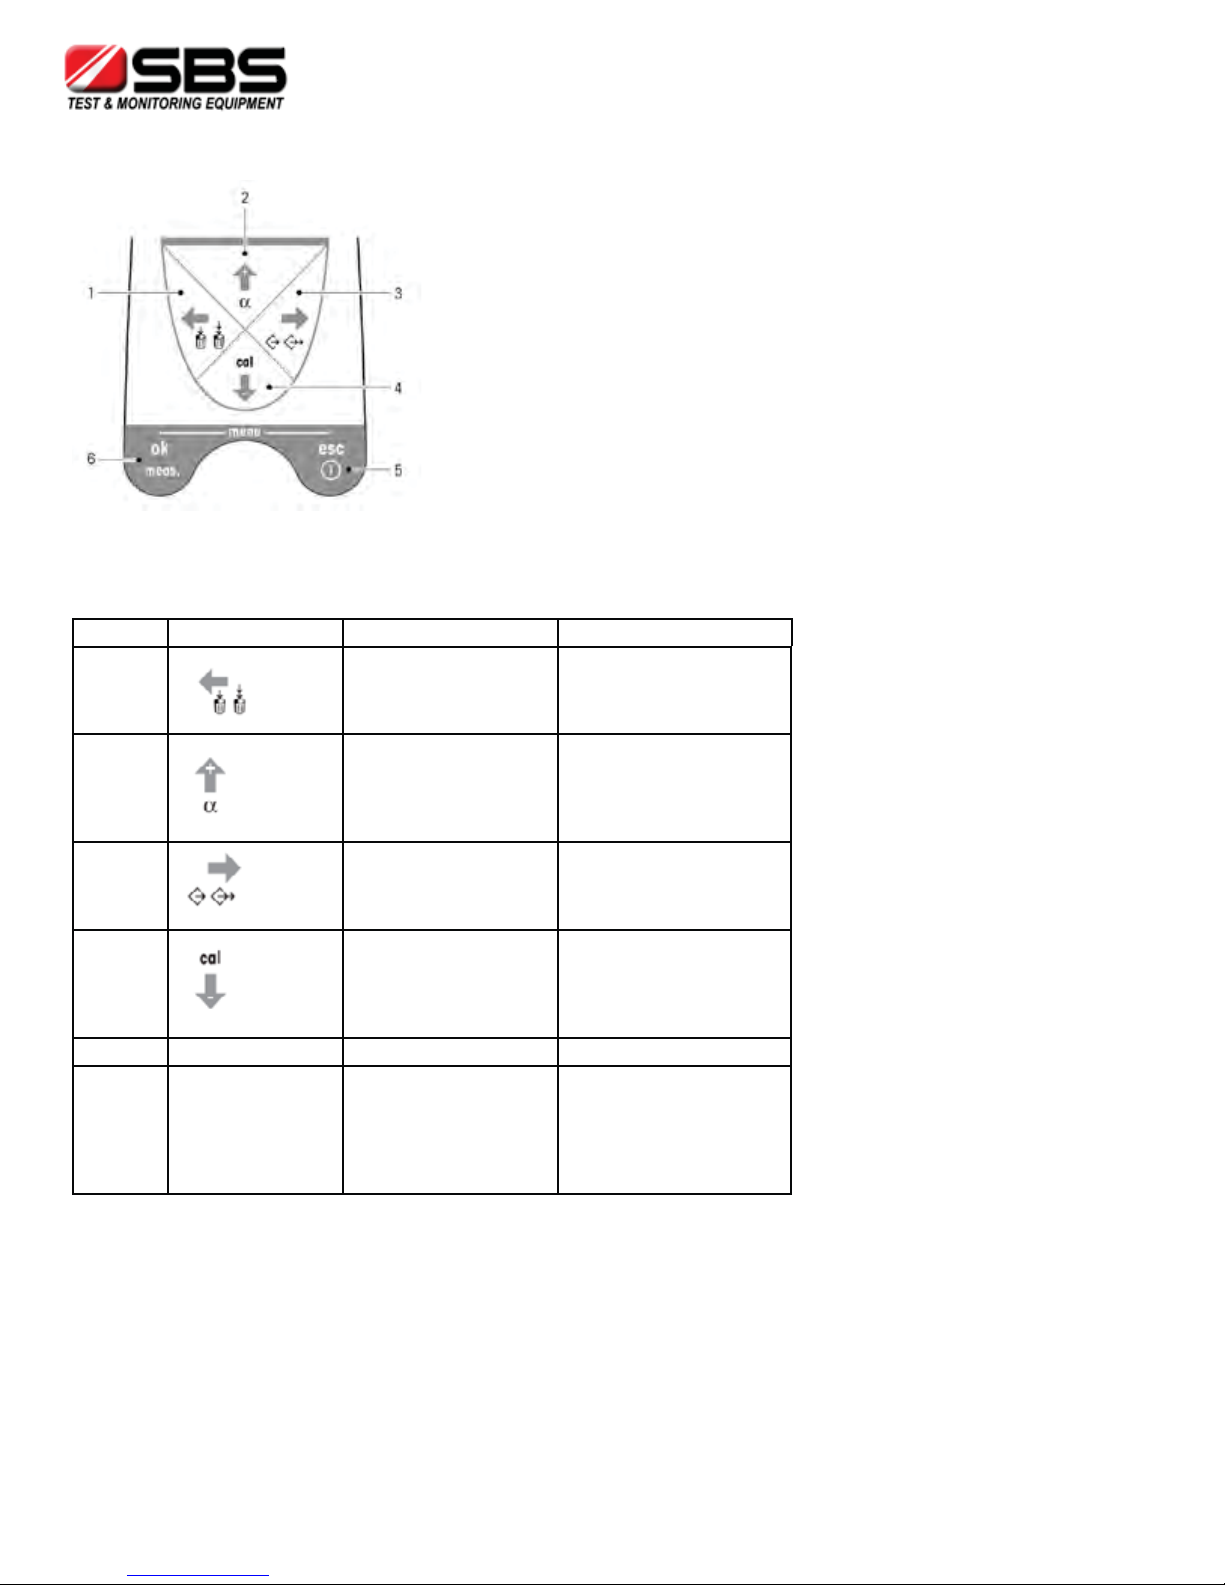
3.3 Keys .......................................................................................................................................................................... 5
4 Tutorial ..................................................................................................................................................................... 7
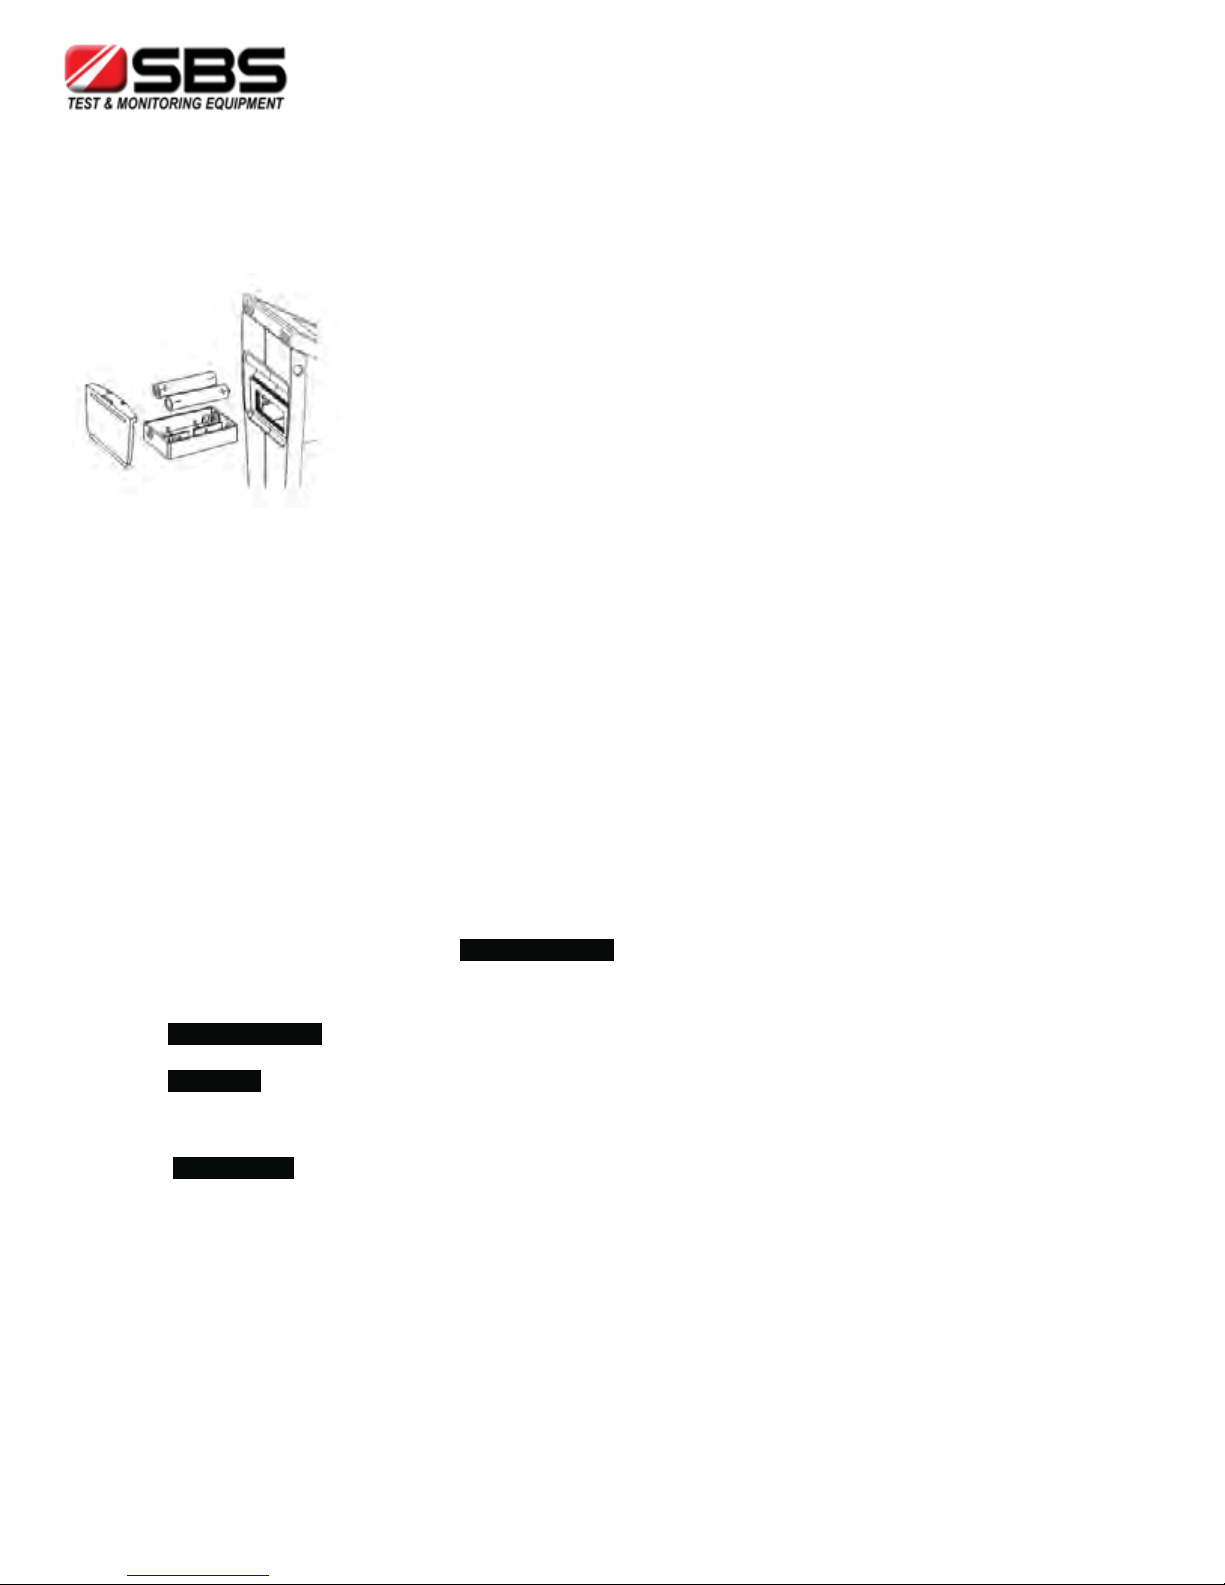
4.1 Inserting batteries .................................................................................................................................................... 7
4.2 Configuration ........................................................................................................................................................... 7
4.3 Test measurement ................................................................................................................................................... 8
4.4 Adjustment ............................................................................................................................................................... 8
4.5 Cleaning .................................................................................................................................................................... 8
4.6 Switching off and on ................................................................................................................................................ 8
5 Menu ........................................................................................................................................................................ 9
5.1 Using the menu ........................................................................................................................................................ 9
5.2 Measurement Unit (Measure Unit) ....................................................................................................................... 10
5.3 Temperature Unit (Temp. Unit) ............................................................................................................................. 12
5.4 Measure Mode ....................................................................................................................................................... 12
5.5 Adjustment Mode (Calib. Mode) ........................................................................................................................... 12
5.6 Interface ................................................................................................................................................................. 12
5.7 Beep . ...................................................................................................................................................................... 12
5.8 Background Lighting and LCD-Contrast (LCD) ....................................................................................................... 13
5.9 Automatic Switch-off (Power) ............................................................................................................................... 13
5.10 Software Version (Version No.) ............................................................................................................................. 13
5.11 Date & Time ........................................................................................................................................................... 13
5.12 Identification .......................................................................................................................................................... 13
6 Measurement ......................................................................................................................................................... 13
6.1 Procedure for proper measurement ..................................................................................................................... 13
6.2 Filling the measuring cell using the built-in sample pump ................................................................................... 14
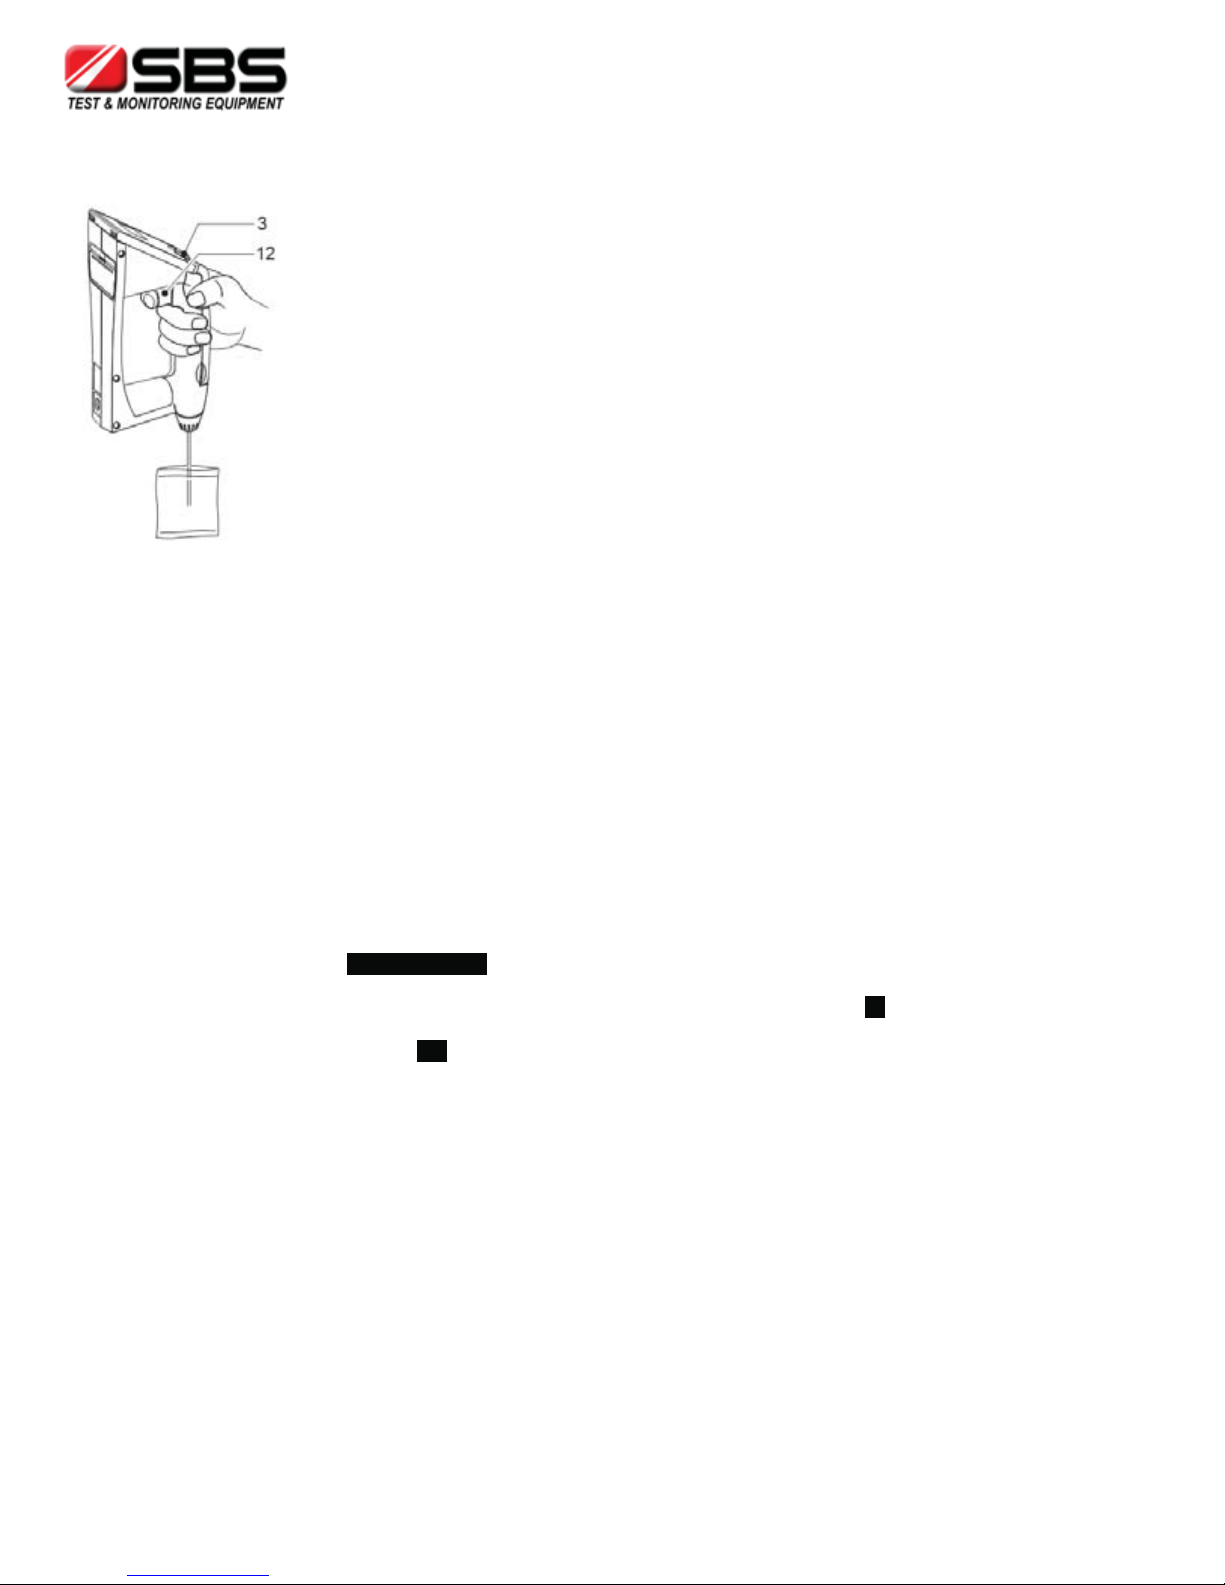
6.3 Filling the measuring cell using an external syringe ............................................................................................. 14
6.4 Measuring ................................................................................................................ .............................................. 15
6.5 Saving the results ................................................................................................................................................... 15
6.6 Displaying and marking saved results ................................................................................................................... 15
6.7 Printing and transferring results ............................................................................................................................ 16
6.8 Deleting results ...................................................................................................................................................... 17
7 Adjustment (cal) ..................................................................................................................................................... 17
7.1 Adjusting the measuring cell with water ............................................................................................................... 17
7.2 Adjusting the measuring cell with a density standard .......................................................................................... 18
7.3 Adjusting the measuring cell with air .................................................................................................................... 18
7.4 Adjusting the temperature display ........................................................................................................................ 19
8 Interface ................................................................................................................................................................. 20
8.1 IR printer settings .................................................................................................................................................. 20
8.2 Data transfer to PC ................................................................................................................................................ 20
8.3 Data format ............................................................................................................................................................ 21
9 Error Messages and Malfunctions ......................................................................................................................... 22
10 Cleaning and Maintenance .................................................................................................................................... 23
10.1 Cleaning the measuring cell ................................................................................................................................... 23
10.2 Cleaning the housing ..............................................................................................................................................23
10.3 Replacing the sample tube .................................................................................................................................... 23
10.4 Replacing the sample pump .................................................................................................................................. 23
11 Standard equipment .............................................................................................................................................. 24
12 Technical data ........................................................................................................................................................ 25
13 Appendices ............................................................................................................................................................. 26

Page 3
SBS-2500 Manual 09-15-TI2500
;ϮϲϮͿϳϬϯͲϱϴϬϬͻƚĞĐŚƐƵƉƉŽƌƚΛƐďƐďĂƚƚĞƌLJĐŽŵ
ϭ /ŶƚƌŽĚƵĐƚŝŽŶƚŽƚŚĞ^^ͲϮϱϬϬ
The SBS-2500 is a portable measuring instrument suited for determining the density of liquids. The instrument uses the oscillating body method.
To fill the measuring cell the built-in sample pump or a syringe may be used. The results are automatically calculated into one of the following
units: density, specific gravity, API degrees, Brix, % Alcohol, % H2SO4, Baumé, Plato, Proof or a user-defined unit. The value is then shown on the
backlit display.
For exact measurements, it is imperative to correct the temperature’s influence on the density. Depending on the selected unit the SBS-2500
carries out this result correction automatically. For this task, the instrument uses either internally-stored tables or one of the 10 temperature-
compensation coefficients entered by the user.
The results, along with the sample identification, temperature, temperature-coefficient, date and time can be saved. Together with the
instrument identification they can then, via the integrated infrared interface, be transferred to the computer or printed out on a printer.
Ϯ ^ĂĨĞƚLJDĞĂƐƵƌĞƐ
DĞĂƐƵƌĞƐĨŽƌzŽƵƌWƌŽƚĞĐƚŝŽŶĂŶĚKƉĞƌĂƚŝŽŶĂů^ĂĨĞƚLJ
Do not work in an explosion-hazardous environment! The instrument
housing is not gas tight. Otherwise, there is a risk of explosion from sparks
and/or risk of corrosion by gasses which can seep in.
ͻ Always hold the end of the sample tube over a waste container!
There is a risk of injury when emptying corrosive substances.
ͻ Leave the syringe in the sample intake after injecting a sample!
Otherwise, the sample will run out of the measuring cell.
1. Never press on the measuring cell window! This can influence the
oscillation characteristics of the measuring cell.
2. Do not clean the measuring cell with concentrated NaOH (caustic
soda) or HF (hydrogen fluoride)! Both substances chemically corrode
the measuring cell.
3. Use batteries of the specified type only. Otherwise, proper operation
cannot be guaranteed.
4. Do not submerge the housing in liquid! The instrument is only
resistant to splashed water.
5. Ensure that the following environmental conditions are met:
ͻŶŽƐƚƌŽŶŐǀŝďƌĂƚŝŽŶƐƉƌĞƐĞŶƚ
ͻŶŽƚŝŶĚŝƌĞĐƚƐƵŶůŝŐŚƚ
ͻŶŽŚŝŐŚŚƵŵŝĚŝƚLJƉƌĞƐĞŶƚ
ͻŶŽĐŽƌƌŽƐŝǀĞŐĂƐƐĞƐƉƌĞƐĞŶƚ
ͻƚĞŵƉĞƌĂƚƵƌĞďĞƚǁĞĞŶʹϮϬΣĂŶĚϳϬΣ
ͻno strong electrical or magnetic fields present

Page 4
SBS-2500 Manual 09-15-TI2500
;ϮϲϮͿϳϬϯͲϱϴϬϬͻƚĞĐŚƐƵƉƉŽƌƚΛƐďƐďĂƚƚĞƌLJĐŽŵ
ϯ ĞƐĐƌŝƉƚŝŽŶŽĨƚŚĞ/ŶƐƚƌƵŵĞŶƚ
ϯϭ^^ͲϮϱϬϬ
1. Backlit Display
2. Keypad
3. Drain button
4. Sample pump
5. Cover of sample pump
6. Connector for syringe adapter
7. Fixing screw for s ample tube
8. Sample tube
9. Measuring cell
10. Infrared interface
11. Lock button
12. Fill button
13. Battery compartment cover

Page 5
SBS-2500 Manual 09-15-TI2500
;ϮϲϮͿϳϬϯͲϱϴϬϬͻƚĞĐŚƐƵƉƉŽƌƚΛƐďƐďĂƚƚĞƌLJĐŽŵ
ϯϮŝƐƉůĂLJ
1. Selected unit of measurement
2. Result
3. Sample identification (a…z or space)
4. Sample number, or error number if an error has occurred
5. Appears if “Stability” is set to “Auto”
6. Appears if “Memory” in is set to “Auto”
7. Appears if “Memory” out is set to “Auto”. If a printer or PC is connected, the data are transferred
automatically
8. Battery-power indicator
9. dĞŵƉĞƌĂƚƵƌĞ;ΣΣ&Ϳ
10. Appears if delete mode is activated
11. Mark for results
For the identification of invalid or incorrect results or for marking a sample change
ѐZĞĨĞƌĞŶĐĞƚĞŵƉĞƌĂƚƵƌĞ;ĨŽƌƚŚĞƵŶŝƚƐŽŵƉĞŶƐŝƚLJĂŶĚ^'ŽŶůLJͿ

Page 6
SBS-2500 Manual 09-15-TI2500
;ϮϲϮͿϳϬϯͲϱϴϬϬͻƚĞĐŚƐƵƉƉŽƌƚΛƐďƐďĂƚƚĞƌLJĐŽŵ
ϯϯ <ĞLJƐ
ZĞĚƐLJŵďŽůƐ Press key longer than 2 seconds.
ůƵĞƐLJŵďŽůƐPress key briefly.
EŽ ^LJŵďŽů ^ŚŽƌƚ<ĞLJWƌĞƐƐ >ŽŶŐ<ĞLJWƌĞƐƐ
1ͻ Move marker to the left
ͻ Mark saved results
ͻ Delete saved results
2ͻ Move marker upward
ͻ Select sample number
(ascends)
ͻ Switch between “Yes” and
“No” setting
ͻ Select temperature-
ĐŽŵƉĞŶƐĂƚŝŽŶĐŽĞĨĨŝĐŝĞŶƚɲ
3ͻ Move marker to the right
ͻ Display saved results
ͻ Transfer one saved result
to a printer/PC
ͻ Transfer a series of saved
results to a printer/PC
4ͻ Move marker downward
ͻ Select sample number
(descends)
ͻ Switch between “Yes” and
“No” setting
ͻ Call up adjustment mode
5ĞƐĐ Exit the menu Switch instrument on or off
6ŽŬŵĞĂƐ ͻ Start measurement
ͻ Confirm input
ͻ Confirm data delete
ͻ Confirm data transfer
ͻ While pressing and holding
key 5: enter the menu
Note
KŶůLJƚŚĞĂƌƌŽǁƐLJŵďŽůƐĂƌĞƵƐĞĚƚŽƌĞƉƌĞƐĞŶƚŬĞLJƐϭʹϰŝŶƚŚĞĨŽůůŽǁŝŶŐŽƉĞƌĂƚŝŽŶŝŶƐƚƌƵĐƚŝŽŶƐ

Page 7
SBS-2500 Manual 09-15-TI2500
;ϮϲϮͿϳϬϯͲϱϴϬϬͻƚĞĐŚƐƵƉƉŽƌƚΛƐďƐďĂƚƚĞƌLJĐŽŵ
ϰ dƵƚŽƌŝĂů
ϰϭ/ŶƐĞƌƚŝŶŐĂƚƚĞƌŝĞƐ
1. Open the battery compartment cover on the back of the SBS-2500.
2. Remove battery compartment.
3. Insert batteries into the battery compartment, observing correct polarity.
4. Insert battery compartment, ensuring that the contacts of the battery compartment face the instrument.
5. Close battery compartment cover.
6. The instrument switches on automatically and is immediately ready for operation.
7. With the backlighting switched off the battery lasts about 90 hours.
If nothing appears in the display, check the polarity of the batteries and battery compartment.
ϰϮŽŶĨŝŐƵƌĂƚŝŽŶ
Configuring the instrument for test measurement.
ŶƚĞƌŝŶŐƚŚĞDĞŶƵ
Press the keys “ŽŬŵĞĂƐ and “ĞƐĐ simultaneously.
The instrument switches to the “FUNCTION” menu, Measure Unit appears in reverse display (white on
black).
^ĞůĞĐƚŝŶŐ^ĞƚƚŝŶŐ
ͻ Confirm Measure Unit by pressing the “ŽŬŵĞĂƐ key.
ͻ Press the Ðkey repeatedly until SG(t/t) is marked.
ͻ Confirm SG(t/t) by pressing the “ŽŬŵĞĂƐŬĞLJ
^ĞƚƚŝŶŐĂƚĞĂŶĚdŝŵĞ
ͻ Use the Ðkey to switch to “Date & Time”.
ͻ Confirm Date & Time with the “ŽŬŵĞĂƐ” key.
ͻ To set the date, confirm Date with the “ŽŬŵĞĂƐ” key.
ͻ Use the side arrows to select the number to change, and use the up and down arrows to change the value.
Confirm with “ok/meas”.
ͻ Use the down arrow key to switch to “Time” and confirm with “ok/meas”. Set the time as described above.
džŝƚŝŶŐƚŚĞDĞŶƵ
Press the “ĞƐĐ” key.
The instrument is configured for test measurement.

Page 8
SBS-2500 Manual 09-15-TI2500
;ϮϲϮͿϳϬϯͲϱϴϬϬͻƚĞĐŚƐƵƉƉŽƌƚΛƐďƐďĂƚƚĞƌLJĐŽŵ
ϰϯdĞƐƚDĞĂƐƵƌĞŵĞŶƚ
1. Push drain button (3) downward completely.
2. Ensure that the sample tube is located in the accompanying density standard or in distilled water.
3. Press the fill button (12) slowly to fill the measuring cell.
4. Ensure that no air bubbles are contained within the measuring cell.
5. Press the “ŽŬŵĞĂƐ” key.
The instrument automatically executes a measurement and the result appears in reverse display.
dŚĞƌĞƐƵůƚĨŽƌǁĂƚĞƌŵƵƐƚďĞϭϬϬϬŝŶƚŚĞƐĞůĞĐƚĞĚŵĞĂƐƵƌĞŵĞŶƚƵŶƚŝů^';ƚƚͿ
/ĨƚŚĞĚĞǀŝĂƚŝŽŶŝƐфϬϬϬϬϱ
Adjustment is ok, the instrument is ready for measurement.
/ĨƚŚĞĚĞǀŝĂƚŝŽŶŝƐхϬϬϬϬϱ
Adjust instrument, see Chapter 4.4.
ϰϰĚũƵƐƚŵĞŶƚ
/ŶŝƚŝĂůŝnjŝŶŐĚũƵƐƚŵĞŶƚ
ͻ Press and hold the Ðkey until CALIB (Water) appears on the display. The instrument adjusts
automatically (duration: approximately 1 minute).
ͻ After adjustment is completed, the measured deviation from the theoretical value and Execute? (No)
appears.
ͻ Press the Ïor Ðkey. Execute? (Yes) appears.
ͻ Press the “ŽŬŵĞĂƐ” key to confirm.
The adjustment is confirmed.
ϰϱůĞĂŶŝŶŐ
The built-in sample pump or an external syringe can be used to fill the measuring cell with cleaning liquid.
1. Empty the measuring cell completely before cleaning. Press the drain button downward completely
2. Clean the measuring cell daily with a suitable cleaning liquid.
3. For very dirty measuring cells, let the inside of the cell soak in the cleaning liquid.
4. Repeat cleaning if necessary.
5. If the housing is soiled, clean with a cleaning tissue.
ϰϲ^ǁŝƚĐŚŝŶŐKĨĨĂŶĚKŶ
^ǁŝƚĐŚŝŶŐŽĨĨ
Press and hold the “ĞƐĐ” key until the display is turned off. The instrument is now turned off.
^ǁŝƚĐŚŝŶŐŽŶ
Press and hold the “ĞƐĐ” key until the display appears. The instrument is ready for operation.

Page 9
SBS-2500 Manual 09-15-TI2500
;ϮϲϮͿϳϬϯͲϱϴϬϬͻƚĞĐŚƐƵƉƉŽƌƚΛƐďƐďĂƚƚĞƌLJĐŽŵ
ϱ DĞŶƵ
The menu of the SBS-2500 offers the following functions:
Measurement Unit (Measure Unit) see Chapter 5.2
Temperature Unit (Temp. Unit) see Chapter 5.3
Measure Mode see Chapter 5.4
Adjust Mode (Calib. Mode) see Chapter 5.5
Interface see Chapter 5.6
Beep see Chapter 5.7
Backlighting and LCD-Contrast (LCD) see Chapter 5.8
Automatic Switch-off (Power) see Chapter 5.9
Software Version (Version No.) see Chapter 5.10
Date & Time see Chapter 5.11
Identification see Chapter 5.12
ϱϭhƐŝŶŐƚŚĞDĞŶƵ
Entering the menu
Press the keys “ŽŬŵĞĂƐ” and “ĞƐĐ” simultaneously.
The instrument switches to the menu
^ĞůĞĐƚŝŶŐ&ƵŶĐƚŝŽŶƐ
ͻ Press Ðand Ïkeys repeatedly until the desired function is marked.
ͻ Press the “ok/meas.” key to activated the marked function.
The instrument switches to the corresponding submenu or activates the desired function.
EƵŵĞƌŝĐĂů/ŶƉƵƚ
ͻ Select decimal places with the ÍandÎkeys.
ͻ Change value with the Ðand Ïkeys.
ͻ Press the “ŽŬŵĞĂƐ” key to confirm the value.
džŝƚŝŶŐƚŚĞDĞŶƵ
Press the “ĞƐĐ” key.

Page 10
SBS-2500 Manual 09-15-TI2500
;ϮϲϮͿϳϬϯͲϱϴϬϬͻƚĞĐŚƐƵƉƉŽƌƚΛƐďƐďĂƚƚĞƌLJĐŽŵ
ϱϮDĞĂƐƵƌĞŵĞŶƚhŶŝƚ;DĞĂƐƵƌĞhŶŝƚͿ
The following unites are available for selection:
ĞŶƐŝƚLJ
Available density units:
g/cm3
lb/gal (US) 1 g/cm3= 8.3454 lb/gal
lb/gal (IP) 1 g/cm3= 10.0224 lb/gal
ŽŵƉĞŶƐŝƚLJ;dĞŵƉĞƌĂƚƵƌĞͲĐŽŵƉĞŶƐĂƚĞĚĚĞŶƐŝƚLJͿ
Density measurement in g/cm3at a reference temperature.
All results at the same reference temperature (T0ĞŐϮϬΣͿƌĞŐĂƌĚůĞƐƐŽĨƚŚĞŵĞĂƐƵƌŝŶŐƚĞŵƉĞƌĂƚƵƌĞ;dͿ
Compensated density = measured density ͻ;ϭнɲͻ(T - T0))
10 temperature-compensation coefficients can be saved.
The following input is required:
Comp. No. Number of the temperature-compensation coefficient (0...9)
Comp. Temp. Reference temperature (T0)
ɲdžϭϬϬϬ dĞŵƉĞƌĂƚƵƌĞͲĐŽŵƉĞŶƐĂƚŝŽŶĐŽĞĨĨŝĐŝĞŶƚ
&ŽƌƚLJƉŝĐĂůƚĞŵƉĞƌĂƚƵƌĞͲĐŽŵƉĞŶƐĂƚŝŽŶĐŽĞĨĨŝĐŝĞŶƚƐƐĞĞŚĂƉƚĞƌϭϯϮĐĂůĐƵůĂƚŝŽŶŽĨɲƐĞĞƉĂŐĞϭϭ
^';ƚƚͿ;ƐƉĞĐŝĨŝĐŐƌĂǀŝƚLJͿ
^';ƚƚͿс Density of the sample at T
Density of water at T
T Measuring temperatures
^';ƐƉĞĐŝĨŝĐŐƌĂǀŝƚLJƚĞŵƉĞƌĂƚƵƌĞͲĐŽŵƉĞŶƐĂƚĞĚͿ
^'с Density of the sample, temperature-compensated for T0
Density of water at T1
10 temperature-compensation coefficients can be saved.
The following input is required:
Comp. No. Number of the temperature-compensation coefficient (0...9)
Comp. T. T0/T1Σ;ĞŶƚĞƌƚĞŵƉĞƌĂƚƵƌĞƐd0and T1)
ɲdžϭϬϬϬ dĞŵƉĞƌĂƚƵƌĞͲĐŽŵƉĞŶƐĂƚŝŽŶĐŽĞĨĨŝĐŝĞŶƚ
&ŽƌƚLJƉŝĐĂůƚĞŵƉĞƌĂƚƵƌĞͲĐŽŵƉĞŶƐĂƚŝŽŶĐŽĞĨĨŝĐŝĞŶƚƐƐĞĞŚĂƉƚĞƌϭϯϮĐĂůĐƵůĂƚŝŽŶŽĨɲƐĞĞƉĂŐĞϭϭ
W/;ŵĞƌŝĐĂŶWĞƚƌŽůĞƵŵ/ŶƐƚŝƚƵƚĞͿ
dŚĞŵĞĂƐƵƌĞĚǀĂůƵĞƐĂƌĞĐŽŶǀĞƌƚĞĚƚŽĂƌĞĨĞƌĞŶĐĞƚĞŵƉĞƌĂƚƵƌĞŽĨϭϱΣŽƌϲϬΣ&dŚŝƐĐŽŶǀĞƌƐŝŽŶŝƐďĂƐĞĚŽŶW/ƚĂďůĞƐ
product group A: crude oil; product group B: fuel, petroleum products; product group D: lubricants. The result can be
expressed as density (e.g. APIA (Density)), or directly in API degrees (e.g. APIA (degrees)).
ƌŝdž;^ƵĐƌŽƐĞͿ
DĞĂƐƵƌĞŵĞŶƚŽĨƚŚĞƐƵĐƌŽƐĞĐŽŶĐĞŶƚƌĂƚŝŽŶƉĞƌĐĞŶƚǁĞŝŐŚƚĂƚϮϬΣ
ůĐŽŚŽů;ƚŚĂŶŽůͿ
DĞĂƐƵƌĞŵĞŶƚŽĨƚŚĞĞƚŚĂŶŽůĐŽŶĐĞŶƚƌĂƚŝŽŶŝŶǁĂƚĞƌƉĞƌĐĞŶƚǁĞŝŐŚƚ;tƚйͿŽƌƉĞƌĐĞŶƚǀŽůƵŵĞ;sŽůйͿĂƚϮϬΣ
,Ϯ^Kϰ;^ƵůĨƵƌŝĐĂĐŝĚĐŽŶĐĞŶƚƌĂƚŝŽŶͿ
DĞĂƐƵƌĞŵĞŶƚŽĨƚŚĞƐƵůĨƵƌŝĐĂĐŝĚĐŽŶĐĞŶƚƌĂƚŝŽŶƉĞƌĐĞŶƚǁĞŝŐŚƚĂƚϮϬΣ
ĂƵŵĞ;ΣĂƵŵĠƐĐĂůĞͿ
DĞĂƐƵƌĞŵĞŶƚŝŶΣĂƵŵĠ;ŚĞĂǀLJĂƵŵĠĨŽƌĚхϭůŝŐŚƚĂƵŵĠĨŽƌĚфϭͿĐĂůĐƵůĂƚĞĚƚŽĂƌĞĨĞƌĞŶĐĞƚĞŵƉĞƌĂƚƵƌĞ
10 temperature-compensation coefficients can be saved. Input of temperature-compensation coefficients via Comp.
ĞŶƐŝƚLJ&ŽƌƚLJƉŝĐĂůƚĞŵƉĞƌĂƚƵƌĞͲĐŽŵƉĞŶƐĂƚŝŽŶĐŽĞĨĨŝĐŝĞŶƚƐƐĞĞŚĂƉƚĞƌϭϯϮĐĂůĐƵůĂƚŝŽŶŽĨɲƐĞĞƉĂŐĞϭ

Page 11
SBS-2500 Manual 09-15-TI2500
;ϮϲϮͿϳϬϯͲϱϴϬϬͻƚĞĐŚƐƵƉƉŽƌƚΛƐďƐďĂƚƚĞƌLJĐŽŵ
WůĂƚŽ
DĞĂƐƵƌĞŵĞŶƚŽĨΣWůĂƚŽĂƚϮϬΣ
WƌŽŽĨ
DĞĂƐƵƌĞŵĞŶƚŽĨƚŚĞWƌŽŽĨĚĞŐƌĞĞĂƚϲϬΣ&
The Proof degree is a unit used to determine the ethanol content.
Proof (US): Measurement with US unit (100v/v% = 200 US Proof).
Proof (IP): Measurement with IP unit (100v/v% = 175 British Proof).
ŽŶĐ;ŽŶĐĞŶƚƌĂƚŝŽŶƐͿ
Measurement of the concentration via the input of the desired concentration-conversion formula y = a + bx at a
reference temperature.
y = concentration in % or without units
a, b = sample-dependent coefficients
x = measured density.
The following units are possible for x:
ͻ 1/compensated density -1
ͻ compensated density -1
ͻ compensated density
ͻ 1/specific gravity -1
ͻ specific gravity -1
ͻ specific gravity
ĂůĐƵůĂƚŝŽŶŽĨƚŚĞƚĞŵƉĞƌĂƚƵƌĞͲĐŽŵƉĞŶƐĂƚŝŽŶĐŽĞĨĨŝĐŝĞŶƚɲ
Measure density of the sample:
ͻ at a temperature (T1) above the normal measuring temperature,
ͻ at a temperature (T2) below the normal measuring temperature.
ĂůĐƵůĂƚĞɲĂĐĐŽƌĚŝŶŐƚŽƚŚĞĨŽƌŵƵůĂ
density at T2 = density at T1 ͻ;ϭнɲͻ(T1- T2))
or
ɲ=(density at T2 - 1 )/ T1- T2
density at T1
ŶƚĞƌǀĂůƵĞɲdžϭϬϬϬŝŶƚŽƚŚĞŝŶƐƚƌƵŵĞŶƚ
Note
The temperatures T1and T2ŚĂǀĞƚŽďĞĞŶƚĞƌĞĚŝŶƚŽƚŚĞƐĞůĞĐƚĞĚƵŶŝƚ;ΣŽƌΣ&ƐĞĞĐŚĂƉƚĞƌϱϯͿ
džĂŵƉůĞ
;ŵĞĂƐƵƌĞĚͿĚĞŶƐŝƚLJĂƚϮϲΣ;d1) 0.7844 g/cm3
;ŵĞĂƐƵƌĞĚͿĚĞŶƐŝƚLJĂƚϭϱΣ;d2) 0.7937 g/cm3
ɲ=(0.7937 - 1 )/ 26 - 15
0.7844
ɲс;ϭϬϭϭϴϱϲͲϭͿϭϭсϬϬϭϭϴϱϲϭϭсϬϬϬϭϬϳϴ
ɲdžϭϬϬϬсϭϬϳϴ; enter this value into the instrument.
10 temperature-compensation coefficients can be saved. Input of temperature-compensation coefficients via
Comp. Density. For typical temperature-compensation coefficients, see Chapter 13.2.

Page 12
SBS-2500 Manual 09-15-TI2500
;ϮϲϮͿϳϬϯͲϱϴϬϬͻƚĞĐŚƐƵƉƉŽƌƚΛƐďƐďĂƚƚĞƌLJĐŽŵ
ϱϯdĞŵƉĞƌĂƚƵƌĞhŶŝƚ;dĞŵƉhŶŝƚͿ
ĂƚĂŝŶΣŽƌΣ&;ƐĞůĞĐƚĂďůĞͿ
ϱϰDĞĂƐƵƌĞDŽĚĞ
Configuration of sample identification, stability mode and method of data storage.
^ĂŵƉůĞEĂŵĞ Sample identification.
A letter (a...z or space) can be set for the identification of samples.
^ƚĂďŝůŝƚLJ Stability control.
Auto The result is accepted automatically when the display is stable.
Manu Result accepted by pressing the “ŽŬŵĞĂƐ” key.
DŽĚĞ Method of data storage.
Labo By pressing the “ŽŬŵĞĂƐ” key the result is saved and transferred (printer, PC).
Field By pressing the “ŽŬŵĞĂƐ” key the result is saved.
Custom User-defined setting.
Memory in Save results.
Auto Save result automatically.
Manu Result saved by pressing the “ŽŬŵĞĂƐ” key
Memory out Transfer result to PC or printer.
Auto Transfer result automatically.
Manu Transfer result by pressing the Îkey.
ϱϱĚũƵƐƚŵĞŶƚDŽĚĞ;ĂůŝďDŽĚĞͿ
KĨĨ Adjust measuring cell with accompanying density standard or distilled water.
KŶ Adjust measuring cell with desired density standard.
The following input is required:
Density Density of the density standard (g/cm3) at the reference temperature
Temp Reference temperature
ɲdžϭϬϬϬ dĞŵƉĞƌĂƚƵƌĞͲĐŽŵƉĞŶƐĂƚŝŽŶĐŽĞĨĨŝĐŝĞŶƚŽĨƚŚĞĚĞŶƐŝƚLJƐƚĂŶĚĂƌĚͻ1000
ϱϲ/ŶƚĞƌĨĂĐĞ
WZE Printer interface
Data transfer to printer
Printer with serial interface and connected infrared adapter. Results are formatted for output to a
printer.
Transfer rate (baud rate), parity and stop and data bits must be configured according to the
peripheral device.
d,&K>>Kt/E'^dd/E'^ZZYh/Z&KZd,Ddd>ZdK>K>ͲWϰϱWZ/EdZ
Baud rate 9600
Parity none
Stop bits 1
Data bits 8
Z^ Serial interface. The Excel macro “PortableCapt” for data transfer to the computer via the infrared
adapter is located on the CD.
/ƌ Data transfer to the PC with the integrated IrDA interface in accordance with protocol 1.20
ϱϳĞĞƉ
KĨĨ Beep off.
KŶ Beep on.

Page 13
SBS-2500 Manual 09-15-TI2500
;ϮϲϮͿϳϬϯͲϱϴϬϬͻƚĞĐŚƐƵƉƉŽƌƚΛƐďƐďĂƚƚĞƌLJĐŽŵ
ϱϴĂĐŬŐƌŽƵŶĚ>ŝŐŚƚŝŶŐĂŶĚ>ͲŽŶƚƌĂĐƚ;>Ϳ
ĂĐŬůŝŐŚƚŝŶŐ
The backlighting is turned off automatically 5 seconds after the last time a key has been pressed (Auto off), or it
is always off (Always off).
ŽŶƚƌĂƐƚ
Display contrast is adjustable to one of 9 levels with the ÍÎkeys.
ϱϵƵƚŽŵĂƚŝĐ^ǁŝƚĐŚͲŽĨĨ;WŽǁĞƌͿ
KĨĨ Automatic switch-off is off. The instrument must be switched off manually.
KŶ The instrument switches off automatically if not operated for 10 minutes.
ϱϭϬ^ŽĨƚǁĂƌĞsĞƌƐŝŽŶ;sĞƌƐŝŽŶEŽͿ
The software version is displayed.
ϱϭϭĂƚĞΘdŝŵĞ
The settings for date and time can be edited here. The date is displayed in the format year/month/day (e.g.
2003/03/04 for March 4, 2003). Both date and time are included in the data transfer to a printer or computer.
ϱϭϮ/ĚĞŶƚŝĨŝĐĂƚŝŽŶ
An identification consisting of 10 letters and numbers (instrument name, user, etc.) may be entered here. This
identification will be included in the data transfer to a printer or computer.
ϲ DĞĂƐƵƌĞŵĞŶƚ;ŵĞĂƐͿ
ϲϭWƌŽĐĞĚƵƌĞĨŽƌWƌŽƉĞƌDĞĂƐƵƌĞŵĞŶƚ
ͻ Test the instrument for accuracy with the accompanying density standard or distilled water before beginning
any measurements (See Chapter 4.3).
ͻ Ensure that the measuring cell is clean before each measurement. Insufficient cleaning leads to remaining
residue in the measuring cell and, therefore, incorrect results.
ͻ Check the sample for chemical resistance of the instrument materials.
Sample tube: PTFE (polytetrafluorethylene)
Measuring cell: Borosilicate glass
Measuring cell holder: PPS (polyphenylene sulphide)
Sample pump: PP (polypropylene)
Ensure that the samples to be measured:
ͻ Are liquid enough to be sucked up or injected;
ͻ Can be dissolved with a solvent suitable for cleaning the measuring cell;
ͻ Are homogeneous (no emulsions or suspended particles, no air bubbles);
ͻ Have reached ambient temperature in the measuring cell.
&ŽƌƐĂŵƉůĞƐǁŚŝĐŚĂƌĞϮϬΣĐŽůĚĞƌƚŚĂŶƚŚĞĂŵďŝĞŶƚƚĞŵƉĞƌĂƚƵƌĞŚĞĂƚƚŚĞƐĂŵƉůĞďĞĨŽƌĞďĞŐŝŶŶŝŶŐƚŚĞƐĂŵƉůŝŶŐ
procedure.

Page 14
SBS-2500 Manual 09-15-TI2500
;ϮϲϮͿϳϬϯͲϱϴϬϬͻƚĞĐŚƐƵƉƉŽƌƚΛƐďƐďĂƚƚĞƌLJĐŽŵ
Note
The unit display flashes when the difference in temperature between the sample and the ambient air is greater
ƚŚĂŶцϱΣ
&ŽƌƐĂŵƉůĞƐŽĨŚŝŐŚǀŝƐĐŽƐŝƚLJ;хϮϬϬϬŵWĂͻs):
ͻ Use an external syringe to fill the measuring cell.
ϲϮ&ŝůůŝŶŐƚŚĞDĞĂƐƵƌŝŶŐĞůůhƐŝŶŐƚŚĞƵŝůƚͲ/Ŷ^ĂŵƉůĞWƵŵƉ
ͻ Ensure that the sample tube is in the sample.
ͻ Press the fill button (12) slowly to fill the measuring cell.
ͻ Ensure that there are no air bubbles in the measuring cell.
ϲϯ&ŝůůŝŶŐƚŚĞDĞĂƐƵƌŝŶŐĞůůhƐŝŶŐĂŶdžƚĞƌŶĂů^LJƌŝŶŐĞ
ͻ Press the drain button (3).
ͻ Slide up the lock button (11).
ͻ Remove the screw stopper (6) with a coin.
ͻ Screw in the adapter for the external syringe.
ͻ Hold the sample tube over a waste container.
ͻ Slowly inject the sample into the measuring cell.
ͻ Ensure that there are no air bubbles in the measuring cell.
ͻ Do not remove the syringe while measuring.

Page 15
SBS-2500 Manual 09-15-TI2500
;ϮϲϮͿϳϬϯͲϱϴϬϬͻƚĞĐŚƐƵƉƉŽƌƚΛƐďƐďĂƚƚĞƌLJĐŽŵ
ϲϰDĞĂƐƵƌŝŶŐ
The procedure is dependent upon the settings in the menu, see Chapter 5.4.
The symbol appears in the display: Measuring with automatic stability control
ͻ Press the “ŽŬŵĞĂƐ key to start measuring.
The symbol blinks during measurement. The result appears in reverse display.
The symbol does not appear on the display: Measuring with manual stability control
The instrument measures continuously.
ͻ Wait until the displayed value stabilizes.
ͻ If the result is to be saved: Press the “ŽŬŵĞĂƐ” key. The result appears in reverse display.
DĞĂƐƵƌŝŶŐǁŝƚŚdĞŵƉĞƌĂƚƵƌĞͲŽŵƉĞŶƐĂƚŝŽŶŽĞĨĨŝĐŝĞŶƚƐ;ɲͿ
(Comp. Density, SG, Conc. or Baume on the display)
ͻ Press the Ïkey until a previously-saved temperature-compensation coefficient appears in the display,
e.g. Į .
ͻ Select the desired coefficient using the Ðand Ïkeys.
ͻ Confirm the selected coefficient with the “ŽŬŵĞĂƐ” key.
ͻ Measure using either automatic or manual stability control.
ŵƉƚLJŝŶŐƚŚĞDĞĂƐƵƌŝŶŐĞůů
ͻ Hold the sample tube over a waste container.
ͻ Press drain button (3) downward slowly and move it up again with the fill button (12).
ϲϱ^ĂǀŝŶŐƚŚĞZĞƐƵůƚƐ
The instrument can save up to 1100 results internally. Each time a result is saved, the number of internally-stored
values increases by one.
The procedure for saving the results is dependent upon the settings in the menu (See Chapter 5.4).
The symbol appears in the display: Saving all results automatically
The instrument saves all results automatically.
The symbol does not appear in the display: Saving selected results manually
Save the result:
ͻ Press the “ŽŬŵĞĂƐ” key.
Do not save the result:
ͻ Press the “ĞƐĐ key.
ϲϲŝƐƉůĂLJŝŶŐĂŶĚDĂƌŬŝŶŐ^ĂǀĞĚZĞƐƵůƚƐ
ŝƐƉůĂLJŝŶŐ^ĂǀĞĚZĞƐƵůƚƐ
ͻ Press the Íkey.
The sample number flashes and the symbol appears.
ͻ Scroll through the saved results using the Ïand Ðkeys.
DĂƌŬŝŶŐZĞƐƵůƚƐ
For the identification of invalid or incorrect results or for marking a sample change.
ͻ Select the desired sample number using the Ïand Ðkeys.
ͻ Press the “ŽŬŵĞĂƐ” key.
The selected sample number is marked with an asterisk.

Page 16
SBS-2500 Manual 09-15-TI2500
;ϮϲϮͿϳϬϯͲϱϴϬϬͻƚĞĐŚƐƵƉƉŽƌƚΛƐďƐďĂƚƚĞƌLJĐŽŵ
Note
The marking is removed if the sample has already been marked.
ϲϳWƌŝŶƚŝŶŐĂŶĚdƌĂŶƐĨĞƌƌŝŶŐZĞƐƵůƚƐ
ŽŶĚŝƚŝŽŶƐ
ͻ The interface and peripheral device are configured properly, see Chapter 5.6 and Chapter 8.
ͻ For PRN and RS interfaces, the infrared adapter must be connected to the printer/PC.
The procedure for printing and transferring results is dependent upon the settings in the menu (See Chapter 5.4).
/ŵƉŽƌƚĂŶƚ
To transfer or print results, hold the instrument in the direction of the infrared adapter at a maximum distance of
approx. 20 cm.
The symbol appears in the display: Printing or transferring results automatically
Every displayed result is transferred automatically.
The symbol does not appear in the display: Printing or transferring selected results manually
ͻ Press the Îkey.
ͻ Select desired result with the Ïor Ðkey.
ͻ Press the ŽŬŵĞĂƐ key to transfer/print the result.
The symbol flashes and the result is transferred.
WƌŝŶƚŝŶŐĂŶĚdƌĂŶƐĨĞƌƌŝŶŐZĞƐƵůƚƐŽĨĂ^ĞƌŝĞƐŽĨ^ĂŵƉůĞƐDĂŶƵĂůůLJ
ͻ Press and hold the Îkey until Memory out, Execute? (All)appears in the display.
ͻ Press the Ïor Ðkey.
Execute? (Range)appears.
ͻ Press the ŽŬŵĞĂƐ key to confirm.
ͻ Enter the desired series of samples (from ... to ...) using the arrow keys.
To transfer the series of samples:
ͻ Press the ŽŬŵĞĂƐ key.
The sample series (from ... to ...) is confirmed. The symbol flashes and the results of the selected series of
samples are transferred.
dŽWƌŝŶƚŽƌdƌĂŶƐĨĞƌůůZĞƐƵůƚƐDĂŶƵĂůůLJ
ͻ Press and hold the Îkey until Memory out, Execute? (All)appears in the display.
ͻ Press the ŽŬŵĞĂƐ key.
The symbol in the display flashes and all results are transferred.
After a successful transfer, the user is asked whether he/she would like to delete the transferred results:
Memory All Clear Execute? (No).
>ĞĂǀŝŶŐdƌĂŶƐĨĞƌƌĞĚZĞƐƵůƚƐ/ŶƚĂĐƚ
ͻ Confirm Memory All Clear Execute? (No)by pressing the ŽŬŵĞĂƐ button.
ĞůĞƚŝŶŐdƌĂŶƐĨĞƌƌĞĚZĞƐƵůƚƐ
ͻ Press the Ïor Ðkey.
Execute? (Yes)appears.
ͻ Press the ŽŬŵĞĂƐ key to confirm.
All results are deleted.

Page 17
SBS-2500 Manual 09-15-TI2500
;ϮϲϮͿϳϬϯͲϱϴϬϬͻƚĞĐŚƐƵƉƉŽƌƚΛƐďƐďĂƚƚĞƌLJĐŽŵ
ϲϴĞůĞƚŝŶŐZĞƐƵůƚƐ
It is not possible to delete individual results with the SBS-2500.
ĞůĞƚŝŶŐĂůůƌĞƐƵůƚƐ
ͻ Press and hold the Íkey until Memory All Clear Execute? (No)appears in the display.
ͻ Press the Ïor Ðkey.
Execute? (Yes)appears.
ͻ Press the ŽŬŵĞĂƐ key to confirm.
All results are deleted.
ϳ ĚũƵƐƚŵĞŶƚ;ĐĂůͿ
ĞĨŽƌĞĂĚũƵƐƚŝŶŐ
ͻ Carry out a test measurement before adjusting the measuring cell (See Chap. 4.3).
dĞƐƚŵĞĂƐƵƌĞŵĞŶƚƌĞƐƵůƚфϬϵϵϵϱŽƌхϭϬϬϬϱ
ͻ Check if the measuring cell is dirty, clean if necessary and repeat the test measurement.
dĞƐƚŵĞĂƐƵƌĞŵĞŶƚƌĞƐƵůƚŽŶĐĞĂŐĂŝŶфϬϵϵϵϱŽƌхϭϬϬϬϱ
ͻ Readjust instrument.
ϳϭĚũƵƐƚŝŶŐƚŚĞDĞĂƐƵƌŝŶŐĞůůǁŝƚŚtĂƚĞƌ
^ĞƚƚŝŶŐƐŝŶƚŚĞŵĞŶƵ
Calib. Mode: off
ĚũƵƐƚŝŶŐ
ͻ Ensure that the measuring cell and sample tube are clean.
ͻ Fill the clean measuring cell with the accompanying density standard or distilled water and ensure that no air
bubbles are allowed to enter.
ͻ Press and hold the Ðkey until CALIB (Water) appears in the display.
The instrument adjusts automatically (duration: approx. 1 minute). After adjustment is completed, the measured
deviation from the theoretical value and Execute? (No)appears.
DĞĂƐƵƌĞĚĞǀŝĂƚŝŽŶфϬϬϬϭ
Press the Ïor Ðkey.
Execute? (Yes)appears.
- Press the ŽŬŵĞĂƐ key to confirm.
The adjustment is confirmed.
DĞĂƐƵƌĞĚĚĞǀŝĂƚŝŽŶшϬϬϬϭ
ͻ Check whether the measuring cell is dirty and if there are air bubbles.
Measuring cell is clean and contains no air bubbles:
ͻ Press the Ïor Ðkey.
Execute? (Yes)appears.
ͻ Press the ŽŬŵĞĂƐ key.
Measuring cell is dirty and/or contains air bubbles:
Execute? (No)is confirmed by pressing the ŽŬŵĞĂƐ button.
ͻ Clean the cell if necessary and readjust.

Page 18
SBS-2500 Manual 09-15-TI2500
;ϮϲϮͿϳϬϯͲϱϴϬϬͻƚĞĐŚƐƵƉƉŽƌƚΛƐďƐďĂƚƚĞƌLJĐŽŵ
ϳϮĚũƵƐƚŝŶŐƚŚĞDĞĂƐƵƌŝŶŐĞůůǁŝƚŚĂĞŶƐŝƚLJ^ƚĂŶĚĂƌĚ
If a different density range is to be used, the measuring cell can be adjusted using a density standard of your choice
(e.g. toluene from the NIST, National Institute of Standards and Technology) instead of distilled water.
^ĞƚƚŝŶŐŝŶƚŚĞDĞŶƵ
Calib. Mode: On
ͻ Enter the following density standard values into the menu:
Density Density of the density standard (g/cm3) at the reference temperature
Temp Reference temperature
ɲdžϭϬϬϬ dĞŵƉĞƌĂƚƵƌĞͲĐŽŵƉĞŶƐĂƚŝŽŶĐŽĞĨĨŝĐŝĞŶƚŽĨƚŚĞĚĞŶƐŝƚLJƐƚĂŶĚĂƌĚͻϭϬϬϬ
ĚũƵƐƚŝŶŐ
ͻ Ensure that the measuring cell and sample tube are clean.
ͻ Fill the clean measuring cell with the density standard (e.g. Toluene) ensuring that no bubbles are allowed to
enter.
ͻ Press and hold the up and down keys simultaneously until CALIB (STD) appears in the display.
The instrument adjusts automatically (duration: approx. 1 minute). After adjustment is completed, the measured
deviation from the theoretical value and Execute? (No)appears.
DĞĂƐƵƌĞĚĞǀŝĂƚŝŽŶфϬϬϬϭ
Press the Ïor Ðkey.
Execute? (Yes)appears.
- Press the ŽŬŵĞĂƐ key to confirm.
The adjustment is confirmed.
DĞĂƐƵƌĞĚĚĞǀŝĂƚŝŽŶшϬϬϬϭ
ͻ Check whether the measuring cell is dirty and if there are air bubbles.
Measuring cell is clean and contains no air bubbles:
ͻ Press the Ïor Ðkey.
Execute? (Yes)appears.
ͻ Press the ŽŬŵĞĂƐ key.
Measuring cell is dirty and/or contains air bubbles:
Execute? (No)is confirmed by pressing the ŽŬŵĞĂƐ button.
ͻ Clean the cell if necessary and readjust.
ϳϯĚũƵƐƚŝŶŐƚŚĞDĞĂƐƵƌŝŶŐĞůůǁŝƚŚŝƌ
The SBS-2500 measures with the specified accuracy if the measuring cell is correctly adjusted with the
accompanying density standard or distilled water.
Additional adjustment with air is generally not necessary, but is recommended when:
ͻ The measuring cell is replaced,
ͻ dŚĞĚŝƐƉůĂLJĞĚĚĞŶƐŝƚLJŽĨĂŝƌŝƐфϬϬϬϬϳŐĐŵ3ŽƌхϬϬϬϭϱŐĐŵ3.

Page 19
SBS-2500 Manual 09-15-TI2500
;ϮϲϮͿϳϬϯͲϱϴϬϬͻƚĞĐŚƐƵƉƉŽƌƚΛƐďƐďĂƚƚĞƌLJĐŽŵ
^ĞƚƚŝŶŐŝŶƚŚĞDĞŶƵ
Calib. Mode: Off.
WƌĞƉĂƌŝŶŐƚŚĞDĞĂƐƵƌŝŶŐĞůů
ͻ Clean the measuring cell with a suitable solvent and rinse with ethanol.
ͻ Hold the sample tube over a waste container.
ͻ Connect a tube from the connection of the external syringe to an air pump (volume flow 1…2 l/min) connected
to dry tube filled with 5…10 g silica gel.
ͻ Dry measuring cell for approx. 5…10 min.
ͻ Wait approx. 30 min. until the measuring cell has reached the ambient temperature.
ĚũƵƐƚŝŶŐ
ͻ Press the Ïand Ðkeys simultaneously.
CALIB (Air) appears in the display. The instrument adjusts the measuring cell automatically.
Adjustment is complete when CALIB (Air) disappears (after approx. 2 min.).
ͻ Adjust measuring cell with water or a density standard of your choice.
ϳϰĚũƵƐƚŝŶŐƚŚĞdĞŵƉĞƌĂƚƵƌĞŝƐƉůĂLJ
Adjustment of the temperature display is generally not necessary, as the SBS-2500 was adjusted at the factory
before shipment.
If the displayed temperature deviates from the actual temperature, carry out the following steps for adjustment:
ͻ Check settings in the Measure Mode menu.
Stability: Manu
Memory in: Manu
ͻ Switch instrument off.
ͻ Set instrument aside for approx. one hour at a constant temperature.
ͻ Switch instrument on.
ͻ Press the ŽŬŵĞĂƐ key briefly; the display appears in reverse.
ͻ Read temperature on the instrument and from an external thermometer.
ͻ Determine and log the difference between the actual temperature (external thermometer) and the
temperature displayed on the instrument.
ͻ Press the Ðand Îkeys simultaneously.
CALIB (°C) or CALIB (°F) (depending on the selected temperature unit) appears, and the unit flashes.
ͻ Enter the logged temperature difference (with sign) using the arrow keys.

Page 20
SBS-2500 Manual 09-15-TI2500
;ϮϲϮͿϳϬϯͲϱϴϬϬͻƚĞĐŚƐƵƉƉŽƌƚΛƐďƐďĂƚƚĞƌLJĐŽŵ
ͻ Press the ŽŬŵĞĂƐ key.
The temperature display is adjusted.
džĂŵƉůĞ
ŝƐƉůĂLJĞĚǀĂůƵĞŽŶŝŶƐƚƌƵŵĞŶƚ ϮϭϳΣ
ĐƚƵĂůƚĞŵƉĞƌĂƚƵƌĞ ϮϭϯΣ
ŝĨĨĞƌĞŶĐĞ ϮϭϯΣʹϮϭϳΣсʹϬϰΣ
Value to be entered: ʹϬϰ;ΣͿ
ϴ /ŶƚĞƌĨĂĐĞ
Using the infrared interface of the SBS-2500, the stored measurements together with the sample identification, the
measurement unit, the temperature, the temperature compensation coefficient, the instrument identification, date
and time can be printed out with a printer or transferred to a PC.
An infrared adapter or a PC/printer with an IrDA interface is required.
/ŵƉŽƌƚĂŶƚ
Data transfer is only possible when:
ͻdŚĞƌĞŝƐǀŝƐƵĂůĐŽŶƚĂĐƚďĞƚǁĞĞŶƚŚĞŝŶĨƌĂƌĞĚĂĚĂƉƚĞƌĂŶĚƚŚĞŝŶĨƌĂƌĞĚŝŶƚĞƌĨĂĐĞ
ͻdŚĞĚŝƐƚĂŶĐĞďĞƚǁĞĞŶƚŚĞ^^ͲϮϱϬϬĂŶĚƚŚĞŝŶĨƌĂƌĞĚĂĚĂƉƚĞƌŝƐŶŽŵŽƌĞƚŚĂŶϮϬĐŵ
ϴϭ/ZWƌŝŶƚĞƌ^ĞƚƚŝŶŐƐ
Configure the infrared interface of the SBS-2500 as described in Chapter 5.6.
ͻ Connect infrared adapter to printer.
ͻ Switch printer on.
ͻ Press the menu button on the printer.
ͻ Set the following serial interface parameters, see the operating instructions for the printer:
Baud rate: 9600
Parity: None
Stop bits: 1
Data bits: 8
ϴϮĂƚĂdƌĂŶƐĨĞƌƚŽW
ͻ Configure the infrared interface of the SBS-2500 as follows (Interface, See Chapter 5.6):
Interface: RS
Baud rate: 9600
Parity: None
Stop Bits: 1
Data Bits: 8
ͻ Connect the infrared adapter to an available serial interface (COM1, COM2,…) on the PC.
ͻ Insert the accompanying CD-ROM in to the CD drive of the PC.
ͻ Install the PortableCapt program (Excel macro).
ͻ Start the PortableCapt program on the PC.
ͻ In the Excel macro: select the serial interface (COM1, COM2, …) to which the infrared adapter is connected.
ͻ For further procedures, see Chapter 6.7.
Other manuals for SBS-2500
2
Table of contents
Other SBS Measuring Instrument manuals