manuals.online logo
Brands
  1. Home
  2. •
  3. Brands
  4. •
  5. Scantronic
  6. •
  7. Security System
  8. •
  9. Scantronic KEY-RAS User manual

Scantronic KEY-RAS User manual

Scantronic
KEY-RAS
UK
Introduction
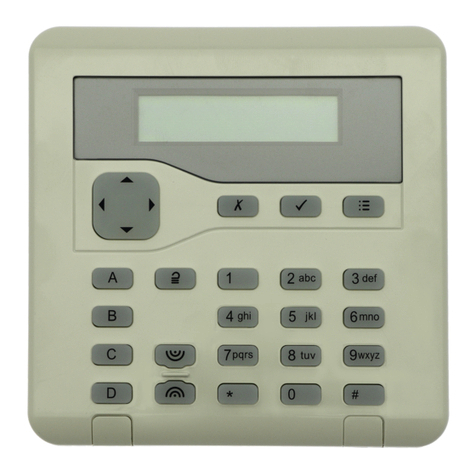
The KEY-RAS allows you to set, unset and
part set the system, and switch output devices
(such as lights) on or off.
Depending on your control unit, the KEY-RAS
is configured in either 1-way or 2-way mode.
When in 2-way mode, the KEY-RAS is able
to display the current set/unset status of the
system, and to sound entry, exit and alarm
tones.These features are not available for
1-way mode.
Features:
•
Used to set, unset or part set the system,
and operate output devices
•
Includes an internal proximity reader
•
Query key (operates for 2-way mode only)
•
Hold-Up Alarm (HUA) and programmable
ABCD keys
•
Uses Rolling Code technology for enhanced
security
To set the system
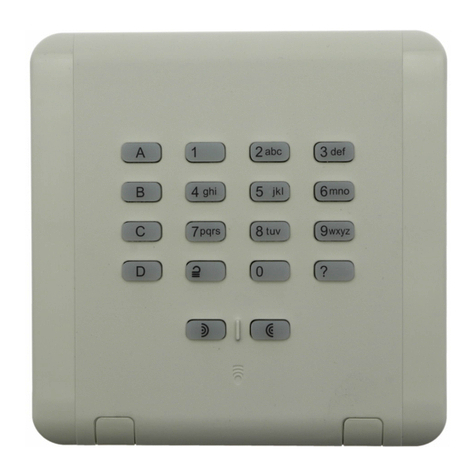
1. Key in your access code, or press the ? key
and present your proximity tag (note 1).
2. Press the appropriate ABCD key, as
configured by your installer.The keys are
normally configured as follows:
Part-setting system:
•
A − Sets the system fully.
•
B, C or D − Sets part-set B, C or D.
Partitioned system:
•
A − Fully sets the partition the KEY-RAS is
assigned to. (The keypad can be assigned
to only one partition.)
•
B − Part sets the assigned partition.
3. Leave by the designated route.
If the KEY-RAS is in 2-way mode, you may
hear an exit tone and see the key you
pressed flash red.This indicates that the
installer has configured an “exit period” −
an amount of time for you to exit.
4. The system sets.
If the KEY-RAS is in 2-way mode, the key
you pressed remains lit red, either for a few
seconds or permanently while the system
is set (depending on configuration).This
indicates that setting was successful.
If the system will not set
The ABCD LEDs alternately flash red and
green if there is an active detector or a fault
that prevents you from setting the system.
For information about the event, please visit a
panel or keypad that has a display.
To unset the system
1. Go to the KEY-RAS using the designated
route. Do not stray from this route, as you
may cause an alarm.
If the KEY-RAS is in 2-way mode, it may
sound an entry tone (if configured by the
installer).
2. Within the allocated time, key in your
access code and press the key, or
present your proximity tag (note 1).
The entry tone stops and the system
unsets.
If the KEY-RAS is in 2-way mode, the ABCD
keys remain lit green, either for a few
seconds or permanently while the system
is unset (depending on configuration).This
indicates that unsetting was successful.
To silence an alarm
Note: An intruder may be in the premises.
Do not enter areas unless you are sure it is
safe to do so.
1. Key in your access code and press the
key, or present your proximity tag (note 1).
The alarm stops and the system is unset.
2. Go to a standard keypad to view the alarm
message, and to reset it.
To query the set/unset status
Note: This feature is available only if the
KEY-RAS is in 2-way mode, and is useful only
if the LEDs are not permanently lit.
1. Key in your access code, or press the ? key
and present your proximity tag (note 1).
2. Press the ?key.
3. The ABCD keys display the status:
•
If the system is set, the key used to set
that part of the system is lit red. For
example, if the system is fully set, key
A is red.
•
If the system is unset, all ABCD keys
are green.
To generate a hold-up alarm
Press the and keys simultaneously.The
keys must be enabled first by your installer.
The system does not need to be set.
You may want to generate a hold-up (panic)
alarm if, for example, you are aware of
an intruder and want to sound an alarm
immediately.
To switch an output device on
or off
1. Key in your access code, or press the ? key
and present your proximity tag (note 1).
2. Press the relevant ABCD key configured by
your installer.
UK KEY-RAS Radio Arming Station − User Guide
DE KEY-RAS Funkaktivierungsstation − Benutzerhandbuch
FR Clavier de commande radio KEY-RAS − Mode d’emploi
IT KEY-RAS - Radio-stazione di inserimento − Guida utente
NL KEY-RAS Draadloos inschakelpaneel − Gebruikershandleiding
Proximity reader / Chip-Leser / Lecteur de proximité / Lettore di prossimità / Naderingssensor
Note 1: If the KEY-RAS is powered only by
batteries, it enters sleep mode after inactivity
to save power. The KEY-RAS wakes up
automatically when its entry sounder starts
(2-way mode only). If the KEY-RAS is in sleep
mode and its entry tone is not sounding, press
the ? key before presenting your proximity tag
to “wake up” the device.
Note 2: Sounds from the KEY-RAS may
start and stop after a short delay.This is
normal, and is due to the nature of the radio
communications.
The information, recommendations, descriptions and
safety notations in this document are based on Eaton
Corporation’s (“Eaton”) experience and judgment and
may not cover all contingencies. If further information is
required, an Eaton sales office should be consulted. Sale
of the product shown in this literature is subject to the
terms and conditions outlined in appropriate Eaton selling
policies or other contractual agreement between Eaton
and the purchaser.
THERE ARE NO UNDERSTANDINGS, AGREEMENTS,
WARRANTIES, EXPRESSED OR IMPLIED, INCLUDING
WARRANTIES OF FITNESS FOR A PARTICULAR
PURPOSE OR MERCHANTABILITY, OTHERTHAN THOSE
SPECIFICALLY SET OUT IN ANY EXISTING CONTRACT
BETWEENTHE PARTIES. ANY SUCH CONTRACT STATES
THE ENTIRE OBLIGATION OF EATON.THE CONTENTS
OFTHIS DOCUMENT SHALL NOT BECOME PART OF OR
MODIFY ANY CONTRACT BETWEENTHE PARTIES.
In no event will Eaton be responsible to the purchaser
or user in contract, in tort (including negligence), strict
liability or other-wise for any special, indirect, incidental
or consequential damage or loss whatsoever, including
but not limited to damage or loss of use of equipment,
plant or power system, cost of capital, loss of power,
additional expenses in the use of existing power
facilities, or claims against the purchaser or user by its
customers resulting from the use of the information,
recommendations and descriptions contained herein.The
information contained in this manual is subject to change
without notice.
© 2019 Eaton. Eaton, Security House, Vantage Point
Business Village, Mitcheldean, GL17 0SZ. www.
touchpoint-online.com. Product Support (UK)Tel: +44 (0)
1594 541978 available 08:30 to 17:00 Monday to Friday.
email: securitytechsuppor[email protected]
DE
Einleitung
Die KEY-RAS ermöglicht es Ihnen, das System
oderTeilsets des Systems zu aktivieren und
zu deaktivieren und Ausgangsgeräte (z.B.
Lampen) ein- und auszuschalten.
Je nach Ihrer Steuereinheit wird die KEY-RAS
entweder im 1-Weg- oder im 2-Wege-Modus
konfiguriert. Im 2-Wege-Modus kann die
KEY-RAS den aktuellen Aktivierungs- bzw.
Deaktivierungsstatus des Systems anzeigen
und Eingangs-, Ausgangs- und Alarmtöne
auslösen. Diese Funktionen sind nicht für den
1-Weg-Modus verfügbar.
Merkmale:
•
Wird zur Aktivierung und Deaktivierung des
Systems bzw. einesTeilsets des Systems
sowie zur Betätigung der Ausgangsgeräte
verwendet
•
Inklusive einem internen Chip-Leser
•
Abfragetaste (funktioniert nur im
2-Wege-Modus)
•
Überfallalarm (ÜA) und programmierbare
ABCD-Tasten
Programmable keys / ProgrammierbareTasten /Touches programmables /Tasti programmabili / Programmeerbare toetsen
Hold-up keys / Überfalltasten / Touches Agression /Tasti allarme panico / Overval-toetsen
1
Query key / Abfragetaste /Touche Requête /Tasto di richiesta stato / Vraag-toets
Page 2
•
Verwendet Rollcodetechnik für verbesserte
Sicherheit
So aktivieren Sie das System
1. Geben Sie Ihren Zugriffscode ein, oder
drücken Sie dieTaste ? und halten Sie Ihren
Chipschlüssel vor (Anmerkung1).
2. Drücken Sie die entsprechende ABCD-Taste,
wie von Ihrem Errichter konfiguriert. Die
Tasten sind normalerweise wie folgt
konfiguriert:
Teilset des Systems aktivieren:
•
A– Aktiviert das System vollständig.
•
B, C oder D− AktiviertTeilset B, C oder D.
System mit Teilbereichen:
•
A– Aktiviert denTeilbereich, dem die
KEY-RAS zugewiesen ist, vollständig. (Das
Bedienteil kann nur einem Teilbereich
zugewiesen werden.)
•
B– Aktiviert einTeilset des zugewiesenen
Teilbereichs.
3. Verlassen Sie den Bereich über den
festgelegten Weg.
Wenn die KEY-RAS im 2-Wege-Modus
ist, hören Sie unter Umständen einen
Ausgangston und dieTaste, die Sie gedrückt
haben, blinkt rot. Das bedeutet, dass
der Errichter einen „Ausgangszeitraum“
konfiguriert hat– einen Zeitraum, in dem
Sie den Bereich verlassen können.
4. Das System wird aktiviert.
Wenn die KEY-RAS im 2-Wege-Modus ist,
leuchtet dieTaste, die Sie gedrückt haben,
weiter rot, entweder für ein paar Sekunden
oder dauerhaft, solange das System aktiviert
ist (abhängig von der Konfiguration). Das
bedeutet, dass die Aktivierung erfolgreich
war.
Wenn das System nicht aktiviert
wird
Die ABCD-LEDs blinken bei einem aktiven
Melder oder einer aktiven Störung, die Sie
daran hindert, das System zu aktivieren,
abwechselnd rot und grün. Informationen zum
jeweiligen Ereignis finden Sie auf einem Panel
oder einem Bedienteil, das ein Display hat.
So deaktivieren Sie das System
1. Gehen Sie über den festgelegten Weg zur
KEY-RAS. Weichen Sie nicht von diesem Weg
ab, da Sie ansonsten einen Alarm auslösen
könnten.
Wenn die KEY-RAS im 2-Wege-Modus
ist, hören Sie unter Umständen einen
Eingangston (sofern dieser vom Errichter
konfiguriert wurde).
2. Geben Sie innerhalb der vorgegebenen Zeit
Ihren Zugriffscode ein und drücken Sie die
Taste , oder halten Sie Ihren Chipschlüssel
vor (Anmerkung 1). Der Eingangston stoppt
und das System wird deaktiviert.
Wenn die KEY-RAS im 2-Wege-Modus ist,
leuchten die ABCD-Tasten weiter grün,
entweder für ein paar Sekunden oder
dauerhaft, solange das System deaktiviert
ist (abhängig von der Konfiguration). Das
bedeutet, dass die Deaktivierung erfolgreich
war.
So schalten Sie einen Alarm
stumm
Hinweis: Ein Eindringling kann in Ihren
Räumlichkeiten bzw. auf Ihrem Gelände sein.
Betreten Sie Bereiche nur, wenn Sie sich sicher
sind, dass Sie sich keiner Gefahr aussetzen.
3. Geben Sie Ihren Zugriffscode ein und
drücken Sie dieTaste , oder halten Sie
Ihren Chipschlüssel vor (Anmerkung1).
Der Alarm stoppt und das System wird
deaktiviert.
4. Gehen Sie zu einem Standard-Bedienteil,
um die Alarmmeldung zu sehen und um sie
zurückzusetzen.
So fragen Sie den Aktivierungs-/
Deaktivierungsstatus ab
Hinweis: Diese Funktion ist nur verfügbar,
wenn die KEY-RAS im 2-Wege-Modus ist, und
ist nur nützlich, wenn die LEDs nicht dauerhaft
leuchten.
1. Geben Sie Ihren Zugriffscode ein, oder
drücken Sie dieTaste ? und halten Sie Ihren
Chipschlüssel vor (Anmerkung1).
2. Drücken Sie die Taste ?.
3. Die ABCD-Tasten zeigen den Status an:
•
Wenn das System aktiviert ist, leuchtet
dieTaste, die zur Aktivierung diesesTeils
des Systems verwendet wurde, rot. Wenn
das System z.B. vollständig aktiviert ist,
istTaste A rot.
•
Wenn das System deaktiviert ist, sind alle
ABCD-Tasten grün.
So lösen Sie einen Überfallalarm
aus
Drücken Sie gleichzeitig die Taste und die
Taste . DieTasten müssen zuerst von Ihrem
Installateur aktiviert werden. Das System muss
nicht aktiviert werden.
Sie könnten beispielsweise einen
Überfallalarm (Panikalarm) auslösen, wenn Sie
wissen, dass jemand in Ihre Räumlichkeiten
eingedrungen ist und Sie sofort einen Alarm
auslösen wollen.
So schalten Sie ein
Ausgangsgerät ein oder aus
1. Geben Sie Ihren Zugriffscode ein, oder
drücken Sie dieTaste ? und halten Sie Ihren
Chipschlüssel vor (Anmerkung1).
2. Drücken Sie die entsprechende ABCD-Taste,
die von Ihrem Errichter konfiguriert wurde.
Anmerkung 1: Wenn die KEY-RAS nur mit
Batterien betrieben wird, geht sie nach
Inaktivität in den Ruhemodus über, um Strom
zu sparen. Die KEY-RAS wacht automatisch
auf, wenn ihr Eingangs-Tongeber startet
(nur 2-Wege-Modus). Wenn die KEY-RAS im
Ruhemodus ist und ihr Eingangston nicht
ertönt, drücken Sie zuerst die Taste ? und
halten Sie dann Ihren Chipschlüssel vor, um
das Gerät „aufzuwecken“.
Hinweis: Aufgrund der Art der
Funkkommunikation kann es zu einer kurzen
Verzögerung beim Starten und Stoppen der
Töne am KEY-RAS kommen.
Die Informationen, Empfehlungen, Beschreibungen und
Sicherheitshinweise im vorliegenden Dokument basieren
auf den Erfahrungswerten und der Beurteilung der Eaton
Corporation („Eaton“) und decken möglicherweise nicht
alle Eventualitäten ab. Sollten darüberhinausgehende
Informationen benötigt werden, stehen Mitarbeiter
des Vertriebsbüros von Eaton gern zur Verfügung.
Der Verkauf des in diesem Dokument beschriebenen
Produkts unterliegt den in den entsprechenden
Eaton-Verkaufsrichtlinien oder anderen vertraglichen
Vereinbarungen zwischen Eaton und dem Käufer
festgelegten Geschäftsbedingungen.
ES BESTEHEN KEINERLEI ABSPRACHEN,
VEREINBARUNGEN, GARANTIEN (AUSDRÜCKLICHE
ODER STILLSCHWEIGENDE), EINSCHLIESSLICH
GARANTIEN HINSICHTLICH DER EIGNUNG
FÜR EINEN BESTIMMTEN ZWECK ODER DER
GEBRAUCHSTAUGLICHKEIT, MIT AUSNAHME DER IN
BESTEHENDEN VERTRÄGEN ZWISCHEN DEN PARTEIEN
AUSDRÜCKLICH AUFGEFÜHRTEN. IN DERARTIGEN
VERTRÄGEN SIND SÄMTLICHE VERPFLICHTUNGEN
SEITENS EATON FESTGELEGT. DER INHALT DES
VORLIEGENDEN DOKUMENTS DARF NICHT ALS TEIL
ODER ZUR ABÄNDERUNG EINES VERTRAGS ZWISCHEN
DEN PARTEIEN DIENEN.
Unter keinen Umständen ist Eaton dem Käufer oder
Benutzer gegenüber vertraglich, aus unerlaubter Handlung
heraus (einschließlich Fahrlässigkeit), in Kausalhaftung
oder anderweitig für etwaige besondere, mittelbare,
Neben- oder Folgeschäden oder Verluste haftbar,
einschließlich Schäden oder Verluste in Bezug auf die
Nutzung von Geräten, Anlagen oder des Stromsystems,
Kapitalkosten, Stromausfälle, Zusatzkosten für die
Verwendung bestehender Energieversorgungsanlagen
oder für Ansprüche gegen den Käufer oder Benutzer
seitens seiner Kunden, die sich aus der Nutzung der
hierin enthaltenen Informationen, Empfehlungen und
Beschreibungen ergeben. Änderungen der in diesem
Dokument enthaltenen Informationen vorbehalten.
© 2019 Eaton. Eaton, Security House, Vantage Point
Business Village, Mitcheldean, GL17 0SZ, Vereinigtes
Königreich. www.touchpoint-online.com
Produkt-Support (Großbritannien)Tel.: +44 (0) 1594
541978, montags bis freitags 08:30 bis 17:00 Uhr
E-Mail: securitytechsuppor[email protected]
FR
Introduction
Le KEY-RAS vous permet d’activer, de
désactiver ou d’activer partiellement le
système, et aussi d’allumer ou d’éteindre des
périphériques de sortie (comme des lampes).
En fonction de votre centrale d’alarme,
le KEY-RAS est configuré en mode
unidirectionnel ou bidirectionnel. En mode
bidirectionnel, le KEY-RAS peut afficher l’état
actuel d’activation du système et émettre des
tonalités d’entrée, de sortie et d’alarme. Ces
fonctions ne sont pas disponibles pour le
mode unidirectionnel.
Caractéristiques:
•
Utilisé pour activer, désactiver ou activer
partiellement le système, et aussi pour
contrôler des périphériques de sortie
•
Lecteur de proximité interne
•
Touche Requête (fonctionne uniquement
pour le mode bidirectionnel)
•
Touches Agression (AGR) et ABCD
programmables
•
Utilise une technologie «rolling code»
(code tournant) pour une sécurité renforcée
Pour armer le système
1. Tapez votre code d’accès ou appuyez
sur la touche ? et présentez votre badge
(remarque 1).
2. Appuyez sur la touche ABCD appropriée,
selon la configuration effectuée par votre
installateur. Les touches sont généralement
configurées comme suit:
Système à armement partiel:
•
A − Armement total.
•
B, C ou D − Armement partiel de B, C
ou D.
Système partitionné:
•
A − Armement total de la partition
affectée pour le KEY-RAS. (Le clavier ne
peut être affecté qu’à une seule partition.)
•
B − Armement partiel de la partition
affectée.
3. Sortez en suivant l’itinéraire désigné.
Si le KEY-RAS est en mode bidirectionnel,
vous entendrez une tonalité de sortie et
la touche que vous avez appuyée clignote
en rouge. Ceci indique que l’installateur
a configuré une «durée de sortie», qui
correspond au temps imparti pour sortir.
4. Le système est armé.
Si le KEY-RAS est en mode bidirectionnel,
la touche que vous avez appuyée reste
allumée en rouge, pendant quelques
secondes ou en continu pendant que le
système reste armé (en fonction de la
configuration). Ceci indique que le système
est correctement armé.
Page 3
Remarque 1: si le KEY-RAS fonctionne
uniquement sur piles, il passe en mode
veille après une période d’inactivité pour
économiser de l’énergie. Le KEY-RAS
se réveille automatiquement quand son
avertisseur se déclenche (mode bidirectionnel
uniquement). Si le KEY-RAS est en mode veille
et si vous n’entendez pas sa tonalité, appuyez
sur la touche ? avant de présenter votre badge
pour «réveiller » l’appareil.
Remarque 2: Le type de certaines
transmissions radio peut entraîner un retard
dans le démarrage et l’arrêt des sons du
KEY-RAS.
L’ensemble des informations, recommandations,
descriptions et consignes de sécurité formulées dans
le présent document reposent sur l’expérience et le
jugement d’Eaton Corporation (« Eaton ») et peuvent
ne pas couvrir toutes les éventualités. Pour obtenir
de plus amples informations, contactez votre agence
commerciale Eaton. La vente du produit faisant l’objet du
présent document est soumise aux Conditions générales
précisées dans les politiques de vente d’Eaton applicables
ou dans tout autre accord contractuel établi entre Eaton
et l’acquéreur.
IL N’EXISTE AUCUN ACCORD, AUCUNE ENTENTE
OU AUCUNE GARANTIE, EXPRESSE OU IMPLICITE,
NOTAMMENT AUCUNE GARANTIE D’ADÉQUATION
À UN USAGE PARTICULIER OU DE BONNE QUALITÉ
MARCHANDE, AUTRE QUE CEUX OU CELLES
EXPRESSÉMENT ÉNONCÉS DANS LES ÉVENTUELS
CONTRATS CONCLUS ENTRE LES PARTIES.
L’INTÉGRALITÉ DES OBLIGATIONS D’EATON SONT
STIPULÉES DANS CES CONTRATS. LE CONTENU DU
PRÉSENT DOCUMENT NE FAIT EN AUCUN CAS PARTIE,
NI NE MODIFIE LES ÉVENTUELS CONTRATS CONCLUS
ENTRE LES PARTIES.
Eaton décline toute responsabilité contractuelle,
délictuelle (négligence y compris), stricte ou autre
envers l’acquéreur ou l’utilisateur quant à d’éventuels
dommages ou pertes particuliers, indirects, accessoires
ou consécutifs de quelque sorte que ce soit, y compris
mais sans s’y limiter, quant à tout dommage ou toute
perte d’utilisation d’un équipement, d’une installation
ou d’un système électrique, tout coût de capital, toute
perte de puissance, toute dépense supplémentaire liée à
l’utilisation d’installations électriques existantes, ou toute
réclamation à l’encontre de l’acquéreur ou de l’utilisateur
par ses clients résultant de l’utilisation des informations,
recommandations et descriptions fournies dans le présent
document. Les infor¬mations contenues dans le présent
manuel sont susceptibles d’être modifiées sans préavis.
© 2019 Eaton. Eaton Cooper Sécurité SAS PEE - rue
Beethoven, 63204 Riom France www.cooperfrance.com
Service après-vente (France)Tél. : +33 (0) 820 867867,
de 08h30 à 17 h00 du lundi au vendredi Email: sales@
cooperfrance.com
Eaton Industries Belgium bvba-sprl Industrialaan 1, 1702
Groot-Bijgaarden Belgium www.coopersafety.beT: +32
(0)27198800 E: [email protected]
IT
Introduzione
Il KEY-RAS consente di inserire, disinserire e
inserire parzialmente il sistema, e attivare o
disattivare i dispositivi di uscita (come le luci).
A seconda della propria unità di controllo, il
KEY-RAS viene configurato in modalità a 1
via o in modalità a 2 vie. In modalità a 2 vie,
il KEY-RAS consente di visualizzare lo stato
inserito o disinserito attuale del sistema e
di azionare i cicalini di entrata, di uscita e di
allarme. Queste funzioni non sono disponibili
nella modalità a 1 via.
Caratteristiche:
•
Utilizzato per inserire, disinserire o inserire
parzialmente il sistema e utilizzare i
dispositivi di uscita
•
Include un lettore di prossimità interno
•
Tasto di richiesta stato (solo in modalità
a 2 vie)
•
Tasti Allarme Panico (AP) e tasti ABCD
programmabili
•
Utilizza la tecnologia Rolling Code per una
maggiore sicurezza
Per inserire il sistema
1. Digitare il proprio codice di accesso o
premere il tasto ? e presentare il tag di
prossimità (nota 1).
2. Premere il tasto ABCD appropriato, in base
alla configurazione del proprio installatore. I
tasti sono in genere configurati come segue:
Si vous ne pouvez pas activer le
système
Les LED ABCD clignotent alternativement en
rouge et en vert en cas de déclenchement
d’un détecteur ou d’anomalie vous empêchant
d’armer le système. Pour en savoir plus sur
l’événement, utilisez le clavier d’une centrale
ou un clavier équipé d’un écran.
Pour désarmer le système
1. Allez devant le KEY-RAS en empruntant
l’itinéraire désigné. Ne vous écartez pas
de cet itinéraire, car vous risqueriez de
déclencher une alarme.
Si le KEY-RAS est en mode bidirectionnel,
il peut émettre une tonalité en option (si
configurée par l’installateur).
2. Avant la fin du délai imparti, tapez votre
code d’accès et appuyez sur la touche ,
ou présentez votre badge (remarque 1). La
tonalité s’arrête et le système est désarmé.
Si le KEY-RAS est en mode bidirectionnel, la
touche ABCD reste allumée en vert, pendant
quelques secondes ou en continu pendant
que le système est désactivé (en fonction
de la configuration). Ceci indique que le
système est correctement désarmé.
Pour arrêter une alarme
Remarque: il est possible qu’un intrus se
trouve sur les lieux. Ne pénétrez pas dans
les zones à moins d’être certain de pouvoir le
faire en toute sécurité.
1. Tapez votre code d’accès et appuyez sur
la touche , ou présentez votre badge
(remarque 1). L’alarme s’arrête et le système
est désactivé.
2. Utilisez un clavier standard pour voir le
message d’alarme et pour réactiver le
système.
Pour demander l’état d’activation
du système
Remarque: cette fonction est seulement
disponible si le KEY-RAS est en mode
bidirectionnel, et seulement utile si les LED ne
sont pas allumées en permanence.
1. Tapez votre code d’accès ou appuyez
sur la touche ? et présentez votre badge
(remarque 1).
2. Appuyez sur la touche ?.
3. Les touches ABCD affichent l’état:
•
Si le système est activé, la touche utilisée
pour armer cette partie du système est
allumée en rouge. Par exemple, pour un
armement total, la touche A est rouge.
•
Si le système est désactivé, toutes les
touches ABCD sont vertes.
Pour générer une alarme
d’agression
Appuyez simultanément sur les touches et
. Les touches doivent d’abord être activées
par votre installateur. Il n’est pas nécessaire
d’activer le système.
Vous pourriez avoir besoin de déclencher
une alarme d’agression (panique), pour par
exemple activer immédiatement la sirène en
présence d’un intrus.
Pour allumer ou éteindre un
périphérique de sortie
1. Tapez votre code d’accès ou appuyez
sur la touche ? et présentez votre badge
(remarque 1).
2. Appuyez sur la touche ABCD pertinente
configurée par votre installateur.
Sistema inserito parzialmente:
•
A − Inserisce completamente il sistema.
•
B, C o D − Inserisce le parti B, C o D
parzialmente inserite.
Sistema partizionato:
•
A − Inserisce completamente la partizione
alla quale il KEY-RAS è assegnato. (La
tastiera può essere assegnata solo a una
partizione.)
•
B − Inserisce parzialmente la partizione
assegnata.
3. Uscire tramite l’itinerario designato.
Se il KEY-RAS è in modalità a 2 vie, è
possibile udire un tono di uscita mentre il
tasto premuto lampeggia in rosso. Questo
indica che l’installatore ha configurato
un “periodo di uscita”, cioè un periodo di
tempo predefinito per uscire.
4. Il sistema si inserisce.
Se il KEY-RAS è in modalità a 2 vie, il
tasto premuto rimane illuminato in rosso
per alcuni secondi o permanentemente
mentre il sistema è inserito (a seconda
della configurazione). Questo indica che
l’inserimento è riuscito.
Se il sistema non si inserisce
Se è un rilevatore è attivo o un guasto
impedisce di inserire il sistema, i LED ABCD
lampeggiano alternativamente in rosso e
verde. Per informazioni sull’evento, andare
a un pannello o a una tastiera dotati di un
display.
Per disinserire il sistema
1. Recarsi al KEY-RAS utilizzando il percorso
designato. Non allontanarsi da questo
percorso, in quanto si potrebbe causare
un allarme.
Se il KEY-RAS è in modalità a 2 vie,
potrebbe emettere un tono di ingresso (se
configurato dall’installatore).
2. Nel tempo predefinito, digitare il proprio
codice di accesso e premere il tasto o
presentare il tag di prossimità (nota 1). Il
tono di ingresso si arresta e il sistema si
disinserisce.
Se il KEY-RAS è in modalità a 2 vie, i
tasti ABCD rimangono illuminati in verde
per alcuni secondi o permanentemente
mentre il sistema è disinserito (a seconda
della configurazione). Questo indica che il
disinserimento è riuscito.
Per silenziare un allarme
Nota: un intruso potrebbe essere presente nei
locali. Non entrare in aree che potrebbero non
essere sicure.
3. Digitare il proprio codice di accesso e
premere il tasto , oppure presentare il tag
di prossimità (nota 1). L’allarme si arresta e
il sistema si disinserisce.
4. Andare a una tastiera standard per
visualizzare il messaggio di allarme e
resettarlo.
Per richiedere lo stato di
inserimento/disinserimento
Nota: questa funzione è disponibile solo se
il KEY-RAS è in modalità a 2 vie ed è utile
solo se i LED non sono accesi in modo
permanente.
1. Digitare il proprio codice di accesso o
premere il tasto ? e presentare il tag di
prossimità (nota 1).
2. Premere il tasto ?.
3. I tasti ABCD visualizzano lo stato:
•
Se il sistema è inserito, il tasto utilizzato
Page 4
per impostare quella parte del sistema
è illuminato in rosso. Per esempio, se il
sistema è completamente inserito, il tasto
A è rosso.
•
Se il sistema è disinserito, tutti i tasti
ABCD sono verdi.
Per generare un allarme di panico
Premere simultaneamente i tasti e . I tasti
devono essere prima abilitati dall’installatore.
Il sistema non deve essere inserito.
È possibile generare un allarme di panico
se, per esempio, è stata rilevata la presenza
di un intruso e si desidera emettere
immediatamente un allarme.
Per attivare o disattivare un
dispositivo di uscita
1. Digitare il proprio codice di accesso o
premere il tasto ? e presentare il tag di
prossimità (nota 1).
2. Premere il tasto ABCD appropriato, in base
alla configurazione del proprio installatore.
Nota 1: se il KEY-RAS è alimentato solo tramite
batterie, si commuterà sulla modalità “sleep”
per risparmiare le batterie. Il KEY-RAS si
riattiva automaticamente quando il cicalino di
ingresso si avvia (solo modalità a 2 vie). Se il
KEY-RAS è in modalità sleep e il suo cicalino di
ingresso non suona, premere il tasto ? prima
di presentare il tag di prossimità per attivare
il dispositivo.
Nota 2: Potrebbe avere un breve ritardo nei
suoni, iniziano e si fermano al KEY-RAS a
causa della natura delle radiocomunicazione.
Le informazioni, raccomandazioni, descrizioni e indicazioni
di sicurezza contenute nel presente documento sono
basate sull’esperienza e sul giudizio di Eaton Corporation
(“Eaton”) e potrebbero non coprire tutte le eventualità. Per
ulteriori informazioni, consultare l’ufficio vendite di Eaton.
La vendita del prodotto illustrato nel presente materiale
informativo è soggetta ai termini e alle condizioni definiti
nelle relative politiche di vendita di Eaton o in altri accordi
contrattuali tra Eaton e l’acquirente.
NON SUSSISTONO INTESE, ACCORDI O GARANZIE,
INCLUSE GARANZIE DI IDONEITÀ A UN DETERMINATO
SCOPO O DI COMMERCIABILITÀ, NÉ ESPRESSI NÉ
IMPLICITI, DIVERSI DA QUELLI SPECIFICATAMENTE
INDICATI NEI CONTRATTI ESISTENTITRA LE PARTI.
OGNI CONTRATTO DI QUESTOTIPO COSTITUISCE
L’INTERO OBBLIGO DI EATON. I CONTENUTI DEL
PRESENTE DOCUMENTO NON COSTITUISCONO PARTE
INTEGRANTE NÉ MODIFICA DEI CONTRATTI ESISTENTI
TRA LE PARTI.
Eaton non sarà in alcun caso responsabile nei confronti
dell’acquirente o dell’utente in base a contratto, atto
illecito (negligenza compresa), responsabilità oggettiva o
altro per nessun tipo di danno o perdita speciale, indiretto,
incidentale o conseguente, tra cui, a titolo esemplificativo,
danni o perdite di utilizzo dell’attrezzatura, dell’impianto
o del sistema di alimentazione, spese di investimento,
perdite di energia, costi aggiuntivi per l’utilizzo degli
impianti energetici esistenti o rivendicazioni sollevate nei
confronti dell’acquirente o utente dai rispettivi clienti che
derivino dall’utilizzo delle informazioni, raccomandazioni
e descrizioni contenute nel presente documento. Le
informazioni contenute nel presente manuale sono
soggette a modifica senza preavviso.
© 2019 Eaton. Cooper CSA srl, Via San Bovio 3, 20090
Segrate (MI) Italia. Tel. +39 02959501 Fax. +39 0295950597
www.coopercsa.it. Email: [email protected]
NL
Inleiding
Via de KEY-RAS kunt u het systeem
in- en uitschakelen, deels inschakelen en
randapparatuur aan- en uitzetten (zoals
lampen).
Naar gelang uw controlepaneel wordt de
KEY-RAS geconfigureerd in een 1-weg of
2-weg-modus. In de 2-weg-modus kan de
KEY-RAS de huidige In/Uit-status van het
systeem tonen en geluidssignalen voor een
inloop, uitloop of alarm laten klinken. Deze
functies werken niet in de 1-weg-modus.
Kenmerken:
•
Dient om het systeem in/uit schakelen,
deels inschakelen en om randapparatuur
te bedienen
•
Heeft een ingebouwde proximity lezer
•
Status opvraag-toets (werkt alleen in
2-weg-modus)
•
Overval-alarm (HUA) en programmeerbare
ABCD-toetsen
•
Gebruikt Rolling Code technologie voor
verhoogde beveiliging
Inschakelen systeem
1. Voer uw toegangscode in of druk op de ?
toets en toon uw proximityTag (opm. 1).
2. Druk op de juiste ABCD-toets, zoals
ingesteld door uw installateur. De toetsen
zijn doorgaans als volgt ingesteld:
Enkelvoudig systeem:
•
A − Systeem volledig Ingeschakeld.
•
B, C of D − Deel B, C of D Ingeschakeld.
Partitie systeem:
•
A − Aan KEY-RAS toegekende partitie
wordt volledig ingeschakeld (toetsenbord
kan maar aan één partitie worden
toegekend.)
•
B −Toegekende partitie wordt deels
ingeschakeld.
3. Volg bij het verlaten de juiste route.
Als de KEY-RAS in de 2-weg-modus zit,
hoort u evt. een uitloop toon en ziet u de
ingedrukte toets rood knipperen. Dat geeft
aan dat de installateur een “uitlooptijd”
heeft ingesteld − die u krijgt om het pand
te verlaten.
4. Het systeem staat nu aan.
Als de KEY-RAS in de 2-weg-modus zit,
dan blijft de ingedrukte toets rood: enkele
sconden of permanent terwijl het systeem
aanstaat (hangt af van de instelling). Dit
geeft aan dat het systeem met succes is
ingeschakeld.
Als het systeem niet wordt
aangezet
De ABCD LED’s knipperen beurtelings rood
en groen als er een actieve detectie is of als
u het systeem vanwege een fout niet kunt
inschakelen. Voor informatie over het voorval
moet u naar een paneel of bediendeel gaan
dat een display heeft.
Het systeem uitschakelen
1. Ga naar de KEY-RAS via de juiste route.
Wijk niet van de route af, anders kan een
alarm afgaan.
Als de KEY-RAS in de 2-weg-modus
zit, hoort u evt. een inloop toon (als de
installateur dat heeft ingesteld).
2. Voer binnen de beschikbare tijd uw
toegangscode in en druk op de -toets
of toon uw proximityTag (opm. 1). De
inloop toon stopt en het systeem wordt
uitgeschakeld.
Als de KEY-RAS in de 2-weg-modus zit,
blijven de ABCD-toetsen groen: enkele
seconden of permanent terwijl het systeem
in rust is (hangt af van de instellingen). Dit
geeft aan dat het systeem met succes is
uitgeschakeld.
Alarmsirene uitzetten
N.B.: Er kan een indringer in het pand zijn.
Bezoek geen ruimtes tenzij u zeker weet dat
het veilig is.
1. Voer uw toegangscode in en druk op de
-toets of toon uw proximityTag (opm. 1).
De alarmsirene stopt en het systeem is
uitgeschakeld.
2. Ga naar een standaard bediendeel om de
alarmmelding te bekijken en te resetten.
Aan/Uit-status opvragen
N.B.: Deze functie werkt bij de KEY-RAS alleen
in de 2-weg-modus en is alleen nuttig als de
LED’s niet permanent branden.
1. Voer uw toegangscode in of druk op de ?
toets en toon uw proximityTag (opm. 1).
2. Druk op de ?-toets.
3. De ABCD-toetsen tonen de status:
•
Als het systeem ingeschakeld is, is
de toets van het betreffende gedeelte
rood. Als het systeem bijv. volledig
ingeschakeld is, is toets A rood.
•
Als het systeem uitgeschakeld is, zijn alle
ABCD-toetsen groen.
Een overval-alarm activeren
Druk de toetsen en ingeschakeld te zijn in.
De toetsen moeten eerst door uw installateur
worden ingeschakeld. Het systeem hoeft niet
ingeschakeld te zijn.
U wilt een overval-alarm (paniek-alarm)
activeren als u bijv. een indringer waarneemt
en u de alarmsirene onmiddellijk wilt laten
afgaan.
Randapparatuur aan- of uitzetten
1. Voer uw toegangscode in of druk op de ?
toets en toon uw proximityTag (opm. 1).
2. Druk op de bijbehorende ABCD-toets, die
uw installateur heeft ingesteld.
Opm. 1: Als de KEY-RAS alleen op batterijen
werkt, gaat deze door inactiviteit naar
de slaapmodus om stroom te besparen.
De KEY-RAS ontwaakt vanzelf als zijn
ingangssignaal klinkt (alleen 2-weg-modus).
Als de KEY-RAS in de slaapmodus zit en het
ingangssignaal niet klinkt, dan drukt u op de ?
toets voordat u uw proximityTag toont om het
apparaat te “wekken”.
N.B.: Er kan een korte vertraging optreden
bij het starten en stoppen van geluiden
bij de KEY-RAS vanwege de aard van
radiocommunicatie.
De informatie, aanbevelingen, beschrijvingen en
veiligheidsaanbevelingen in dit document zijn gebaseerd
op de ervaring en de beoordeling van Eaton Corporation
(‘Eaton’) en dekken niet alle eventualiteiten. Indien u
meer informatie nodig heeft, raadpleegt u een Eaton-
verkoopkantoor. De verkoop van het in dit document
getoonde product valt onder de algemene voorwaarden
zoals die zijn beschreven in het betreffende Eaton-
verkoopbeleid en andere contractuele overeenkomsten
tussen Eaton en de koper.
ER GELDEN GEEN ANDERE EXPLICIETE OF IMPLICIETE
AFSPRAKEN, OVEREENKOMSTEN, GARANTIES
WAARONDER GARANTIES M.B.T. DE GESCHIKTHEID
VOOR EEN BEPAALD DOEL OF VERKOOPBAARHEID DAN
DIE UITDRUKKELIJK GENOEMD ZIJN IN EEN BESTAAND
CONTRACTTUSSEN DE PARTIJEN. EEN DERGELIJK
CONTRACT BEVAT ALLE VERPLICHTINGEN VAN EATON.
DE INHOUD VAN DIT DOCUMENT MAAKT GEEN DEEL
UIT VAN HET CONTRACTTUSSEN PARTIJEN EN WIJZIGT
HET CONTRACT NIET.
Eaton is in geen geval verantwoordelijk jegens de
koper of de gebruiker op grond van het contract, een
onrechtmatige daad (inclusief nalatigheid), strikte
aansprakelijkheid of anderszins voor enige bijzondere,
indirecte, incidentele of gevolgschade of verlies, inclusief
maar niet beperkt tot beschadiging of verlies van het
gebruik van apparatuur, centrale of elektriciteitssysteem,
kapitaalkosten, stroomverlies, extra uitgaven bij het
gebruik van bestaande stroomfaciliteiten of claims
jegens de koper of gebruiker door zijn klanten die
voortvloeien uit het gebruik van informatie, aanbevelingen
en beschrijvingen in dit document. De informatie in
deze handleiding kan worden gewijzigd zonder enige
aankondiging vooraf.
© 2019 Eaton. Eaton, Security House, Vantage Point
Business Village, Mitcheldean, GL17 0SZ. www.
touchpoint-online.com
Product Support (UK)Tel: +44 (0) 1594 541978 available
09:30 to 18:00 Monday to Friday.
email: securitytechsuppor[email protected]
Part number 13403938 Issue 3
03/12/19

Other Scantronic Security System manuals

Scantronic 760ES User manual

Scantronic

Scantronic 760ES User manual

Scantronic i-on Series User manual

Scantronic

Scantronic i-on Series User manual

Scantronic 4601 User manual

Scantronic

Scantronic 4601 User manual

Scantronic 808 Installation guide

Scantronic

Scantronic 808 Installation guide

Scantronic 8136UK-50 User manual

Scantronic

Scantronic 8136UK-50 User manual

Scantronic DET-RSDC User manual

Scantronic

Scantronic DET-RSDC User manual

Scantronic HOMELINK EXTRA Operating instructions

Scantronic

Scantronic HOMELINK EXTRA Operating instructions

Scantronic i-on Security System User manual

Scantronic

Scantronic i-on Security System User manual

Scantronic 601 User manual

Scantronic

Scantronic 601 User manual

Scantronic i-on30R+ User manual

Scantronic

Scantronic i-on30R+ User manual

Scantronic KEY-RAS User manual

Scantronic

Scantronic KEY-RAS User manual

Scantronic 9800 User manual

Scantronic

Scantronic 9800 User manual

Scantronic Spartan 650F User manual

Scantronic

Scantronic Spartan 650F User manual

Scantronic 9452 User manual

Scantronic

Scantronic 9452 User manual

Scantronic 515r User manual

Scantronic

Scantronic 515r User manual

Scantronic 9448+ User manual

Scantronic

Scantronic 9448+ User manual

Scantronic 500r+ User manual

Scantronic

Scantronic 500r+ User manual

Popular Security System manuals by other brands

AKO 55424 user manual

AKO

AKO 55424 user manual

Toleko A131 instruction manual

Toleko

Toleko A131 instruction manual

BSM Home 4+ installation guide

BSM

BSM Home 4+ installation guide

NookBox SRV-23-ZBS installation guide

NookBox

NookBox SRV-23-ZBS installation guide

ASCOM telePROTECT 900 System installation

ASCOM

ASCOM telePROTECT 900 System installation

Digital Alert Systems DASDEC-III DAS3-EX quick start guide

Digital Alert Systems

Digital Alert Systems DASDEC-III DAS3-EX quick start guide

Pyronix OCTAGON II installation instructions

Pyronix

Pyronix OCTAGON II installation instructions

Scolmore ESP beacon BA4ZM Installation and operation manual

Scolmore

Scolmore ESP beacon BA4ZM Installation and operation manual

Subsite TXu Original instruction

Subsite

Subsite TXu Original instruction

Siemens FDM223-Ex Technical manual

Siemens

Siemens FDM223-Ex Technical manual

Climax Technology vesta series user manual

Climax Technology

Climax Technology vesta series user manual

JCM Technologies GO-PUSH1 manual

JCM Technologies

JCM Technologies GO-PUSH1 manual

PTI Falcon 2000 Troubleshooting

PTI

PTI Falcon 2000 Troubleshooting

ELBRO EAB01 operating instructions

ELBRO

ELBRO EAB01 operating instructions

Ropam elektronik OptimaGSM user manual

Ropam elektronik

Ropam elektronik OptimaGSM user manual

Safety Track UCIT PRO-4 installation manual

Safety Track

Safety Track UCIT PRO-4 installation manual

ADT ADTHYBWL Series Quick installation guide

ADT

ADT ADTHYBWL Series Quick installation guide

ACTi B41 Manual guide

ACTi

ACTi B41 Manual guide

manuals.online logo
manuals.online logoBrands
  • About & Mission
  • Contact us
  • Privacy Policy
  • Terms and Conditions

Copyright 2025 Manuals.Online. All Rights Reserved.