Schulze PRETREATmaker LINE 7-4 User manual

Instruction manual
Version 18.04
Self – contained industrial pretreatment device for the full process of preparing garments
incluiding pretreatment, drying and pre-pressing
7 – 4
11 – 6
Version 18.04
1/20

1. Introduction
1.1 Content
1. Introduction 02
1.1 Content 0
1. Construction of the machine 03
1.3 Technical data 04
1.4 Protection of the device 04
1.5 Safety arrangements at the workplace 05
2. Initiation 06
.1 Notes regarding transportation 06
. Warranty terms and conditions 06
.3 Supply voltage 06
.4 Connecting the machine to the compressor 06
.5 Preparation of the machine for operation 07
3. Working with the machine 08
3.1 Usage of the machine 08
3. Starting the working procedure 08
3.3 Programming and functions of the machine 08
3.4 Changing the precoating liquid during operation 11
3.5 Barcode printing 11
3.6 Configuration of the barcode scanner 11
4. aintenance 12
4.1 Daily maintenance 1
4. Periodic maintenance 13
4.3 Side cover’s sensors adjustment (pretreatment station) 15
4.4 Electronic RE 7 settings 15
4.5 Instructions for replacement, cleaning and storage of the nozzles 16
4.6 Instructions for replacement of the fuse in the pretreatment station 16
4.7 Activation of the main fuse 16
4.8 Instructions for replacement of the filter 16
4.9 Troubleshooting 17
4.10 Wiring diagram 18
4.11 Testing report 0
4.1 EC – Conformance declaration 0
Version 18.04
2/20

1.2 Construction of the machine
Version 18.04
3/20

1. Press 1
. Barcode scanner
3. Press
4. Moveable control panel
5. Aircirculation ventilator
6. Signal tower
7. Drip tray
8. Exhaust ventilator
9. Separator
10. Switch for separator
11. Plug
1 . Legs
13. Switching valves
14. Protective barrier
15. Base plate
16. Proximity sensor (START activation)
17. Switch for proximity sensor
18. START switch
19. Control box
0. Main switch
1. Compressed air filter with water separator
. Exhaust ventilator
3. Exhaust ventilator
4. Safety frame
5. Sensor for starting the precoating
6. Emergency stop switch
7. Rolling system with a break
8. Pressure gauge
9. Heating plate plug
30. Pressure adjustment
31. Protective cover
3 . Cooling fan for stepper motor
1.3 Technical data
Technical data PRETREATmaker LINE 7-4 PRETREATmaker LINE 11-6
Dimension 360 x 00 x 180 cm 516 x 00 x 180 cm
Weight 1067 kg 1460 kg
Operation voltage 3 x 400 VAC
Rated power 15 kW 33 kW
Power consumption 5 A 45 A
Air consumption 15 L / machine cycle
ECO mode yes
Main fuse C3 A B50 A
Noise The machine generates noise less than 70 dB (A)
Print size 40 x 54,5 cm
Warm-up time 5 min.
Drying tunnel
Max. height of the used material 30 mm
Max. air flow temperature 50 °C
Max. IR temperature 350 °C
Heating time 100 - 1 0 seconds
Fans 1
Zones 1
Heat press
Max. pressing force 6 bar
Max temperature 0 °C (optimal 180 °C)
Plate size 45 x 56 cm
Heating time 1 – 5 seconds
1.4 Protection of the device
The PRETREATmaker LINE is equipped with different safety arrangements to make a safe usage possible.
ain fuse
Main fuse is situated in the back part of the machine, in the control box. In case of overcharge the main fuse prevents the machine from
getting damaged. If the main fuse has been switched off, it has to be switched on again.
Fuse 6A (Pretreatment station)
The fuse 6A is located in the back part of the preteatment station. In case of overcharge the main fuse prevents the machine from getting
damaged. If the main fuse has been activated, it has to be replaced. Instructions for replacement of the fuse are given in chapter 4.6.
Thermal fuse
PRETREATmaker LINE has been equipped with two thermal fuses. One of them is situated in the drying tunnel and the other one in the
heat press. The thermal fuse in the press is situated on the heat plate and cuts off the power supply if the temperature exceeds ~ 60°C. If
the fuse is activated the temperature sinks down to 90°C. After that the power supply gets activated again and the temperature of the
heating plate rises and it’s possible to continue the work with the press. Over time the thermal fuse may wear out and cut off the power
supply by lower temperature, for example by 180°C. In such case it’s needed to replace the thermal fuse as soon as possible.
The thermal fuse in the drying tunnel is located inside of the machine, on the sime side as control box. When the temperature of the
thermal fuse gets ~ 60°C, it cuts off the power supply of the whole machine, until the drying tunnel cools down to the safe temperature.
Thet the machine wil continue to work. If the machine doesn’t continue to work after it reached the safe temperature, the thermal fuse in
the drying tunnel has to be replaced.
Automatic ECO mode
If the START switch will not be activated within 15 minutes, the machine mode will change automatically to the ECO mode. The
temperature will sink down by 50°C, all covers will open and the plates will move slowly to the right side.
Version 18.04
4/20

Emergency stop switch
Has been used to eliminate the residual risk. In case of emergency push the emergency stop switch which is situated on the heat press.
The heating elements of the press and of the drying tunnel will switch off, the covers will open and the movement of the plates will stop.
The compressed air will be disconnected. The control panel and the electronic device will be still working. In order to contunue the work
with the machine, the emergency stoip switch has to be pulled out.
Safety frame (Pretreatment station)
The safety frame is located on the left side of the pretreatment station, by the side cover. If it gets activated, the movement of the machine
will stop. It protects the operators’ hands and fingers from getting crushed by the movement of the cover to the top position.
Stepper motor
The main drive of the machine has been equipped with a stepper motor and its power has been adjusted, so that the movement of the
plates can be stopped using just one hand. In such case the electronic device wil report an error and stop the movement of the plates.
Covers
There are covers which protect the area of the plate movement. Some of the covers are movable. The covers have to be connected to the
machine with the plugs. Otherwise the machine will not start.
Safety valve 6 bar
Pneumatic installation has been equipped with a safety valve, which protects the machine from excessive pressure from the pneumatic
installation.
1.5 Safety arrangements at the workplace
Set-up and installation
Set-up and installation of the device has to be done under supervision of an authorised person by the company owner. The installation has
to be done by or more persons. The machine should be situated on the flat, non-inflammable surface, in a room with constant
temperature and moisture. Keep the machine away from dusty rooms because dust could have a negative influence on some parts of the
machine. Very important! The machine may be connected only to an installation provided with a protection against electric shock
(RCD/RCCB device). The machine is destined for industrial use only.
Testing the machine
After the correct installation of the machine, it is important to ensure that the machine works properly, is not damaged after the
transportation and has no safety defects. The testing can only be done by the employer or other authorised persons. It is mandatory to
guarantee correct installation an a safe usage of the machine. The testing should be protocoled. If any irregularities regarding funcionality
or safety are found during the testing, it has to be noted and reported to Walter Schulze GmbH in written form within 7 days. Until the
clarification it is not allowed to use the machine.
Information and education
According to §81 of the industrial law, §14 of the employment protection law (German law) and the general safety arrngements at the
workplace, the employer or an authorised person is obligated to give all information about the safety, functions and the range of application
about the machine to the user. In particular the user needs to be acquainted with the complete manual personally and be explicitly
informed about the dangers of using and working with the machine. The details have to be explained in a coherent form and language.
Every user is obligated to a safe usage of the machine and to read the instruction manual before starting work with the machine. Using the
machine means that the operator has read the instruction an is aware of the possible risks of working with the machine.
Safety arrangements
In order to ensure optimized safety please read the instruction manual precisely. Only one person is allowed to work with the machine at
the time. The machine has to be under supervision the whole time, when it is working. Supervise the machine till it is switched off and the
power plug is pulled out. There should be no unauthorised persons near the machine while it’s working. In case of emergency push the red
emergency button, situated on the heat press. After the problem is solved, the machine can be restart by turning the emergency switch to
the left. The device is equipped with a power plug. Special attention should be paid to the socket and presence of the connected safety
circuit inside. Very important! The machine may be connected only to an installation provided with a protection against electric shock.
Pressure adjustment has to be done when the press is open. There should be no unauthorised persons near the machine while it's
working. Beware of the heating plate – risk of burns. Attention! The press opens automatically – keep the safetdy clearance. Using the
machine with certain materials may create a strong smell. That's why the user should evaluate the need for a ventilation system at the
workplace. The type of ventilation should be used as needed and depends of the size of the room and used inks. The machine has to be
installed at a place with enough space around the machine. The space in front of the machine has to be wide enough. Nothing can disturb
the operator at work. Do not install the machine in doors, floors or busy places. By using different kind of technologies, the operator may
use personal protective equipment (protective gloves). The power plug has to be pulled out of the power supply while maintenance. All
wires should be placed in a safe way, to make sure they will not pose a threat for the person working at the machine or passing it. In case
of damages or untypical signals from the machine, please disconnect the machine from the power supply, contact the service and do not
work with the machine, till the problem is solved. All repairs should be performed after consulting the service. Do not remove machine
covers while the machine is working.
Starting the working procedure
The operator needs enough space and free distance to all switches and buttons to work with the machine. Safe position of the operator
allows him to activate the emergency stop switch in every moment. The operator is obligated to work with the machine as recommended
by the manufacturer in order to avoid risks.
Version 18.04
5/20

Correct operating position (plan view)
Other risks and dangers
There are some moveable elements on the machine, which can cause injuries of hands or fingers. For reasons of workability, these
elements cannot be eliminated. They can cause injuries / mash fingers or hands. It is important to work with the machine with great care
and be alert to avoid other dangerous situations. The machine should be operated in accordance with the manufacturers recommendations
to avoid risks. The machine complies with the essential requirements laid down in regulation for machines. Above information has been
worked out in accordance with the standards PN-EN 1 100: 01 . The machine is constantly upgraded in order to improve its safety. All
comments regarding the contents of this manual can be addressed to the distributor or manufacturer.
2 . Initiation
2.1 Notes regarding transportation
Because of the large dimensions of the machine, the PRETREATmaker LINE is delivered, installed and assembled by the manufacturer
(service).
2.2 Warranty terms and conditions
The machine has to be operated with a precoating liquid for fabrics, to prepare them for DTG printing. Cleaning must be done with destilled
water only. Other liquids may damage pumps or other components of the machine. Damages caused by unauthorized liquids are excluded
from the warranty. The PRETREATmaker Line comes with a 1 months warranty. This warranty includes the whole construction of the
machine, mechanical parts, electronics, drawer with rails, casing, pumps electronic valve and pipes. Consumption items such as
brass/stainless steel nozzles, silicon foam, safety covers, seals and filters are excluded from the warranty. Thermo fuses, temperature
sensors, switches and buttons and all springs in the machines have a warranty of 6 months.
2.3 Supply voltage
The PRETREATmaker LINE has to be connected to a voltage of 400VAC/50Hz. The machine is equipped with a power plug. Make sure
thet the power outlet is in the right condition and that the grounding is connected to the power outlet.
Caution: please do not connect this press to any other outlet (socket) than those equipped with ground-fault protection ELCB (earth
leakage circuit breaker). In case of doubt ask your licensed electrician to check the wiring. Connecting the machine to a socket that is not
earthed or where the earthing does not work properly, is hazardous to health and dangerous for the machine. Any damages arising from
an improper plugging invalidated the warranty.
2.4 Connecting the machine to the compressor
PRETREATmaker Line is a pneumatic device, which needs to be connected to a compressed air system. Optimal pressure for correct
work shouldn’t exceed 6 bar. The air supplied to the machine needs to be dry and without oil. If needed use an additional filter and
dessicator. The air compressor is connected with a connector type 6 eurostandard (picture 1). After finishing work disconnect the
compressed air and drain the filter. If the compressed air system has no additional dessicator, the container needs to be checked every 4
hours during operating sequence. If needed it can be emptied by twisting the little valve off (picture 2). If there is oil in the container
besides water, the air compressor is working faultily. In this case the machine has to be shut down and the compressor needs to be
repaired. The oil from the compressor can damage the pneumatic valves in the machine. If needed,contact the service for help.
Version 18.04
6/20

2.5 Preparation the machine for operation
Before start to work with the machine, make sure that all the covers are assembled and connected to the machine. The device may be
operated by a person trained and acquainted with the service manual. After removing the unit from the pallet and remove the protective
film should be mounted nozzles. The nozzles are attached to the machine with the power cord, filter and washer. The nozzles must be put
together and installed into the machine (pictures below).
Fumes escaping from the pretreatment machine will condense and discharge to the separator. The separator needs to be connected to the
machine (pictures 1-2).
Before starting to work with the machine the drip trays have to be placed in the designated spaces.
Before switching the machine on, check whether the protective cable is correctly connected. All containers should be controlled before
starting operations. The container with precoating liquid should be shaken everyday. Make sure that the deposit tank is empty and properly
connected.
1. Fill the water container with distilled water.
. Fill the precoatinhg containers up with the liquid. The containers must be shaken every day.
3. Make sure the waste-water container is empty
4. Take the nozzles off.
5. Turn the machine on.
6. Turn the precoating button on the touch screen display and hold it until the precoating liquid starts flowing from the nozzles.
7. Turn the first nozzle on the left on and press the precoating button on the touch screen display again.
8. Turn the first nozzle off and the second one – on. Press the precoating button on the touch screen display again.
9. Proceed with the nozzles 3,4, and 5 in similiar way. This process removes air bubbles from the ducts.
Version 18.04
7/20

10. If all nozzles don’t work identically, press the water button on the touch screen display (picture 5) and hold it until the water starts
flowing from the nozzles and next repeat the procedure given in points 7-9. The procedure given in points 7-9 must also be repeated if the
precoating container has been empty, so the pump must fill in the ducts again.
3 . Working with the machine
3.1 Usage of the machine
PRETREAT maker LINE is self- contained industrial pretreatment device for the full process of preparing garments including
preatreatment, drying and pre-pressing. It is destined for automatic application of precoat for white ink in printers directly printing on fabrics.
The device is equipped with 5 nozzles. Application of the precoat is executed directly over the fabric. The containers may not be filled with
other liquids.
3.2 Starting the working procedure
T-shirt has to be placed on the base plate, which is situated in the operators’ area (picture 1A). After pushing the START
button the movement of the plates will start (picture 1B). The plate with the t-shirt moves to the pretreatment station. While it gets covered
automatically with the precoating, the operator is placing another t-shirt on the base plate that arrives to his work station. After pushing the
start button again the first plate with t-shirt moves automatically to the drying tunnel. Every time after pushing the START button the plates
will will move by one station to the right. Depending on model, there are 6 or 4 stations in the drying tunnel. After the drying process, the
first base plate with the t-shirt arrives to the heat press station and gets pressed. After pushing the START button again the first base plate
with the t-shirt arrives to the operators’ station and the process is finished. The t-shirt is covered with the precoating, dried and pressed.
There can be 11 t-shirts in a machine at a time in 11-6 Version or 7 t-shirts in 7-4 Version.
3.3 Programming and functions of the machine
1. Setting the temperature of the air flow
After touching the field, the keyboard will appear on the display. Max. temperature of the air flow is 50ºC. Recommended
temperature is 185ºC.
2. Current power consumption of the air flow
Power consumption level, expressed as percentage. While warming up the drying tunnel, the power consumption reaches 100%.
After the programmed temperature is reached, the power consumption is reduced till around 70%. Power consumption level depends
on the external conditions and on the number of t-shirts that are currently in the drying tunnel.
3. Current temperature of the air flow
Current temperature of the hot air is shown on the display.
Version 18.04
8/20

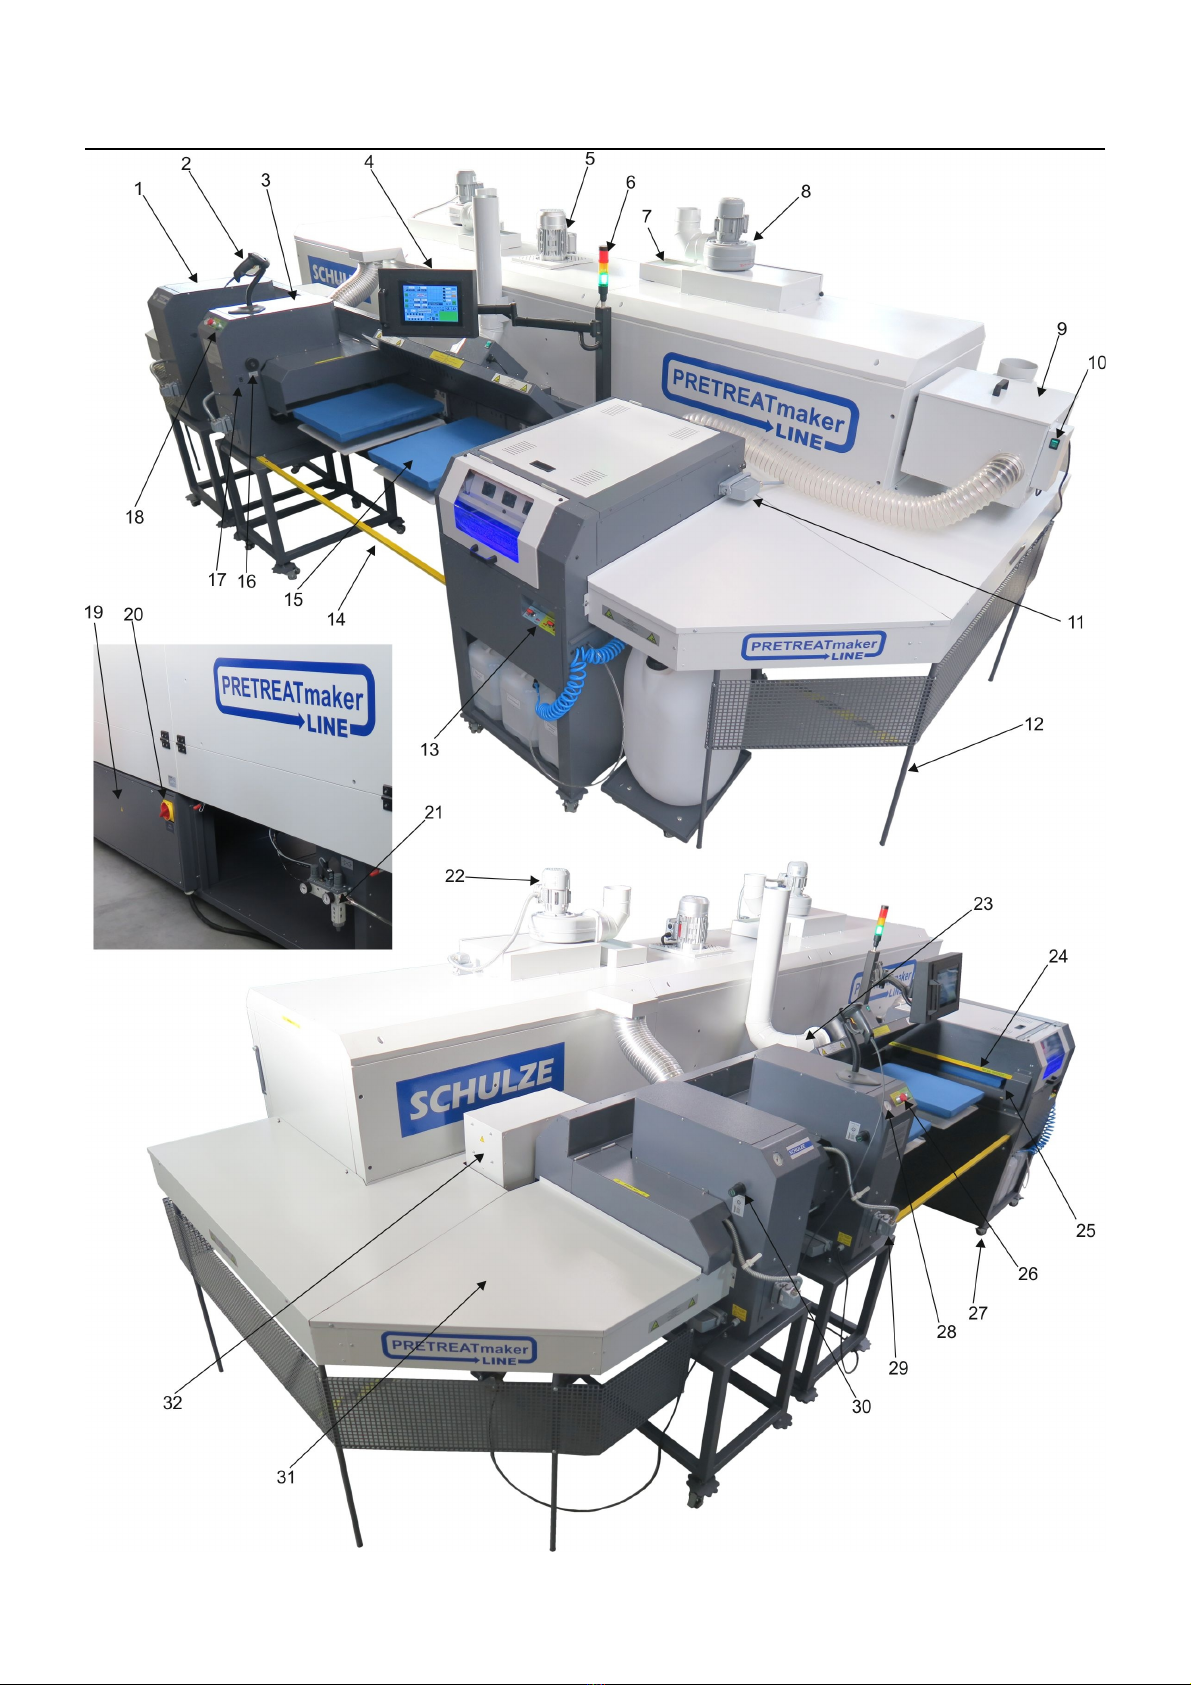
4. Setting the temperature of the IR
After touching the field, the keyboard will appear on the display. Max. temperature of the IR is 350ºC. Recommended temperature is
300ºC.
5. Current power consumption of the IR
Power consumption level, expressed as percentage. While warming up the drying tunnel, the power consumption reaches 100%.
After the programmed tempeature is reached, the power consumption is reduced till around 80%. Power consumption level depends
on the external conditions and on the number of t-shirts that are currently in the drying tunnel.
6. Current temperature of the IR
Current temperature of the heat elements is shown on the display.
7. Switching on the heating of the machine
After touching the icon, the drying tunnel warms up till the programmed temperature (base plates are moving slowly). After the
programmed temperature is reached, the machine goes into standby mode (ready).
8. Switching off the heating of the machine
After touching the icon, the heat elements in the drying tunnel switch off.
9. ECO mode
After touching the icon, the ECO mode gets activated. The temperature of the drying tunnel sinks down by 50ºC, and the base plates
are moving slowly (like when the machine is warming up). To switch off the ECO mode touch the ON icon on the display (7) Then the
machine will warm up again to the programmed temperature. If the machine stays in standby mode longer than 15 minutes, it goes
automatically to the ECO mode.
10. Current condition of the machine
OFF - heat elements are switched off
WARMING - the machine warms up
READY - the machine is ready to work
ECO - ECO mode is activated
11. anual closing / opening the press
When the automatic mode is switched off, it is possible to close the press manually. After pressing the icon press will close. It will
open after the adjusted time runs out. In order to open the press earlier, the icon needs to be pressed again.
12. Setting the temperature of the heat press
After touching the field, the keyboard will appear on the display. Max. temperature of the heat plate is 0 ºC. Recommended
temperature is 180ºC
13. Setting the presstime of the heat press
After touching the field, the keyboard will appear on the display. Time of the pressing can be adjusted between 1 – 5 seconds. It is
recommended to set it on 8 seconds.
14. Current temperature of the heat press
The current temperature of the heat plate is shown on the display.
15. Current power consumption of the heat press
Power consumption level expressed as percentage.
16. Setting of the exhaust ventilator.
After touching the field, the keyboard will appear on the display. The speed of the exhaust ventilator can be settled between 1 and 10.
17. Daily counter
Number of cycles performed during one run.
18. Preview
It can be checked, which plates are covered with t-shirt, and what times of pressing are adjusted for each of them. If the plate without
t-shirt will arrive to the pressing or pretreatment station, the station will not activate.
19. Switching the nozzles on/off (print width)
After touching the right field, the nozzle will switch on or off.
20. Printing range (print length)
Quick adjustment of the printing range (every 10 cm).
21. Setting preview of the pretreatment station
22. Settings selection
This function allows to choose between previously saved settings. To save settings touch and hold for some seconds one of the icons
(F1-F6). Information „settings saved” will show up on the screen.
23. Reset the counter
24. Cycle counter
Number of the performed cycles since last reset will show up on the screen.
25. Automatic mode ON / OFF
This function allows to switch on or off the automatic mode. When the automatic mode is activated, the first cycle has to be switched
on with the START button, which is situated in front part of the press. Next cycles will switch on automatically after the programmed
time runs out. When the automatic mode is switched off, each cycle has to be preceded by pushing the START switch. Next cycle will
begin after the adjusted time of the cycle runs out.
26. Current cycle time
It shows the current time of the cycle. After it runs out the machine will start another cycle automatically (in the automatic mode).
27. Setting the time of the cycle (+/-)
With the icons + i – time of the cycle can be adjusted. Max. time which can be adjusted is 99 seconds. Min. time is moveable but it
cannot be shorter than the time adjusted on the press.
28. Print beginning
Setting the beginning of the printing. After touching the field, the keyboard will appear on the display. It is possible to set the beginning
od the printing between 0 and 48 cm.
29. Print length
After touching the field, the keyboard will appear on the display. It is possible to set the printing range between and 50 cm.
Version 18.04
9/20

30. Carriage speed
Carriage speed expressed as percentage. After touching the field, the keyboard will appear on the display. The carriage speed can
be adjusted between 50% and 150%.
31. Pressure of the nozzles
After touching the field, the keyboard will appear on the display. The pressure of the nozzles can be adjusted between 50% and
150%.
32. Rotating the t-shirt
There is a possibility to set the position of the t-shirt on the display (beginning of printing on top of the plate or beginning of printing on
bottom of the plate). Touch the icon to change the position of the t-shirt.
33. Single/ double precoat
After touching the icon single or dual application of the precoating can be selected.
34. Water
After touching the icon, the nozzles get rinsed with water from the container.
35. Precoating
In order to fill the tubes with the precoating push and hold several times precoating icon.
36. Settings
After touching the icon the settings menu will show up on the screen.
37. PRETREATmaker ON / OFF
Touch the icon to switch on or off the pretreatment station..
38. ovement (left)
After touching the icon, the base plates will move by one position to the left.
39. ovement (right)
After touching the icon, the base plates will move by one position to the right.
40. Current status of the machine
Depending on the status of the machine the field changes colour.
greens – machine is ready
yellow – machine is working
red – malfunction of the machine
Starting the machine
Check the working plates (stations), if they are free of items. They can get damaged or cause damages of the machine if the device start
working (melt, burn). The compressed air has to be connected to the device. Check if all covers are in the right place, connected to the
machine and if the switches of the press and pretreatment machine are switched on.
After turning the main switch on and setting up all configurations (time, temperature, modus, etc.), touch the ON icon on the control panel
to activate the machine.
SETTINGS ENU
41. Pump cleaning
After touching the icon follow the instructions showed on the screen.
42. Config file via USB port
In order to import the settings to an external device or export the previous saved setting to the machine press the right icon.
43. Temperature adjustment
In the PRETREATmaker LINE it is possible to adjust the temperature of the heating plates and the heating elements to its original
settings from -15ºC to +15ºC.
Version 18.04
10/20

3.4 Changing the precoating liquid during operation
In order to switch from precoating tank 1 to precoating tank move the switch "tank change" from tank 1 to tank . Always flush the pump
afterwards for at least 0 seconds with the new precoating in order to properly fill the pump. To do this press the precoating button for at
least 10 times.
3.5 Barcode printing
PRETREATmaker LINE can be equipped with an input interface and a barcode scanner.With this option job parameters can be
transfered directly into the machine without doing any manual parameter adjustments. With the Program „Pre4 barcode v ” (Foto 1) work
parameters can be set up an printed with a barcode printer (CODE 39). Work parameters can also be generated with another system and
transferred to the machine. Job parameter setup needs to follow these rules: (read from left to right)
The first numbers represent the code version ( 0)
Next numbers are for binary number (nozzle off or on) (0b000xxxxx)
Next numbers are for spray start (in cm)
Next numbers are for spray stop (in cm)
Next 3 numbers are for carriage speed (050 - 150%)
Next number is for setting um cm or inch (1 = inch / 0 = cm)
Next number is for setting up double spray option(1 = on / 0 = off)
Next number is for table setting (1 = on/ 0 = off)
3.5 Configuration of the barcode scanner
If the scanner does not work properly the codes below should be scanned in order to configurate the scanner. Then switch off the
machine, wait around 10 seconds and switch it on again.
BACK TO THE FACTORY SETTINGS
CONFIGURATION OF THE BARCODE SCANNER
Version 18.04
11/20

4. aintenance
4.1 Daily maintenance
The device should be cleaned with a dry cotton cloth every day (pictures 1 – 2). Dry the inside walls of the machine. Always remove all
precoating residues. The containers must be controlled many times during operation of the machine. At least once a day the drip trays
have to be controlled end emptied if needed. (pictures 3-4). The surface of the base plates and heat plate need to be clean all the time.
The heat plate has to be cleaned with a clean and dry cloth (picture 5). Do not touch the heat plate – danger of burns. Following the
completion of work the bottom parts of protective covers have to be cleaned (picture 6). Clean the arms of the base plates and the
surface of the drip trays several times a day (pictures 7 – 8). It must be remembered that the guide rails of the cover should always be
greased (picture 9). Those guides have to be greased with water resistant grease using a brush (picture 10). It prevents rusting the rails
and protects the rails against precoating liquid.
1. Don’t let the liquid flow over the waste-water container. The container should be emptied if the need arises.
. The containers with pre-coating liquid should be shaken every day and filter in the container must always be immersed in the liquid.
3. Check the container with distilled water every day.
4. The nozzles must be kept clean. Instructions for cleaning of the nozzles are given in chapter 4.3.
5. Every day after completion of work, press the water button 3 x 1 sec. on the touch screen display. This shall rinse the valves and
nozzles with water.
6. After rinsing, disassemble the nozzles. Instruction - in chapter 4.3.
7. Before starting to work with the machine, install the nozzles.
8. Press the precoating button 3 x 1 sec. Long on the touch screen display until the nozzles start working at a uniform rate.
9. Definitely, after completion of work, dry the interior of the machine. Make sure there are no effluents in the chamber with the
containers.
10. Once a week all the tubes and precoating pumps should be cleaned with water.
Before make sure that the water container is filled with water
Version 18.04
12/20

4.2 Periodic maintenance
Before performing any maintenance work, turn off the machine, disconnect it from the electricity and wait till it gets cold. Clean
the carriage rails and the teflon holder once a month using WD40. To clean the carriage and teflon holder/slider, unscrew the fixing screw
of the covering rail and remove it (pictures 1 – 2). After cleaning of the carriage rails, the teflon holder and the belt (zdjęcie 3) put the
covering rail back and screw the fixing screw on. It is recommended to grease the main driver once a month using a brush and a
waterproof grease, for example CX-80 (picture 4). It is also recommended to grease the contact screws which are situated under the
base plates (picture 5). The chamber of the exhaust ventilator should be controlled once a month (pictures 6 – 7) and cleaned when
necessary (picture 8).
Once a month the separator has to be controlled and emptied when needed(pictures 9 – 10). The carriage’s filter should be cleaned at
least once a month (pictures 11 – 13).
Version 18.04
13/20

At least once a month (or more often, if dirty stains on the base plate’s arms will appear) it is recommended to clean the silicone
protective covers which are situated in the drying tunnel. Unscrew the fixation screw (picture 14) and take out the panels with silicone
covers (pictures 15 – 16) and clean them (picture 17). Clean the upper covers in the same way (picture 18).
It is recommended to clean the Fan’s filter every 6 months. Unscrew the mounting screws (pictures 19 – 20), remove the filter (picture
21) and clean with the compressed air (picture 22).
It is recommended to replace the tubes in the pretreatment station at least once a year (pictures 23-24).
Version 18.04
14/20

4.3 Side cover’s sensors adjustment (pretreatment station)
The side cover’s sensors are situated on the pneumatic cylinder in the lower part of the pretreatment station (picture 1). They are equipped
with a diodes (picture 2). During normal operation, the upper diode should glow when the side cover is closed (pictures 3-4). When the base
plate with a t-shirt will move to the pretreatment station, the application of precoatng will start automatically. If the side cover will not close, or
the sensor will be moved or damaged, the application of precoating will not start. If the side cover is closed, but the cycle does not start, the
position of the upper sensor has to be adjusted. In order to do this, the fastening screw has to be loosen (picture 5). Move the sensor down,
to the middle of the cylinder length and then move it up till the diode will glow. Then move the sensor for another 5 mm up and fasten it with a
screw.
The lower diode should glow when the side cover is open (pictures 6-7). When the side cover will open, the base plates will move to the
right. If the plates will not move after the side cover will open, the signal tower will light red and an error message will appear on the
touchscreen (PRE 4 4-covers up time err – READY Move Tab), it has to be checked if the diode on the lower sensor glows. If not, the
position of lower sensor has to be adjusted. In order to do this, the fastening screw has to be loosen (picture 8). Move the sensor down and
then up till the diode glows. Then fasten the sensor with a screw.
4.4 Electronic RE72 settings
Version 18.04
15/20

4.5 Instructions for replacement, cleaning and storage of the nozzles
Replacement:
1. Open the front cover (picture 1).
. Turn the nozzle left and then pull it out down (picture 2)
3. Place a new nozzle and fix it in the machine.
Cleaning:
1. The nozzle may be cleaned in an ultrasonic cleaner (picture 3).
. To clean the nozzles please use destilled water or jewerlly cleaner.
3. Fill the cleaner with some water.
4. Put the nozzles into the cleaner
5. Turn it on for 7 minutes (max. 15 minutes).
6. After that please take them out to dry.
Storage:
To storage the nozzles please use clean distilled water. Never leave the nozzles exposed to air when there are remains of precoating on
the nozzles. Store the nozzles in clean, distilled water and clean them at least once a week.
4.6 Instructions for replacement of the fuse in the pretreatment station
In case the machine is not working after it has been switched on, check the safety fuse. The safety fuse (6A) is located in the back side of
the pretreatment station. In order to replace it, turn off the machine and pull out the power plug. Now open the holder with the fuses
(picture 1). There are fuses: fuse A and fuse B. Fuse A is connected to the machine – fuse B is a spare fuse. Remove both fuses from
the holder (picture 3). Now insert fuse B in a place of the fuse A and close the fuse holder.
4.7 Activation of the main fuse
If the machine is not working after it has been switched on check the main fuse
of the machine. The main fuse is situated in the control box. Open the cover
of the control box and if needed switch the main fuse on (picture).
4.8 Instructions for replacement of the filter
If the precoating dosage is not smoothly carried out check the filter and if necessary – replace it. Open the side cover. The filters are in
the containers with precoating. Remove the tube from the container and replace the filter.
Version 18.04
16/20

4.9 Troubleshooting
Problem Possible reason Solution
After pushing START button, machine does not continue to
work. The signal lamp lights red. An error message „PRE4
4-covers up time err. - READY Move Tab” appears on the
display.
Lower sensor of the pneumatic
cylinder in the pretreatment
station is moved or damaged.
Check if the diode on the sensor which is
situated in the lower part of the pneumatic
cylinder glows when the side cover of the
pretreatment station is open. If it doesn’t glow,
the position of the lower sensor has to be
adjusted (chapter 4.3 Side cover’s sensors
adjustment (pretreatment station))
After pushing START button, machine does not continue to
work. The signal lamp lights red and there are no error
messages on the display.
1. The upper or front cover of
the pretreatment station is not
closed properly.
Check if the machine’s covers are closed
properly.
. Upper sensor of the
pneumatic cylinder in the
pretreatment station is moved
or damaged.
Check if the diode on the sensor which is
situated in the upper part of the pneumatic
cylinder glows when the side cover of the
pretreatment station is closed. If it doesn’t glow,
the position of the upper sensor has to be
adjusted (chapter 4.3 Side cover’s sensors
adjustment (pretreatment station))
3. There is no pressure, or the
pressure is to low
Change the pressure on the manometer, if it’s
to low – increase it, if it’s appropriate – contact
the service.
The movement of the machine is stopped. The power is
cut. Signal lamp lights red. An error message: „LUM
0,1, ,3, ERROR Emergency input 3 active” appears on the
display
Emergency stop switch is
pushed.
Pull out the emergency stop switch and then
start the cycle again by touching „ON” on the
display and pushing the START button.
The movement of the machine is stopped. Signal lamp
lights red. An error message „PRE4 13 safety circuit break
– OFF Idle” appears on the display
Safety frame is activated Reset the error codes by pushing the icon
„OFF” and then „ON” on the display. Then push
the START button.
Version 18.04
17/20

4.10 Wiring diagram
Version 18.04
18/20

Version 18.04
19/20

4.11 Testing report
O – base, paint
O - nozzles x 5 pcs
O – precoating application
O – electrical connection (safety wire, power cable)
O – electronics, communication control
O - test on garment
O – caution labels
O – ultrasonic washer
O - filter x 3 pcs
O - greasing
O – heating plates, base plates, silicon, teflon
O – working by settings of 180° C (heat press), 180° C (air flow), 330 ° C (IR)/ . . . . . hours
O – press test
O - electronic 1, IR max. temperature 0 °C - 400°C
O - electronic , air flow max. temperature 0°C - 50°C
O - electronic 3, heat press max. temperature 0 °C - 0°C
O – exhaust ventilation
O – ventilation of the stepper motor
O – ventilation of the air flow
O - packing
4.12 EC Conformance declaration
The Walter Schulze GmbH
Haberstraße 15 - 19
1 057 Berlin
as European representative of the manufacturer company ROMANIK hereby declares that the following machine:
Type.…..........…............…........…….
Name.…..........…............….....……..
Serial number…...........….................
is compliant with the specifications of the following EC directives:
Machinery ( 006/4 /EC)
Low Voltage ( 014/35/EU)
EMC ( 014/30/EU)
used norms and technical specifications:
PN-EN ISO 1 100: 01
PN-EN 60 04-1: 010
PN-EN 61000-6-1: 008
PN-EN 61000-6-3: 008/A1: 01
PN-EN 60335-1: 01
Applied quality system: testing report / 016
Noise: The machine generates noise less than 70 dB A
Berlin , . . . . . . .
_____________________________
Peter Meidinger
President
Manufacturer: ROMANIK, ul. Przemysłowa 10, 84- 40 Reda, www.romanik.pl
Distributor: Walter Schulze GmbH, Haberstraße 15-19, 1 057 Berlin, www.schulze.com
The manufacturer reserves the right to make constructional and technological changes.
Version 18.04
20/20
This manual suits for next models
1
Table of contents
Other Schulze Industrial Equipment manuals

Schulze
Schulze DTF PowDR User manual

Schulze
Schulze PRETREATMaker III User manual

Schulze
Schulze Big-O-Lite pneu plus User manual

Schulze
Schulze BluePRESSLine CAP User manual

Schulze
Schulze PRETREATmaker IV User manual

Schulze
Schulze Mug 1 Press User manual

Schulze
Schulze BLUEpress User manual

Schulze
Schulze PRETREATmaker 5 User manual