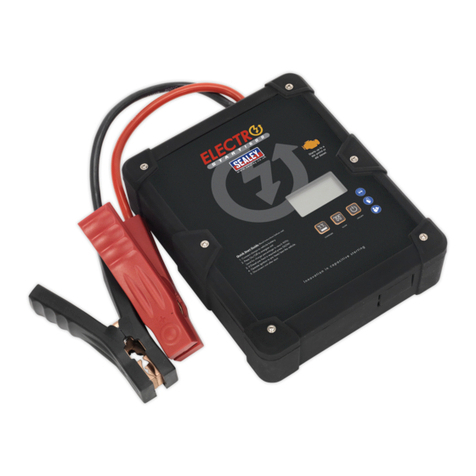
Sealey ElectroStart E/START1224 User manual

Refer to
Instruction
Manual
Wear Eye
Protection
Wear
Protective
Gloves
Warning:
Explosive
Risk
Warning:
Electricity
© Jack Sealey Limited Original Language Version
INSTRUCTIONS FOR:
IMPORTANT: PLEASE READ THESE INSTRUCTIONS CAREFULLY. NOTE THE SAFE OPERATIONAL REQUIREMENTS, WARNINGS & CAUTIONS. USE THE PRODUCT
CORRECTLY AND WITH CARE FOR THE PURPOSE FOR WHICH IT IS INTENDED. FAILURE TO DO SO MAY CAUSE DAMAGE AND/OR PERSONAL INJURY AND WILL
INVALIDATE THE WARRANTY. KEEP THESE INSTRUCTIONS SAFE FOR FUTURE USE.
Thank you for purchasing a Sealey product. Manufactured to a high standard, this product will, if used according to these instructions
and maintained properly, give you years of trouble free performance.
E/START1224 Issue: 1 - 12/07/16
ELECTROSTART® BATTERYLESS POWER
START 500/800A 12/24V
MODEL NO: E/START1224
9Read the manufacturer's manual for the vehicle being started: the manufacturer may have
specic cautions and instructions regarding emergency starting procedures.
9Ensure that the vehicle is in a well ventilated area.
9Apply the handbrake and select neutral or 'park' before attempting to start.
9Ensure that the ignition switch and all ancillary electrical equipment is switched off.
9Keep clear of any pulleys, belts etc. that will move once the engine starts.
9Take care to ensure correct connection polarity; red clamp to positive, black clamp to negative.
9Energise the E/START1224 only at ambient temperatures between -30°C and 40°C.
9When not in use, switch off and store in a cool, dry place out of the reach of children.
8DO NOT allow this power pack to become wet.
8DO NOT dismantle this E/START1224: there are no user-servicable parts inside.
8DO NOT use in explosive atmospheres (e.g. the presence of flammable liquids, gases or dust).
8DO NOT use the E/START1224 if it appears damaged in any way.
8DO NOT use this product for any purpose other than that for which it is designed.
8DO NOT leave in direct sunlight or expose to heat.
8DO NOT use abrasive or solvent cleaners on this product.
8DO NOT allow children to play with this product
8DO NOT allow the positive and negative clamps to touch.
11. SAFETY
22. INTRODUCTION
33. SPECIFICATION.
Model No: ........................................................E/START1224
Output: ................................................................ 12/24V
12V Output Start Peak(EN):........................................... 1000A(500A)
24V Output Start Peak(EN):........................................... 1600A(800A)
g.1
34. CONTROL PANEL
4.1. CONTROL PANEL FUNCTIONS
ON/OFF Button:
Switches the E/START1224 on to display the level of stored energy. Enables the E/START1224 to energise
from a 12 or 24V battery via the clamp leads. The unit will detect the nominal battery voltage and select the
appropriate range as shown by the voltage indicator lights:
If a 24V battery contains less than 10V, the unit will default to 12V operation (see section 5.1.3.).
Hold the ON/OFF button down to select Override mode if necessary (see section 6.3). having energised the
E/START1224 fully.
Press to turn E/START1224 off.
Voltage Indicator: 12V red, 24V green
Energising Indicator (EI) (g.1):
Press the ON/OFF button. The EI will show the internal energy of the E/START1224.
With the E/START1224 switched off, and connected to a battery, the EI indicates the charge in that battery.
When the ON/OFF button is pressed, the EI ashes to indicate the internal charge being accumulated from that
battery until the E/START1224 is fully energised, indicated by a steady 14 or 28V green LED.
GLOW Button:
Only used in special circumstances with some diesel engines (see section 6.2).
Fault/Glow/Override Indicator:
Steady red display when the ON/OFF button is pressed indicates incorrect polarity, or battery voltage too low
to energise.
Steady green indicates that the unit is fully energised and ready to start the engine.
Flashing red/green indicates that the Glow function is selected.
Flashing green indicates that the Override function is initialising, steady green indicates that Override is ready.
Flashing red, with both 12 and 24V indicator lit: jump starter is energised to 24V whereas the receiving battery is 12V.
12/24V Vehicle jump starting made easy with innovative technology which, unlike traditional boosters, does not require an internal battery. Simply
connect to a at vehicle battery and the unit will draw power from it and energise itself fully in a matter of minutes. It then pushes full power safely
back through the starting system, jump starting the vehicle. If the vehicle battery is faulty or is holding less than 5 volts the ElectroStart1224 can
be pre-charged via another vehicle’s 12 or 24V battery and capable of starting a 24V even when charged via a 12V. No internal battery means no
storage issues. No wait for the battery to charge which means it is ready to use in a matter of minutes. Compact and lightweight for easier handling
and storage, yet still delivers the same result as heavy, bulky, lead acid battery equivalents. Ideal for the professional mechanics and DIY users.
Supplied in a tough storage case.

35. ENERGISING5.
5.1. The E/START1224 can only be energised from a donor battery, by means of the battery clips.
5.1.1. Under normal circumstances, the E/START1224 will select either the 12 or 24V function automatically, denoted by the appropriate
voltage indicators.
5.1.2. If a donor 24V battery contains 10V or less, the E/START1224 will select the 12V operation; follow section 5.1.3.
5.1.3. The E/START1224 can be energised to 28V from a 12V battery. Energise to 14V rst and then press the ON/OFF switch for 4 seconds to
select the 24V function and progress to 28V.
5.1.4. If the E/START1224 is energised above 14V, and is required to start a 12V vehicle, both voltage indicators will light and the
fault/glow/override light ash. Disconnect the clamps and wait for the voltage to subside; this could take up to 2 hours in extreme
circumstances
6. OPERATION
NORMAL STARTING
Ensure that the E/START1224 is switched off. Connect the clamps to the vehicle battery terminals, observing correct polarity.
The Energising Indicator display shows the charge in the vehicle battery. A low initial battery indication may suggest that there is an internal
fault. If the normal starting procedure fails, consider using the Override mode at 6.3.
Press the ON/OFF button. If the E/START1224 is not already fully energised, the Energising Indicator LED's will ash until a steady green
14/28V LED indicates that it is energised fully.
When the 14/28V LED is steady the E/START1224 is ready.
Operate the vehicle ignition switch to start the engine.
Switch the E/START1224 off and disconnect from the battery.
6.2. GLOW MODE (Only use if the GLOW symbol appears on the vehicle instrument panel)
Ensure that the E/START1224 is switched off. Connect the clamps to the vehicle battery terminals, observing correct polarity.
The Energising Indicator display shows the charge in the vehicle battery. A low initial battery indication may suggest that
there is an internal fault. If the GLOW procedure fails, consider using the Override mode at 6.3.
Press the ON/OFF button. If the E/START1224 is not already energised fully, the Energising Indicator LED's will ash until a steady green
14/28V LED indicates a full charge.
When the 14/28V LED is steady, the E/START1224 is ready.
Press the GLOW button. The Fault/Glow/Override Indicator will ash red/green to show that the glow mode is active. Operate the vehicle
ignition switch and wait for the GLOW symbol on the vehicle instrument panel to extinguish. Start the engine.
Switch the E/START1224 off and disconnect from the battery.
If the Normal or GLOW start procedures are unsuccessful, the following mode may need to be used.
6.3. OVERRIDE MODE (Faulty battery)
WARNING: There is no short-circuit or reverse polarity protection in this mode.
NOTE: The GLOW function will not operate in this mode.
Always read the vehicle manufacturer's instruction manual.
An initial low battery indication may suggest that there is an internal fault.
The E/START1224 will need to be energised as in Section 5.
Remove the vehicle's positive (red) lead from the battery terminal (g.2).
Ensure that the E/START1224 is switched off. Connect the E/START1224 positive clamp
to the vehicle positive lead, NOT the battery terminal (g.2).
Press the On/Off button.
Then press and hold the ON/OFF button until the Fault/Glow/Override Indicator
ashes green.
This indicates that Override mode is initialising.
When the Indicator shows a steady green, the Override mode is active.
Operate the ignition switch to start the engine (the ability for an engine to continue to
run without a battery connected will vary, depending on the make and model of the vehicle).
WARNING: Do not leave the engine running without the E/START1224 or the battery being connected. Failure to comply could
result in damage to the vehicle ECU. Sealey will not accept responsibility for any damage caused by incorrect use of this
product.
As soon as the engine starts, and keeping the E/START1224 clamp and battery lead connected, attach the positive lead to the positive
battery terminal and tighten the terminal clamp (g.3). After the positive lead has been secured to the battery terminal disconnect the
E/START1224 from the battery and switch the unit off.
6.4. Duty Cycle
Maximum Successive Start Attempts in a Session................................................................3
Minimum Rest Period Between Sessions...............................................................20 minutes
g.2
NOTE: It is our policy to continually improve products and as such we reserve the right to alter data, specifications and component parts without prior notice.
IMPORTANT: No liability is accepted for incorrect use of this product.
WARRANTY: Guarantee is 12 months from purchase date, proof of which will be required for any claim.
01284 757500
01284 703534
sales@sealey.co.uk
Sole UK Distributor, Sealey Group,
Kempson Way, Suffolk Business Park,
Bury St. Edmunds, Suffolk,
IP32 7AR
www.sealey.co.uk
Environmental Protection
Recycle unwanted materials instead of disposing of them as waste. All tools, accessories and packaging should be
sorted, taken to a recycling centre and disposed of in a manner which is compatible with the environment.
When the product becomes completely unserviceable and requires disposal, dispose of it according to local regulations.
WEEE Regulations
Dispose of this product at the end of its working life in compliance with the EU Directve on
Waste Electrical and Electronic Equipment (WEEE). When the product is no longer required, it must be disposed
of in an environmentally protectve way. Contact your local solid waste authority for recycling information.
© Jack Sealey Limited Original Language Version E/START1224 Issue: 1 - 12/07/16
g.3
Table of contents
Other Sealey Batteries Charger manuals

Sealey
Sealey CP1200MC User manual

Sealey
Sealey WCB4 User manual

Sealey
Sealey SPI1224S User manual

Sealey
Sealey CHARGE106 User manual

Sealey
Sealey AUTOCHARGE12S User manual

Sealey
Sealey AUTOCHARGE6 User manual

Sealey
Sealey Power Products BB8 User manual

Sealey
Sealey AUTOCHARGE6D User manual

Sealey
Sealey SDC75 User manual

Sealey
Sealey SCI90S.V2 User manual

Sealey
Sealey CP40MC User manual

Sealey
Sealey SPI15S.V2 User manual

Sealey
Sealey AK451DX User manual

Sealey
Sealey SDC150 User manual

Sealey
Sealey TECSTART420.V2 User manual

Sealey
Sealey CHARGETRONIC 12 User manual

Sealey
Sealey AUTOCHARGE650HF User manual

Sealey
Sealey AK459DX.V2 User manual

Sealey
Sealey SMC02.V3 User manual

Sealey
Sealey WCB3 User manual