manuals.online logo
Brands
  1. Home
  2. •
  3. Brands
  4. •
  5. Sealey
  6. •
  7. Jack
  8. •
  9. Sealey RJA1450 User manual

Sealey RJA1450 User manual

3.1 ASSEMBLY
3.1.1 The jack comprises the following parts:
Aluminium chassis.
Two-part pumping handle.
3.1.2 Insert the upper handle into the lower handle. The spring
loaded locking pin will lock the two pieces together (Fig.1).
3.1.3 Undo the handle socket screw (A) until it no longer
protrudes into the handle socket (Fig.2).
3.1.4 Insert the pump handle into the handle socket hole,
engaging the square drive of the release valve.
3.1.5 Ensure that the handle is correctly inserted into the socket,
then tighten the handle socket screw.
INSTRUCTIONS FOR:
TROLLEY JACK 1.5 TONNE
ALUMINIUM ROCKET LIFT
MODEL No: RJA1450
Your new Jack is produced and manufactured to a high standard of dependability and will, if used according to these instructions and properly
maintained, give you years of trouble free performance.
IMPORTANT: READ THESE INSTRUCTIONS CAREFULLY. NOTE THE SAFE OPERATIONAL REQUIREMENTS, WARNINGS AND CAUTIONS. USE
THIS JACK CORRECTLY AND WITH CARE FOR THE PURPOSE FOR WHICH IT IS INTENDED. FAILURE TO DO SO MAY CAUSE DAMAGE AND/
OR PERSONAL INJURY AND WILL INVALIDATE THE WARRANTY. RETAIN THESE INSTRUCTIONS FOR FUTURE USE.
1. SAFETY PRECAUTIONS
2. INTRODUCTION / SPECIFICATION
3. ASSEMBLY
Ensure the jack is in sound condition and good working order.
Take action for immediate repair or replacement of damaged
parts. Use genuine parts only. The use of improper parts may be
dangerous and will invalidate the warranty.
Locate the jack in a suitable, well lit working area.
Keep working area clean and tidy and free from unrelated
materials.
Use jack on level and solid ground, preferably concrete.
Avoid tarmacadam as jack may sink in.
Chock wheels of vehicle.
Ensure the vehicle handbrake is engaged, engine is switched off
and transmission is in gear (or “PARK” if automatic).
Ensure minimum distance of 0.5m between vehicle and static
objects such as doors, walls, etc., to allow for vehicle tilting.
Ensure all non-essential persons keep a safe distance whilst the
jack is in use.
Ensure there are no passengers in the vehicle.
Place jack under only those lifting points recommended by
vehicle manufacturer (see vehicle handbook).
Check that the lifting point is stable and centred on the jack
saddle.
 Ensure the jack wheels are free to move and that there are no
obstructions.
 DANGER: Use the jack for lifting only, NOT for supporting the
lifted load.
 Ensure there are no persons or obstructions beneath the vehicle
before lowering.
Use suitable axle stands under the vehicle before proceeding with
any task.
Use a qualified person to lubricate and maintain the jack.
 Ensure that only hydraulic jack oil is used during maintenance.
 DO NOT operate the jack if damaged.
 DO NOT allow untrained persons to operate the jack.
 DO NOT exceed the rated capacity of the jack.
 DO NOT allow the vehicle to move during jacking, or use the jack
to move the vehicle.
 DO NOT jack vehicle if there is a risk of spillage of fuel, battery
acid, or other dangerous substances.
 DO NOT work under the vehicle until axle stands have been
correctly positioned.
 DO NOT use the jack for purposes other than that for which it is
intended.
 DO NOT top up hydraulic system with brake fluid. Use hydraulic
jack oil only.
 DO NOT adjust the safety overload valve.
 When not in use store jack, fully lowered, in a safe, dry, childproof
area.
Model No: ...................................... RJA1450
Capacity.......................................... 1.5 tonne
Minimum saddle height................... 98mm
Maximum saddle height.................. 455mm
Maximum frame height ...................155mm
Length............................................. 600mm
Weight............................................. 17.5kg
4. HYDRAULIC / AIR SYSTEM PURGING
4.1 Open the release valve by turning it one full turn
counter-clockwise.
4.2 Pump the handle a minimum eight full strokes.
4.3 Close the release valve by turning it clockwise.
Fig.3
Fig.2
A
Fig.1
Made primarily for the motor racing enthusiast, this jack weighs in at
just 17.5kg. The jack utilises many weight-saving techniques such as
a skeletal lift arm and single roller load wheel. Lifting bars are fitted
either side of the anodised aluminium chassis enabling fast,
lightweight pick-up.
Original Language Version RJA1450 Issue: 1 - 16/11/09
IMPORTANT: Only fully qualified personnel should attempt
maintenance or repair.
6.1 Monthly Maintenance
Lubrication is critical to jacks, since they support heavy
loads. Any restriction due to dirt or rust can cause either
slow jack movement, or extremely rapid jerks, causing
damage to the internal components. To keep the jack well
lubricated, carry out the following steps.
6.1.1 Lubricate the ram, the linkages and the saddle and pump
mechanism with light oil.
6.1.2 Grease the wheel bearing and axles.
6.1.3 Keep all jack surfaces and warning labels clean.
6.1.4 Check and maintain the ram oil level (Section 6.3).
6.2 Three Monthly Maintenance
6.2.1 At three monthly intervals, check the ram for any signs of
rust or corrosion. Clean the ram as required and wipe with
an oil cloth.
6. MAINTENANCE
 WARNING! Before use ensure you have read,
understood and apply Section 1 safety instructions.
IMPORTANT: Before use, the operator is to visually inspect
the jack for cracked welds, damaged or missing parts or
hydraulic leaks.
5.1 Raising a Vehicle
5.1.1 Ensure that the jack and the vehicle are on a hard, level
surface.
5.1.2 Always ensure that the vehicle handbrake is engaged and
that the vehicle wheels are chocked.
5.1.3 Consult the vehicle manual to determine the location of
jacking points. Position the jack under a suitable lifting point.
5.1.4 Turn the release valve clockwise, to the closed position
(Fig.3). DO NOT over-tighten.
5.1.5 Raise the vehicle to the designed height by pumping the
handle up and down.
5.1.6 Place axle stands beneath the locations recommended by
the vehicle manufacturer.
5.1.7 Turn the release valve slowly counterclockwise to lower the
vehicle on to the axle stands.
5.2 Lowering a Vehicle
5.2.1 Turn the release valve clockwise to the closed position.
5.2.2 Pump the handle to raise the vehicle off the axle stands.
5.2.3 Remove the axle stands from beneath the vehicle.
5.2.4 Turn the release valve slowly counterclockwise to lower the
vehicle to the ground.
NOTE: When not in use, ALWAYS leave the saddle and ram fully
retracted.
5. OPERATING INSTRUCTIONS
De-commissioning the Jack
Should the jack become completely unserviceable and require
disposal, draw off the oil into an approved container and dispose of
the jack and the oil according to local regulations.
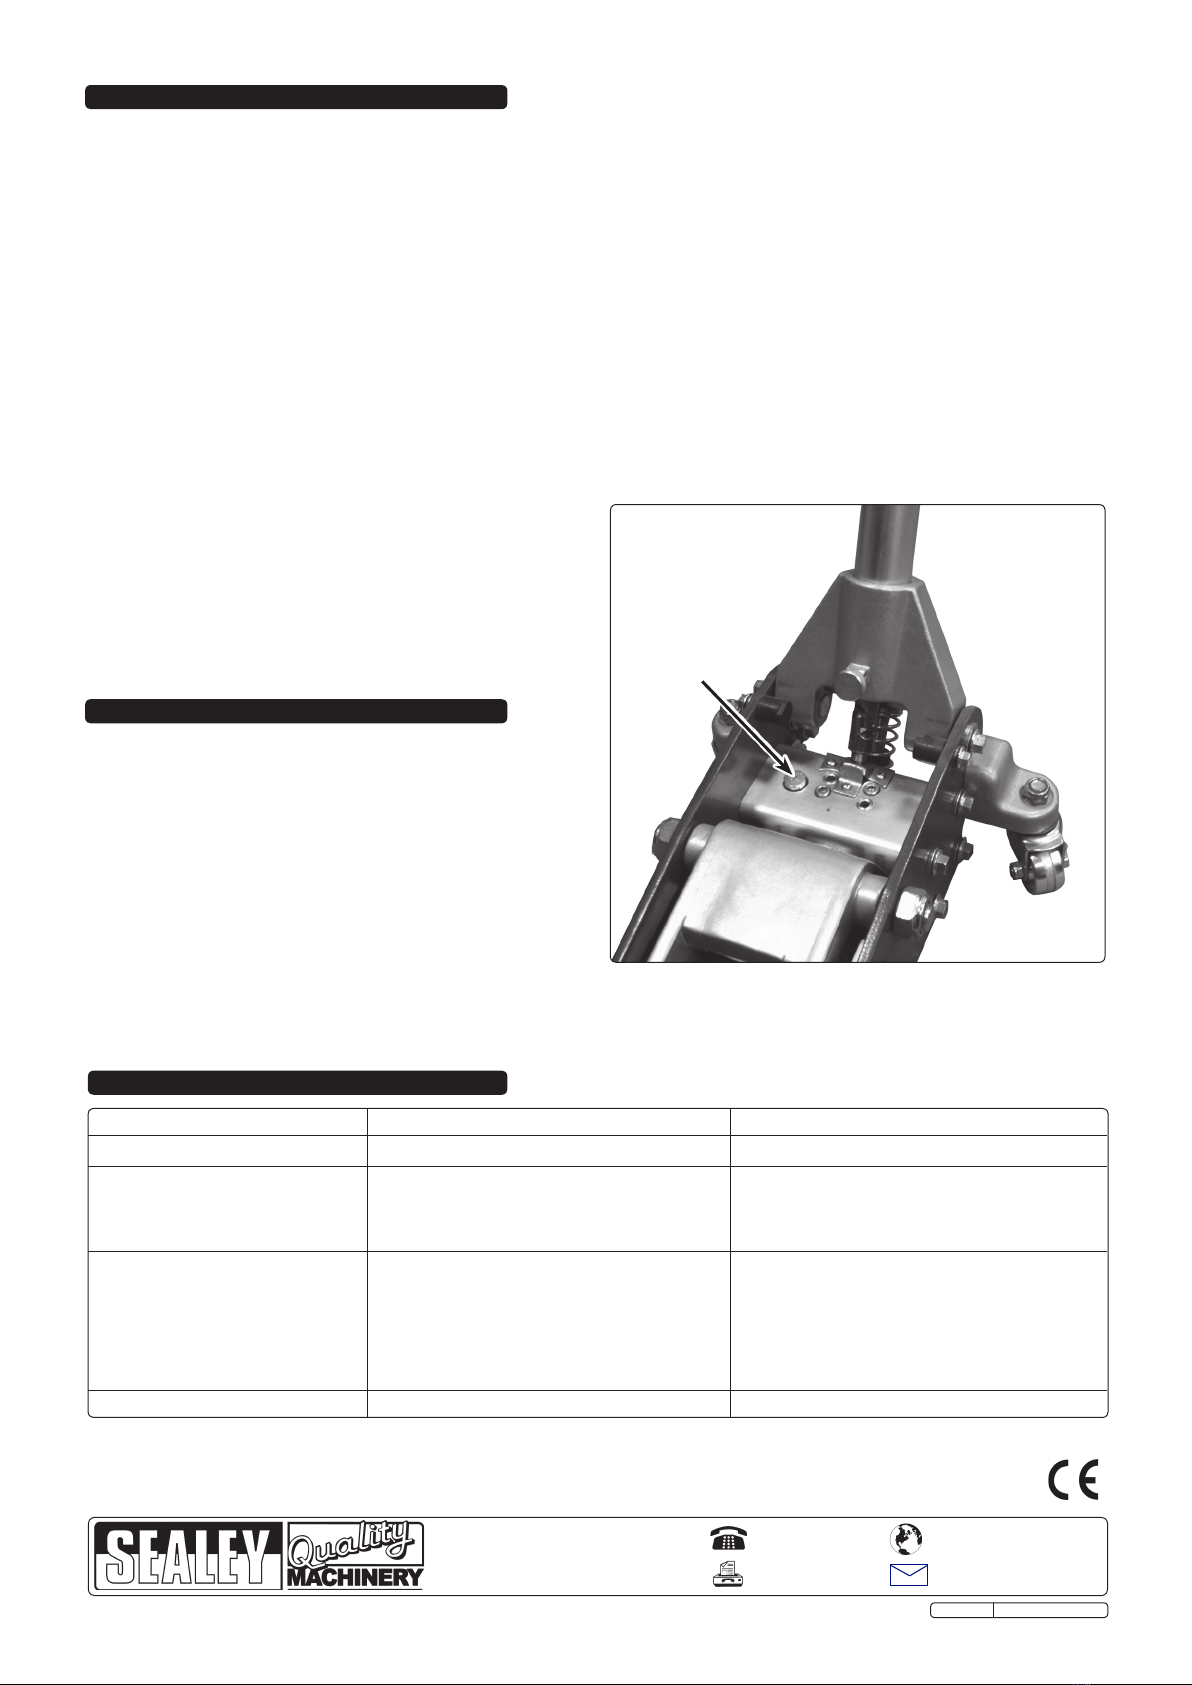
A
Fig.4
7. TROUBLESHOOTING
PROBLEM CAUSE REMEDY
Jack will not lift to full height Oil level low Check / top up oil level.
Jack will not hold the load Release valve not closing Call for customer service
Hydraulic jack oil is contaminated
Pump valves not sealing
Lift arm will not lower Cylinder ram binding Call for customer service
Parts worn
Internal component damage
Broken or unhooked return spring
Lift arm linkage either bent or binding
Jack feels spongy when lifting System requires purging Refer to air purge procedure at Section 3
NOTE: It is our policy to continually improve products and as such we reserve the right to alter data, specifications and component parts without prior notice.
IMPORTANT: No liability is accepted for incorrect use of this product.
WARRANTY: Guarantee is 12 months from purchase date, proof of which will be required for any claim.
INFORMATION: For a copy of our latest catalogue and promotions call us on 01284 757525 and leave your full name and address, including postcode.
01284 757500
01284 703534
sales@sealey.co.uk
Sole UK Distributor, Sealey Group,
Kempson Way, Suffolk Business Park,
Bury St. Edmunds, Suffolk,
IP32 7AR
www.sealey.co.uk
Web
email
Original Language Version RJA1450 Issue: 1 - 16/11/09
6.3 Checking the Oil Level
6.3.1 Fully retract the ram by turning the release valve
counter-clockwise.
6.3.2 With the jack in the level position, remove the oil filler plug
(Fig.4.A).
6.3.3 The oil should be level with the bottom of the oil filler hole. If
it is not top up with clean hydraulic jack oil.
6.3.4 Replace the oil filler plug and check the jack operation.
6.3.5 Purge air from the hydraulic unit as required. Refer to
Section 4.
NOTE: Always store the jack in the fully lowered position. This will
protect critical areas from excessive corrosion.
IMPORTANT: NO RESPONSIBILITY IS ACCEPTED FOR
INCORRECT USE OF THIS PRODUCT.
Hydraulic products are only repaired by local service agents. We
have service/repair agents in all parts of the UK.
DO NOT RETURN JACKS TO US.
Please telephone us on 01284 757500 to obtain the address and
phone number of your local agent. If jack is under guarantee you can
also contact your local dealer.

Other Sealey Jack manuals

Sealey RE97/10.V3 User manual

Sealey

Sealey RE97/10.V3 User manual

Sealey 3010CX.V2 User manual

Sealey

Sealey 3010CX.V2 User manual

Sealey 1500SLR User manual

Sealey

Sealey 1500SLR User manual

Sealey 1050CX.V5 User manual

Sealey

Sealey 1050CX.V5 User manual

Sealey RJAS1500.V2 User manual

Sealey

Sealey RJAS1500.V2 User manual

Sealey RJAS1500 User manual

Sealey

Sealey RJAS1500 User manual

Sealey AM12A User manual

Sealey

Sealey AM12A User manual

Sealey HSJ07 User manual

Sealey

Sealey HSJ07 User manual

Sealey 3002HLA User manual

Sealey

Sealey 3002HLA User manual

Sealey RJA1550 User manual

Sealey

Sealey RJA1550 User manual

Sealey 10000LQ User manual

Sealey

Sealey 10000LQ User manual

Sealey YAJ18S User manual

Sealey

Sealey YAJ18S User manual

Sealey VIKING 13HM User manual

Sealey

Sealey VIKING 13HM User manual

Sealey VIKING 3100TB User manual

Sealey

Sealey VIKING 3100TB User manual

Sealey 2180LE User manual

Sealey

Sealey 2180LE User manual

Sealey 500GTA User manual

Sealey

Sealey 500GTA User manual

Sealey 1015CX.V2 User manual

Sealey

Sealey 1015CX.V2 User manual

Sealey 3000CXd.V2 User manual

Sealey

Sealey 3000CXd.V2 User manual

Sealey 2201HL User manual

Sealey

Sealey 2201HL User manual

Sealey 3040AB.V1 User manual

Sealey

Sealey 3040AB.V1 User manual

Sealey HI-VIS 1153CXHV.V2 User manual

Sealey

Sealey HI-VIS 1153CXHV.V2 User manual

Sealey 4040AR User manual

Sealey

Sealey 4040AR User manual

Sealey YAJ15-30.V3 User manual

Sealey

Sealey YAJ15-30.V3 User manual

Sealey ADT200 User manual

Sealey

Sealey ADT200 User manual

Popular Jack manuals by other brands

ERBA 03088 instruction manual

ERBA

ERBA 03088 instruction manual

PROPOINT JACK STANDS instructions

PROPOINT

PROPOINT JACK STANDS instructions

PROCRAFT PJ2 manual

PROCRAFT

PROCRAFT PJ2 manual

PROPOINT 12V DC A-frame user manual

PROPOINT

PROPOINT 12V DC A-frame user manual

TCE TCE44008 owner's manual

TCE

TCE TCE44008 owner's manual

RWA impos 30911485 manual

RWA

RWA impos 30911485 manual

Performance Tool W1627 owner's manual

Performance Tool

Performance Tool W1627 owner's manual

Tractel top BT 1.5 Operating and maintenance instructions

Tractel

Tractel top BT 1.5 Operating and maintenance instructions

TradeQuip 2820 owner's manual

TradeQuip

TradeQuip 2820 owner's manual

Tractel Top Series Operation and maintenance manual

Tractel

Tractel Top Series Operation and maintenance manual

rodac RQGCL10T35A Operation and maintenance instructions

rodac

rodac RQGCL10T35A Operation and maintenance instructions

ITI HOLELESS installation guide

ITI

ITI HOLELESS installation guide

ATD Tools ATD-7304A owner's manual

ATD Tools

ATD Tools ATD-7304A owner's manual

AC Hydraulic 100-1H user guide

AC Hydraulic

AC Hydraulic 100-1H user guide

Motomaster 299-7003-2 instruction manual

Motomaster

Motomaster 299-7003-2 instruction manual

Meec tools 023750 operating instructions

Meec tools

Meec tools 023750 operating instructions

Bahco BH28050 Original instructions

Bahco

Bahco BH28050 Original instructions

Jet JTJ-2ST Operating instructions and parts manual

Jet

Jet JTJ-2ST Operating instructions and parts manual

manuals.online logo
manuals.online logoBrands
  • About & Mission
  • Contact us
  • Privacy Policy
  • Terms and Conditions

Copyright 2025 Manuals.Online. All Rights Reserved.