manuals.online logo
Brands
  1. Home
  2. •
  3. Brands
  4. •
  5. Sealey
  6. •
  7. Power Tools
  8. •
  9. Sealey PPB15S User manual

Sealey PPB15S User manual

15TONNE PREMIER HYDRAULIC PRESS -
BENCH TYPE
MODEL NO: PPB15S
Thank you for purchasing a Sealey product. Manufactured to a high standard, this product will, if used according to these instructions,
and properly maintained, give you years of trouble free performance.
IMPORTANT: PLEASE READ THESE INSTRUCTIONS CAREFULLY. NOTE THE SAFE OPERATIONAL REQUIREMENTS, WARNINGS & CAUTIONS. USE
THE PRODUCT CORRECTLY AND WITH CARE FOR THE PURPOSE FOR WHICH IT IS INTENDED. FAILURE TO DO SO MAY CAUSE DAMAGE AND/OR
PERSONAL INJURYAND WILL INVALIDATE THE WARRANTY. KEEP THESE INSTRUCTIONS SAFE FOR FUTURE USE.
1. SAFETY
9Familiarise yourself with the applications, limitations and hazards of the press.
9Maintain the press in good condition (use an authorised service agent).
9Replace or repair damaged parts. Use recommended parts only. Unauthorised parts may be dangerous and will invalidate the warranty.
9Keep the press clean for best and safest performance.
9Locate the press in a suitable work area, on a surface that is stable, level, dry, not slippery, and capable of sustaining the load.
9Keep area clean and tidy and free from unrelated materials, and ensure there is adequate lighting.
WARNING! Always wear approved eye or face protection when operating the press.
9Remove ill fitting clothing. Remove ties, watches, rings and other loose jewellery, and contain long hair.
9Keep hands and body clear of the work table when operating the press.
9Maintain correct balance and footing. DO NOT over reach. Ensure the floor is not slippery and wear non-slip shoes.
9Keep children and unauthorised persons away from the working area.
8DO NOT use the press for a task it is not designed to perform.
8DO NOT adjust or tamper with the safety valve, or make any modifications to the press.
8DO NOT exceed the rated capacity of the press. Avoid applying excessive force, use the pressure gauge to determine the applied load.
8DO NOT apply off-centre loads. Ensure that workpiece is centrally loaded and correctly secured before operating the press.
8DO NOT allow the workpiece or the arbor plates to fall from the press work bench.
8DO NOT get the press wet or use in damp or wet locations or areas where there is condensation.
8DO NOT operate the press when you are tired or under the influence of alcohol, drugs or intoxicating medication.
8DO NOT climb upon the press.
8DO NOT use if bent, broken, cracked, leaking or otherwise damaged, or if press has been subjected to a shock load.
8DO NOT operate the press if any parts are missing as this may cause failure and/or possible personal injury.
8DO NOT use the press to compress a spring or any other item that could disengage and cause a potential hazard.
8DO NOT stand directly in front of loaded press and never leave loaded press unattended.
8DO NOT allow untrained persons to operate the press.
▲DANGER! This model is purpose designed to withstand greater loads than the hydraulic unit can develop. For safety reasons, always
ensure the workpiece and press tools are secured on the table and will not flex or suddenly give way, causing danger to operator or
the workpiece.
WARNING! DO NOT use brake fluid, or any fluid other than a good quality jack oil, such as SEALEY HYDRAULIC JACK OIL, as
this may cause serious damage to the press and will invalidate the warranty.
9When not in use, release pressure from the pump and clean the press. Stand or store the arbors in a safe, childproof location.
2. INTRODUCTION
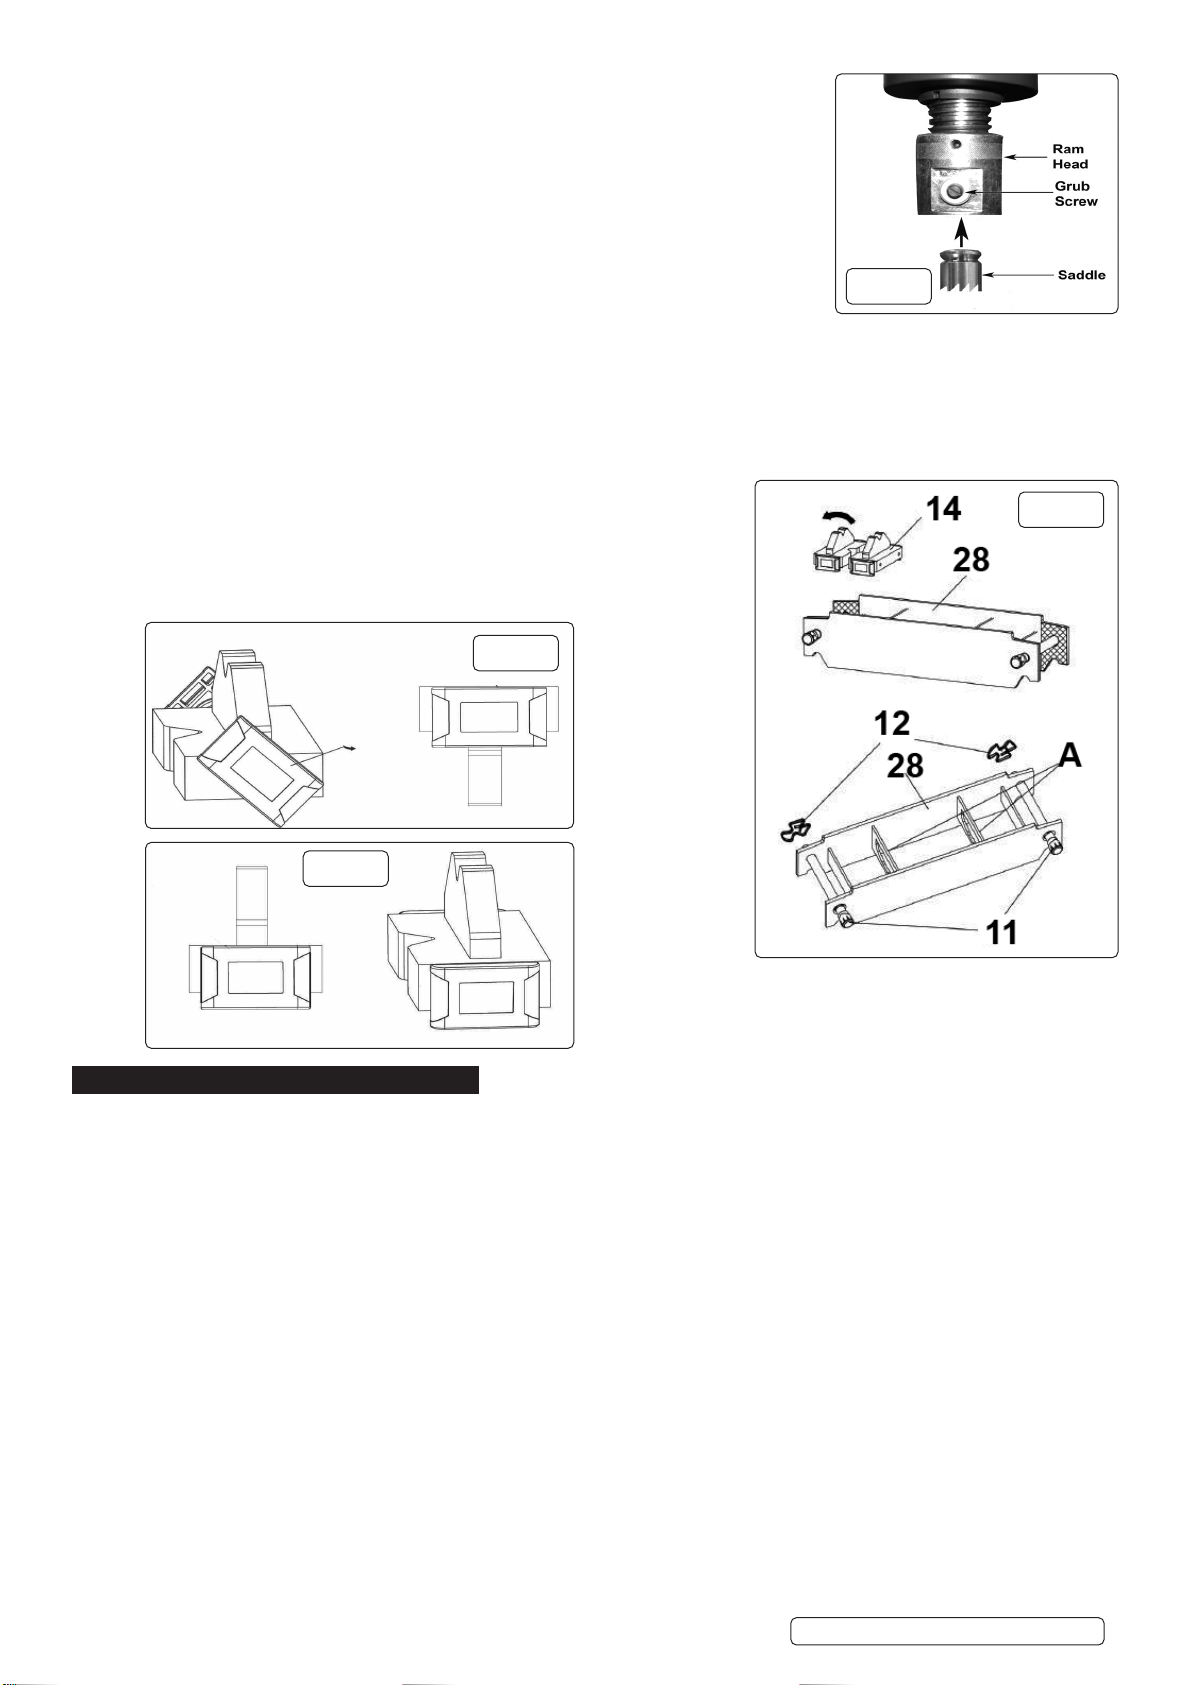
Heavy-duty steel frame construction with handle operated hydraulic pump unit. Screw adjustable ram and adjustable work area with removable
tray. Frame head tted with ram pressure gauge. Storage for press pins included in frame. Supplied with press pins, at pressing plate/V-blocks.
Suitable for workshop use or by the serious motoring enthusiast.
3. SPECIFICATION
Model No:................................................................ PPB15S
Capacity:...................................................................15tonne
Maximum Height - Ram to Table:...............................385mm
Minimum Height - Ram to Table:..................................45mm
Overall Height:...........................................................855mm
Ram Diameter:.......................................................... Ø78mm
Ram Stroke:.................................................................95mm
Screw Extension:.........................................................75mm
Table Aperture:...........................................................147mm
Total Ram Travel:.......................................................170mm
Type:................................................................... Bench Type
Working Table Depth:.................................................163mm
Working Table Width:.................................................565mm
Refer to
instruction
manual
Wear a face
shield Wear protective
gloves Wear safety
footwear Wear protective
clothing Beware
crushing of
hands
No reaching in Piston rod
should face
workpiece
Place V block
correctly
PPB15S Issue 1 18/02/22
Original Language Version
© Jack Sealey Limited
4. CONTENTS
4.1.
4.2.
4.3.
4.4.
4.5.
4.6.
4.7.
4.8.
4.9.
4.10.
4.11.
4.12.
4.13.
4.14.
4.15.
4.16.
4.17.
4.18.
4.19.
4.20.
4.21.
4.22.
4.23.
4.24.
4.25.
4.26.
5. ASSEMBLY
WARNING! These presses are heavy, the use of a lifting appliance is recommended.
NOTE: Refer to Parts List for part number details.
5.1.  FITFEETg.1
5.1.1. Attach the permanent press feet (g.1.8, g.1.9, g.1.10)
5.1.2. It is recommended that the press is rmly secured to the bench using suitable xings for the nature of the supporting structure/bench.
5.2.  FITPUMPHANDLEg.2,g.3
5.2.1. Fig.2: Assemble part 34 with parts 32 and 22 (2pcs).
5.2.2. Fig.3: Assemble part 20 with part 34.
6. OPERATION
6.1.  BLEEDHYDRAULICCIRCUITg.4
6.1.1. Open pump compartment g.4.19.
6.1.2. Lift central plunger of oil ller plug part g.4.1.
6.1.3. Open release valve g.6 by turning 180° counter clockwise.
6.1.4. Pump handle ten times.
6.1.5. Close release valve by turning handle clockwise.
6.1.6. Press is ready to use.
PPB15S Issue 1 18/02/22
Original Language Version
© Jack Sealey Limited
1
6
3
10
2
5
8
11
4
7
9
1312
ITEM NO. DESCRIPTION
1 Frame Assembly
2 Ram Cylinder Assembly
3 Oil Pump Assembly
4 Pump Handle
5 Pin Set
6 Press Tray
7V-Block Set
8 Bed Frame Pin
9 Bed Frame
10 Foot Assembly
11 Locking Nut M10
12 M10 Spring Washer
13 M10x25 Hex. Hd. Set screw
g.1 g.2
g.3
g.4
6.2. USING THE PRESS
6.2.1. Insert the mandrel/saddle or pin into the ram head and secure with the grub screw (g.5).
6.2.2. Lift or lower the table to the required height and insert the pins to support it.
6.2.3. Place the V block on the press table, then place workpiece onto the V block plate and align
beneath the ram as required.
NOTE: Care must be taken to ensure a V block does not fall from the press work table.
If necessary hold the configuration in position with clamps.
6.3. OPERATION
6.3.1. Ensure press is fully assembled and securely bolted to a firm, regular horizontal surface.
6.3.2. Only to be used by fully trained operatives who have read and fully understood the whole of this
manual.
6.3.3. Ensure working table is at the correct height and locked into position with its pins.
6.3.4. Leave enough space around the press whilst it is being used.
6.3.5. V blocks must be used in pairs not singly.
6.3.6. Close pressure release valve (fig.2) by turning clockwise. Pump the handle until the piston approaches the workpiece.
6.3.7. Align the workpiece and the piston so that the workpiece is properly centred.
6.3.8. Pump the handle to apply pressure to the workpiece.
6.3.9. When work is finished, stop pumping and open the release valve to remove the workpiece.
6.3.10. When the press is not in use, ensure that the ram is retracted fully to help avoid corrosion.
6.4. TABLE OPERATION fig.6
6.4.1. Remove the V-Blocks from the bed frame (fig.6).
6.4.2. Remove the E-clips from the Bed Frame pins (fig.6).
6.4.3. Hold the bed frame at positions A and withdraw the pins.
6.4.4. Position the bed frame to the required location and insert pins and E-clips.
6.4.5. Replace and lock V-blocks in place.
6.5. V-BLOCK OPERATION fig.7A
.
7. MAINTENANCE
NOTE: Maintenance and repair must only be carried out by a qualified person. Contact your Sealey stockist for details.
7.1. Lubricate all joints and moving parts periodically.
7.2. Always keep the press clean, dry and protected from harsh conditions.
7.3. To check hydraulic oil level, open the right hand top cover, and remove the oil filler plug fig.6.1. If oil needs replacing, use only Sealey
hydraulic jack oil. DO NOT use brake fluid. Contact your local Sealey stockist for details). Replace oil filler plug and purge system of air.
7.4. When replacing the hydraulic oil, ensure the piston is fully retracted.
7.5. If press efficiency begins to drop, purge the system to eliminate any air from the hydraulic system (see 6.1.).
7.6. When not in use, clean the press with a damp, soapy cloth. DO NOT use abrasive or solvent cleaners.
IMPORTANT! Owing to their size and weight, hydraulic products should ideally be repaired by local service agents. We have service /
repair agents in most parts of the UK. Before returning your product please call our technical helpline on 01284 757505 for advice and
trouble shooting guidance.
If the product is under guarantee please contact your Sealey stockist.
IMPORTANT: NO RESPONSIBILITY IS ACCEPTED FOR INCORRECT USE OF THE MACHINE.
Hydraulic products are only repaired by local service agents. We have service/repair agents in all parts of the UK.
DO NOT return product to us. Please telephone us on 01284 757500 to obtain the address and phone number of your local agent.
If product is under guarantee please contact your stockist.
De-commissioning Product
Should the product become completely unserviceable and require disposal, draw off the oil into an approved container and dispose
of the product and the oil according to local regulations.
g.X
PPB15S Issue 1 18/02/22
Original Language Version
© Jack Sealey Limited
g.6
g.5
g.7A
g.7B
Sealey Group, Kempson Way, Suffolk Business Park, Bury St Edmunds, Suffolk. IP32 7AR
01284 757500 01284 703534 sales@sealey.co.uk www.sealey.co.uk
ENVIRONMENT PROTECTION
Recycle unwanted materials instead of disposing of them as waste. All tools, accessories and packaging should be sorted, taken to
a recycling centre and disposed of in a manner which is compatible with the environment. When the product becomes completely
unserviceable and requires disposal, drain any fluids (if applicable) into approved containers and dispose of the product and fluids
according to local regulations.
Note: It is our policy to continually improve products and as such we reserve the right to alter data, specifications and component parts without prior
notice.
Important: No Liability is accepted for incorrect use of this product.
Warranty: Guarantee is 12 months from purchase date, proof of which is required for any claim.
WEEE REGULATIONS
Dispose of this product at the end of its working life in compliance with the EU Directive on Waste Electrical and Electronic Equipment
(WEEE). When the product is no longer required, it must be disposed of in an environmentally protective way. Contact your local solid
waste authority for recycling information.

Other Sealey Power Tools manuals

Sealey SA390 User manual

Sealey

Sealey SA390 User manual

Sealey SJS700.V2 User manual

Sealey

Sealey SJS700.V2 User manual

Sealey SA656 User manual

Sealey

Sealey SA656 User manual

Sealey CP2144 User manual

Sealey

Sealey CP2144 User manual

Sealey CP2612 User manual

Sealey

Sealey CP2612 User manual

Sealey SB973.V3 User manual

Sealey

Sealey SB973.V3 User manual

Sealey SA7/SAS User manual

Sealey

Sealey SA7/SAS User manual

Sealey SV10.8 Series User manual

Sealey

Sealey SV10.8 Series User manual

Sealey Auto Service VS954 User manual

Sealey

Sealey Auto Service VS954 User manual

Sealey SMS2004 User manual

Sealey

Sealey SMS2004 User manual

Sealey CP3003.V2 User manual

Sealey

Sealey CP3003.V2 User manual

Sealey AK5063 User manual

Sealey

Sealey AK5063 User manual

Sealey SA2003KIT User manual

Sealey

Sealey SA2003KIT User manual

Sealey AUTO SERVIC VS007.v3 User manual

Sealey

Sealey AUTO SERVIC VS007.v3 User manual

Sealey YK30XF User manual

Sealey

Sealey YK30XF User manual

Sealey SMS01 User manual

Sealey

Sealey SMS01 User manual

Sealey SA6021 User manual

Sealey

Sealey SA6021 User manual

Sealey YK30F.V2 User manual

Sealey

Sealey YK30F.V2 User manual

Sealey SA660 User manual

Sealey

Sealey SA660 User manual

Sealey SDL7.V2 User manual

Sealey

Sealey SDL7.V2 User manual

Sealey TST09 User manual

Sealey

Sealey TST09 User manual

Sealey GENERATION Series User manual

Sealey

Sealey GENERATION Series User manual

Sealey Power Tools SA651.V3 User manual

Sealey

Sealey Power Tools SA651.V3 User manual

Sealey YK30XF.V3 User manual

Sealey

Sealey YK30XF.V3 User manual

Popular Power Tools manuals by other brands

DUROFIX RW1216-3 Product information manual

DUROFIX

DUROFIX RW1216-3 Product information manual

HART HPRL01 Operator's manual

HART

HART HPRL01 Operator's manual

Roller Arcus instruction manual

Roller

Roller Arcus instruction manual

Master S 48 pias operating instructions

Master

Master S 48 pias operating instructions

Hilti NURON STR 4-22 manual

Hilti

Hilti NURON STR 4-22 manual

Proxxon SS 115E manual

Proxxon

Proxxon SS 115E manual

Meganex MEG20 instruction manual

Meganex

Meganex MEG20 instruction manual

King Industrial 8" Jointer KC-203C Service manual

King Industrial

King Industrial 8" Jointer KC-203C Service manual

Urrea PVC855 User manual and warranty

Urrea

Urrea PVC855 User manual and warranty

Clarke CAT209 Operating & maintenance instructions

Clarke

Clarke CAT209 Operating & maintenance instructions

KNIPEX NexStrip operating instructions

KNIPEX

KNIPEX NexStrip operating instructions

Ingersoll-Rand 5980 Series Product information

Ingersoll-Rand

Ingersoll-Rand 5980 Series Product information

909 OSC400 instruction manual

909

909 OSC400 instruction manual

Rocks 03.4031 manual

Rocks

Rocks 03.4031 manual

Stanley BR45 user manual

Stanley

Stanley BR45 user manual

Ferm JSM1026 Original instructions

Ferm

Ferm JSM1026 Original instructions

DeWalt DW130 Safety instructions

DeWalt

DeWalt DW130 Safety instructions

swepac FB 510 user manual

swepac

swepac FB 510 user manual

manuals.online logo
manuals.online logoBrands
  • About & Mission
  • Contact us
  • Privacy Policy
  • Terms and Conditions

Copyright 2025 Manuals.Online. All Rights Reserved.