manuals.online logo
Brands
  1. Home
  2. •
  3. Brands
  4. •
  5. Sealey
  6. •
  7. Tools
  8. •
  9. Sealey SA120.V2 User manual

Sealey SA120.V2 User manual

Other Sealey Tools manuals

Sealey SA51 User manual

Sealey

Sealey SA51 User manual

Sealey SPL01 User manual

Sealey

Sealey SPL01 User manual

Sealey VS2077 User manual

Sealey

Sealey VS2077 User manual

Sealey GH60A User manual

Sealey

Sealey GH60A User manual

Sealey HP700 User manual

Sealey

Sealey HP700 User manual

Sealey VS550 User manual

Sealey

Sealey VS550 User manual

Sealey SA821.V2 User manual

Sealey

Sealey SA821.V2 User manual

Sealey AdBlue ADB07A User manual

Sealey

Sealey AdBlue ADB07A User manual

Sealey SA40 User manual

Sealey

Sealey SA40 User manual

Sealey AK49 User manual

Sealey

Sealey AK49 User manual

Sealey SA613 User manual

Sealey

Sealey SA613 User manual

Sealey VS779.V4 User manual

Sealey

Sealey VS779.V4 User manual

Sealey VSE6541 User manual

Sealey

Sealey VSE6541 User manual

Sealey VSE6000 User manual

Sealey

Sealey VSE6000 User manual

Sealey Auto Service Line MS070 User manual

Sealey

Sealey Auto Service Line MS070 User manual

Sealey MK66.V3 User manual

Sealey

Sealey MK66.V3 User manual

Sealey VSE127H05 User manual

Sealey

Sealey VSE127H05 User manual

Sealey WORKSAFE 9602L User manual

Sealey

Sealey WORKSAFE 9602L User manual

Sealey POWER PRODUCTS SA811 User manual

Sealey

Sealey POWER PRODUCTS SA811 User manual

Sealey SA36.V2 User manual

Sealey

Sealey SA36.V2 User manual

Sealey VS0286 User manual

Sealey

Sealey VS0286 User manual

Sealey VS4980 User manual

Sealey

Sealey VS4980 User manual

Sealey RE105 User manual

Sealey

Sealey RE105 User manual

Sealey Professional Tools Auto Service VS0561 User manual

Sealey

Sealey Professional Tools Auto Service VS0561 User manual

Popular Tools manuals by other brands

AGI Westfield MKX16 Assembly manual

AGI

AGI Westfield MKX16 Assembly manual

GYS HAND-DUCTION 056923 Translation of the original instructions

GYS

GYS HAND-DUCTION 056923 Translation of the original instructions

Grizzly H7583 instruction manual

Grizzly

Grizzly H7583 instruction manual

Makita HR2650 instruction manual

Makita

Makita HR2650 instruction manual

Forza 1100H Series manual

Forza

Forza 1100H Series manual

Aventics EBS-PI operating instructions

Aventics

Aventics EBS-PI operating instructions

Martor SECUNORM 175 quick start guide

Martor

Martor SECUNORM 175 quick start guide

jbc N4473 instruction manual

jbc

jbc N4473 instruction manual

FEINMETALL FZWZ-SET-001 quick start guide

FEINMETALL

FEINMETALL FZWZ-SET-001 quick start guide

Worx Professional Sonicrafter WU676 Original instructions

Worx Professional

Worx Professional Sonicrafter WU676 Original instructions

Gage Bilt GB713SH Original instructions

Gage Bilt

Gage Bilt GB713SH Original instructions

Hilti DX 9-ENP Original operating instructions

Hilti

Hilti DX 9-ENP Original operating instructions

norbar NORTRONIC 34399 Operator's manual

norbar

norbar NORTRONIC 34399 Operator's manual

BGS technic 8578 manual

BGS technic

BGS technic 8578 manual

axing BWZ 5-02 Operation instructions

axing

axing BWZ 5-02 Operation instructions

Makita DHR241 instruction manual

Makita

Makita DHR241 instruction manual

Motor Guard JMB-1250 instructions

Motor Guard

Motor Guard JMB-1250 instructions

Power Adhesives 805-12 operating instructions

Power Adhesives

Power Adhesives 805-12 operating instructions

manuals.online logo
manuals.online logoBrands
  • About & Mission
  • Contact us
  • Privacy Policy
  • Terms and Conditions

Copyright 2025 Manuals.Online. All Rights Reserved.

 WARNING! Ensure Health & Safety, local authority, and general
workshop practice regulations are adhered to when using this
equipment.
 WARNING!Disconnect the hammer from the air supply before
changing accessories, servicing or performing any maintenance.
 Keep the hammer clean and maintain it in good condition (use an
authorised service agent).
Replace or repair damaged parts. Use genuine parts only.
Unauthorised parts may be dangerous and will invalidate the
warranty.
 Keep the work area clean, uncluttered and ensure there is
adequate lighting.
Ensure chisels are correctly rated for the job, and DO NOT use
damaged or suspect chisels.
WARNING! Wear approved safety eye or face protection, ear
defenders, and if dust is generated, respiratory protection.
Keep hands and body clear of the work when operating the
hammer.
 Maintain correct balance and footing. Ensure the floor is not
slippery and wear non slip-shoes.
Remove ill fitting clothing. Remove ties, watches, rings, and other
loose jewellery, and contain and/ or tie back long hair.
Keep children and unauthorised persons away from the working
area.
 Secure non stable work piece with a clamp, vice or other adequate
holding device.
 Avoid unintentional starting.
WARNING! ensure correct air pressure is maintained and not
exceeded.
Keep air hose away from heat, oil and sharp edges. Check air
hose for wear before each use, and ensure that all connections
are secure.
 DO NOT force the hammer to achieve a task it was not designed
to perform.
 DO NOT operate the hammer if any parts are damaged or missing
as this may cause failure or possible personal injury.
WARNING! DO NOT cut, grind, saw, sand any materials
containing asbestos.
 DO NOT switch the hammer on whilst the chisel is in contact with
the workpiece.
 DO NOT carry the by the hose, or yank the hose from the air
supply.
DO NOT hold the workpiece by hand. Use clamps or a vice (not
included) to secure the workpiece. Available from your Sealey
dealer.
 DO NOT allow untrained persons to operate the hammer.
 DO NOT operate the hammer when you are tired, under the
influence of alcohol, drugs or intoxicating medication.
 DO NOT use hammer where there is flammable liquids, solids or
gases such as paint solvents, including waste wiping or cleaning
rags etc.
 DO NOT leave the hammer operating unattended.
 DO NOT carry the hammer with your finger on the power switch.
 DO NOT direct air from the air hose at yourself or others.
When work is complete ensure the air supply is turned off.
 When not in use disconnect from the air supply and store in a
safe, dry, child proof area.
INSTRUCTIONS FOR:
AIR HAMMER
MODEL NO: SA120.V2
Thank you for purchasing a Sealey product. Manufactured to a high standard this product will, if used according to these instructions
and properly maintained, give you years of trouble free performance.
IMPORTANT: PLEASE READ THESE INSTRUCTIONS CAREFULLY. NOTE THE SAFE OPERATIONAL REQUIREMENTS, WARNINGS & CAUTIONS.
USE THE PRODUCT CORRECTLY AND WITH CARE FOR THE PURPOSE FOR WHICH IT IS INTENDED. FAILURE TO DO SO MAY CAUSE
DAMAGE AND/OR PERSONAL INJURY, AND WILL INVALIDATE THE WARRANTY. PLEASE KEEP INSTRUCTIONS SAFE FOR FUTURE USE.
The recommended hook-up is shown in fig 1.
2.1. Ensure the air valve is in the "off" position before connecting to the air supply.
2.2. You will require an air pressure of more than 6bar (90psi) , and an air volume of
more than 4cfm for operating the unit.
2.3. WARNING! Ensure the air supply does not exceed 140PSI while
operating the hammer. Too high an air pressure and unclean air will shorten
the product life due to excessive wear, and may be dangerous causing
possible damage and/or personal injury.
2.4. Drain the air tank daily. Water in the air line will damage the tool.
2.5. Clean the air inlet filter screen weekly.
2.6. Line pressure should be increased to compensate for unusually long air hoses (over 8 metres). The minimum hose diameter should
be 10mm I.D. and fittings must have the same inside dimensions.
2.7. Keep hose away from heat, oil and sharp edges. Check hoses for wear, and make certain that all connections are secure.
2.8 Couplings.Vibration may cause failure if a quick change coupling is connected directly to the wrench. To overcome this, connect a
leader hose to the wrench. A quick change coupling may then be used to connect the leader hose to the air line recoil hose.
See fig 1 & 2.
2. AIR SUPPLY
fig 1.
1. SAFETY INSTRUCTIONS
fig 2.
Original Language Version SA120.V2 Issue: 2 - 04/11/09
Ensure you have read understood and follow the safety instructions in Section 1.
4.1. Attach the retaining spring by holding the front end of the spring and screwing it onto the gun retainer.
4.2. Insert the chisel using the spring’s hooked end to hold the chisel in place.
4.3. Attached the tool to the air supply as mentioned in Section 2.
4.4. To operate the hammer, squeeze the trigger.
NOTE: The air regulator may be used as a means of throttle control.
Chisel: Available from your authorised Sealey Dealer. Part No: SA120/P - Pointed SA120/F - Flat.
 WARNING!Disconnect the hammer from the air supply before changing accessories, servicing or performing any maintenance.
5.1 Keep the hammer oiled for optimum performance
Lubricate daily with a good grade of air oil such as Sealey ATO/500 or ATO/1000. If no air tool oiler is used, a teaspoon of oil can be
poured into the tool’s air inlet, or into the hose at the nearest connection to the air supply. Then run the hammer for a short time.
5.2. When not in use, always turn off air supply.
Note: The following external factors may cause loss of power and effect hammer performance:
The air system.
Reduced compressor output, excessive drain on the air line, moisture or restrictions in air pipes or in the use of hose connection
having the improper size. Correct the condition accordingly.
The Tool
Grit or gum deposits in the tool. Correct by cleaning the air stainer,if present, and flushing out the tool with gum solvent oil or an equal
mixture of
SAE No.10 oil and kerosene.
If despite taking action as for above situations the tool function is impaired, contact your local Sealey service dealer for advice.
4. OPERATING INSTRUCTIONS
5. MAINTENANCE
Risk of Hand Arm Vibration Injury.
The SA120.V2 Air Hammer, when operated in accordance with these instructions and tested in accordance with EN 28662-2: 1994, results in
the following vibration emission declared in accordance with BS EN12096: 1996.
Measured vibration emission value: .........6.6m/s² Uncertainty: . . . . . . . . . . . . . . . . . 2.64m/s²
These values are suitable for comparison with emission levels of other tools that have been subject to the same test.
This tool may cause hand-arm vibration syndrome if its use is inadequately managed.
Recommended Measures to reduce risk of hand-arm vibration syndrome:
This item represents a low Hand Arm Vibration risk to users. The calculated minimum usage period exceeds 8 hours. We recommend appropriate
safety equipment is utilised and regular breaks for the operator are employed to reduce any residual risk of fatigue or repetitive strain injury.
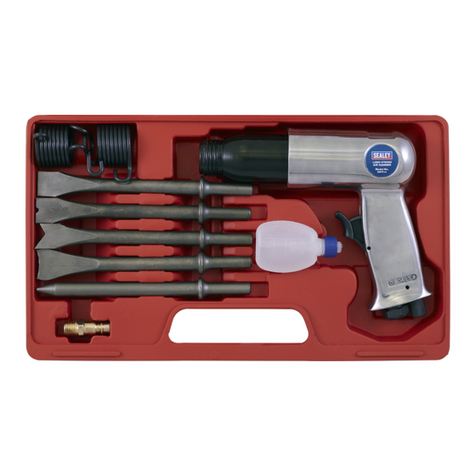
The air hammer is designed primarily for use on vehicle bodywork. We do not recommend any other use. Contact your supplier immediately
should there be any missing, or damaged parts. Chisels not included.
3. INTRODUCTION & SPECIFICATIONS
Chisel Shank Size ......12.7 x 47mm
Speed ...................3000bpm
Air Consumption.............. 4cfm
Operating Pressure ...........90psi
Air Inlet Size ...............1/4”BSP
Piston Stroke ............... 20mm
Vibration Level ............. 6.6m/s²
Sound Pressure Level ........96.5dB
Sound Power Level .........107.7dB
NOTE: It is our policy to continually improve products and as such we reserve the right to alter data, specifications and component parts without prior notice.
IMPORTANT: No liability is accepted for incorrect use of this product.
WARRANTY: Guarantee is 12 months from purchase date, proof of which will be required for any claim.
INFORMATION: For a copy of our latest catalogue and promotions call us on 01284 757525 and leave your full name and address, including postcode.
01284 757500
01284 703534
sales@sealey.co.uk
Sole UK Distributor, Sealey Group,
Kempson Way, Suffolk Business Park,
Bury St. Edmunds, Suffolk,
IP32 7AR
www.sealey.co.uk
Web
email
Original Language Version SA120.V2 Issue: 2 - 04/11/09