Sealey VS2386 User manual

INSTRUCTIONS FOR
DESCRIPTION. FRONT WHEEL BEARING
PULLER - FORD TRANSIT
MODEL NO: VS2386
Thank you for purchasing a Sealey product. Manufactured to a high standard, this product will, if used according to these
instructions, and properly maintained, give you years of trouble free performance.
IMPORTANT: PLEASE READ THESE INSTRUCTIONS CAREFULLY. NOTE THE SAFE OPERATIONAL REQUIREMENTS, WARNINGS & CAUTIONS. USE
THE PRODUCT CORRECTLY AND WITH CARE FOR THE PURPOSE FOR WHICH IT IS INTENDED. FAILURE TO DO SO MAY CAUSE DAMAGE AND/OR
PERSONAL INJURY AND WILL INVALIDATE THE WARRANTY. KEEP THESE INSTRUCTIONS SAFE FOR FUTURE USE.
1. SAFETY
WARNING! Ensure Health and Safety, local authority and general workshop practice regulations are adhered to when using tools.
1.1. Observe standard workshop safety procedures.
WARNING! Take extreme caution when using these tools, components are heavy.
1.2. Maintain correct balance and footing. DO NOT over reach, ensure the floor is not slippery, wear non-slip toe protector shoes.
1.3. Remove loose fitting clothing, ties, watches, rings, loose jewellery, and contain or tie back long hair.
1.4. Wear approved eye protection, gloves and footwear. A range of personal safety equipment is available from your Sealey dealer.
8DO NOT use these tools for any purpose other than those for which they have been designed.
8DO NOT use with air tools or impact socket
8DO NOT use tools if damaged.
1.5. Maintain tools in good and clean condition for best and safest performance.
1.6. Ensure that a vehicle which has been jacked up is adequately supported with axle stands.
1.7. Remove appropriate road wheels and brake calipers.
8DO NOT attempt to start engine or move vehicle whilst in gear with tools fitted.
1.8. Account for all tools and parts being used and do not leave them in or near the engine.
1.9. These instructions are provided as a guide only. Always refer to the vehicle manufacturer’s service instructions, or a
proprietary manual, to establish the current procedure and data.
1.10. When not in use, clean and store the tools in their case in a safe, dry, childproof location.
2. INTRODUCTION
Engineered for safe removal of drive ange with wheel bearing from the hub assembly in situ and wheel bearing from drive ange. An essential
tool when replacing brake discs, allowing the drive ange to be split from the hub assembly. Features a cleverly designed impact force screw.
3. SPECIFICATION
Model No:.................................................................. VS2386
Applications............ Front Wheel Drive Ford Transit (2006on)
4. CONTENTS
Item Sealey Part No. Description Qty
1 VS2386.01 Impact Force Screw 1
2 VS2386.02 Flange Adaptor 1
3 VS2386.03 Large Adaptor (Ø76.5mm) 1
4 VS2386.04 Small Adaptor (Ø43.5mm) 1
5 VS2386.05 Hex Screws/Hex Nuts (M10) 5
6 VS2386.06 Spanner 1
4.1. ALWAYS KEEP FORCE SCREW WELL LUBRICATED.
MOLYBDENUM/COPPER BASED RECOMMENDED
8DO NOT USE AIR TOOLS OR IMPACT SOCKETS.
VS2386 | Issue 1(I) 06/04/16
Original Language Version
© Jack Sealey Limited
Refer to
Instruction
Manual
Wear Eye
Protection
Wear
Protective
Gloves
23
4
1
6
5
g.1
NOTE: It is our policy to continually improve products and as such we reserve the right to alter data, specications and component parts without prior notice.
IMPORTANT: No liability is accepted for incorrect use of this product.
WARRANTY: Guarantee is 12 months from purchase date, proof of which will be required for any claim.
Sole UK Distributor, Sealey Group.
Kempson Way, Suffolk Business Park,
Bury St. Edmunds, Suffolk.
IP32 7AR
www.sealey.co.uk
sales@sealey.co.uk
01284 757500
01284 703534
Web
Original Language Version
© Jack Sealey Limited
5. OPERATION
5.1. Removingthedriveangehousing,completewithtaperrolleredwheelbearingfromthesuspensionstrut.
5.1.1. Referring to the vehicle manufacturer’s manual, remove the ABS sensor and caliper and place carefully to one side.
5.1.2. Referring to the vehicle manufacturer’s manual, remove the drive shaft hub (a split pin, castellated nut, nut and washer). Gently drift
out the hub with a copper mallet.
5.1.3. Remove the 5 screws (size 50 Torx) xing the bearing housing to the suspension strut through the wheel mounting ange clearance
holes. These 5 screws are used to x the ange adaptor in 5.1.5.
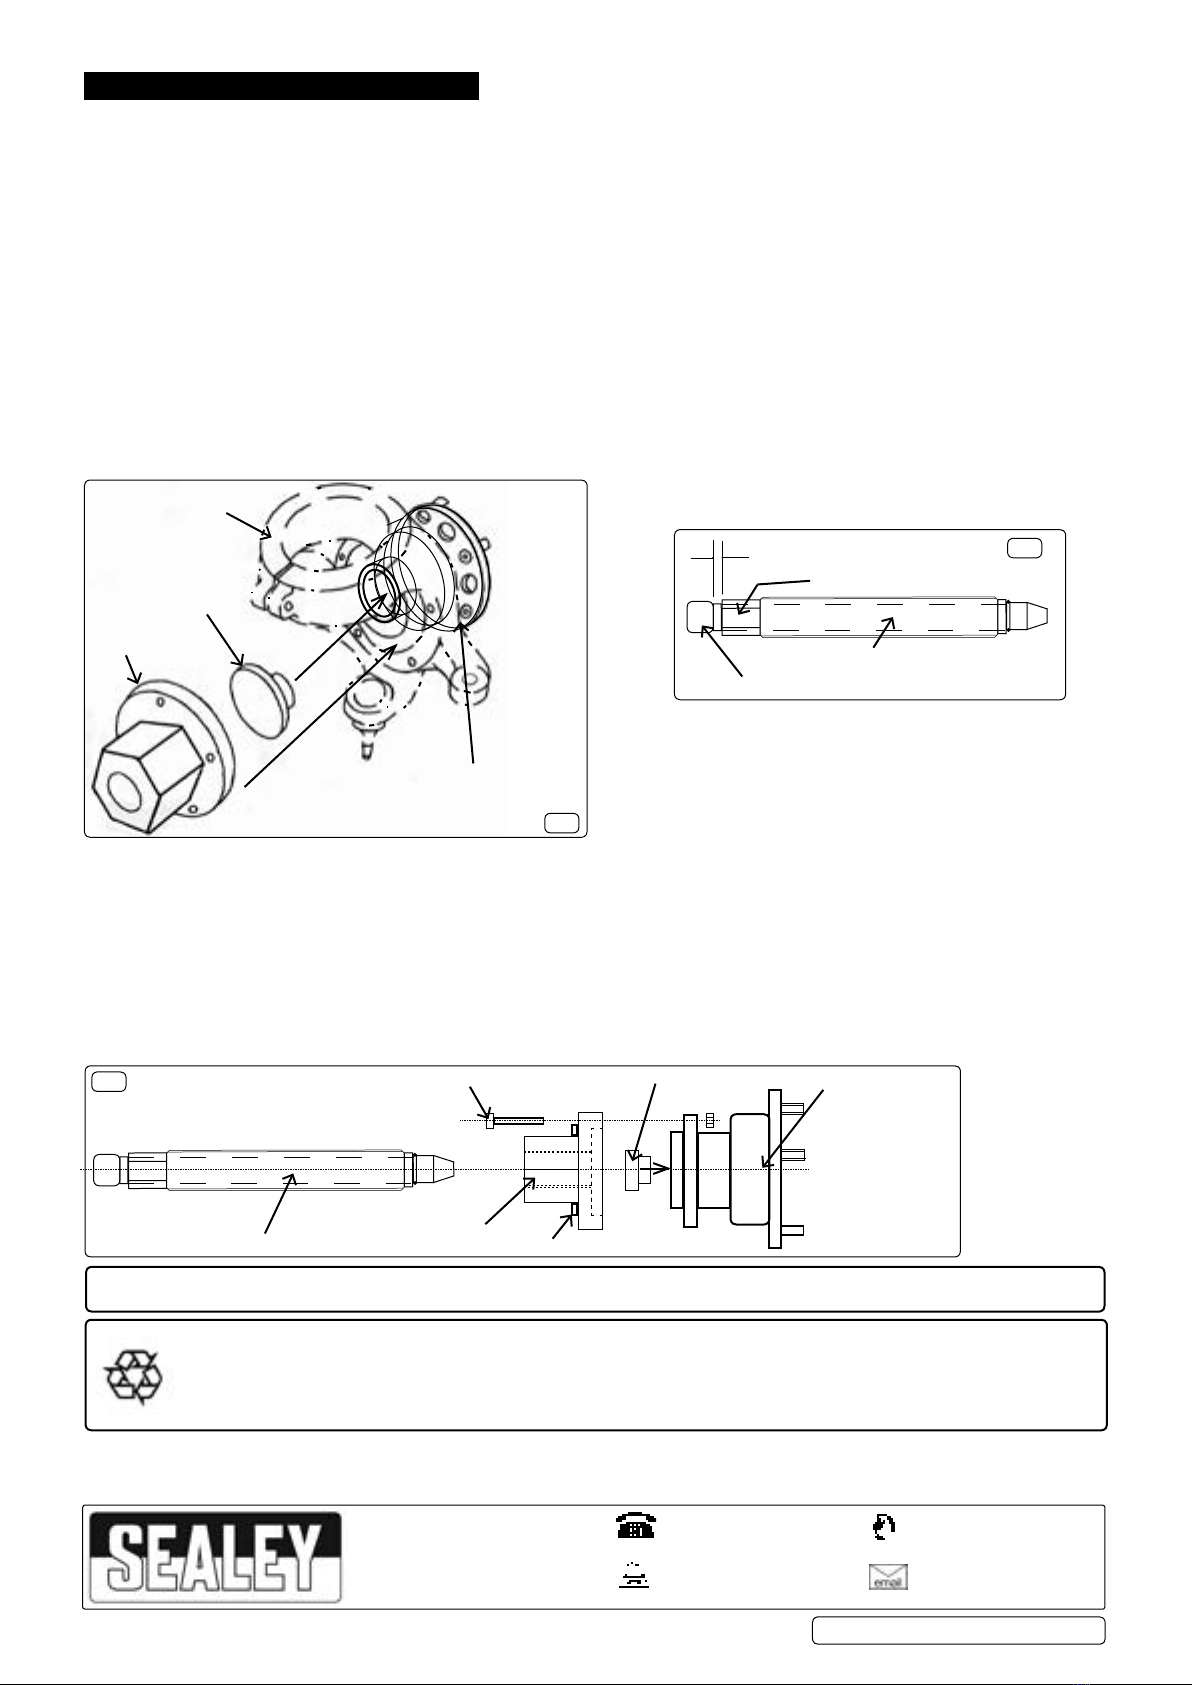
5.1.4. From the rear of the suspension strut, insert the large adaptor (item 3) spigot rst into the drive ange bore in g.2.
5.1.5. With the ange leading, align the 5 holes of the ange adaptor (item 2) with the 5 x M10 tapped holes in the suspension strut in g.2.
Fix with the 5 screws removed in 5.1.3.
5.1.6. Lubricate the thread of the force screw with a copper based grease or similar product.
5.1.7. Thread the force screw, tapered end leading, clockwise through the boss of the adaptor, winding until solid resistance is felt. The
solid resistance will be the large adaptor (item 3). A 5.5mm gap should become apparent between the hexagon and the ram head,
see g.3.
5.1.8. With a copper head mallet, strike the ram head square on the end to overcome any residual adhesion of housing spigot and
suspension strut bore. This will initiate bearing housing removal; strike the ram again if required.
5.1.9. Observe the decrease in the “slide gap”. Rotate the threaded force screw barrel clockwise to increase the gap back to 5.5mm again.
Continue to rotate the force screw, whilst supporting the bearing housing until fully removed. Alternatively, if the housing spigot is not
“seized” a 30mm spanner can be used to slowly extract the hub at 1.6mm per turn.
5.2. Taper roller bearing removal.
5.2.1. Insert the spigot of the small adaptor (item 4), into the bearing bore as shown in g.4.
5.2.2. Fit the ange adaptor (item 2) to the bearing housing with the ve sets of xings (item 5). Torque equally.
5.2.3. Lubricate the thread of the force screw with a copper based grease or similar product.
5.2.4. Thread the force screw, tapered end leading, clockwise through the boss of the adaptor, winding until solid resistance is felt. The
solid resistance will be the small adaptor (item 4). A 5.5mm gap should become apparent between the hexagon and the ram head, g.4.
5.2.5. With a copper head mallet, strike the ram head square on the end to overcome any residual adhesion of the bearing and housing
bore. This will initiate bearing removal; strike the ram again if required.
5.2.6. Observe the decrease in the “slide gap”. Rotate the threaded force screw barrel clockwise to increase the gap back to 5.5mm again.
With caution repeat actions from 5.2.4 and 5.2.5 until the bearing is removed.
g.2
Suspension
Strut
Item 3
Item 2
5.1.4.
5.1.5.
Drive Flange Bearing Housing
g.3
30mm A/F Hexagon
1½" 16TPI Whitworth Form Thread
5.5mm slide gap
Removable Ram Head
Reversible Force Screw (Item 1)
Drive Bearing Flange Housing
Item 1 Item 2
Item 4
Item 5
g.4
Item 6
Parts support is available for this product. To obtain a parts listing and/or diagram,
please log on to www.sealey.co.uk, email sales@sealey.co.uk or telephone 01284 757500.
Environmental Protection
Recycle unwanted materials instead of disposing of them as waste. All tools, accessories and packaging should be sorted,
taken to a recycling centre and disposed of in a manner which is compatible with the environment.
VS2386 | Issue 1(I) 06/04/16
Table of contents
Other Sealey Tools manuals

Sealey
Sealey PFT07.V2 User manual

Sealey
Sealey VS1205 User manual

Sealey
Sealey SJBEX200.V2 User manual

Sealey
Sealey RE105 User manual

Sealey
Sealey SA84.V2 User manual

Sealey
Sealey GA42 User manual

Sealey
Sealey PS985.V2 User manual

Sealey
Sealey SA6002.V2 User manual

Sealey
Sealey VSE6000 User manual

Sealey
Sealey SX210 User manual

Sealey
Sealey TC904 User manual

Sealey
Sealey TS01 User manual

Sealey
Sealey SA92.V3 User manual

Sealey
Sealey ES600 User manual

Sealey
Sealey VS2049 User manual

Sealey
Sealey AK458DX.V4 User manual

Sealey
Sealey Auto Service VS392 User manual

Sealey
Sealey CPG12V.V4 User manual

Sealey
Sealey AK629 User manual

Sealey
Sealey POWER PRODUCTS SA821 User manual


