Sector CHRONO User manual

Instruction Manual


We thank you for the
confidence that you have
shown in us by choosing
the SECTOR brand.
To enable you to use your
watch to the best advanta-
ge, we ecommend that you
carefully read the
instructions in this leaflet.
SECTOR
ENGLISH
FRANÇAIS
DEUTSCH
ITALIANO
ESPAÑOL
PORTUGUÊS
中國的

FEATURES
Hour Hand
Crown
STOPWATCH
minute hand
24-hour hand
N: Normal Position
1:First Click Position
2:Second Click Position
Minute hand
Date
Second hand
STOPWATCH
second hand

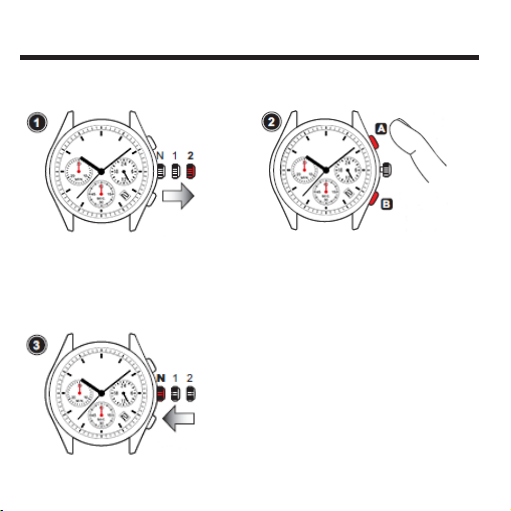
• Pull the crown out to the 1st
click position.
• Turn the crown counterclockwise
until the previous day’s date appears.
Note: Do not set the date between 9:00 PM
and 1:00 AM. Otherwise, the date may not
change properly.
HOW TO SET TIME AND DATE
Pull out to
1st position

• Pull the crown out to the 2nd click
position when the second hand is at the
12 o'clock position.
Note: When the stopwatch is or has been
measuring or is stopped, if the crown is pulled
out to the 2nd click position, it will automatically
reset the Stopwatch hands to "0".
• Turn the crown to set the hour and minute
hands.
• Turn the crown clockwise to advance the
hour and minute hands past 12:00 midnight.
This will advance the date to the current date.
• Take AM/PM into consideration when
setting
HOW TO SET TIME AND DATE
• Push the crown back to the
normal position.
Push back
to normal
postition
Recommend:
• When setting the minute hand, first advance
it 4 to 5 minutes ahead of the desired time
and then turn it back to the exact minute.
Pull out to
2nd position

HOW TO USE THE STOPWATCH FUNCTIONS
• The stopwatch can measure up to 29'59" in one-second increments.
• When the measurement reaches 30 minutes, the stopwatch automatically stops counting.
• The stopwatch second hand is capable of timing 30 minutes. (60 seconds x 30 times)
• The stopwatch minute hand is capable of timing 30 minutes.
• Whether the stopwatch hands return to the "0" position in a clockwise rotation or in a
counterclockwise rotation is decided depending on the elapsed time the stopwatch has
measured.
* Before using the stopwatch, be sure to check that the crown is set at the normal position and that the
stopwatch hands are reset to the “0” position.
Note: If the stopwatch hands do not return to the “0” position when the stopwatch is reset to “0”, follow the
procedure in "Stopwatch hand position adjustment".
STOPWATCH minute hand
STOPWATCH second hand
START
STOP
RESTART
SPLIT
SPLIT RELEASE
RESET
Standard Measurement
Accumulated Elapsed Time Measurement
Split Time Measurement
Measurement of Two Competitors
START
START
START
START
STOP
STOP
STOP
STOP
SPLIT
FINISH TIME
OF 1ST
COMPETITOR
FINISH TIME
OF 2nd
COMPETITOR
2nd
COMPETITOR
FINISHES
SPLIT RELEASE
RESET
RESET
RESET
RESET
RESTART
Note: Restart and stop of the stopwatch can be repeated by pressing Button “A.”
Note: Measurement and release of split time can be repeated by pressing Button “B.”

Pull out to
2nd
position
• Pull the crown out to the 2nd click position.
Note: While the stopwatch is running or has been
stopped while running, if the crown is pulled out to the
2nd click position, the stopwatch will be automatically
reset.
STOPWATCH HAND POSITION ADjUSTMENT
If the stopwatch hands are not in the “0” position, follow the procedures below to set them to
the “0” position.
Push
back to
Normal
position
Press A to move
the stopwatch
hands clockwise
Press B to move
the stopwatch hands
counterclockwise
• Press Button “A” or “B” to set the stopwatch
hands tothe “0” position.
• The movements of the stopwatch
minute hand and stopwatch second hand
areinterlocked. To set the stopwatch minute
hand to the "0" position, continue to move the
stopwatch second hand until the stopwatch
minute hand reaches the "0" position.
Note: The stopwatch minute and second hand move
quickly if Button “A” or “B” is kept pressed.
• Push the crown back to the
normal position.

The warranty is valid for two years. To benefit from the warranty it is essential to present to a Dealer
or a Technical Service Center the International Warranty card duly compiled, stamped and dated by the
Dealer at the time of purchase, together with the sales receipt. Defects deriving from accidents (knocks,
crushing, etc.), improper use, the use of non-prescribed batteries, dead batteries left inside the watch,
alterations, repairs and/or unauthorized tampering are excluded from the warranty. Batteries, glass,
watch straps, discoloration of the plating or color, and the consequences of normal wear and tear and
aging of the watch are also excluded from the warranty. Interventions under warranty must be carried out
at authorized Technical Service Centers, otherwise the product warranty will be discontinued.
The water resistant indication is valid only for brand new watches. Case is watertight for purposes of
DIN 8310.
in compliance with Italian Legislative Decree no. 206 – 06/09/2005
ALL SECTOR WATCHES ARE MADE OF HYPOALLERGENIC 304/316L STEEL WITH PARTS IN
POLYCARBONATE AND SILICONE RUBBER, IN CONFORMITY TO CURRENT ITALIAN AND INTERNATIONAL
REGULATIONS. THE WATCHES ARE MANUFACTURED IN PEOPLE’S REPUBLIC OF CHINA TO
MORELLATO’S DESIGN AND SPECIFICATIONS, AND ARE SOLD EXCLUSIVELY BY MORELLATO SPA, WITH
REGISTERED OFFICE AT VIA COMMERCIALE, 29 - 35010 FRATTE DI S. GIUSTINA IN COLLE (PD) ITALY
– VAT NO. 13442590157.

Nous vous remercions de la
confiance que vous nous
accordez en ayant choisi la
marque SECTOR.
Sfin d’utiliser votre montre
de mainière appropriée,
nous vous recommandos
de lire attentivements les
instructions contenues
dans ce document.
SECTOR
ENGLISH
FRANÇAIS
DEUTSCH
ITALIANO
ESPAÑOL
PORTUGUÊS
中國的

MODE D'EMPLOI
Aiguille des heures
Couronne
Aiguille des minutes
du CHRONOMÈTRE
Aiguille 24
heures
N: Position normale
1:Premier déclic
2:Deuxième déclic
Aiguille des
minutes
Date
Aiguille des
secondes
Aiguille des
secondes du
CHRONOMÈTRE

•Tirer la couronne au premier
déclic
•Tourner la couronne dans le sens
antihoraire jusqu'à ce que la date de
la veille apparaisse.
Nota: Ne pas régler la date entre 21h00
et 01h00. Dans le cas contraire, la date
pourrait ne pas changer correctement.
RégLAgE DE L'HEURE ET DE LA DATE
Tirer sur
la 1ère
position

RégLAgE DE L'HEURE ET DE LA DATE
•Tirer la couronne sur le 2ème déclic
lorsque l'aiguille des secondes est à 12
heures.
Nota:Lorsque le chrono mesure ou a mesuré ou
lorsqu'il est arrêté, si la couronne est tirée au
deuxième déclic, cela remettra automatiquement
les aiguilles du chronomètreà "0".
•Tourner la couronne pour régler les aiguilles
des heures et des minutes.
•Tourner la couronne dans le sens horaire
pour faire avancer les aiguilles des heures et
des minutes après minuit. Ceci fera avancer
la date au jour actuel.
•Respecter le rythme de 24 heures pour
régler les aiguilles des heures et des minutes
à l'heure désirée.
•Repousser la couronne en
position normale.
Repousser
en position
normale
Conseil :
Lors du réglage de l'aiguille des
minutes, la placer 4 à 5 minutes en
avance par rapport à l'heure souhaitée,
puis la replacer à la minute exacte.
Tirer sur
la 2ème
position

COMMENT UTILISER LES FONCTIONS DE CHRONOMèTRE
• Le chronomètre peut mesurer jusqu'à 29'59 "en incréments d'une seconde.
• Lorsque la mesure atteint 30 minutes, le chronomètre s'arrête automatiquement.
• L'aiguille des secondes du chronomètre a une capacité de 30 minutes. (60 secondes x
30 fois)
• L'aiguille des minutes du chronomètre a une capacité de 30 minutes.
• Le fait que les aiguilles du chronomètre reviennent en position "0" dans le sens horaire ou
antihoraire est décidé en fonction du temps écoulé que le chronomètre a mesuré.
* Avant d'utiliser le chronomètre, vérifier que la couronne est placée en position normale et que les aiguilles
du chronomètre soient remises à “0”.
Nota Si les aiguilles du chronomètre ne reviennent pas à la position "0" lorsque le chronomètre est remis à
"0", suivez la procédure décrite au paragraphe "Ajustage de la position de l'aiguille du chronomètre".
Aiguille des minutes
du CHRONOMÈTRE
Aiguille des secondes du
CHRONOMÈTRE
START
STOP
RESTART
INTERMÉDIAIRE
LIBÉRATION
INTERMÉDIAIRE
REMISE À ZÉRO
Standard Measurement
Chronométrage du temps écoulé
Mesure du temps intermédiaire
Mesure de deux concurrents
START
START
START
START
STOP
STOPSTOP
Intermédiaire Intermédiaire
Temps final du
1er concurrent
Temps
final du 2ème
concurrent
Arrivée
du 2ème
concurrent
LibérationStop
REMISE À ZÉRO
REMISE À ZÉRO
REMISE À ZÉRO
RESET
RESTART
Nota Les fonctions restart et stop du chronomètre peuvent être répétées en appuyant sur le Bouton “A.”
Nota La mesure et la libération du temps intermédiaire peuvent être répétées en appuyant sur le Bouton “B.”

COMMENT UTILISER LES FONCTIONS DE CHRONOMèTRE
Tirer sur
la 2ème
position
• Tirer la couronne au deuxième déclic.
Nota:Pendant que le chronomètre est en marche ou
s'il a été arrêté pendant qu'il était en marche, si la
couronne est tirée au deuxième déclic, le chronomètre
sera automatiquement remis à zéro.
AjUSTAgE DE LA POSITION DE L'AIgUILLE DU CHRONOMèTRE
Si les aiguilles du chronomètre ne sont pas en position “0”, suivre la procédure ci-dessous
pour les placer en position the “0”.
Repousser
en
position
normale
Appuyer sur A.
pour déplacer les aiguilles
du chronomètre dans le
sens horaire.
Appuyer sur B.
pour déplacer les aiguilles
du chronomètre dans le
sens antihoraire.
• Press Button “A” or “B” to set the stopwatch
hands tothe “0” position.
• The movements of the stopwatch
minute hand and stopwatch second hand
areinterlocked. To set the stopwatch minute
hand to the "0" position, continue to move the
stopwatch second hand until the stopwatch
minute hand reaches the "0" position.
Note: The stopwatch minute and second hand move
quickly if Button “A” or “B” is kept pressed.
• Repousser la couronne en
position normale.

Cette garantie est valable deux ans. Pour bénéficier de la garantie, il est indispensable de présenter
l’International Warranty Card dument complétée, et portant le cachet du revendeur et la date d’achat,
à un revendeur ou un centre d’assistance technique agréé, ainsi que le ticket de caisse. Les défauts
dérivant d’accidents (choc, écrasement, etc.), utilisation incorrecte, utilisation de piles non approuvées,
piles déchargées laissées à l’intérieur de la montre, altérations, réparations et/ou modifications non
autorisées sont exclus de la garantie. De plus, la garantie ne couvre pas: les piles, les verres, les bracelets,
la décoloration du placage ou de la teinte, les effets dus à l’usure et au vieillissement normaux de la
montre. Les réparations sous garantie doivent impérativement être effectuées par un centre d’assistance
technique agréé, sous peine d'annulation de la garantie.
L'indication "water resistant" (étanche à l'eau) ne s'applique qu'aux montres sortant de nos ateliers.
Boîtier étanche aux termes de la norme DIN 8310.
conformément au décret -loi 206 – 06/09/2005
TOUTES LES MONTRES SECTOR SONT RÉALISÉES EN ACIER 304/316L HYPOALLERGÉNIQUE,
AVEC ELEMENTS EN POLYCARBONATE ET CAOUTCHOUC SILICONE, DANS LE PLEIN RESPECT DES
RÉGLEMENTATIONS ITALIENNES ET INTERNATIONALES EN VIGUEUR. ELLES SONT RÉALISÉES EN R.P.C.
SUR DESIGN MORELLATO ET COMMERCIALISÉES EXCLUSIVEMENT PAR MORELLATO SPA, SIÈGE SOCIAL
VIA COMMERCIALE, 29 – 35010 FRATTE DI S. GIUSTINA IN COLLE (PD) Italie – Code TVA 13442590157.

Sie haben die Marke
SECTOR gewählt und wir
danken lhnen für lhr Ver-
trauen. Damit Sie lhre Uhr
richtig bedienen, empfehlen
wir lhnen, diese
Gebrauchsanweisung
aufmerksam durchzulesen.
SECTOR
ENGLISH
FRANÇAIS
DEUTSCH
ITALIANO
ESPAÑOL
PORTUGUÊS
中國的

ANWEISUNgEN
Stundenzeiger
Krone
STOPPUHR
Minutenzeiger
24-Stundenzeiger
N: Normalstellung
1: Herausziehen auf Pos. 1
2: Herausziehen auf Pos. 2
Minutenzeiger
Datum
Sekundenzeiger
STOPPUHR
Sekundenzeiger

• Auf Position 1 herausziehen • Die Krone entgegen dem
Uhrzeigersinn soweit drehen, bis das
Datum des Vortages erscheint.
Zur Beachtung: Das Einstellen
des Datums nicht zwischen 21.00
und 01.00 Uhr vornehmen. Der
Datumswechsel könnte in diesem Fall
nicht korrekt erfolgen.
DAS EINSTELLEN vON ZEIT UND DATUM
Krone auf
Position 1
herausziehen.

• Krone dann auf Position 2 heraus-
ziehen, wenn der Sekundenzeiger auf 12
Uhr steht.
Zur Beachtung: Wenn die Stoppuhr
gerade misst bzw. gemessen hat und
gestoppt wird, werden die Stoppuhrzeiger
bei Herausziehen der Krone auf Position 2
automatisch auf „0“ gesetzt.
• Die Krone drehen und Stunden- und
Minutenzeiger einstellen.
• Die Krone im Uhrzeigersinn drehen, um mit
dem Stunden- und dem Minutenzeiger auf nach
24.00 Uhr vorzurücken. So wird das Datum auf
das aktuelle Datum eingestellt.
• Bei Einstellen des Stunden- und des
Minutenzeigers darauf achten, ob sich die Uhrzeit
auf den Vor- oder den Nachmittag bezieht.
DAS EINSTELLEN vON ZEIT UND DATUM
• Die Krone auf die Normalstellung
zurück drücken.
Auf die
Normalstellung
zurück
drücken.
Empfehlung:
• Beim Einstellen des Minutenzeigers sollte
dieser zuerst auf 4 bis 5 Minuten nach der
gewünschten Zeit eingestellt werden, um ihn
dann auf die genaue Minute zurückzudrehen.
Auf
Position 2
herausziehen
Table of contents
Languages:
Other Sector Watch manuals

Sector
Sector S02 User manual

Sector
Sector CHRONOGRAFO JS25 User manual

Sector
Sector Marathon User manual

Sector
Sector S-04 User manual

Sector
Sector EX-30 User manual

Sector
Sector R3251575010 User manual

Sector
Sector 9003 User manual

Sector
Sector NO LIMITS User manual

Sector
Sector EX-25 User manual

Sector
Sector S-01 User manual