Sector Marathon User manual

Sector Marathon Timer
We thank you for the
confidence that you have
shown in us by choosing the
Sector brand. To enable you
to use your watch to the best
advantage, we recommend
that you carefully read the
instructions in this leaflet.
SECTOR MARATHON TIMER
ESPAÑOL
ITALIANO
PORTUGUÊS
DEUTSCH
FRANÇAIS
ENGLISH

1. Introduction
1.1 Marathon Watch Features
1.2 Heart Rate Chest Belt
1.3 Foot Pod
2. Getting Start
2.1 Display symbols at a glance
2.2 How to navigate among Modes
3. Compatible Devices
4. Time of Day
4.1 Display format
4.2 Turn on EL backlight
4.3
Setting Time1,Time2, Keytone and Hourly Chime
4.3.1 Setting Analog time
5. User Profile
5.1 User Profile mode
5.2 Setting User Profile
6. Sport
6.1 Sport Mode Features
6.2 Sport Basic . Start, Stop, Clear sport
6.2.1 What to do when sport Memory Full
6.3 Interval Training.
Start, Pause/Stop, Interrupt
6.4 Entering Sport Setting
6.4.1 Setting Sport Alarm
6.4.2 Setting Training Set
6.4.2.1 Setting Basic Mode
6.4.2.2 Setting Interval Train Mode
6.4.3 Setting Devices
6.4.3.1 Pairing Devices
6.4.4 Calibrating Distance
6.4.4.1 Manual Distance Calibration
6.4.4.2 Auto Distance Calibration
6.4.5 Setting Units
6.5 Basic Mode . Current Phase Review
6.6 Interval Training Mode . Current
Phase Review
TABLE OF CONTENTS

7. Altimeter
7.1 In Altimeter Mode
7.2 Setting Altimeter Parameters
7.2.1 Set Units Mode
7.2.2 Calibration Mode
7.2.2.1 To Calibrate Altitude
7.2.2.2 To Calibrate Sea Level Pressure
8. File
8.1 Entering File Mode
8.1.1 Entering Individual File
8.1.2 Viewing File Summary
8.1.3 Viewing Individual Lap or Session
8.2 Clearing File Memory
9. Chrono
9.1 Record Data
9.2 Check Data
10. Timer
10.1 Setting Timer
10.2 Timer Operation
11. Alarm
11.1 Alarm Setting
12. CE/FCC Compliance
12.1 Disposal
12.2 EMC Compliance
13. Product Specifications
14. Troubleshooting guide
15. Maintenance
15.1 Low Battery Alert
15.2 Battery Replacement
16. Appendix
Icons Representation

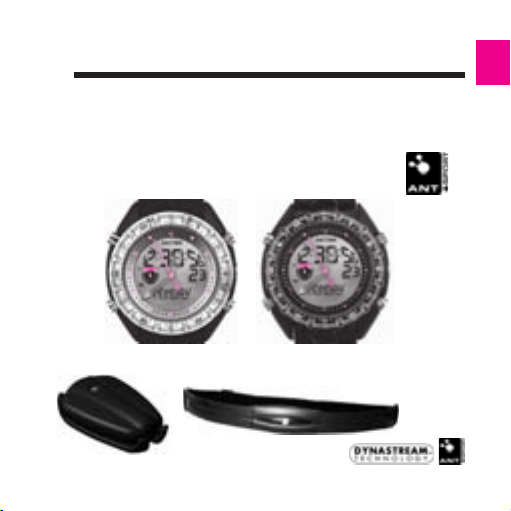
Sector Marathon is a multifunction sport watch. Apart from dual digital & analogue day of time
function, it is capable of measuring altitude and receiving 2.4GHz RF signal from heart rate
monitor, speed & distance monitor devices with .ANT+ sport. marking.
INTRODUCTION
1
S.S. Black versionS.S. Silver version
Foot Pod Heart rate chest belt

1.2 Heart rate chest belt
It is used to detect your heart beat via 2 side conductive straps. As the heart beat signal is very
weak, well positioning must be taken & the elastic belt should be fastened firmly. Wear the
HR chest belt to the chest area with less hair.
In dry climate, a few drops of water wetting on both conductive straps will ensure the best
skin contact.
In general, HR chest belt is not designed for swimming usage because salt water may interfere
with the very weak heart beat signal.
For detail operation of the HR monitor device, please refer to your HR instruction manual.
1.1 Features
- Synchronized digital & analogue time, alarm, chrono & timer
- Altitude measurement, Temperature measurement
- Heart Rate Monitor, Speed and Distance Monitor
- Repeatable Interval Training for warm up, recovery and cool down cycle
- 2.4GHz coded wireless communication to minimize any interference in environment when
working with heart rate chest belt & foot pod
- 99 Lap count for chronograph & 30 lap count for sport exercise

1.3 Foot Pod
Foot pod is usually equipped with an acceleration sensor which is to
sense the initial motion to determine the distances & speed.
Positioning the foot pod correctly is important to ensure the
accuracy. Same as heart rate chest belt, foot pod is also required to
have pairing with Marathon first before use.
For detail operation of the foot pod, please refer to your foot
pod instruction manual.
- Press S1 & S3 simultaneously and hold for a while, the Marathon will then wake up and
ready to use.
Please go to section 4 for setting TIME OF DAY.
- User is required to input his/her personal information such as weight, gender, birth date in
user profile mode. Such data is for the calculation of user.s body fitness and calories burnt.
Please refer to USER Profile mode section on how to input personal info.
GETTING START
2
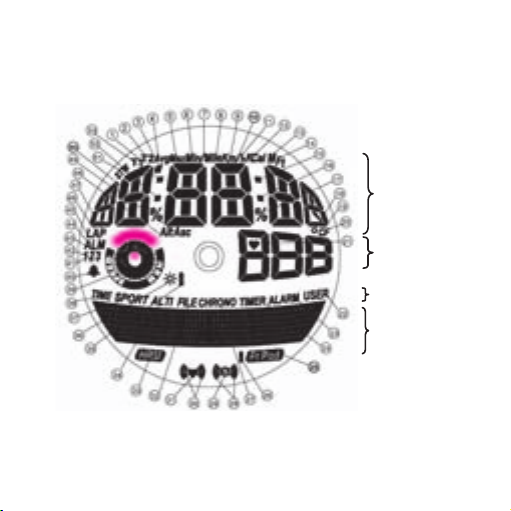
2.1 Display symbol at a glance
Row 1
Middle Row
Mode Bar
Row 2

N. Function
1 Time 1 (TOD, TOD setting, Alarm)
2 Time 2 (TOD, TOD setting)
3 Year (TOD)
4 Year (TOD)
5 Maximum mark (Sport)
6 Minimum mark (Sport)
7 Slash-1 (Sport, File, Min/Mile, Min/Km)
8 Mile mark (Sport, File)
9 Km mark (Sport, File)
10 Slash-2 (Sport, File, Mile/h, Km/h)
11 Hour mark (Sport, File)
12 K calorie mark (Sport, File)
13 Meter mark (Sport, File, Altimeter, User)
14 Feet mark (Sport, File, Altimeter, User)
15 Col-21 mark (TOD, Sport, File, Chrono, Timer)
16 Col-22 mark (TOD, Sport, File, Altimeter,
Chrono, Timer, User)
17 IN zone % mark (Sport, File, User)
18 degree mark (Sport, File, Altimeter, C, F)
19 Celsius mark (Sport, File, Altimeter, C)
20 Fahrenheit mark (Sport, File, Altimeter, F)
21 Heart Rate mark (Sport)
22 User mode mart (User)
23 Alarm mode mark (Alarm)
24 Timer mode mark (Timer)
25 Foot Pod mark (Sport)
26 Foot Pod battery mark (Sport)
N. Function
27 Chrono mode mark (Chrono)
28 Speed alarm sound mark (Sport)
29 Speed alarm mark (Sport)
30 Heart Rate alarm sound mark (Sport)
31 Heart Rate alarm sound mark (Sport)
32 File mode mark (File)
33 HRM mark (Sport)
34 Altimeter mode mark (Altimeter)
35 Watch battery mark (All modes)
36 Night mode mark (All modes)
37 Sport mode mark (Sport)
38 TOD mode mark (TOD)
39 Animations, Speedometer (TOD, Timer, Sport)
40 Chime mark (All modes)
41 Alarm 1 mark (All modes)
42 Alarm 2 mark (All modes)
43 Alarm 3 mark (All modes)
44 Alarm mark (All modes)
45 Lap mark (Sport, Chrono)
46 Lap mark (Sport, Chrono), AM mark (TOD)
47 Lap mark (Sport, Chrono), PM mark (TOD)
48 Altitude mark (Sport)
49 Ascent mark (Sport)
50 Above zone % mark (Sport, File, User)
51 Split mark (Sport, File)
52 Col-12 mark (TOD, Sport, File, Chrono, Timer, Alarm)
53 Col-11 mark (TOD, Sport, File, Chrono, Timer, Alarm)

2.2 Navigating among modes
At any mode main display, press S3 to
go to next mode, as below sequences:
Queste le modalità possibili:
TOD → Sport → Altimeter → File → Chrono → Timer →
Alarm → User → TOD
In each mode, related mode icon will show in the Mode Bar.
If you are under setting mode, press S4 2 seconds to get to the main display first
Below are each mode’s main displays:
S1 = pusher at 2 o’clock position
S2 = pusher at 4 o’ clock position
S3 = pusher at 8 o’ clock position
S4 = pusher at 10 o’clock position
S1
S2
S4
S3
TOD Sport Altimeter File
Chrono Timer Alarm User

Any devices (HRM & foot pod) with ANT+sport logo available in the market can be compatible
with this Marathon. Before getting communication between them, user is required to pair them
before each exercise so a unique ID will be generated & learned by Marathon.
Refer to Sport Pairing Device section for how to pairing with Marathon.
- Turn on your ANT+sport sensors. Some devices may require user to wear them for the device
to turn on automatically
- Place the sensors near to the Marathon (within 1 meter) to ensure maximum signal strength
during PAIRING and no other user is using ANT+ device around you
- Switch to Pairing Mode on the Marathon
- Once the unique ID is realized & learned successfully (within 15 seconds), LCD will
display .Found.
- After getting off the sensor for certain seconds (usually 30 seconds), the unique ID will
be released, Marathon will not communicate with this sensor unless performing another
PAIRING.
COMPATIBLE DEVICES
3

TIME OF DAY
4
4.1 Display format
- Under Normal time (TOD) mode main display (Refer to Getting Start section if you
encounter problem)
- Press S1 to switch among Time 1 → Date → Time 2 (Row 1 display)
- Press S2 to switch among Weekday → weekday & temperature → year month day
(Row 2 display)
- Press S3 to switch to Sport mode
4.2 Turn on el backlight
- Press and hold S3 for 2 sec to turn on the EL

4.3 Setting time1, time2, keytone & hourly chime
- Press and hold S4 for 2 sec to enter the Time Setting Mode
- Press S1/S2 to switch among setting branches:
(Time setting mode) → Time 1 setting → Time 2 setting →
Option setting → Hands SET setting
- Under above setting branches, use S3/S4 to select SET item as below, use S1/S2 to
increase or decrease the SET item.
(Time 1 setting) → SET Hour → SET Minute → SET Second → SET Year → SET Month
→ SET Day Time 1
(Time 2 setting) → SET Hour → SET Minute → SET Second → Time 2
(Option setting) → SET Hour format → SET Keytone → SET Hourly Chime → SET Night
Mode → Option
(When night mode is enabled, press any key to turn on the EL. Night mode will be turned off
automatically after 8 hours.)

4.3.1 SETTING ANALOG TIME
After battery replacement or Reset, users are required to set analog time to the current time
position manually. The succeeding analog time will be set by watch automatically whenever
digital time changes.
- When entering Hands SET setting, Row 2 will display AlignSecTo00. Second Hand will
move quickly to 00 and stop at position 00. If not, press S1 to align Second Hand to
position 00.
- Press S3/S4 to select below SET item, use S1/S2 to adjust SET item to current hand.
s position
(Hands SET setting) → SET AlignSecTo00 → SET MinuteHand → SET HourHand
- Press and hold S4 for 2 seconds for exiting setting mode. Upon exiting, Hands will move
quickly to the current digital time. (note: to avoid shock & swing during the alignment)
Row 2 will display count down time for analog hands to complete adjusting. If the waiting
time is less than moving time, hands will wait for the digital time to come.
Remark: If the setting mode is idle for 1 minute at any stage, the watch will automatically
return to Normal Time mode.

USER PROFILE
5
5.1 User profile mode
In Normal Time Mode, press S3 seven times to enter the User Profile Mode.
Use S1/S2 to view through profile sequence as below:
BMI → Activity Level → HRmax → Unit → BMI
Remarks:
BMI: Body Mass Index is a measure of body fat index based on height and weight that applies
to both adult men and women.
BMI categories are as below:
Under Weight: BMI <18.5
Normal Weight: BMI = 18.5 to 24.9
Over Weight: BMI = 25-29.9
Obesity: BMI of 30 or greater

5.2 User profile setting mode
In User Profile mode, press and hold S4 for 2 seconds to enter User Profile Setting mode. Use
S3 to select set item as below sequences and then use S1/S2 to enter set value.
Weight → Height → Birthday → Gender → Activity level → HR Max → Units
Remarks:
Weight (kg): min=20, max=200, default=60
Weight (lbs): min=44, max=440, default=143
Height (cm): min=69, max=231, default=170
Height (ft/inch): min=2’3’’, max=7’7’’, default=5’7’’
Birthday: min=1-1-1900, max = data attuale -5 anni, default=1-1-1980
Activity level: min=1, max=3, default=1
HR Max: min=80, max=240, default=200
Units: metric or imperial
Activity Level definition:
1: Do not participate regularly in programmed recreation sport or heavy physical activity
2: Participate regularly (2 to 3 times per week) in recreation or work requiring modest
physical activity, such as table tennis, bowling, weight lifting, yard work, totally about one
hour per week,
3: Participate regularly in heavy physical exercise such as running or jogging, swimming,
cycling, running in place or engaging in vigorous aerobic activity type exercise such as tennis,
basketball or handball.

SPORT
6
6.1 Sport mode features
1. Monitoring Heart Rate (with any ANT+ Heart Rate Strap)
2. Monitoring Speed, Distance and Steps of Running (with any ANT+ Foot Pod)
3. Split & Lap time
4. Pace
5. Altitude and Ascent
6. Calories Burned
7. Show IN zone and ABOVE zone percentage
8. Maximum Heart Rate and Average Heart Rate
9. Over Heart Rate Alarm
10. 30 laps and 30 Repeat Interval
11. Exercising with Interval Training Set (Max 3 sets)
12. Manual Interval, Time-based Interval, Distance-based Interval, HR-based Interval

6.2 Sport basic - start, stop, close sport
13. In Normal Time Mode, press S3 once to enter the Sport (Basic) Mode.
14. In Sport mode, press S1 to start sport, press S1 again to lap, press S2 to stop sport.
15. When sport stop, if S1 is pressed to restart, data will be recorded in the same file. Refer
to File mode section on how to view recorded file.
16. When sport stop, press & hold S2 to close sport record and then return to the
basic mode.
6.2.1 COSA FARE QUANDO LA MEMORIA SPORT E’ PIENA
17. When file memory is full, the earliest file will be deleted automatically.
User is not required to do any actions.

6.3 Interval training . Start, pause/stop, interrupt
In Sport mode, press S2 to enter interval training set 1, there are total of 3 sets for
selection. Please refer to Interval Training Setting section for setting each set with its own
training method.
Sport Basic mode → Int Training set 1 → Int Training set 2 → Int Training set 3 →
Sport Basic mode
In each interval training set, press S1 to start training. Below is sequence of training phases,
the Repeat cycle of Interval and Recovery phase can be set by user.
(Int Training set X) Warm up phase → 1st Interval phase →
1st Recovery phase → Nth interval → Cool down phase → Finish
When one phase ends and next phase starts, alarm will sound for 5 seconds. This sound can
be turned off at setting mode/Devices setting. User may also press S1 to forward to next
phase (no alarm sound).
Press S2 To Pause or Stop training. Press and hold S2 to close training at any stage.
Table of contents
Languages:
Other Sector Watch manuals

Sector
Sector EX-25 User manual

Sector
Sector CHRONOGRAFO JS25 User manual

Sector
Sector R3251575010 User manual

Sector
Sector NO LIMITS User manual

Sector
Sector S02 User manual

Sector
Sector S-04 User manual

Sector
Sector 9003 User manual

Sector
Sector CHRONO User manual

Sector
Sector EX-30 User manual

Sector
Sector S-01 User manual


