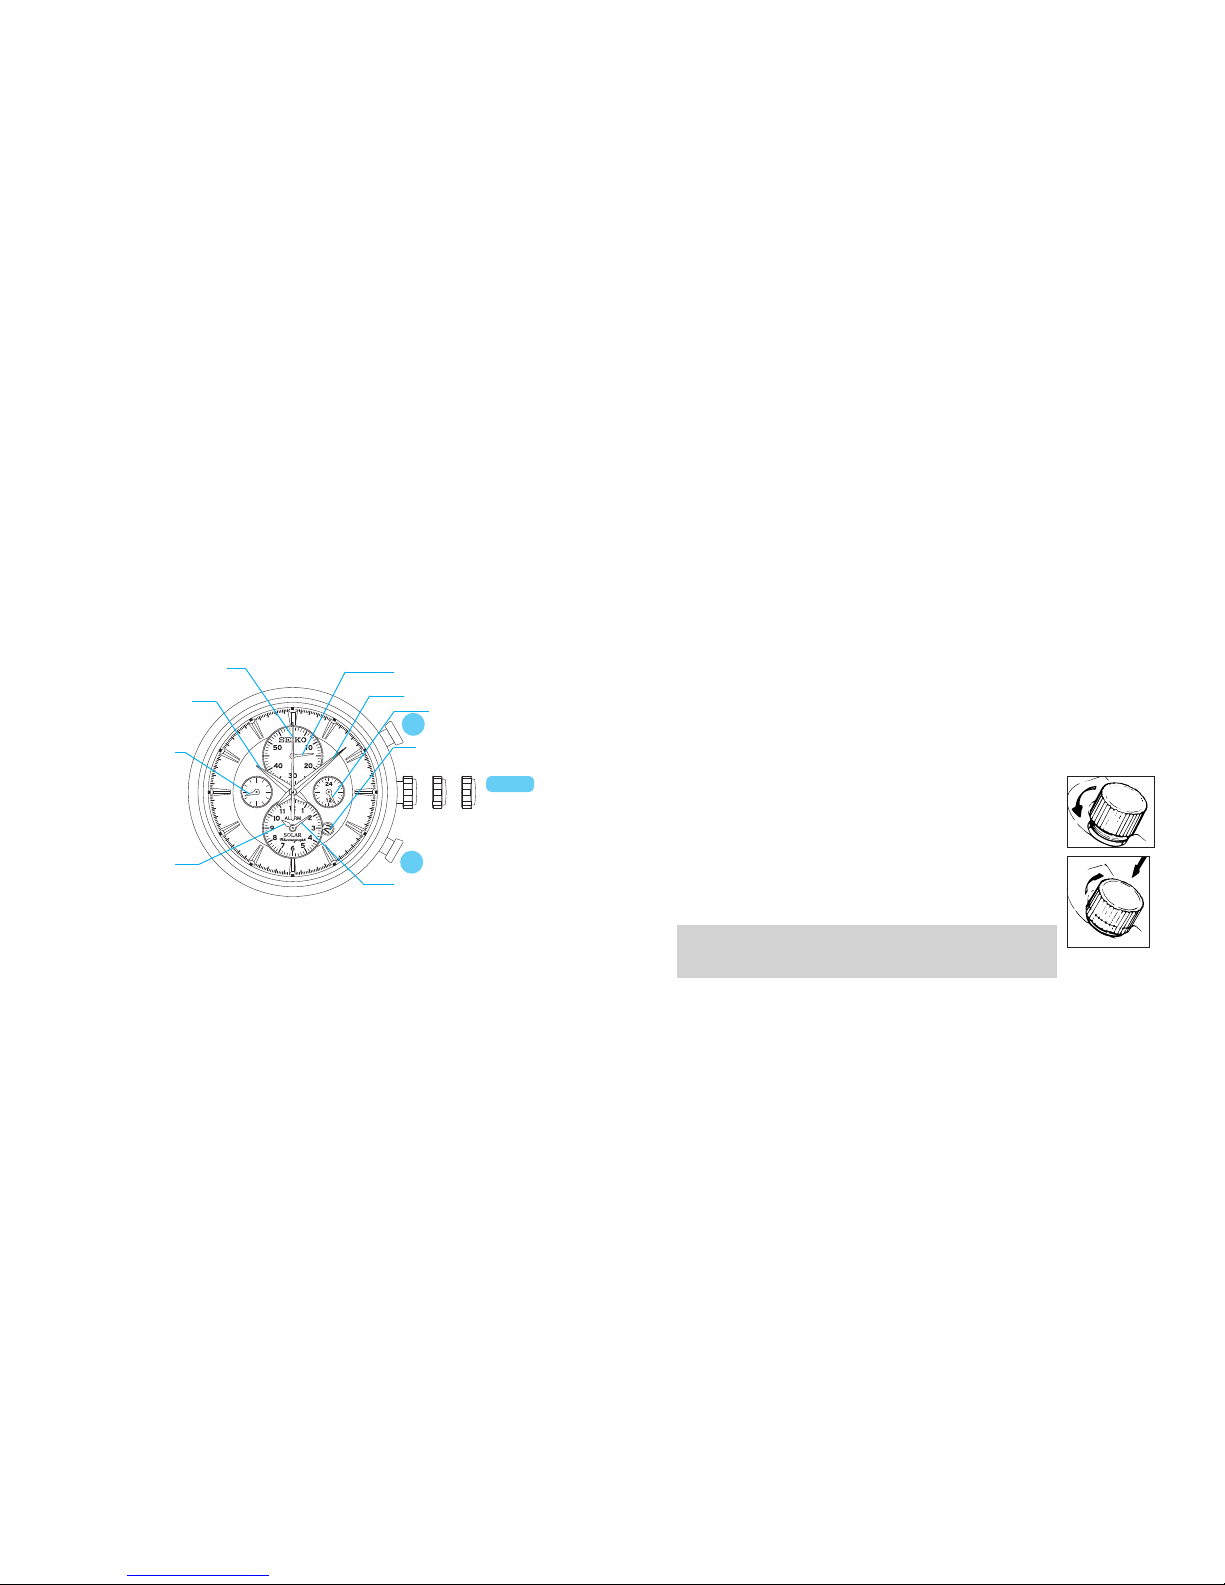
Seiko Cal. V174 User manual

Cal. V174
INSTRUCTIONS (P. 4)
BEDIENUNGSANLEITUNG (S. 35)
INSTRUCTIONS (P. 67)
ISTRUZIONI (P. 99)
INSTRUCCIONES (P. 131)
INSTRUÇÕES (P. 163)
ИНСТРУКЦИИ (P. 195)
(227 )

You are now the proud owner of a SEIKO Analogue Quartz Solar Cal. V174. For the best results,
please read the instructions in this booklet carefully before using the watch. Please keep this manual
handy for ready reference.
Wir gratulieren Ihnen zum Kauf der SEIKO Analog-Quarzuhr mit Solarzelle Kal. V174. Lesen Sie
diese Bedienungsanleitung vor der Verwendung aufmerksam durch, um ihre optimale Nutzung zu
gewährleisten. Heben Sie diese Bedienungsanleitung gut auf, um jederzeit wieder nachlesen zu können.
Vous êtes maintenant l’heureux propriétaire d’une montre à quartz solaire et analogique SEIKO Cal.
V174. Pour en obtenir des performances optimales, veuillez lire attentivement cette brochure avant
d'utiliser la montre. Conservez ce manuel pour vous y référer en cas de besoin.
Grazie di aver acquistato questo orologio SEIKO Analogico al Quarzo, Solar Cal. V174. Per poter
utilizzare l’orologio al massimo delle sue prestazioni leggere attentamente questo manuale di
istruzioni prima di passare all’uso dell’orologio stesso, e conservarlo poi per qualsiasi eventuale
futura consultazione.
Usted es ahora un orgulloso propietario de un SEIKO Cuarzo Analógico Solar Cal. V174. Para los
mejores resultados, por favor, lea cuidadosamente las instrucciones de este panfleto antes utilizar
su Reloj SEIKO. Por favor, guarde este manual en un lugar conveniente para su futura referencia.
Agora pode sentir-se orgulhoso de possuir um Seiko Solar Quartz Analógico Cal. V174. Para obter
os melhores resultados, leia atentamente as instruções contidas neste opúsculo antes de usá-lo.
Conserve este manual para consultas futuras.
Теперь вы являетесь обладателем аналоговых кварцевых часов Сейко Соляр (Seiko Solar) Калибра
V174. Перед использованием их, для достижения лучших результатов, пожалуйста, внимательно
ознакомьтесь с данной инструкцией и обязательно сохраните ее.
歡迎購買 V174 機型精工石英指針式太陽能錶。為能更有效地利用本錶,使用本錶前,請
仔細閱讀本手冊內的各項使用說明,並妥善保管本手冊,以便今後參考。

5
English
ENGLISH
4
CONTENTS
PAGE
FEATURES ......................................................................................................5
DISPLAY AND BUTTONS ..............................................................................6
SCREW-LOCK-TYPE CROWN.......................................................................7
SETTING THE TIME AND ADJUSTING THE STOPWATCH HAND POSITION
........8
SETTING THE DATE.......................................................................................12
STOPWATCH..................................................................................................13
SINGLE-TIME ALARM ...................................................................................16
HOW TO CHARGE AND START THE WATCH ..............................................19
OVERCHARGING PREVENTION FUNCTION ...............................................20
GUIDELINE OF CHARGING TIME/ACCURACY............................................21
ENERGY DEPLETION FOREWARNING FUNCTION ....................................22
NOTE ON POWER SUPPLY...........................................................................23
IMPROPER FUNCTION .................................................................................24
ROTATING BEZEL ..........................................................................................25
TACHYMETER................................................................................................26
TELEMETER ..................................................................................................28
TROUBLESHOOTING ....................................................................................30
SPECIFICATIONS ...........................................................................................34
FEATURES
n TIME/CALENDAR
n60-MINUTE STOPWATCH IN 1/5-SECOND INCREMENTS WITH SPLIT TIME
MEASUREMENT FUNCTION
nSINGLE-TIME ALARM WITHIN 12 HOURS
nPOWERED BY LIGHT ENERGY
nNO BATTERY CHANGE REQUIRED (Please refer to page 23 "NOTE ON POWER
SU PP LY" )
nLASTS FOR 6 MONTHS AFTER FULL CHARGE
nENERGY DEPLETION FOREWARNING FUNCTION
nOVERCHARGING PREVENTION FUNCTION
CAL. V174

7
English
English
6
a b c
CROWN
Hour hand Minute hand
STOPWATCH 1/5-second hand STOPWATCH minute hand
ALARM minute hand
Small second hand Date
a: Normal position
b: First click
c: Second click
ALARM hour hand
DISPLAY AND BUTTONS
• Somemodelsmayhaveascrew-lock-typecrown.Ifyourwatchdoes,refertothe
“SCREW-LOCK-TYPECROWN”sectiononthenextpage.
• Simpliedillustrationsmaybeusedinthefollowingsectionsofthismanual.
SCREW-LOCK-TYPE CROWN
uSome models may have a screw-lock mechanism that can securely lock the
crown by a screw when not being operated.
uLocking the crown will help prevent operational errors and enhance the
water resistant quality of the watch.
uIt is necessary to unlock the screw-lock-type crown before operating it.
Once you have finished operating the crown, make sure to relock it.
lHow to use the screw-lock-type crown
Keep the crown securely locked unless you need to operate it.
• Whenlockingthecrown,turnitslowlywithcare,ensuringthatthe
screwisproperlyengaged.Ifthereisanyresistance,unscrewitand
tryagain.Becarefulnottoforciblypushitin,asdoingsomaydamage
thescrewholeinthecase.
[How to unlock it]
Turn the crown counterclockwise.
The crown is unlocked and can then be operated.
[How to lock it]
Once you have finished operating the crown, turn it
clockwise while gently pressing it in toward the watch body
until it stops.
A
B
24-hour hand

9
English
English
8
30
60
55
05
10
15
50
45
30
25
20
35
40
60
SETTING THE TIME AND ADJUSTING
THE STOPWATCH HAND POSITION
Minute hand
Hour hand
Pull out to the second click when the second hand is at the 12 o'clock
position.
Turn to set the hour and
minute hands.
Small second
hand
1. MAIN TIME SETTING
lThis watch is designed so that the following adjustments are made with the
crown at the second click position:
1) main time setting
2) alarm hand adjustment
3) stopwatch hand position adjustment
Once the crown is pulled out to the second click, be sure to check and adjust
1) and 2) at the same time. If needed, 3) should also be adjusted then.
30
60
55
05
10
15
50
45
30
25
20
35
40
60
ALARM
3
9
6
12
1. Whenthestopwatchisorhasbeenmeasuring,ifthecrownispulledouttothesecondclick,itwill
automaticallyresettheSTOPWATCHhandsto“0.”
2. The24-hourhandmovescorrespondinglywiththehourhand.
3. Ifthealarmhasbeensetandthecrownispulledouttothesecondclick,theALARMhandswillturn
toindicatethecurrenttime.
4. Itisrecommendedthatthehandsbesettothetimeafewminutesaheadofthecurrenttime,taking
into consideration the time required to set the ALARM hands and to adjust the STOPWATCH hand
positionifnecessary.
5. Whensettingthehourhand,besuretocheckthatAM/PMiscorrectlyset.Thewatchdesignedso
thatthedatechangesoncein24hours.
6. Whensettingtheminutehand,rstadvanceit4to5minutesaheadofthedesiredtimeandthen
turnitbacktotheexactminute.
2. ALARM HAND ADJUSTMENT
Hour hand Minute hand
ALARM hour hand ALARM minute hand
Press repeatedly to set the ALARM
hands to the time indicated by the
main time hands.
ISet the ALARM hands to the time
the main time hands indicate.
TheALARMhandsmovequicklyifButton
Biskeptpressed.
CROWN
CROWN
B
B

11
English
English
10
MIN.
15
45
30
60
55
05
10
15
50
45
30
25
20
35
40
60
3. STOPWATCH HAND POSITION ADJUSTMENT
STOPWATCH minute hand
t
t
Press for 2 seconds.
TheSTOPWATCHminutehandturnsafull
circle.
Press repeatedly to set the
STOPWATCH minute hand to the "0"
position.
Press for 2 seconds.
Press repeatedly to set the
STOPWATCH 1/5-second hand to the
"0" position.
t
STOPWATCH 1/5-second hand The STOPWATCH 1/5-second hand turns a
fullcircle.
t
IIf the STOPWATCH hands are not in
the "0" position, follow the procedure
below to set them to the "0" position.
ThehandmovesquicklyifButtonBiskept
pressed.
ThehandmovesquicklyifButtonBiskept
pressed.
t
t
lThe ALARM and STOPWATCH hands can be readjusted in the
following order by pressing Button for 2 seconds.
STOPWATCH
minute hand
▲
STOPWATCH
1/5-second hand
▲
ALARM hands
* The ALARM hands
advance12hours. * The STOPWATCH minute
handturnsafullcircle.
* The STOPWATCH
1/5-second hand turns
afullcircle.
▲
Push back into the normal position in
accordance with a time signal.
Afteralltheadjustmentsarecompleted,
checkthatthemaintimeandalarmhands
indicatethesametime.
A
B
A
B
A
B
A
CROWN

13
English
English
12
55
05
10
15
50
45
30
25
20
35
40
60
SETTING THE DATE
lBefore setting the date, be sure to set the main time.
Pull out to the first click.
t
Turn clockwise until the desired date
appears.
t
Push back into the normal position.
Date
1. ItisnecessarytoadjustthedateattheendofFebruaryand30-daymonths.
2. Donotsetthedatebetween9:00p.m.and1:00a.m.Otherwise,thedatemaynotchangeproperly.
3. DonotpressButtonBwhenthecrownisattherstclickposition,asthiswillmovetheALARM
hands.
MIN.
15
45
30
60
55
05
10
15
50
45
30
25
20
35
40
60
STOPWATCH
lThe stopwatch can measure up to 60 minutes in 1/5-second increments.
When the measurement reaches 60 minutes, the stopwatch automatically
stops.
lSplit time measurement is available.
IBefore using the stopwatch, be sure to check that the crown is set at the normal
position and that the STOPWATCH hands are reset to the "0" position.
STOPWATCH minute hand
STOPWATCH 1/5-second hand
• IftheSTOPWATCHhandsdonotreturntothe“0”positionwhenthestopwatchisreset
to“0,”followtheprocedurein“SETTINGTHETIMEANDADJUSTINGTHESTOPWATCH
HANDPOSITION”.
CROWN
A
B

15
English
English
14
<How to reset the stopwatch>
WHILE THE STOPWATCH HANDS ARE MOVING
1. Press Button A to stop the stopwatch.
2. Press Button B to reset the stopwatch.
WHILE THE STOPWATCH HANDS ARE STOPPED
One of the following stopwatch operations has been made. Reset the stopwatch
accordingly.
[When the stopwatch is stopped]
1. Press Button B to reset the stopwatch.
[When the split time measurement is displayed while the stopwatch is
measuring]
1. Press Button B to release the split time display. The stopwatch hands
move quickly, and then indicate the measurement in progress.
2. Press Button A to stop the stopwatch.
3. Press Button B to reset the stopwatch.
[When the split time measurement is displayed and the stopwatch is
stopped]
1. Press Button B to release the split time display. The stopwatch hands
move quickly, and then stop.
2. Press Button B to reset the stopwatch.
Accumulated elapsed time measurement
A
START
A
STOP RESTART
t
t
A
STOP RESET
B
t
A
t
RestartandstopofthestopwatchcanberepeatedbypressingButtonA.
Split time measurement
A
START SPLIT
t
t
A
STOP RESET
B
t
t
BB
MeasurementandreleaseofsplittimecanberepeatedbypressingButtonB.
SPLIT
RELEASE
Measurement of two competitors
A
START
t
t
B
RESET
B
t
t
B A
FINISH TIME
OF 1ST COM-
PETITOR
2ND COMPETI-
TOR FINISHES
FINISH TIME
OF 2ND COM-
PETITOR
Standard measurement
A A B
t
t
START STOP RESET

17
English
English
16
ALARM
3
9
6
12
55
05
10
15
50
45
30
25
20
35
40
60
B
SINGLE-TIME ALARM
lThe alarm can be set to ring only once at a designated time within the
coming 12 hours.
lThe alarm time can be set in one minute increments.
l You can preview the alarm sound by using the sound demonstration
function.
IBefore using the alarm, check that the ALARM hands are adjusted to
the current time. (See "SETTING THE TIME AND ADJUSTING THE
STOPWATCH HAND POSITION")
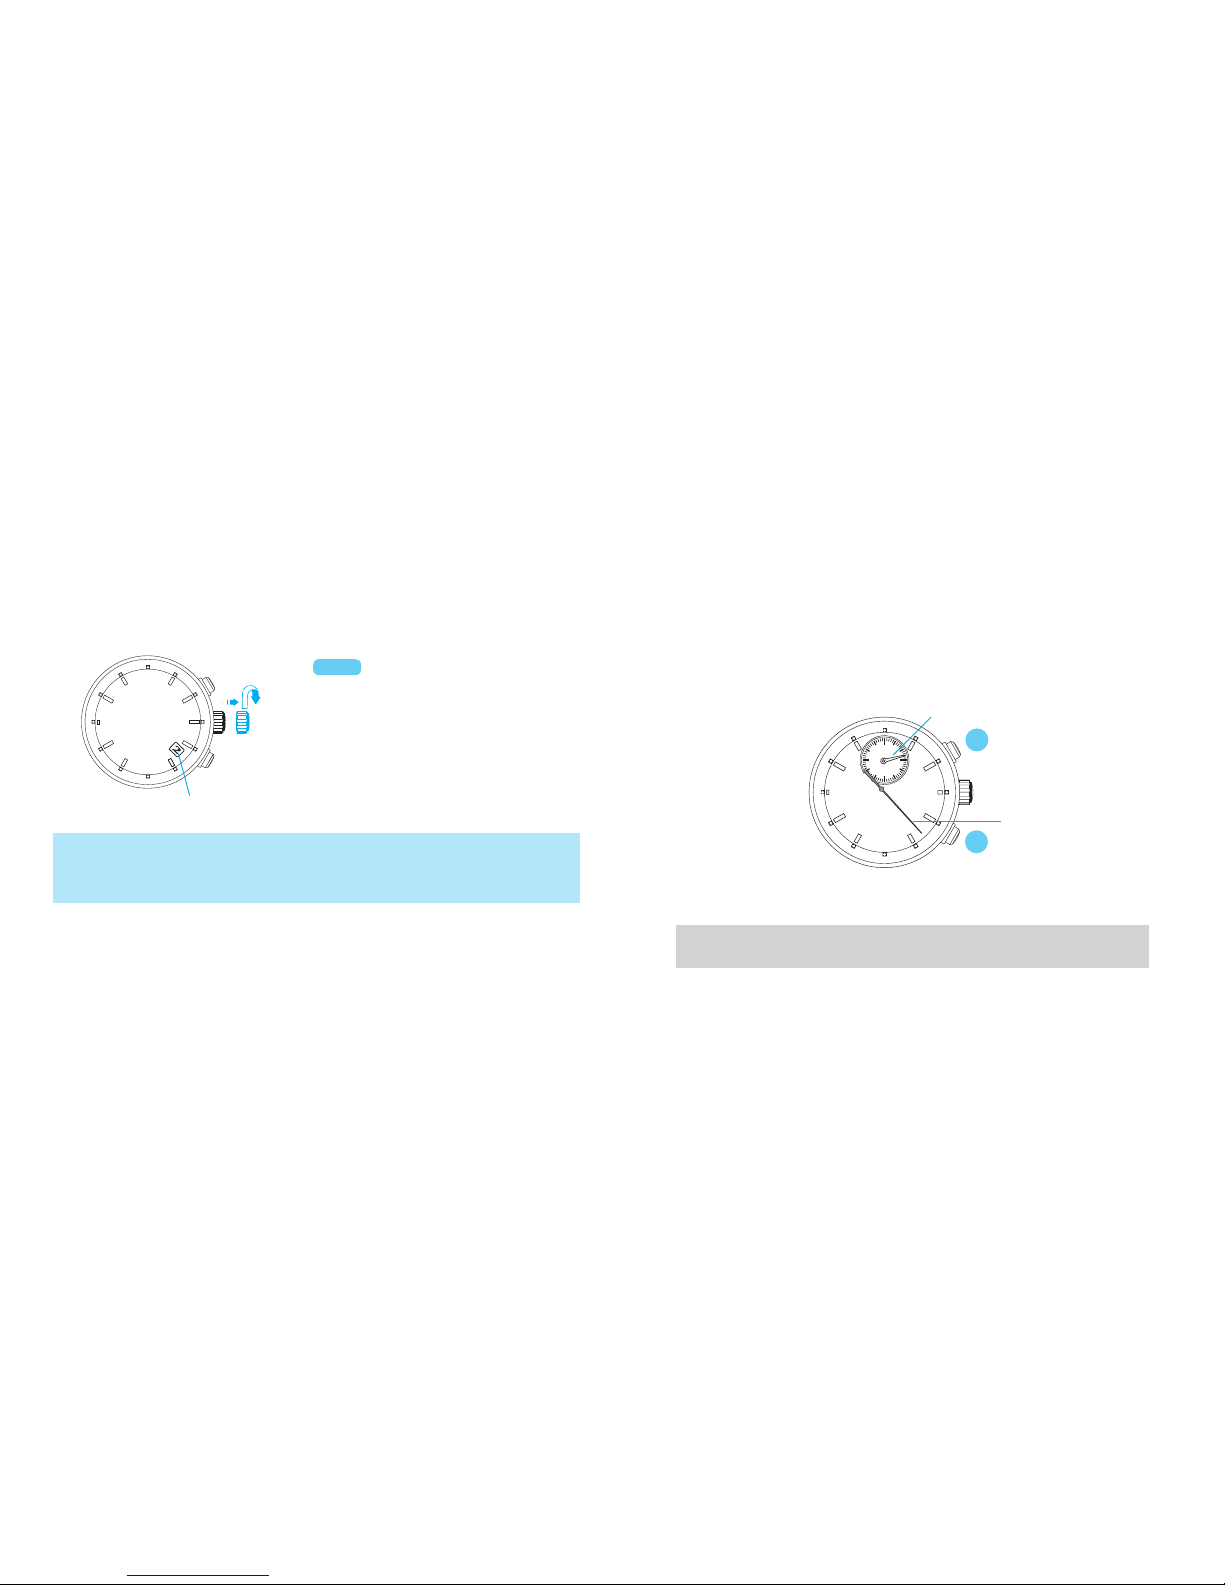
ALARM TIME SETTING
ALARM minute hand
Pull out to the first click.
B
t
t
Press repeatedly to set the
desired alarm time.
Push back into the normal
position.
Thealarmisautomaticallyengaged.
ALARM hour hand
TheALARMhandsmovequicklyif
ButtonBiskeptpressed.
lHOW TO STOP THE ALARM
At the designated time the alarm rings for 20 seconds, and it is automatically
disengaged as it stops. To stop it manually, press Button A or B.
1. Thesingle-timealarmcannotbesetforatimemorethan12hoursaheadofthecurrenttime.While
youkeepButtonBpressedtoadvancetheALARMhandsquickly,theystopwhentheyindicatethe
currenttimeandthealarmisdisengaged.Inthatcase,releaseButtonB,andthen,pressandhold
thebuttonagaintosettheALARMhandstothedesiredtime.
2. Whilethecrownisatthenormalposition,theALARMhandsindicatethecurrenttimewhenthe
alarmisdisengagedandthedesignatedalarmtimewhenitisengaged.
1. Whilethestopwatchismeasuring,thealarmringsdifferentlythanusual.However,thisis
notamalfunction.
2. Whilethealarmisringing,pressingButtonAorBwillonlystopthealarm,andno
stopwatchoperationcanbemade.
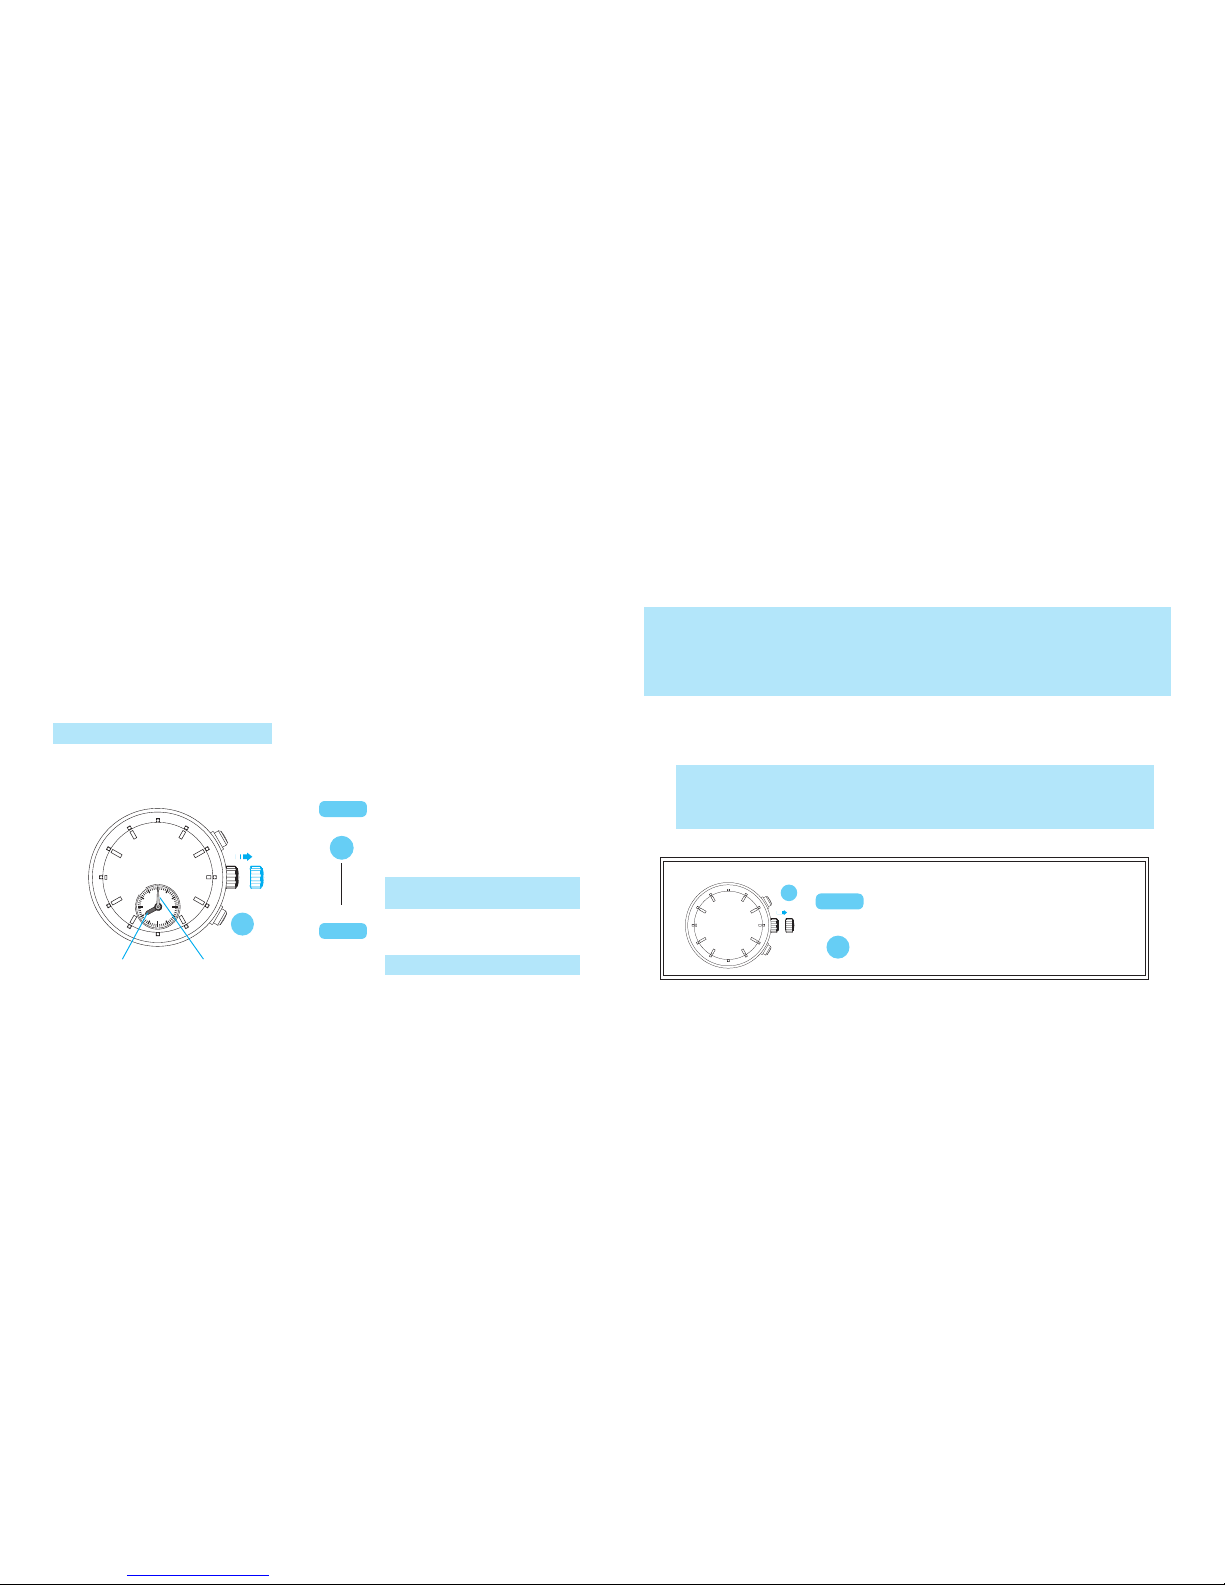
CROWN
CROWN
Pull out to first click.
Press for longer than 3 seconds. The
alarm sound can be heard while Button A
is kept pressed.
ALARm sOuNd dEmONsTRATION FuNCTION
t
55
05
10
15
50
45
30
25
20
35
40
60
ACROWN
A

19
English
English
18
ALARM
3
9
6
12
55
05
10
15
50
45
30
25
20
35
40
60
HOW TO CHARGE AND START THE WATCH
uWhen you start the watch or when the energy in the rechargeable battery is
reduced to an extremely low level, charge it sufficiently by exposing the watch
to light.
1 Exp ose the wat ch to sunlight or strong
artificial light.
Whenthewatchhasstoppedoperating,thesecond
handwillstartmovingat2-secondintervals.
See“GUIDELINEOFCHARGINGTIME/ACCURACY.”
2 Keep the watch exposed to the light until the
second hand moves at 1-second intervals.
3 When the watc h is charge d after it has
completely stopped, set the date and time
before wearing the watch.
lHOW TO CANCEL THE ALARM TIME YOU HAVE SET
Pull out to the first click.
t
t
Press and hold until the ALARM
hands stop and indicate the
current time.
Push back into the normal
position.
• Tocorrectthealarmtimeyouhaveset,followtheproceduredescribedin“ALARMTIMESETTING.”
CROWN
B
CROWN
B

21
English
English
20
Caution for charging
lWhen charging the watch, do not place it too close to a photoflash
light, spotlight, incandescent light or other light sources as the watch
temperature will become extremely high, causing damage to the parts
inside the watch.
lWhen exposing the watch to sunlight to charge it, do not leave it on the
dashboard of a car, etc., for a long time, as the watch temperature will
become extremely high.
lWhile charging the watch, make sure the watch temperature does not
exceed 60 °C.
CAUTION
OVERCHARGING PREVENTION FUNCTION
No matter how long the secondary battery is charged, the performance of the
watch will not be degraded. When the secondary battery becomes fully charged,
the overcharging prevention function will be automatically activated to prevent it
from being charged further.
vThe above table provides only a general guideline.
GUIDELINE OF CHARGING TIME/ACCURACY
Environment/Lightsource (lux)
V174
A
(minutes)
B
(hours)
C
(hours)
General offices/ Fluorescent light (700)
150 60 -
30W20cm/ Fluorescent light (3000) 33 13 110
Cloudy weather/Sunlight (10000) 93.5 30
Fair weather/Sunlight (100000) 20.6 5
Expected life per charge from full
charge to stoppage 6 months
Loss/gain (monthly rate)
Less than 15 seconds when the watch
is worn on your wrist at a normal
temperature range (5 ºC to 35 ºC)
Operational temperature range -10 ºC to 60 ºC
A: Time to charge 1 day of power
B: Time required for steady operation
C: Time required for full charge
uThe watch operates while
charging electricity by
converting light received on
the dial to electrical energy.
It cannot properly operate
unless the remaining energy
is sufficient. Place or store
the watch in a location
receiving light etc., to
sufficiently charge electricity.
• Whenthewatchis
stopped or the second
hand starts moving
at 2-second intervals,
charge the watch by
exposing it to light.
• Thetimerequiredfor
charging the watch
varies depending on
the calibres. Check the
calibre of your watch
engraved on the back
cover.
• It is recommended that
the watch be charged for
as long as the charging
time "B" to assure the
stable movement of the
watch.

23
English
English
22
ENERGY DEPLETION FOREWARNING FUNCTION
lWhen the energy stored in the rechargeable battery is reduced to an extremely
low level, the second hand starts moving at 2-second intervals instead of the
normal 1-second intervals. The watch remains accurate even while the second
hand is moving at 2-second intervals.
lWhen this occurs, recharge the watch as soon as possible by exposing it to light.
Otherwise, the watch may stop operating in a few days. (For recharging the
watch, see “HOW TO CHARGE AND START THE WATCH”)
• Whilethesecondhandismovingat2-secondintervals,thestopwatchcannotbeactivated.
Thisisnotamalfunction.
• Ifthesecondhandstartstomoveat2-secondintervalswhilethestopwatchisoperating,
thestopwatchwillbeautomaticallystoppedandthestopwatchhandswillreturntothe“0”
position.
• Whilethesecondhandismovingat2-secondintervals,thealarmtimecannotbeset.
• Ifthetimereachesthealarmtimewhilethesecondhandismovingat2-secondintervals,
thealarmwillnotsound,andthealarmwillbeautomaticallycancelled.
NOTE ON POWER SUPPLY
l The battery used in this watch is a rechargeable battery, which is different
from ordinary silver oxide batteries. Unlike other disposable batteries such as
dry-cell batteries or button cells, this rechargeable battery can be used over
and over again by repeating the cycles of discharging and recharging.
l The capacity or recharging efficiency of the rechargeable ba ttery may
gradually deteriorate for various reasons such as long-term use or usage
conditions. Worn or contaminated mechanical parts or degraded oils may
also shorten recharging cycles. If the efficiency of the rechargeable battery
decreases, it will be necessary to have the watch repaired.
lDo not remove the rechargeable battery yourself. Replacement of the
rechargeable battery requires professional knowledge and skill. Please
ask a watch retailer for replacement of the rechargeable battery.
lInstallation of an ordinary silver oxide battery can generate heat that can
cause bursting and ignition.
CAUTION
vTO PREVENT THE ENERGY DEPLETION
•When wearing the watch, make sure that the watch is not covered by
clothing.
•When the watch is not in use, leave it in a bright place as long as
possible.

25
English
English
24
IMPROPER FUNCTION
When an abnormal display appears, follow the procedures below to reset the built-
in IC. The watch will resume its normal operation.
<HOW TO RESET THE IC>
ALARM
MIN.
15
45
30
30
60
3
9
6
12
60
55
05
10
15
50
45
30
25
20
35
40
60
1. Pull out the crown to the second
click.
2. Keep pressing down Button A and
B for 3 seconds or longer.
3. Pu sh the cr ow n bac k in to t he
normal position and check if the
small sec on d ha nd m oves a s
normal.
ROTATING BEZEL
(for models with rotating bezel)
lThe rotating bezel can show up to 60 minutes of elapsed time.
1 Turn the rotating bezel to align its " "
mark with the minute hand.
Note:Forsomemodels,therotatingbezelrotatesonlycounterclockwise.
Start
Elapsedtime
2 Read the number on the rotating bezel
that the minute hand points to.
30minuteshave
elapsed.
B
A
CROWN
• ResettingtheICwillinitializethewatch.Beforestartingtousethewatch,itwillbe
necessarytosetthetimeandadjusttheSTOPWATCHhandstothe“0”position.
Referto“SETTINGTHETIMEANDADJUSTINGTHESTOPWATCHHAND
POSITION”sectionofthismanual.

27
English
English
26
TACHYMETER
(for models with tachymeter scale on the dial)
lTachymeter scale can be used only when the time required is less than 60 seconds.
TO MEASURE THE HOURLY AVERAGE SPEED OF A VEHICLE
Use the stopwatch to determine
how many seconds it takes to
go 1 km or 1 mile.
Tachymeter scale indicated by
the STOPWATCH 1/5-second
hand gives the average speed
per hour.
Ex. 1
STOPWATCH 1/5-
secondhand:
40seconds
Tachymeterscale:"90"
“90” (tachymeter scale figure) x 1 (km or mile)
= 90 km/h or mph
Ex. 2: If the measuring distance is extended to 2 km or miles or shortened to 0.5 km or
miles and the STOPWATCH 1/5-second hand indicates “90” on tachymeter scale:
"90" (tachymeter scale figure) x 2 (km or mile) = 180 km/h or mph
"90" (tachymeter scale figure) x 0.5 (km or mile) = 45 km/h or mph
TO MEASURE THE HOURLY RATE OF OPERATION
Use the stopwatch to measure
the time required to complete
1 job.
1
Tachymeter scale indicated by
the STOPWATCH 1/5-second
hand gives the average number
of jobs accomplished per hour.
2
Ex. 1
STOPWATCH 1/5-
secondhand:
20seconds
Tachymeterscale:"180"
“180” (tachymeter scale figure) x 1 job
= 180 jobs/hour
Ex. 2: If 15 jobs are completed in 20 seconds:
"180" (tachymeter scale figure) x 15 jobs = 2700 jobs/hour
1
2

29
English
English
28
TELEMETER
(for models with telemeter scale on the dial)
l The telemeter can provide a rough indication of the distance to the source of
light and sound.
lThe telemeter indicates the distance from your location to an object that emits
both light and sound. For example, it can indicate the distance to the place
where lightning struck by measuring the time elapsed after you see a flash of
lightning until you hear the sound.
lA flash of lightning reaches you almost immediately while the sound travels to
you at a speed of 0.33 km/second. The distance to the source of the light and
sound can be calculated on the basis of this difference.
lThe telemeter scale is graduated so that the sound travels at a speed of 1 km in
3 seconds.*
*Undertheconditionoftemperatureof20° C(68° F)
The telemeter provides only a rough indication of the distance to the place
where lightning struck, and therefore, the indication cannot be used as the
guideline to avoid the danger of lightning. It should also be noted that the
speed of the sound differs depending on the temperature of the atmosphere
where it travels.
HOW TO USE THE TELEMETER
Before beginning, check that the stopwatch has been reset.
START
(Flash of light)
STOP
(Crash of thunder)
Press Button A to start the
stopwatch as soon as you
see light.
When you hear the sound,
press Button A to stop the
stopwatch.
Read the telemeter scale
that the STOPWATCH 1/5-
second hand points to.
Approx. 3 km
• PleasenotethattheSTOPWATCH1/5-secondhandmovesin1/5-secondincrementsanddoesnot
always pointexactlytothegraduationsofthetelemeterscale.Thetelemeterscalecanbeused
onlywhenthemeasuredtimeislessthan60seconds.
3
2
1
CAUTION

31
English
English
30
TROUBLESHOOTING
Troubles Possible causes
The watch stops operating. The energy has been depleted.
The small second hand moves at
two-second intervals. The energy is running short.
The stopped watch has been
charged for longer than the time
required for full charge, but the
second hand does not resume
one-second interval movement.
The light the watch has been exposed to was
too weak.
The built-in IC has fallen into an unstable
condition.
The watch temporarily gains or
loses time.
The watch has been left or worn in extremely
high or low temperatures.
The watch has been left close to an object
with a strong magnetic field.
You have dropped the watch, hit it against a hard
surface or worn it while playing active sports.
The watch was exposed to strong vibrations.
Solutions
If you often encounter this problem even though you wear the watch everyday, the
watch may not be exposed to sufficient light while you wear it. For example, the
watch may be covered by the cuff of clothing. Re
charge the watch sufficiently by
exposing it to light.
The time required for charging will vary depending on the intensity of light.
Recharge the watch referring to "GUIDELINE OF CHARGING TIME/ACCURACY."
Reset the watch by following the instructions in “IMPROPER FUNCTION."
Return the watch to a normal temperature so that it works accurately as usual, and
then reset the time. The watch has been adjusted so that it works accurately when
it is worn on your wrist under a normal temperature range between 5 ºC and 35 ºC.
Correct this condition by moving and keeping the watch away from the
magnetic source. If this action does not correct the condition, contact the
retailer from whom the watch was purchased.
Reset the time. If the watch does not return to its normal accuracy after
resetting the time, contact the retailer from whom the watch was purchased.

33
English
English
32
Troubles Possible causes
The STOPWATCH hands do not
return to the "0" position when the
stopwatch is reset.
Affected by external sources, or because the
internal IC had been reset, the stopwatch hand
positions have moved out of correct alignments.
Although the alarm time has not
been set, the time on the alarm
sub dial and the time on the main
dial are not the same.
The watch has been left close to an object
with a strong magnetic field. The watch has
been exposed to strong vibrations.
The inner surface of the glass is
clouded.
Moisture has entered the watch because the
gasket has deteriorated.
The date changes during the day. The time is set 12 hours ahead of or behind
the correct time.
Solutions
Adjust the STOPWATCH hands to the "0" position by following the instructions in
“SETTING THE TIME AND ADJUSTING STOPWATCH HAND POSITION”
Reset the time for main dial and alarm sub dial.
Contact the retailer from whom the watch was purchased.
Reset the time correctly, referring to “SETTING THE TIME AND ADJUSTING
STOPWATCH HAND POSITION”
• Intheeventofanyotherproblem,pleasecontacttheretailerfromwhomthewatchwaspurchased.

English
34
SPECIFICATIONS
1 Frequency of crystal oscillator ............. 32,768 Hz (Hz = Hertz … Cycles per second)
2 Loss/gain (monthly rate) ...................... ±15 seconds at normal temperature range
(5 °C to 35 °C/ 41 °F to 95 °F)
3 Operational temperature range............. –10 °C to 60 °C/ 14 °F to 140 °F
4 Driving system ...................................... Step motor 4 pieces
5 Display system
Time/calendar................................... 24-hour, hour, minute and small second hands
Date is displayed in numerals.
Stopwatch ......................................... STOPWATCH 1/5-second and STOPWATCH
minute hands
Alarm................................................. Alarm hour and minute hands
6 Power supply.........................................
Manganese titanium-lithium rechargeable battery
7
Continuous operating time from full charge
....... Approximately 6 months i
f the stopwatch is used
for shorter than 1 hour per day and the alarm
sounds for shorter than 20 seconds per day
8 Additional function ................................ Energy depletion forewarning function,
overcharging prevention function
9 IC (Integrated Circuit) ........................... C-MOS-IC, 1 piece
• The specications are subject to change without prior notice due to product
improvements.
This manual suits for next models
1
Table of contents
Other Seiko Watch manuals

Seiko
Seiko 6M13 User manual

Seiko
Seiko 5M62 User manual

Seiko
Seiko 7T85 Quick start guide

Seiko
Seiko Astron SSH109J User manual

Seiko
Seiko Cal. 8R39 User manual

Seiko
Seiko Conceptual S23158J User manual

Seiko
Seiko SKY671P1 User manual

Seiko
Seiko W073 User manual

Seiko
Seiko SSE017J9 User manual

Seiko
Seiko SRX011P1 User manual

Seiko
Seiko 7B24 User manual

Seiko
Seiko 7T82A Quick start guide

Seiko
Seiko 7D Series Owner's manual

Seiko
Seiko 7F22 User manual

Seiko
Seiko Cal. 5J22 5J32 User manual

Seiko
Seiko 6G34A Quick start guide

Seiko
Seiko Essentials SSA346 User manual

Seiko
Seiko 7T04 User manual

Seiko
Seiko Presage SRQ033J User manual

Seiko
Seiko H024 User manual