Serene S2212 Manual

Europa - Model S2212
Touch Control Programable Panel
Operating &
Installation Manual
Electronic 24/7 Programming

2
Introduction
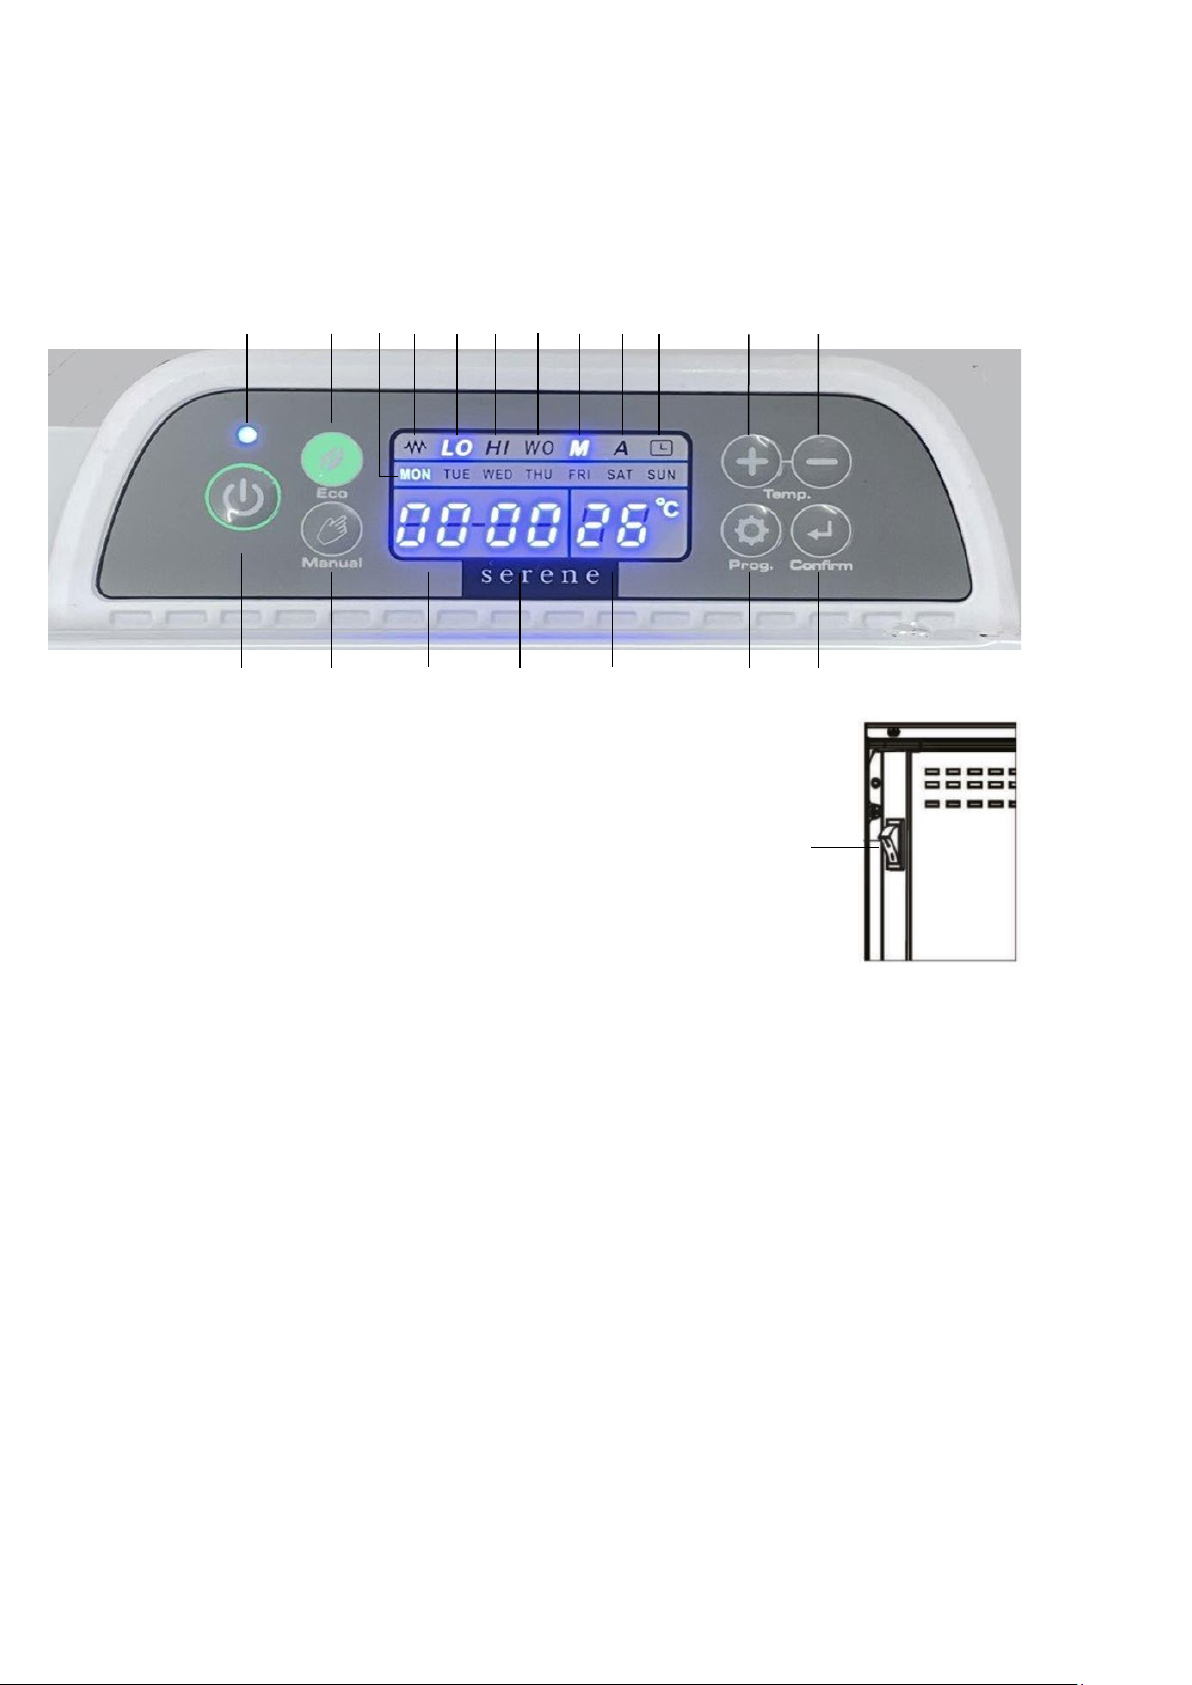
The Serene Europa S2212 is an easy to use fully programmable real time electronic
controlled heater with manual override and ECO program.
The electronic thermostat samples the air temperature every few minutes which
ensures that the element is energized for shorter periods minimising power usage.
Safety Information
•When using any electrical appliance, safety precautions should always be observed.
Read these instructions carefully, and retain for future reference. For service, contact
your nearest authorised service agent.
•Under no circumstances should an unauthorized person open the heater to adjust
the thermostat.
•This appliance is not intended for use by persons (including children) with reduced
physical, sensory or mental capabilities, or lack of experience and knowledge, unless
they have been given supervision or instruction concerning use of the appliance by a
person responsible for their safety.
•Children should be supervised to ensure that they do not play with the appliance. Do
NOT use this appliance other than for its intended use.
•Use this appliance only with the voltage specified on the rating label.
•Be very careful not to touch hot surfaces or moving parts.
•Do NOT cover the grilles or place any object or material up against the unit as this
may block the entry or exhaust of airflow.
•Do NOT probe any opening to remove fluff. To ensure trouble-free performance, it is
recommended that the unit be isolated from the power supply and a vacuum cleaner
used to remove dust and fluff from the inlet and outlet grilles on a regular basis.
•Installation must be performed by a licensed electrician. Regulations require that
electrical work be carried out only by properly qualified person. For your own safety
and that of others, ensure this is done.
•Do NOT allow the supply cord to come into contact with heated surfaces during
operation.

3
Safety Cutout:
Serene Convection heating panels are fitted with an auto-reset thermal cutout. This
safety device will automatically switch off the elements should the heater reach an
abnormal temperature.
Should this occur: switch off the heater immediately and allow the heater to cool-
down. Overheating is normally caused by blockage of the air vents or by the vents
being covered.
NEVER COVER THE HEATING PANNEL OR ANY OF THE VENTS. To clean the vents, use a
vacuum cleaner as necessary.
Installation
Connection Details:
The heater is supplied with a power cord fitted with a 3-pin plug and is IP24 compliant.
Electrical Installation:
This appliance must be installed in accordance with the current electrical wiring rules
and regulations.
The heater must not be located immediately below a socket-outlet.
When used in a bathroom, the heater must be installed such that the controls cannot
be touched by a person in the bath or shower.
The minimum required distance from the heater to any floor is 150mm. The minimum
required distance from the heater to any adjacent wall is 200mm.

4
Wall Mounting Instructions:
The heater is fixed on the wall with the mounting bracket attached to back of the
heater.
To secure mounting bracket to the wall
•Remove the wall mounting bracket from the back of the heater, by compressing
the fittings at the top and/or sides of the bracket, which clip into the heater
body.
•Place the mounting bracket against the wall, ensuring the bracket is level and the
minimum distance between the heater and the adjacent surfaces are adhered to
•Mark and drill the fixing holes at the top and bottom of the mounting bracket,
and attached to the wall with suitable screws and/or wall anchors).
•Locate the heater over the bottom clips of the wall bracket and then push the
heater securely into the fittings on the top and/or sides of the bracket.
To remove heater from the wall
•Using a pointed tip screwdriver, push in and lever out the fittings at the top
and/or sides of wall mounting bracket.
•Lift the heater up and away from the wall.
Important:
The minimum required distance from the heater to any floor is 150mm. The
minimum required distance from the heater to any adjacent wall is 200mm.
The heater must NOT be located immediately below a socket outlet or within reach
of a bath or shower.

5
Guide to the Control Panel
Operation and Functions:
1 :
Power On/Off
2 :
Manual or Automatic mode
3 :
Programing
4 :
Confirm
5-6 :
Temp Adjustment
7 :
ECO Mode
8 :
Power indicator
9 :
Day Indicator
10 :
Heating indicator
11 :
Low power setting
12 :
High power setting
13 :
Manual Mode Indicator
14 :
Open Window indicator
15 :
Auto Mode Indicator
16 :
Timer set Indicator
17 :
Hour Indicator
18 :
Minute Indicator
19 :
Real Time Temp
20 :
On / Off Switch
1 2 17 18 19 3 4
8 7 9 10 11 12 14 13 15 16 5 6
20

6
Operation Guide
Setup:
Power on/off
Ensure the power switch (20) is set to off before plugging in. Once plugged-in turn on
the power switch (20). There will be a short “beep” to indicate the unit is connected
to the power & the power indicator light will display.
Then Press (1) to switch the unit on.
Manual or Auto mode Selection:
Touch (2) to select the required mode.
If manual mode is selected Mwill display. If Auto mode is selected Awill display.
Note:
• If the unit is turned off the prior settings will be retained and used when
powered back on.
• The temperature is factory preset to 35c.
• The programed memory is held in the event of any power interruption.
Manual Mode Operation:
Once manual mode is selected use (5) & (6) to set the desired room temperature, this
temperature will display in (19) while being set. The heater will warm the room until
this temperature is reached and then ensure this is efficiently maintained.
Note: Once the temp has been set (19) will return to displaying the real time room
temp.

7
Time & Date setting:
When setting up the program for the first time the actual time needs to be set up as
follows.
Day: With the power on press (3 and 4) at the same time for 3 seconds.
The day (9) will flash.
Press (5 and 6) to select the day and press (3) to finish.
Hour: The hour indicator (17) will be flashing,
Touch (5 or 6) to set the hour and press (3) to finish.
Minute: The minute indicator (18) will be flashing.
Touch (5 or 6) to set the minute and touch (3) to finish.
The time symbols will now stop flashing & the time and day are set and will be
displayed.
24-Hour Manual Mode Timer:
This can be set to switch the unit off at a desired time with in 24-hour period.
Touch (2) to select Manual mode.
Touch (3) to set the timer and (17) will flash
Then touch (5 or 6) to adjust the hour.
Touch (3) again to set the minute and touch (4) to confirm.
The timer set indicator (16) will illuminate once the timer has been successfully set.
Note:
•If the selected hour is prior to the current hour, the system automatically rolls
over to the following day.
•If the selected hour is the same as the current hour but the selected minute is
less than the current minute, the system automatically rolls over to the following
day.

8
Automatic Mode Weekly Timer:
You can set a maximum of four heating programs per day. This means that you can
schedule up to four start times and end times per day. Programs can only be set in one-
hour increments.
1. Selecting the day to set:
Press (2) to select automatic mode and (15) will display A
Then press (3) and the current day on the screen (9) will be flashing
Touch (5 or 6) to select the day you wish to program
Then Press (3) to confirm the day before proceeding to set the time.
Note: If setting the program for the first time 00 will display in (17-18) if the unit has
been previously programmed the first program will display.
2. Time setting:
The program indictor 1 will now be displayed in (19) indicating you are setting the first
program for the day selected and (17) will flash.
Touch (5 or 6) to set the desired starting time. Then touch (3) to confirm and (18) will
flash now Touch (5 or 6) to set the desired end time.
Touch (4) to confirm the first program and end programming OR touch (3) to confirm
and proceed to set the second program for the day.
If proceeding to set the second program for the selected day the program indicator 2
will display in (19) Repeat as above to set program 2-4.
Once finished touch (4) to confirm ad exit program setting.
Repeat 1 & 2 as needed for each day of the week.
Notes:
•When in automatic mode (16) will not display.
•Your Serene Heating Panel is fitted with a 24-hour clock.
•If the start time and end time match the system will cancel the program

9
Other Functions:
Eco Mode
This heating panel is fitted with an Eco mode that drops the power to 1200 watts.
To engage Eco mode press (7) and the LO indicator will display at (11) to disengage Eco
mode press (7) again and the HI indicator will display at (12).
Built in Memory Function
When the unit is switched off and then back on the temperature defaults to the last
set and the previously set programming is still active.
Both the Auto Mode and the Manual Mode have a shutdown memory function.
Switching off the Electrical Memory Function
If the unit is unexpectedly turned off or there is a sudden power failure, only the
power indicator (8) lights up when the power is back on and the system is in standby.
Press the power button (1) to turn the system back on. The system will then operate in
the last mode in used before the power outage.
Delete Timers
Hold the Confirm button (4) for 5 seconds until a "di" tone is sounded, all prior daily
and weekly timers will now be erased.
Open Window Detection
When the heater is in operation it is automatically in open window detection mode
and will shut down if the ambient temperature rapidly falls below 3 degrees or more.
The open widow indicator will display at (14).
Child Lock
When the unit is in operation, press the up temp adjust buttons (5) & (6)
simultaneously for 3 seconds. The control panel will now be locked. The temperature
display (19) first shows ‘’[]“ to indicate the unit is locked and returns to displaying the
room temperature after 5 seconds.
Unlock Child Lock
Method 1: Press the temperature adjust buttons (5) & (6) for 3 seconds and the child
lock is deactivated.
Method 2: Turn off the power supply by pressing the power switch (20).

10
Cleaning:
The heater requires regular cleaning to ensure trouble free operation:
•Isolate the heater from the mains power supply.
•Use a damp cloth to clean the exterior of the heater. Do not use any abrasive cleaners.
•Use a vacuum cleaner to remove dust and fluff visible on the heater inlet and outlet
grilles.
Ensure the heater is dry before turning the mains power supply to the heater back on.
Specifications:
Serene Europa Model S2212
Model: S2212
Dimensions (mm): W 950 D 75 H 400
Electrical Supply:
220-240 volts A.C. 50/60 Hz
Wattage:
2400 Watts
Wiring:
3 pin plug or permanent connection.
Ingress Protection Rating: IP24
Serene Industries Limited reserves the right to alter specifications without notice

11
UK & EU Only:
Table for information requirements for electric local space heaters
Item
Symbol
Value
Unit
Item
Unit
Heat output (for model S2212)
Type of heat input, for electric local space
heaters only (select one)
Nominal heat
output
Pnom
2.4
kW
Manual heat charge control with
integrated thermostat
[no]
Minimum heat
output (indicative)
Pmin
1.2
kW
Manual heat charge control with
room and/or outdoor temperature
feedback
[no]
Maximum
continuous heat
output
Pmax.c
2.4
kW
Electronic heat charge control with
room and/or outdoor temperature
feedback
[no]
Auxiliary electricity consumption
Fan assisted heat output
[no]
At nominal heat
output
elmax
2.230
kW
Type of heat output/room temperature
control (select one)
At minimum heat
output
elmin
1.132
kW
Single stage heat output and no
room temperature control
[no]
In standby mode
elSB
0.00038
kW
Two or more manual stages, no
room temperature control
[no]
With mechanic thermostat room
temperature control
[no]
With electronic room temperature
control
[no]
Electronic room temperature
control plus day timer
[no]
Electronic room temperature
control plus week timer
[yes]
Room temperature control, with
presence detection
[no]
Room temperature control, with
open window detection
[yes]
With distance control option
[no]
With adaptive start control
[no]
With working time limitation
[no]
With black bulb sensor
[no]
Contact Details:
Serene Industries Limited
Unit 2, Royd's Mill Trading Estate, Dyehouse Lane,
Brighouse, West Yorkshire, HD6 1LL
t: +44 01924 481053
e: ukenquiry@serene-ind.com
w: www.serene-ind.com

12
Contact:
HONG KONG
Head Office - Serene Industries Limited
t: +852 2325 3209
f: +852 2325 3166
e: info@serene-ind.com
w: www.serene-ind.com
Suite 1010, 10F, Block A, Alexander Industrial Building, 62 King Lam Street,
Cheung Sha Wan, Kowloon Hong Kong SAR
NEW ZEALAND
t: + 64 (3) 344 5550
f: 0800 437 264- Freefax
e: nzenquiry@sereneind.com
w: www.serene-ind.com
PO BOX 33501, Barrington, Christchurch 8024
AUSTRALIA
t: 1800 844 942 – Free Phone
e: auenquiry@serene-ind.com
w: www.serene-ind.com
UNITED KINGDOM and EUROPE
t: +44 01924 481053
e: ukenquiry@serene-ind.com
w: www.serene-ind.com
Unit 2, Royd's Mill Trading Estate, Dyehouse Lane, Brighouse,
West Yorkshire, HD6 1LL
Table of contents
Other Serene Heater manuals
Popular Heater manuals by other brands

Eldom Invest
Eldom Invest RH10N MANUAL FOR INSTALLATION, OPERATION AND MAINTENANCE

Master
Master DC 61 User and Maintenance Book

Hyundai power products
Hyundai power products HY70DKH instruction manual

KRHÜNER
KRHÜNER 53090 instruction manual

Whale
Whale SL5512 operating instructions

TERMOFOL
TERMOFOL TF-SWT400 Installation & operation instructions

Detroit Radiant Products
Detroit Radiant Products DSCS-9 Series Installation, operation, maintenance and parts manual

EXALTA
EXALTA EL-550 user manual

Kampmann
Kampmann VertiCool Assembly instructions

Scarlett
Scarlett SC-155 instruction manual

Swegon
Swegon CASA R3 Smart Instructions for use

Duraflame
Duraflame 7QH1000 Owners operating manual and parts list