Sharp UA-KIL80E User manual

UA-KIL80E, UA-KIL60E
Operation Manual
Air Purifier with Humidifying Function
EN FRDE ITES PL NL

CONTENTS
IMPORTANT SAFETY INSTRUCTIONS ............................................... The current page
OPERATION PRINCIPLE ....................................................................................4
PART NAMES ...................................................................................................... 6
BEFORE FIRST USE...........................................................................................9
OPERATION ....................................................................................................... 10
CARE AND MAINTENANCE ..............................................................................14
REPLACEMENT .................................................................................................20
TROUBLESHOOTING........................................................................................21
SPECIFICATIONS...............................................................................................23
Thank you for purchasing this SHARP Air Purifier.
Please read this manual carefully before using the product.
This manual should be kept in a safe place for handy reference.
ENGLISH
IMPORTANT SAFETY INSTRUCTIONS
Always follow basic safety precautions
when using electrical appliances,
including the following:
WARNING
Always observe the following to reduce the
risk of electrical shock, fire, or injury:
OPERATION
• Read all instructions before using the
product.
• Use only a 220 - 240 volt outlet.
• Do not use the product if the power cord
or plug is damaged or if the connection
to the wall outlet is loose.
• Periodically remove dust from the plug.
• When removing the power plug, always
hold the plug and never pull on the cord.
Failure to do so can cause a short circuit
resulting in electrical shock or fire.
• Be careful not to damage the power
cord. When removing the product, do not
damage the power cord with the casters.
Failure to do so can cause electric
shock, heat generation, or fire.
• Do not remove the plug when your
hands are wet.
• Be sure to remove the power plug
when refilling the Water Tank, before
performing maintenance, when removing
and attaching and replacing the filter and
when not using for a long time. Failure to
do so can cause a short circuit resulting
in electrical shock or fire.
• If the power cord is damaged, it must be
replaced by the manufacturer, its service
agent, a Sharp authorized Service
Centre or similarly qualified persons in
order to avoid a hazard.
Contact the nearest Service Centre for
any problems, adjustments, or repairs.
• Do not repair or disassemble the product
yourself.

EN-1
ENGLISH
• Do not insert fingers or foreign objects
into the Air Inlet or Air Outlet.
• Do not expose the product to water.
Doing so can cause a short circuit or
electrical shock.
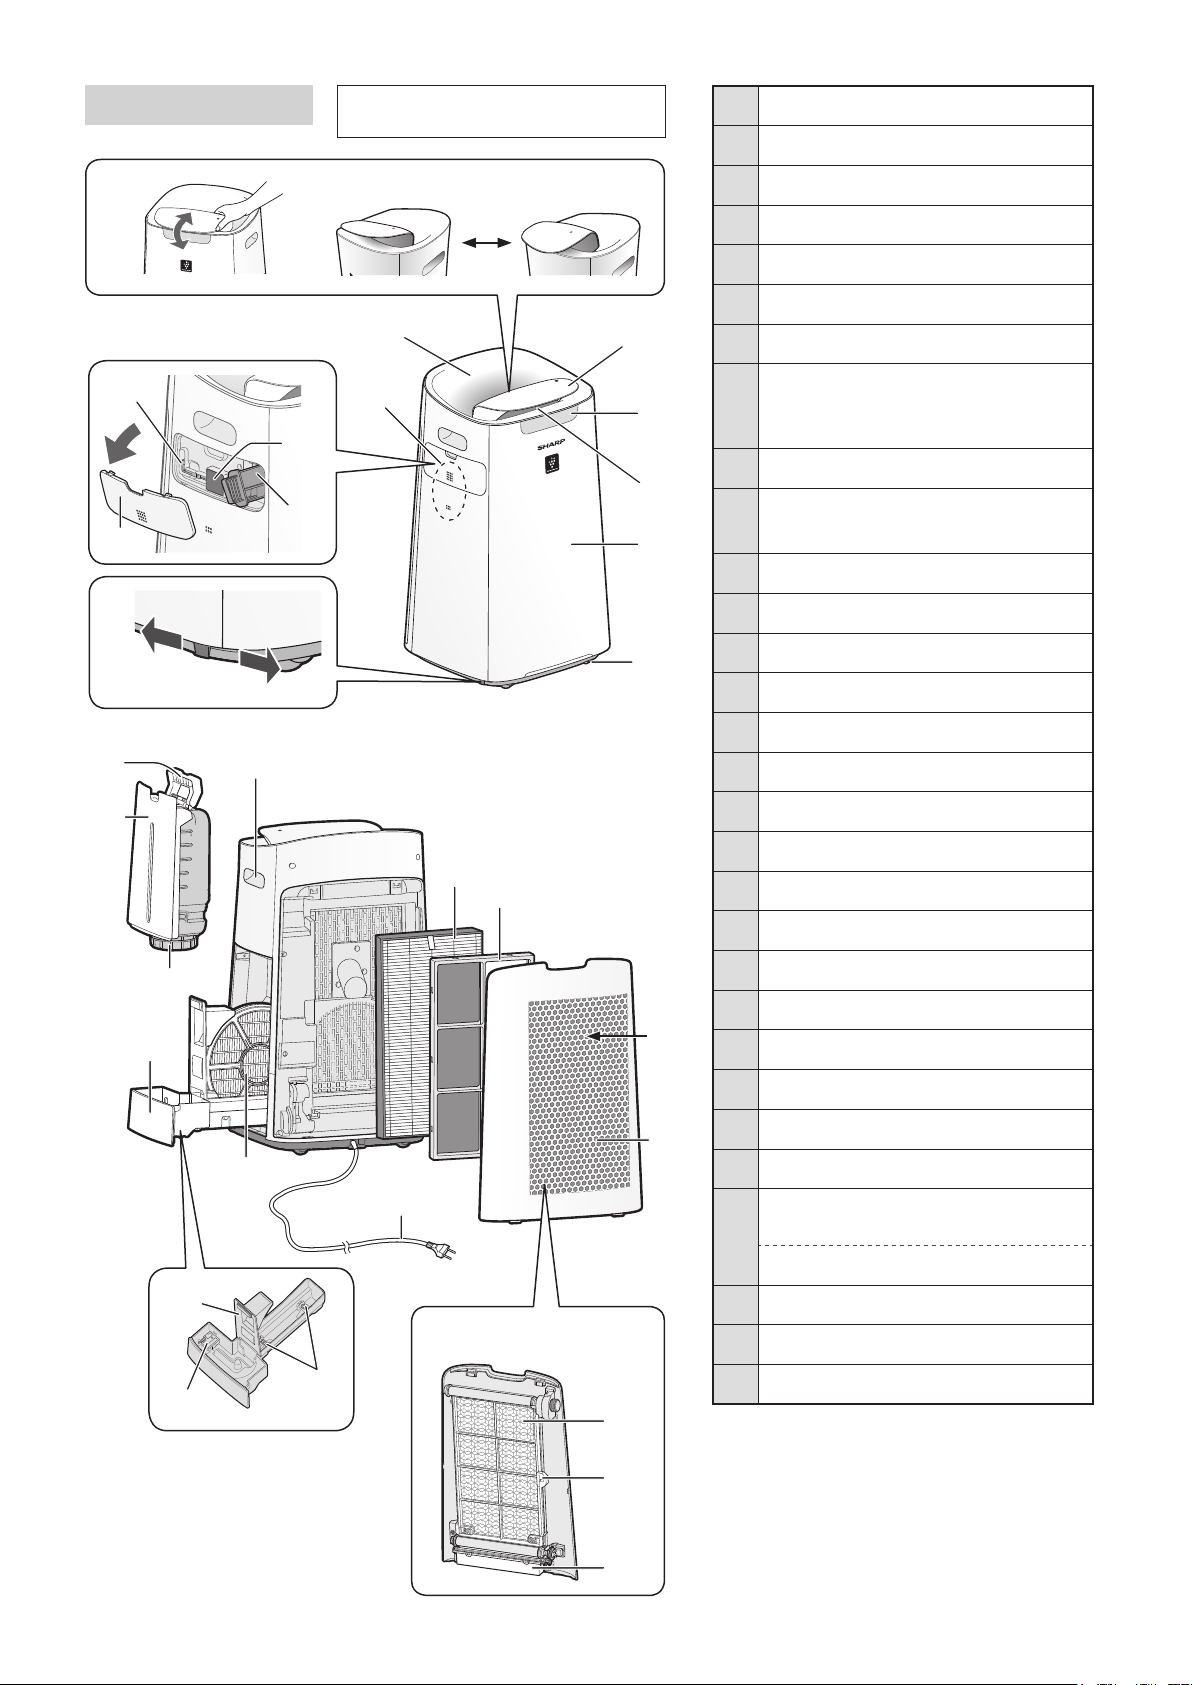
• When carrying the product, first remove
the Water Tank and Humidifying Tray,
and then hold the product by the handles
on both sides.
• Do not drink the water in the Humidifying
Tray or Water Tank.
• Replace the water in the Water Tank
daily with fresh tap water, and regularly
clean the Water Tank and Humidifying
Tray.
When the product is not in use, dispose
of the water in the Water Tank and
Humidifying Tray. Leaving water in the
Water Tank or Humidifying Tray can
cause mold, bacteria, and bad odours.
In rare cases, such bacteria can be a
health hazard.
• This appliance can be used by
children aged from 8 years and above
and persons with reduced physical,
sensory or mental capabilities or lack of
experience and knowledge if they have
been given supervision or instruction
concerning use of the appliance in a
safe way and understand the hazards
involved. Children shall not play with
the appliance. Cleaning and user
maintenance shall not be made by
children without supervision.
INSTALLATION
• Do not use this product near gas
appliances or fireplaces.
When the product is operated with gas
appliances in same room, Ventilate a
room periodically, otherwise it may cause
Carbon monoxide poisoning.
• Do not operate the product in rooms
where aerosol insecticides are present.
Do not operate the product in rooms
where there is oily residue, incense,
sparks from lit cigarettes, or chemical
fumes in the air.
• Keep the product away from water.
Do not operate the product in places
where it may get wet, such as a
bathroom.
MAINTENANCE
• Be cautious when cleaning the product.
Strong corrosive cleansers can damage
the exterior.
CAUTION
OPERATION
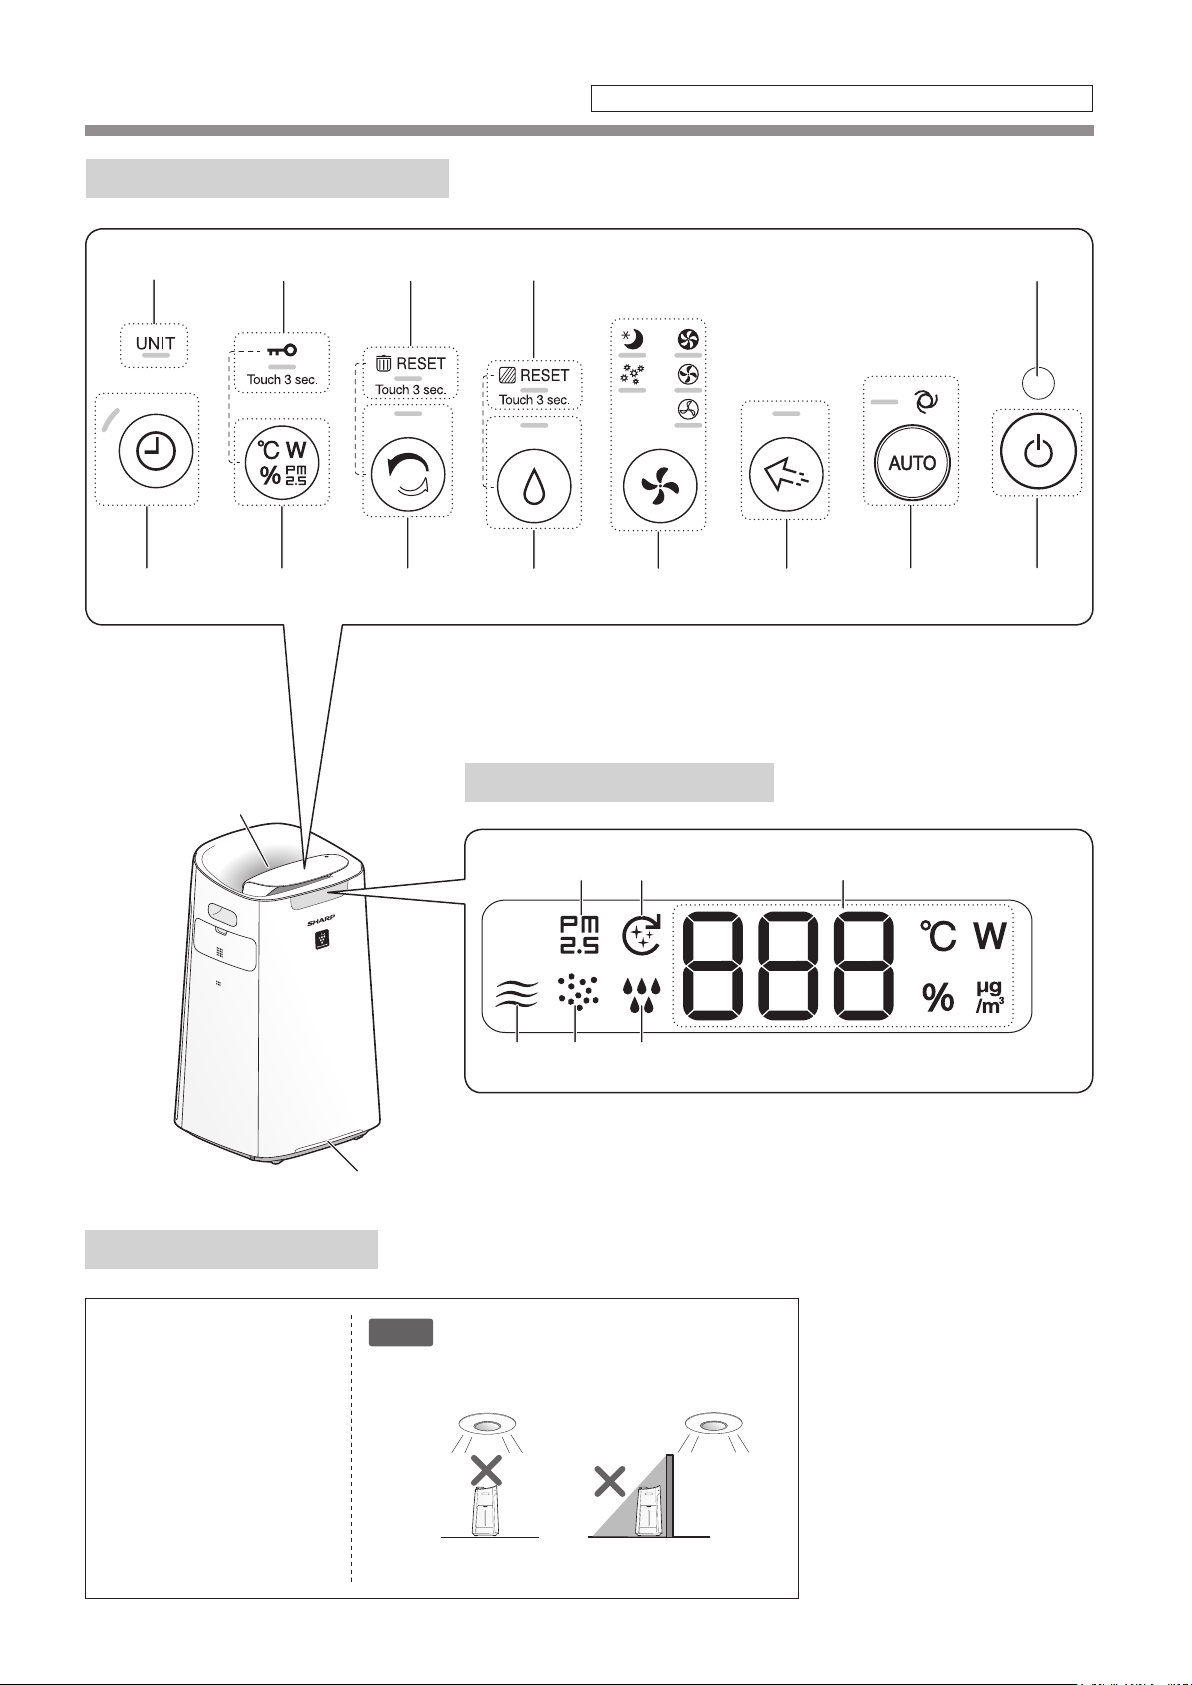
• Do not block the Air Inlet or Air Outlet.
• Always operate the product in an upright
position.
• Do not move the product when it is in
operation.
• Do not move or change the direction of
the product while dragging the casters.
• If the product is on easily damaged
flooring, an uneven surface, or thick-
piled carpet, lift it up when moving.
• When moving the product by its casters,
move it slowly and in a horizontal
direction.
• Turn the product off and remove the
Water Tank before moving, take care not
to catch your fingers.
• Do not operate the product without
the filters, the Water Tank, and the
Humidifying Tray properly installed.
• When refilling the Water Tank, make
sure of no water leaking from the Water
Tank.
• Be sure to wipe off any excess water on
the outside of the Water Tank.
• Do not use hot water (40 ºC or more),
chemical agents, aromatic substances,
dirty water, or other damaging
substances. Doing so can deform the
product or cause it to malfunction.
• Use only fresh tap water. Using other
water sources risks the growth of molds,
fungi, or bacteria.
• Do not shake the Water Tank with
holding the carrying handle.
INSTALLATION
• Do not place the product near or on
hot objects, such as stoves or heaters,
or where it may come into contact with
steam.
MAINTENANCE
• Clean the exterior with a soft cloth only.
Do not use volatile fluids or detergents.
The product surface may be damaged
or cracked with Benzine paint thinner

EN-2
or polishing powder. In addition, the
sensors may malfunction as a result.
• Do not scrub the Pre-Filter hard during
its maintenance.
• Do not wash and reuse the HEPA filter
and the Deodorizing filter.
Doing so will not improve filter
performance and can also cause electric
shock or operating malfunctions.
• The frequency of descaling maintenance
will depend on the hardness of and the
impurities in the water that you use;
the harder the water the more often
descaling will be necessary.
• Do not use detergents other than
instructions when perform maintenance
of the Humidifying Tray and Cover. It
may cause deformation, tarnishing,
cracking (water leakage).
• Avoid spilling water when removing or
cleaning the Humidifying Tray.
• Do not remove the Float and the Roller.
If the Float comes off, refer to Page
15.
• Do not remove the Humidifying Filter
from the Filter Frame except replacing it.
NOTE
What to do if the product
interferes with radio or TV
reception
If the air purifier interferes with radio or
television reception, try one or more of the
following measures:
• Adjust or reposition the receiving
antenna.
• Increase the distance between the
product and the radio or TV.
• Connect the equipment into an outlet on
a circuit different from that of the radio or
TV receiver.
• Consult the dealer or a qualified radio or
TV technician.
INSTALLATION
• Avoid locations where the sensors are
exposed to direct wind.
Doing so can cause the product to
malfunction.
• Avoid locations where furniture, fabrics,
or other objects can come in contact with
the product and interfere with the intake
and outtake of air.
• Avoid locations where the product is
exposed to condensation or drastic
changes in temperature. Appropriate
room temperature is between 0 – 35 ºC.
• Place the product on a level and stable
surface with sufficient air circulation.
Strong wind or Dust through the window
may prevent the unit’s air purifying
performance and efficacy.
When placed on heavy carpet, the
product may vibrate slightly. Place the
product on a level surface to avoid
water leakage from the Water Tank and
Humidifying Tray
• Avoid locations that generate grease
or oily smoke. Doing so can cause the
product exterior to crack and the sensors
to malfunction.
• The dust collecting ability of the product
is effective even when the product is
as close to 3 cm from the wall, the
surrounding walls and floor may get dirty.
Please place the product at a distance
from the wall. The wall directly behind
the Air Outlet may become dirty over
time. When using the product for an
extended period of time at the same
location, periodically clean the walls
adjacent to it.
MAINTENANCE
• Follow the instructions in this manual for
proper filter care and maintenance.

EN-3
ENGLISH
A. Information on Disposal for Users (private households)
1. In the European Union
IF YOU WISH TO DISPOSE OF THIS EQUIPMENT, DO NOT USE THE ORDINARY
WASTE BIN, AND DO NOT PUT THEM INTO A FIREPLACE!
Used electrical and electronic equipment should always be collected and treated
SEPARATELY in accordance with local law.
Separate collection promotes an environment-friendly treatment, recycling of materials,
and minimizing final disposal of waste. IMPROPER DISPOSAL can be harmful to human
health and the environment due to certain substances! Take USED EQUIPMENT to a
local, usually municipal, collection facility, where available.
If in doubt about disposal, contact your local authorities or dealer and ask for the correct
method of disposal.
ONLY FOR USERS IN THE EUROPEAN UNION, AND SOME OTHER COUNTRIES;
FOR INSTANCE NORWAY AND SWITZERLAND: Your participation in separate collection
is requested by law.
The symbol shown above appears on electrical and electronic equipment (or the
packaging) to remind the users of this.
Users from PRIVATE HOUSEHOLDS are requested to use existing return facilities for
used equipment. Return is free of charge.
If the equipment has been used for BUSINESS PURPOSES, please contact your SHARP
dealer who will inform you about take-back. You might be charged for the costs arising
from take-back. Small equipment (and small quantities) might be taken back by your local
collection facility. For Spain: Please contact the established collection system or your
local authority for take-back of your used products.
2. In other Countries outside the EU
If you wish to discard this product, please contact your local authorities and ask for the
correct method of disposal.
For Switzerland: Used electrical or electronic equipment can be returned free of charge to
the dealer, even if you don’t purchase a new product. Further collection facilities are listed
on the homepage of www.swico.ch or www.sens.ch.
B. Information on Disposal for Business Users.
1. In the European Union
If the product is used for business purposes and you want to discard it:
Please contact your SHARP dealer who will inform you about the take-back of the
product. You might be charged for the costs arising from take-back and recycling.
Small products (and small amounts) might be taken back by your local collection facilities.
For Spain: Please contact the established collection system or your local authority for
take-back of your used products.
2. In other Countries outside the EU
If you wish to discard of this product, please contact your local authorities and ask for the
correct method of disposal.
Attention: Your product is
marked with this symbol. It
means that used electrical
and electronic products
should not be mixed with
general household waste.
There is a separate
collection system for these
products.

EN-4
OPERATION PRINCIPLE
PRE-FILTER AUTO CLEANING (Only UA-KIL80E)
Removing dusts trapped and held on
the Pre-Filter by the auto cleaning
unit will help in prevent impairing
the efficiency of the dust collecting
performance.
Pre-Filter
Dust Box
Back Panel
FEATURES
Unique Combination of Air Treatment Technologies
“Plasmacluster” and “Device of a cluster of
grapes” are trademarks of Sharp Corporation.
* The number in this technology mark indicates
an approximate number of ions supplied into air
of 1 cm3, which is measured around the centre
of a room applicable floor area (at 1.2 m height
above the floor) when the product is placed
close to a wall at the MED mode setting.
* The illustration in this instruction manual is UA-KIL80E.
Throw away dusts
in the Dust Box
approximately every six
months.
Plasmacluster
Plasmacluster treats the air similar to
the way nature cleans the environment
by emitting a balance of positive and
negative ions.
Triple Filteration System + Humidification
Pre-Filter
Pre-filter traps dust larger than approx 240 micron particles.
Deodorizing Filter
Deodorizing filter absorbs many common household odours.
HEPA Filter
HEPA filter traps 99.97% of particles as small as 0.3 microns.
Humidifying Function
Comfortable Humidity Indoors Keeps Your Skin and Throat
Moisturized and Healthy.
HEPA Filter
Deodorizing Filter
Pre-Filter
Unique Airflow
Powerful air suction and unique airflow quickly and efficiently collect dust and other particles.
Faster airflow at a 20º angle collects dust at
lower levels in the room for more effective
cleaning.
Plasmacluster can remove static electricity
and can thus prevent dust from attaching to
walls and other surfaces.
EN-5
ENGLISH
NOTE
The air purifier draws in room air through the Air Inlet, circulates it through a Pre-Filter, a
Deodorizing Filter and a HEPA Filter inside the product, and then discharges it through the Air
Outlet. The HEPA Filter can remove 99.97% of dust particles as small as 0.3 microns that pass
through the filter and also helps absorb odours.
The Deodorizing Filter gradually absorbs odours as they pass through the filter.
Some odours absorbed by the filters will break down over time, causing additional odours.
Depending on usage conditions, and especially if the product is used in environments
significantly more severe than a normal household, these odours may become noticeable
sooner than expected. If these odours persist, replace the filters.
When minerals in tap water adhere to the filters and become a hard and white, they absorb
odours in the room that can cause the emission of an unpleasant odour when the Humidifying
Filter is dry. (Varies depending on water quality and other environmental factors)
If this occurs, perform the Humidifying Filter maintenance. (Page 15)
• The air purifier is designed to remove air-suspended dust and the odours.
The air purifier is not designed to remove harmful gases such as carbon monoxide contained in cigarette smoke.
The air purifier may not completely remove an odour if the source of the odour is still present.
Please read before operating your new Air Purifier

EN-6
PART NAMES
OPERATION PANEL
FRONT DISPLAY
15
14
138 4561012
71113 2
19 17
21 20 18
16
9
Directly under
a light fixture.
In shadow
When the Light Control
is set to “Auto”, Front
Display and Cleanliness
Indicator will automatically
switch ON or OFF based
on room brightness.
(Page 12, 13)
NOTE Detection range of Light sensor
Do not install the product in the following places.
The Light Sensor may not sense correctly.
LIGHT SENSOR
*The illustration in this instruction manual is UA-KIL80E.

EN-7
ENGLISH
16
Display
• Timer
Indicates setting time or remaining time of
ON/OFF timer.
• PM2.5 Concentration*
PM2.5 10 μg/m3 to 499 μg/m3is displayed.
• Temperature*
Temperature 0 oC to 50 oC is displayed.
• Humidity*
Humidity 25 % to 75 % is displayed.
• Wattage*
Indicates wattage by current operation.
* The displayed numbers are approximate.
17 Pre-Filter Auto Cleaning Indicator (White)
(Only UA-KIL80E)
18
Humidifying Indicator
White Humidify ON
Off Humidify OFF
Red (Flashing) the product needs water
19
PM2.5 Indicator (White)
Indicates the Sensitive Dust Sensor detects microscopic
dust.
20 Dust Indicator (White)
Indicates the Sensitive Dust Sensor detects usual dust.
21 Odour Indicator (White)
Indicates the Odour Sensor detects odours.
500 μg/m3
or more
9 μg/m3
or less
51 oC
or more
-1 oC
or less
24 %
or less 76 %
or more
1 Power ON/OFF Button
2 Light Sensor
3 Auto Mode Button, Lamp (White)
4 Plasmacluster Ion Spot Button, Lamp (White)
5 Mode Button, Lamps (White)
6Humidify ON/OFF Button, Lamp (White)
(Touch 3 sec.) Filter Reset Button
7 Filter Maintenance Lamp (Orange)
8
Clean Ion Shower Button, Lamp (White)
(Touch 3 sec.) Dust Box Reset Button
(Only UA-KIL80E)
9Dust Box Reset Lamp (Orange)
(Only UA-KIL80E)
10 Switching Display Button
(Touch 3 sec.) Child-Lock Button
11 Child-Lock Lamp (White)
12 ON/OFF Timer Button, Lamp (White)
13 Unit Replacement Lamp (Red)
14 Plasmacluster Ion Indicator (Blue)
15
Cleanliness Indicator
• Indicates the air purity of the room with colour changes
and flashing speeds.
Cleanliness Indicator turns off when the air is clean.
When the air changes from dirty to clean, it flashes blue
for a while and then turns off.
Clean
Impure
Turn off or Blue (Flashing)
Yellow (Flashing)
Red (Flashing fast)

EN-8
Unlocked
MAIN BODY 1 Louver
2 Air Outlet (Back)
3 Operation Panel
4 Front Display
5 Air Outlet (Front)
6 Main Body
7 Caster (4 Locations)
8
Sensor (Internal)
Temperature / Humidity /
Sensitive Dust / Odour
9 Sensor Filter
10 Unit* Holder
(Plasmacluster Ion Generating Unit)
11 Unit* Cleaning Brush
12 Unit* Cover
13 Caster Stopper (Right & Left)
14 Tank Handle
15 Water Tank
16 Tank Cap
17 Humidifying Tray
18 Tray Panel
19 Float
20 Roller
21 Humidifying Filter
22 Power Cord, Plug
23 Handle (2 Locations)
24 HEPA Filter
25 Deodorizing Filter
26 Air Inlet
27
Back Panel with Pre-Filter
(Only UA-KIL60E)
Back Panel (Only UA-KIL80E)
28 Pre-Filter (Only UA-KIL80E)
29 Pre-Filter Lock (Only UA-KIL80E)
30 Dust Box (Only UA-KIL80E)
* The Unit refers to Plasmacluster Ion
Generating Unit. (The same as below.)
4
3
6
7
5
8
1
11
12
Locked
13
9
10
2
15
23
22
24 25
16
21
17
14
18
19 20
27
26
28
29
30
(Only UA-KIL80E)
* The illustration in this instruction
manual is UA-KIL80E.
EN-9
ENGLISH
FILTER INSTALLATION
1. Remove the Back Panel.
2. Remove the plastic bag from the
each filter.
3. Install the filters in the correct order
as shown.
4. Install the Back Panel.
Back Panel
HEPA Filter Deodorizing Filter
HEPA Filter
Deodorizing Filter
Tag
Always be sure to remove the
power plug from the wall outlet.
1. Remove the Water Tank.
2. Fill the Water Tank with the tap
water.
3. To prevent leaks, securely tighten
the Tank Cap.
4. Install the Water Tank.
Tank Handle
Water Tank
Tank Cap
Click
Click
NOTE
• When replacing the fi lter, making a memo of
the start of use date is recommended.
BEFORE FIRST USE
REFILLING THE WATER TANK

EN-10
START/STOP SELECT AIR VOLUME
AND MODE
OPERATION
AUTO MODE
START STOP
♪
♪~
NOTE
• When the product starts operation, the
operation starts in the previous mode it was
operated in.
NOTE
• When operating with humidifi cation ON in
the modes in the table below, the product
automatically controls humidity by sensing
temperature and humidity. (Except MAX / MED
/ LOW mode.)
Temperature
Humidity
ALL MODE
(Except MAX / MED /
LOW / SLEEP)
SLEEP
MODE
- 18 ºC 65 % 65 %
18 ºC - 24 ºC 60 % 65 %
24 ºC - 28 ºC 55 % 60 %
28 ºC - 45 % 50 %
HUMIDIFICATION
SETTING
♪♪
ON OFF
♪
POLLEN:
The Sensitive Dust Sensor sensitivity is
automatically increased and quickly detects
impurities such as dust and pollen and clean the air
powerfully.
SLEEP:
The product will operate quietly, and the fan speed
is automatically switched depending on the amount
of impurities in the air.
When the Light Control is set to “Auto”, Front
Display and Cleanliness Indicator automatically go
off. (Page 12, 13)
♪♪ ♪♪♪ ♪
POLLEN SLEEP LOW MED MAX
♪
The fan speed is automatically controlled
depending on the six detection. (PM2.5 / Usual dust
/ Odour / Temperature / Humidity / Light)
PLASMACLUSTER
ION SPOT MODE
Use this mode when you want to remove adhering
odour, germs, and other substances from clothes,
sofas and curtains.
Discharges stronger air with high-density
Plasmacluster ions only in the forward direction.
♪
NOTE
• The Plasmacluster ion cannot be turned
“OFF”.
Adjust Front Louver manually.

EN-11
ENGLISH
CLEAN ION SHOWER
MODE
The product releases Plasmacluster ions with
strong airflow and collects dusts while decreasing
static electricity for 10 minutes. After that, the
Sensitive dust sensor sensitivity is automatically
increased and quickly detects impurities and clean
the air powerfully for 50 minutes.
NOTE
• When the operation fi nishes after 60 minutes,
the product will return to the prior operation
mode. It is able to change the other mode
during this mode.
• The Plasmacluster ion cannot be turned
“OFF”.
ON/OFF TIMER
ON TIMER:
Select the length of time you want. The product
automatically starts once the selected time is
passed.
OFF TIMER:
Select the length of time you want. The product
automatically stops once the selected time is
reached.
NOTE
ON TIMER:
• If there is no operation in 8 seconds, the
setting will be fi nished with a beep. The ON/
OFF TIMER Lamp will be on and display the
remaining hour before the operation starts.
• You may reset the timer by touching the ON/
OFF Timer Button again.
OFF TIMER:
• If there is no operation in 8 seconds, the
setting will be fi nished with a beep. The
Display will be back to its previous status.
• After the setting is done, touch once the ON/
OFF Timer Button, the remaining hour of the
operation will show, and touch twice, you may
reset the timer.
(ON TIMER: with the product OFF)
(OFF TIMER: with the product ON)
SWITCH DISPLAY
Humidity
Temperature
PM2.5
Concentration
CHILD LOCK
The operation panel will be locked.
ON CANCEL
Touch for
3 sec.
♪
Touch for
3 sec.
♪♪
(with the product ON or OFF)
♪
Flashing
♪
♪♪
♪
♪
Wattage
Cancel
♪♪♪♪ ♪♪

EN-12
HOW TO CHANGE
VARIOUS SETTING
You can change the functions in the table on
page 13.
1. (with the product OFF)
2. Select “Function number”.
3. Select “Setting number”.
4. Touch Power ON/OFF Button to
finish the setting mode.
Touch for 3 sec.
♪
Turn off
♪~
PRE-FILTER AUTO
CLEANING
(Only UA-KIL80E)
Auto cleaning
(about 8 minutes)
Auto cleaning
(about 8 minutes)
Operating
time
48 hours or
720 hours
48 hours or
720 hours
Previous auto cleaning
The pre-filter auto cleaning will operate for about
8 minutes automatically when the product reaches
a certain operating time since a completion of the
previous pre-filter auto cleaning.
During the pre-filter auto cleaning, the on-going
operation will be suspended.
You can set the pre-filter auto cleaning interval to
48 hours or 720 hours. The default is 48 hours.
(Page 12, 13)
Back
Panel
Pre-Filter (inside)
During the pre-filter
auto cleaning, the Pre-
Filter Auto Cleaning
Indicator is flashing.
NOTE
• Depending on the conditions, the start of auto
cleaning maybe delayed.
(Example: When the light sensor detects that
the room brightness is “dark”.)
• If you want to stop the auto
cleaning, touch Power ON/OFF
Button.
• If you want to start the auto
cleaning manually, Please touch Auto Mode
Button and Mode Button 3 seconds at once.
♪~
Set
or
Forward
♪
Reverse
♪
Set
♪
(F8: Only UA-KIL80E)
・・・
or
Forward
♪
Reverse
♪
Touch for 3 sec.

EN-13
ENGLISH
Function Setting
Light Control
You can select the brightness of the Front Display and
Cleanliness Indicator.
Turn off
When set to “Turn off”, the “Dim” light illuminates for 8
seconds after operation starts and then the light turns
off.
The Humidifying Indicator flashes darker only when the
product needs water.
The Unit Replacement Lamp flashes darker only when
the Plasmacluster Ion Generating Unit need to be
replaced.
Dim
Auto (default)
Light automatically switches ON or OFF based on room
brightness.
Room is bright : light is ON / Room is dark : light is OFF
Even though room is bright, the light will turn off when
operating in sleep mode.
Plasmacluster Ion ON/OFF
OFF
ON (default)
Auto restart
If the product is unplugged or if there is a power
failure, the product will resume operation with the
previous settings after power is restored.
Cancellation
ON (default)
Adjusting sensor sensitivity (F4 - F6)
Light Sensor Low
Sensitive Dust Sensor Standard (default)
Odour Sensor High
Sound Indicator Setting
You can set the product to make a beeping sound
when the Water Tank is empty.
Cancellation (default)
ON
The interval of Pre-Filter Auto Cleaning
(Only UA-KIL80E)
720 hours
48 hours (default)

EN-14
WATER TANKMAIN BODY
CARE INDEX FILTER
MAINTENANCE LAMP
CARE AND MAINTENANCE
2
5
4
9
6
3
18
7
Place Page
1Main Body 14
2Water Tank 14
3Humidifying Filter / Humidifying Tray 15
4Sensors 16
5HEPA Filter / Deodorizing Filter 16
6
Back Panel with Pre-Filter
(Only UA-KIL60E) 16
Back Panel (Only UA-KIL80E)
7Dust Box (Only UA-KIL80E) 17
8Pre-Filter (Only UA-KIL80E) 18
9Plasmacluster Ion Generating Unit 19
Rinse the inside
with water.
Wipe with a dry,
soft cloth.
When the cumulative operation period or the water
containing period is more than approximately 720
hours, the Filter Maintenance Lamp will turn on.
• The Lamp is off when there is no water fi lled.
(Only UA-KIL80E)
• It will not calculate the time when the product is
unplugged.
• 30 days × 24 hours = 720 hours
This is a reminder to perform the maintenance
described Humidifying Filter and Tray, Main Body,
Back Panel, and Sensors.
After performing maintenance, reset the Filter
Maintenance Lamp.
RESET
♪
Touch for
3 sec.
Always be sure to remove the
power plug from the wall outlet.
NOTE How to clean hard to remove dirt.
Tank Cap Toothbrush
Clean the inside of the
Water Tank with a soft
sponge and the Tank
Cap with a cotton
swab or toothbrush.

EN-15
ENGLISH
1. Remove the
Humidifying
Filter and Tray.
HUMIDIFYING FILTER / HUMIDIFYING TRAY
NOTE How to clean hard to remove dirt.
NOTE How to install the Float and the Rollers
Float
Tray Panel
Roller
Kitchen detergent
(only Humidifying tray)
Citric acid
(available at some drugstores)
100% bottled lemon juice
with no pulp
1
1. Fill the tray half-way with
water.
2. Add a small amount of
kitchen detergent.
2 1/2 cups of water 3 cups of water
2Soak for 30
minutes.
Soak for 30 minutes.
(When using lemon juice as your
descaling solution, allow for more
soak time.)
3Rinse off the kitchen detergent or the descaling solution with clean water.
3 teaspoons 1/4 cup
RollerFloat
3. Insert the tab on the other
side of the float into the
hole.
Tab
Float
Cross-Section view
2. Insert the tab of the float
into the hole.
Click
Click
2. Rinse with plenty of water.
• Do not remove the Float and the
Rollers. If they come off , refer to
below.
3. Attach the Humidifying
Filter and Tray.
• After maintenance, correctly
reattach the parts.
3. Insert the tab on the other
side of the float into the
hole.
2. Insert the tab of the float into
the hole.
1. Insert the Float under this
tab.

EN-16
Remove the dust on the filters.
HEPA Filter
Tag
Deodorizing Filter
NOTE
• Do not wash the filters. Do not expose to
sunlight.
(Otherwise these filters may lose efficacy.)
• Some odours absorbed by the filters will break
down over time, causing additional odours.
Depending on usage conditions, and especially if
the product is used in environments significantly
more severe than a normal household, these
odours may become noticeable sooner than
expected.
Replace the filter in those cases or if dust is unable
to be removed after maintenance.
HEPA FILTER /
DEODORIZING FILTER
Clean only the tagged
surface. Do not clean
up the opposite
surface. The filter is
fragile, so be careful
not to give too much
pressure.
Both surfaces can
be cleaned. The filter
may be broken if being
too much pressure is
applied on it, so please
handle it with care.
NOTE How to clean hard to remove dirt.
1. Remove the Unit Cover.
2. Remove the Sensor Filter.
3. If the Sensor Filter is very dirty, wash it with water
and dry it thoroughly.
Sensor Filter
SENSORS
Remove the
dust gently
with a cleaning
tool such as a
vacuum cleaner.
Sensors
NOTE
• Do not apply excessive pressure when
scrubbing the Back Panel.
• How to clean hard to remove dirt.
1. Add a small amount of kitchen detergent to water
and soak for about 10 minutes.
2. Rinse off the kitchen detergent with clean water.
3. Completely dry the filter in a wellventilated area.
Back Panel
BACK PANEL
WITH PRE-FILTER
(Only UA-KIL60E)
BACK PANEL
(Only UA-KIL80E)
Remove the
dust gently
with a cleaning
tool such as a
vacuum cleaner.
Remove the
dust gently
with a cleaning
tool such as a
vacuum cleaner.
Back Panel
(Pre-Filter)
Back Panel

EN-17
ENGLISH
DUST BOX RESET LAMP
When the Dust Box Reset Lamp will
turn on, please throw away the dusts
in the Dust Box.
• The Lamp will turn on every 6
months if the product is used for 24
hours per day.
1. Remove the Back Panel.
2. Remove the Dust Box.
3. Throw away the dusts in the Dust
Box.
4. Close the cover of the Dust Box.
5. Install the Dust Box.
2
1
Push
1
2
Push
DUST BOX (Only UA-KIL80E)
NOTE How to clean hard to remove dirt.
1. Remove the Brush.
1
2
12
Brush
2. Wash with water.
• Dry them thoroughly.
3. Attach the Brush.
6. Install the Back Panel.
7. Reset the Dust Box Reset Lamp.
Touch for
3 sec.
♪

EN-18
1. Remove the Back Panel and the
Dust Box.
2. Remove the Pre-Filter Lock.
3. Remove the Shaft.
4. Remove the Cap and pull out the
Pre-Filter from the Shaft.
Pre-Filter Lock
1
1
2Tab (orange)
①
1
2
4
Shaft (lower)
Shaft (upper) 3
Shaft
Pre-Filter
Cap
1
1
2
2
5. Soaking and cleaning the Pre-Filter.
1. Add a small amount
of kitchen detergent
to water and soak for
about 10 minutes.
2. Rinse off the kitchen
detergent with clean
water.
3. Dry it thoroughly.
6. Insert the Pre-Filter shaft into the
groove of the Shaft.
7. Attach the Shaft (upper) to the Back
Panel.
8. Roll up the Pre-Filter.
Pre-Filter
NOTE
• Do not clean it too hard. Do not wash it with a
washing machine. (Otherwise it might cause
damage.)
• Do not dry it with a dryer. (Otherwise it might
cause shrinkage.)
1
1
2
2
Shaft (upper)
1
2
Shaft (lower)
Click, Click, ...
Pre-Filter
PRE-FILTER (Only UA-KIL80E)
EN-19
ENGLISH
PRE-FILTER (Only UA-KIL80E)
NOTE
• Do not clean with anything other than the Unit
Cleaning Brush. Doing so could lead to failures in
the Unit.
• A bent electrode could be cut off and dropped
during the cleaning process, but it will not change
the performance.
• Do not touch the electrode directly. Doing so could
lead to pain / itching.
• Do not transform the Electrode Section. Doing so
can damage it.
• Do not touch the Connection Terminals. Doing so
can damage them.
Connection Terminals
1. Remove the Unit Cover, and pull out
the Unit Holder.
2. Remove dusts from the Electrode
Section.
3. Insert the Unit Holder in the product,
and install the Unit Cover.
Click
PLASMACLUSTER ION
GENERATING UNIT
(Electrode Section)
Unit Cleaning Brush
Electrode
After cleaning
Before
cleaning
Around the base
Electrode
Unit Cleaning
Brush
9. Pull down the Shaft (lower) and
attach it to the Back Panel.
10. Install the Pre-Filter Lock.
11. Install the Dust Box and the Back
Panel.
Shaft (lower)
1
2
1
1
22
This manual suits for next models
1
Table of contents
Languages:
Other Sharp Air Cleaner manuals

Sharp
Sharp IG-CL15A User manual

Sharp
Sharp Plasmacluster FP-N60CX User manual

Sharp
Sharp FP-F40A User manual

Sharp
Sharp FP-GM50E User manual

Sharp
Sharp KC-F30Y User manual

Sharp
Sharp FP-JM30E User manual

Sharp
Sharp FP-J40E User manual

Sharp
Sharp UA-KIN40E-W User manual

Sharp
Sharp Plasmacluster FP-J80M User manual

Sharp
Sharp FP-F40TA User manual

Sharp
Sharp FU-S51E User manual

Sharp
Sharp IG-A20A? IG-A40A User manual

Sharp
Sharp KC-A60Y User manual

Sharp
Sharp FU-A28E User manual

Sharp
Sharp FU-S51A User manual

Sharp
Sharp KC-860EKW User manual

Sharp
Sharp EH-HS41 User manual

Sharp
Sharp UA-HG40E-T User manual

Sharp
Sharp FP-J50J User manual

Sharp
Sharp FP-J40TA User manual