Sharp AR-C250 User manual

DigitalDigital
MODEL
AR-C250
•GETTING STARTED
•MAKING COPIES
•SPECIAL FUNCTIONS
•SUPPLIES
•COPIER TROUBLE?
•GENERAL
INFORMATION
•OPTIONAL EQUIPMENT
1-1
2-1
3-1
4-1
5-1
6-1
7-1
DIGITAL FULL COLOR
COPYING MACHINE
OPERATION MANUAL
Page
•GETTING STARTED
•MAKING COPIES
•SPECIAL FUNCTIONS
•SUPPLIES
•COPIER TROUBLE?
•GENERAL
INFORMATION
•OPTIONAL EQUIPMENT
1-1
2-1
3-1
4-1
5-1
6-1
7-1
DIGITAL FULL COLOR
COPYING MACHINE
OPERATION MANUAL
Page

❧❧❧❧❧❧❧❧❧❧❧❧❧❧❧❧❧❧❧❧❧❧❧❧❧❧❧❧❧❧❧❧❧❧❧❧❧❧❧❧❧❧❧❧❧❧❧
❧
❧❧❧❧❧❧❧❧❧❧❧❧❧❧❧❧❧
❧
❧❧❧❧❧❧❧❧❧❧❧❧❧❧❧❧❧❧❧❧❧❧❧❧❧❧❧❧❧❧❧❧❧❧❧❧❧❧❧❧❧❧❧❧❧❧❧
❧
❧❧❧❧❧❧❧❧❧❧❧❧❧❧❧❧❧
❧
➢➣➢➣➢➣➢➣➢➣➢➣➢➣➢➣➢➣➢➣➢➣➢➣➢➣➢➣➢➣➢➣
➢
➣➢➣➢➣➢➣➢➣➢➣➢➣➢➣➢➣➢➣
➢
➣➢➣➢➣➢➣➢➣➢➣➢➣➢➣➢➣➢➣➢➣➢➣➢➣➢➣➢➣➢➣➢➣
➢
➣➢➣➢➣➢➣➢➣➢➣➢➣➢➣➢➣➢➣
➢
➣
The power switch positions are marked “I” to indicate power “ON” and
“ ” to indicate stand-by.
In the stand-by position, power is being supplied to a drying heater
within the optical system of the copier.
Caution:
For complete electrical disconnection, pull out the main plug.
The socket-outlet shall be installed near the equipment and shall be
easily accessible.
FOR YOUR RECORDS ...
To protect against loss or theft, record and retain for reference the
copier’s serial number located on the right hand side at the rear corner
of the copier.
Model Number
AR-C250
Serial Number
Date of Purchase
Place of Purchase
Authorized Sharp Copier
Service Department Number
Do not make copies of anything which is prohibited from copying by law. The following items are
nomally prohibited from copying by national law. Other items may be prohibited by local law.
● Money ● Stamps ● Bonds ● Stocks ● Bank drafts
● Checks ● Passports ● Driver’s licenses

1
The following pages contain samples of the various color copying functions described in this manual. They are
designed to demonstrate the wide range of capabilities and applications for the Sharp AR-C250 digital full color
copying machine.
Note that the samples shown on page 1 to page 8 are not actual copies from the AR-C250 copier. The colors
displayed may differ from those of actual copies.
Color Copying with Special Features
1. Single color copying (See page 3-24.)
The single color function is used to produce copies using a selected single color.
Original
Red
Purple
Green
Orange
Blue
Brown
COLOR COPY SAMPLES

2
2. Neg./Pos. Reverse (See page 3-26.)
TheNEG./POS.REVERSEfunctionisusedtotransformacolororiginalintoits complementarycolors.Ifthisfunction
is selected in the black/white mode, the black and white areas of the original will be reversed.
Original
3. Photo repeat (See page 3-30.)
PHOTO REPEAT is used to produce multiple copies of a photo on a single sheet of copy paper.
Copy (8-1/2" x 11")
Copy (11" x 17")
Color copy
Black/white copy
Original (3" x 5")
Original (5" x 7")

3
4. Multi-page Enlargement (See page 3-34.)
Thisfunctionisusedtoenlargeanoriginalimagetoasizelargerthan11"x17"andtoprintportionsoftheimageonto
multiple sheets of paper.
Original (8.5" x 11")
Copies (2 sheets of 11" x 17")
Original (11" x 17")
Copies (4 sheets of 11" x 17")

4
Adjustments for Color Copying
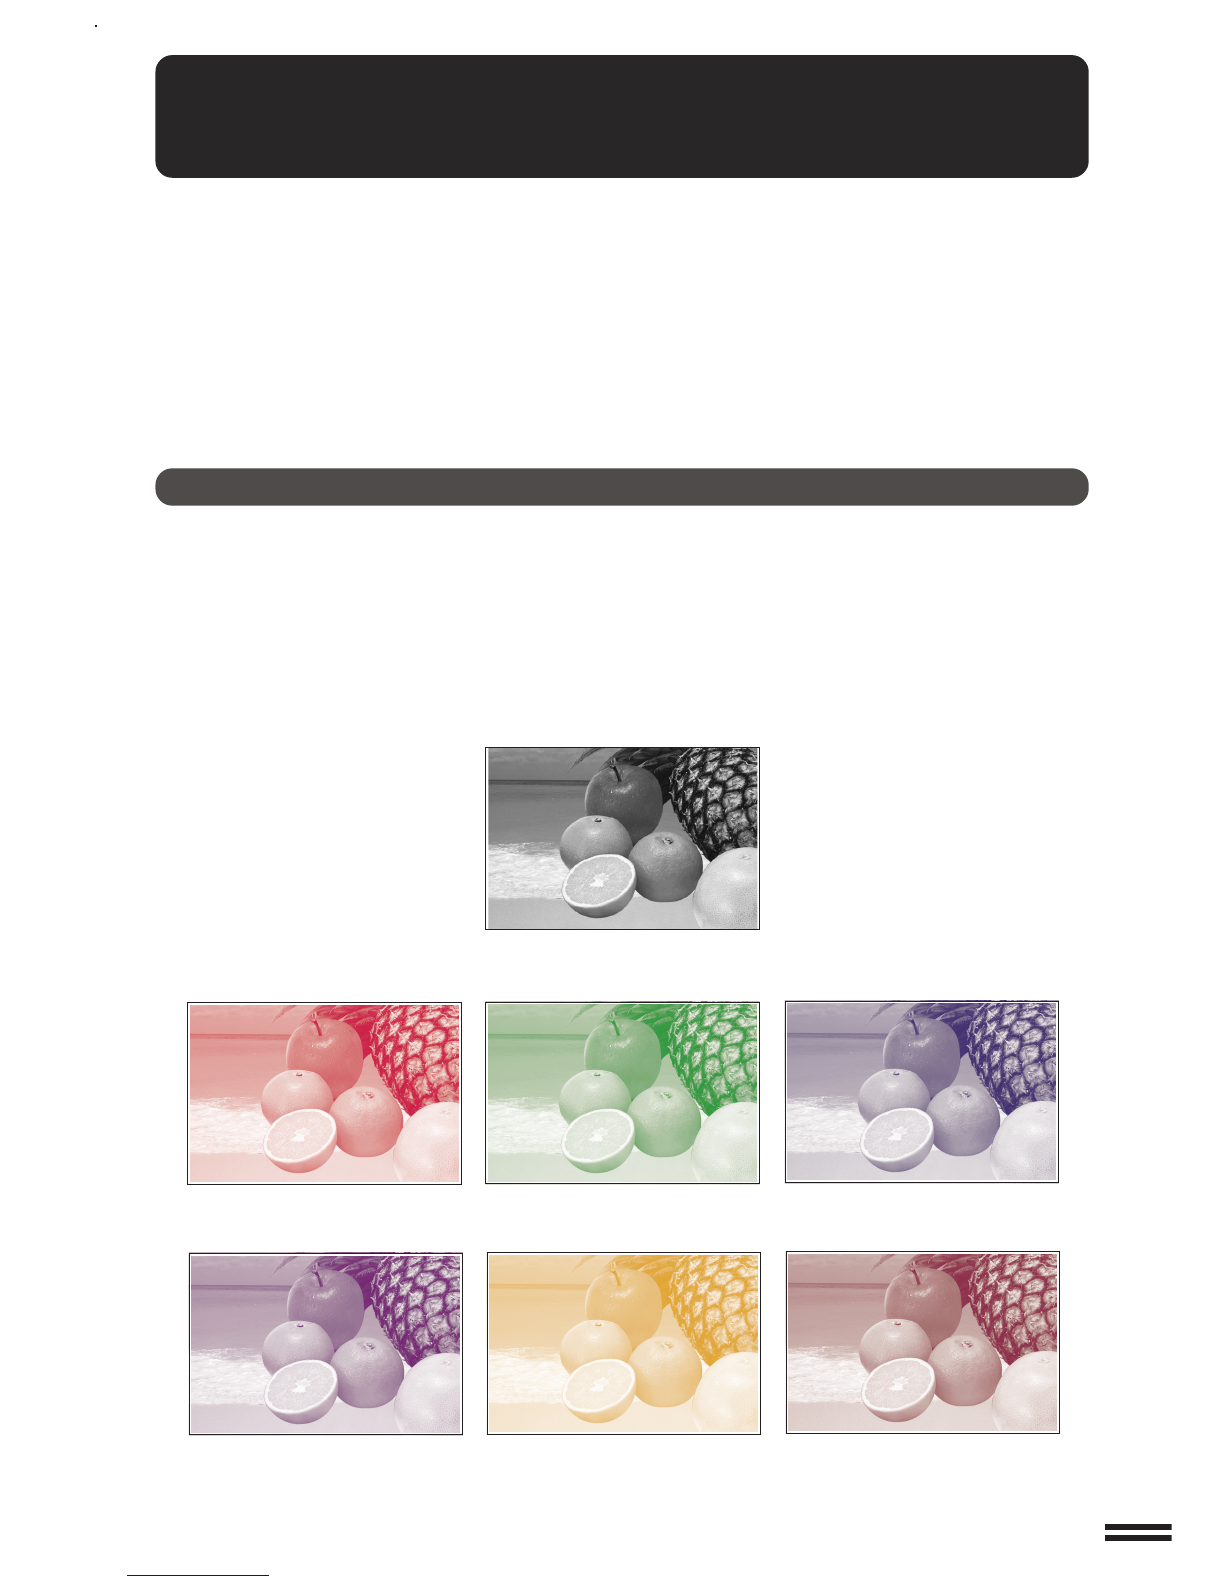
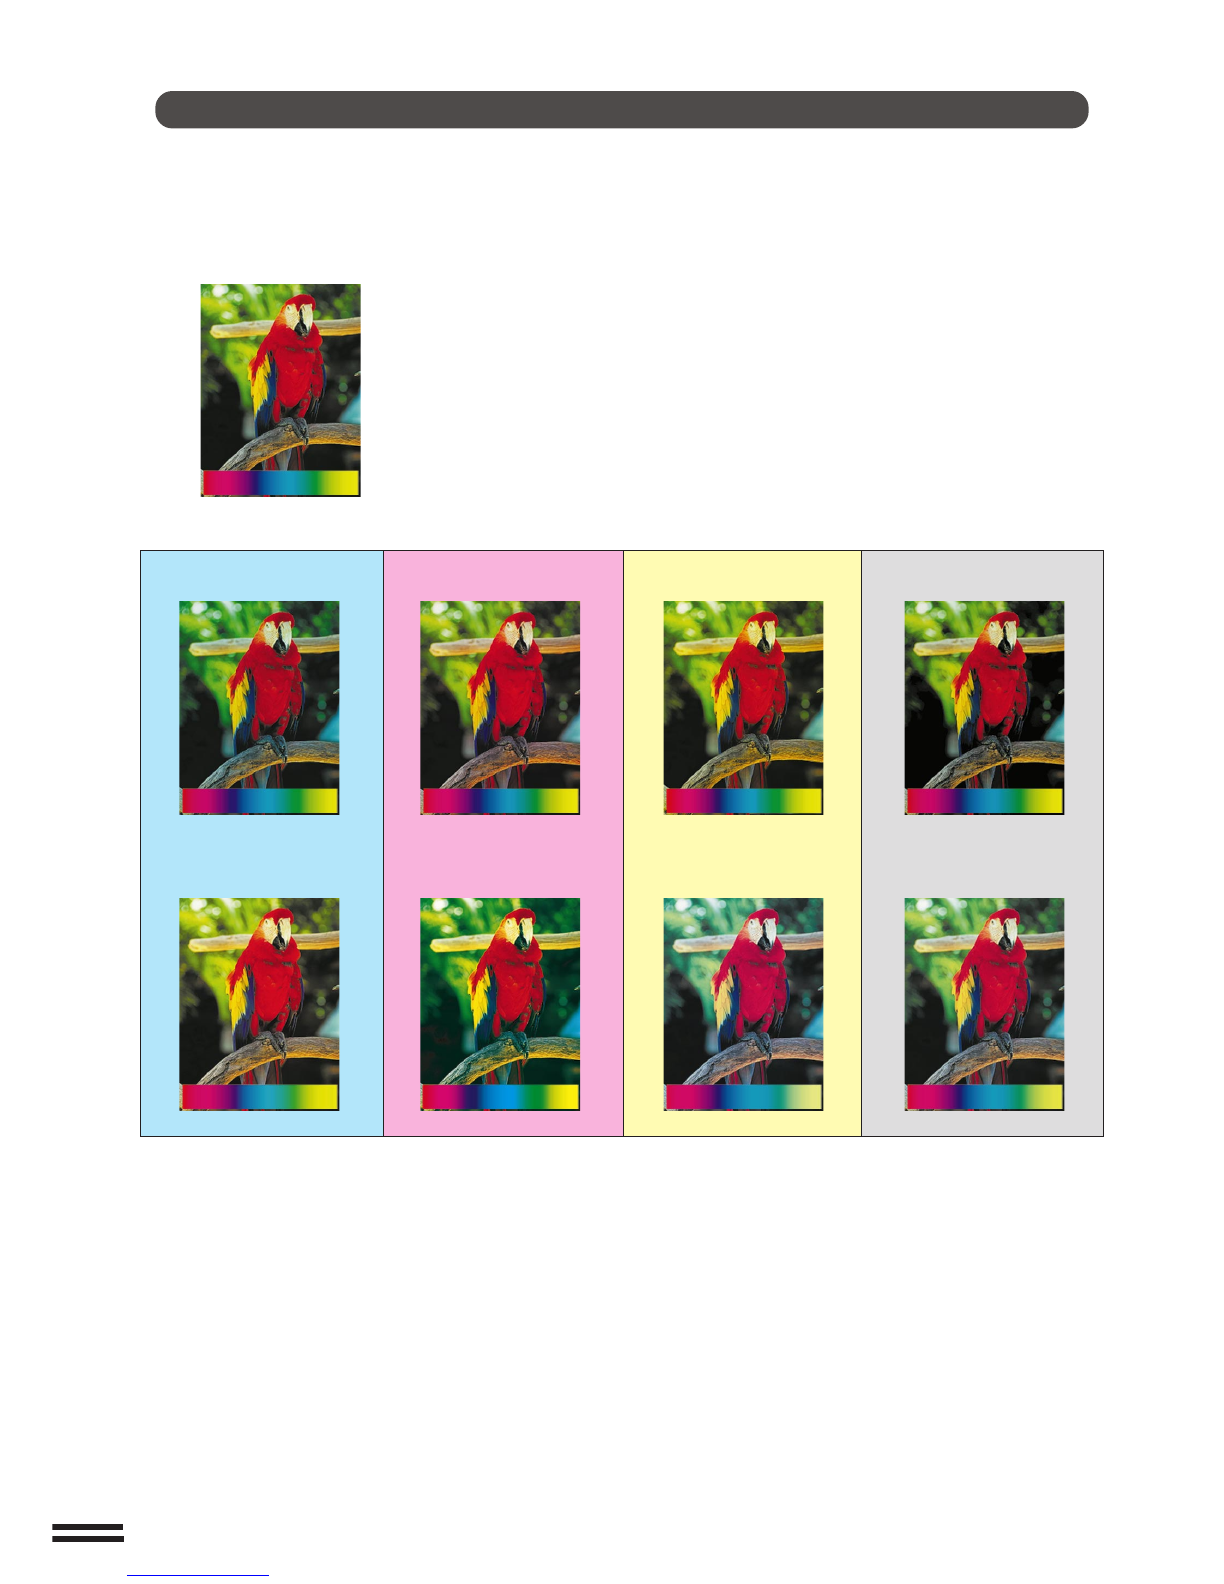
1. Exposure adjustments (See page 2-16.)
Exposureselectionsforthiscopiershouldbeselectedaccordingtothetypeoforiginalsbeingcopied:TEXT/PRTD.
PHOTO, TEXT/PHOTO, TEXT, PHOTO, PRINTED PHOTO or MAP.
Text/prtd. photo mode,
Text/photo mode: Text mode:
Photo mode: Printed photo mode:
This mode is useful for copying printed photographs.This mode provides the best quality
reproduction of photographs with
finedetail.
This mode is useful for enhancing low density
areas of an original or suppressing high density
background areas.
K
E
Y
O
P
E
R
A
T
O
R
C
O
D
E
N
U
M
B
E
R
A
k
e
y
o
p
e
r
a
t
o
r
c
o
d
e
n
u
m
b
e
r
m
u
s
t
b
e
r
e
g
i
s
t
e
r
e
d
b
e
f
o
r
e
a
k
e
y
o
p
e
r
a
t
o
r
p
r
o
g
r
a
m
c
a
n
b
e
u
s
e
d
.
T
h
e
k
e
y
o
p
e
r
a
t
o
r
m
u
s
t
r
e
m
e
m
b
e
r
t
h
i
s
n
u
m
b
e
r
.
O
n
l
y
t
h
i
s
r
e
g
i
s
t
e
r
e
d
n
u
m
b
e
r
w
i
l
l
a
l
l
o
w
a
c
c
e
s
s
t
o
t
h
e
k
e
y
o
p
e
r
a
t
o
r
p
r
o
g
r
a
m
s
.
R
e
g
i
s
t
e
r
i
n
g
t
h
e
k
e
y
o
p
e
r
a
t
o
r
c
o
d
e
n
u
m
b
e
r
1
P
r
e
s
s
t
h
e
C
U
S
T
O
M
S
E
T
T
I
N
G
S
k
e
y
.
P
h
o
t
o
KEY OPERATOR CODE NUMBER
Akeyoperatorcodenumbermustberegistered
beforeakeyoperatorprogramcanbeused.The
keyoperator must rememberthisnumber.Only
this registered number will allow access to
the key operator programs.
Registering the key operator code number.
1PresstheCUSTOMSETTINGSkey.
These modes provide the best
balance for copying originals which
contain text, printed photos and
photos.

5
2. RGB Adjust (See page 3-16.)
RGBadjustmentsfunctiontoincreaseordecreasetheoverallamountofasingleprimarycolor.Theamountofchange
dependsuponthecharacteristicsoftheparticularoriginalbeingcopied.Generally,lightertonedareaswillbeaffected
to a greater degree than will darker toned areas.
Original
Blue +
Blue -
Green +
Green -
Red +
Red -
The thumbnails appearing on the screen
areaguidelinetoshowtherelativeeffectof
adjustments.Theactualamountofchange
will vary for different originals.

6
4. Suppress background (See page 3-20.)
Thiscopiercansuppressunnecessarybackgroundcolorsontheoriginalimagewhencopying.Thisfunctionisused
to adjust the density level of background colors to be erased.
Original Copy
3. Sharpness (See page 3-18.)
This function is used to sharpen or soften image outlines.
Original Softer Sharper
The thumbnails appearing on the screen
areaguidelinetoshowtherelativeeffectof
adjustments.Theactualamountofchange
will vary for different originals.

7
Contrast +Brightness + Intensity +
Contrast -Brightness - Intensity -
Original
5. Brightness/intensity/contrast (See page 3-22.)
Thiscopierallowsthelevelofbrightness,intensityorcontrastofimagestobeadjusted.Ifbrightnessisselected,color
tonecanbedarkenedorlightened.Ifintensityisselected,thelevelofcolorsaturationcanbemodifiedbetween vivid
and dull. If contrast is selected, the contrast between two image areas can be adjusted higher or lower.
The thumbnails appearing on the screen
areaguidelinetoshowtherelativeeffectof
adjustments.Theactualamountofchange
will vary for different originals.

8
Color Balance
The key operator program Color Balance allows the key operator to adjust the density of colors. Adjusted color
samples are shown below. (See page 22 of the KEY OPERATOR’S GUIDE.)
Black adjustment -
Cyan adjustment- Magenta adjustment - Yellow adjustment -
Black adjustment +
Cyan adjustment + Magenta adjustment + Yellow adjustment +
Original

9
CHAPTER 4
SUPPLIES
●PAPER .......................... 4-2
Types and sizes of copy paper ......... 4-2
Loading copy paper ................. 4-2
●ADDING TONER ................... 4-5
●USED TONER DISPOSAL ............ 4-8
●STORAGE OF SUPPLIES ............ 4-9
CHAPTER 5
COPIER TROUBLE?
●MISFEED REMOVAL................ 5-2
●MAINTENANCE REQUIRED ......... 5-11
●TONER COLLECTING CONTAINER OF
TRANSFER UNIT ................. 5-12
●TROUBLESHOOTING .............. 5-13
CHAPTER 6
GENERAL INFORMATION
●PART NAMES AND FUNCTIONS....... 6-2
Exterior .......................... 6-2
Interior .......................... 6-3
Operation panel .................... 6-4
Touch panel (Basic screen) ........... 6-5
●USER MAINTENANCE .............. 6-6
●TOUCH PANEL CONTRAST
ADJUSTMENT .................... 6-7
●SPECIFICATIONS .................. 6-8
CHAPTER 7
OPTIONAL EQUIPMENT
●SYSTEM CONFIGURATION .......... 7-2
●20-BIN STAPLE SORTER (AR-SS2)..... 7-3
●LARGE CAPACITY TRAY (AR-LC2) .... 7-15
●FINISHER (AR-FN4) ............... 7-19
●INTRODUCTION ....................10
●USING THIS MANUAL................10
CHAPTER 1
GETTING STARTED
●INSTALLATIONREQUIREMENTS ...... 1-2
●CAUTIONS ....................... 1-3
●POWER ON AND OFF............... 1-5
Power save modes ................. 1-6
●INFORMATION FUNCTION ........... 1-7
●USING THE TOUCH PANEL .......... 1-8
How to use the touch panel ........... 1-8
Selection of function................. 1-8
Function setting icons ............... 1-9
CHAPTER 2
MAKING COPIES
●AUDITING ACCOUNTS .............. 2-2
●COPYING FROM THE DOCUMENT
GLASS .......................... 2-3
●USING THE RADF ................. 2-6
●REDUCTION/ENLARGEMENT/ZOOM .. 2-11
●SPECIAL PAPERS (manual feed) ...... 2-14
Two-sided copying with bypass tray .... 2-15
●EXPOSURE ADJUSTMENTS......... 2-16
●JOB MEMORY ................... 2-18
●INTERRUPTING A COPY RUN ....... 2-20
CHAPTER 3
SPECIAL FUNCTIONS
●XY ZOOM ........................ 3-2
●MARGIN SHIFT.................... 3-4
●ERASE .......................... 3-6
●DUAL PAGE COPYING .............. 3-8
●CENTERING ..................... 3-10
●TRANSPARENCY FILM WITH
INSERT SHEETS ................. 3-12
●COVERS ....................... 3-14
●COLOR ADJUSTMENTS ............ 3-16
RGB adjust ...................... 3-16
Sharpness....................... 3-18
Suppress background .............. 3-20
Brightness/intensity/contrast .......... 3-22
●IMAGE EDITING FUNCTIONS ........ 3-24
Single color ...................... 3-24
Neg./pos. reverse ................. 3-26
Mirror image ..................... 3-28
Photo repeat ..................... 3-30
11x17 full-bleed ................... 3-32
Multi-pageenlargement ............. 3-34
Extra size ....................... 3-36
Page
Page
CONTENTS
CHAPTER1CHAPTER2CHAPTER3CHAPTER4CHAPTER5CHAPTER6CHAPTER7

10
INTRODUCTION
The AR-C250 copier is a digital color image processing copier which provides
high productivity at a color copy speed of 25 copies/minute and convenient
features including intelligent image-editing functions.
Amongst its many useful features and functions are the document feeder
(optional),photocopying,internalauditor,andvariousspecialfunctionssuchas
dual page copying, margin shift, erase, XY zoom, and NEG./POS. reverse
functions.Thiscopiercanbeequippedwithanoptionallargecapacitytraywhich
holds 3,000 sheets of copy paper. The machine can also be equipped with an
optionalstaplesorteroran optional finisher with offset stack function to provide
finished copy sets ready for distribution.
Thiscopierwasalsodesignedwitheaseofuseinmind.Theeasy-to-understand
and colored operation panel with touch panel system and INFORMATION
function will guide the user through most operations. To gain the maximum
benefitofallthecopierfeatures,however,itisrecommendedthatusersfirstread
this manual to become familiar with all the copier features.
NOTES:
●This manual describes only copier features. For a description of optional
printer features, see the separate relevant manual.
●This copier can be equipped with an optional document cover or reversing
automatic document feeder (RADF). The illustrations in this manual are
mainly for the copier with an optional RADF installed.
●Thedisplayonthetouchpanelvarieswithinstallationofoptional equipment.
Theillustrationsofthetouchpanelinthismanualaremainlyforthecopierwith
an optional RADF (AR-RF1) installed.
USINGTHIS MANUAL
This manual is intended as an operation guide for both general users and key
operators.
For General Users
It is recommended that you read the GETTING STARTED, MAKING COPIES,
and SPECIAL FUNCTIONS sections to become familiar with the available
features and functions of your copier. Then refer to the manual as needed to
become thoroughly familiar with those features you will normally use.
For Key Operators
Please read all sections thoroughly to become familiar with all features and
functions of your copier. Throughout the manual, information which is relevant
to key operator functions is noted by “★KEY OPERATOR.” Please pay close
attentiontothesenotesandtotheSUPPLIES,COPIERTROUBLE?,GENERAL
INFORMATION, and OPTIONAL EQUIPMENT sections so you can ensure
smooth and efficient operation of your machine.
A separate KEY OPERATOR’S GUIDE has been written especially for you. It
containstheprogramsandprogramminginformationthatwillenableyoutotailor
functions for maximum benefit to your company.

1-1
CHAPTER1
CHAPTER 1
GETTING STARTED
This chapter describes the basic information on the use of this copier.
Page
●●
●●
●INSTALLATION REQUIREMENTS ..................... 1-2
●●
●●
●CAUTIONS ...................................... 1-3
●●
●●
●POWER ON AND OFF .............................. 1-5
Power save modes ................................. 1-6
●●
●●
●INFORMATION FUNCTION .......................... 1-7
●●
●●
●USINGTHETOUCH PANEL .......................... 1-8
How to use the touch panel ........................... 1-8
Selection of function ................................ 1-8
Function setting icons ............................... 1-9

1-2
CHAPTER1
INSTALLATION REQUIREMENTS
Toensuresafetyandpropermachineperformance,pleasenotethefollowing
before initial installation and whenever the machine is to be relocated.
1. Thecopier should beinstallednearanaccessiblepoweroutletforeasy
connection.
2. Besuretoconnectthe power cord only to apoweroutlet that meets the
specified voltage and current requirements.
Also make certain the outlet is properly grounded.
3. Do not install the machine where it is:
●damp or humid,
●exposed to direct sunlight,
●extremely dusty,
●poorly ventilated,
●subjecttoextremetemperatureorhumiditychanges(e.g.,nearanair
conditioner or heater).
4. Ensure that the area chosen for the machine location is level.
5. Besuretoallowtherequiredspacearoundthemachineforservicingand
properventilation.
A small amount of ozone is produced within the copier during operation.
The emission level is insufficient to cause any health hazard.
NOTE:
The present recommended long term exposure limit for ozone is 0.1 ppm
(0.2 mg/m3) calculated as an 8 hr. time-weighted average concentration.
However,sincethesmallamountthatisemittedmayhaveanobjectionable
odor, it is advisable to place the copier in a ventilated area.
GETTING STARTED Installation requirements
11-13/16"
(30 cm)
23-5/8"
(60 cm)
23-5/8"
(60 cm) 11-13/16"
(30 cm)

1-3
CHAPTER1
CAUTIONS
1. Donottouchthephotoconductivedrumsorpapertransport.
Scratches or smudges on them will cause copy defects.
2. The fusing unit is extremely hot. Exercise care in this area.
3. Do not look directly at the light source. Doing so may damage
your eyes.
4. Installationadjsuters.
When moving the machine, be sure to raise the installation
adjusters. After moving the machine, lower the installation
adjusters until they reach the floor.
This copier contains fusing oil that is very slippery if leaked
on the floor. Ensure that the machine is located at level
positionandtakecareifitistobemovedthatoilleakagedoes
not occur.
5. Thiscopier is equipped with aforgery prevention feature. If paper
that closely resembles paper money is used as an original,
copying may not be performed properly.
GETTING STARTED Cautions
Fusing unit Paper transport
Lock Release
Adjuster

1-4
CHAPTER1
CAUTIONS
GETTING STARTED Cautions
Cautions on laser
Wave length +10 nm
785 nm - 15 nm
Pulse times (4.374 µs ±4.4 ns)/7 mm
Output power 0.25 mW - 0.45 mW
SAFETY PRECAUTIONS
This Digital Copier is rated Class 1 and complies with 21 CFR
1040.10 and 1040.11 of the CDRH standards. This means that
the copier does not produce hazardous laser radiation. For your
safety, observe the precautions below.
●Do not remove the cabinet, operation panel or any other
covers.
●The copier’s exterior covers contain several safety interlock
switches. Do not bypass any safety interlock by inserting
wedges or other items into switch slots.
Caution
Useofcontrolsoradjustmentsorperformanceofproceduresother
than those specified herein may result in hazardous radiation
exposure.

1-5
CHAPTER1
POWER ON AND OFF
The power switch is located on the left side of the copier. When the
power switch is turned to the “ON” position, the message “WARMING
UP. PLEASE WAIT.” will appear in the message display. Warming
uptakes about 330 seconds. Oncethecopierisready,the message
display will change to “READY TO COPY.”, and the START key
indicators will light up, indicating that copying is possible.
Ifthecopierhasbeenprogrammedintheauditingmode,themessage
“ENTER YOUR ACCOUNT NUMBER. -----”willappearafterwarming
up. Once a valid account number has been entered, copying will
become possible.
GETTING STARTED Power on and off
Power off
Power on
●Be sure to extend the tray when paper sizes 8-1/2"
x 14" or larger are to be received.

1-6
CHAPTER1GETTING STARTED Power on and off
Sleep mode
If the sleep mode is enabled, the copier will enter the mode once a
programmed length of time has elapsed without any copier
operation after the last copy of a run is made or the power is first
turned on. When the copier enters the sleep mode, the display on
the touch panel will disappear. In this condition, power is not
supplied to the fuser in the copier. To exit from the sleep mode,
press the COPY key.
★KEY OPERATOR Seepage25oftheKEYOPERATOR’SGUIDEfor
setting the sleep mode timer. See page 30 of the KEY OPERATOR’S
GUIDE for enabling or disabling the sleep mode.
Preheat mode
Thecopier will enter the modeonce the set time haselapsedwithout
any copier operation after the last copy of a run is made or power is
turned on.
When the copier enters the preheat mode, the message “PREHEAT
MODE. PLACE ORIGINALS.” will appear.
In this condition, the fuser in the copier is maintained at a lower heat
level thereby saving power. The preheat level is, however, high
enough to allow the copier to come to a ready condition or begin
copying approximately 30 seconds after any key input is made.
Tocopy from the preheatmode, make desired copier selectionsand
press a START key using the normal copying procedure.
★KEY OPERATOR See page 26 of the KEY OPERATOR’S GUIDE for
information on setting the preheat mode.
As an ENERGY STAR®Partner,
SHARP has determined that this
product meets the ENERGY
STAR®guidelines for energy
efficiency.
POWER ON AND OFF
Power save modes
The copier has two power save modes to reduce overall power
consumptionandtherebyreducethecostofoperationandtoconserve
natural resources to help reduce environmental pollution. The two
power save modes are preheat mode and sleep mode.
★KEY OPERATOR
The preheat activation time and the sleep activation time have been
preset at the factory to 15 min. for preheat mode and 60 min. for sleep
mode. These times can be changed as described in the key operator’s
guide. It is suggested that you set appropriate times according to the
actual usage of the copier.

1-7
CHAPTER1
1Press the INFORMATION ( ) key in the standby mode.
●The screen for the information categories will appear.
2Select the “COPIER” key to display the first screen of
the copier feature items.
●If the toner supply is low, press the ADDING TONER key for
toner replenishment instructions.
3Select the feature you would like to know about by
pressing a copier feature item key on the touch panel.
●Ifthefeatureyouwouldliketoknowaboutisnotdisplayedonthe
touch panel, press the scroll ( ) key on the touch panel until
the feature is displayed.
●If a copier feature item key is pressed, the description for that
featurewillappear.Usethescroll( )keytodisplayadditional
informationuntilallinformationforthatfeaturehasbeendisplayed.
●To return to the copier feature item screen, press the “INDEX”
key.
●To exit the INFORMATION mode, press the “EXIT” key on the
touch panel.
INFORMATION FUNCTION
The information function provides a quick reference guide to the use
of the various features and functions of this copier. The information
mode can be entered when the copier is in the standby mode.
GETTING STARTED Information function
EXIT
INFORMATION
SELECT INFORMATION.
COPIER
ADDING TONER
EXIT
MAKING 2-SIDED COPIES (2-SIDED COPY)
INFORMATION
SORTING COPIES INTO SETS OR STAPLING
FINISHED SETS OF COPIES (OUTPUT)
USING THE DOCUMENT FEEDER
(DOCUMENT FEEDER)
REDUCTION/ENLARGEMENT/ZOOM
(COPY RATIO)
STORING FREQUENTLY USED JOB PROGRAMS
(PROGRAM)
1/5
1
4
INFORMATION
CUSTOM
SETTINGS

1-8
CHAPTER1
USINGTHETOUCH PANEL
How to use the touch panel
You can set or cancel a function displayed on the touch
panel by pressing (touching) a key with a finger. The touch
key operation can be confirmed with a beep tone (and
highlighting of the touch key).
★★
★★
★KEY OPERATOR For the beep tone to be heard, the beep tone must be
enabledbyakeyoperatorprogram.Seepage27oftheKEYOPERATOR’S
GUIDE.
Atransparent status functionkeyrepresents unavailability
of that function. If a transparent status key is pressed, two
short beeps will sound.
Selection of function
To register the selected settings for a function, press the
“OK” key on the setting screen. The settings indicated by
ahighlighteddisplaywillberegisteredasaselectedfunction.
Some special functions can be selected by pressing the
relevant keys on the SPECIAL MODES screen (page 3-4) or
on the IMAGE EDIT menu (page 3-24) to highlight the keys.
To cancel these functions, press the relevant keys again to
return the keys to the normal display. These functions are:
Dual page copying, Centering, Transparency inserts, Neg./
pos. reverse, Mirror image, and 11x17 full-bleed.
GETTING STARTED Using the touch panel
READY TO COPY.
SPECIAL MODES
MARGIN SHIFT ERASE
IMAGE EDITCOVERS
CENTERING
DUAL PAGE
COPY
COLOR
ADJUSTMENTS
TRANSPARENCY INSERTS
OK
AUTO
EXPOSURE PAPER SELECT
100%
COPY RATIO
8/ 11AUTO
12
ERASE
EDGE ERASE
CENTER ERASE
EDGE+CENTER
ERASE
CANCEL
1/2
OK
OK
(0~1)
inch
READY TO COPY.
AUTO
EXPOSURE PAPER SELECT
100%
COPY RATIO
1.8/ 11
2.11 17
3.8/ 14
12
12
16~28 lbs.
28+~35 lbs.
35+~55 lbs.
TRANSPARENCY
PAPER TYPE
STORE/DELETE
RECALL
1 2 3
456
789
Other manuals for AR-C250
1
Table of contents
Other Sharp Copier manuals

Sharp
Sharp SF-780 User manual

Sharp
Sharp AR-162 User manual

Sharp
Sharp AR-281 User manual

Sharp
Sharp SF-2530 User manual

Sharp
Sharp AR-650 User manual

Sharp
Sharp DM-FX1 User manual

Sharp
Sharp SF-7400 User manual

Sharp
Sharp AL-1220 User manual

Sharp
Sharp MX-2300N Guide User instructions

Sharp
Sharp MX-C382SC Guide

Sharp
Sharp AL1215 - B/W Laser - Copier User manual

Sharp
Sharp AR-150 SERIES User manual

Sharp
Sharp AR-280 User manual

Sharp
Sharp Multi Access User manual

Sharp
Sharp AR-120E User manual

Sharp
Sharp AR-C330 Key operators User manual

Sharp
Sharp AR-650 User manual

Sharp
Sharp AR-RP7 User manual

Sharp
Sharp AR-122E N User manual

Sharp
Sharp MX-CF10 User manual