Sharp SF-2530 User manual

•GETTING STARTED
•MAKING COPIES
•STATUS INDICATORS
•GENERAL INFORMATION
•OPTIONAL EQUIPMENT
2
8
22
30
53
PLAIN PAPER COPIER
OPERATION MANUAL
MODEL
SF-2530
Page
SF
-
2530 PLAIN PAPER COPIER

❧❧❧❧❧❧❧❧❧❧❧❧❧❧❧❧❧❧❧❧❧❧❧❧❧❧❧❧❧❧❧❧❧❧❧❧❧
❧
❧
❧❧❧❧❧❧❧❧❧❧❧❧❧
❧
❧❧❧❧❧❧❧❧❧❧❧❧❧❧❧❧❧❧❧❧❧❧❧❧❧❧❧❧❧❧❧❧❧❧❧❧❧
❧
❧
❧❧❧❧❧❧❧❧❧❧❧❧
❧
❧
The power switch positions are marked “I” to indicate power “ON” and
“” to indicate stand-by.
In the stand-by position, power is being supplied to a drying heater within
the optical system of the copier.
Caution:
For complete electrical disconnection, pull out the main plug.
The equipment should be installed near an accessible socket outlet for
easy disconnection.
FOR YOUR RECORDS ...
To protect against loss or theft, record and retain for reference the
copier’s serial number located on the right hand side at the rear bottom
corner of the copier.
Model Number
Serial Number
Date of Purchase
Place of Purchase
Authorized Sharp Copier
Service Department Number
SF-2530
➣➢➣➢➣➢➣➢➣➢➣➢➣➢➣➢➣➢➣➢➣➢➣➢➣➢➣➢➣➢➣➢➣➢➣➢➣➢
➣➢➣➢➣➢➣➢➣➢➣➢➣➢➣➢➣➢➣➢➣➢➣➢➣
➢➣➢➣➢➣➢➣➢➣➢➣➢➣➢➣➢➣➢➣➢➣➢➣➢➣➢➣➢➣➢➣➢➣➢➣➢➣
➢➣➢➣➢➣➢➣➢➣➢➣➢➣➢➣➢➣➢➣➢➣➢➣➢

1
CONTENTS Page
GETTING STARTED
●INSTALLATION REQUIREMENTS ..................2
●CAUTIONS .................................... 3
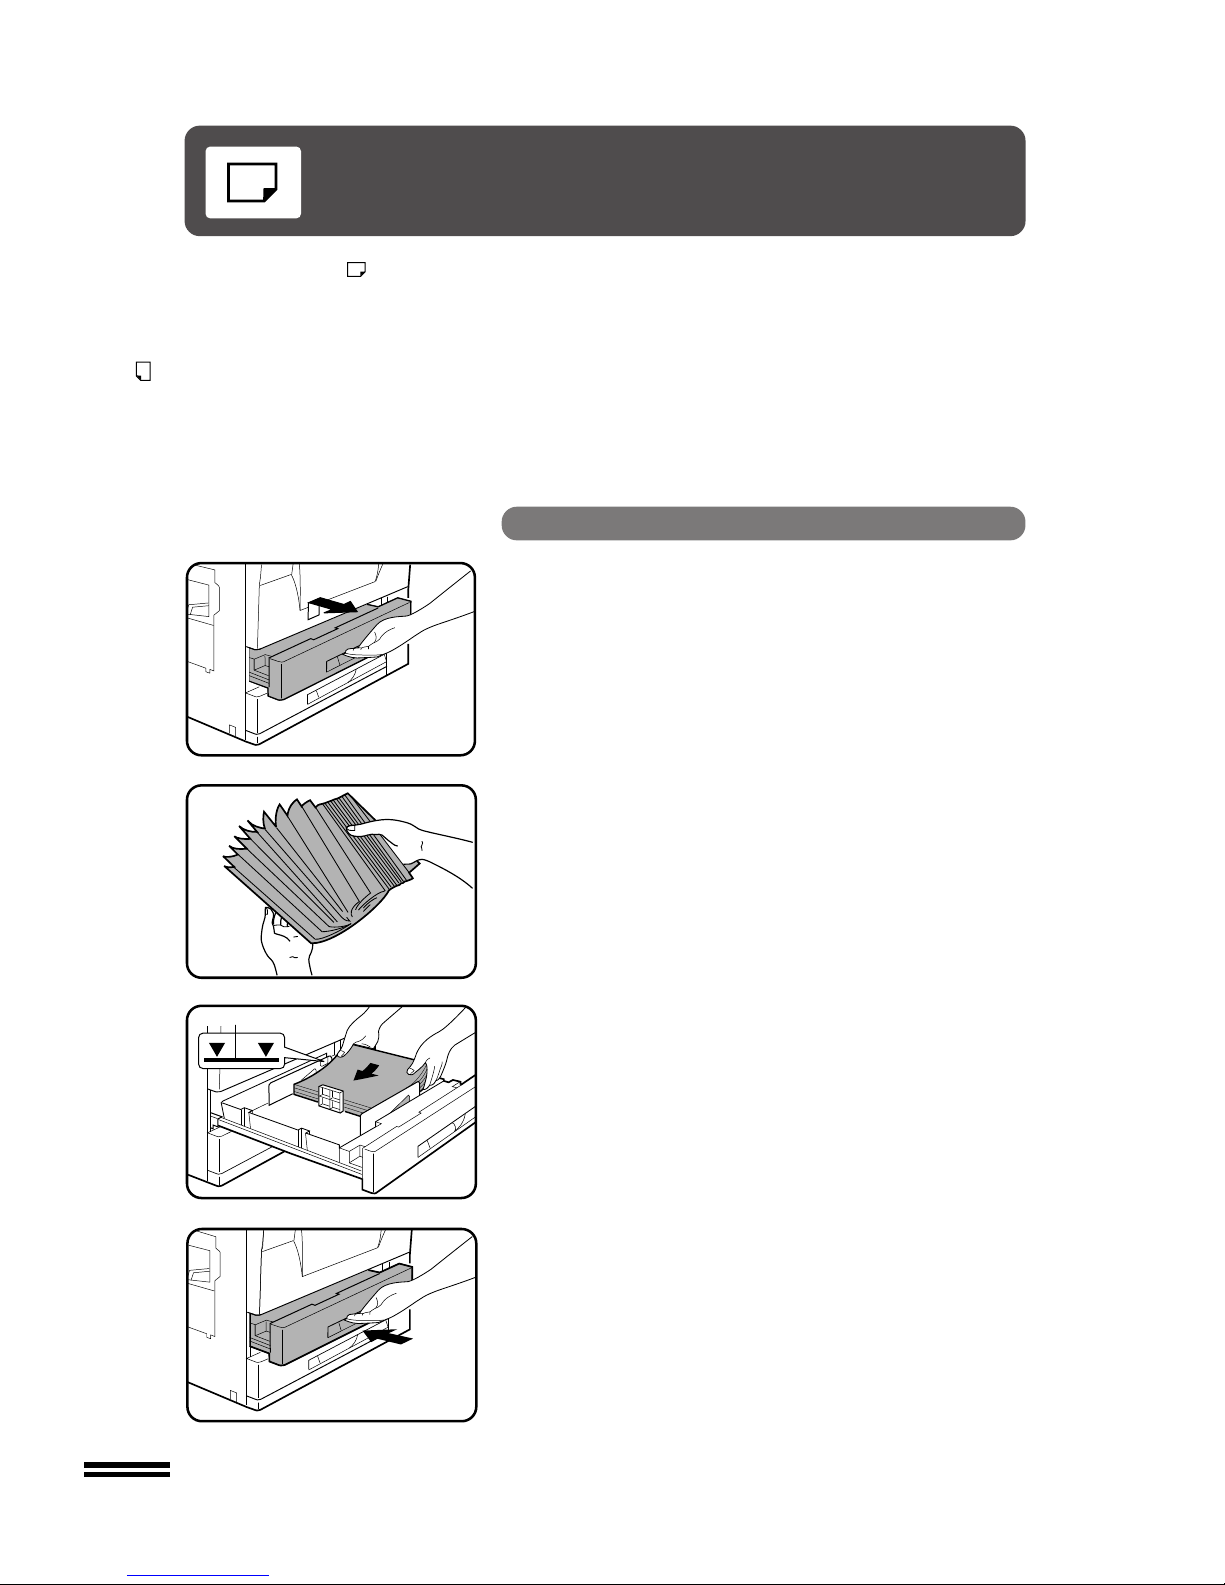
●LOADING COPY PAPER...................... 4
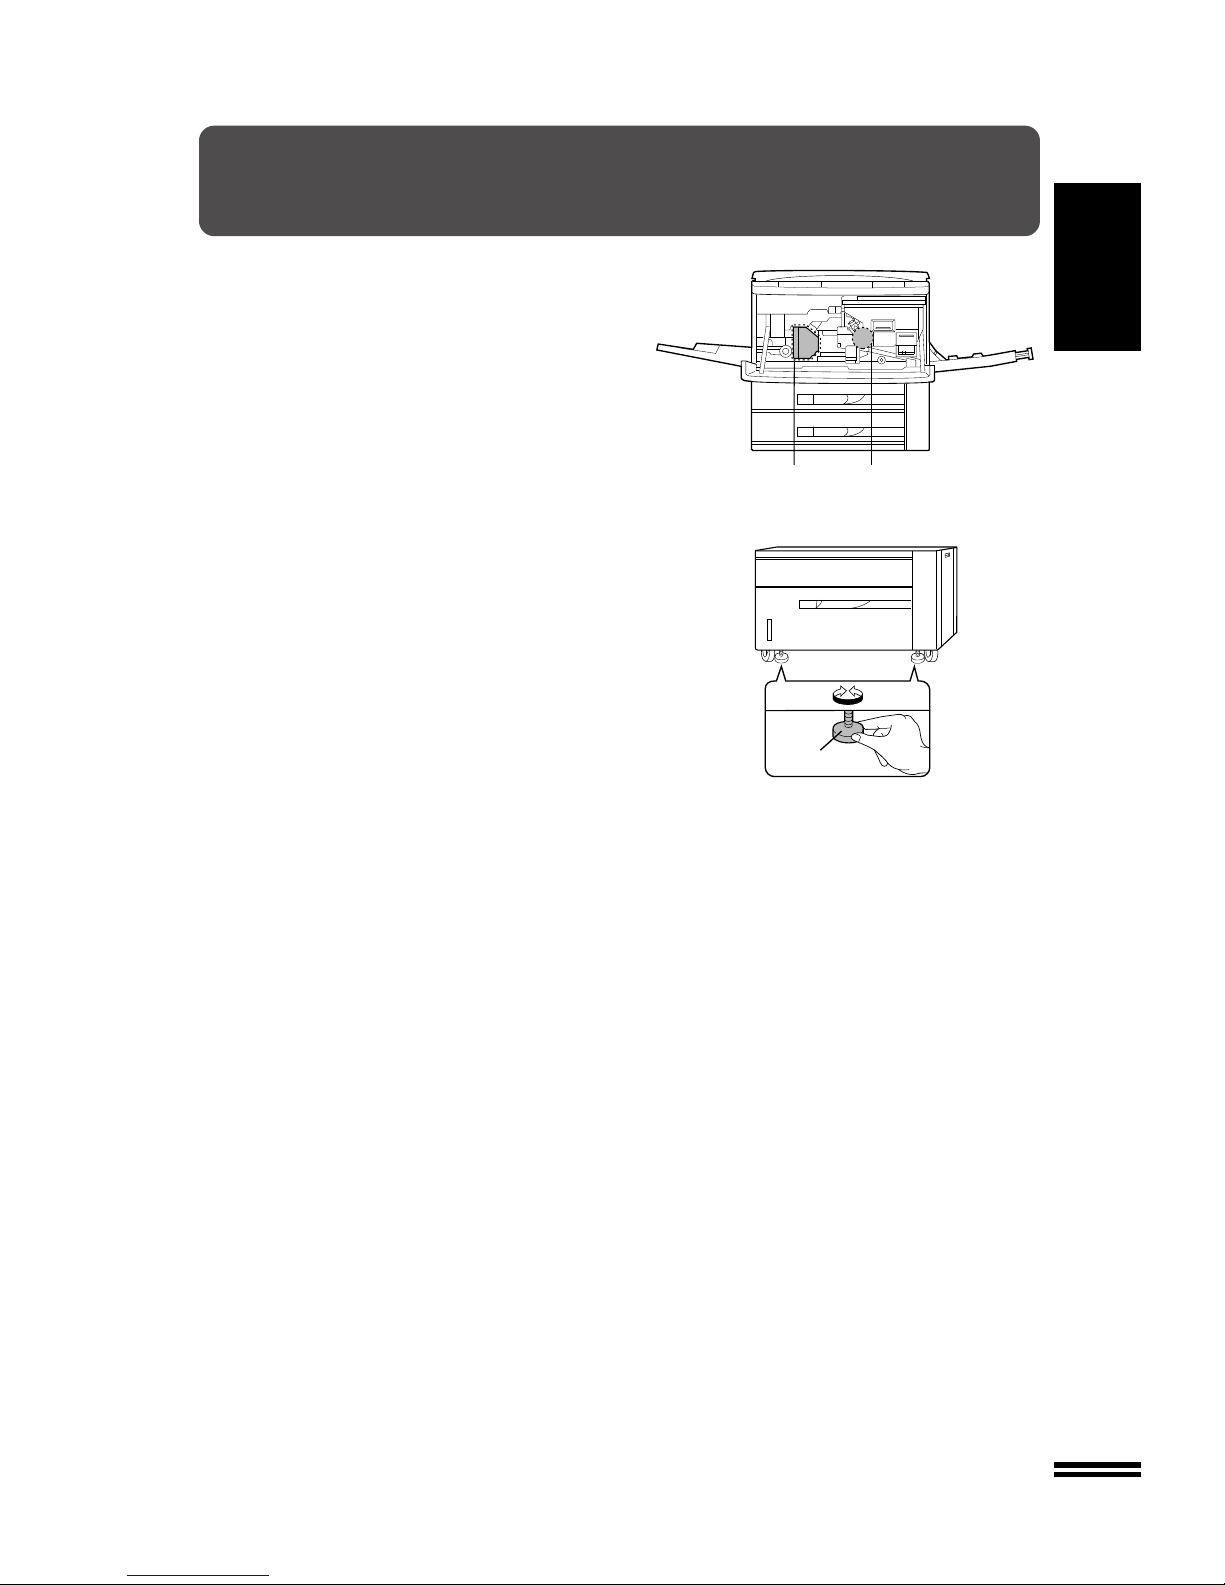
●ADDING TONER ............................6
GETTING STARTED
INTRODUCTION
The SF-2530 has been designed to give
high productivity while offering convenient
copying features. Its main features are:
●Easy operation,
●Automatic exposure control,
●PHOTO mode copying,
●Convenient functions such as DUAL
PAGE COPYING, EDGE ERASE,
MARGIN SHIFT, and
●Power savings with preheat and auto
power shut-off modes.
The machine can be equipped with an
optional automatic document feeder
(ADF) or reversing automatic document
feeder (RADF) for automatic feeding of
original documents and an optional sorter
or staple sorter to provide finished copy
sets ready for distribution.
To ensure optimum use of copier
functions, please familiarize yourself with
this manual and the copier. Be sure to
keep this manual available for quick
reference during copier operation.
MAKING COPIES
●AUDITING ACCOUNTS .......................... 8
●NORMAL COPYING .............................9
One-sided copying............................... 9
Two-sided copying with optional duplex module......... 11
●USING THE MANUAL FEED TRAY (special paper)..... 12
Two-sided copying with manual feed tray ............. 13
●REDUCTION/ENLARGEMENT/ZOOM ............... 14
●DUAL PAGE COPYING ......................... 16
●EDGE ERASE................................. 17
●MARGIN SHIFT ............................... 18
●INTERRUPTING A COPY RUN .................... 19
●AUTOMATIC EXPOSURE ADJUSTMENT ............ 20
●TONER SAVE MODE ........................... 21
GENERAL INFORMATION
●PART NAMES AND FUNCTIONS .................. 30
Exterior ...................................... 30
Interior ...................................... 31
Operation panel................................ 32
●USER PROGRAMS............................. 34
●AUDITING PROGRAMS .........................37
●POWER SAVE MODES.......................... 43
●USER MAINTENANCE .......................... 45
●COPIER TROUBLE?............................ 46
●SUPPLIES ...................................49
Types and sizes of copy paper ..................... 49
Genuine supplies statement ....................... 50
●SPECIFICATIONS .............................51
OPTIONAL EQUIPMENT
●SYSTEM CONFIGURATION ...................... 54
●AUTOMATIC DOCUMENT FEEDER (SF-A17) ......... 55
●
REVERSING AUTOMATIC DOCUMENT FEEDER (SF-A56)
... 55
●10-BIN SORTER (SF-S18)........................ 61
●20-BIN SORTER (SF-S15)........................ 61
●10-BIN STAPLE SORTER (SF-S54N) ............... 67
●20-BIN STAPLE SORTER (SF-S56)................. 67
●STAND/500-SHEET PAPER DRAWER (SF-D20) ....... 82
●STAND/1000-SHEET PAPER DRAWER (SF-D21) ...... 82
●AUDITOR CODE NUMBER: FACTORY SETTING ...... 87
STATUS INDICATORS
STATUS INDICATORS
●MISFEED REMOVAL ....................... 22
●USED TONER DISPOSAL .................... 27
●DEVELOPER REQUIRED .................... 28
●MAINTENANCE REQUIRED .................. 29
OPTIONAL EQUIPMENT
GENERAL INFORMATION
MAKING COPIES

2
GETTING STARTED
INSTALLATION REQUIREMENTS
To ensure safety and proper machine performance, please note the
following before initial installation and whenever the machine is to be
relocated.
1. The copier should be installed near an accessible power outlet
for easy connection.
2. Be sure to connect the power cord only to a power outlet that
meets the specified voltage and current requirements.
Also make certain the outlet is properly grounded.
3. Do not install the machine where it is:
●damp or humid,
●exposed to direct sunlight,
●extremely dusty,
●poorly ventilated,
●subjectto extremetemperature orhumidity changes(e.g., near
an air conditioner or heater).
4. Ensure that the area chosen for the machine location is level.
5. Be sure to allow the required space around the machine for
servicing and proper ventilation.
A small amount of ozone is produced within the copier during operation.
The emission level is insufficient to cause any health hazard.
NOTE:
The present recommended long term exposure limit for ozone is 0.1 ppm
(0.2 mg/m3) calculated as an 8 hr.time-weighted average concentration.
However,sincethe small amountthat is emittedmayhave anobjectionable
odor, it is advisable to place the copier in a ventilated area.
Installation requirements
11-13/16"
(30 cm)
23-5/8"
(60 cm)
23-5/8"
(60 cm)
11-13/16"
(30 cm)

3
GETTING STARTED
CAUTIONS
1. Do not touch the photoconductive drum. Scratches or
smudges on the drum will cause dirty copies.
2. The fusing unit is extremely hot. Exercise care in this area.
3. Installation adjusters are provided on the optional stand/
500-sheetpaper drawer orstand/1000-sheet paper drawer.
Whenmoving themachinewith theoptional stand/500-sheet
paper drawer or stand/1000-sheet paper drawer, be sure
toraisetheinstallation adjusters.Aftermovingthe machine,
lower the installation adjusters until they reach the floor to
lock the machine in place.
Fusing unit Photoconductive drum
Cautions
Lock Release
Adjuster

4
GETTING STARTED
The paper required ( ) indicator will light up when
there is no copy paper in a selected paper feed station
or when a selected paper tray is not installed or is
improperly installed.
For best results, use only Sharp recommended paper.
The copy paper size for the 500-sheet paper drawer
and the optional stand/500-sheet paper drawer or
optional stand/1000-sheet paper drawer will be set by
Sharp service personnel according to your request
when you purchase the copier. If a different paper size
setting is required, contact your authorized Sharp
Service Center.
The 500-sheet paper drawer can be adjusted for four
different paper sizes: 8-1/2" x 11", 8-1/2" x 11"R,
8-1/2" x 14", and 11" x 17".
The 1000-sheet paper drawer can be adjusted for
three different paper sizes: 8-1/2" x 11", 8-1/2" x 11"R,
and 8-1/2" x 14".
The paper size for the lower paper tray can be
changed by the user.
500-sheet paper drawer
1Gently lift and pull out the paper tray.
●If there is paper in the tray, push the tray firmly back into the
copier.
2If the tray is empty, fan the copy paper and insert it into
the tray.
●The tray holds 500 sheets of 20 lb. bond paper.
Do not load paper above the maximum height line.
3Push the paper tray firmly back into the copier.
Loading copy paper
Maximum height line
LOADING COPY PAPER

5
GETTING STARTED
Changing the lower paper tray’s inner cassette
The lower paper tray can accommodate five different paper sizes. To
change the paper size, simply change the inner cassette. (The inner
cassettes are optional.)
1Gently lift and pull out the lower paper tray.
2Grasp the inner cassette tabs and remove the cassette.
3Remove the cover of the inner cassette to be installed.
If the cassette is empty, fan the copy paper and place it
in the cassette.
●The cassette holds 500 sheets of 20 lb. bond paper.
(For 5-1/2" x 8-1/2" sized paper, the maximum is 250 sheets.)
Do not load paper above the maximum height line.
●Place the cover on the inner cassette which was removed.
4Place the inner cassette into the tray.
●Position the inner cassette so its four protrusions fit into the
holes of the paper tray.
●Inner cassettes are available for five different paper sizes:
5-1/2" x 8-1/2", 8-1/2" x 11", 8-1/2" x 11"R, 8-1/2" x 14", and
11" x 17".
5Place the paper size plate in the front of the paper tray.
●The paper size indication which shows through the slot on the
front of the copier should match the selected paper size.
6Push the lower paper tray firmly back into the copier.
LOADING COPY PAPER
Loading copy paper
Paper size plate
12
EXTRA

6
GETTING STARTED
1Open the front cover.
2Pull down the toner hopper lock lever and pull the toner
hopper out slowly until it stops.
3Holdthe tonercartridge verticallyandvigorouslyshake
it up and down about 20 times to loosen the toner. This
will allow the toner to flow more easily into the toner
hopper.
Adding toner
GENUINE SUPPLIES
ADDING TONER
The toner required ( ) indicator will light up when toner
concentration level in the developer unit is low. If copying is
continued while the indicator is lit, copies will gradually become
lighter until the copier stops and the indicator begins blinking.
The indicator may also begin blinking during long copy runs of
multiple dark originals, even though toner is left. If the indicator
begins to blink, the copier will stop making copies. Open and close
the front cover. After a sufficient amount of toner has been fed,
the indicator will go out and the START key indicator will light up.
Press the START key to resume copying.
For best copying results, be sure to
use only Sharp Genuine Supplies
which are designed, engineered, and
tested to maximize the life and
performance of Sharp copiers.
Look for the Genuine Supplies label
on the toner package.

7
GETTING STARTED
4Place the new toner cartridge with the tabs in the
notches as shown.
5Slidethetonercartridgealongtheguidesoverthetoner
hopper.
6Hold the toner cartridge with one hand while pulling on
the sealing tape to remove it.
7Tap on the top of the toner cartridge 5 times to release
all toner into the toner hopper.
●It will take about 30 seconds for the toner to flow into the toner
hopper. Do not remove the toner cartridge until it is empty.
8Slide the empty toner cartridge back along the guides
and remove it.
●The cartridge opening will be closed as it is moved back along
the guides.
9Slide the toner hopper into the copier and return the
toner hopper lock lever into place.
●If the toner hopper is not positioned properly, either the copies
will come out blank or will blink in the copy quantity display
indicatingthat thecopier willnot operate.In eithercase, ensure
thatthetonerhopperisproperlylocked initsoperatingposition.
10
Close the front cover .
NOTE:
Add only one cartridge of toner.
Adding toner
ADDING TONER
Sealing tape

8
MAKING COPIES Auditing accounts
AUDITING ACCOUNTS
If this copier has been programmed in the auditing mode, it will not
function until an assigned 3-digit account number has been entered.
See page 37 for setting the auditing mode.
If the copier has been programmed in the auditing mode, “––” will
appear in the copy quantity display in the initial conditions.
1Enter your account number using the 10-key pad.
●Aseach digitisentered,thedashes inthe copyquantity display
will disappear.
●After the number is entered, the copy quantity display will
change to 0 and the START key indicator will light up.
●Ifanunassignednumberisentered,“––”willappearagaininthe
copy quantity display, indicating that the number was not
accepted.
2When a copy run is completed, press the key.
●“––”willappearagaininthecopyquantitydisplay,indicatingthe
auditing mode.
●Intheinterruptcopymode(seepage19),presstheINTERRUPT
key after an interrupt copy run is completed.
123
456
7
0C
89
LECT
CLEAR ALL

9
MAKING COPIES
One-sided copying
NORMAL COPYING
Normal copying
1Turn the power switch on.
●It will take about 60 seconds for the copier to warm up. After
warm-up, the START key indicator will light up, indicating that
copying is possible.
●If the copier has been programmed in the auditing mode, the
STARTkey indicatorwill not lightup and “––”will appear inthe
copyquantitydisplay.Enteranassigned3-digitaccountnumber.
See page 8.
2Open the document cover and place an original face
down on the document glass, using the centering scale
to position it.
●Image loss (max. 5/32" (4 mm)) can occur at the leading and
trailing edges of the copies.
NOTE:
●Do not place objects under the original size detector, because
they may damage it.
3Close the document cover.
●TheORIGINAL SIZEindicatorfor thedetectedsizewilllight up.
4Ensure that the desired paper tray is selected.
●Paper matching the size of the original will be automatically
selected when the auto paper select function is enabled. To
copy onto paper of a different size, press the TREY SELECT
key.
●The auto paper select function can be disabled using user
program No. 8. If this function is disabled, use the TRAY
SELECT key to select the desired paper tray. See page 34,
USER PROGRAMS.
5Adjust the copy density.
●Thiscopierhasthreeselectableexposuremodes–AUTOMATIC,
MANUAL and PHOTO.
●Automaticexposureis thestandardinitial settingforthiscopier.
Inthis mode, thecharacteristicsof theoriginalare “read”bythe
exposure system and adjustments are automatically made.
Thisoptimizesthecontrastofthecopiedimagesbyreducingthe
effect of colored or shaded background areas. See page 20 to
adjust the automatic exposure level.
Power on
EORIGINAL
SIZE PAPER
SIZE
17
14
11
11
11
×
×
×
×
×
EXTRA
AUTO PAPER
SELECT
TRAY SELECT
8
1
/
2
8
1
/
2
8
1
/
2
8
1
/
2
5
1
/
2
OPY
BER
ER
EXPOSURE
AUTO
MANUAL
PHOTO
Original size detector

10
MAKING COPIES
NORMAL COPYING
●For manual copy density adjustment, press the EXPOSURE
key to select MANUAL and adjust with the LIGHT and DARK
keys as desired.
●Forphotographs,selectPHOTOandthenadjustwiththeLIGHT
and DARK keys as desired.
6Use the 10-key pad to enter the desired number of
copies.
●The number will be shown in the copy quantity display.
●A single copy can be made with the initial setting, i.e., when “0”
is displayed.
●Usetheclear(
C
)keytocancelanentryifamistakeismade.
7Press the START key.
●Thenumberinthecopyquantitydisplaywilldecreaseby1each
time a copy is made.
●Tocancelacopyrun,presstheCLEARALL( )key.Copying
willstopandthenumberinthecopyquantitydisplaywillbereset
to 0.
●To repeat the same copy sequence for a different original,
simply replace the original and press the START key.
Normal copying
R
EXPOSURE
AUTO
MANUAL
PHOTO
LIGHT DARK
12345
NT
SLIGHT DARK
12345
R
EXPOSURE
AUTO
MANUAL
PHOTO
LIGHT DARK
12345
NT
SLIGHT DARK
12345
123
456
7
0C
89
TRAY SELECT
INTERRUPT
CLEAR ALL
POWER SAVE
START
9
START

11
MAKING COPIES
NORMAL COPYING
1Placethefirstoriginalfacedownonthedocumentglass
and close the document cover.
2Press the ORIGINAL TO COPY key to select EVEN
NUMBER.
●ODD NUMBER copying is only possible when copying from an
optionalautomaticdocumentfeeder(ADF)orreversingautomatic
document feeder (RADF). (See page 55 for details.)
3Ensure that the desired paper tray is selected.
●Paper sizes that can be used in the duplex mode are 8-1/2" x
11", 8-1/2" x 11"R, 8-1/2" x 14", and 11" x 17".
4Enter the number of copies.
●Themaximumnumberofcopiesintheduplexmodeis50for8-1/
2" x 11" and 8-1/2" x 11"R, and 30 for the other paper sizes.
5Press the START key.
6Place the second original and press the START key
again to copy onto the other side.
●To stop a copy run during duplex copying, press the clear
(
C
) key. To resume copying, press the START key. To
cancelcopying, presstheCLEARALL( ) keyand manually
removeanycopiesremainingintheduplexmodulefollowingthe
procedure for removing misfed paper from the duplex module.
(See page 26.)
●Tocanceltheduplexmode,presstheORIGINALTOCOPYkey
untiltheindicatorsintheORIGINALTOCOPYsectionallgoout.
Normal copying
Two-sided copying with optional duplex module
Two-sided copies can be made by pressing the ORIGINAL TO
COPY key when an optional duplex module is installed.
ODD NUMBER
PRE-COUNT
ORIGINALS
ORIGINAL TO COPY
(ORIGINALS)
EVEN NUMBER
ODD NUMBER
EORIGINAL
SIZE PAPER
SIZE
17
14
11
11
11
×
×
×
×
×
EXTRA
AUTO PAPER
SELECT
TRAY SELECT
8
1
/
2
8
1
/
2
8
1
/
2
8
1
/
2
5
1
/
2
POWER SAVE
START
123
456
7
0C
89
9
START

12
MAKING COPIES
USING THE MANUAL FEED TRAY (special paper)
The manual feed tray is used to copy onto transparency film, labels,
tracing paper, and other special purpose papers. Up to 50 sheets of
standard copy paper can be set in the manual feed tray.
●Automaticduplexcopyingwillnot workwhena non-standardsized
paper is used. If a duplex copying mode is selected and a non-
standard sized paper is used from the manual feed tray, the
correspondingone-sidedmodewillbeselectedautomaticallywhen
the START key is pressed. (Automatic duplex copying can be
performed only when an optional duplex module is installed.)
1Placetheoriginalfacedownonthedocumentglassand
close the document cover.
2Open the manual feed tray.
3Set the manual feed tray guides to the width of the copy
paper.
●Besuretoextendthe traywhenfeeding8-1/2"x14" or11"x17"
paper.
4Insert the copy paper all the way into the manual feed
tray.
●Transparency film, labels, tracing paper, and other special
purpose papers must be fed individually.
●Up to 50 sheets of standard copy paper measuring from 5-1/2"
x 8-1/2" to 11" x 17" can be loaded into the manual feed tray.
●When adding paper, first remove remaining paper, combine it
with the paper to be added and then reload as a single stack.
5Use the TRAY SELECT key to select the manual feed
tray.
6Leave the copy quantity at 0 if using special papers.
Enter the number of copies if using standard copy
paper.
7Press the START key.
Using the manual feed tray (special paper)
POWER SAVE
START
GINAL PAPER
SIZE
17
14
11
11
11
×
×
×
×
×
EXTRA
TO PAPER
LECT
TRAY SELECT
8
1
/
2
8
1
/
2
8
1
/
2
8
1
/
2
5
1
/
2

13
MAKING COPIES
Two-sided copying with manual feed tray
Two-sided copies can be made using the manual feed tray.
1Placethe firstoriginal facedown onthe documentglass
and make a copy.
●The first side of the copy can be made using any of the paper
feed stations.
2Replace the first original with the second original and
close the document cover.
●Makesurethefirstandsecondoriginalsareorientedinthesame
way on the document glass.
3Turnthefirstcopyover withoutchangingitstop-bottom
orientation and place it into the manual feed tray.
●Be sure to feed the copies one sheet at a time.
4Use the TRAY SELECT key to select the manual feed
tray.
5Press the START key.
USING THE MANUAL FEED TRAY (special paper)
Using the manual feed tray (special paper)
1 2
1 2
3 4
3 4
1 2
POWER SAVE
START
GINAL PAPER
SIZE
17
14
11
11
11
×
×
×
×
×
EXTRA
TO PAPER
LECT
TRAY SELECT
81
/
2
81
/
2
81
/
2
81
/
2
51
/
2

14
MAKING COPIES
REDUCTION/ENLARGEMENT/ZOOM
Reduction and enlargement ratios can be selected either auto-
matically with the AUTO IMAGE key or manually with the reduction
() key, enlargement ( ) key, or ZOOM keys. The zoom
function enables precise copy ratio selection from 50% to 200% in
1% increments.
Automatic
1Place the original on the document glass and close the
document cover.
●TheORIGINAL SIZEindicatorfor thedetectedsizewilllight up.
2Press the TRAY SELECT key to select the paper tray
with the desired paper size.
3Press the AUTO IMAGE key.
●The copy ratio will be automatically set.
●If the size and orientation of the original do not correspond to
standard reduction/enlargement ratios for the selected paper
tray, then the ORIGINAL SIZE indicator will blink.
4Enter the number of copies.
5Press the START key.
NOTE:
To cancel the automatic reduction/enlargement mode, press the
AUTO IMAGE key again.
Reduction/Enlargement/Zoom
1
4
7
0
EORIGINAL
SIZE PAPER
SIZE
17
14
11
11
11
×
×
×
×
×
EXTRA
AUTO PAPER
SELECT
TRAY SELECT
8
1
/
2
8
1
/
2
8
1
/
2
8
1
/
2
5
1
/
2
POWER SAVE
START
123
456
7
0C
89
AUTO IMAGE

15
MAKING COPIES
Manual
1Placetheoriginalfacedownonthedocumentglassand
close the document cover.
2Usethe reduction( ),enlargement( )andZOOM
keys to set the desired copy ratio.
A.Preset reduction ratios are: 95%, 77%, 64%, and 50%.
B.Preset enlargement ratios are: 121%, 129%, 141%, and
200%.
C.Zoom ratios: Any ratio from 50% to 200% can be set in 1%
increments.
●Pressthereduction( )keyorenlargement( )keytoset
the approximate ratio, then press the key to decrease the
ratio or the key to increase the ratio.
●To decrease or increase the zoom ratio rapidly, press and hold
the or key.Howeverthe value willstopat the preset
reduction or enlargement ratios. To move beyond these ratios,
release the key and then press and hold it again.
D.Same-size copying: Press the 100% key to reset the copy
ratio to 100%.
3Ensure that the desired paper tray is selected.
●Ifthe AUTO PAPERSELECT mode ison, the appropriatecopy
paper size will have been automatically selected based on the
original size and selected copy ratio.
●Ifatrayoftherequiredsizeis notinstalled,use themanualfeed
trayandpresstheTRAYSELECTkeytoselectthemanualfeed
tray.
4Enter the desired number of copies.
5Press the START key.
REDUCTION/ENLARGEMENT/ZOOM
Reduction/Enlargement/Zoom
100%
ZOOM
11
11
×
×
×
EXTRA
AUTO PAPER
SELECT
8
1
/
2
8
1
/
2
8
1
/
2
5
1
/
2
EORIGINAL
SIZE PAPER
SIZE
17
14
11
11
11
×
×
×
×
×
EXTRA
AUTO PAPER
SELECT
TRAY SELECT
8
1
/
2
8
1
/
2
8
1
/
2
8
1
/
2
5
1
/
2
POWER SAVE
START
123
456
7
0C
89
100%
ZOOM
11
11
×
×
×
EXTRA
AUTO PAPER
SELECT
8
1
/
2
8
1
/
2
8
1
/
2
5
1
/
2

16
MAKING COPIES
DUAL PAGE COPYING
The DUAL PAGE COPY feature produces separate copies of two
documents placed side by side on the document glass. It is
especially useful when copying books and other bound documents
and can be used with the MARGIN SHIFT feature. If an optional
duplex module is installed, this feature can also be used with two-
sided copying.
1Place the originals on the document glass with the
centerofthetwopagesalignedwiththepapersizeindex
81/2. Close the document cover.
●Set the page to be copied first on the left part of the document
glass.
2Press the DUAL PAGE COPY key.
●8-1/2" x 11" sized copy paper will be automatically selected.
●To leave a binding margin on the copy, press the MARGIN
SHIFT key. See page 18. The MARGIN SHIFT feature applies
only to the left page on the document glass.
●Toeraseshadowscausedbydocumentbinding,usetheEDGE
ERASE feature. See next page.
●Toperformtwo-sided copying whenan optional duplexmodule
is installed, use the ORIGINAL TO COPY key to select EVEN
NUMBER.
3Ensure that the desired tray is selected.
4Enter the desired number of copies.
5Press the START key.
Dual page copying
MARGIN
SHIFT
DUAL PAGE
COPY
POWER SAVE
START
123
456
7
0C
89
EORIGINAL
SIZE PAPER
SIZE
17
14
11
11
11
×
×
×
×
×
EXTRA
AUTO PAPER
SELECT
TRAY SELECT
8
1
/
2
8
1
/
2
8
1
/
2
8
1
/
2
5
1
/
2

17
MAKING COPIES
1Placetheoriginalfacedownonthedocumentglassand
close the document cover.
●Ifanoptionaldocumentfeeder(ADForRADF)isinstalled,place
the originals face up in the document feeder tray.
NOTE:
WhenanoptionalADForRADFisused,theamountofedgeerase
willvarydependingonthecopyratio.However,whenthedocument
glass is used, the amount will be constant.
2Press the EDGE ERASE key.
3Ensure that the desired paper tray is selected.
●The edge erase mode will work only when standard size copy
paper is used.
4Make all other desired copier selections and press the
START key.
●Whenusingthedocumentglass,theareatobeerasedissimply
a specified portion of the copy paper. By repositioning the
original, the portion of it which falls within the area to be erased
can be shifted.
When using an optional document feeder (ADF or RADF), the
original is always fed to the same position on the document
glass, so the area to be erased is fixed.
EDGE
ERASE MARGIN
SHIFT
EORIGINAL
SIZE PAPER
SIZE
17
14
11
11
11
×
×
×
×
×
EXTRA
AUTO PAPER
SELECT
TRAY SELECT
8
1
/
2
8
1
/
2
8
1
/
2
8
1
/
2
5
1
/
2
EDGE ERASE
Edge erase can be used to eliminate shadow lines around the edges
of copies caused when thick paper or a book is used as an original.
Edge erase
9
START

18
MAKING COPIES
MARGIN SHIFT
The MARGIN SHIFT feature automatically shifts the text or image to
the right on one-sided copies to increase the left margin by ap-
proximate 1/4". If two-sided copying is made possible by using an
optional duplex module, the image is shifted to the right on the front
side of copies and to the left on the second side.
1Placetheoriginalfacedownonthedocumentglassand
close the document cover.
●Ifanoptionaldocumentfeeder(ADForRADF)isinstalled,place
the originals face up in the document feeder tray.
2Press the MARGIN SHIFT key.
3Ensure that the desired paper tray is selected.
4Enter the desired number of copies.
5Press the START key.
Margin shift
Expanded margin
Copy
Original
Margin is expanded here.
MARGIN
SHIFT
DUAL PAGE
COPY
EORIGINAL
SIZE PAPER
SIZE
17
14
11
11
11
×
×
×
×
×
EXTRA
AUTO PAPER
SELECT
TRAY SELECT
8
1
/
2
8
1
/
2
8
1
/
2
8
1
/
2
5
1
/
2
POWER SAVE
START
123
456
7
0C
89
Table of contents
Other Sharp Copier manuals

Sharp
Sharp SF-2220 User manual

Sharp
Sharp AR-164 User manual

Sharp
Sharp AR-280 User manual

Sharp
Sharp AR-151 User manual

Sharp
Sharp AR-BC260 User manual

Sharp
Sharp SD-2060 User manual

Sharp
Sharp AR-150 SERIES User manual

Sharp
Sharp MX-C382SC Guide

Sharp
Sharp AR-C240P User manual

Sharp
Sharp AR-205 User manual

Sharp
Sharp AR-407 User manual

Sharp
Sharp MX-CF10 User manual

Sharp
Sharp DX-C310 Operation User manual

Sharp
Sharp AR-162 User manual

Sharp
Sharp AR-151 User manual

Sharp
Sharp AR-120E User manual

Sharp
Sharp AR-M160 User manual

Sharp
Sharp MX-2300N Guide User instructions

Sharp
Sharp AL-1000 Series User manual

Sharp
Sharp AR-280 User manual