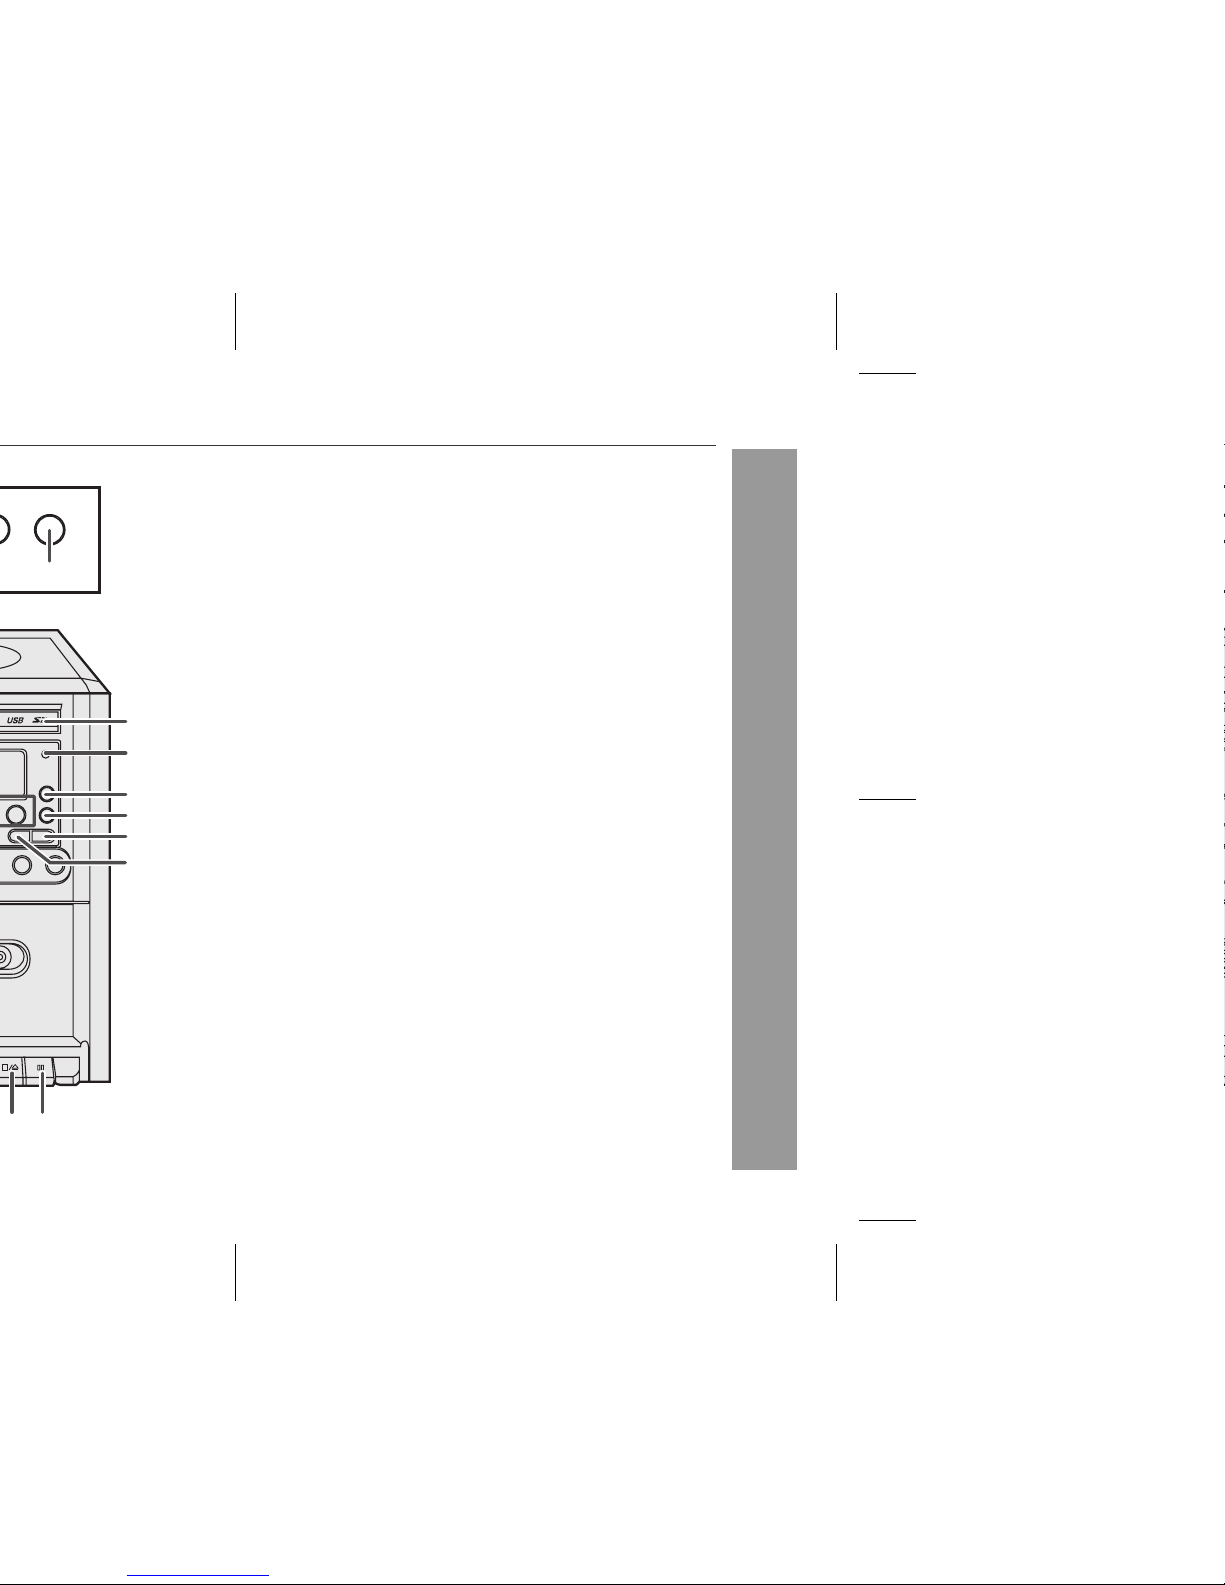
Sharp XL-UR5H User manual

Thank you for purchasing this SHARP product.
To obtain the best performance from this product, please read this
manual carefully. It will guide you in operating your SHARP product.
XL-UR5H Micro Component System consisting of XL-UR5H (main unit)
and CP-UR5H (speaker system).
MICRO COMPONENT SYSTEM
MODEL
SHARP CORPORATION
OPERATION MANUAL
Note:
This product is not compatible with MTP and AAC file systems.
XL-UR5H

2
XL-UR5H
Important Instruction
Special notes
WARNINGS
When the ON/STAND-BY button is set at STAND-BY position,
mains voltage is still present inside the unit. When the ON/
STAND- BY button is set at STAND-BY position, the unit may be
brought into operation by the timer mode or remote control.
This unit contains no user serviceable parts. Never remove covers
unless qualified to do so. This unit contains dangerous voltages,
always remove mains plug from the socket before any service
operation and when not in use for a long period.
To prevent fire or shock hazard, do not expose this appliance to
dripping or splashing. No objects filled with liquids, such as vases,
shall be placed on the apparatus.
Note for users in Australia:
Copyright may exist in material you wish to record. Copying or
broadcasting such material without permission of the relevant
licensees or owners of the copyright is prohibited by law. SHARP is
not in a position to authorise the copying or broadcasting of copyright
materials and nothing in this OPERATION MANUAL should be
implied as giving that authority.
For other countries:
Audio-visual material may consist of copyrighted works which must
not be recorded without the authority of the owner of the copyright.
Please refer to the relevant laws in your country.
CAUTION
This product is classified as a CLASS 1 LASER product.
Use of controls, adjustments or performance of procedures other
than those specified herein may result in hazardous radiation ex-
posure.
As the laser beam used in this compact disc player is harmful to
the eyes, do not attempt to disassemble the cabinet. Refer servic-
ing to qualified personnel only.
Laser Diode Properties
Material: AlGaAs
Wavelength: 790 nm
Emission Duration: continuous
Laser Output: max. 0.6 mW
CAUTION-INVISIBLE LASER RADIATION WHEN OPEN.
DO NOT STARE INTO BEAM OR VIEW DIRECTLY WITH
OPTICAL INSTRUMENTS.
WARNUNG-UNSICHTBARE LASERSTRAHLUNG WENN GERÄT
GEÖFFNET. NICHT IN DIE STRAHLUNG SCHAUEN ODER
DIREKT MIT OPTISCHEN HILFSMITTELN BETRACHTEN.
ATTENTION-RAYON LASER INVISIBLE EN CAS D'OUVERTURE.
NE PAS REGARDER LE FAISCEAU DIRECTEMENT OU AVEC DES
INSTRUMENTS OPTIQUES.
PLAY
RECORD
XL-UR5
MICRO COMPONENT SYSTEMS
REWIND
STOP/EJECT
F.FWD
PAUSE
ON/
STANDBY

3
XL-UR5H
General Information
Special Note
Supply of this product does not convey a license nor imply any right
to distribute content created with this product in revenue-generating
broadcast systems (terrestrial, satellite, cable and/or other distribu-
tion channels), revenue-generating streaming applications (via Inter-
net, intranets and/or other networks), other revenue-generating
content distribution systems (pay-audio or audio-on-demand appli-
cations and the like) or on revenue-generating physical media (com-
pact discs, digital versatile discs, semiconductor chips, hard drives,
memory cards and the like). An independent license for such use is
required. For details, please visit http://mp3licensing.com
MPEG Layer-3 audio coding technology licensed from Fraunhofer
IIS and Thomson.
Accessories
Please confirm that the following accessories are included.
Note:
Only the above accessories are included.
Contents
Page
General Information
Precautions . . . . . . . . . . . . . . . . . . . . . . . . . . . . . . . . . . . . . . . . . 4
Controls and indicators . . . . . . . . . . . . . . . . . . . . . . . . . . . . .5 - 7
Preparation for Use
System connections . . . . . . . . . . . . . . . . . . . . . . . . . . . . . . .8 - 10
Remote control . . . . . . . . . . . . . . . . . . . . . . . . . . . . . . . . . . . . . 11
Basic Operation
General control . . . . . . . . . . . . . . . . . . . . . . . . . . . . . . . . . . . . . 12
Setting the clock . . . . . . . . . . . . . . . . . . . . . . . . . . . . . . . . . . . . . 13
CD or MP3/WMA disc Playback
Listening to a CD or MP3/WMA disc . . . . . . . . . . . . . . . . .14 - 15
Advanced CD or MP3/WMA disc playback . . . . . . . . . . . .16 - 19
MP3/WMA folder mode (only for MP3/WMA files) . . . . . . .20 - 21
USB Memory Playback
Listening to USB mass storage device / MP3 player . . . . . . . 22
To remove USB memory device . . . . . . . . . . . . . . . . . . . . . . . . 23
SD Memory Playback
Listening to SD mass storage device / MP3 player . . . . .23 - 24
To remove SD memory device . . . . . . . . . . . . . . . . . . . . . . . . . 24
Advanced USB/SD playback . . . . . . . . . . . . . . . . . . . . . . . 25 - 26
USB/SD Recording
Recording on a USB/SD memory device . . . . . . . . . . . . . . . . . 27
Radio
Listening to the radio . . . . . . . . . . . . . . . . . . . . . . . . . . . . .28 - 29
Tape Playback
Listening to a cassette tape . . . . . . . . . . . . . . . . . . . . . . . .29 - 30
Tape Recording
Recording on a cassette tape . . . . . . . . . . . . . . . . . . . . . . .31 - 32
Advanced Features
Using the Radio Data System (RDS) . . . . . . . . . . . . . . . . .33 - 37
Timer and sleep operation . . . . . . . . . . . . . . . . . . . . . . . . .37 - 40
Enhancing your system . . . . . . . . . . . . . . . . . . . . . . . . . . . . . . 40
References
Troubleshooting chart . . . . . . . . . . . . . . . . . . . . . . . . . . . . .40 - 42
Maintenance . . . . . . . . . . . . . . . . . . . . . . . . . . . . . . . . . . . . . . . . 42
Specifications . . . . . . . . . . . . . . . . . . . . . . . . . . . . . . . . . . . . . . 43
Remote control 1 “AAA” size battery (UM-4,
R03, HP-16 or similar) 2
AM loop aerial 1 FM aerial 1

4
XL-UR5H
General Information
Precautions
General
Please ensure that the equipment is positioned in a well-ventilated
area and ensure that there is at least 10 cm (4") of free space
along the sides, top and back of the equipment.
Do not place anything on top of the unit.
Do not expose the unit to moisture, to temperatures higher than
60
˚
C (140
˚
F) or to extremely low temperatures.
If your system does not work properly, disconnect the AC power
lead from the wall socket. Plug the AC power lead back in, and
then turn on your system.
No naked flame sources, such as lighted candles, should be
placed on the apparatus.
Attention should be drawn to the environmental aspects of battery
disposal.
This unit should only be used within the range of 5˚C - 35˚C
(41˚F - 95˚F).
Warning:
The voltage used must be the same as that specified on this unit.
Using this product with a higher voltage other than that which is
specified is dangerous and may result in a fire or other type of
accident causing damage. SHARP will not be held responsible for
any damage resulting from use of this unit with a voltage other than
that which is specified.
Volume control
The sound level at a given volume setting depends on speaker
efficiency, location, and various other factors. It is advisable to avoid
exposure to high volume levels. Do not turn the volume on to full at
switch on and listen to music at moderate levels. Excessive sound
pressure from earphones and headphones can cause hearing loss.
Use the unit on a firm, level surface free from
vibration.
Keep the unit away from direct sunlight,
strong magnetic fields, excessive dust,
humidity and electronic/electrical equip-
ment (home computers, facsimiles, etc.)
which generate electrical noise.
In case of an electrical storm, unplug the
unit for safety.
10 cm (4")10 cm (4") 10 cm (4")
10 cm (4")
XL-UR5
MICROCOMPONENT SYSTEM
REMOTE
SENSOR
EQUALIZER
X-BASS
TUNER(BAND)TAPE
USB/SD
ON/
STANDBY
PRESET
PHONES
TUNING/FOLDER
CD
VOLUME
0/6
53 24
0/6
RECORD PLAY REWIND F.FWD STOP/EJECT PAUSE
CLOCK/TIMER
SLEEP
MEMORY/DISP
TIMER
H REC
CLOCK/TIMER
SLEEP
MEMORY/DISP
TIMER
CLOCK/TIMER
SLEEP
MEMORY/DISP
TIMER
Hold the AC power plug by the head when
removing it from the wall socket, as pulling
the lead can damage internal wires.
The AC power plug is used as disconnect
device and shall always remain readily
operable.
Do not remove the outer cover, as this
may result in electric shock. Refer inter-
nal service to your local SHARP service
facility.
The ventilation should not be impeded by
covering the ventilation openings with
items, such as newspapers, tablecloths,
curtains, etc.
8
CLOCK/TIMER
SLEEP
MEMORY/DISP
TIMER

5
XL-UR5H
General Information
Controls and indicators
Front panel
Reference page
1. Disc Compartment . . . . . . . . . . . . . . . . . . . . . . . . . . . . . . . . 15
2. On/Stand-by Button . . . . . . . . . . . . . . . . . . . . . . 12, 13, 14, 28
3. Timer Indicator . . . . . . . . . . . . . . . . . . . . . . . . . . . . . . . . . . . 39
4. Sleep Button . . . . . . . . . . . . . . . . . . . . . . . . . . . . . . . . . . . . . 39
5. Clock/Timer Button . . . . . . . . . . . . . . . . . . . . . . 13, 37, 38, 39
6. Memory/Disp Button . . . . . . . . . . . . . . . . . . . . . . . . 18, 21, 28
7. Disc Track Down or Fast Reverse, Tuner Preset Down,
Time Down Button . . . . . 13, 18, 21, 22, 23, 24, 28, 29, 33, 37
8. Disc Track Up or Fast Forward, Tuner Preset Up,
Time Up Button . . . . . . . 13, 18, 21, 22, 23, 24, 28, 29, 33, 37
9. Headphone Socket . . . . . . . . . . . . . . . . . . . . . . . . . . . . . . . . 40
10. Tuning Up/Folder Up Button . . . . . . . . . . . . . . . 21, 22, 24, 28
11. Tuning Down/Folder Down Button . . . . . . . . . . 21, 22, 24, 28
12. Volume Control . . . . . . . . . . . . . . . . . . . . . . . . . . . . . . . . . . 12
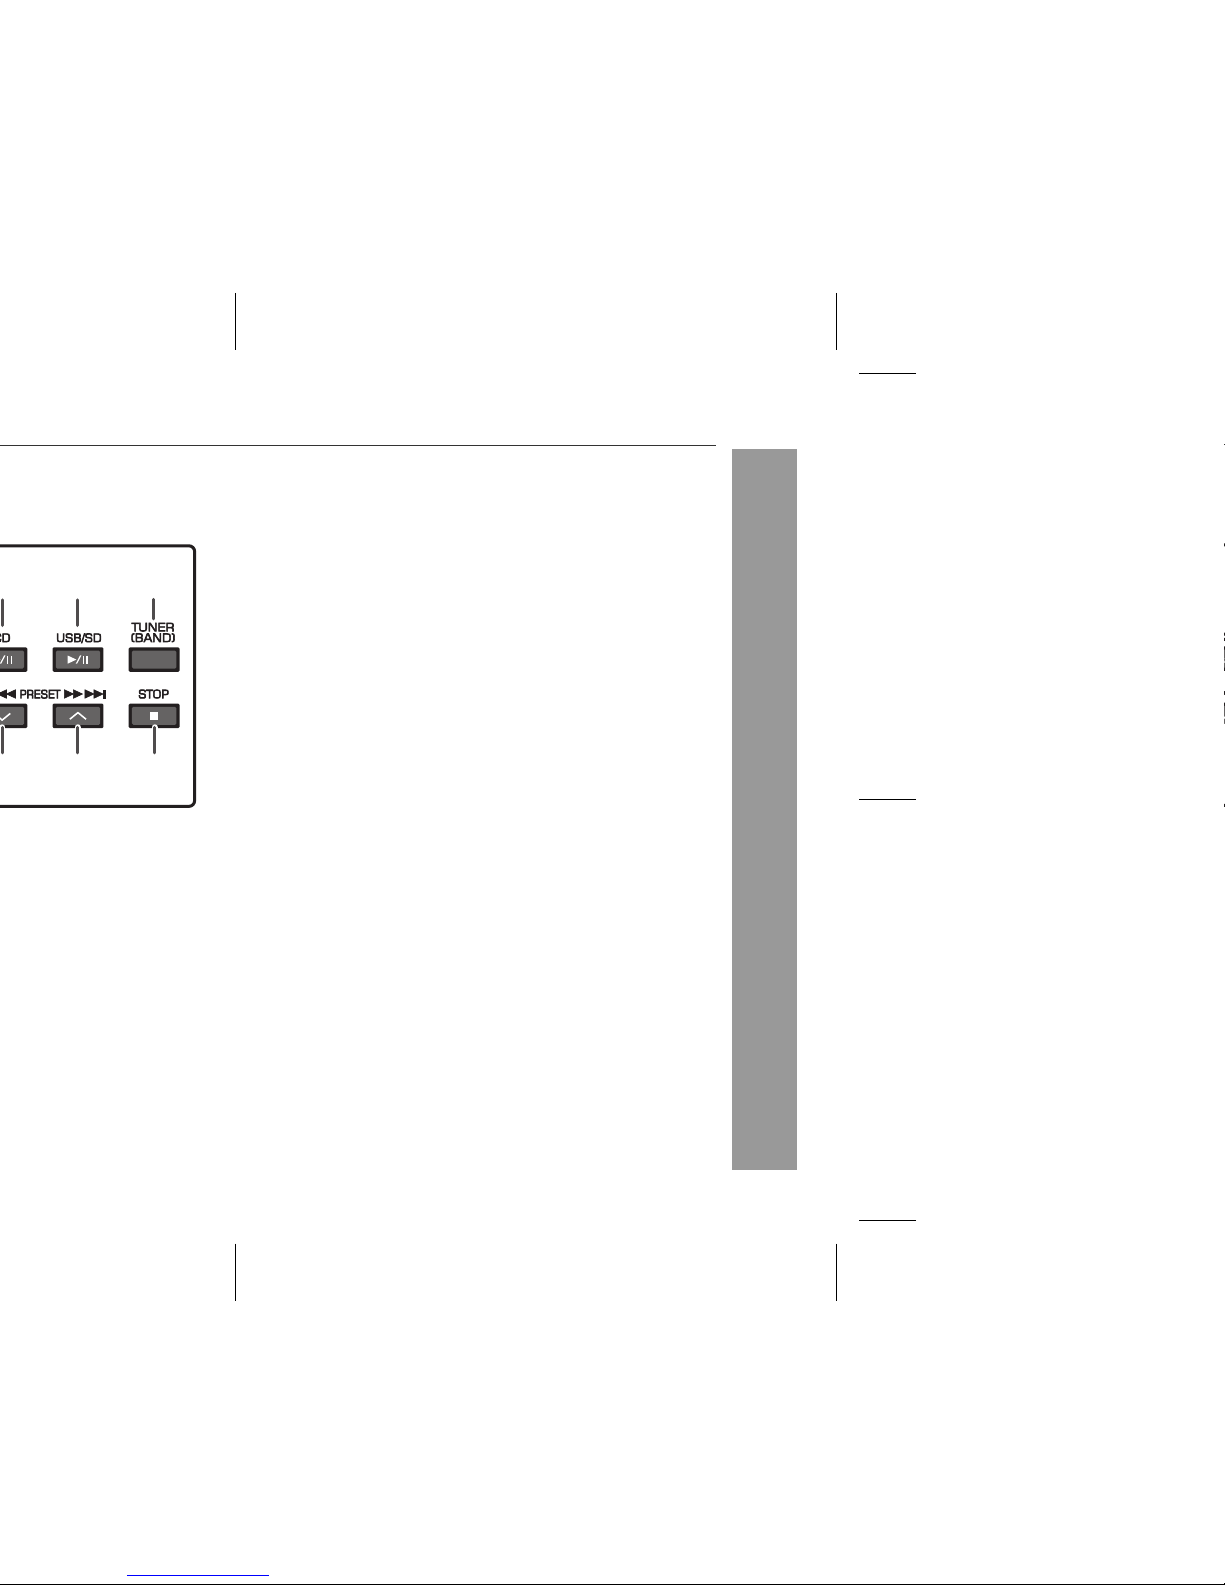
13. Cassette Compartment . . . . . . . . . . . . . . . . . . . . . . . . . . . . 29
14. CD Play/Pause Button . . . . . . . . . . . . . . . . . . . . . . . 14, 15, 21
15. USB/SD Play/Pause Button . . . . . . . . . . . . . . . . . . . 22, 23, 24
16. Tape Button . . . . . . . . . . . . . . . . . . . . . . . . . . . . . . . . . . 29, 32
17. Tuner (Band) Button . . . . . . . . . . . . . . . . . . . . . . . . . . . . . . 28
18. USB/SD Terminal . . . . . . . . . . . . . . . . . . . . . . . . . . . 22, 23, 24
19. Remote Sensor . . . . . . . . . . . . . . . . . . . . . . . . . . . . . . . . . . . 11
20. Equaliser Button . . . . . . . . . . . . . . . . . . . . . . . . . . . . . . . . . . 12
21. Extra Bass Button. . . . . . . . . . . . . . . . . . . . . . . . . . . . . . . . . 12
22. USB or SD Record Button . . . . . . . . . . . . . . . . . . . . . . . . . . 27
23. Disc or USB or SD Stop Button . . . . . . . . . 18, 23, 24, 25, 27
24. Tape Record Button . . . . . . . . . . . . . . . . . . . . . . . . . . . . . . . 31
25. Tape Play Button . . . . . . . . . . . . . . . . . . . . . . . . . . . . . . . . . 30
26. Tape Rewind Button . . . . . . . . . . . . . . . . . . . . . . . . . . . . . . 30
27. Tape Fast Forward Button . . . . . . . . . . . . . . . . . . . . . . . . . 30
28. Tape Stop/Eject Button . . . . . . . . . . . . . . . . . . . . . . . . . 30, 31
29. Tape Pause Button . . . . . . . . . . . . . . . . . . . . . . . . . . . . . . . 30
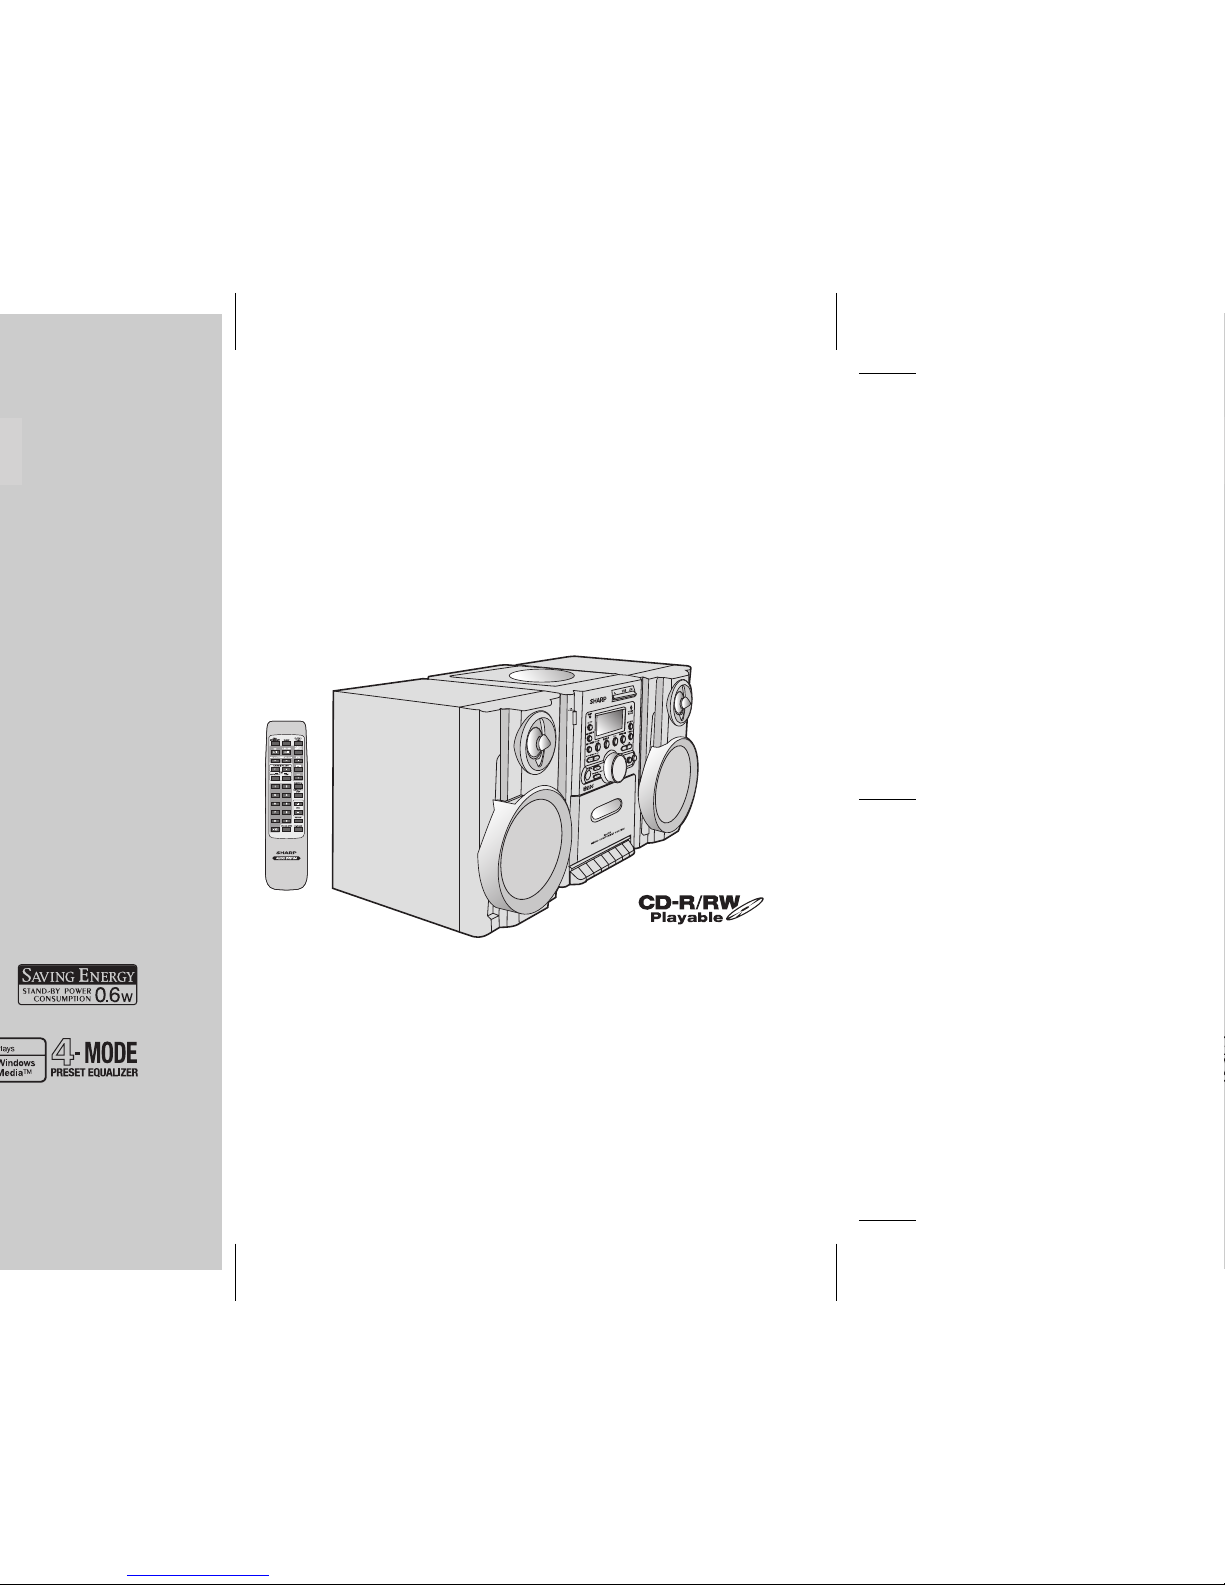
XL-UR5
MICRO COMPONENT SYSTEM
REMOTE
SENSOR
EQUALIZER
X-BASS
TUNER (BAND)TAPE
USB/SD
CLOCK/TIMER
ON/
STANDBY
1
2
3
4
5
6
7
8
9
10
11
12
18
19
20
21
22
23
24 25 26 27 28 29
13
SLEEP
MEMORY/DISP
PRESET H REC
PHONES
TUNING/FOLDER
CD
VOLUME
0/6
53 24
0/6
RECORD PLAY REWIND F.FWD STOP/EJECT PAUSE
TUNER (BAND)TAPE
USB/SD
CD 0/ 60/ 6
161514 17
TIMER

6
XL-UR5H
General Information
Controls and indicators (continued)
Display
Reference page
1. Memory Indicator . . . . . . . . . . . . . . . . . . . . . . . . . . . . . . 18, 29
2. MP3/WMA Folder Indicator . . . . . . . . . . . . . . . . . . . 21, 22, 27
3. Disc or USB or SD Repeat Play Indicator . . . . . . . . . . 17, 26
4. Random Indicator . . . . . . . . . . . . . . . . . . . . . . . . . . . . . . . . . 26
5. Record Indicator . . . . . . . . . . . . . . . . . . . . . . . . . . . . . . . . . . 27
6. CD/MP3/WMA Track Indicator . . . . . . . . . . . . . . . . . . . . . . . 15
7. WMA Indicator . . . . . . . . . . . . . . . . . . . . . . . . . . . . . . . . . 15, 21
8. MP3 Indicator. . . . . . . . . . . . . . . . . . . . . . . . . . . . . . . . . . 15, 21
9. CD Indicator . . . . . . . . . . . . . . . . . . . . . . . . . . . . . . . . . . . . . 15
10. Disc or USB or SD Pause Indicator . . . . . . . . . . . . . 15, 22, 24
11. Disc or USB or SD Play Indicator . . . . . . . . . . . . . . . . . . . . 15
12. USB Indicator . . . . . . . . . . . . . . . . . . . . . . . . . . . . . . . . . 22, 23
13. SD Indicator . . . . . . . . . . . . . . . . . . . . . . . . . . . . . . . . . . 22, 23
14. RDS Indicator . . . . . . . . . . . . . . . . . . . . . . . . . . . . . . . . . . . . 33
15. Timer Play Indicator . . . . . . . . . . . . . . . . . . . . . . . . . 37, 38, 39
16. Sleep Indicator . . . . . . . . . . . . . . . . . . . . . . . . . . . . . . . . . . . 39
17. Equaliser (ROCK, CLASSIC, POPS, JAZZ) Indicators . . . 12
18. Extra Bass Indicator . . . . . . . . . . . . . . . . . . . . . . . . . . . . . . . 12
19. FM Stereo Mode Indicator . . . . . . . . . . . . . . . . . . . . . . . . . . 28
20. FM Stereo Receiving Indicator . . . . . . . . . . . . . . . . . . . . . . 28
Rear panel
Reference page
1. Beat Cancel Switch . . . . . . . . . . . . . . . . . . . . . . . . . . . . . . . 32
2. FM 75 Ohms Aerial Socket . . . . . . . . . . . . . . . . . . . . . . . . . . 9
3. AM Loop Aerial Terminals . . . . . . . . . . . . . . . . . . . . . . . . . . 9
4. Speaker Terminals . . . . . . . . . . . . . . . . . . . . . . . . . . . . . . . . . 9
5. AC Power Lead . . . . . . . . . . . . . . . . . . . . . . . . . . . . . . . . . . . 10
Speaker system
1
2
MEMORY
SLEEP
TRACK
ROCK CLASSIC POPS JAZZ X BASS ST
WMA MP3
E
USB RDS
kHz
MHz
FOLDER 1 RANDO RECM
CD
TRACK
WMA MP3
USB RDS
CD
1
678910111213
243
16 17 18 19 20
15
14
5
3
4
2
5
1
1. Tweeter
2. Woofer
3. Bass Reflex Duct
4. Speaker Wire
3
4
1
2

7
XL-UR5H
General Information
Remote control
Reference page
1. Remote Control Transmitter . . . . . . . . . . . . . . . . . . . . . . . . 11
2. On/Stand-by Button . . . . . . . . . . . . . . . . . . . 11, 12, 13, 14, 28
3. Tuning Up/Folder Up Button . . . . . . . . . . . . 21, 22, 23, 24, 28
4. Tuning Down/Folder Down Button . . . . . . . 21, 22, 23, 24, 28
5. RDS ASPM/PTY Button . . . . . . . . . . . . . . . . . . . . . . . . . . . . 33
6. RDS Display Button . . . . . . . . . . . . . . . . . . . . . . . . . . . . . . . 34
7. Disc Direct Search Buttons . . . . . . . . . . . . . . . . . . . . . . . . . 14
8. Sleep Button . . . . . . . . . . . . . . . . . . . . . . . . . . . . . . . . . . . . . 39
9. Clock/Timer Button . . . . . . . . . . . . . . . . . . . . . . 13, 37, 38, 39
10. Tape Button . . . . . . . . . . . . . . . . . . . . . . . . . . . . . . . . . . 29, 32
11. Record Button . . . . . . . . . . . . . . . . . . . . . . . . . . . . . . . . . . . 27
12. Random Button . . . . . . . . . . . . . . . . . . . . . . . . . . . . . . . 17, 26
13. Memory/Disp Button . . . . . . . . . . . . . . . . . . . . . . . . 18, 21, 28
14. Volume Up and Down Buttons . . . . . . . . . . . . . . . . . . . . . . 12
15. Repeat Button . . . . . . . . . . . . . . . . . . . . . . . . . . . . . . . . 17, 26
16. Extra Bass Button . . . . . . . . . . . . . . . . . . . . . . . . . . . . . . . . 12
17. Equaliser Button . . . . . . . . . . . . . . . . . . . . . . . . . . . . . . . . . 12
18. CD Play and Pause Button . . . . . . . . . . . . . . . . . . . 14, 15, 21
19. USB/SD Play and Pause Button . . . . . . . . . . . . . . . 22, 23, 24
20. Tuner (Band) Button . . . . . . . . . . . . . . . . . . . . . . . . . . . . . . 28
21. Disc Track Down or Fast Reverse, Tuner Preset Down,
Time Down Button . . . . . 13, 18, 21, 22, 23, 24, 28, 29, 33, 37
22. Disc Track Up or Fast Forward, Tuner Preset Up,
Time Up Button . . . . . . . 13, 18, 21, 22, 23, 24, 28, 29, 33, 37
23. Disc or USB or SD Stop Button . . . . . . . . . 18, 23, 24, 25, 27
2
3
4
5
6
7
8
9
12
13
14
15
16
17
1
11
10
18 19 20
21 22 23

8
XL-UR5H
Preparation for Use
System connections
75 OHMS
AC INPUT
FM
ANT
BEAT
CANCEL
AM
LOOP
RATED SPEAKER IMPEDANCE:
8 OHMS MIN
1
2
Left speaker
Right speaker
Speaker connection
(see page 9)
AM loop aerial FM aerial
Make sure to unplug the AC power lead before any connections.
Aerial connection (see page 9)
AC power connection (see page 10)
Wall socket
(AC 220 - 240V, 50/60 Hz)

9
XL-UR5H
Preparation for Use
Aerial connection
Supplied FM aerial:
Connect the FM aerial wire to the FM 75 OHMS socket and position
the FM aerial wire in the direction where the strongest signal can be
received.
Supplied AM loop aerial:
Connect the AM loop aerial to the AM loop aerial terminals. Position
the AM loop aerial for optimum reception. Place the AM loop aerial
on
a shelf, etc., or attach it to a stand or a wall with screws (not
supplied).
Note:
Placing the aerial on the unit or near the AC power lead may cause
noise pickup. Place the aerial away from the unit for better reception.
Installing the AM loop aerial:
Speaker connection
Connect the black wire to the minus (-) terminal, and the red wire to
the plus (+) terminal.
Caution:
< Assembling > < Attaching to the wall >
Wall Screws (not supplied)
Use speakers with an impedance of 8 ohms or more, as lower
impedance speakers can damage the unit.
Do not mistake the right and the left
channels. The right speaker is the one on the
right side when you face the unit.
Do not let the bare speaker wires touch
each other.
Do not allow any objects to fall into or to be
placed in the bass reflex ducts.
Do not stand or sit on the speakers. You may
be injured.
75 OHMS
AC INPUT
FM
ANT
BEAT
CANCEL
AM
LOOP
RATED SPEAKER IMPEDANCE:
8 OHMS MIN
1
2
BlackRed
Incorrect

10
XL-UR5H
Preparation for Use
System connections (continued)
AC power connection
After checking all the connections have been made correctly, plug
the AC power lead of this unit into the wall socket. If you plug in the
unit first, the unit will enter the stand-by mode.
Note:
Unplug the AC power lead from the wall socket if the unit will not
be in use for a prolonged period of time.
External FM aerial
Use an external FM aerial if you require better reception.
Consult your dealer.
Note:
When an external FM aerial is used, disconnect the supplied FM
aerial wire.
Wall socket
(AC 220 - 240V, 50/60 Hz)
75 OHMS
AC INPUT
FM
ANT
BEAT
CANCEL
AM
LOOP
RATED SPEAKER IMPEDANCE:
8 OHMS MIN
1
2
75 OHMS
FM
ANT
AM
LOOP
75 OHMS
FM
ANT
AM
LOOP

11
XL-UR5H
Preparation for Use
Remote control
Battery installation
Precautions for battery use:
Replace all old batteries with new ones at the same time.
Do not mix old and new batteries.
Remove the batteries if the unit will not be used for long periods
of time. This will prevent potential damage due to battery leakage.
Caution:
Do not use rechargeable batteries (nickel-cadmium battery, etc.).
Installing the batteries incorrectly may cause the unit to
malfunction.
Batteries (battery pack or batteries installed) shall not be exposed
to excessive heat such as sunshine, fire or the like.
Battery removal:
Open the battery cover and pull up the battery to take out.
Notes concerning use:
Replace the batteries if the operating distance is reduced or if the
operation becomes erratic. Purchase 2 “AAA” size batteries (UM-
4, R03, HP-16 or similar).
Periodically clean the transmitter on the remote control and the
sensor on the unit with a soft cloth.
Exposing the sensor on the unit to strong light may interfere with
operation. Change the lighting or the direction of the unit if this
occurs.
Keep the remote control away from moisture, heat, shock, and
vibrations.
Test of the remote control
After installing the unit (see pages 8 - 10), check that the remote
control operates correctly.
Point the remote control directly at the remote sensor on the unit.
The remote control can be used within the range shown below:
Press the ON/STAND-BY button. Does the power turn on? Now, you
can use the unit.
1 Open the battery cover.
2 Insert the batteries according to the direction indicated in
the battery compartment.
When inserting or removing the batteries, push them towards the
battery terminals.
3 Close the cover.

12
XL-UR5H
Basic Operation
General control
To turn the power on
Press the ON/STAND-BY button to turn the power on.
Auto power off function
In the stop mode of CD/USB/SD operation, the main unit enters the
stand-by mode after 10 minutes of inactivity.
Volume auto set-in
If you turn off and on the main unit with volume set to 16 or
higher, the volume will start at 16.
If you turn the unit off then on again with the volume level set to
less than 15, it will turn on again at the level set.
Volume control
Main unit operation:
When the VOLUME control is turned clockwise, the volume will
increase. When it is turned anti-clockwise, the volume will decrease.
Remote control operation:
Press the VOLUME (+ or -) button to increase or decrease the volume.
Equaliser
When the EQUALIZER button on the remote control or main unit is
pressed, the current mode setting will be displayed. To change to a
different mode, press the EQUALIZER button repeatedly until the
desired sound mode appears.
X-BASS
When the X-BASS button on the remote control or main unit is
pressed, the unit will enter the extra bass mode which emphasises
the bass frequencies and “X-BASS” will appear. To cancel the extra
bass mode, press the X-BASS button again.
After use:
Press the ON/STAND-BY button to enter the power stand-by mode.
30 MAXMIN 01...
ROCK
FLAT (Display off)
CLASSIC
POPS
JAZZ

13
XL-UR5H
Basic Operation
Setting the clock
In this example, the clock is set for the 24-hour (0:00) display.
To confirm the time display:
Press the CLOCK/TIMER button. The time display will appear for
about 5 seconds.
Notes:
To reset the clock if the power fails or is unplugged, the unit must
be in the STAND-BY mode.
“0:00” or time will flash when the AC power supply is restored after
a power failure or unplugging the unit or when reset button is
pressed.
Readjust the clock as follows:
To readjust the clock:
Perform “Setting the clock” from beginning.
PRESET
1In STAND-BY condition.
2Press the CLOCK/TIMER button for more than 2 seconds.
3Within 10 seconds, press the PRESET ( or ) button to
set hour.
4Press the CLOCK/TIMER button again.
5Within 10 seconds, press the PRESET ( or ) button to
set minute.
6Press the CLOCK/TIMER button. The clock is set.

14
XL-UR5H
CD or MP3/WMA disc Playback
Listening to a CD or MP3/WMA disc
This system can play back a standard CD, CD-R/RW in the CD
format and CD-R/RW with MP3 or WMA files, but cannot record on
them. Some audio CD-R and CD-RW discs may not be playable due
to the state of the disc or the device that was used for recording.
MP3:
MP3 is a form of compression. It is an acronym which stands
for MPEG Audio Layer 3.
MP3 is a type of audio code which is processed by significant
compression from the original audio source with very little loss
in sound quality.
This system supports MPEG 1 Layer 3 and VBR files.
During VBR file playback, time counter in the display may differ
from its actual playback time.
Bitrate which is supported by MP3 is 32 ~ 320 kbps.
WMA:
WMA files are Advanced System Format files that include audio
files which are compressed with Windows Media Audio codec.
WMA is developed by Microsoft as an audio format file for
Windows Media Player.
“MP3” and “WMA” indicator will light up after the unit reads
information on an MP3 or WMA disc.
Bitrate which is supported by WMA is 64 ~ 160 kbps.

15
XL-UR5H
CD or MP3/WMA disc Playback
To interrupt playback:
Press the CD / button during playback.
Press the CD / button again to resume playback.
To listen to the track being played again:
During playback, press the button.
To move to the beginning of the next track:
During playback, press the button.
To skip a number of tracks at one time:
Press the or button repeatedly until the desired track
number is shown.
To start playback a desired track:
Press the or button whilst in the stop mode to select
the track number and then press the CD / button.
To fast forward audibly:
During playback, press and hold down the button. Release
the button to resume playback.
To fast reverse audibly:
During playback, press and hold down the button. Release
the button to resume playback.
To stop playback:
Press the button.
Caution:
Do not play discs with special shapes (heart or octagon shaped)
as it may cause malfunctions.
If a disc is damaged, dirty, or loaded upside down, “NO DISC” will
appear on the display.
Keep foreign objects out of the disc compartment.
Subjecting the unit to shock or vibration may cause mistracking.
When the unit is not being used, be sure to close the disc
compartment. If it is left open, the lens may be covered with dust
and the unit may not operate properly.
If TV or radio interference occurs during disc operation, move the
unit away from the source of the interference.
7Press the ON/STAND-BY button to turn the power on.
8Open the CD compartment.
9Place the disc on the spindle, label side up. 8 cm (3") discs
may be played without an adaptor.
10Close the CD compartment.
11Press the CD / button to start playback.
12 cm (5") 8 cm (3")
or
Total number of
tracks on the disc
Total playing
time of the disc
Total number of
folders on the disc
Total number
of tracks
(CD) (MP3/WMA)
CD
WMA MP3
FOLDER
WMA indicator MP3 indicator

16
XL-UR5H
CD or MP3/WMA disc Playback
Advanced CD or MP3/WMA disc playback
Direct track search
By using the direct search buttons, the desired tracks on the current
disc can be played.
Notes:
A track number higher than the number of tracks on the disc
cannot be selected.
During random play, direct search is not possible.
For CD-R/RW discs recorded in the MP3 or WMA format, you can
select the track number but cannot select the folder by pressing
the direct search buttons.
To stop playback:
Press the button.
Use the direct search buttons
on the remote control to select
the desired track whilst playing
or in the stop mode.
Selected track number
The direct search buttons allow you to select up to number 9.
When selecting number 10 or higher, use the “+10” button.
Whilst in the stop mode:
Press the direct search buttons to select desired track and the
selected track will be played back.
Whilst playing the disc:
The desired track can be selected by simply pressing the direct
search buttons and the selected track will be played back.
TRACK CD

17
XL-UR5H
CD or MP3/WMA disc Playback
Repeat play (REMOTE CONTROL ONLY)
Repeat play can play single track and all track sequence continu-
ously.
Each time press the button, the repeat mode changes in the following
order:
Random play (REMOTE CONTROL ONLY)
The tracks on the disc(s) can be played in random order automatically.
To cancel random playback, press the button again, so that the
random indicator will disappear.
Notes:
If you press the or button during random play, you
can move to the track selected next by the random operation.
In random play, the unit will select and play tracks automatically.
(You cannot select the order of the tracks.)
During random play, repeat function is not possible.
In random function, playback will stop after all the tracks are
played randomly.
Caution:
After performing repeat, be sure to press the button.
Otherwise, it will play continuously.
Note:
Notes:
This unit only supports “MPEG-1 Audio Layer-3” format.
(Sampling Frequency is 32, 44.1, 48kHz)
“MPEG-2 Audio Layer-3”, “MPEG-2.5 Audio Layer-3” and MP1,
MP2 format are not supported.
Playback order for MP3 files may differ sometimes depending on
the writing software used during file download.
Bitrate which is supported by MP3 is 32~320 kbps, WMA is
64~160 kbps.
For MP3/WMA files, please put “.MP3” “.WMA” extension. Files
cannot be played back if there is no MP3/WMA extension.
Playlists are not supported on this unit.
This unit only supports MP3 ID3-Tag version 1.x.
The display playback time may not be displayed correctly when
playing back a variable bitrate file.
WMA meta tag also supports title, artist and album name which
are recorded in WMA files.
Copyright protected WMA files cannot be played back.
In case of an audio CD mode:
To random play all tracks:
Press the RANDOM button on the remote control so that the
random indicator light up in the display window.
RANDOM
REPEAT
WMA MP3
FOLDER 1
1
Repeat playback of a single track
Repeat playback of all tracks on the disc
Repeat playback of folder on the disc when in folder mode
Folder
Repeat playback is cancelled
1
MP3
FOLDER RANDOM
RANDOM
( ) When in folder mode, the selected play mode can be used for
the files in the selected folder only.

18
XL-UR5H
CD or MP3/WMA disc Playback
Advanced CD or MP3/WMA disc playback (continued)
Programmed play (Audio CD) To cancel the programmed play mode:
Whilst in the stop mode, press the button or STOP button on the
remote control. The “MEMORY” indicator will disappear and all the
programmed contents will be cleared.
Notes:
If the disc lid is opened, the programmed sequence will be
cancelled.
The programme will automatically cancelled if you press the ON/
STAND-BY button to enter the stand-by mode or change the
function from CD to another.
During the programme operation, press the RANDOM button will
automatically cancelled the programme.
1Whilst in the stop mode, press the MEMORY/DISP button
to enter the programming save mode.
2Press the direct search buttons on the remote control to
select the desired tracks.
You can also select a track by pressing the or
button.
3Press the MEMORY/DISP button to save the track number.
4Repeat steps 2 – 3 for other tracks. Up to 32 tracks can be
programmed.
5Press the CD / button to start playback.
MEMORY
CD
MEMORY
CD
MEMORY
CD

19
XL-UR5H
CD or MP3/WMA disc Playback
Programmed play (Folder mode)
To cancel the programmed play mode:
Whilst in the stop mode, press the button or STOP button on the
remote control. The “MEMORY” indicator will disappear and all the
programmed contents will be cleared.
Notes:
If the disc lid is opened, the programmed sequence will be
cancelled.
The programme will automatically cancelled if you press the ON/
STAND-BY button to enter the stand-by mode or change the
function from CD to another.
During the programme operation, press the RANDOM button will
automatically cancelled the programme.
1Whilst in the stop mode, press the MEMORY/DISP button
to enter the programming save mode.
2Press the direct search buttons on the remote control to
select the desired folder.
You can also select a folder by pressing the TUNING/FOLDER
( or ) button.
3Press the MEMORY/DISP button to save the folder number.
4Press the direct search buttons on the remote control to
select the desired tracks.
You can also select a track by pressing the or
button.
MEMORY
WMA MP3
MEMORY
WMA MP3
MEMORY
WMA MP3
MEMORY
WMA MP3
MEMORY
WMA MP3
5Press the MEMORY/DISP button to save the track number.
6Repeat steps 2 – 5 for other folder/tracks. Up to 32 tracks
can be programmed.
7Press the CD / button to start playback.
MEMORY
WMA MP3
MEMORY
WMA MP3

20
XL-UR5H
CD or MP3/WMA disc Playback
MP3/WMA folder mode (only for MP3/WMA files)
To playback MP3/WMA (Windows Media Audio) file
There are many music sites on the internet that you can download
MP3/WMA (Windows Media Audio) music files. Follow the
instructions from the website on how to download the music files.
You can then playback these downloaded music files by burning
them to a CD-R/RW disc or by connecting a USB Memory Player
device.
Your downloaded song/files are for personal use only. Any other
usage of the song without owner’s permission, is against the law.
About folder playback order
If MP3/WMA files are recorded in several folders, a folder number will
be set to each folder automatically.
These folders can be selected by the TUNING/FOLDER button on
the remote control. If there is no supported file formats inside the
selected folder, the folder is skipped and the next folder will be
selected.
Example: How to set folder number if MP3/WMA format files are
recorded as below figure.
* The folder and file order information which is recorded on the disc
depends on the writing software. There maybe possibilities that this
unit will playback the files not according to our expected playback
order.
All the files inside the selected folder will be played back.
In case Folder D is selected, file 4, 5 and 6 will be played back. File
7 and 8 in Folder E will not be played back.
1. ROOT folder is set as folder 1.
2. As for folders inside ROOT folder (Folder A and Folder B), the
folder which is recorded earlier on the disc will be set as folder 2.
3. As for folder inside Folder A (Folder C and Folder D), the folder
which is recorded earlier on the disc will be set as folder 3.
4. Because there is no folder in Folder C, Folder D will be set as
folder 4.
5. Folder E that is inside Folder D will be set as folder 5.
6. Folder B inside ROOT folder will be set as folder 6.
ROOT
(FOLDER 1)
FOLDER A
(FOLDER 2)
FOLDER B
(FOLDER 6)
FILE 7
FILE 8
FILE 1
FILE 2
FILE 3
FILE 4
FILE 5
FILE 6
FOLDER E
(FOLDER 5)
FOLDER C
(FOLDER 3)
FOLDER D
(FOLDER 4)
FILE 9
FILE 10
Other manuals for XL-UR5H
2
Table of contents
Other Sharp Stereo System manuals

Sharp
Sharp XL-MP35H User manual

Sharp
Sharp XL-70V User manual

Sharp
Sharp CD-SW330H User manual

Sharp
Sharp GF-A2Z(S) User manual

Sharp
Sharp AQUOS CD-BA250 User manual

Sharp
Sharp CP-BP99V User manual

Sharp
Sharp CD-XP700H User manual

Sharp
Sharp CD-E110H User manual

Sharp
Sharp CD-XP305V User manual

Sharp
Sharp CMS-55H(GY) User manual

Sharp
Sharp XL-DAB10NH User manual

Sharp
Sharp XL-HP550E User manual

Sharp
Sharp CD-BA3100 User manual

Sharp
Sharp CD G14000 User manual

Sharp
Sharp CD-BA1600 User manual

Sharp
Sharp XL-DK227NH User manual

Sharp
Sharp XL-MP150 User manual

Sharp
Sharp MD-E9000H User manual

Sharp
Sharp CD-MPX870 User manual

Sharp
Sharp XL-S15H User manual