Sharp GX-M10H(OR) User manual

12/8/1 GX-M10H_OM_EN.fm
E-1
Introduction
Thank you for purchasing this SHARP product. To obtain the best performance from this product, please read this manual
carefully. It will guide you in operating your SHARP product.
Special Note
Supply of this product does not convey a license nor imply any right to distribute content created with this product in
revenue-generating broadcast systems (terrestrial, satellite, cable and/or other distribution channels), revenue-generating
streaming applications (via Internet, intranets and/or other networks), other revenue-generating content distribution
systems (pay-audio or audio-on-demand applications and the like) or on revenue-generating physical media (compact
discs, digital versatile discs, semiconductor chips, hard drives, memory cards and the like). An independent license for
such use is required. For details, please visit http://mp3licensing.com
MPEG Layer-3 audio coding technology licensed from Fraunhofer IIS and Thomson.
Accessories
The following accessories are included.
The illustrations printed in this operation manual are for the model GX-M10H(OR).
Page
General Information
Precautions . . . . . . . . . . . . . . . . . . . . . . . . . . . . . . . . 1 - 2
Controls and indicators . . . . . . . . . . . . . . . . . . . . . . . 2 - 3
Preparation for Use
System connections . . . . . . . . . . . . . . . . . . . . . . . . . . . . 4
Remote control . . . . . . . . . . . . . . . . . . . . . . . . . . . . . . . . 5
Carrying the unit . . . . . . . . . . . . . . . . . . . . . . . . . . . . . . . 5
Placing the unit . . . . . . . . . . . . . . . . . . . . . . . . . . . . . . . . 5
Basic Operation
General control . . . . . . . . . . . . . . . . . . . . . . . . . . . . . . . . 6
Setting the clock (Remote control only) . . . . . . . . . . . 6 - 7
iPod, iPhone and iPad
Listening to the iPod, iPhone or iPad. . . . . . . . . . . . . 7 - 9
CD or MP3/WMA disc Playback
Listening to a CD or MP3/WMA disc . . . . . . . . . . . 9 - 10
Advanced CD or MP3/WMA disc playback . . . . . . 10 - 11
MP3/WMA folder mode (only for MP3/WMA files) . . . . 12
Page
USB
Listening to USB mass storage device/MP3 player . . . 13
Advanced USB playback . . . . . . . . . . . . . . . . . . . . . . . 14
Radio
Listening to the radio . . . . . . . . . . . . . . . . . . . . . . .14 - 15
Advanced Features
Using the Radio Data System (RDS) . . . . . . . . . 15 - 17
Connecting other equipment . . . . . . . . . . . . . . . . . . . . 18
Timer and sleep operation (Remote control only) 19 - 20
References
Troubleshooting chart . . . . . . . . . . . . . . . . . . . . . .20 - 21
Maintenance . . . . . . . . . . . . . . . . . . . . . . . . . . . . . . . . 21
Specifications . . . . . . . . . . . . . . . . . . . . . . . . . . . . . . . 22
Precautions
●Use the unit on a firm, level surface free from vibration.
●Place the unit at least 30 cm (12") away from any CRT
TV to avoid colour variations across the TV screen. If
the variations persist, move the unit further away from
the TV. LCD TV is not prone to such variation.
●Keep the unit away from direct sunlight, strong
magnetic fields, excessive dust, humidity and
electronic/electrical equipment (home computers,
facsimiles, etc.) which generate electrical noise.
●Do not place anything on top of the unit.
●Do not expose the unit to moisture, to temperatures
higher than 60°C (140°F) or to extremely low
temperatures.
AC power lead x 1 Remote control x 1
(RRMCGA292AWSA)
Stand for iPad x 1 “AA” size battery
(UM/SUM-3, R6, HP-
7 or similar) x 1
Dock spacer x 1 Carrying Strap x 1
CONTENTS
■General
●Please ensure that the equipment is positioned in a
well ventilated area and ensure that there is at least 10
cm (4") of free space along the sides, top and back of
the equipment.
PORTABLEMUSICBOOMBOXGX-M10
REMOTE
SENSOR
TIMER
10 cm (4")
10 cm (4")
10 cm (4") 10 cm (4")
ENGLISH

12/8/1 GX-M10H_OM_EN.fm
10
9
8
7
6
5
4
3
2
1
E-2
Precautions (continued)
●
If your system does not work properly, disconnect the AC
power lead from the wall socket. Plug the AC power lead back
in, and then turn on your system.
●
In case of an electrical storm, unplug the unit for safety.
●
Hold the AC power plug by the head when removing it from
the wall socket, as pulling the lead can damage internal wires.
●
The AC power plug is used as a disconnect device and shall
always remain readily operable.
●
Do not remove the outer cover, as this may result in
electric shock. Refer internal service to your local
SHARP service facility.
●
The ventilation should not be impeded by covering the
ventilation openings with items, such as newspapers,
tablecloths, curtains, etc.
●
No naked flame sources, such as lighted candles, should be
placed on the apparatus.
●
Attention should be drawn to the environmental aspects of
battery disposal.
●
This unit should only be used within the range of 5°C - 35°C
(41°F - 95°F).
●
The apparatus is designed for use in moderate climates.
●
Do not lift the unit by holding left or right side panel and the
CD door, it may cause speaker diaphragm or unit damage
and broken.
Warning:
The voltage used must be the same as that specified on
this unit. Using this product with a higher voltage other
than that which is specified is dangerous and may result
in a fire or other type of accident causing damage. SHARP
will not be held responsible for any damage resulting from
use of this unit with a voltage other than that which is
specified.
The sound level at a given volume setting depends on
speaker efficiency, location, and various other factors. It is
advisable to avoid exposure to high volume levels. Do not
turn the volume on to full at switch on. Listen to music at
moderate levels. Excessive sound pressure from
earphones and headphones can cause hearing loss.
Controls and indicators
Page
1. Equaliser/X-Bass Button. . . . . . . . . . . . . . . . . . . . . . 6
2. On/Stand-by Button. . . . . . . . . . . . . . . . . . . 6, 8, 9, 14
3. Demo/Dimmer/Stop Button. . . . . . . . . . . . . . . . . . . 10
4. Tuner/Audio In Button . . . . . . . . . . . . . . . . . . . . . . . 14
5. Tuner Preset Down, CD/USB Track Down,
iPod/iPhone Skip Down. . . . . . . . . . . . . . . . . . . . 9, 10
6. USB Play/Pause Button . . . . . . . . . . . . . . . . . . . 8, 13
7. Tuner Preset Up, CD/USB Track Up,
iPod/iPhone Skip Up . . . . . . . . . . . . . . . . . . . . . . 9, 10
8. CD Play/Pause Button . . . . . . . . . . . . . . . . . . . . . . . 10
9. Volume Down Button. . . . . . . . . . . . . . . . . . . . . . . . . 6
10. iPod Play/Pause Button. . . . . . . . . . . . . . . . . . . . . . . 8
11. Volume Up Button . . . . . . . . . . . . . . . . . . . . . . . . . . . 6
12. iPod door open knob
13. Timer indicator. . . . . . . . . . . . . . . . . . . . . . . . . . . . . 19
14. Remote sensor. . . . . . . . . . . . . . . . . . . . . . . . . . . . . . 5
15. Docking station . . . . . . . . . . . . . . . . . . . . . . . . . . . . . 8
16. USB Terminal . . . . . . . . . . . . . . . . . . . . . . . . . . . . . . . 7
17. CD compartment . . . . . . . . . . . . . . . . . . . . . . . . . . . 10
18. CD compartment open knob. . . . . . . . . . . . . . . . . . . 9
Page
1. FM aerial
2. DC 12 V input socket . . . . . . . . . . . . . . . . . . . . . . . . . 4
3. Headphone socket. . . . . . . . . . . . . . . . . . . . . . . . . . 18
4. Microphone volume knob . . . . . . . . . . . . . . . . . . . . 18
5. Microphone input socket . . . . . . . . . . . . . . . . . . . . 18
6. Guitar input socket . . . . . . . . . . . . . . . . . . . . . . . . . 18
7. Guitar volume knob . . . . . . . . . . . . . . . . . . . . . . . . . 18
8. Audio input socket. . . . . . . . . . . . . . . . . . . . . . . . . . 18
9. Video output socket . . . . . . . . . . . . . . . . . . . . . . . . . 5
10. AC input socket . . . . . . . . . . . . . . . . . . . . . . . . . . . . . 4
11. Cable holder . . . . . . . . . . . . . . . . . . . . . . . . . . . . . . . 18
■Volume control
X-BASS/EQ DEMO/DIMMER
VOLUME
iPod
CD
USB
TUNER/AUDIO-IN
ON/STAND-BY
PORTABLE MUSIC BOOMBOX GX-M10
PRESET
TIMER
REMOTE
SENSOR
11 357911
246810
13
12
14
16
15
17 18
1 2 34 5 6 7 89
10
11
■Front panel
■Rear panel

12/8/1 GX-M10H_OM_EN.fm
E-3
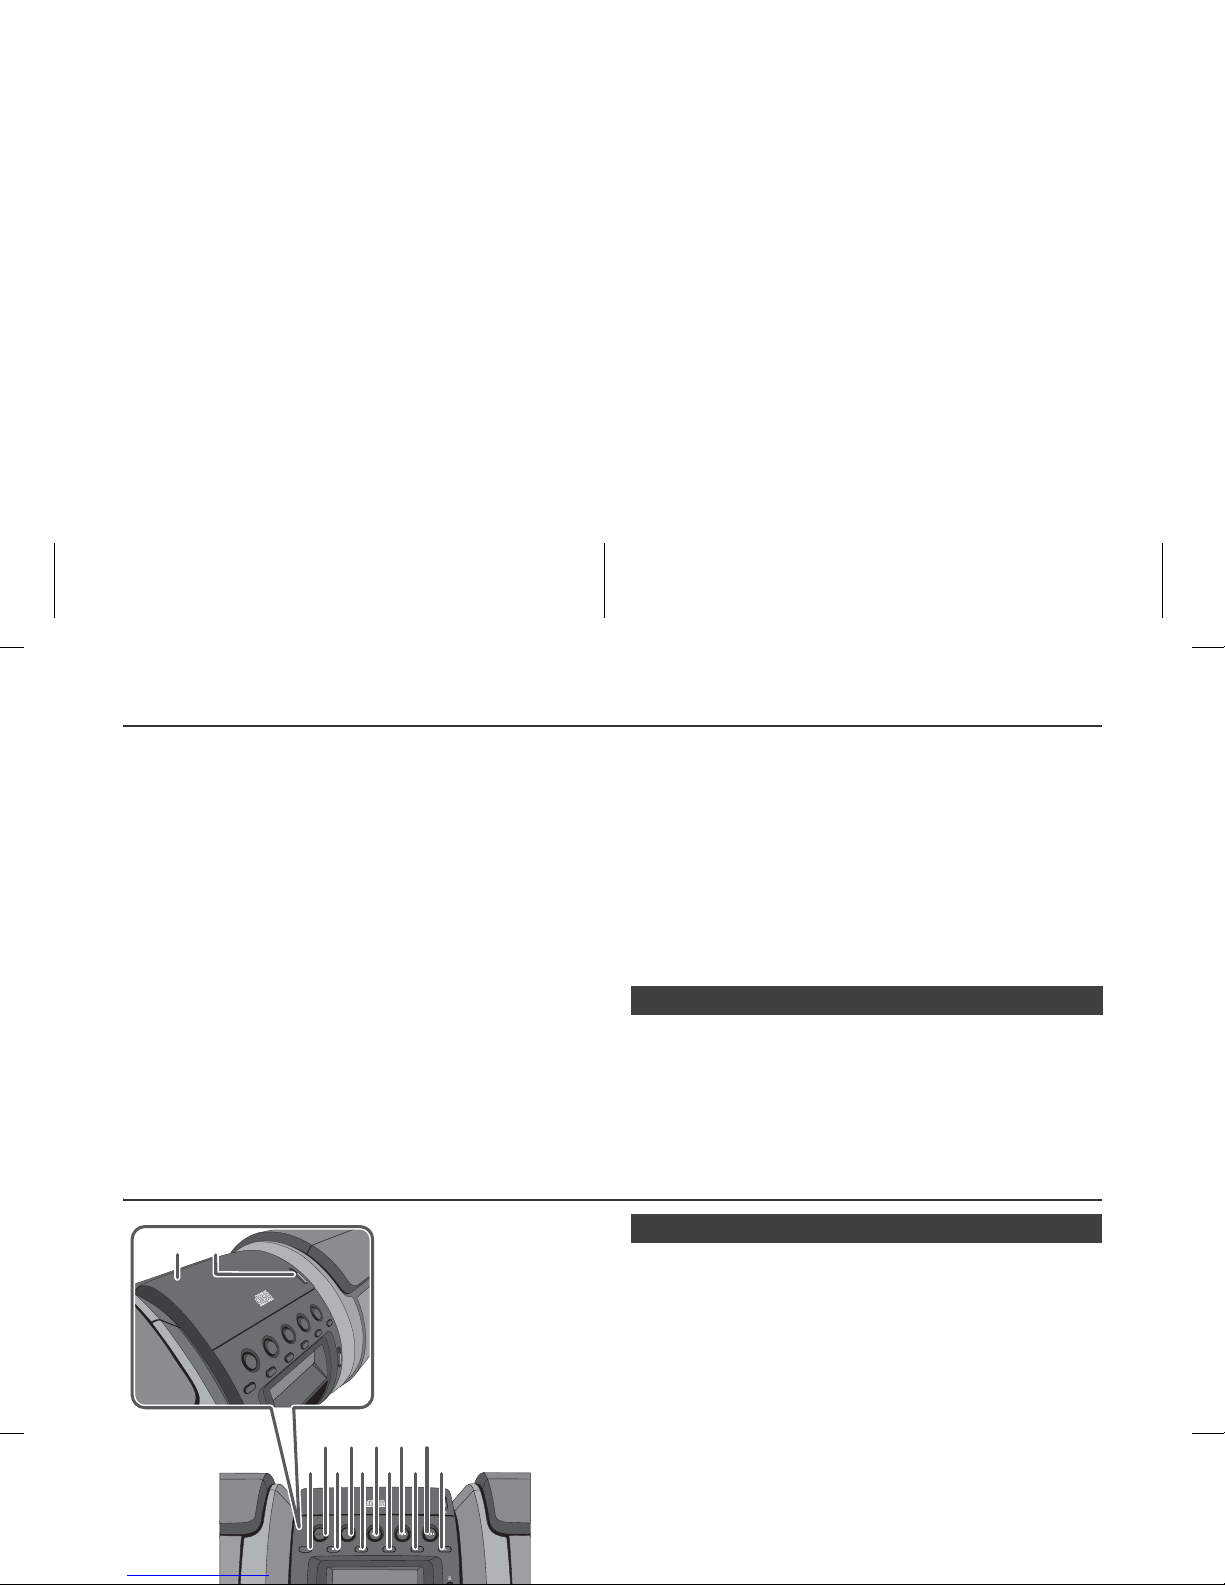
Controls and indicators (continued)
Page
1. CD Indicator . . . . . . . . . . . . . . . . . . . . . . . . . . . . . 10
2. USB Indicator . . . . . . . . . . . . . . . . . . . . . . . . . . . . 13
3. MP3 Indicator . . . . . . . . . . . . . . . . . . . . . . . . . . . . 11
4. WMA Indicator . . . . . . . . . . . . . . . . . . . . . . . . . . . 11
5. iPod Indicator . . . . . . . . . . . . . . . . . . . . . . . . . . . . . 8
6. RDS Indicator . . . . . . . . . . . . . . . . . . . . . . . . . . . . 15
7. TA Indicator . . . . . . . . . . . . . . . . . . . . . . . . . . . . . 15
8. PTY Indicator . . . . . . . . . . . . . . . . . . . . . . . . . . . . 15
9. TP Indicator . . . . . . . . . . . . . . . . . . . . . . . . . . . . . 15
10. FM Stereo Mode Indicator . . . . . . . . . . . . . . . . . . 14
11. Stereo Station Indicator . . . . . . . . . . . . . . . . . . . 14
12. Total Indicator. . . . . . . . . . . . . . . . . . . . . . . . . . . . 12
13. Folder Indicator . . . . . . . . . . . . . . . . . . . . . . . . . . 12
14. Title Indicator . . . . . . . . . . . . . . . . . . . . . . . . . . . . 12
15. MEM (Memory) Indicator . . . . . . . . . . . . . . . . 11, 15
16. X-bass Indicator . . . . . . . . . . . . . . . . . . . . . . . . . . . 6
17. Sleep Indicator . . . . . . . . . . . . . . . . . . . . . . . . . . . 20
18. Once Timer Indicator . . . . . . . . . . . . . . . . . . . . . . 19
19. Daily Timer Indicator . . . . . . . . . . . . . . . . . . . . . . 19
20. RDM (Random) Indicator. . . . . . . . . . . . . . . . . . . 11
21. Repeat Indicator . . . . . . . . . . . . . . . . . . . . . . . . . . 10
22. Microphone Indicator
23. Guitar Indicator
24. Battery Level Indicator . . . . . . . . . . . . . . . . . . . . . 4
25. Play Indicator . . . . . . . . . . . . . . . . . . . . . . . . . . . . . 9
26. Pause Indicator . . . . . . . . . . . . . . . . . . . . . . . . . . . 9
Page
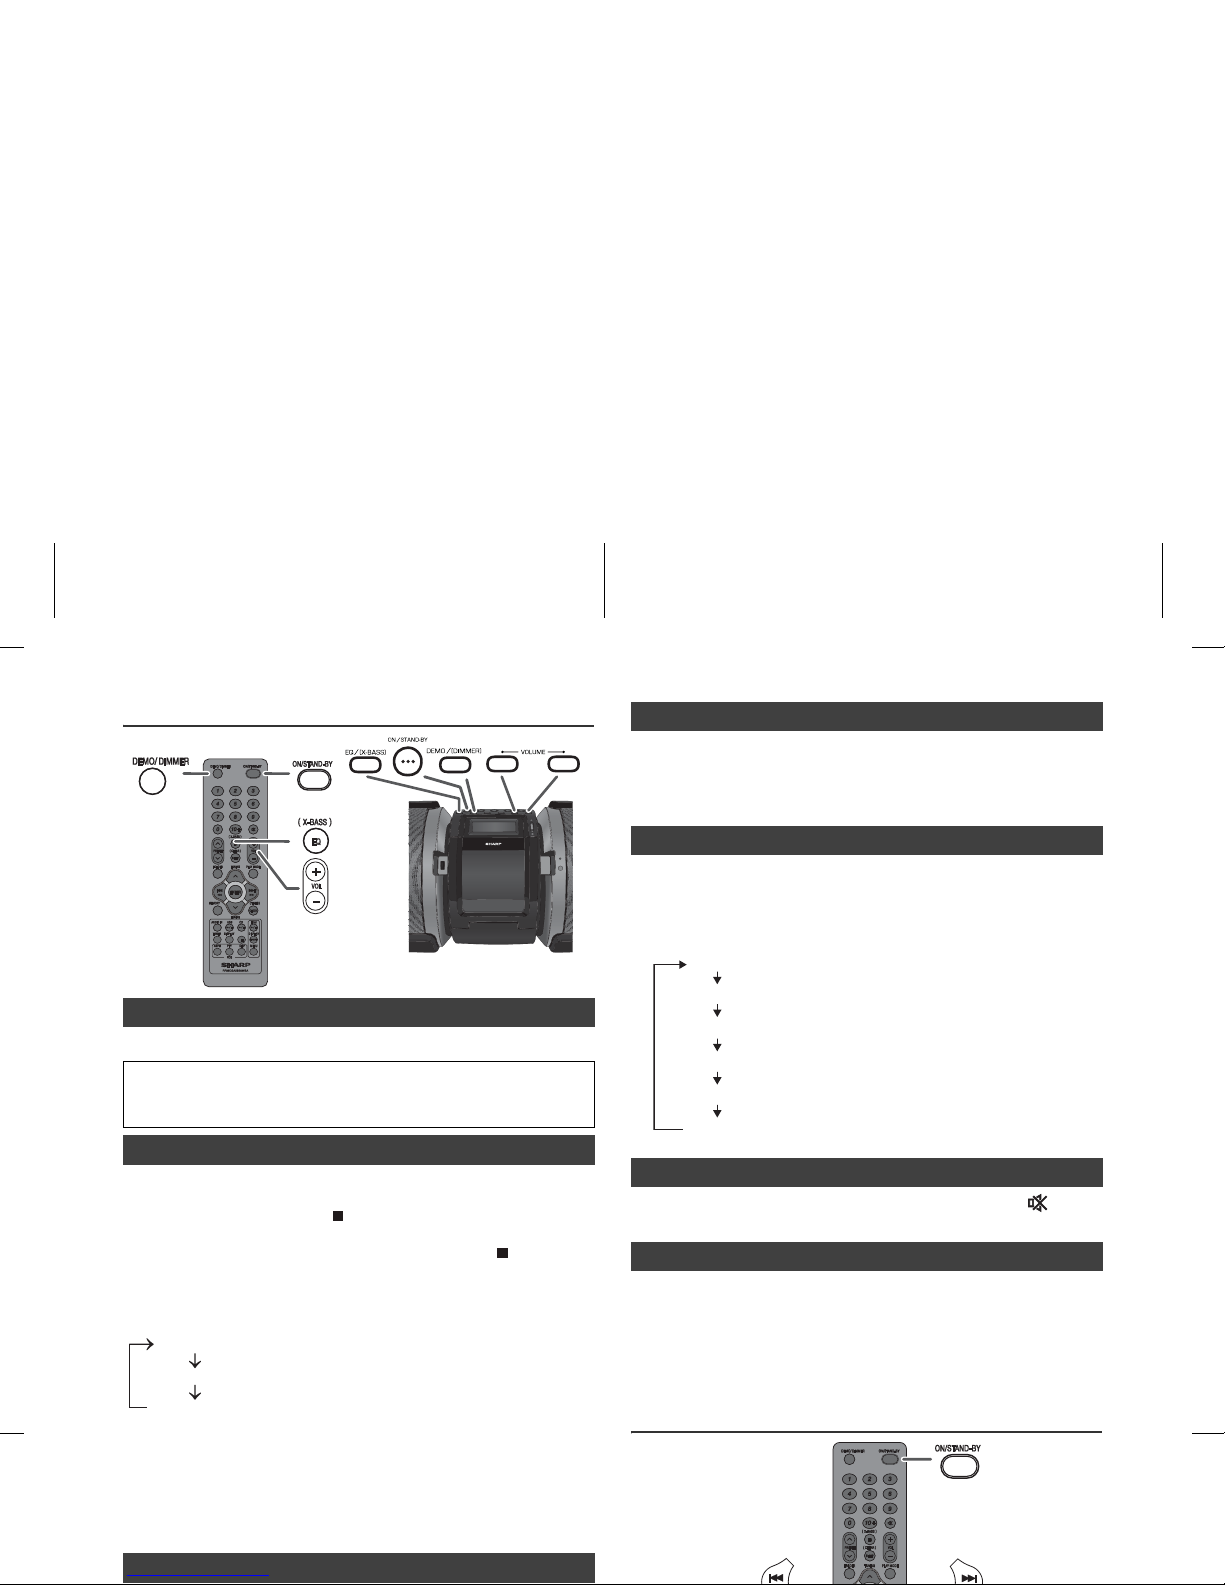
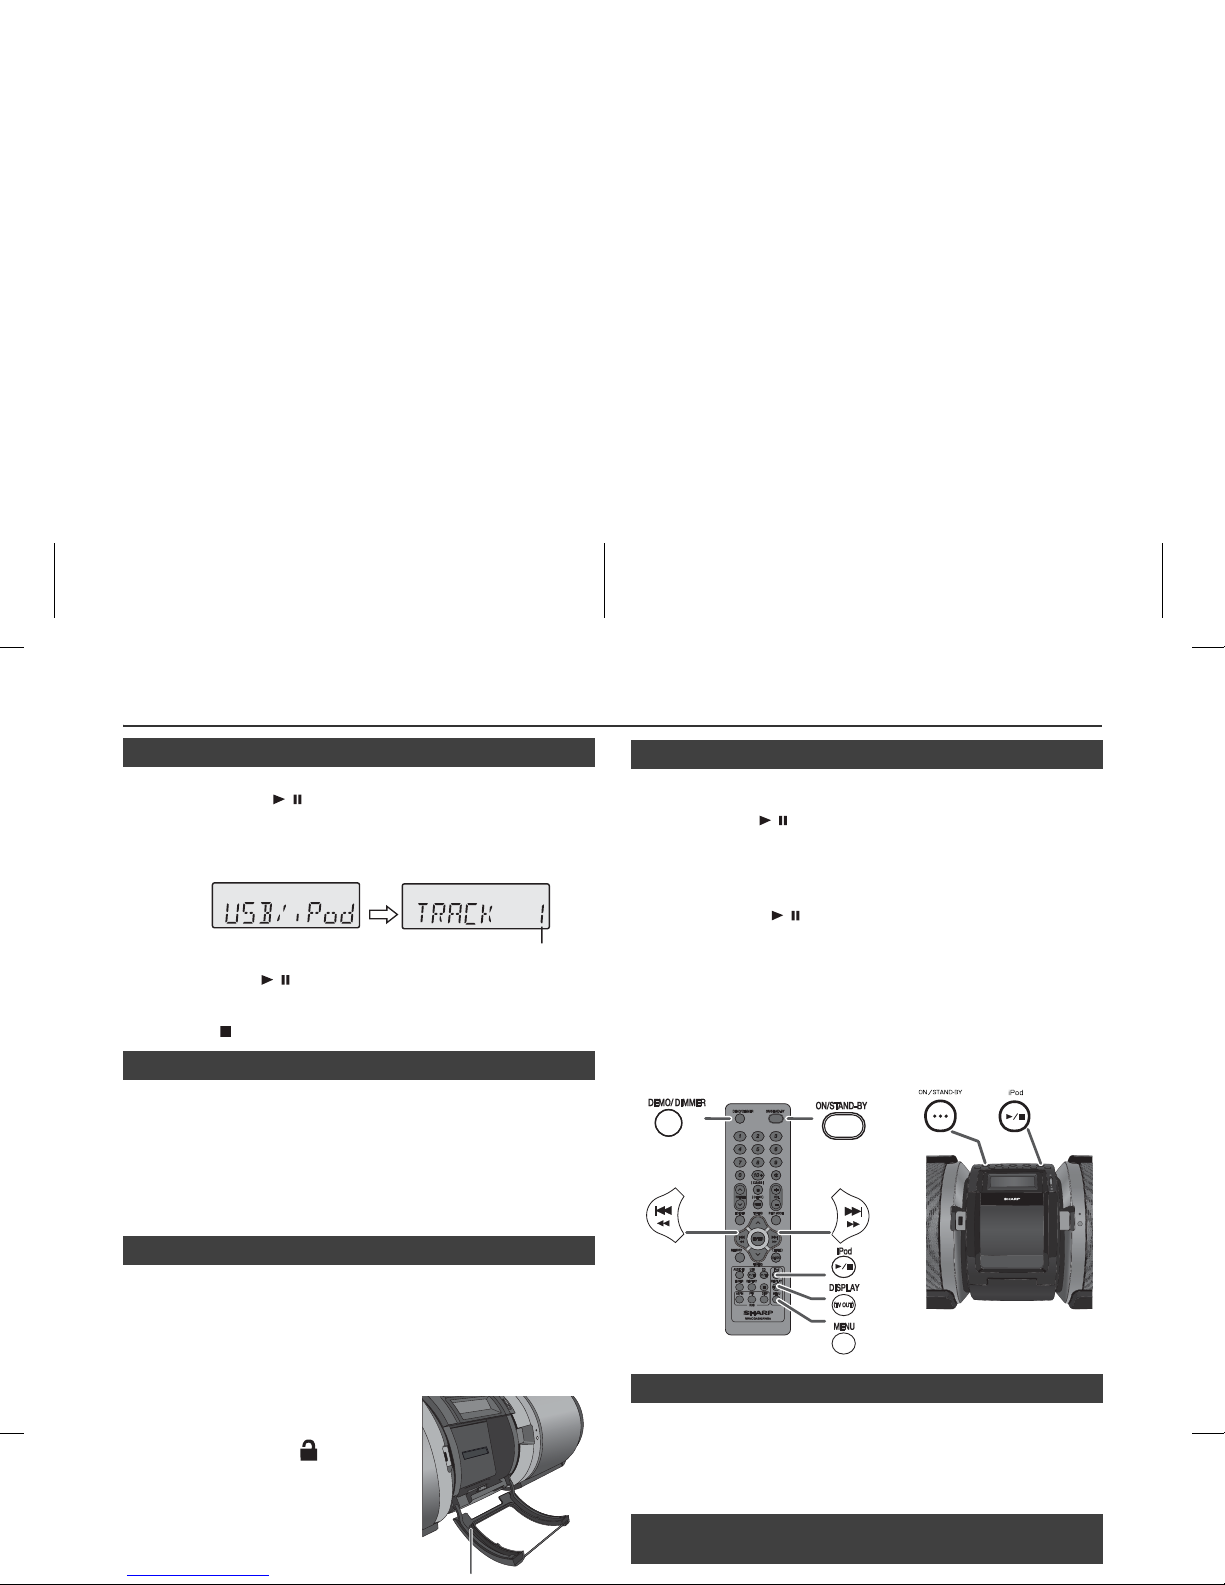
1. Remote Control Transmitter . . . . . . . . . . . . . . . . . . . . 5
2. Demo/Dimmer Button . . . . . . . . . . . . . . . . . . . . . . . 4, 6
3. Numeric Buttons . . . . . . . . . . . . . . . . . . . . . . . . . . . . 10
4. Equaliser (X-Bass) Button . . . . . . . . . . . . . . . . . . . . . 6
5. Tuner Preset Up Button . . . . . . . . . . . . . . . . . . . . . . 15
6. Tuner Preset Down Button . . . . . . . . . . . . . . . . . . . . 15
7. Folder Button. . . . . . . . . . . . . . . . . . . . . . . . . . . . 12, 13
8. Tuning Up, iPod Cursor Up,
Folder Up Button . . . . . . . . . . . . . . . . . . . 11, 12, 13, 14
9. Skip Down, Fast Reverse,
Time Down Button. . . . . . . . . . . . . . . . . . . . 6, 9, 12, 19
10. Tuning Down, iPod Cursor Down,
Folder Down Button . . . . . . . . . . . . . . . . 11, 12, 13, 14
11. Memory Button . . . . . . . . . . . . . . . . . . . . . . . . . . 11, 15
12. Audio In Button . . . . . . . . . . . . . . . . . . . . . . . . . . . 6, 18
13. USB Play/Pause Button . . . . . . . . . . . . . . . . . . . . 8, 13
14. Tuner Button . . . . . . . . . . . . . . . . . . . . . . . . . . . . 14, 16
15. Display Button . . . . . . . . . . . . . . . . . . . . . . . . . . . 13, 14
16. RDS ASPM Button . . . . . . . . . . . . . . . . . . . . . . . . . . 16
17. RDS PTY Button . . . . . . . . . . . . . . . . . . . . . . . . . . . . 16
18. On/Stand-by Button. . . . . . . . . . . . . . . . . . . . 6, 8, 9, 18
19. Mute Button . . . . . . . . . . . . . . . . . . . . . . . . . . . . . . . . . 6
20. Volume Up Button . . . . . . . . . . . . . . . . . . . . . . . . . . . 6
21. Volume Down Button . . . . . . . . . . . . . . . . . . . . . . . . . 6
22. Sleep (Clear) Button . . . . . . . . . . . . . . . . . . . . . . 11, 20
23. Play Mode Button . . . . . . . . . . . . . . . . . . . . . . . . 10, 11
24. Skip Up, Fast Forward, Time Up Button . . 6, 9, 12, 19
25. Enter Button. . . . . . . . . . . . . . . . . . . . . . . . . 6, 8, 13, 14
26. Clock (Timer) Button. . . . . . . . . . . . . . . . . . . . . . . 6, 19
27. CD Play/Pause Button. . . . . . . . . . . . . . . . . . . 9, 10, 13
28. iPod Play/Pause Button . . . . . . . . . . . . . . . . . . . . . . . 9
29. iPod Display (TV OUT) Button . . . . . . . . . . . . . . . . . . 8
30. CD/USB Stop Button . . . . . . . . . . . . . . . . . . . 9, 10, 13
31. iPod Menu Button . . . . . . . . . . . . . . . . . . . . . . . . . . . . 9
32. RDS Display Button . . . . . . . . . . . . . . . . . . . . . . . . . 15
■Speakers
1. Front speaker
2. Subwoofer
3. Bass Reflex Duct
1 2 34 5 6 7 89 10 11
24232221201918171615141312
25
26
PORTABLEMUSICBOOMBOXGX-M10
321
7
8
10
13
12
11
15
16
17
14
5
2
4
6
3
9
18
19
20
21
22
23
24
25
26
27
29
32
31
30
28
1
■Display
■Remote control

12/8/1 GX-M10H_OM_EN.fm
10
9
8
7
6
5
4
3
2
1
E-4
System connections
After checking all the connections have been made correctly,
plug the AC power lead of this unit into the wall socket.
Notes:
●
Remove all batteries when using AC power.
●
Unplug the AC power lead from the wall socket if the unit
will not be in use for a prolonged period of time.
Caution:
●
During battery/DC operation, the unit will be set to Demo
mode off with display and subwoofer light in MODE 2 to
reduce the battery power consumption.
●
When using battery/DC power, the remote control cannot
be used to turn on the unit.
●
Unplug the AC power lead from the unit before using the
DC power. Otherwise the unit will not work.
●
Use only a car adaptor with DC 12V output voltage.
●
Insert the plugs firmly.
●
When the unit is not in use for an extended period, remove
the car adaptor from the car supply socket.
Precautions for battery use:
●
Insert the batteries according to the direction indicated on the
rear panel.
●
Remove the batteries if they are weak or if the unit will not be
used for long periods of time. This will prevent potential damage
due to battery leakage.
●
Replace all old batteries with new ones at the same time.
●
Do not mix old and new batteries.
Battery replacement:
●
When batteries are low, battery indicator “ ” will blink to show
that the batteries need to be replaced. sound may become
distorted and unit may automatically turn off or mute during high
volume level. Reduce the volume level or replace the batteries.
●
When replacing the batteries, place the unit on a cushion or soft
cloth to avoid damage.
Cautions:
●
Do not use rechargeable battery (nickel-cadmium battery, etc.).
●
Immediately remove the discharged batteries. If the chemical
leak into the unit, clean it.
●
Batteries (battery pack or batteries installed) shall not be
exposed to excessive heat such as sunshine, fire or the like.
●
The first time the unit is plugged in with AC power, the unit will
enter the demonstration mode. You will see words scroll and
the subwoofer light up will operate in the flashing mode.
●
To cancel the demonstration mode, press the DEMO/
DIMMER button (remote control) during power stand-by
mode. The unit will enter the low power consumption mode.
The subwoofer light will be off.
●
To return to the demonstration mode, press the DEMO/
DIMMER button again.
●
If iPod or iPhone is docked, the unit will begin charging. “iPod
CHARGING” will be displayed.
Do not connect the DC or AC power to the unit at the same time.
Car adaptor (not supplied)
Socket: DC 12 V 4.5 A
Wall socket
AC 110 - 240 V
~ 50/60 Hz
To AC I N P U T
socket
To DC IN 12 V
socket
■AC power connection
■DC power connection
Attention: connection of DC lead and
battery terminals.
: Connect the red battery clip to (+)
on the battery terminal.
: Connect the black battery clip to
(–) on the battery terminal.
DC power can only be used for a 12V
battery.
Do not use any battery besides a 12V.
■Operation with batteries
1Disconnect the AC and DC power lead, and
remove the battery compartment cover.
●Connection of the AC or DC power lead to the unit
disconnects the batteries.
2Insert 10 "D" size batteries (UM/SUM-1, R20, HP-2
or similar) into the battery compartment.
●When inserting or removing the batteries 5and 0,
push them towards the (-) battery terminals.
●Installing the batteries incorrectly may cause the unit
to malfunction.
●Batteries are not included.
12V
24V
Black
Red
3Replace the battery compartment cover.
■Demonstration mode
67
9
8
10
1254
3

12/8/1 GX-M10H_OM_EN.fm
E-5
Photo and video files from iPod or iPhone can be viewed
by connecting the system to TV/monitor.
If the TV/monitor has a video input, connect it to the VIDEO
OUT socket at the back of the unit and set the TV Out on
the iPod or iPhone unit to “ON” position.
Note:
Please make sure to set iPod unit to either NTSC or PAL to
match your TV signal. Please visit Apple’s homepage for
further information.
Remote control
Caution:
●
Remove the battery if the unit will not be used for a long
period of time. This will prevent potential damage due to
battery leakage.
●
Do not use rechargeable battery (nickel-cadmium battery,
etc.).
●
Installing the battery incorrectly may cause the unit to
malfunction.
●
Batteries (battery pack or batteries installed) shall not be
exposed to excessive heat such as sunshine, fire or the like.
Notes concerning use:
●
Replace the battery if the operating distance is reduced or
if the operation becomes erratic. Purchase an “AA” size
battery (UM/SUM-3, R6, HP-7 or similar).
●
Periodically clean the transmitter on the remote control and
the sensor on the unit with a soft cloth.
●
Exposing the sensor on the unit to strong light may interfere
with operation. Change the lighting or the direction of the
unit if this occurs.
●
Keep the remote control away from moisture, heat, shock,
and vibrations.
Check the remote control after checking all the connections.
Point the remote control directly at the remote sensor on the unit.
The remote control can be used within the range shown below:
Note:
Exposing the infrared remote control to direct sunlight may
cause the remote control to be inoperable.
Carrying the unit
This unit can be carried by using a supplied carrying strap.
Insert the carrying strap carabiner (hook) to each end of the
unit as shown below.
Caution:
Before carrying the unit, make sure the carabiner (hook) is
properly secured and closed, otherwise it will cause damage
and injury.
Placing the unit
This unit can be placed in 2 positions as shown below.
Caution:
●
Make sure that the unit is placed on a flat and level surface.
●
Make sure to turn the unit carefully when adjusting the
position.
●
Do not place the unit other than these 2 positions to avoid
damage and injury.
To get the best display viewing angle, place the unit as
below.
Position 1:
On the shelf/table.
Position 2:
On the floor/ground
■Connecting iPod or iPhone to TV
■Battery installation
1
Open the battery cover.
2
Insert the supplied battery according to the terminal
indicated in the battery compartment.
When inserting or removing the battery, push it towards the
(–) battery terminals.
3
Close the cover.
■Test of the remote control
REMOTE
SENSOR
TIMER
0.2 m - 6 m
(8" - 20' )
Remote sensor
Caution:
Before transporting the unit, remove the iPod, iPhone, iPad,
USB memory device and disc from the unit. Then, set the unit
to the power stand-by mode. Transporting the unit with iPod,
iPhone, iPad or USB memory device left connected or discs
left inside might damage the unit.
■Using the carrying strap
Carabiner (hook)
Hole
Hole
To r e m ove t h e
carrying strap
T
R
O
PABLEM
I
S
UO
B
CM
OBG
X
OX-M10
Foot cushion 1and 2
touching the surface.
O
PRTABLEI
S
U
MB
CO
OMBOXGX-M10
Foot cushion 2and 3
touching the surface.

12/8/1 GX-M10H_OM_EN.fm
10
9
8
7
6
5
4
3
2
1
E-6
General control
Press the ON/STAND-BY button to turn the power on.
The display and subwoofer light can be changed.
Main unit:
1) Press DEMO/(DIMMER)/ button for more than 3 seconds.
The current mode will be displayed.
2) Within 5 seconds, press DEMO/(DIMMER)/ button to
change the mode.
Remote control:
Press DEMO/DIMMER button to change the mode.
Notes:
●
During battery/DC operation, the unit will be set to Demo
mode off with display and subwoofer light in MODE 2 to
reduce the battery power consumption.
●
During MODE 2, press any button to light up the display
backlight for a few seconds.
If you turn off and on the main unit with the volume set to 27 or
higher, the volume starts at 16 and fades in to the last set level.
Press VOLUME +/– buttons (on main unit) or VOL +/– (on
remote control) to increase or decrease the volume.
When you press any of the following buttons, the unit turns on.
●
iPod / , CD / , USB / on the main unit or the
remote control: selected function is activated.
●
TUNER/AUDIO IN on the main unit: last tuner or audio
function is activated
●
TUNER or AUDIO IN on the remote control: the unit turns
on with the selected function activated.
The main unit will enter the stand-by mode (when iPad, iPod ,
iPhone, guitar or microphone is not connected) after 15
minutes of inactivity during:
iPod: Not docked.
Audio In: No detection of input signal.
CD: In the stop mode or no disc.
USB: In the stop mode or no media.
Note:
However, if iPod or iPhone is docked, the unit will begin
charging. “iPod CHARGING” will be displayed.
The auto resume function will resume the last function and
playback, should there be a power failure or the AC power
lead becomes disconnected. However, CD/MP3 programme
and random mode are not memorised.
When the EQ/(X-BASS) button is pressed, the current mode
setting will be displayed. To change to a different mode, press
the EQ/(X-BASS) button repeatedly until the desired sound
mode appears.
The volume is muted temporarily when pressing the button
on the remote control. Press again to restore the volume.
When the power is first turned on, the unit will enter the extra
bass mode which emphasises the bass frequencies, and
“X-BASS” will appear. To cancel the extra bass mode, press
the EQ/(X-BASS) button. The last equaliser mode will turn on.
To turn on the X-Bass mode again, press the EQ/(X-BASS)
button for more than 2 seconds.
Setting the clock (
Remote
control only)
In this example, the clock is set for the 24-hour (0:00) display.
■To turn the power on
After use:
Press the ON/STAND-BY button to enter the power stand-
by mode.
■Display and Subwoofer light up control
■Volume auto fade-in
■Volume control
■Direct key power on function
■Auto power off function
PORTABLEMUSIC BOOMBOX GX-M10
REMOTE
SENSOR
TIMER
MODE 1
MODE 2
MODE Off
(Display backlight on and Subwoofer light off)
(Display backlight on and Subwoofer light on)
(Display backlight off and Subwoofer light off)
■Auto resume function
■Equaliser
No equalisation.
For rock music.
Vocals are enhanced.
For hip hop music.
For salsa music.
For reggae music.
■Muting
■X-Bass control
1
Press the ON/STAND-BY button to turn the power on.
2
Press the CLOCK/TIMER button.
3
Within 10 seconds, press the ENTER button. To adjust
the time, press the or button and then
press the ENTER button.
4
Press the or button to select 24-hour or
12-hour display and then press the ENTER button.
The 24-hour display will appear.
(0:00 - 23:59)
The 12-hour display will appear.
(AM 12:00 - PM 11:59)
The 12-hour display will appear.
(AM 0:00 - PM 11:59)
ROCK
FLAT
VOCAL
HIP HOP
REGGAE
SALSA

12/8/1 GX-M10H_OM_EN.fm
E-7
Setting the clock (Remote control
only) (continued)
To confirm the time display:
Press the CLOCK/TIMER button. The time display will
appear for about 5 seconds.
Notes:
●
When power supply is restored after unit is plugged in
again or after a power failure, confirm the clock, if
required, reset the clock (pages 6 - 7).
●
The clock will continue counting for 24 hours should there
be a power failure or the AC power lead becomes
disconnected.
To readjust the clock:
Perform “Setting the clock” from step 1. If the “CLOCK” does
not appear in step 2, step 4 (for selecting the 24-hour or 12-
hour display) will be skipped.
To change the 24-hour or 12-hour display:
Listening to the iPod, iPhone or iPad
Made for:
Caution:
Please update your iPod, iPhone and iPad unit to the latest
software version before using it. Please visit Apple’s
homepage to download the latest version for your iPod,
iPhone and iPad.
Notes:
●
Charging terminal for iPod, iPhone and iPad:
●
The message
“
This accessory is not made to work with
iPhone” or similar, may appear on the iPhone screen
when:
- battery is low.
- the iPhone is not properly docked (eg. slanting).
If this occurs, remove and re-dock the iPhone.
●
This product is made for iPod, iPhone and iPad. To
prevent random interference when iPod, iPhone or
iPad is connected, the headphone output is disabled,
and “HPINVALID” will be displayed.
You may also experience brief audio interference
during incoming calls.
●
The headphone output is switched off during inserting
iPod, iPhone and iPad unit. This is an Apple product
specification.
Note:
USB terminal does not support VIDEO out.
5 To adjust the hour, press the
or
button
and then press the ENTER button. Press the
or
button once to advance the time by 1 hour. Hold
it down to advance continuously.
6To adjust the minutes, press the
or
button and then press the ENTER button. Press the
or
button once to advance the time by 1
minute. Hold it down to advance the time by 5 minutes
interval.
1Clear all the programmed contents. [Refer to “Factory
reset, clearing all memory” on page 21 for details.]
2Perform “Setting the clock” from step 1 onwards.
●
iPod touch (4
th
generation)
●
iPod touch (3
rd
generation)
●
iPod touch (2
nd
generation)
●
iPod touch (1
st
generation)
●
iPod classic
●
iPod nano (6
th
generation)
●
iPod nano (5
th
generation)
●
iPod nano (4
th
generation)
●
iPod nano (3
rd
generation)
●
iPod nano (2
nd
generation)
●
iPhone 4S
●
iPhone 4
●
iPhone 3GS
●
iPhone 3G
●
iPhone
●
iPad (3
rd
generation)
●
iPad 2
●
iPad
Condition DOCK USB terminal
USB function YES YES
(without iPod
or iPhone
docking)
Other function
(iPod / CD / Tuner /
Audio In )
YES NO
Stand-by YES NO
■iPod, iPhone and iPad connection (USB
only)
1Insert the connector to the iPod, iPhone or iPad.
2 Place the iPad to the stand for iPad.
3Connect the iPod, iPhone or iPad to the unit via USB
connector.
iPad
Connector
iPad
Stand for iPad

12/8/1 GX-M10H_OM_EN.fm
10
9
8
7
6
5
4
3
2
1
E-8
Listening to the iPod, iPhone or iPad
(continued)
1Press the ON/STAND-BY button to turn the power on.
2Press the USB
/
button on the remote control or the
main unit to select USB function.
3Connect iPod, iPhone or iPad to the unit. “USB/iPod” will
appear.
4
Press the USB / button to start playback.
Note:
Stop button ( ) is invalid during iPod, iPhone or iPad playback.
●
Sound will only switch from iPhone to the main unit after
authentication process is completed in approximately 10
seconds.
●
Incoming calls will pause the playback.
●
Once the calls are answered, the conversation can only be
heard through the built-in iPhone speaker. Turn on the
iPhone speaker or undock the iPhone to start conversation.
Caution:
Unplug all accessories from the iPod or iPhone before
inserting it into the dock.
Note:
Do not use the docking station to connect your iPad.
For additional support, apply dock spacer (supplied) as shown.
It is safe to disconnect iPod, iPhone and iPad even during
playback. However, attention should be drawn when
removing the iPod or iPhone from docking station to avoid
damage.
Notes:
●If the TV Out setting is already turned on at video menu,
the video is automatically displayed on the TV screen
when ENTER key is pressed.
●USB terminal does not support VIDEO OUT.
●To return to watching video on iPod or iPhone screen,
press the MENU button to enter video menu. Then
press the DISPLAY (TV OUT) button for more than 2
seconds until “V-OUT OFF” appears.
●During iPod or iPhone video playback, pressing the
DISPLAY (TV OUT) button will not toggle video out
display between iPod and TV.
Caution:
●Stop button ( ) is invalid during iPod function.
■iPod, iPhone or iPad playback (USB only)
■iPhone playback
■iPod and iPhone connection (Dock only)
1
Open the iPod door by pushing
the iPod door open knob to the
area area marked ' '.
Cautions:
●
Close the iPod door if not
in use.
●
Do not press the iPod
door downwards when it
is open as it may cause
damage and injury.
2Dock your iPod or iPhone into the unit.
1Peel off the double sided tape separator.
2
Place the spacer on the space allocated inside the docking
station as shown.
Track number
iPod door
iPhone
Dock connector
iPhone (bottom)
Dock for iPhone
Dock spacer
Peel off
separator
Docking station
■iPod or iPhone playback
1
Press the ON/STAND-BY button to turn the power on.
2
Press the iPod / button on the remote control or the main unit
to select iPod function.
3
Insert iPod or iPhone unit into the dock of main unit. “DOCK OK”
will appear. Make sure to close the iPod door before playback.
4
Press the iPod / button to start playback.
Notes:
iPod touch and iPhone need to be operated itself in the
following operations.
1. Returning to the home screen.
2. Selecting the application on the home screen.
3. Dragging the slider.
To operate the connected iPod or iPhone, turn this unit to
position 2 (refer "Placing the unit" on page 5).
■To disconnect iPod, iPhone or iPad
■Watching videos on a TV connected to
iPod or iPhone
1Press the DISPLAY (TV OUT) button for more than 2
seconds until “V-OUT ON” appear on display.
2Press the ENTER button to start playback.
PORTABLEMUSIC BOOMBOX GX-M10
REMOTE
SENSOR
TIMER

12/8/1 GX-M10H_OM_EN.fm
E-9
Listening to the iPod, iPhone or iPad
(continued)
Note:
When navigating the iPod, iPhone or iPad menu with remote
control, do not operate any of the buttons on the iPod or iPhone
unit. The volume level is adjusted by pressing the VOL (+ or –)
button on the main unit or the remote control. Adjusting the
volume on the iPod, iPhone or iPad units give no effect.
iPod, iPhone and iPad operations:
The operations described below depend on the generation iPod,
iPhone and iPad you are using.
System on operation:
When the main unit is powered on, the iPod, iPhone or iPad units
will automatically power on when docked or connected in the unit.
System off (stand-by operation):
When the main unit is turned to stand-by mode, the docked iPod,
iPhone or connected iPad unit will automatically pause the
playback.
Listening to a CD or MP3/WMA disc
This system can play back a standard CD, CD-R/RW in the CD
format and CD-R/RW with MP3 or WMA files, but cannot record
on them. Some audio CD-R and CD-RW discs may not be
playable due to the state of the disc or the device that was used
for recording.
MP3:
MP3 is a form of compression. It is an acronym which stands
for MPEG Audio Layer 3. MP3 is a type of audio code which
is processed by significant compression from the original
audio source with very little loss in sound quality.
●
This system supports MPEG 1 Layer 3 and VBR files.
●
During VBR file playback, time counter in the display may
differ from its actual playback time.
●
Bitrate which is supported by MP3 is 32 ~ 320 kbps.
WMA:
WMA files are Advanced System Format files that include
audio files which are compressed with Windows Media
Audio codec. WMA is developed by Microsoft as an audio
format file for Windows Media Player.
●
“MP3” and “WMA” indicator will light up after the unit reads
information on an MP3 or WMA disc.
●
Bitrate which is supported by WMA is 64 ~ 160 kbps.
■Navigating the iPod, iPhone or iPad
menus
1
Press the MENU button to view the menu on iPod, iPhone or
iPad unit. Press it again to go back to previous menu.
2
Use the TUNING ( or ) button to select an item on the
menu and then press ENTER button.
■Various iPod, iPhone and iPad functions
Function Main unit Remote control Operation
Dock/USB Dock/USB
Play
Press in the pause
mode.
Pause
Press in the
playback mode.
Track up/
down
Press in the
playback or pause
mode.
If you press the
button in the pause
mode, press the /
button to start the
desired track.
Fast
forward/
reverse
Press and hold
down in the
playback mode.
Release the button
to resume
playback.
Display
____
Press to toggle
display content.
Repeat
____
Press to toggle
repeat mode.
Shuffle
____
Press for more
than 2 seconds to
toggle shuffle
mode.
Function Main unit Remote control Operation
Dock/USB Dock/USB
Menu
____
Press to view the
iPod menu during
iPod function.
Enter
____
Press to confirm the
selection.
Cursor
Up/Down
____
Press to select the
iPod menu.
■Disc playback
1
Press the ON/STAND-BY button to turn the power on.
2
Press the CD
/
button on the remote control or the main
unit to select CD function.
3
Open the CD compartment by pushing the CD compartment
open knob to the area marked ' '.
4
Place the disc on the spindle, label side up.
PORTABLEMUSIC BOOMBOX GX-M10
REMOTE
SENSOR
TIMER
ON/STAND-BY CD

12/8/1 GX-M10H_OM_EN.fm
10
9
8
7
6
5
4
3
2
1
E-10
Listening to a CD or MP3/WMA disc
(continued)
Caution:
●
Do not place two discs in the spindle.
●
Do not play discs of special shapes (heart, octagon, etc). It
may cause malfunctions.
●
If TV or radio interference occurs during CD operation, move
the unit away from the TV or radio.
●
Due to the structure of the disc information, it takes longer to
read an MP3/WMA disc than a normal CD (approximately 20
to 90 seconds).
●
Do not open the CD compartment during playback or you may
be injured.
Notes for CD or MP3/WMA disc:
●
When the end of the last track is reached during fast forward,
“END” will appear on the display and CD operation will be
paused. When the beginning of the first track is reached
during fast reverse, the unit will enter the playback mode (only
for CD).
●
Rewritable multi-session discs with unfinished writing, can
still be played.
Advanced CD or MP3/WMA disc
playback
By using the Numeric buttons, the desired tracks on the
current disc can be played.
Use the Numeric buttons on the remote control to select
the desired track whilst playing the selected disc.
●
The Numeric buttons allow you to select up to number 9.
●
When selecting number 10 or higher, use the “10+” button.
Notes:
●
A track number higher than the number of tracks on the
disc cannot be selected.
●
During random play, direct search is not possible.
To stop playback:
Press the DEMO/(DIMMER)/ ( ) button.
Repeat play can play one track, all tracks or a programmed
sequence continuously.
To repeat one track:
Press the PLAY MODE button repeatedly until “REP ONE”
appears. Press the CD / button.
To repeat all tracks:
Press the PLAY MODE button repeatedly until “REP ALL”
appears. Press the CD / button.
To repeat desired tracks:
Perform steps 1 - 5 in “Programmed play” section on page 11
and then press the PLAY MODE button repeatedly until “REP
ALL” appears.
To cancel repeat play:
Press the PLAY MODE button repeatedly until “NORMAL”
appears and “ ” disappears.
Caution:
After performing repeat play, be sure to press the DEMO/
(DIMMER)/ ( ) button. Otherwise, the disc will play
continuously.
5 Close the CD compartment.
6
Press the CD / button to start playback. After the last track
is played, the unit will stop automatically.
■Various disc functions
Function Main unit Remote
control
Operation
Play
Press in the stop
mode.
Stop
Press in the
playback mode.
Pause
Press in the
playback
mode. Press the
/ button to
resume playback
from the paused
point.
Track
up/
down
Press in the
playback or stop
mode.
If you press the
button in the stop
mode, press the
/ button to
start the desired
track.
Fast
forward/
reverse
Press and hold
down in the
playback mode.
Release the
button to resume
playback.
DEMO/(DIMMER)
■Direct track search
A. For example, to choose 13
1
Press the “10+” button once.
2
Press the “1” button.
3
Press the “3” button.
B. For example, to choose 130
1
Press the “10+” button twice.
2
Press the “1” button.
3
Press the “3” button.
4
Press the “0” button.
■Repeat play

12/8/1 GX-M10H_OM_EN.fm
E-11
Advanced CD or MP3/WMA disc playback (continued)
The tracks on the disc can be played in random order
automatically.
To random play all tracks:
Press and hold PLAY MODE button on the remote control
until “RANDOM” appears. Press the CD / button.
To cancel random play:
Press the PLAY MODE button again. “RDM” indicator will
disappear.
Notes:
●
If you press the button during random play, you
can move to the track selected next by the random
operation. On the other hand, the button does not
allow you to move to the previous track. The beginning of
the track being played will be located.
●
In random play, the unit will select and play tracks
automatically. (You cannot select the order of the tracks.)
You can choose up to 32 selections for playback in the order
you like.
To cancel the programmed play mode:
During programmed stop mode, press the DEMO/
(DIMMER)/ button. The display will show “MEM CLR”
and all the programmed contents will be cleared.
Adding tracks to the programme:
If a programme has been previously stored, the “MEM”
indicator will be displayed. Press the MEMORY button.
Then follow steps 2 - 3 to add tracks.
Notes:
●When a CD compartment door is opened, the
programme is automatically cancelled.
●If you press the ON/STAND-BY button to enter the
stand-by mode or change the function from CD to
another, the programmed selections will be cleared.
●During the programme operation, random play is not
possible.
■Random play
■Programmed play (CD)
1
Whilst in the stop mode, press the MEMORY button on the
remote control to enter the programming save mode.
2Press the numeric button or
or
buttons on
the remote control to select the desired track.
3
Press the MEMORY button to save the track number.
4
Repeat steps 2 - 3 for other tracks. Up to 32 tracks can be
programmed. If you want to check the programmed tracks,
press the MEMORY button repeatedly. If you make a
mistake, the programmed tracks can be cleared by
pressing the CLEAR button for more than 2 seconds.
5Press the CD / button to start playback.
■Programmed play (MP3/WMA)
1Whilst in the stop mode, press the MEMORY button to
enter the programming save mode.
2Press the TUNING ( or ) button on the remote
control to select the desired folder.
Then press the
or
button on the remote
control to select the desired tracks.
3Press the MEMORY button to save the folder and track
number.
4Repeat steps 2 – 3 for other folder/tracks. Up to 32
tracks can be programmed.
5Press the CD / button to start playback.

12/8/1 GX-M10H_OM_EN.fm
10
9
8
7
6
5
4
3
2
1
E-12
MP3/WMA folder mode (only for MP3/WMA files)
To play back MP3/WMA (Windows Media Audio) file
There are many music sites on the internet that you can
download MP3/WMA (Windows Media Audio) music files.
Follow the instructions from the website on how to
download the music files. You can then play back these
downloaded music files by burning them to a CD-R/RW
disc.
●Your downloaded song/files are for personal use only.
Any other usage of the song without owner’s
permission, is against the law.
If MP3/WMA files are recorded in several folders, a folder
number will be set to each folder automatically.
These folders can be selected by the FOLDER button on
the remote control. If there is no supported file formats
inside the selected folder, the folder is skipped and the next
folder will be selected.
Example: How to set folder number if MP3/WMA format
files are recorded as below figure.
●The folder and file order information which is recorded
on the disc depends on the writing software. There
maybe possibilities that this unit will playback the files
not according to our expected playback order.
●For CD MP3/WMA, 999 numbers of folders and files
inclusive of the folders which have non playable files
can be read.
Folder mode on/off can be operated by the FOLDER
button on the remote control. Files that are played when
folder mode is set to the on position, may differ from those
played back when folder mode is turned off.
To play back CD-R/RW.
Note:
If “NOTSUPRT” is displayed, it means “Copyright
protected WMA file” or “Not supported playback file” is
selected.
■About folder playback order
1ROOT folder is set as folder 1.
2As for folders inside ROOT folder (Folder A and Folder
B), the folder which is recorded earlier on the disc will be
set as folder 2 and folder 6.
3As for folder inside Folder A (Folder C and Folder D), the
folder which is recorded earlier on the disc will be set as
folder 3 and folder 4.
4Folder E that is inside Folder D will be set as folder 5.
ROOT
(FOLDER 1)
FOLDER A
(FOLDER 2)
FOLDER B
(FOLDER 6)
FILE 7
FILE 8
FILE 1
FILE 2
FILE 3
FILE 4
FILE 5
FILE 6
FOLDER E
(FOLDER 5)
FOLDER C
(FOLDER 3)
FOLDER D
(FOLDER 4)
FILE 9
FILE 10
■Procedure to playback MP3/WMA disc with
folder mode on
1Press the CD / button, and load an MP3/WMA disc.
Press the FOLDER button and disc info will be
displayed.
2Press the TUNING ( or ) button to select desired
playback folder. (Folder mode on)
3Select desired file to be played back by pressing the
or
button.
4Press the CD / button. Playback will start and file
name will be displayed.
●Title, Artist and Album name are displayed if they are
recorded on the disc.
●In case of playback with the folder mode on, press
the TUNING ( or ) button, and the folder can be
selected even though it is in playback/pause mode.
It will continue playback/pause mode in the 1st track
of the selected folder.
●Display content can be changed by pressing the
DISPLAY button.
File name display Folder display
Title display
Album display
Counter display
Artist display

12/8/1 GX-M10H_OM_EN.fm
E-13
Listening to USB mass storage device/MP3 player
Caution:
At USB mode, once the iPod or iPhone is docked onto the
unit, the iPod or iPhone will automatically start charging.
‘iPod CHARGING’ will be displayed. In order to listen to
any USB mass storage device / MP3 player, the iPod or
iPhone must be removed from the docking station.
Note:
This product is not compatible with MTP and AAC file
systems from USB mass storage device or MP3 player.
Note:
To pause playback:
Press the USB / button.
Notes:
●SHARP will not be held liable for the loss of data whilst
the USB memory device is connected to the audio
system.
●Files compressed in MP3 and/or WMA format can be
played back when connected to the USB terminal.
●This USB memory’s format supports FAT 16 or FAT 32.
●SHARP cannot guarantee that all USB memory
devices will work on this audio system.
●USB cable is not recommended for use in this audio
system to connect to USB memory device. Use of the
USB cable will affect the performance of this audio
system. iPod, iPhone and iPad is not prone to this
condition.
●This USB memory cannot be operated via USB hub.
●The USB terminal in this unit is not intended for a PC
connection but is used for music streaming with a USB
memory device.
●External HDD-storage cannot be played back via USB
terminal.
●If the data inside the USB memory is large, it may take
longer time for the data to be read.
●This product can play WMA and MP3 files. It will
automatically detect the file type being played. If
unplayable file is played on this product, “NOTSUPRT”
is indicated and the file will be automatically skipped.
This will take a few seconds. If abnormal indications
appear on the display due to the unspecified file, turn
off the unit and then turn it on again.
●This product relates to USB mass storage devices and
MP3 players. It may however face some irregularities
due to various unforeseen reasons from some devices.
Should this happen, turn off the unit and then turn it on
again.
●During CD function, MP3 player will not be charging.
■To play back USB/MP3 player with folder
mode off
1Press the USB / button on the remote control or the
main unit to select USB function. Connect the USB
memory device that has MP3/WMA format files on the
unit. When the USB memory is connected to the main
unit, the device information will be displayed.
2Select desired file to be played back by pressing the
or
button.
3Press the USB / button. Playback will start and the
file name will be displayed.
●Title, Artist and Album name are displayed if they are
recorded in the USB memory device.
●Display content can be changed by pressing the
DISPLAY button.
■To play back USB/MP3 player with folder
mode on
1Press the USB / button on the remote control or the
main unit to select USB function. Connect the USB
memory device that has MP3/WMA format files on the
unit. When the USB memory is connected to the main
unit, the device information will be displayed.
PORTABLEMUSIC BOOMBOX GX-M10
REMOTE
SENSOR
TIMER
2Press the FOLDER button, and press the TUNING
( or ) button to select desired playback folder. To
start playback with folder mode on, go to step 4. To
change the playback folder, press the TUNING
( or ) button to select another folder.
3Select desired file to be played back by pressing the
or
button.
4Press the USB /
button. Playback will start and the
file name will be displayed.
●Title, Artist and Album name are displayed if they are
recorded in the USB memory device.
●Display content can be changed by pressing the
DISPLAY button.
■To remove USB memory device
1
Press the DEMO/(DIMMER)/ ( ) button to stop playback.
2
Disconnect USB memory device from the USB terminal.

12/8/1 GX-M10H_OM_EN.fm
10
9
8
7
6
5
4
3
2
1
E-14
Advanced USB playback
The following functions are the same as CD
operations:
Page
Direct track search. . . . . . . . . . . . . . . . . . . . . . . . . . . .10
Repeat play . . . . . . . . . . . . . . . . . . . . . . . . . . . . . . . . . .10
Random play. . . . . . . . . . . . . . . . . . . . . . . . . . . . . . . . .11
Programmed play (MP3/WMA) . . . . . . . . . . . . . . . . . .11
Note:
If USB memory device is not connected, “NO MEDIA” will
be shown on the display.
Notes:
●This unit only supports “MPEG-1 Audio Layer-3”
format. (Sampling Frequency is 32, 44.1, 48kHz)
●Playback order for MP3 files may differ depending on
the writing software used during file download.
●Bitrate which is supported by MP3 is 32~320 kbps,
WMA is 64~160 kbps.
●For MP3/WMA files, please put “.MP3” “.WMA”
extension. Files cannot be played back if there is no
MP3/WMA extension.
●Playlists are not supported on this unit.
●This unit can display Folder Name or File Name up to
32 characters.
●Maximum total number of MP3/WMA files is 65025.
●Total number of folders read is 999 including folder with
non-playable file. However, the display shows only
folder with MP3 files.
●The display playback time may not be displayed
correctly when playing back a variable bitrate file.
●The ID3TAG information supported are TITLE, ARTIST
and ALBUM only. Title name, artist name and album
name can be displayed by pressing the DISPLAY
button during file playback or pause mode.
●WMA meta tag also supports title, artist and album
name which are recorded in WMA files. Copyright
protected WMA files cannot be played back.
Listening to the radio
Notes:
●When radio interference occurs, auto scan tuning may
stop automatically at that point.
●Auto scan tuning will skip weak signal stations.
●To stop the auto tuning, press the TUNING ( or )
button again.
●When an RDS (Radio Data System) station is tuned in,
the frequency will be displayed first, and then the RDS
indicator will light up. Finally, the station name will
appear.
●Full auto tuning can be achieved for RDS stations
“ASPM”, see page 16.
To receive an FM stereo transmission:
●Press the TUNER button to select stereo mode and
“ST” indicator will be displayed. “ ” will appear when
an FM broadcast is in stereo.
●If the FM reception is weak, press the TUNER button to
extinguish the “ST” indicator. The reception changes to
monaural, and the sound becomes clearer.
■Tuning
1Press the ON/STAND-BY button to turn the power on.
2Press the TUNER button on the remote control or
TUNER/AUDIO IN button on the main unit repeatedly to
select FM Stereo or FM Mono.
3Press the TUNING ( or ) button on the remote
control to tune in to the desired station.
●Manual tuning:
Press the TUNING ( or ) button repeatedly to
tune in to the desired station.
●Auto tuning:
When the TUNING ( or ) button is pressed for
more than 0.5 seconds, scanning will start
automatically and the tuner will stop at the first
receivable broadcast station.
PORTABLEMUSIC BOOMBOX GX-M10
REMOTE
SENSOR
TIMER

12/8/1 GX-M10H_OM_EN.fm
E-15
Listening to the radio (continued)
You can store 40 FM stations in memory and recall them
at the push of a button. (Preset tuning)
Note:
The backup function protects the memorised stations for a
few days should there be a power failure or the AC power
lead become disconnected.
1Press the PRESET ( or ) button for less than 0.5
seconds to select the desired station.
The stations saved in the memory can be scanned
automatically. (Preset memory scan)
Using the Radio Data System (RDS)
RDS is a broadcasting service which a growing
number of FM stations provide. These FM stations
send additional signals along with their regular
programme signals. They send their station names,
and information about the type of programme such as
sport, music, etc.
When tuned to an RDS station, “RDS” and the station
name will be displayed.
“TP” (Traffic Programme) will appear on the display when
the received broadcast carries traffic information, and “TA”
(Traffic Announcement) will appear whilst a traffic
information is on air.
“PTYI” (Dynamic PTY Indicator) will appear whilst the
Dynamic PTY station is received.
You can control the RDS by using the buttons on the
remote control only.
Each time the RDS DISP button is pressed, the display
will switch as follows:
■Memorising a station
1Perform steps 1 - 3 in “Tuning”.
2Press the MEMORY button.
3Within 30 seconds, press the PRESET ( or ) button
to select the preset channel number. Store the stations
in memory, in order, starting with preset channel 1.
4Within 30 seconds, press the MEMORY button to store
that station in memory. If the “MEM” indicator and preset
number disappear before the station is memorised,
repeat the operation from step 2.
5Repeat steps 1 - 4 to set other stations, or to change a
preset station. When a new station is stored in the
memory, the station previously memorised for that
preset channel number will be erased.
■To recall a memorised station
■To scan the preset stations
1Press the PRESET ( or ) button for more than 0.5
seconds. The preset number will flash and the
programmed stations will be tuned in sequentially, for 5
seconds each.
2Press the PRESET ( or ) button again when the
desired station is located.
■To erase entire preset memory
1Press the ON/STAND-BY button to enter the stand-by
mode.
2Whilst pressing down the PRESET button, press
the ON/STAND-BY button until “TUNCLEAR” appears.
■Information provided by RDS
When tuning in to a station other than an RDS station or
to an RDS station which sends weak signal, the display
will change in the following order:
Station name (PS) Programme type (PTY)
Frequency Radio text (RT)
NO PSNO PTY
98.80 MHz NO RT

12/8/1 GX-M10H_OM_EN.fm
10
9
8
7
6
5
4
3
2
1
E-16
Using the Radio Data System (RDS) (continued)
Whilst in the ASPM operation mode, the tuner will
automatically search for new RDS stations. Up to 40
stations can be stored.
If you have already stored some stations in memory, the
number of new stations you can store will be less.
To stop the ASPM operation before it is complete:
Press the RDS ASPM button whilst it is scanning for stations.
The stations which are already stored in memory will be kept
there.
Notes:
●Any station which has the same frequency as the one
stored in memory will not be stored.
●If 40 stations have already been stored in memory, the
scan will be aborted. If you want to redo the ASPM
operation, erase the preset memory.
●If no station have been stored in memory, “END” will
appear for about 4 seconds.
●If the RDS signals are very weak, station names may
not be stored in memory.
●The same station name can be stored in different
channels.
●In a certain area or during certain time periods, the
station names may temporarily be different.
If any of the following events occur, it does not mean
that the unit is faulty:
●“PS”, “NO PS” and a station name appear alternately,
and the unit does not operate properly.
●If a particular station is not broadcasting properly or a
station is conducting tests, the RDS reception function
may not work properly.
●When you receive an RDS station whose signal is too
weak, information like the station name may not be
displayed.
●“NO PS”, “NO PTY” or “NO RT” will flash for about 5
seconds, and then the frequency will be displayed.
Notes for radio text:
●The first 8 characters of the radio text will appear for
4 seconds and then they will scroll across the display.
●If you tune in to an RDS station which is not
broadcasting any radio text, “NO RT” will be displayed
when you switch to the radio text position.
●Whilst radio text data is received or when the text
contents change, “RT” will be displayed.
To specify programmed types and select stations
(PTY search):
You can search a station by specifying the programme type
(news, sports, traffic programme, etc. ... see page 17) from
the stations in memory.
Notes:
●If the display has stopped flashing, start again from
step 2. If the unit finds a desired programme type, the
corresponding channel number will lit for about
8 seconds, and then the station name will remain it.
●If you want to listen to the same programme type of
another station, press the RDS PTY button whilst the
channel number or station name is flashing. The unit
will look for the next station.
●If no station can be found, “NOTFOUND” will appear for
4 seconds.
If you select the traffic programme:
If you select the traffic programme (TP) in step 3, “TP” will
appear.
(This does not mean that you can listen to the traffic
information at that time.)
When the traffic information is broadcast, “TA” will appear.
■Using the Auto Station Programme
Memory (ASPM)
1Press the TUNER button on the remote control or
TUNER/AUDIO IN button repeatedly on the main unit
to select TUNER function.
2Press and hold down the RDS ASPM button on the
remote control.
1 After “ASPM” has flashed for about 4 seconds,
scanning will start (87.50 - 108.00 MHz).
2 When an RDS station is found, “RDS” will appear
for a short time and the station will be stored in
memory.
3 After scanning, the number of stations stored in
memory will be displayed for 4 seconds, and then
“END” will appear for 4 seconds.
■Notes for RDS operation
■To recall stations in memory
1Press the TUNER button on the remote control or
TUNER/AUDIO IN button repeatedly on the main unit
to select TUNER function.
2Press the RDS PTY button on the remote control.
“SELECT” and “PTY TI” will appear alternately for
about 6 seconds.
3Within 6 seconds, press the PRESET ( or ) button
to select the programme type.
Each time the button is pressed, the programme type
will appear. If the button is held down for more than
0.5 seconds, the programme type will appear
continuously.
4Whilst the selected programme type is flashing (within
6 seconds), press the RDS PTY button again.
After the selected programme type has been lit for 2
seconds, “SEARCH” will appear, and the search
operation will start.

12/8/1 GX-M10H_OM_EN.fm
E-17
Using the Radio Data System (RDS) (continued)
Descriptions of the PTY (Programme Type) codes, TP
(Traffic Programme) and TA (Traffic Announcement)
You can search for and receive the following PTY, TP and
TA signals.
NEWS Short accounts of facts, events and
publicly expressed views, reportage and
actuality.
AFFAIRS Topical programme expanding or
enlarging upon the news, generally in
different presentation style or concept,
including debate, or analysis.
INFO Programmes whose purpose is to impart
advice in the widest sense.
SPORT Programme concerned with any aspect
of sport.
EDUCATE Programme intended primarily to
educate, of which the formal element is
fundamental.
DRAMA All radio plays and serials.
CULTURE Programmes concerned with any aspect
of national or regional culture, including
language, theatre, etc.
SCIENCE Programmes about the natural sciences
and technology.
VARIED Used for mainly speech-based
programmes usually of light-
entertainment nature, not covered by
other categories. Examples include:
quizzes, panel games, personality
interviews.
POP M Commercial music, which would
generally be considered to be of current
popular appeal, often featuring in current
or recent record sales charts.
ROCK M Contemporary modern music, usually
written and performed by young
musicians.
EASY M Current contemporary music considered
to be “easy-listening”, as opposed to
Pop, Rock or Classical, or one of the
specialised music styles, Jazz, Folk or
Country. Music in this category is often
but not always, vocal, and usually of
short duration.
LIGHT M Classical music for general, rather than
specialist appreciation. Examples of
music in this category are instrumental
music, and vocal or choral works.
CLASSICS Performances of major orchestral works,
symphonies, chamber music, etc., and
including Grand Opera.
OTHER M Musical styles not fitting into any of the
other categories. Particularly used for
specialist music of which Rhythm &
Blues and Reggae are examples.
WEATHER Weather reports and forecasts and
meteorological information.
FINANCE Stock Market reports, commerce,
trading, etc.
CHILDREN For programmes targeted at a young
audience, primarily for entertainment
and interest, rather than where the
objective is to educate.
SOCIAL Programmes about people and things
that influence them individually or in
groups. Includes: sociology, history,
geography, psychology and society.
RELIGION Any aspect of beliefs and faiths, involving
a God or Gods, the nature of existence
and ethics.
PHONE IN Involving members of the public
expressing their views either by phone or
at a public forum.
TRAVEL Features and programmes concerned
with travel to near and far destinations,
package tours and travel ideas and
opportunities. Not for use for
announcements about problems, delays,
or roadworks affecting immediate travel
where TP/TA should be used.
LEISURE Programmes concerned with
recreational activities in which the
listener might participate. Examples
include, Gardening, Fishing, Antique
collecting, Cooking, Food & Wine, etc.
JAZZ Polyphonic, syncopated music
characterised by improvisation.
COUNTRY Songs which originate from, or continue
the musical tradition of the American
Southern States. Characterised by a
straightforward melody and narrative
story line.
NATION M Current Popular Music of the Nation or
Region in that country's language, as
opposed to International “Pop” which is
usually US or UK inspired and in English.
OLDIES Music from the so-called “golden age” of
popular music.
FOLK M Music which has its roots in the musical
culture of a particular nation, usually
played on acoustic instruments. The
narrative or story may be based on
historical events or people.
DOCUMENT Programme concerned with factual
matters, presented in an investigative
style.
TEST Broadcast when testing emergency
broadcast equipment or receivers.
ALARM! Emergency announcement made under
exceptional circumstances to give
warning of events causing danger of a
general nature.
NONE No programme type (receive only).
TP Broadcasts which carry traffic
announcements.
TA Traffic announcements are being
broadcast.

12/8/1 GX-M10H_OM_EN.fm
10
9
8
7
6
5
4
3
2
1
E-18
Connecting other equipment
The connection lead is not included. Purchase a
commercially available lead as shown below.
Caution:
Be careful not to connect a bass guitar as it might damage
this unit.
Note:
To prevent noise interference, place the unit away from the
television.
●Do not turn the volume on to full at switch on and listen
to music at moderate levels. Excessive sound pressure
from earphones and headphones can cause hearing
loss.
●Before plugging in or unplugging the headphone,
reduce the volume.
●Be sure your headphone has a 3.5 mm (1/8") diameter
plug and impedance between 16 and 50 ohms. The
recommended impedance is 32 ohms.
●Plugging in the headphone disconnects the speakers
automatically. Adjust the volume using the VOLUME
control.
■Connecting a guitar / microphone
1Set the guitar/microphone volume (GAIN) knob to the
minimum level.
2Connect a guitar/microphone to the correct input socket.
Make sure that the cable has a 6.3 mm (1/4") diameter
plug.
3Arrange the guitar/microphone cables into the grooves
of the cable holder on the left or the right side of the unit.
Then, thread the cable through the bottom of the unit.
Do not let the cables to be on top of the unit when
using guitar/microphone as it may cause the unit to
roll over causing damage and injury.
4Connect the cables to a guitar/microphone.
5Select a source.
●To mix a guitar or microphone sound with a source
sound, select the playback source (iPod/CD/USB/
Audio In/Tuner).
●To play a guitar or using the microphone only, select
’AUDIO IN’ function. Make sure there is no playback
from Audio In connection.
6Adjust the volume (GAIN) knob on the connected
equipment.
Note:
Before disconnecting the guitar/microphone, set the guitar/
microphone volume (GAIN) knob to the minimum level.
Microphone or
guitar (not supplied)
∅6.3 mm monoaural
cable (not supplied)
Cable holder
Thread the cables under the unit
■Listening to the playback sounds of
portable audio player, etc.
1Use a connection lead to connect the portable audio
player etc. to the AUDIO IN socket. When using video
equipment, connect the audio output to this unit and the
video output to a television.
2Press the ON/STAND-BY button to turn the power on.
3Press the AUDIO IN button on the remote control or
TUNER/AUDIO IN button repeatedly on the main unit to
select AUDIO IN function.
4Play the connected equipment. If volume level of the
connected device is too high, sound distortion may
occur. Should this happen, lower the volume of the
connected device. If volume level is too low, increase the
volume of the connected device.
■Headphones
Audio cable (not supplied)
Portable audio
player, etc.
Headphone
(not supplied)

12/8/1 GX-M10H_OM_EN.fm
E-19
Timer and sleep operation (Remote control only)
Timer playback:
The unit turns on and plays the desired source (CD,
TUNER, USB, iPod, AUDIO IN) at a preset time.
This unit has 2 types of timer: ONCE TIMER and DAILY
TIMER.
Once timer:
Once timer play works for one time only at a preset time.
(“ ” indicator).
Daily timer:
Daily timer play works at the same preset time every day. For
example, set the timer as a wake-up call every morning.
(“DAILY” indicator).
Using the once timer and daily timer in combination:
For example, use the once timer to listen a radio
programme, and use the daily timer to wake up.
Notes:
●When performing timer playback using another unit
connected to the USB terminal or AUDIO IN socket,
select “USB” or “AUDIO IN” in step 5. However, if the
source is set to USB, make sure there is no iPod or
iPhone docked to the unit.
●This unit will turn on or enter the power stand-by mode
automatically. However, the connected unit will not turn
on or off. To stop the timer playback, follow step
“Cancelling the timer setting” of this page.
Checking the timer setting:
Cancelling the timer setting:
1Set the daily timer (pages 19 - 20).
2Set the once timer (pages 19 - 20).
■Timer playback
Before setting timer:
●Check that the clock is set to the correct time (refer to
page 6). If it is not set, you cannot use the timer
function.
●For timer playback: Plug in USB or load discs or dock
iPod to be played.
1Press the ON/STAND-BY button to turn the power on.
2Press and hold the CLOCK/TIMER button.
3Within 10 seconds, press the
or
button to
select “ONCE” or “DAILY”, and press the ENTER
button.
4Within 10 seconds, press the
or
button to
select “TIM.SET”, and press the ENTER button.
5
To select the timer playback source (CD, TUNER, USB, iPod,
AUDIO IN), press the
or
button. Press the
ENTER button.
When you select the tuner, select a station by pressing the
or
button, and then press the ENTER button.
If a station has not been programmed, “NOPRESET” will be
displayed and timer setting will be cancelled.
Once timer
Daily timer
Start Stop
1 minute or more
Start Stop
6Press the ENTER button to adjust the hour. Press the
or
button and then press the ENTER
button.
7To adjust the minutes, press the
or
button and then press the ENTER button.
8Set the time to finish as in steps 7 and 8 above.
9Adjust the volume using the VOLUME control, and then
press the ENTER button. Do not turn the volume up too
high.
10 Press the ON/STAND-BY button to enter the power
stand-by mode. The “TIMER” indicator lights up and
the unit is ready for timer playback.
11 When the preset time is reached, playback will start.
The volume will increase gradually until it reaches the
preset volume. The timer indicator will blink during
timer playback.
12 When the timer end time is reached, the system will
enter the power stand-by mode automatically.
Once timer:
The timer will be cancelled.
Daily timer:
The timer operates at the same time every selected day.
It will continue until the daily timer setting is cancelled.
Cancel the daily timer when it is not in use.
1Turn the power on and press and hold down the
CLOCK/TIMER button.
2Within 10 seconds, press the
or
button to
select “ONCE” or “DAILY”, and press the ENTER button.
3Within 10 seconds, press the
or
button to
select “TIM.CALL”, and press the ENTER button.
1Turn the power on and press and hold down the
CLOCK/TIMER button.
2Within 10 seconds, press the
or
button to
select “ONCE” or “DAILY”, and press the ENTER button.
3Within 10 seconds, press the
or
button to
select “TIM.OFF”, and press the ENTER button. Timer
will be cancelled (the setting will not be cancelled).
REMOTE
SENSOR
TIMER

12/8/1 GX-M10H_OM_EN.fm
10
9
8
7
6
5
4
3
2
1
E-20
Timer and sleep operation (Remote
control only) (continued)
Reusing the memorised timer setting:
The timer setting will be memorised once it is entered. To
reuse the same setting, perform the following operations.
The radio, compact disc, iPod, USB, and Audio In function
can all be turned off automatically.
To confirm the remaining sleep time:
To cancel the sleep operation:
Press the ON/STAND-BY button whilst “SLEEP” is
indicated. To cancel the sleep operation without setting
the unit to the stand-by mode, proceed as follows.
Sleep and timer playback:
For example, you can fall asleep listening to the radio and
wake up to CD in the next morning.
Troubleshooting chart
Many potential problems can be resolved by the owner without
calling a service technician.
If something is wrong with this product, check the following before
calling your authorised SHARP dealer or service centre.
1Turn the power on and press and hold down the
CLOCK/TIMER button.
2Within 10 seconds, press the
or
button to
select “ONCE” or “DAILY”, and press the ENTER button.
3Within 10 seconds, press the
or
button to
select “TIM.ON” , and press the ENTER button.
4Press the ON/STAND-BY button to enter the power
stand-by mode.
■Sleep operation
1Play back the desired sound source.
2Press the SLEEP button.
3Within 5 seconds, press the Numeric button to set the
time. (1 minute ~ 99 minutes)
4“SLEEP” will appear.
5The unit will enter the power stand-by mode
automatically after the preset time has elapsed. The
volume will be turned down 1 minute before the sleep
operation finishes.
1Whilst “SLEEP” is indicated, press the SLEEP button.
2Within 5 seconds, press the “0” button twice until
“SLEEP 00” appears.
■To use timer and sleep operation together
1Set the sleep time (see above, steps 1 - 5).
2Whilst the sleep timer is set, set the timer playback
(steps 2 - 9, page 19).
Desired time
1-99 minutes
Sleep operation will
automatically stop
Sleep timer
setting
Timer playback
setting
End
time
Timer playback
start time
■General
Symptom Possible cause
●The clock is not set
to the correct time.
●A power failure occured.
Reset the clock. (Refer
page 6)
●When a button is
pressed, the unit
does not respond.
●Set the unit to the power
stand-by mode and then
turn it back on.
●If the unit still malfunctions,
reset it. (Refer page 21)
●No sound is heard. ●The volume level is set to
“MIN”.
●The headphones are
connected.
●Sound too low or
distorted.
●Power suddenly
shuts down.
●The batteries are depleted.
Change the batteries.
■CD player
Symptom Possible cause
●Playback does not
start.
●Playback stops in
the middle or is not
performed properly.
●The disc is loaded upside
down.
●The disc does not satisfy
the standards.
●The disc is distorted or
scratched.
●Playback sounds are
skipped, or stopped
in the middle of a
track.
●The unit is located near
excessive vibrations.
●A very dirty disc has been
used.
●Condensation has formed
inside the unit.
●Volume level is too high.
Adjust to lower volume.
■Remote control
Symptom Possible cause
●The remote control
does not operate.
●The AC power lead of the
unit is not plugged in.
●Wrong battery polarity.
●The batteries are
exhausted.
●The distance or angle is
incorrect.
●The remote control sensor
receives strong light or
sunlight.
■Tuner
Symptom Possible cause
●The radio makes
unusual noises
continuously.
●The unit is placed near the
TV or computer.
●The FM aerial is not
properly extended or
positioned.
Other manuals for GX-M10H(OR)
2
Table of contents
Other Sharp Stereo System manuals

Sharp
Sharp CD-ES900 User manual

Sharp
Sharp CD-ES111H User manual

Sharp
Sharp CD-MPS1000 User manual

Sharp
Sharp CD-ES770 User manual

Sharp
Sharp CMS-R160CDH User manual

Sharp
Sharp GX-M10 (OR) User manual

Sharp
Sharp CD-BA1500H User manual

Sharp
Sharp CD-ES777 User manual

Sharp
Sharp CD-SW340H User manual

Sharp
Sharp QT-95H User manual

Sharp
Sharp CD-MPX870H User manual

Sharp
Sharp WF-2000W User manual

Sharp
Sharp GBOXS0072AWM1 User manual

Sharp
Sharp CD-ES900 User manual

Sharp
Sharp CD-G15000 User manual

Sharp
Sharp CD-RW5000 User manual

Sharp
Sharp CP-BP99V User manual

Sharp
Sharp SD-CX1H User manual

Sharp
Sharp CD-C491H User manual

Sharp
Sharp XL-UR5H User manual