ShowPro Hercules User manual
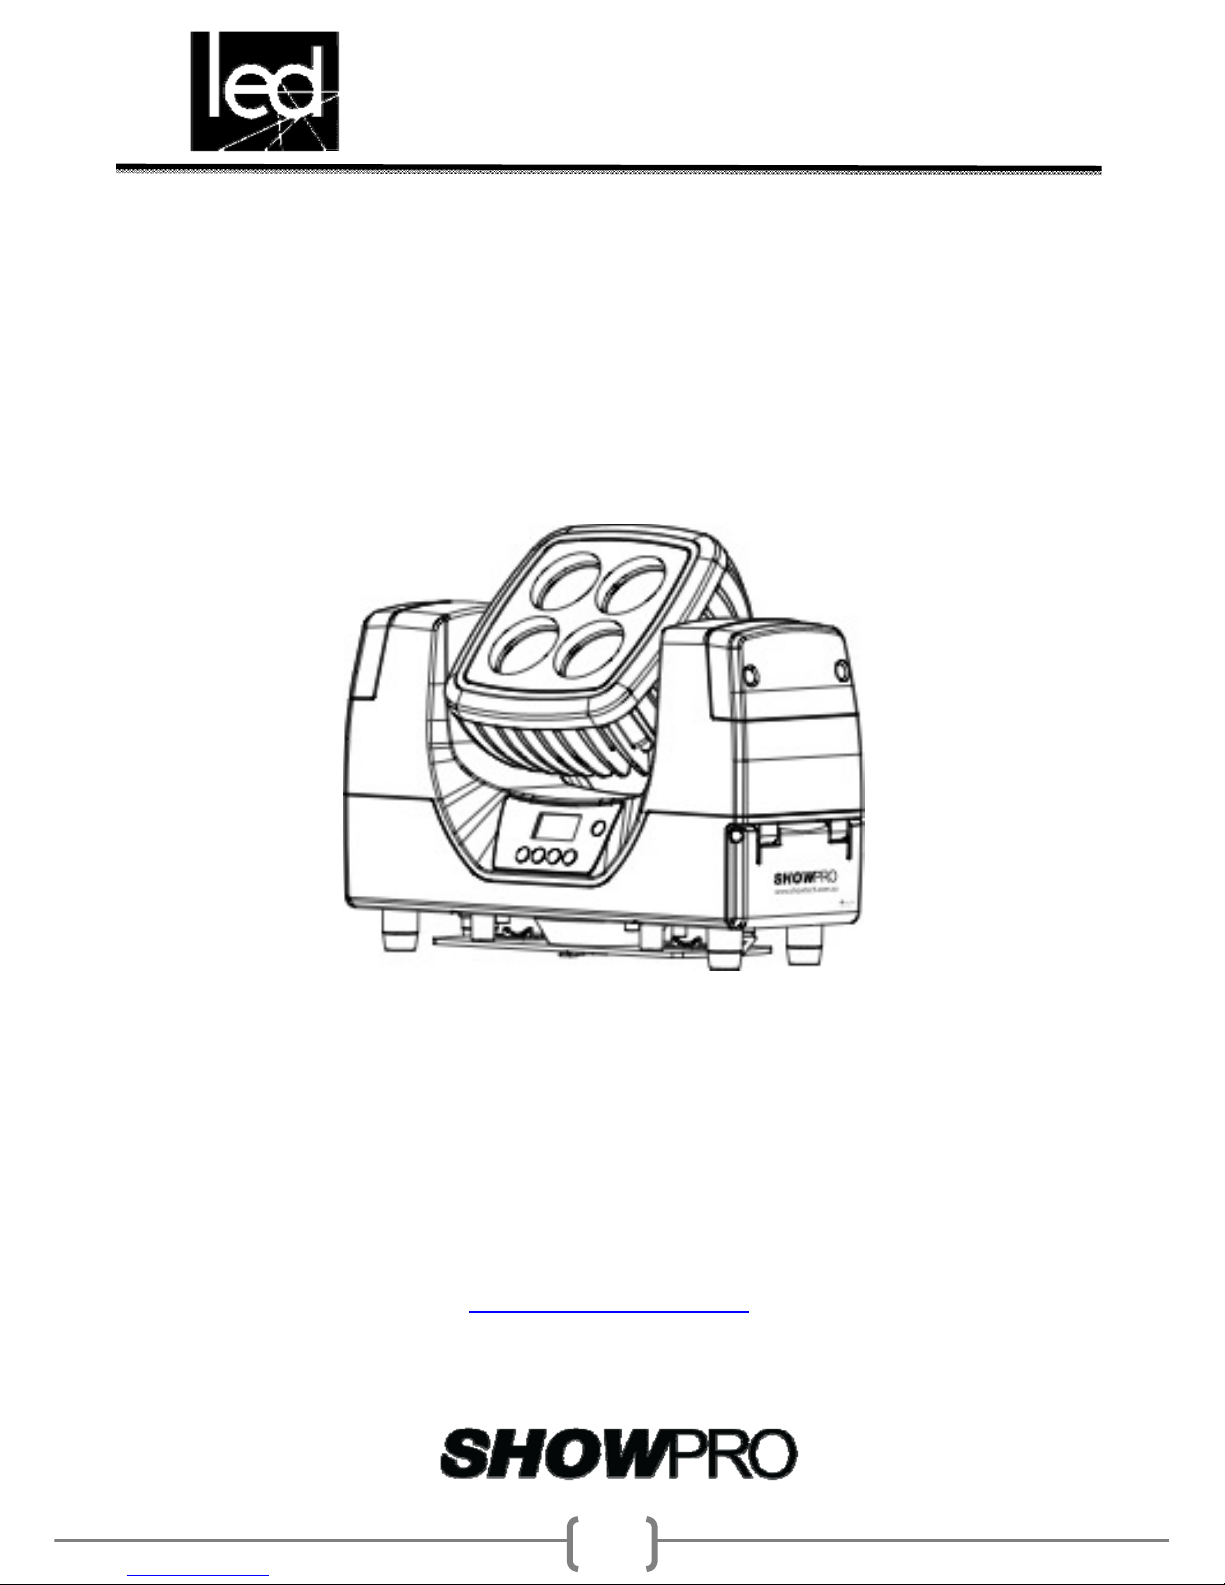
Hercules
UserManual
www.showtech.com.au
1

Hercules
2
TableofContents
1. Safetyinstructions…………………………………………………………3
1.1 PowerConnection………………………………….……………….4
1.2 OverheadRigging…………………………………………………...5
1.3 DMXConnection……………………………………………………..7
1.4CleaningandMaintenance………………………………………9
2. MenuNavigation.…………………………………………………………10
3. DMXAllocation….………………………………………………………….12
4. TechnicalSpecifications……………………….……………………….15

Hercules
3
1. SafetyInstructions
FORSAFEANDEFFICIENTOPERATION
Becarefulwithheatandextremetemperature.
Avoidexposingittodirecttoraysofsun.
Operateonlybetween41°F/5°Cand95°F/35°C.
Keepawayfromhumidity,wateranddust.
Donotplacetheuseinalocationwithhighhumidityorlotsofdust.
ItisidealtousetheHerculesawayfromsuchequipment:
Transformermotor,tuner,TVsetandamplifier.
Avoidplacingonun‐stablelocation
Selectalevelandstablelocationtoavoidvibration.
Donotusechemicalsorvolatileliquidsforcleaning
Useadryclothtowipeoffdust,orawetsoftclothforstubborndirt.
NOUSERSERVICABLEPARTSINSIDE.
Ifunitisoutofservice,pleasecontactyourpointofpurchase.
Ifanytroublesarise,removethepowerplugandcontactyourShowPro
representativeforrepair.Donotopenthemachinebyyourself,itmightresulta
dangerofelectricshock.
Takecarewiththepowercable.Neverpullthepowercabletoremovetheplugfrom
thereceptacle,besuretoholdtheplug.
Whennotusingtheunitforanextendedperiodoftimebesuretodisconnectthe
plugformthereceptacle.

Hercules
1.1PowerConnection
ACPowerThisproducthasanauto‐rangingpowersupplythatcanworkwithan
inputvoltagerangeof100–240VAC,50/60Hz.
ACPlugConnectionWire
ACLiveBrown
4
ACNeutralBlue
ACGroundGreen/Yellow
BatteryChargeNotes
∙Rechargethebatterywithinthreedaysfromlastuse.
∙Rechargethebatterytofullcapacitybeforestoringthisproduct.
∙Forbestresults,chargethebatteryinatemperaturebetween0ºCand35ºC.
∙Whenchargingthebattery,keeptheproductatnolessthan1mfromanyopen
flameorhotplate.
∙Whenchargingthebatteryinsidetheroadcasecharger,keeptheroadcasescover
open.
∙Whenchargingensurethereissufficientairflowinfrontoftheairvent.
∙Alwayschargethebatterywiththeproductinanuprightposition.
∙Donotchargethebatteryformorethan24hours.
∙Performafulldischarge/rechargecycleeverythreemonths.
∙Indicatorsinsidetheroadcasewillshowthestatusofcharging.RED=Charging,
GREEN=Complete
Besuretoremoverubberplugfromthebottomoftheproductbeforechargingintheroadcase.
ReplacingtheFuseTheHerculeshasnoexternalfuse.However,theroadcasecharger
comeswithareplaceablefuse.
1.Disconnectthisproductfrompower.
2.Usingaflat‐headscrewdriver,unscrewthefuseholdercapfromthehousing.

Hercules
5
3.Removeblownfuseandreplacewithagoodfuseofthesametypeandrating.
4.Screwthefuseholdercapbackinplaceandreconnectpower.
1.2OverheadRigging
Thisitemmustbebuiltinawaythatitcanhold10timesmoreofitsweightfor1
hourwithoutcausinganydamage.Theinstallationmustbesecuredwithasecondary
safetyattachment.TheSafetyattachmenthastobeconstructedinawaythatno
partoftheinstallationcanfall.Whenrigging,de‐riggingorservicingthefixture
ensurethattheareabelowissecure.Beforeputtingthedeviceintooperation,the
installationmustbeapprovedbyanexpert.Theoperatorhastomakesurethat
safety‐relatingandmachine‐technicalinstallationsareapprovedbyaskilledperson
onceayear.
IMPORTANT!OVERHEADRIGGINGREQUIRESEXTENSIVEEXPERIENCE.
Including(butnotlimitedto)calculatingworkingloadlimits,installationmaterial
beingused,andperiodicsafetyinspectionofallinstallationmaterialandthe
projector.Ifyoulackthesequalifications,donotattempttheinstallationsyourself,
butinsteaduseaprofessionalstructuralrigger.Improperinstallationcanresultin
bodilyinjuryand/ordamagetoproperty.
Useonlyprofessionaltrussingsystemiftheitemistobeloweredfromtheceilingor
highjoists.Neverletthedeviceswingfreelyinaroom.
CAUTION:OverheadItemsmaycauseseriousinjurieswhennotinstalledcorrectly!!If
thereisconcernaboutthesafetyDONOTINSTALLthedevice.

Hercules
6
DANGEROFFIRE!
Wheninstallingthedevice,makesurethereisnohighly‐flammablematerial
(decorationarticles,etc.)withinadistanceofmin.0.5m.
Mounttheprojectorwiththemountingbrackettoyourtrussingsystemusingan
appropriateclamp.
Foroverheaduse,alwaysinstallaratedsafety‐wirethatcanholdatleast10times
theweightofthefixture.Youmustonlyuseratedsafety–wirewithquicklinkswith
screwcap.Pulltheratedsafety‐wirethroughtheholeinthemountingbracketand
overthetrussingsystemorasafefixationspot.Inserttheendinthequicklinkand
tightenthesafetyscrew.Themaximumdropdistancemustneverexceed20cm
Asafety‐wirewhichhasalreadyheldthestrainofafallorwhichisdefectivemust
notbeusedagain.
IMPORTANT!
Beforetakingintooperationforthefirsttime,theinstallationhastobeapprovedby
anexpert.

Hercules
7
1.3DMXConnection
DMXLinkingtheHerculeswillworkwithaDMXcontrollerusinga5‐pinDMXserial
connection.
DMXConnectiontheHerculesusesa5‐pinDMXdataconnectionforitsDMXpersonalities:
4Ch,6Ch,10Ch,HSIandHSV.SeetheUserManualforinformationaboutconnectingand
configuringtheproductforDMXoperation.
Master/SlaveConnectiontheHerculesusestheDMXdataconnectionforitsMaster/Slave
mode.
Master/Slavemodenotavailableinwirelessoperation.
WirelessOperationTheHerculescanoperateinW‐DMX™modeupto300m(900ft)from
theW‐DMX™transmitter.TheW‐DMX™receiverintheHerculesmustbepairedwiththeW‐
DMX™transmitterforwirelessoperation.
InitialSetup
1.TurntheW‐DMX™transmitteron.
2.ConnecttheW‐DMX™transmittertoaDMXcontroller.
3.PlacetheHerculeswithin300mfromtheW‐DMX™transmitter.
4.DisconnectanyDMXcablefromtheHercules.
5.TurntheHerculeson.
Configuration
1.FromtheHercules’scontrolpanel,gotoDMXAddress.
2.Selectthestartaddress,aswithanyotherDMXcompatibleproduct.
3.GotoWirelessSetting>Receive.4.SelectOn.(TheSignalStrengthIndicatorwillshowa?in
frontofthebars)
5.PresstheresetbuttonontheW‐DMX™transmitter.(TheSignalStrengthIndicatoronthe
Herculeswillshowaϟinfrontofthebarsfor3secondswhileaconnectionisestablished.)

Hercules
8
ProductPairingIftheHerculeshasalreadybeenpairedwiththeW‐DMX™transmitter,the
SignalStrengthIndicatorinthemiddleoftheLCDscreenwillshowthestrengthofthesignal.
Inthiscase,theHerculesisreadytoworkinWirelessmode.
PairingtheHerculesandanewW‐DMX™transmitter
1.FromtheHercules’scontrolpanel,gotoWirelessSetting.
2.SelectReset.TheSignalStrengthIndicatorontheHerculeswillshowa?infrontofthebars.
3.FromtheW‐DMX™transmitter,press<RESET>(theSignalIndicatoronthetransmitterwill
flash).
4.OncethetransmitterhasfoundtheHercules,theSignalindicatorontheW‐DMX™
transmitterwillilluminatesolid.
5.TheSignalStrengthIndicatorinthemiddleoftheLCDscreenontheHerculeswillshowthe
strengthofthesignal.
StorageNotes
∙Alwaysstoretheproductinanuprightposition(≤10ºtilt).
∙Rechargethebatterytofullcapacitybeforestoringtheproduct.
∙Storechargedproduct(s)inadryenvironment,awayfromdirectsunlight.
W‐DMX™operationcanbeinterruptedorinhibitedbyliquidmassesbetweenthe
transmitterandreceiversuchaswater,snow,orpeople.Forbestresults,keepthearea
betweenthetransmitterandreceiverclearofanyliquidmass.

Hercules
9
1.4CleaningandMaintenance
Pleasemakesurethatsafety‐relatingandmachine‐technicalinstallationsareinspectedbya
skilledpersononceayear.
1. Makesurebeforeinstallingthatallscrewsaretightlyconnectedandnotcorroded.
2. Theremustbenodeformationsonthehousings,fixationsandinstallationsspots
3. Anydefectsontheelectronics,powercablesorhousingmustberepairedforsafe
use.
Iftheexterioroftheunitisgoingtobecleaned,pleaseusemoist,lintfreecloths.Neveruse
alcoholorsolvents.
TheCoolingfanmustbecleanedmonthlyandchecktoensureitisfreeofobstructions.
Tocleantheinteriorofthedevicepleaseuseavacuumcleaneroranairjet,howeverwe
recommendcleaningthelensesweeklytoensurethebestoutputfromyourunit.

Hercules
10
2.0MenuNavigation
Menu
AutoShowAuto SpeedDefault:Auto0
<Auto0>0~100
<Auto1>0~100
<Auto2>0~100
<Auto3>0~100
<Auto4>0~100
Static<FixedColor>FixedColor Default:RGBW
<R>
<G>
<B>
<W>
<GB>
<RB>
<RG>
<RGB>
<RW>
<GW>
<BW>
<RGW>
<RBW>
<GBW>
<RGBW>
<ManualColor> ValueDefault:RGBW=255
<R=0‐255>
<G=0‐255>
<B=0‐255>
<W=0‐255>

Hercules
11
DimmerMode<Off> Default:Off
<Dimmer1>
<Dimmer2>
<Dimmer3>
BackLight<On> Default:On
<10S>
<20S>
<30S>
InformationAutoTestTest
FixtureHours<9999>
Version<V1.0>
DMXAddress001‐512 Default:001
DMXChannel<4Ch> Address:1‐509
<6Ch>Address:1‐507
<10Ch>Address:1‐503
<HSV>Address:1‐510
<HSI>Address:1‐510
Master/Slave<Master> Default:Slave
<Slave>
WirelessSettingReceiveOnDefault:Off
Off
ResetReset
WhiteBalanceBalanceValueDefault:RGB=255
<R=255><R=255>R:125‐255
<G=255><G=255>G:125‐255
<B=255><B=255>B:125‐255

Hercules
12
3.0DMXAllocation
4‐CHFunctionValuePercent/Setting
1Red000‐255 0~100%
2Green000‐255 0~100%
3Blue000‐255 0~100%
4White000‐255 0~100%
6‐CH
1Dimmer000‐255 0~100%
2Red000‐255 0~100%
3Green000‐255 0~100%
4Blue000‐255 0~100%
5White000‐255 0~100%
6Strobe000‐010
011‐255
NOFunction
SlowtoFast
10CH
1Dimmer000‐255 0~100%
2Red000‐255 0~100%
3Green000‐255 0~100%
4Blue000‐255 0~100%
5White000‐255 0~100%
6Strobe000‐010
011‐255
NOFunction
SlowtoFast
7ColorMacro+ 000‐010 NoFunction
White 011‐030 R100%G0~100%B0
Balance031‐050 R100%~0G100%B0
051‐070 R0G100%B0~100%
071‐090 R0G100%~0B100%

Hercules
13
091‐110 R0~100%G0B100%
111‐130 R100%G0B100%~0
131‐150 R100%G0~100%B0~100%
151‐170 R100%~0G100%~0B100%
171‐200 R100%G100%B100%W100%
201‐205 Colortemperature1
206‐210 Colortemperature2
211‐215 Colortemperature3
216‐220 Colortemperature4
221‐225 Colortemperature5
226‐230 Colortemperature6
231‐235 Colortemperature7
236‐240 Colortemperature8
241‐245 Colortemperature9
246‐250 Colortemperature10
251‐255 Colortemperature11
8Autoprograms 000‐051 NoFunction
052‐101 AutoProgram1
102‐152 AutoProgram2
153‐203 AutoProgram3
204‐254 AutoProgram4
255AutoProgram0(AutoProgram1‐4)
9Autospeed000‐255 Autospeedslowtofast
10Dimmer000‐051 Presetdimmerspeedfromdisplaymenu
speed052‐101 Dimmerspeedmodeoff
mode102‐152 Dimmerspeedmode1(fastspeed)
153‐203 Dimmerspeedmode2(middlespeed)
204‐255 Dimmerspeedmode3(slowspeed)

Hercules
14
H,S,V
1H000‐255 Hue
2S000‐255 Saturation
3V000‐255 Value(Brightness)
H,S,I
1H000‐255 Hue
2S000‐255 Saturation
3I000‐255 Intensity

Hercules
15
4.0TechnicalSpecifications
OPTICS
LEDSpecificationCREEWW2700K3W
LEDquantity4PCS
FieldAngleZoomfrom20°to40°
BeamAngleZoomfrom15°to30°
Output1736lux/3m/15°
625lux/3m/30°
Control
ControlmethodWDMXorDMX
WDMXCompatibilityWirelessSolution
DMXChannels4,6,10,HSVandHSI
DimmingCurves4Modes
DimmingResolution16bit
DataConnections5pinDMX,BuiltinWirelessSolution
Electrical
PowerLithiumBattery,NeutrikPowerConIN
BatterySpecificationsLithiumBattery,14.8V,13.2AH
WorkingHours9hoursat100%
Charginghours6hours
Charging FlightcaseandbuiltinPowerCon
ChargingduringuseYES
InputVoltageAC110V‐240VAC50/60Hzauto‐ranging
PowerConsumption50W
FuseN/A

Hercules
16
Physical
HerculesWeight5.5KG
HerculesSize312x250x108mm
CoolingSystemFan‐free
IPRatingIP44
Table of contents
Other ShowPro Dj Equipment manuals

ShowPro
ShowPro LED House Light User manual

ShowPro
ShowPro Atomizer Pro Hazer User manual

ShowPro
ShowPro PLUTO 2000 User manual

ShowPro
ShowPro LED PAR Hex-18 IP65 User manual

ShowPro
ShowPro Fusion IP Profile FC User manual

ShowPro
ShowPro ALLIGATOR User manual

ShowPro
ShowPro Atomizer Pro Hazer User manual

ShowPro
ShowPro K SMART PROFILE User manual

ShowPro
ShowPro NEPTUNE 200 BEAM User manual

ShowPro
ShowPro LEDMOV640 User manual