Shure MV88+ User manual

MV88plus Video
MV88+ Video Kit
The ShurePlus MV88 video app user guide.
Version: 4.1 (2021-I)

Shure Incorporated
2/17
Table of Contents
MV88plus Video MV88+ Video Kit 3
General Description 3
Features 3
Standby Mode 3
Visual Settings 4
Record Mode 4
Using the ShurePlus MOTIV™ App with the MV88+ mi
crophone 5
Aiming the Microphone 5
MV88+ Outputs 8
Device Setup 8
Preset Modes 10
Direct Monitoring Blend 11
Advanced Mic Settings 11
Limiter 11
Compressor 11
High Pass Filter 11
Left-Right Channel Swap 12
Equalizer 12
Using the Apple Watch with ShurePlus MOTIV 12
Connect your Apple Watch to the MOTIV recording app. 1
2
Controls and Navigation 13
Recording Tips 13
Turn Off Notifications 13
Adjust your Sample Rate 13
Get the Best-looking Video Image 13
Record in Mono 13
Record in Stereo 13
Capture the Complete Performance 13
Record with Confidence with Automatic Save 14
Sharing MOTIV Video Recordings 14
Troubleshooting 14
System Requirements 15
System Requirements and Compatibility: iOS 15
System Requirements and Compatibility: Android 15
Specifications 15
Supported Audio Formats 17
Certifications 17

Shure Incorporated
3/17
•
•
•
•
•
•
MV88plus Video
MV88+ Video Kit
General Description
The Shure MV88+ Video recording app provides instant video recording with uncompressed audio for your mobile device.
Customize the sound with digital signal processing (DSP) preset modes, adjustable gain, and stereo width control.
Features
Compatible with iOS, Android, PC and Mac devices.
Note: See https://www.shure.com/MOTIVcompatibility for information on recommended Android devices.
Plug-and-Play Operation supporting landscape and portrait recording
Flexible Recording Control includes gain adjustment settings
Support for mono and stereo audio devices
When used with MOTIV microphones, preset modes are available for a variety of recording situations.
Tip: Turn on Airplane Mode and Do Not Disturb to prevent interruptions to the recording caused by phone calls, text messages, or alerts.
Standby Mode
①Flash Use the flash when recording in low light situations.
②Connected Device Status/Recording Length/Focus Lock Device status will display the model name of the connected
MOTIVdevice.Recordinglengthisdisplayedinhours,minutes,andseconds.SeetheVisualSettingstopicformoreinforma
tion on setting focus and exposure.
③Zoom Level Pinch the screen to adjust your zoom level for a closer view of your subject.
④File Information Displays available video format options.
Note: Option availability may vary based on your mobile device specifications.
Audio file formats: (iOS) WAV, ALAC, AAC 96, AAC 128, AAC 256 (Android) AAC 96, AAC 128, AAC 256
®

Shure Incorporated
4/17
•
•
•
Sample rate: 44.1 kHz, 48 kHz
Video resolution: 720p, 1080p, 4K
Frame rate: 24 fps, 30 fps, 60 fps
⑤Reverse Camera Use the front-facing camera to shoot selfie videos.
⑥Settings Tap the app settings sprocket to select light or dark theme appearance, to find version information, help materials,
and to send feedback.
⑦Record/Stop Button
⑧Device Setup Access advanced settings for your audio device. See Device Setup section for more information.
⑨Preview Window Tap to review the most recently recorded video.
⑩Grid/Level/Off Display Tap through to display grid lines or a level for easy image composition. Or turn this feature off if you
prefer a clean display.
⑪Device Status Displays remaining battery life and available storage space for your recording device.
⑫Input Meter/Microphone Gain Displays the strength of the mono or stereo input signal. Tap the input meter to bring up the
mic gain and direct monitoring sliders. You can adjust microphone gain during recording to match the volume of the sound
source. Make live adjustments to ensure levels are in the target range (indicated by the shaded region of the input meter).
Note: Display will read AGC when using the app with the built-in microphone. Automatic Gain Control (AGC) adjusts levels to ensure consistent volume.
Weaker signals are boosted and stronger signals are attenuated to control gain. The dynamic range is decreased but the result is a more even recording.
Visual Settings
Be sure to adjust your visual settings to get the best-looking video image. We recommend making adjustments in this order.
Zoom: Pinch to zoom in or out and frame your shot.
Brightness: Swipe up and down to set brightness level.
Focus: Tap to focus or tap and hold to lock brightness and focus. Tap again to release the lock.
Record Mode
①Flash Use the flash when recording in low light situations.

Shure Incorporated
5/17
②Connected Device Status/Recording Length/Focus Lock Status will display the model name of the connected MOTIV
device. Recording length is displayed in hours, minutes, and seconds. The red dot will flash when video is recording. See the
Visual Settings topic for more information on focus and exposure.
③Zoom Level Pinch the screen to adjust your zoom level for a closer view of your subject.
④Record/Stop Button Start and stop video recording.
Note: Video files are saved to the Photos app on your mobile device.
⑤Audio Recording The MOTIV Video app displays the audio waveform as it is being recorded.
⑥Grid Use the grid lines to assist in composing your image.
⑦Device Status Displays remaining battery life and available storage space for your recording device.
⑧Input Meter Displays the strength of the mono or stereo input signal. Tap the input meter to bring up the mic gain and direct
monitoringsliders.Youcanadjustmicrophonegainduringrecordingtomatchthevolumeofthesoundsource.Makelivead
justments to ensure levels are in the target range (indicated by the shaded region of the input meter).
Note: The maximum file size for a recording is 2GB, which will result in approximately 2 hours of record time. This limitation was put in place to maximize app
performance. Continuous recording for more than 2 hours will generate a second file.
Using the ShurePlus MOTIV App with the MV88+ micro-
phone
The MOTIV app controls microphone settings to optimize performance for specific uses. The device stores the most recently
used settings for quick setup each time you record.
Aiming the Microphone
Thefollowingsuggestionsarefortypicalusecases.Keepinmindthattherearemanyeffectivewaystorecordasource.Ex
periment with horizontal or landscape orientation, microphone placement and settings to find what works best for you.
Portrait (Vertical)
Position your recording device so you can monitor the recording. Aim the front of the microphone toward the source, with left
and right sides facing the appropriate directions.
™

Shure Incorporated
6/17
Landscape (Horizontal) Video Recording
Aim the front of the microphone toward the source. Ensure that the left and right sides of the microphone barrel are facing the
appropriate sides.
Portrait/Selfie (Vertical) Video Recording
Aim the microphone toward yourself and select Left Right Swap.

Shure Incorporated
7/17
•
•
Tip: If you begin shooting in portrait mode, video will remain in portrait mode even if device orientation is turned to landscape.
Video Interview
To record audio from on-camera audio only, select the CARDIOID polar pattern and point the microphone toward your
subject.
To capture the voices of both the on-camera subject and the off-camera interviewer, select the MONO BIDIRECTIONAL
polar pattern in the app. Position the microphone with the left and right sides facing each person.
Self-Recording (Video Streaming)
Set the device on a flat surface and angle the microphone toward your mouth. Select the MONO CARDIOID preset in the
MOTIV app to reduce ambient noise.
Handheld Recording
The legs collapse to create a portable hand-held stand.

Shure Incorporated
8/17
•
•
MV88+ Outputs
3.5mm monitor output for connecting to headphones and earphones
Send audio to your recording device using the micro-B USB port
MV88+ LEDs
iOS Android/Mac/PC
Green: Mic active, audio flowing Green: Power is on
Amber: Error
Flash Amber: Firmware is updating
Red: Microphone is muted
Flash Red: Audio is clipping

Shure Incorporated
9/17
Device Setup
Tap Device on the navigation bar to access microphone settings

Shure Incorporated
10/17
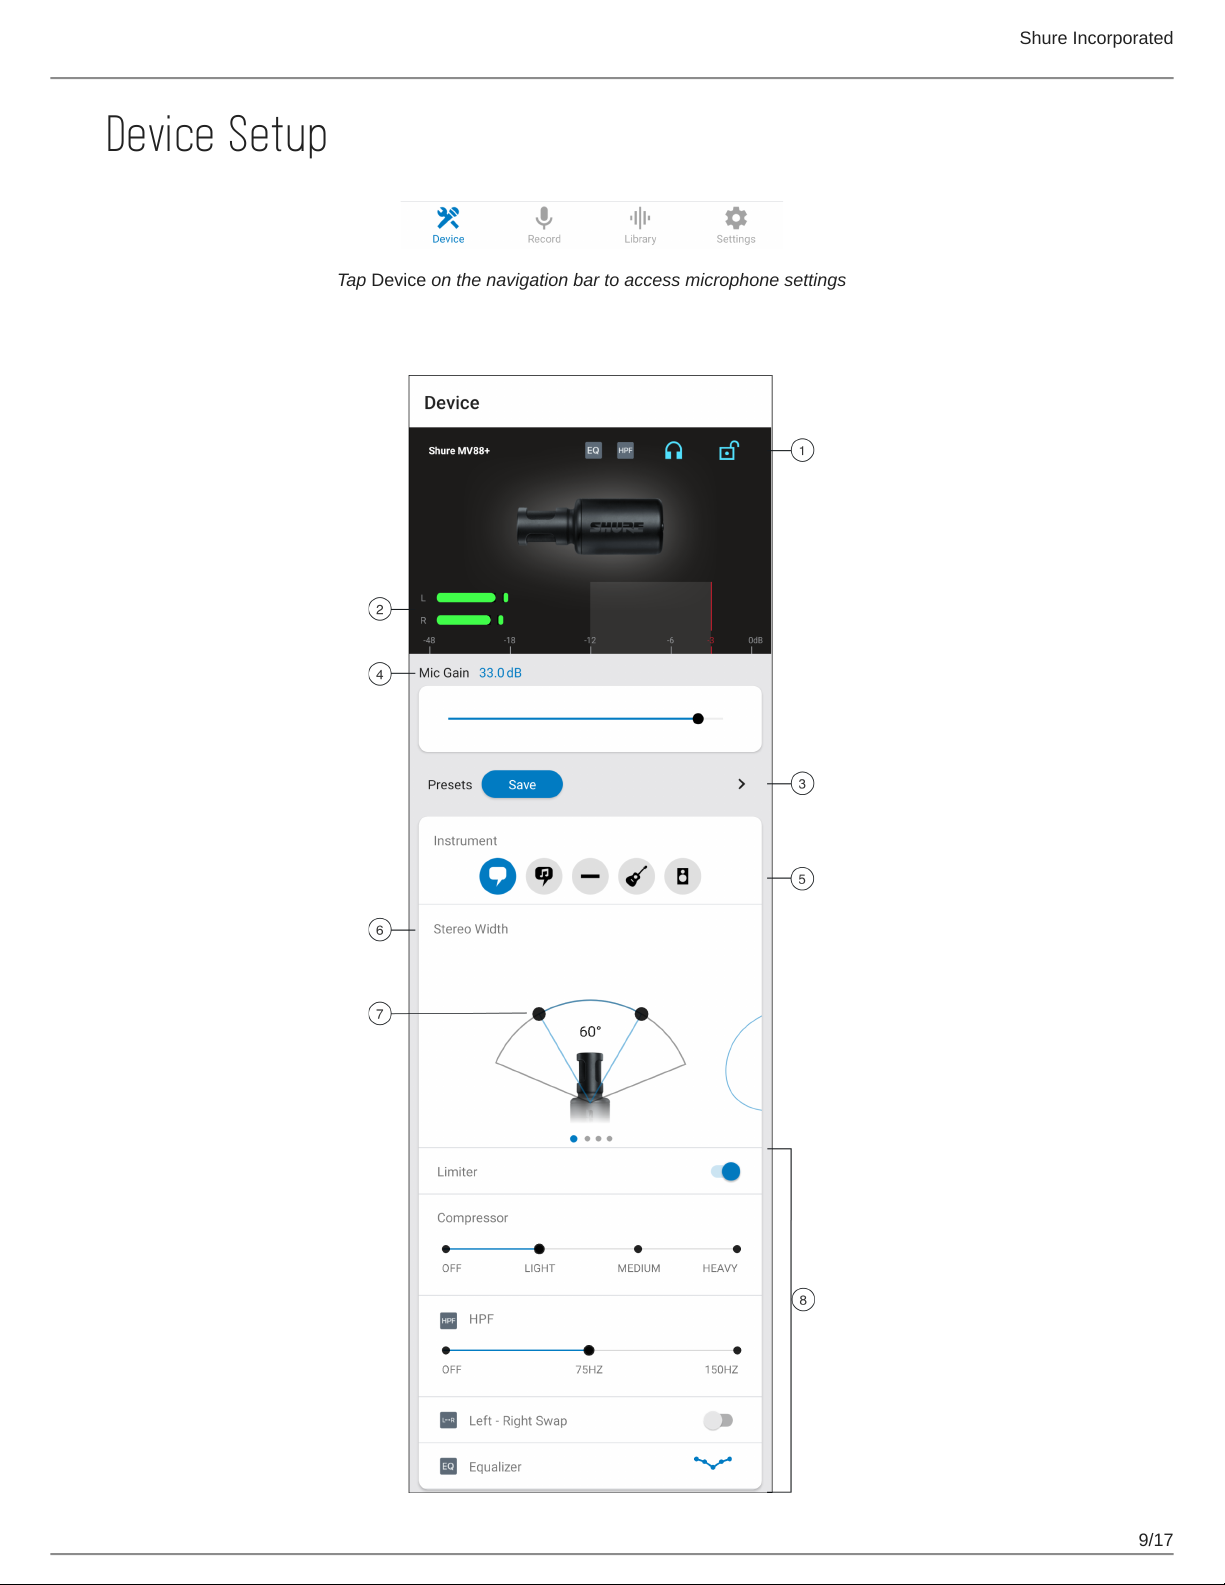
①Notifications The top row displays which device is connected. A red flashing dot next to the name let you know whether
recording is active. The charms show which advanced features are on. Tap the headphone icon to access direct monitoring
control. Tap the lock to lock or unlock the settings.
Note: Lockthesettingstopreventaccidentalchangestosettingswhenhandlingyourdeviceduringrecording.Whenmicset
tings are Locked, the setting screen is grayed out.
②Input Meter Displays the strength of the input signal and whether that signal is mono or stereo. The loudest peaks should
reach within the target range (indicated by the shaded region between -12 and -3 dB).
③Microphone Gain Adjust the mic gain slider to set the volume of the sound source.
④Custom Presets Tap the caret to quickly access your saved presets. Or tap the Save button to save current settings. See
Custom Presets for more information.
⑤Preset Modes Setstereowidth,equalization,andcompressionforspecificapplications.See"PresetModes"formoreinfor
mation.
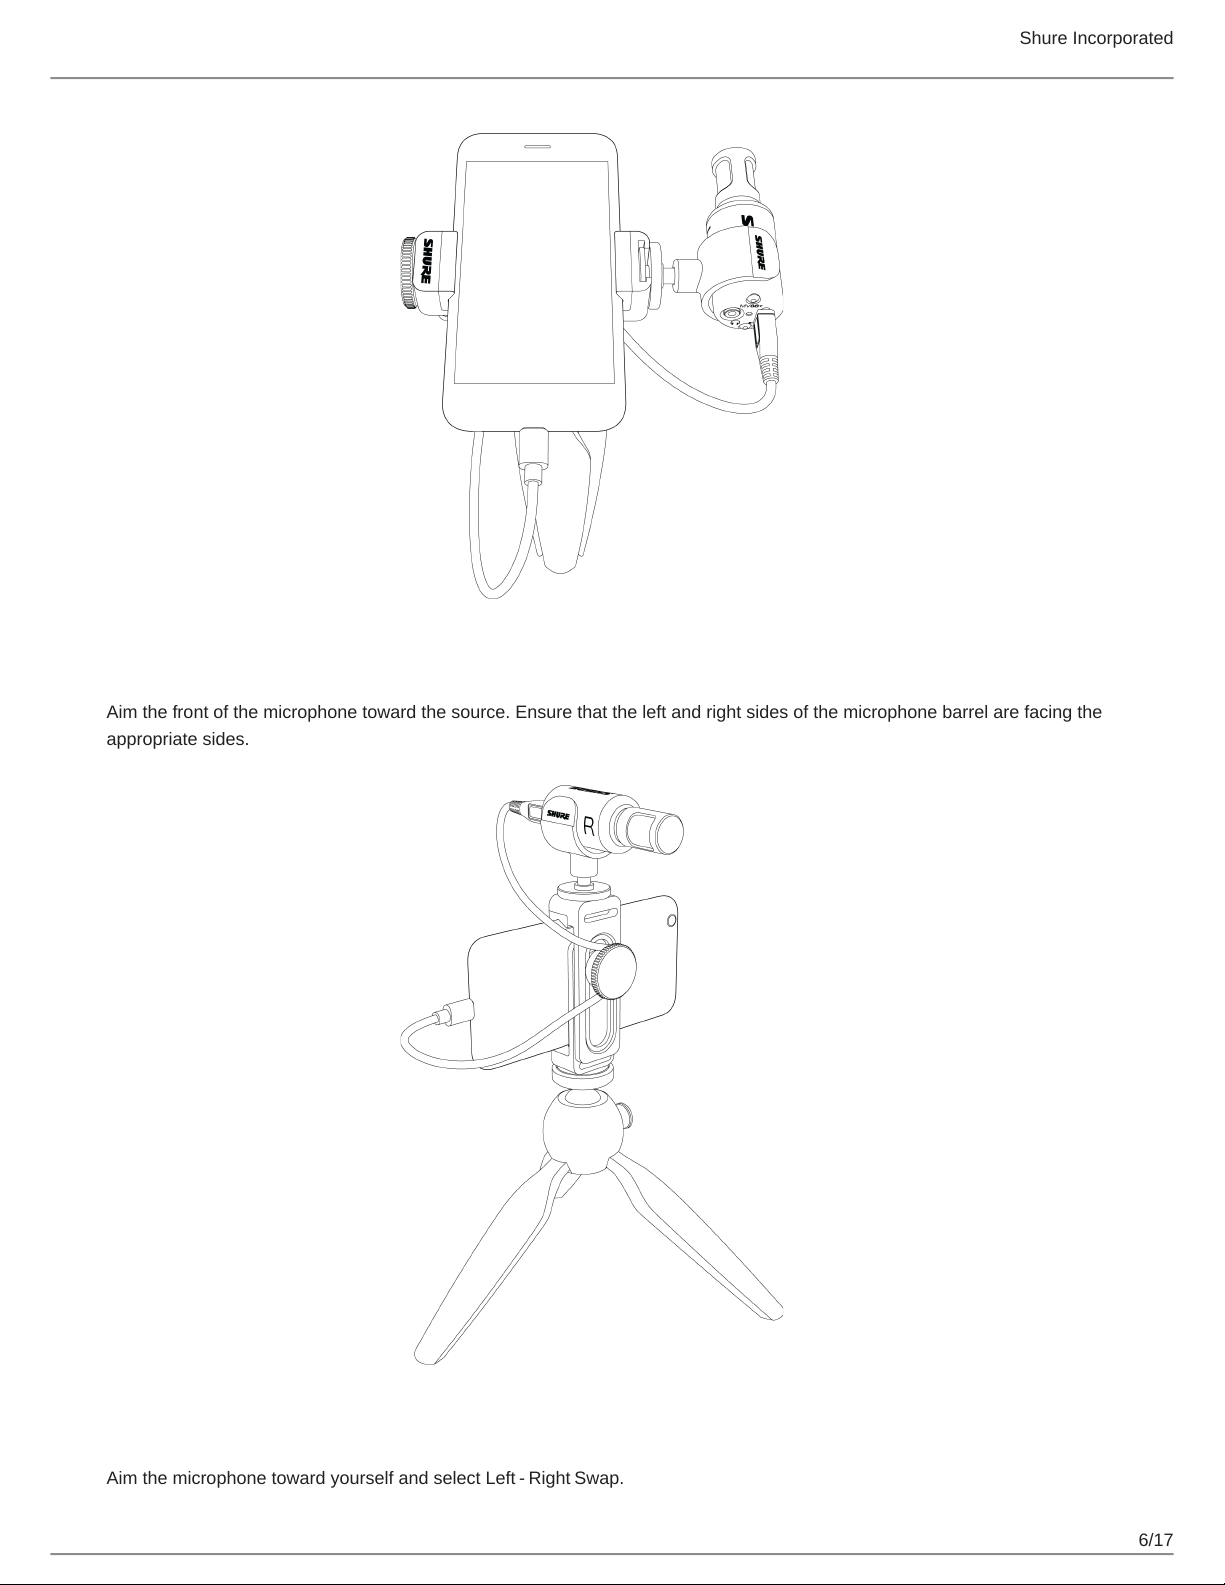
⑥Polar Pattern Selection Swipe to choose your pick-up pattern. Use the handles to adjust the width of the stereo image.
Tip: Consider the location of the microphone and the size of the sound source when adjusting the width. For example, a large orchestra or ensemble recording
benefits from a wide stereo image, which increases separation between instruments. Speech benefits from a narrow width, which improves clarity and rejects
ambient (room) sound.
⑦Stereo Width Handles Use the dots to quickly set stereo width.
⑧Advanced Features Fine tune your audio recording with limiter and compressor controls, high pass filter, left-right swap,
and equalization settings.
Preset Modes
Five selectable modes optimize settings for gain, stereo width, equalization, and compression. Set the microphone level and try
the modes to find which sounds best. Preset modes can affect the strength of the input signal, so adjust the microphone level
as needed after changing presets.
Mode Application Characteristics
Speech
speech Narrow stereo width to reject background noise, equalization that emphasizes
clarity and fullness, and gentle compression.
Singing
soloorgroupvocalper
formances
Mediumstereowidthwithsubtleequalizationtoaddrichnessandclarityforanat
ural sound.
Flat
any Anunprocessedsignal(noequalizationorcompressionsettingsused).Addsflexi
bility when processing the audio after recording.
Acoustic
acoustic instruments and
quiet music
Medium stereo width with transparent compression to smooth out volume spikes
and bring out quiet passages. The equalizer setting emphasizes detail and an
overall natural sound.
Loud
live performance and
louder sources
Widestereotoincreaseseparationbetweensources.Equalizationfurtherim
proves definition by reducing frequencies that can make the instrumentation
sound crowded.

Shure Incorporated
11/17
•
•
Direct Monitoring Blend
There are two ways to access the Direct Monitoring slider when you want to adjust your monitor source. Tap the input meter to
view the mic gain and monitoring blend sliders. Or you can view the slider by tapping the headphone icon in the device settings
tab.
Usethedirectmonitoringslidertodeterminehowmuchofeachinputyouhear.Forbestresults,startmonitoringatthemid
point and adjust.
Move the slider towards Mic to hear more of the audio that is being currently recorded by the microphone.
Move the slider towards Playback when you want to listen to the previously recorded audio and less of the audio coming
in to the microphone. This is useful for when you want to review your recording.
As one source increases, the other source decreases.
Advanced Mic Settings
After you have selected the preset mode for your application, fine tune the sound of your recording with limiter, compressor,
andequalizercontrols.Yoursettingswillberetainedinthemicrophonewhenusingotheraudioandvideorecordingapplica
tions.
Limiter
Toggle the limiter on to set an input threshold and prevent distortion from volume peaks in your recordings.
Compressor
Choosenocompression,orselectlightorheavycompressiontocontrolvolumewhenyoursoundsourceisdynamic.Thecom
pressor will narrow the dynamic range, which means that quiet signals are boosted and loud signals are lowered.
High Pass Filter
Choose no HPF for the most natural sound. Or select 75 Hz or 150 Hz to reduce wind noise, room noise, or proximity effect.

Shure Incorporated
12/17
1.
2.
3.
4.
75 Hz Low frequency cutoff Provides a 6 dB-per-octave cutoff at 75 Hz. Helps eliminate floor rumble and low-frequency room
noise from heating and air conditioning systems. This setting may also be used to compensate for proximity effect or to reduce
low frequencies that make an instrument sound dull or muddy.
150 Hz Low frequency rolloff Provides a 6 dB-per-octave rolloff filter at 150 Hz. Use this to compensate for proximity effect or
to reduce low frequencies that could make an instrument sound dull or muddy.
Left-Right Channel Swap
For stereo recordings, use Left Right Swap to flip the left and right audio channels to match the stereo image to the video. For
example, when using video to record yourself.
Tip: Use the L and R indicators on the microphone barrel. This way you can set Left Right Swap before you start to record.
Equalizer
ChangethepresetmodestoheartheDSPchanges,andthenusetheequalizertoboostorcutbandsoffrequenciestoim
prove sound clarity.
Note:Equalizationwithinpresetswillnotbedisplayed.However,theequalizergraphicintheadvancedsettingsstatusbardisplaystheuserselectedequaliza
tion.
Tap to access the MOTIV equalizer. Equalization changes are displayed in the equalizer image.
EQ persists between preset mode changes.
Using the Apple Watch with ShurePlus MOTIV
The ShurePlus MOTIV Apple Watch app allows greater recording flexibility when using it as a remote control for the ShurePlus
MOTIV Audio and Video Recording Apps.
Connect your Apple Watch to the MOTIV recording app.
Open the Watch App on your iPhone, then tap the My Watch tab
Apps that are available to install will appear in the Available Apps section
Find the MOTIV Watch app and tap Install
Note: See the Apple support page with additional instructions on Apple watch app installation.
TheApplewatchwillrecognizewhenyourMOTIVmicisconnectedtoyourphone.Themicrophonenamewillbedis
played in the upper left corner when the connection is made.

Shure Incorporated
13/17
5.
6.
Placement of the microphone depends on the size of the room, number of people, and instrument volume. If possible,
walk around the room and listen to find where it sounds best.
Select the correct preset mode for your recording application. Adjust the microphone level and other settings in the app
and place the microphone near your source.
Note: Advanced settings should be set up before microphone is in place. The Apple Watch app will only allow you to control record, pause recording,
complete recording, make bookmarks and set and lock gain control.
Controls and Navigation
Start recording: Tap the red record button
Pause recording: Tap the pause icon. You can continue recording from a paused state
Create bookmark: Tap the bookmark icon
Stop recording: Tap the Done button
Adjust gain: Use the digital crown on the Apple Watch
Lock mic gain: Tap the lock icon
Recording Tips
Turn Off Notifications
When you open the MOTIV app, a message prompts you to enable airplane mode and do not disturb mode. It's important to do
thistoavoidrecordinginterferencefromphonecalls,messages,andvariousnotificationswhichcanaddstatictoyourrecord
ings.
Note: Enable airplane mode and then turn Wi-Fi back on to add geolocation information to your audio file.
Adjust your Sample Rate
Selectalowersampleratewhenitisusefultohaveasmallerfile,forexample,whenrecordingspeechorapodcastfordown
load. Select a higher sample rate for music and dynamic recordings.
Get the Best-looking Video Image
Pinchtozoominoroutandframeyourshot.Swipeupanddowntosetbrightness.Taptofocusortapandholdtolockbright
ness and focus. Tap again to release the lock.
Record in Mono
Record in mono to increase your available record time or when recording a single source, like vocals, that would benefit from
less ambient noise. Select the Mono Cardioid or Mono Bidirectional polar pattern and audio from all capsules are summed to a
single channel. The input meter will indicate mono recording by displaying the top half of the waveform. MOTIV supports third-
party microphones with mono recording.
Record in Stereo
Rotate the MV88+ barrel in the mic clip to accommodate portrait or landscape recording. L and R are labeled to show stereo
orientation of the microphone. The stereo image is accurate if the Shure logo is facing upward.
Capture the Complete Performance
To ensure that you capture the entire sound source, start your recording before the performance starts and edit the recording
later to trim any silence.

Shure Incorporated
14/17
•
•
Note: If your microphone accidentally becomes disconnected during recording, MOTIV will automatically stop the recording. The save file dialog will appear,
prompting you to name and save your audio.
Record with Confidence with Automatic Save
If your microphone accidentally becomes disconnected during recording, MOTIV will automatically stop the recording. The
save file dialog will appear, prompting you to name and save your audio.
Sharing MOTIV Video Recordings
Stop the recording to create a video file that is saved in the Photos app on your mobile device. You can share videos created
with the MOTIV video recording app from Photos.
On an iOS device, find your video in Photos > MOTIV. Or in Photos > Media Types > Videos.
On an Android device, find your video in the main Photos library or in Photos > Albums > Camera.
Troubleshooting
Issue Solution
Microphone is plugged in, but
the volume meter does not
register a signal.
Edit the privacy setting for your recording device under SETTINGS > PRIVACY > MICRO
PHONE to give the app permission to use the microphone.
Microphone is plugged in, but
not detected.
Unplug and reconnect the cable connections so that the app recognizes the microphone.
You'll know that the connection is secure when you see the microphone name visible in
the status bar.
You hear no audio despite
LEDs and the volume meter
responding as if audio is
present.
Check the Monitor Mixblendtoensurethataudioispassingandyoucanmonitorplay
back. Move the Monitor Mix slider to the center to hear audio that is being currently
recorded and previously recorded audio.
Audio sounds bad or distant.
ToensurethatyouarereceivingaudiofromtheMOTIVmicrophoneandnotabuiltinmi
crophone;unplugandreconnectthemicrophone.You'llknowthattheconnectionisse
cure when you see the microphone name visible in the status bar.
Audio is distorted. Use the audio meter to ensure that volume peaks are within the target range (the gray
area). If the level reaches the red peak indicator of the input meter, turn the gain down.
Left/right stereo channels do
not match video.
Depending on the orientation of the recording device, it may be necessary to engage the
Left-Right swap in MOTIV settings. If the audio has already been recorded, you can
switch the left and right channels in most audio editing software.
Audio is not in sync with
video
Switch to a lower frame rate or resolution size. You might achieve better performance with
a less system intensive frame rate.
Unable to share file.
If a file is too large to be shared, there are a couple options for reducing file size.
Convert your file to a compressed file format.

Shure Incorporated
15/17
•
•
•
•
•
•
Issue Solution
Connectyourmobiledevicetoyourcomputerandusefiletransfer,likeiTunes,todown
load the file to your desktop.
Split your track in two, export both files and recombine them using audio editing software.
General troubleshooting.
Ensure that your app is updated to the most current version.
Make sure that your phone's operating system is updated to the most current version.
Check to see how the microphone works using a different connection cable or different
device.
Close and restart the application.
Powering down and rebooting the device will clear the cache and can sometimes help
with software performance.
Note: Itmaybeusefultoresettheapptorestorefunctionality.Performahardresetbyunpluggingandrepluggingthemicro
phone.
System Requirements
System Requirements and Compatibility: iOS
iOS: iOS 12 and higher
iPhone: iPhone 6 and higher
iPod Touch: 6th gen
Note: iPad Pro (USB-C) is not supported.
System Requirements and Compatibility: Android
Will work with any Android device that has:
Android Oreo 8.0 and higher
USBHostPowerRequirementof≥100mA
USB Audio Class 1.1 support and higher
Android is a trademark of Google Inc.
Note: See https://www.shure.com/MOTIVcompatibility for information on supportive Android devices.
Specifications
MFi Certified
Yes
DSP Modes (Presets)
Speech/Singing/Acoustic/Loud/Flat

Shure Incorporated
16/17
Polar Pattern
Adjustable Width Stereo/Mono Bidirectional/Mono Cardioid/Mid-Side
Stereo Principle
Mid-Side
Supported Audio Format
iOS
WAV, AAC (Up to 256 KHz)
Supported Audio Format
Android
AAC (Up to 256 KHz)
Frequency Response
20Hzto20,000Hz
Adjustable Gain Range
0to+36dB
Sensitivity
37dBFS/Paat1kHz[1][2]
Maximum SPL
120dBSPL[2]
Limiter
Yes
Compressor
Yes
Equalizer
5-band
[1]1Pa=94dBSPL
[2]At Minimum Gain, Flat Mode
Bit Depth Sampling Rate
24 48 kHz
24 44.1 kHz
16 48 kHz
16 44.1 kHz

Shure Incorporated
17/17
Supported Audio Formats
Android
PCM/WAV Up to 352 KHz
AAC 256, 128, 96
iOS
PCM/WAV Up to 352 KHz
MP4 Audio Audio file extensions: .mp4, .m4a, .m4p, .m4b
AAC 256, 128, 96
Certifications
Industry Canada ICES-003 Compliance Label: CAN ICES-3 (B)/NMB-3(B)
Note: Testingisbasedontheuseofsuppliedandrecommendedcabletypes.Theuseofotherthanshielded(screened)cabletypesmaydegradeEMCper
formance.
This product meets the Essential Requirements of all relevant European directives and is eligible for CE marking.
The CE Declaration of Conformity can be obtained from: www.shure.com/europe/compliance
Authorized European representative:
Shure Europe GmbH
Global Compliance
Jakob-Dieffenbacher-Str. 12
75031 Eppingen, Germany
Phone: +49-7262-92 49 0
www.shure.com
Made for iPhone Xs Max, iPhone Xs, iPhone XR, iPhone X, iPhone 8 Plus, iPhone 8, iPhone 7 Plus, iPhone 7, iPhone SE,
iPhone 6s Plus, iPhone 6s, iPhone 6 Plus, iPhone 6, iPhone 5s, iPhone 5c, iPhone 5, iPad Pro (10.5-inch), iPad Pro (12.9-
inch) 2nd generation, iPad Pro (12.9-inch) 1st generation, iPad Pro (9.7-inch), iPad mini 4, iPad mini 3, iPad mini 2, iPad Air 2,
iPad Air, iPad (6th generation), iPad (5th generation), iPad (4th generation), iPod touch.
iPad, iPhone, iPod, and iPod touch are trademarks of Apple Inc.,registered in the U.S. and other countries. iPad Air, iPad mini,
andLightningaretrademarksofAppleInc.Thetrademark“iPhone”isusedinJapanwithalicensefromAiphoneK.K.
PIXI and Manfrotto are registered trademarks of Vitec Imaging Solutions. Mini tripod maximum weight: 1Kg/2.2 lbs.
® ®
Other manuals for MV88+
10
Table of contents
Other Shure Microphone manuals

Shure
Shure MXA920 Assembly instructions

Shure
Shure 575S User manual

Shure
Shure PGA 98D User manual

Shure
Shure MV5C User manual

Shure
Shure TwinPlex TL47 Series User manual

Shure
Shure 526T Series II Super Punch User manual

Shure
Shure SM48 User manual

Shure
Shure 515SBGX User manual

Shure
Shure KSM32 User manual

Shure
Shure PGA 52 User manual

Shure
Shure ROSWELLITE KSM353 User manual

Shure
Shure SM81 User manual

Shure
Shure PGA 56 User manual

Shure
Shure MV7 User manual

Shure
Shure SM81 User manual

Shure
Shure SM87A User manual

Shure
Shure SONODYNE II 540 User manual

Shure
Shure BETA 56 User manual

Shure
Shure 588SDX User manual

Shure
Shure SM11 User manual