Shure VP83F User manual

VP83F
LensHopper Camera-Mount Condenser Mi-
crophone with Integrated Flash Recording
™
The Shure professional shotgun microphone, VP83F, user guide.
Version: 1.1 (2020-H)

Shure Incorporated
2/21
Table of Contents
VP83F LensHopper™ Camera-Mount Condenser Micro-
phone with Integrated Flash Recording 3
General Description 3
Features 3
VP83F 3
Accessories 4
Installing the Memory Card and Batteries 4
Mounting the Microphone 5
On a Camera: 5
On a Tripod: 6
Audio Connections 6
Camera Output (Red) 6
Headphone Output (Black) 7
Control Panel 7
Home Screen Indicators 8
Menu Navigation 9
Audio Path 9
Format The Memory Card Before Use 10
Adjusting Microphone Gain 10
Headphone and Camera Output Volume 11
Low-Cut Filter 11
Recording Audio 11
Adjusting Settings While Recording 12
Managing Tracks 12
Track Playback 12
Deleting Tracks 13
Exporting Tracks 13
Utilities 13
SD CARD 13
BACKLIGHT 13
TIME/DATE 13
BATTERY TYPE 14
CAMERA OUT 14
CONTRAST 14
RESTORE DEFAULTS 14
DEVICE DATA 14
UPDATE FW 14
Battery Life 14
Memory Card Requirements 14
Troubleshooting 15
Accessories and Replacement Parts 16
Camera and Headphone Output Pin Configuration 16
Specifications 16
Information to the user 20
Certifications 21

Shure Incorporated
3/21
•
•
•
•
•
•
•
•
•
•
VP83F
LensHopper Camera-Mount Condenser Microphone with
Integrated Flash Recording
General Description
The Shure VP83F is a professional-quality condenser microphone designed for use with DSLR and video cameras. The VP83F
features built-in flash recording and captures crystal-clear, high definition audio, completely independent from other hardware.
The intuitive menu makes configuration fast and simple for use in almost any sonic environment.
Features
Exceptional Audio Quality
High-resolution recording (24 Bit/48khz sampling, WAV format)
Supercardioid/lobar pickup pattern rejects unwanted sounds
Interference tube for increased directionality
RF Immunity
Built-in Flash Recording
Records directly to microSD card (32 GB maximum)
Intuitive menu for easy microphone configuration and track management
Separate outputs for headphone monitoring and camera input with independent volume adjustment
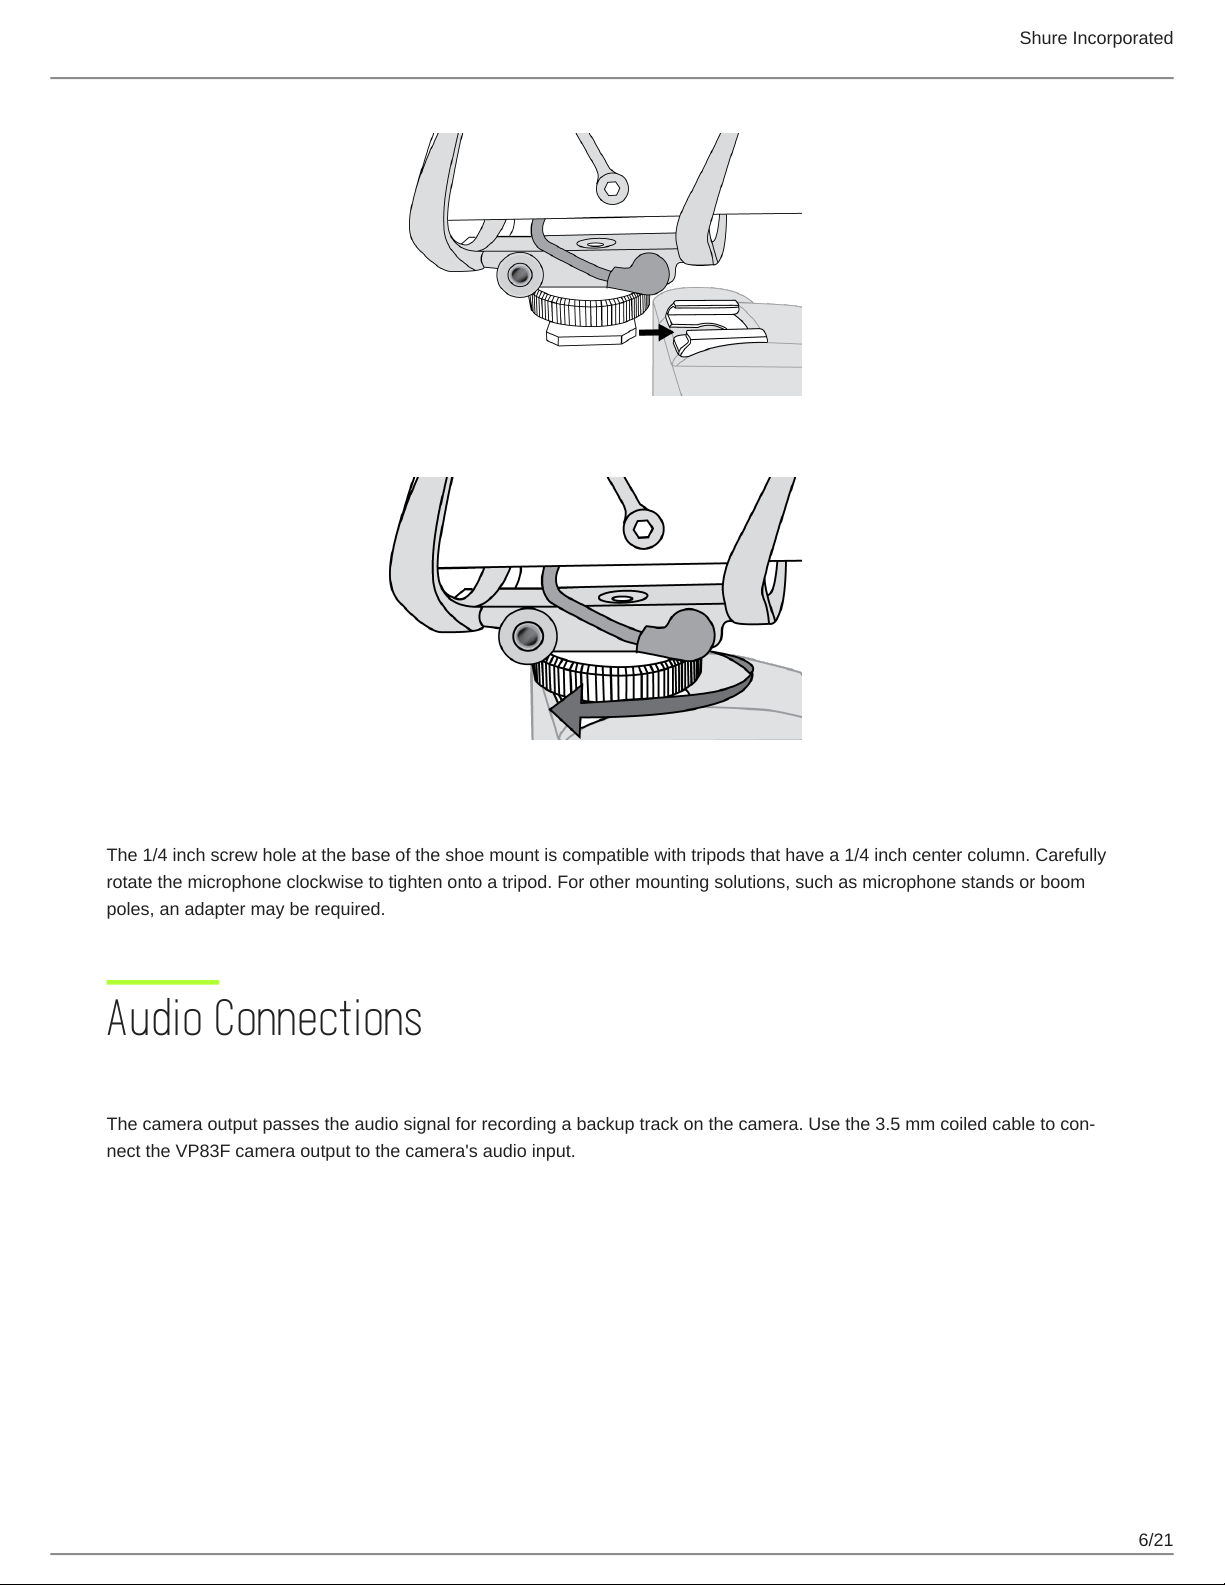
Rugged and Reliable
Durable, all-metal housing
Integrated shockmount
Shoemount adapter for easy installation
VP83F
①Windscreen
②Camera audio output
③Camera shoe mount
④Battery and memory card compartment
⑤Integrated shockmount
⑥Control panel
⑦Headphone audio output
™

Shure Incorporated
4/21
•
•
•
•
Accessories
Foam windscreen
3.5 mm coiled audio cable
(2) AA batteries (except in Argentina)
Rycote Windjammer (optional)
Installing the Memory Card and Batteries
The VP83F requires two AA batteries to operate (compatible with Alkaline, NiMH, or Lithium). Installing a MicroSD memory
card enables recording functionality.
Audio is still passed through to the camera and headphone outputs if there is no memory card installed.
①Opening the front panel
Squeeze the latches on each side and open the front panel to access the memory card and battery compartment.
②Installing the memory card
Always turn the power off before removing or installing a memory card.
To Install: Insert the card into the slot located above the battery door, with the contacts facing up. When fully inserted, the
card locks into place.
To Remove: Press the card to unlock it, then pull it from the device.
Note: Format the memory card in the device prior to first use. Refer to the memory card requirements section in the user guide for additional information.
③Installing and replacing batteries
®™

Shure Incorporated
5/21
1.
2.
Openthebatterydoorlocatedinsidethefrontpanelbypressingthefastenerdown.Insertthebatteriesaccordingtothepo
larity indicators.
Note: The battery door must be closed and latched before closing the front panel.
Mounting the Microphone
On a Camera:
Slide the microphone onto the camera shoe.
Tighten the knurled ring to secure.
Tip:Inadditiontothevibrationisolationprovidedbytheshockmount,thelowcutfiltercanbeusedtofurthereliminatehan
dling noise and low frequency rumble.

Shure Incorporated
6/21
On a Tripod:
The 1/4 inch screw hole at the base of the shoe mount is compatible with tripods that have a 1/4 inch center column. Carefully
rotate the microphone clockwise to tighten onto a tripod. For other mounting solutions, such as microphone stands or boom
poles, an adapter may be required.
Audio Connections
Camera Output (Red)
Thecameraoutputpassestheaudiosignalforrecordingabackuptrackonthecamera.Usethe3.5mmcoiledcabletocon
nect the VP83F camera output to the camera's audio input.

Shure Incorporated
7/21
Headphone Output (Black)
Connect a pair of headphones to the headphone output for monitoring recordings and listening during playback.
Important:Neverusethemicrophonegaintoadjusttheheadphonevolume,asthismayresultinpoorsignalqualityordistor
tion.
Control Panel
①Menu Display
Displays menu information and settings.
②Power Button
Turns the unit on and off.
③Five-Position Joystick
Navigates through the menu. Push the center of the joystick to make a selection.

Shure Incorporated
8/21
◦
◦
◦
◦
◦
④Record Button
Press to begin and pause recording
Press and hold to stop recording
When in the menu, press to return home
⑤LED Record Indicator
Solid red = recording
Flashing red = paused
Home Screen Indicators
①Track information
Displays track title and duration
②Low-cut filter icons
On:
Off:
③Remaining recording time
Displays time remaining on the memory card
④Headphone volume
⑤Battery meter
⑥Audio meter (Gain)
Displays microphone signal level, with range indicator for suggested peak levels
⑦Microphone gain value

Shure Incorporated
9/21
•
•
•
Quick adjustments from the home screen
The following settings are adjustable when highlighted in the homescreen:
Headphone volume
Microphone gain
Low-cut filter
Press the joystick left or right to highlight an icon for adjustment, and use up/down to change the value.
Menu Navigation
Open menu: Press the joystick to the right to open the main menu and to proceed into submenu screens.
Return to previous screen / select homescreen icons:Pressthejoysticktothelefttobackoutofthemenu.Inthehome
screen, pushing left will highlight the gain, headphone volume, or low-cut filter and allow them to be adjusted.
Enter: Press the joystick center button.
Scroll / adjust parameters:Pressthejoystickupordowntoscrollthroughmenuitems,ortochangeparameterswhenselect
ed.
Audio Path
The following diagram shows how audio flows through the device:

Shure Incorporated
10/21
Important:Followthedirectionsonsettingthegainforthebestsignaltonoiseperformance.Sinceitisfirstinthesignalpath,thegainaffectseverythingfol
lowing it. The gain should never be used to boost or attenuate the headphone signal; use the headphone volume to adjust monitoring levels. The headphone
and camera output level adjustments occur after the signal has reached the recording section of the device, and should not be used to compensate if the gain
setting is too low or is clipping.
Format The Memory Card Before Use
Format the memory card in the device prior to first use for best recording performance. Formatting the card after tracks have
been exported is recommended.
To format the card, enter the menu and select UTILITIES > SD CARD > FORMAT CARD.

Shure Incorporated
11/21
•
•
Adjusting Microphone Gain
In order to capture the highest quality audio signal, the microphone gain must be set at the appropriate level. Press the joystick
up or down to adjust levels in the MIC GAINscreeninthemenu,orfromthehomescreenwhenthemicgainiconishighlight
ed. Use the following guidelines to achieve the best results:
Adjust the gain to correspond to the highest anticipated sound level. The loudest sounds should peak between -12 dB and
-6 dB.
Setting the gain too low will result in more noise in the recording. If set too high, the signal will clip and become distorted.
The audio meter will indicate that the signal is clipping when the level reaches the highest bar.
Tip: For higher resolution metering, adjust the gain in the MIC GAIN screen to see more precisely where the signal is peaking.
Headphone and Camera Output Volume
Headphone Volume: Accessible in the menu by selecting HEADPHONE, or in the playback, recording, and home screens by
selecting the headphone icon and pressing the joystick up or down.
Camera Output Volume: Accessible in the menu by selecting UTILITIES > CAMERA OUT. Level is selectable (LOW,
MEDIUM, or HIGH) to accommodate different camera preamp sensitivities.
Note: Always set the gain to the appropriate level prior to adjusting the headphone or camera output volume.
Low-Cut Filter
Rolls off low frequencies 170 Hz and below (12 dB per octave) in order to reduce low frequency rumble caused by camera
handling and other environmental factors. A custom Rycote Windjammer (A83-FUR) can be used to further reduce wind noise.
®

Shure Incorporated
12/21
Recording Audio
Record:Presstherecordbuttontobeginrecording.TheLEDindicatorilluminateswhilerecording.Pressingrecordalwayscre
ates a new track, unless resuming a paused recording.
Pause:Presstherecordbuttontopausetherecording.TheLEDflasheswhilerecordingispaused.Pressrecordagaintore
sume.
Stop: Press and hold the record button (2 seconds).
Adjusting Settings While Recording
If necessary, audio settings (Microphone gain, Headphone volume, and Low-cut filter) can be adjusted while recording to
compensateforunexpectedchanges,suchasavolumeincreasethatresultsinclipping.Pressthejoysticktothelefttohigh
lightanitem,andthenpressthejoystickupordowntochangethevalue.Forbestresults,configureallsettingspriortorecord
ing.
Note: The menu is not accessible during recording.
Managing Tracks
Track Playback
To listen to recorded tracks, select FILE LIST from the menu screen. Highlight a track and select PLAYBACK to open it.

Shure Incorporated
13/21
Playback Controls
Function Joystick action
Previous / next track Press left / right
Rewind / fast forward Hold left / right
Play / pause Center push
Return to track list Press left while paused
Return to home screen Press record button
Deleting Tracks
To delete audio tracks, select FILE LIST from the menu screen and open the track you would like to delete, and select
DELETE.
Note: Once tracks have been deleted, they cannot be recovered.
Exporting Tracks
To export .WAV audio files, turn the device off and remove the MicroSD memory card. Transfer files to a computer using an SD
card adapter or USB adapter. All imported tracks include a title and timestamp.
Tip: For best performance, format the memory card in the device every time after exporting tracks.
Utilities
SD CARD
Remaining recording time is displayed and the following settings can be accessed:
FORMAT CARD
Formatting the microSD card will erase all data and should be done before first use.
MAX FILE TIME
Adjusting the maximum file size determines the partitioning of longer tracks. If the maximum file size is set to 1GB (2
hours), a 6 hour recording will be divided into three separate WAV files.
SET FILE NAME
The file name is set to TRACK by default, but can be changed by selecting a character and scrolling up or down to change
it. This feature is useful for identifying different sessions or projects.
BACKLIGHT
Adjusts the duration that the LED screen backlight will remain on.
TIME/DATE
Set the time and date so that tracks include a timestamp when exported.

Shure Incorporated
14/21
BATTERY TYPE
Select the appropriate battery type for the meter to read accurately.
CAMERA OUT
Adjusts the volume of the audio signal that is sent to the camera.
HIGH (0 dB)
For cameras with a low-gain preamp.
MEDIUM (-20 dB)
Appropriate for most cameras.
LOW (-40 dB)
For cameras with a sensitive preamp.
CONTRAST
Adjust the contrast value to change the ratio of light to dark on the display screen.
RESTORE DEFAULTS
Restores all default factory settings except for the time and date.
DEVICE DATA
Displays technical device information.
UPDATE FW
Enables firmware updates from the memory card. Having the latest firmware installed on the unit is recommended. Please visit
www.shure.com for details.
Battery Life
Use the following information for reference when considering which battery type to use with the device. Actual runtime may
vary depending on the brand of memory card and batteries, output volume levels, and the type of headphones used.
Battery Type (AA)
Battery Runtime (Hours)
When Recording Passing Audio Only
Alkaline 9.5 10.5
NiMH 12 15
Lithium 17.5 22.5
Note: The battery icon will begin flashing when the battery has approximately 15 minutes of run time remaining.
Memory Card Requirements
The VP83F requires a MicroSD card rated class 6 or higher. Always format new memory cards in the device prior to recording.
Shure recommends using name brand memory cards, as lower quality or slower memory cards may have a negative effect on
performance.

Shure Incorporated
15/21
Note: If using a UHS-1 microSDHC memory card, format the card from a computer to FAT32 file system, and the allocation size to DEFAULT.
Memory Card Recording Capacity
Memory Approximate Recording Time
4 GB 8 Hours
8 GB 16 Hours
16 GB 32 Hours
32 GB (maximum card size) 64 Hours
Troubleshooting
Issue Resolution
Unit does not turn on Replace batteries and make sure that the batteries are installed correctly.
Sound is distorted
Microphone gain may be set too high, resulting in clipping. Try lowering the gain.
If gain appears to be adjusted properly, try lowering the headphone output volume or using
a different pair of headphones.
Make sure headphone and/or camera outputs are plugged in all the way.
No sound
Iftheaudiometerdoesn’tregisterasignal,tryincreasingthemicrophonegain.
If the audio meter indicates a signal, check the headphone output level and the headphone
connection.
If gain is adjusted correctly with the headphone output turned up and there is still no
sound, try a different pair of headphones.
Sound is not being recorded
Ensure the MicroSD memory card is installed correctly.
Tryformattingthecardinthedeviceandensurethememorycardmeetslistedrequire
ments. Use a new memory card if problem persists.
Wind noise Use A83-FUR windscreen and engage low-cut filter
Audio dropouts Use a memory card with a higher speed class rating or a different brand
Notification screen: SD
CARD ERROR
Format the memory card or try a new card that meets the requirements. Be sure to export
any tracks before formatting the card.
Notification screen: SET
TIME/DATE?
Set the time and date and keep the device on for 30 minutes upon initial power-up to
charge the internal clock (RTC) battery.
Note: The RTC battery may lose the ability to hold a charge after approximately ten years, in which case the time
and date settings will not be saved. This does not affect any other functionality of the device.
Notification screen:
BATTERY LOW CANNOT
FORMAT
Formatting the memory card and updating the firmware cannot be done when the battery is
low. To perform these functions, install a new battery.

Shure Incorporated
16/21
Issue Resolution
BATTERY LOW CANNOT UP-
DATE
Notification screen: WAV
FILE ERROR
The .wav file may be corrupted, or the file format is not supported. Files ripped from a CD
that include metadata or files with a sampling rate greater than 48 KHz will not play in the
VP83F. Export .wav files to a computer if they are not backed up and remove them from
the memory card.
Accessories and Replacement Parts
Replacement foam windscreen A83W
Rycote Windjammer A83-FUR
Camera and Headphone Output Pin Configuration
Thecameraandheadphoneoutputssendidentical,monoaudiosignalsonthetipandringportionsoftheconnector.Head
phonesandstereoinputs,whichtypicallyusethetipastheleftchannelandtheringastherightchannel,receivethesameau
dio on both channels.
Tip Ring Sleeve
Audio (mono 1) Audio (mono 2) Ground
®™

Shure Incorporated
17/21
Specifications
Type
Electret Condenser
Polar Pattern
Supercardioid/Lobar
Recording Format
WAV, 24-bit, 48kHz Sampling Rate
Frequency Response
50 to 20,000Hz
Sensitivity
open circuit voltage, @ 1 kHz, typical
0 dB Gain -35.8dBV/Pa (16.2mV)
+30 dB Gain -5.8dBV/Pa (512.9mV)
Maximum SPL
0dB Gain Setting, 1 kHz at 1% THD , 1000Ωload
129.2dBSPL
Signal-to-Noise Ratio
+30dB Gain Setting
78.4dB
Self Noise
equivalent SPL, A-weighted, typical, +30dB Gain Setting
15.6dBSPLA
Environmental Conditions
Operating Temperature Range -18°C (0°F) to 60°C (145°F)
Storage Temperature Range -29°C (-20°F) to 74°C (165°F)
Operating Relative Humidity 0 to 95%
Housing
Cast aluminum
Power Requirements
2 AA batteries (Alkaline, NiMH, Rechargeable Li-Ion)
Weight
215g (7.6oz.)
1 Pa=94 dB SPL
[1]
[1]
[2]
[3]
[1] [2]

Shure Incorporated
18/21
THD of microphone preamplifier when applied input signal level is equivalent to cartridge output at specified SPL
S/N ratio is the difference between 94 dB SPL and equivalent SPL of self noise, A-weighted
Connector Type
3.5 mm (1/8") dual mono, Unbalanced
Output Impedance
47Ω
Connector Type
3.5 mm (1/8") dual mono
Output Impedance
5Ω
[3]

Shure Incorporated
19/21

Shure Incorporated
20/21
1.
2.
•
•
•
•
Information to the user
This device complies with part 15 of the FCC Rules. Operation is subject to the following two conditions:
This device may not cause harmful interference.
This device must accept any interference received, including interference that may cause undesired operation.
Note: This equipment has been tested and found to comply with the limits for a Class B digital device, pursuant to part 15 of
theFCCRules.Theselimitsaredesignedtoprovidereasonableprotectionagainstharmfulinterferenceinaresidentialinstalla
tion. This equipment generates uses and can radiate radio frequency energy and, if not installed and used in accordance with
the instructions, may cause harmful interference to radio communications. However, there is no guarantee that interference will
not occur in a particular installation. If this equipment does cause harmful interference to radio or television reception, which
can be determined by turning the equipment off and on, the user is encouraged to try to correct the interference by one or more
of the following measures:
Reorient or relocate the receiving antenna.
Increase the separation between the equipment and the receiver.
Connect the equipment to an outlet on a circuit different from that to which the receiver is connected.
Consult the dealer or an experienced radio/TV technician for help.
Other manuals for VP83F
3
Table of contents
Other Shure Microphone manuals

Shure
Shure PG27-USB User manual

Shure
Shure MX202W-A/N User manual

Shure
Shure SM35-TQG User manual

Shure
Shure SV100 User manual

Shure
Shure 550L User manual

Shure
Shure Microflex MX405/C User manual

Shure
Shure MXA920 User manual

Shure
Shure BETA 98/S User manual

Shure
Shure Microflex MX395 User manual

Shure
Shure BG2.1 User manual
Popular Microphone manuals by other brands

Ecler
Ecler MPAGE1r user manual

AKG
AKG WMS 40 SINGLE/DUAL user guide

Audio Technica
Audio Technica ES917S Installation and operating

Brüel & Kjær
Brüel & Kjær 4131 /32 instruction & application

POTOMAC INSTRUMENTS INC.
POTOMAC INSTRUMENTS INC. 19 instruction manual

IMG STAGE LINE
IMG STAGE LINE ECM-170 operating instructions