Sibata AQUAB AQ-201 User manual

CODE 080560-201
Handy Water Meter
"AQUAB"
Model AQ-201
[ For Measurement of Residual Chlorine ]
Thank you for purchasing this product.
This operation manual describes
important precautions for preventing
accidents as well as procedures for
handling the product.
Read this operation manual and the
attached warranty thoroughly before
use, and use the product safely and
correctly.
After reading this operation manual
and the warranty, keep them handy
for future reference.
2003-2022 SIBATA SCIENTIFIC TECHNOLOGY LTD.

2
Table of Contents
Page Page
Before Use
Finding the Combined Residual
Chlorine Concentration
About This Operation Manual
Memory Check Mode
Contents of Package
User Calibration Mode
Safety Precautions Troubleshooting
About This Product
Error Displays
Names of Parts
Inspections and
Maintenance
Powder Reagents Main Specifications
Using the Product
Consumables and
Related Parts
Workflow
Warranty and Repairs
Measurement Precautions
Inquiries
Mode Selection
Inserting the Batteries
Measurement
Be Sure to Read This
Page 4 lists important precautions for ensuring the safe use of the product, and for
preventing harm to you and other people and damage to property. Be sure to
thoroughly read these precautions before use and observe them.

3
Before Use
Read and understand the instructions given in
this operation manual before using the product.
Keep this operation manual handy for future
reference.
Familiarize yourself with the safety precautions
given in this operation manual and observe them.
Observe usage procedures that are suitable for
the product and are specified in this operation
manual.
Be sure to observe the above instructions.
Failure to do so may result in an accident or injury.
About This Operation Manual
Information in this operation manual is subject to change without notice in the interest of
product improvement.
Every effort has been made to ensure that the information in this operation manual is correct.
If you discover any errors or omissions, however, please contact your Sibata representative.
The copyright of this operation manual belongs to Sibata Scientific Technology Ltd.
This operation manual, or any part thereof, may not be reproduced, reprinted, or altered in
any form without prior written permission from Sibata Scientific Technology Ltd.
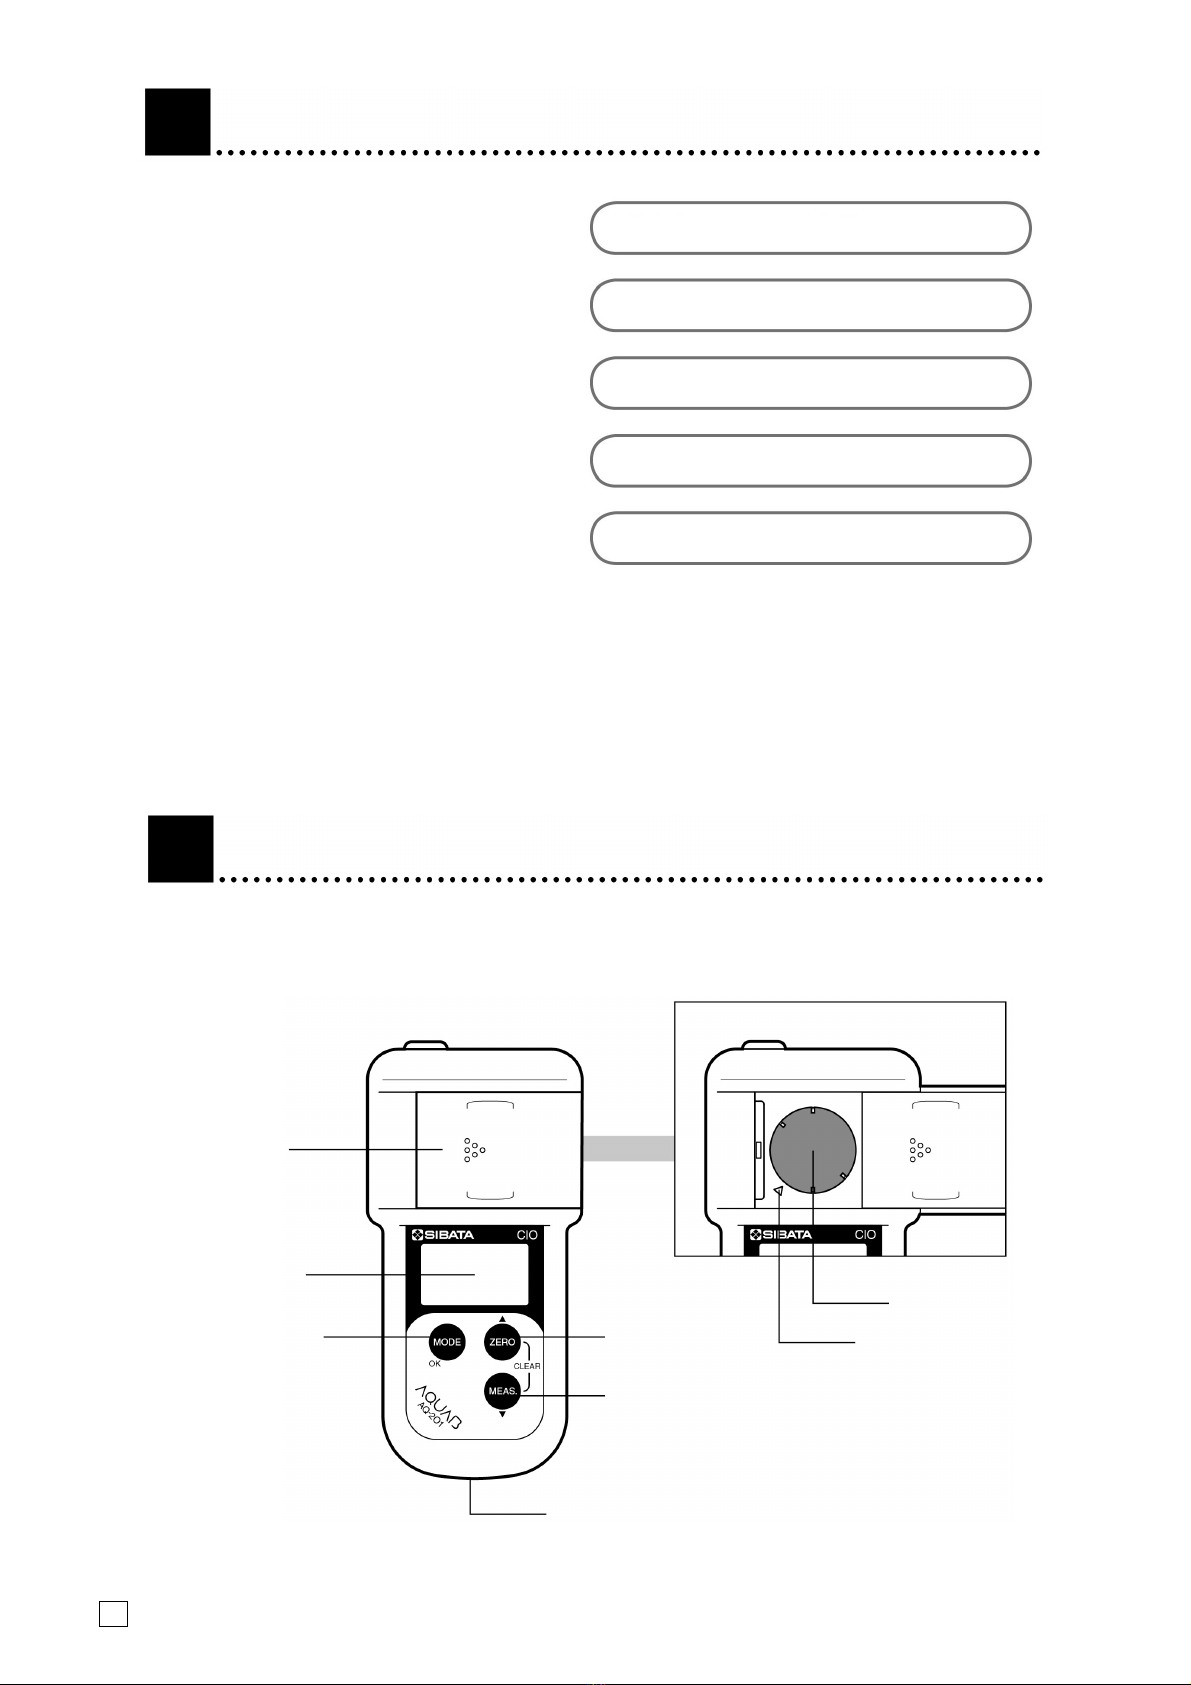
Contents of Package
Check the package for the following items before using the product.
AQUAB body ·······1 unit Sample cells ····················2 pcs
Powder reagent ···25 packs AAA batteries
(for checking operation) ····· 4 pcs
Carrying case ······1 pc Warranty ························· 1 copy
Quick Manual ······1 copy
Note: If any of the items are damaged or missing, contact the distributor where you purchased
the product.

4
Important
WARNING
CAUTION
Do Not Touch
Mandatory
Safety Precautions
The precautionary information in this operation manual is provided to ensure the safe use of the
product and to prevent property damage and injury to you and other people. It is all important for
ensuring safety, so be sure to read it thoroughly before using the product and observe it during
use.
Graphical Symbols
This operation manual uses various graphical symbols to indicate warnings and instructions.
The meanings of these graphical symbols are as follows. Fully understand the following
descriptions before reading the subsequent sections.
Indicates a potentially hazardous situation which, if not avoided,
could result in serious injury or possibly death.
Indicates a potentially hazardous situation which, if not avoided,
may result in minor to moderate injury or equipment damage.
Examples of Labels
indicates a forbidden action (that must not be done).
Specific details are given in or near the symbol.
The label on the left indicates that touching is prohibited.
indicates a mandatory action (that must be done).
Specific details are given in or near the symbol.
The label on the left indicates something that must be done.
Precautionary Information
Do Not Touch
Do not touch or operate
the product with wet
hands.
Doing so may result in
electric shock.
Do Not Touch
Do not handle batteries
with wet hands.
Doing so may result in
electric shock.
WARNING

5
Mandatory
Handle sample cells
carefully to prevent
them from getting
damaged.
Sample cells are partially
made of glass. Failure to
handle them carefully may
result in injury.
Prohibited
Do not use a power
supply not specified in
this document.
Doing so may damage the
product.
Prohibited
Do not allow water or
chemicals to come in
contact with the
product.
Doing so may result in
electric shock or damage
to the product.
Prohibited
Do not put your fingers
or foreign objects in the
product.
Doing so may result in
injury, electric shock, or
damage to the product.
Prohibited
Do not use the product
near flammable objects.
The product is not
explosion-proof. Doing so
may result in fire or
explosion, which is very
dangerous.
Prohibited
Do not install the
product in locations
with an ambient
temperature outside the
range 5 °C to 40 °C.
Doing so may damage the
product.
Mandatory
If the product becomes
abnormally hot or emits
sound or smoke, stop
using it immediately.
Failure to do so may result
in an accident or injury.
Mandatory
If you hear thunder
during use outdoors,
stop using the product
immediately.
Failure to do so may result
in electric shock or injury.
WARNING

6
Prohibited
Do not let powder or
other reagents get into
your eyes or mouth.
Doing so may cause
physical abnormalities.
Prohibited
Do not use powder or
other reagents for other
applications.
Doing so may result in an
accident.
Note: If these get into your eyes or mouth,
see page 11 for remedies.
Prohibited
Do not swing the
carrying case or
strongly tug the strap.
Doing so may result in an
accident or injury.
Prohibited
Do not leave the
product within reach of
children.
Doing so may result in an
accident or injury.
Do Not
Disassemble
Do not attempt to
disassemble, repair, or
modify the product by
yourself.
Doing so may result not
only in damage to the
product, but also in electric
shock or fire.
WARNING

7
Prohibited
Do not use the product
in environments where
there is condensation
or condensation is likely
to form.
Doing so may damage the
product.
Mandatory
When not using the
product for a long time,
remove the batteries
from the compartment.
Failure to do so may
damage the product.
Prohibited
Do not subject the
product to vibrations or
shocks or drop it.
Doing so may damage the
product.
Prohibited
Do not place any
objects on top of the
product.
Doing so may result in an
accident or damage to the
product.
Prohibited
Do not place the
product in locations that
are subject to direct
sunlight or that reach
high temperatures.
Doing so may damage the
product.
Prohibited
Do not wipe the product
with organic solvents or
chemicals that will
damage its surface.
Doing so may damage the
product.
CAUTION
In addition to the precautions
given here, precautionary
information is provided
throughout this operation manual.
Be sure to read it thoroughly
before using the product.

8
About This Product
This product is an easy-to-use handy water
meter.
The test water is colored with a reagent,
and the concentration of residual chlorine
is measured by the amount of transmitted
light. Being compact and easy to handle,
the AQ-201 makes it suitable for use in
on-site measurement.
For a meter in this class, it employs a large,
easy-to-view, original LCD screen so that
just enough information can be displayed.
In addition, it is provided with handy
functions including a memory function for
saving up to 99 measurement values, a
user two-point calibration function, and an
auto OFF function for automatically turning
the power OFF.
The AQ-201, dedicated to measurement of
residual chlorine, can measure the
concentration of free residual chlorine in
tap water in the range 0.00 to 2.00 mg/L.
Names of Parts
AQUAB Body Front
Easy-to-carry, compact body
Auto OFF function
Carrying case handy for carrying around
User calibration mode
Saves up to 99 measurement values
Cell cover
Display
[MODE] key [ZERO] key
[MEAS.] key
Metal strap attachment
Measurement
chamber
Triangle mark
[ When cell cover is open ]

9
Function of Operation Keys
Name Function
[ZERO] key
When this key is pressed in the measurement mode, zero-point recognition
is started.
In the memory check mode or user calibration mode, it functions as the up
key.
[MEAS.] key
When this key is pressed in the measurement mode, measurement of the
test water is started.
In the memory check mode or user calibration mode, it functions as the
down key.
[MODE] key
When this key is pressed, the mode is changed as shown below.
Pressed in the measurement mode →Memory check mode
Pressed in the memory check mode →Measurement mode
Pressed in the user calibration mode →Measurement mode
Holding this key down for at least 2 seconds enters the mode selection
screen. This key functions as the enter key when selecting a mode, etc.
CLEAR
When the [ZERO] and [MEAS.] keys are held down at the same time for at
least 5 seconds, data is cleared.
Measurement mode →Clears the zero-point value.
Memory check mode →Clears all measurement data.
User calibration mode →Clears user-specified conversion equation.
AQUAB Body Rear and Sample Cell
Battery cover
Cap
Reference
line
Triangle mark
Sample cell
Battery compartment
Connector for calibrations
by the manufacturer
(Note: This connector cannot be
used by customers.)
Battery lock

10
Carrying case
Quick manual
Powder
reagent
Display
No. Name Description
(1) Main display This displays measurement values, various setting values, error
messages, and other information.
(2) Unit display In this water quality photometer, concentration is displayed in terms
of mg/L.
(3) Display in memory
check mode This is displayed and flashes in the memory check mode.
(4) Number of memory
entries and entry No.
In the measurement mode, the memory No. used for saving the
measurement results (the number of saved measurement values) is
displayed (When the number exceeds 99, data is overwritten
starting from "01."). In the memory check mode, the memory No.
displayed is indicated.
(5) Display in
measurement mode This is displayed in the measurement mode.
(6) Display at zero-point
recognition
This is displayed when the zero-point recognition has been
completed.
(7) Display in user
calibration mode
This is displayed when the mode is switched to the user calibration
mode.
(8) Display at user
calibration setting
This is displayed when the concentration conversion equation has
been changed in the user calibration mode.
(9) Display at mode
selection This is displayed when the screen is at mode selection.
(10) Remaining battery
power
The remaining battery power is displayed graphically in three
stages.
Other
There is sufficient
battery power left.
The remaining battery
power is approximately
50 %.
The batteries have run
out. Replace with new
batteries.

11
Powder Reagents
The powder reagents provided with this product are prepared based on the
diethyl-p-phenylenediamine method, a test method used in hygienic chemistry. When a pack of
powder reagent is added to test water such as tap water or pool water that contains free residual
chlorine, it is colored to between light reddish purple and dark reddish purple. (When
measurement is performed on the AQ-201, the concentration of free residual chlorine is
displayed.)
To measure total residual chlorine in test water containing combined residual chlorine,
potassium iodide (sold separately) is used.
This product has been adjusted to suit our powder reagents, so correct measurement results
cannot be obtained if other reagents are used. If you have used up the provided amount, ask for
our powder reagent "for Residual Chlorine (DPD Method)" for use.
Effect of Coexistent Substances
Coexistent substances contained in test water sometimes affect measurement. If this happens,
compare the results with those obtained by a standard method for examining tap water to
check the measurement values.
Ions affected even by small amounts of coexistent substances Fe2+, Fe3+, NO2-
Disposal After Measurement
Pour test water containing the powder reagent into the sewage system together with large
amounts of water. Thoroughly wash the containers used for testing with water.
If there is powder reagent remaining in the opened pack, pour it into the sewage system
together with large amounts of water.
Be sure to take back used packs or other unwanted items, and dispose of each of them by
following the instructions from the relevant local government.
Use up remaining powder reagents in unopened packs as soon as possible. In particular, if
powder reagent is stored in high-humidity locations during the summer or rainy season, it
might deteriorate in several days. When storing powder reagent, put it in a dry container and
close the container, then store it in a cool, dark place.
If Powder or Other Reagent Gets on You or Is Swallowed...
Note 1: The above remedies are merely emergency treatment. If abnormalities persist even after these
remedies, immediately consult a physician.
Note 2: Those with allergies or sensitive skin should put on water-impermeable gloves before starting work.
If it gets into your eyes
Immediately wash with
running water for at least
15 minutes.
If it gets on your skin
Immediately wash the affected
area on your skin thoroughly
with large amounts of water.
If you breathe it in
Go to a location where there is
fresh air, rest, and blow your
nose and gargle with water.
If you swallow it
Drink large amounts of
water and regurgitate it.

12
Using the Product
Workflow
The main workflow when using this product is as follows.
Measurement Precautions
Test water (sample)
•Use test water in the range 10 °C to 40 °C. (Note 1)
•When the pH of the test water exceeds the range 3 to 10, neutralize the water with
dilute hydrochloric acid or dilute sodium hydroxide.
•Do not use colored water for test water.
Powder reagents
•Use powder reagents designated by us.
•Use powder reagents within the expiry date.
•Do not use colored powder reagents even within the expiry date.
•Open powder reagent packs immediately before use.
AQUAB body
•When performing measurement, set the control panel surface face up and horizontal.
•When inserting the sample cell in the measurement chamber, be sure to align the
triangle marks.
•When performing zero-point recognition or concentration measurement, properly close
the cell cover to prevent light from entering the measurement chamber.
Insertion of batteries Sampling of
test water
Zero-point
recognition
Addition
of powder
reagent
Concentration
measurement
Saving of
measurement values
Memory data
transcription
Be sure to observe the following precautions when performing measurement. Note
that, if these precautions are not followed, correct measurement results will not be
obtained, for example due to measurement error.
Also, perform the corrective action according to the cause if measurement values are
not normal.

13
Sample cells
•Take care when handling sample cells to prevent them from becoming scratched.
•Wipe off dirt from sample cells beforehand.
•Use the same sample cell for zero-point calibration and measurement.
•If the outside of a sample cell is wet, thoroughly wipe off moisture on the cell.
•Before storing sample cells, clean them with deionized water after use. (Note 2)
Measurement
•When adding powder reagent to the test water to color it, be sure to perform
measurement at the specified time, as color darkens with time.
Note 1: If the temperature of the test water deviates considerably from 20 °C, we recommend
performing user calibration to make the measurement more accurate.
Note 2: Residual chlorine remaining in the sample cell might cause measurement error. Thoroughly
clean the cell before storage. If it is difficult to obtain deionized water, clean the cell thoroughly
with tap water before storage, and clean it with test water a few times before measurement.
Causes preventing normal measurement values from being
obtained and corrective actions
Problem Cause Corrective Action
Measurement
values are
slightly low.
Water from an
infrequently used
hydrant was measured.
Take a new sample and measure again after flushing
water through the hydrant for a while.
Water left for a while
after sampling was
measured.
The concentration might have changed due to
evaporation of chlorine. Sample the water again.
Your hand came into
contact with the test
water.
Free residual chlorine might have been used up.
Sample the water again.
Apparatus used was
dirty.
Thoroughly rinse and clean the apparatus to use with
test water.
The chlorine
concentration was too
high.
With test water containing residual chlorine of
15 mg/L or more, the powder reagent is not colored
properly and measurement cannot be performed. If
this happens, use AQ-202 "Residual Chlorine
(High-Concentration)."
The test water contains
coexistent substances
that affect measurement.
Remove coexistent substances that affect
measurement. In particular, measurement values
become slightly low if the test water contains nitrite
ions or ferrous ions.
Measurement
values are
slightly high.
Measurement was
performed past the
specified time.
Test water containing powder reagent gradually
colors more heavily due to the influence of dissolved
oxygen or oxidant. Perform measurement at the
specified time.
The amount of combined
residual chlorine is
greater than the amount
of free residual chlorine.
If the test water contains a large amount of combined
residual chlorine, coloring gradually begins about 10
seconds after adding the powder reagent. Perform
measurement at the specified time.
The test water contains
coexistent substances
that affect measurement.
Remove coexistent substances that affect
measurement. In particular, if the test water contains
ammonium ions, they react with free residual chlorine
to form combined residual chlorine. If this happens,
measure the combined residual chlorine, too.

14
Mode Selection Screen
Use this mode to measure
concentration.
This mode is used immediately after
the power is turned ON.
User Calibration Mode
Memory Check Mode
Use this mode to check saved
measurement values.
You can also clear data (clear all).
Use this mode to set a user-specified
concentration conversion equation.
Select this screen and determine
the selection to turn OFF the power.
Measurement Mode
Mode Selection
When using this product, select a mode according to the purpose to perform the intended work
procedure.
Select one of the three modes: measurement mode, memory check mode, and user calibration
mode. To change the mode, you can use the mode selection screen or press the [MODE] key.
Changing the Mode on the Mode Selection Screen
Holding down the [MODE] key for at least 2 seconds enters the mode selection screen. To
display the desired mode, select the screen for the mode to use (see the figures below) and
determine the selection*.
To turn OFF the power by manual operation instead of using the auto OFF function, select the
power OFF screen in this process.
Changing the Mode by Pressing the [MODE] Key
Pressing the [MODE] key once can also change the mode. However, patterns to change the
mode are limited in this case.
User Calibration Mode
Measurement Mode
Memory Check Mode
Note: Every time the [MODE] key is pressed, the
mode is changed in the direction of arrows.
* On the mode selection screen, the [ZERO]
key functions as the up key, the [MEAS.] key
functions as the down key, and the [MODE]
key functions as the enter key.

15
Inserting the Batteries
Insert four AAA alkaline batteries into the AQUAB body.
Prepare four fresh AAA alkaline batteries.
Note: The batteries included with the product are only for checking operation.
Orient the rear side of the AQUAB
body toward you.
Slot a coin or similar object into the
groove of the battery lock and turn it
to loosen.
Once it is sufficiently loose, hold the
battery lock and remove the battery
cover.
Fit the four AAA alkaline batteries
you have prepared into the battery
compartment, making sure that their
polarities are facing the correct way.
Close the battery cover, and slot a coin or similar object into the groove of the battery
lock and tighten it to lock. This completes insertion of the batteries.

16
[ How to open the cell cover ]
Align the
triangle marks.
Display example
Measurement
This section describes measurement procedures. Before starting measurement, be sure to
thoroughly read "Safety Precautions" and "Measurement Precautions."
Turning the Power ON
With the display OFF, press any key
to turn the instrument ON.
The measurement mode is used
immediately after the power is
turned ON.
Note: If the previous zero-point recognition value
is saved, "ZERO" is displayed on the screen.
If a measurement value is already saved or
user calibration setting has been configured,
indication for them is displayed.
Zero-Point Recognition
Sample 10 mL of test water in the sample cell (up to its reference line) and close the cap.
Quickly wipe off any dirt or water droplets on the sample cell with clean laboratory
paper, for example.
Note: If the sample cell is wiped with dirty paper, the dirt from that paper will transfer to the sample cell.
Be sure to use clean paper.
Open the cell cover, and load the
sample cell in the measurement
chamber. At this time, be sure to
align the triangle marks on the
sample cell and measurement
chamber.

17
[ How to close the cell cover ]
Sample cell
Align the
triangle marks.
Close the cell cover, and press the
[ZERO] key.
After zero-point recognition for 2
seconds, "0.00 mg/L" and "ZERO"
are displayed.
This completes "zero-point
recognition."
Concentration Measurement
When zero-point recognition is
completed, remove the sample cell from
the measurement chamber. Add the
provided powder reagent to the test
water inside the sample cell, close the
cap, and shake the cell thoroughly so
that the reagent is dissolved completely.
Note: Concentration cannot be measured if zero-point
recognition is not completed. Be sure to finish
zero-point recognition before measurement.
Quickly wipe off any dirt or water droplets on the sample cell with clean laboratory
paper, for example.
Note: If the sample cell is wiped with dirty paper, the dirt from that paper will transfer to the sample cell.
Be sure to use clean paper.
After the test water has reacted with
the powder reagent, insert the
sample cell into the measurement
chamber. At this time, be sure to
align the triangle marks on the
sample cell and measurement
chamber.

18
Display example
Mode Selection Screen
total residual chlorine
concentration (mg/L)
free residual chlorine
concentration (mg/L)
Combined residual chlorine
concentration (mg/L)
Close the cell cover, and press the [MEAS.] key.
(Press the [MEAS.] key within 5 seconds of pouring the powder reagent into the
sample cell.)
After concentration measurement
for 2 seconds, the resulting
concentration value is displayed.
Note: Measurement values are automatically saved
to the memory No. displayed. When 99
values are saved, following values are saved
by overwriting the oldest values.
Measurement values are not saved correctly
if the power is turned OFF by means other
than powering OFF from the mode selection
or the auto OFF function.
If the auto OFF function is activated during measurement and the display disappears,
press any key to restore it. (The previously recognized zero point is saved.)
Turning the Power OFF
When work is finished, you can turn
OFF the power by selecting the
power OFF screen at mode
selection. (see page 14.)
Note: The power goes OFF automatically
120 seconds after the last operation
due to the auto OFF function.
Finding the Combined Residual Chlorine Concentration
To find the concentration of the combined residual chlorine contained in test water, measure
the concentration of free residual chlorine by the regular procedure, add potassium iodide (sold
separately)*to the same sample cell, and then measure the sample again using the water
quality photometer to find the total residual chlorine concentration.
The value obtained by subtracting the free residual chlorine concentration from the total
residual chlorine concentration is the combined residual chlorine concentration.
*: Add one spoonful (0.1 to 0.5 g) using the spoon (provided), attach the cap, shake the sample cell to mix,
and leave for about 2 minutes.
= -

19
Display example
Saved measurement value
Memory No.
Mode Selection Screen
Memory Check Mode
Up to 99 measurement values can be saved on this water quality photometer. To check saved
measurement values (memory check) or clear all saved measurement values (memory clear),
switch to the memory check mode and perform the desired operation.
Transcript measurement data on a regular basis to be prepared
for incorrect operations, malfunctions, and accidents.
If you fail to do so, measurement data may not be obtained.
Please be aware that in the rare event of product failure, Sibata bears no
responsibility to compensate for unrecorded measurement data, and is not
responsible for loss of data or for other direct or indirect damages incurred from
such loss.
Note: In the memory check mode, the auto OFF function is disabled. When operation is finished, be sure to
return to the measurement mode.
Memory Check
Change the mode to the memory
check mode by mode selection.
(see page 14.)
Note 1: In the measurement mode, pressing
the [MODE] key starts the memory
check mode.
Note 2: In the memory check mode, the
"MEMORY" indication keeps flashing.
Using the [ZERO] and [MEAS.]
keys, display the memory No. to
be called up.
The measurement value
corresponding to that memory No.
can be checked in the main
display.
Note: In the memory check mode, the
[ZERO] key functions as the up
key, the [MEAS.] key functions
as the down key. Holding down
either of the keys changes the
memory No. in increments of 10.
After checking the saved measurement values, press the [MODE] key to return to
the measurement mode.

20
-During memory clear -
-Memory clear completed -
Display
example
Mode Selection Screen
Memory Clear
Before clearing the memory, confirm that it will not cause any
problems.
Memory clear means cleaning all measurement data saved in the product.
Once the memory is cleared, the data cannot be restored. Before clearing the
memory, thoroughly confirm that it will not cause any problems.
Change the mode to the memory
check mode by mode selection.
(see page 14.)
Note 1: In the measurement mode, pressing the
[MODE] key starts the memory check
mode.
Note 2: In the memory check mode, the
"MEMORY" indication keeps flashing.
Hold down the [ZERO] and [MEAS.]
keys at the same time for at least 5
seconds. "CLr" appears on the main
display and starts flashing. When
the main display changes to "---,"
this indicates that memory has been
cleared.
Releasing your finger from the key
while "CLr" is displayed cancels the
memory clear.
When the memory has been cleared, press the [MODE] key to return to the
measurement mode.
Table of contents
Other Sibata Measuring Instrument manuals

Sibata
Sibata LB-6N2 User manual

Sibata
Sibata AP-632TL User manual

Sibata
Sibata DM-100S User manual

Sibata
Sibata LD-6N2 User manual

Sibata
Sibata LV-20N User manual

Sibata
Sibata 080150-066 User manual

Sibata
Sibata VB-3T User manual

Sibata
Sibata LD-5R User manual

Sibata
Sibata LD-5 User manual

Sibata
Sibata Aquab AQ-202 User manual