Simrad RS20S User manual

General Information | RS20S User Guide
General Information
Your RS20S provides the following useful features:
•Prominent channel display
•Built-in GPS receiver and antenna
•With external GPS antenna connection
•Adjustable contrast settings for the LCD
•Adjustable keypad backlighting for easy night-time use
•Waterproof and submersible to comply with IPx7
•GPS latitude and longitude (LL) and time display (when connected
to a GPS source)
•Choice of High (25 W) or Low (1 W) transmission power
•4 key handset mic with built-in speaker
•Powerful 4 W external audio output
•Access to all currently-available marine VHF channel banks (USA,
Canada, International) including weather channels where available
(model dependant)
•Dedicated CH16/9 key for quick access to the priority (international
distress) channel
•TRI key to select DUAL/TRI scan
•Dedicated Wx (Weather) key
•DSC (Digital Selective Calling) capability that meets Global DSC
Class D Standards
•Separate CH70 receiver included built in
•DISTRESS call button to automatically transmit the MMSI and
position until an acknowledgement is received
•Contacts list that stores up to 50 names with MMSI numbers
•MMSI storage for three favourite groups
•Group Call and All Ships Call facility
•LL position polling information
•Weather alert facility where available (US mode)
•ATIS facility for inland waterways (EU mode)
•With DSC Auto-Switch disable and DSC Test function
1

General Information | RS20S User Guide
How to display and navigate menus
The majority of the buttons, and both of the rotary knobs, can open
menus with multiple options.
The channel knob is used to scroll through the options. The
currently selected option is indicated by a black highlight bar, and
the text is inverted to white.
Selection of a highlighted option is made by pressing the channel
knob.
If a list of options is too long for the page, a scroll bar is shown on
the right side of the screen. The black rectangle on the scroll bar
indicates the highlighted options relative position in the list.
Press the Exit button to step backwards to the previous menu page,
or exit the menus completely.
Entry of alphanumeric data
Rotate the channel knob to scroll through the alphanumeric
characters.
Press channel knob, to select and step to the next character.
To step backwards, press the MENU button. Press X to cancel entry
and return to previous menu.
LCD symbols and meanings
When the RS20S starts up it momentarily displays the brand, model,
region, software version, and MMSI.
Scroll bar indicates further
options above and below
displayed text

General Information | RS20S User Guide
During normal operation, the following icons may be displayed on
the screen depending on setup:
Symbol Meaning
Transmitting
Transmition power
Weather channel stored by user (EU & INT only)
Weather alert enabled (USA/CAN only)
Receiver Busy with incoming signal
Missed DSC call
Duplex channel selected (off when Simplex)
Local mode enabled (used when in areas of high radio
traffic, ie inner harbour)
Channel can only be received on
DSC functionality is enabled
DSC functionality is enabled, auto switching is turned
off
EU models only - must be enabled when in European
inland waterways
Low Battery warning (activates at 10.5 V)
Channel bank is set to USA
Channel bank is set to International. (Channels
available depends on selected Country mode)
Channel bank is set to Canada
Weather channel bank active replaces channel bank
icon temporarily (USA/CAN only)
Channel is saved in the MY CHANNELS list
Track your Buddy feature is active
TRI watch or DUAL scan is active
GPS simulator is active

General Information | RS20S User Guide
A typical display:
1. Channel is set to high power transmit
2. Missed call in the DSC call log
3. Channel is busy
4. Volume is under active control
5. Current channel saved in ‘My Channels’
6. Track your buddy is enabled
7. Current channel will be skipped during a scan
8. Volume level indicator
9. Time (derived from GPS) - UTC offset is applied
10. Latitude/Longitude
11. Squelch level indicator
12. Channel number (2 or 4 digits)
13. The USA channel bank is active
14. DSC functionality is enabled, but autoswitch is off
15. Weather alert function is enabled

General Information | RS20S User Guide
Key functions
The following describes the direct functions of the keys/knobs.
Where necessary, additional detail on any menus accessed by keys is
covered in following chapters.
6
1
2
3
4
5 7 8 9 10
9
11
12
13
1. Channel knob / Press to Select
Turn knob for channel selection, menu scrolling, alphanumeric
entry, and fine adjustment of backlight level (dependent on active
menu).
Short press to make selections in menus.
Long press to open MY CHANNELS.
2. VOL / SQL
Volume and Squelch level.
Short press knob to select which control to adjust. Which is
currently selected is indicated by a small triangular arrow above
the level bar for each option. Turning the knob clockwise increases
setting, anti-clockwise decreases it. Volume control is common to
internal and external speaker.
Long press to open SHORTCUTS.
3. EXIT
Press EXIT when navigating menus, to clear incorrect entries, to
exit from a menu without saving changes, and to back up to the
previous screen.
4. DSC CALL / MENU SELECT
Short press to enter the DSC Call Menu and make DSC calls.
Long press to open the MENU SELECT page.
5. Power / Backlight
Short Press to adjust backlight level sequentally.
Repeated short press of the power button will step through large
backlight adjustments. The Channel knob can be used to make finer
adjustments.

General Information | RS20S User Guide
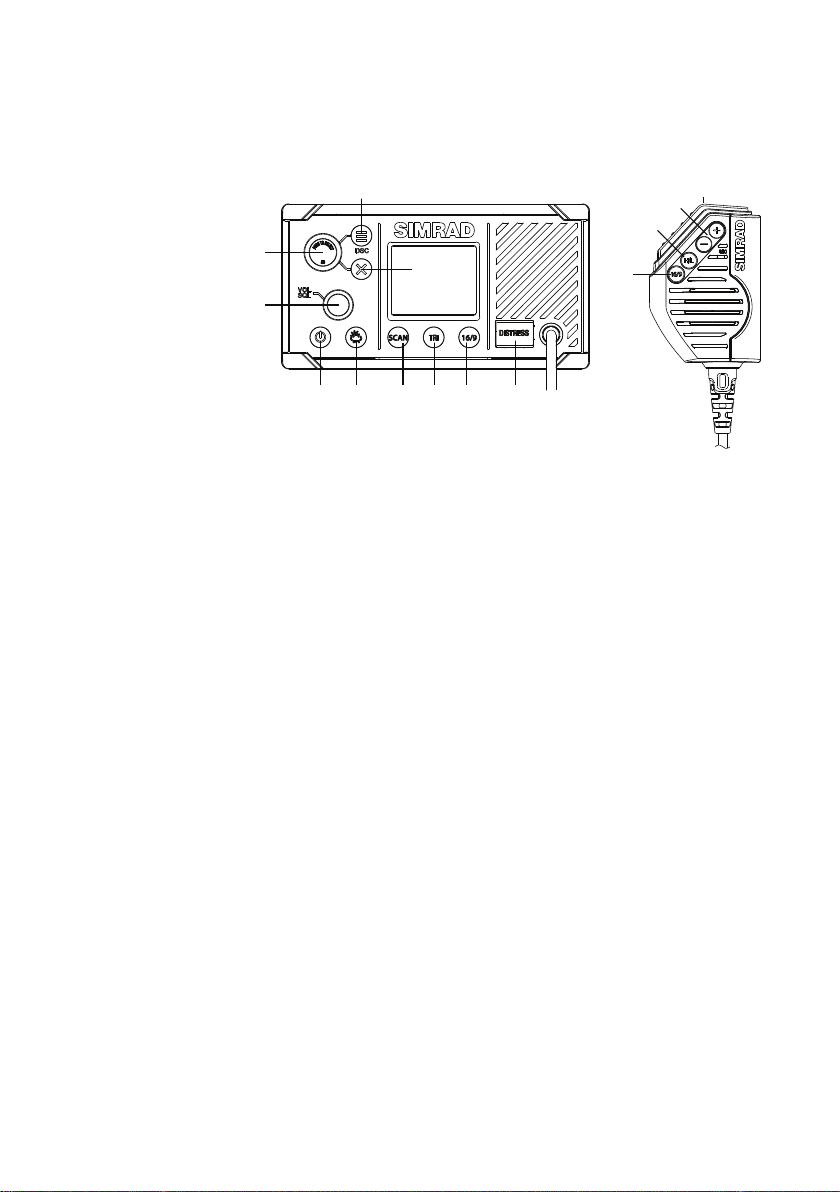
Long press to turn radio on or off.
6. Weather Channel
Short press (US/CAN models): press to hear the most recently
selected NOAA/Canadian weather station.
For all other models, changes channel to user programmed choice.
Long press (non US/CAN models): to store current channel as the
weather channel.
7. SCAN
Short press to enter ALL SCAN mode.
ALL SCAN sequentially scans all channels for activity.
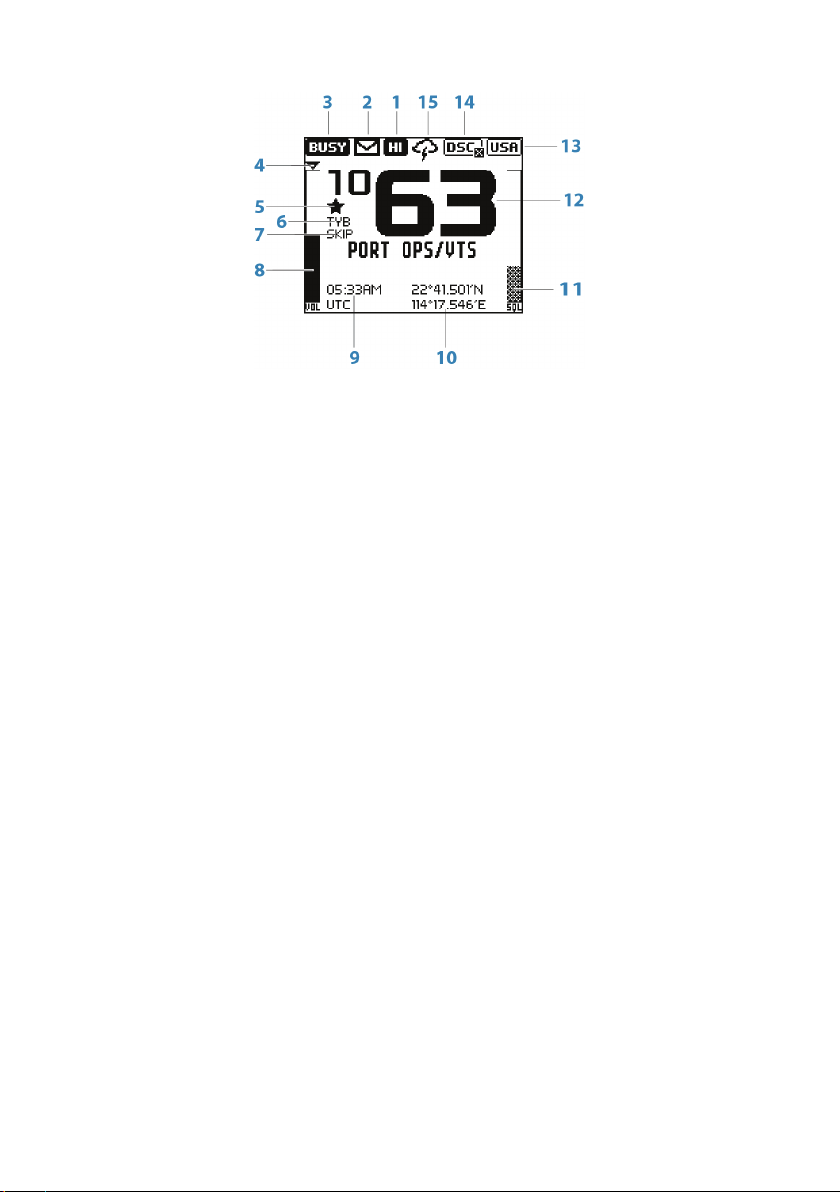
When a signal is received, scanning stops at that channel and the
BUSY icon appears on the screen. If the signal ceases for more than 5
seconds, the scan automatically resumes.
Turn the channel knob to temporarily skip over (lock out) a busy
channel and resume the scan. The direction turned determines if
the scan goes up or down the channel numbers (ie ‘forward’ or
‘reverse’). If it is still busy when the scan completes a full cycle, it will
stop again at this channel. Note that it is not possible to skip over
the priority channel.
Press ENT to permanently skip over the channel. The SKIP icon will
show on the LCD for this channel.
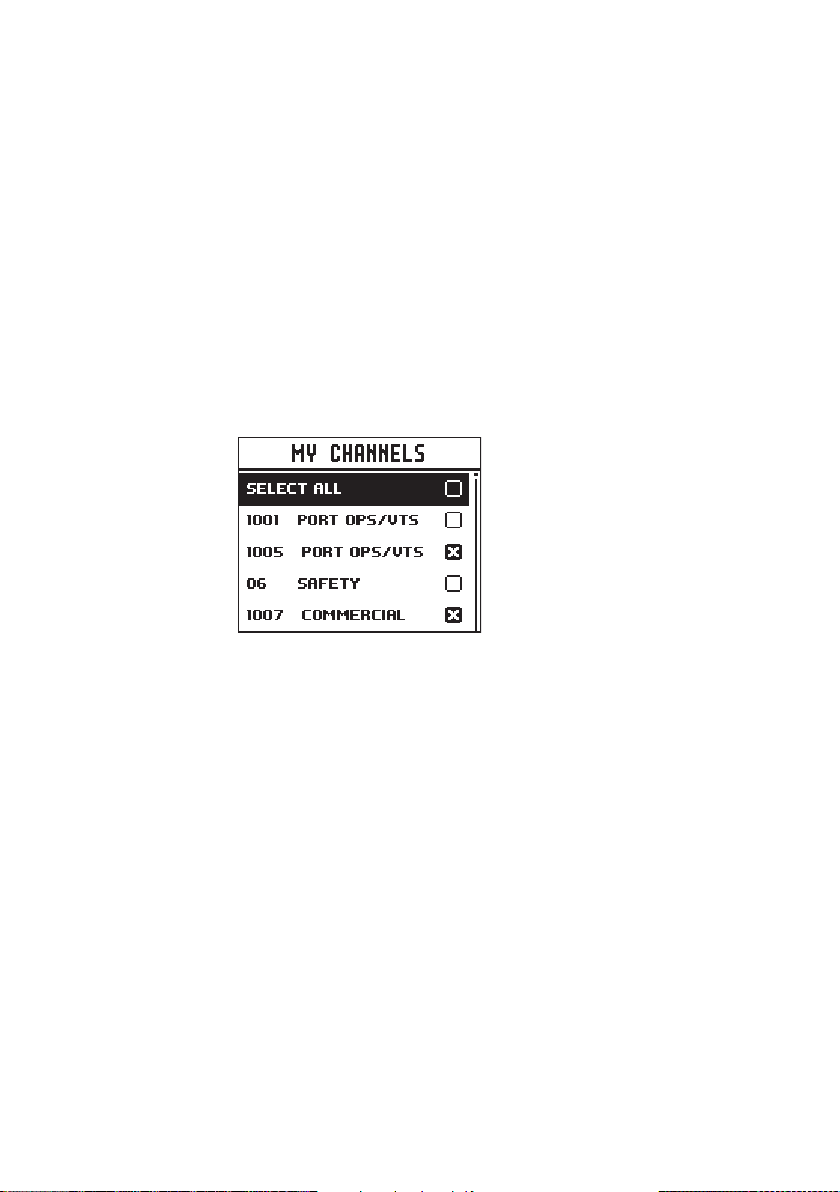
To cancel a skipped channel, select the channel while in normal
mode (non-scan mode) then press the ENT key - the SKIP icon will
disappear. Repowering the radio also restores all skipped channels.
Press SCAN or EXIT while scanning is active to stop at the current
channel and return to normal operation.
Long press SCAN from normal operation to enter the SCAN menu.
8. TRI (WATCH)
Short press to start DUAL WATCH or TRI WATCH (if ‘watch’ channel
set)
Long press to set the current channel as the watch channel.
When a short press is made on the TRI key, the radio will either
switch to DUAL or TRI watch mode depending on whether a watch
channel has been setup.
Without a watch channel the radio will go to DUAL WATCH, where
the channels ‘watched’ are the current channel and the priority
channel (the distress channel, CH16 for most countries).
With a watch channel selected, TRI WATCH is enabled, where the
channels ‘watched’ are the current channel the ‘watch’ channel, and
the priority channel (the distress channel, CH16 for most countries).
If the radio is set to ‘Country: USA’, two priority channels are watched
- Channel 9 and Channel 16.

General Information | RS20S User Guide
9. 16 / 9 (radio and handset)
Short press to change to priority channel. Press again to return to
original channel.
For US models: Long press to make Channel 09 the priority
channel.
The default Priority Channel is CH16.
10. DISTRESS
Short press to start a distress call, where the nature of distress can
be selected from a list.
Long press the distress button to initiate an ‘undesignated’ distress
call.
This call is broadcast to all DSC equipped radios, so will create an
alarm on every DSC radio within range.
If position information is available it will be included in the
transmition.
11. H/L (handset mic only)
Transmission Power.
Press to toggle between high (25 W) or low (1 W) transmission
power for the entire channel bank. The HI or LO selection is shown
on the LCD.
Some channels allow only low power transmissions. Error beeps will
sound if attempting to change the transmission power while on one
of these channels.
Some channels allow only low power transmissions initially, but can
be overridden to high power by pressing (and holding) H/L after
depressing PTT. Keep the H/L button pressed down after releasing
the PTT button, if wanting to transmit again on high power.
12. + /- (handset mic only)
Channel change.
Short press (+) goes up one channel, or (-) goes down one channel.
Holding either key will, after a short delay, step rapidly through the
channels.
13. PTT (handset mic only)
Push-to-talk button.
Press button to transmit. Only depress for duration of message to be
broadcast. Radio can’t receive while it is transmitting.

The radio menus | RS20S User Guide
The radio menus
A long press of the MENU button opens MENU SELECT page. The
following shows the menu structure (top and 2nd level only):
ALL SCAN
ALL CHANNELS + 16
MY CHANNELS
MY CHANNELS + 16
EDIT MY CHANNELS (choose channels)
DUAL WATCH
TRI WATCH
SET WATCH CHANNEL (choose channel)
TIME DISPLAY (ON / OFF)
POS DISPLAY (ON / OFF)
COG/SOG (ON / OFF)
BACKLIGHT (>)
CONTRAST (0-10)
SENSITIVITY (DISTANT/LOCAL)
UIC (USA/INT’L/CANADA)
POWER OUTPUT (HIGH/LOW)
CH NAME (>)
KEY BEEP (0-10)
UNITS (>)
INT SPEAKER (ON/OFF)
EXT SPEAKER (ON/OFF)
GPS (>)
TIME (>)
VESSEL CALLSIGN (>)
MENU TIMEOUT (>)
DSC FUNCTION (X)
USER MMSI (>)
ATIS FUNCTION (ON/OFF)
SEA/INLAND USE (SEA/INLAND)
ATIS MMSI (>)
INDIVIDUAL ACKN. (AUTO/MANUAL)
POS ACKNOWLEDGE (>)
AUTO SWITCH (ON/OFF)
TEST ACKNOWLEDGE (AUTO/MANUAL)
RX DISTR WHILE OFF (X)
DSC TIMEOUT (>)
WATCH
DISPLAY
SCAN
RADIO SETUP
DSC SETUP
ALARMS
GPS ALERT (>)
WX ALERT (>)
DSC ALARM (>)
RESET
(EU mode)
(EU mode)
(EU mode)
(US/CAN mode)
(YES/CANCEL)
Key:
(>) further menu options
(X) toggle selection. ‘X’ means option enabled.
Scan
This menu is for choosing a scan mode to enable, as well as
selection of the channels scanned per the MY CHANNELS list.
¼Note: Scanning is not available if ATIS mode is turned on.
All scan
Scans all channels cyclically.
2

The radio menus | RS20S User Guide
All channels + 16
Scans all channels cyclically, but checks the priority channel after
every channel step
My channels
Scan all channels selected in EDIT MY CHANNELS
My channels + 16
Scans all channels selected in EDIT MY CHANNELS, while also
checking the priority channel after every channel step.
Edit my channels
Allows creation of a custom list of channels - used in a MY
CHANNELS scan.
Watch
This menu is for choosing a watch mode to enable, as well as
selection of the watch channel. Watch modes can be thought of as
a channel scan on a subset of channels, where scanned channels
are ‘listened’ to briefly every 3 seconds, to determine if there is any
active radio communication.
¼Note: Watch modes are not available if ATIS mode is turned on.
Dual watch
Select this to watch the current channel and the priority channel
(Channel 16).
TRI watch
Select this to watch the current channel, the user selected ‘watch’
channel, and the priority channel (Channel 16).

The radio menus | RS20S User Guide
Set Watch Channel
Allows a watch channel to be selected from all available channels.
Selected channel is used by TRI WATCH mode.
¼Note: If the radio is configured for USA market, two priority channels
are watched: Channel 9 and Channel 16.
Display
This menu allows the user to partially customize the screen
information displayed, and adjust the screen for best visibility to suit
the user and operating conditions.
Time display
Select to switch the display of Time to ON or OFF.
If turned ON, the display of COG/SOG is turned off, due to screen
space constraints.
LOC (Local Time) is displayed below the time if a UTC (Coordinated
Universal Time) offset has been entered; otherwise UTC is shown in
it’s place if no offset has been applied.
POS display
Select to switch ON or OFF the display of position provided from
connected GPS. If no GPS is connected and a manual entry has
been made, the position will be displayed prefixed with an ‘M‘.
COG/SOG
Select to switch ON or OFF the display of COG/SOG provided from
the selected GPS source.
If turned ON, Time display is turned OFF, due to screen space
constraints.
Backlight
Backlight level
Select to make adjustment to the backlight level using the Channel
knob. Range is OFF, then 1 to 10.
Press MENU SELECT button to activate night mode (inverts display).
Network group
Set this value to the same as other Simrad devices on NMEA 2000 in
order to control backlight levels simultaneously. To keep backlight
control inpedenent, set to a value not used elsewhere.

The radio menus | RS20S User Guide
Contrast
Select to make adjustment of the screens contrast, using the
Channel knob. Range is 00 to 10.
Radio setup
The Radio setup menu covers settings that are typically configured
at installation, and seldom need changing.
Local/Dist
Use LOCAL/DIST to improve the sensitivity of the receiver either
locally (LOCAL) or over distances (DIST).
LOCAL is not recommended for use in open sea conditions. It is
designed for use in areas of high radio noise; for example, close to a
busy port or city.
UIC
Select between USA, International or Canadian channel banks. The
selected channel bank is displayed on the LCD along with the last
used channel. All the channel charts are shown in chapter 8.
¼Note: UIC may not be available on all models.
Power output
Select to toggle between high (25 W) or low (1 W) transmission
power for the entire channel bank. The HI or LO selection is shown
on the LCD. Low power transmission draws significantly less current
(about 1/4) from the battery, so is recommended for short range
communication, and where battery capacity is limited.
¼Note: Some channels can’t be switched to high power, and will
show LO regardless of power output setting in menu.
CH name
CH NAME gives you the option to edit or delete the channel name
descriptions displayed on the screen. Select to edit the existing
description of the channel currently in use. It can be a maximum of
12 characters long.
Key beep
Select to allow adjustment of key beep volume.
Volume can be set from 00 - 10 (where 00 is off, and 10 is loudest).

The radio menus | RS20S User Guide
Units
Select SPEED to choose whether displayed in KNOTS, MPH, or KPH.
Select COURSE to toggle between displaying in MAGNETIC or TRUE.
A true north heading is corrected for magnetic declination. A
magnetic north heading source must also output magnetic
variation data if the heading is to be displayed as a true north value.
Int speaker
Select to switch the radio’s internal speaker ON or OFF.
Ext speaker
Select to switch the radio’s external speaker ON or OFF.
GPS
MANUAL
Select MANUAL to enter a GPS position (and time) from another
source when radio is not receiving position data from an external
antenna, or no antenna is connected.
The manually entered GPS position can be used in DSC calls.
If POS Display is turned ON, the latitude and longitude are shown on
the screen with a prefix‘M’ indicating manual entry.
¼Note: The manual entry is automatically replaced when a real GPS
position is received via the NMEA 0183, NMEA 2000 or Internal GPS,
depending on the GPS SOURCE setting.
GPS SOURCE
•Choose NMEA 2000 for GPS via NMEA 2000 network. A list of
available devices installed on your NMEA 2000 network will be
displayed. Choose AUTO SELECT to pick the best GPS source visible
on NMEA 2000 or any other device listed.
•Choose NMEA 0183 to have the radio listen for GPS data on its serial
NMEA 0183 port
•Choose BUILT-IN to use the internal GPS system. You then have a
choice of using the INTERNAL GPS antenna built into the radio, or
an optional EXTERNAL GPS antenna connected to the radio external
GPS antenna SMA port.

The radio menus | RS20S User Guide
CHECKSUM
Select to toggle ON or OFF. When ON, NMEA 0183 data received is
validated. If the checksum does not match, the data will be ignored.
When OFF, there will be no tolerance to data corruption.
GPS SIM
Select to toggle ON or OFF.
Whenever the GPS Simulator is turned ON, simulated Speed Over
Ground (SOG), Course Over Ground (COG), and LL position appear
on the screen. This is for the purpose of demonstration only. The SIM
icon is displayed to warn the user it is in this mode.
¼Notes:
•It is not possible to send a DSC transmission when in Simulator
mode.
•The GPS Simulator is set to OFF whenever the radio has the power
cycled, or real GPS data is available.
Time
Time Oset
Select TIME OFFSET to enter the difference between UTC and local
time. 15 minute increments can be used with a maximum offset of
±13 hours.
¼Note: Does not automatically adjust for Daylight Savings Time.
Time Format
Select to toggle between 12 and 24 hour format.
Vessel call sign
Select to enter vessel callsign. Not used by radio - purely for record
keeping purposes.
Menu timeout
An inactivity timeout can be set up to return the radio to normal
operational mode when no activity is seen from the radio operator
while radio is displaying a menu.
Select between NONE, 5 MINS, 10 MINS, and 15 MINS.
(default is 10 MINS).
¼Note: A different timeout is used when the radio is left in a DSC call.
See “DSC timeout” on page 23

The radio menus | RS20S User Guide
DSC setup
DSC Function
It’s recommended DSC functionality is always enabled, unless
operating the vessel in an ATIS region. An MMSI number must be
entered in radio before the DSC function can be enabled.
User MMSI
Enter an MMSI number to access the radio’s DSC functionality. This
unique identifier must be supplied a local radio spectrum authority.
DO NOT enter a random ‘made up’number.
¼Note: Contact a Simrad dealer if you need to change your MMSI
after initial input.
ATIS function (EU ATIS radios only)
ATIS must be enabled when navigating inland waterways in
signatory countries of the RAINWAT agreement. It should NOT be
used outside these regions. DSC functionality is not possible when
ATIS is turned on.
Sea/Inland mode (EU ATIS radios only)
Toggles between DSC (Sea) and ATIS (Inland) modes. Does not allow
both to be selected at the same time.
ATIS ID (EU ATIS radios only)
Enter an ATIS number to access the radio’s ATIS functionality. This
unique identifier must be supplied a local radio spectrum authority.
DO NOT enter a random ‘made up’number.
¼Note: Contact a Simrad dealer if you need to change your ATIS ID
after initial input.
Individual acknowledge (“INDIVIDUAL ACK”)
The radio can be configured to automatically acknowledge an
incoming ‘individual’call, or require manual intervention:
AUTO
After a 15 second delay, radio will switch to requested channel, and
send an automatic acknowledgement, ready for conversation.
US model default.

The radio menus | RS20S User Guide
MANUAL
Operator must manually choose to send acknowledgement, as well
as change to requested channel. EU model default.
¼Note: This does not apply for calls types other than ‘Individual’.
Position request acknowledge (“POS ACK”)
The radio can be configured to automatically acknowledge
an incoming position request, require manual intervention to
acknowledge, or simply ignore them:
AUTO
Sends current position automatically to calling radio.
MANUAL
Operator must manually choose to send position information.
OFF
All incoming position requests are ignored.
Auto channel switch (“AUTO SWITCH”)
This setting only relates to All Ships and Group DSC calls.
When a DSC call is received, it may include a request to change
to a specific channel for subsequent communications. With AUTO
SWITCH set to ON, the radio will switch channels after a 10 second
delay. The radio will also display options to switch immediately, or
reject the request and stay on the current channel.
With AUTO SWITCH set to OFF, any channel change request will
require manual confirmation.
Test acknowledge (“TEST ACK”)
The radio can be configured to automatically acknowledge an
incoming test call, or require manual intervention:
MANUAL
Operator must manually choose to send acknowledgement, or
cancel.
AUTO
The DSC test call is automatically acknowledged after a 10 second
delay.

The radio menus | RS20S User Guide
Receive distress while o
Enabling this feature will allow the radio to raise an alert for DSC
distress calls, even when the DSC feature is turned off. This will work
regardless of whether or not an MMSI number has been entered.
DSC timeout
An inactivity timeout can be set up to return the radio to normal
operational mode when no activity is seen from the radio operator
while radio is engaged in a DSC call.
Distress calls have a discrete timer from that used for all other DSC
calls:
Distress
Select between NONE, 5 MINS, 10 MINS and 15 MINS.
(default is NO TIMEOUT).
Non Distress
Select between NONE, 5 MINS, 10 MINS and 15 MINS.
(default is 15 MINS).
Alarms
GPS alert
The GPS alert is a warning to the user that the selected GPS source
is not outputting valid position data.
It comprises of an audible alarm and visual alarm (screen flash and
warning text).
GPS alert function
Turns ON or OFF all alerts for missing GPS data, including audible
alarm, screen flash, and warning text.
Alert volume
Select between HIGH, LOW, and OFF.
Screen ash
Select between ON and OFF.
WX alert (US/CAN only)
The WX alert is a warning to the user that a special weather station
alert has been received.
It comprises of an audible alarm and visual alarm;

The radio menus | RS20S User Guide
WX alert function
Turns ON or OFF the radios response to weather alerts. This includes;
automatic switching to the last used weather channel, audible
alarm, screen message, and flashing backlight.
Alert volume
Select between HIGH, LOW, and OFF.
Screen ash
Select between ON and OFF.
DSC Alarm
The alert volume and screen flash for some incoming call types can
be altered.
SAFETY, ROUTINE and URGENCY calls can individually be set to have:
Alert volume
HIGH, LOW or OFF.
Screen ash
ON or OFF.
¼Note: It is not possible to alter distress call alert settings
Reset
Use this setting to return every setting to the factory defaults except
all MMSI settings, entries in your buddy list and any customized
channel names.

DSC call menu | RS20S User Guide
DSC call menu
DSC (Digital Selective Calling) is a semi-automated method of
establishing VHF, MF, and HF radio calls. One big advantage that
DSC enabled radios offer is that they can receive calls from another
DSC radio without being on the same channel as the calling radio.
The calling radio will provide details on what channel to switch to
so that voice communication can be established. There are various
types of DSC calls - the type of call made determines information
sent with the call, and how other radios respond to the incoming
call.
The following options are available when the DSC button is pressed;
DSC calls
There are four call types, as well as related options, that can be
accessed from this menu;
Individual
Used to place a call to a single other vessel.
The call can be initiated by selected an existing vessel in the
CONTACTS; by entering in a new vessel’s MMSI (MANUAL); or by
selecting a vessel in the RECENT list.
When the SEND TO page is displayed, turn the channel knob to
select the channel to use for voice communication.
Distress
The distress menu can be accessed via the DSC Calls menu, or
directly by a short press of the Distress key on the front of the radio.
The nature of the distress call must be selected from the list of
options - this will be displayed on other radios receiving the call.
After the Distress Call is sent, the radio waits for an acknowledg-
ment.
3

DSC call menu | RS20S User Guide
The Distress Call is automatically re-sent every 3.5 to 4.5 minutes
until a distress acknowledgement is received.
Alternatively the operator can select:
RESEND (under OPTION - access by pressing the Menu/DSC button)
used to immediately resend the Distress Call
PAUSE (under OPTION - access by pressing the Menu/DSC button)
used to pause the automatic Distress Call resend timer
CANCEL (press ‘X’ button) to cancel the Distress Call
If a distress cancel is sent, the display shows PTT --> REASON,
prompting the operator to state the reason for the cancellation.
After a DISTRESS ACK is received, the alert should be silenced, and
the reason for distress should be clearly stated, pressing the ‘PTT’ on
the MIC and talking.
The following information (if available) is contained in the Distress
Call:
•Nature Of Distress (if selected)
•Position information (the latest GPS or manual input position is held
for 23.5 hours, or until the power is turned OFF).
Group
Used to place a call to a known group of vessel, all using the same
‘Group Call ID’(GCID) number.
The call can be initiated by selecting an existing group from the
group list, by entering a new GCID, or by selecting a group from the
RECENT list.
When the SEND TO page is displayed, turn the channel knob to
select the channel to use for voice communication.
Table of contents
Other Simrad Radio manuals

Simrad
Simrad RT62 User manual

Simrad
Simrad RS25-E User manual

Simrad
Simrad RS90S User manual

Simrad
Simrad RS20 User manual

Simrad
Simrad Axis30 User manual

Simrad
Simrad WR20 RemoteCommander User manual

Simrad
Simrad RS81 User manual

Simrad
Simrad RS35 VHF HS35 User manual

Simrad
Simrad RS10U User manual

Simrad
Simrad RT62 User manual

Simrad
Simrad HT50 User manual

Simrad
Simrad HT50 User manual

Simrad
Simrad HT50 User manual

Simrad
Simrad FishNet 144 User manual

Simrad
Simrad Shipmate RS8400 Reference manual

Simrad
Simrad RD68 User manual

Simrad
Simrad HH36 User manual

Simrad
Simrad RD68 User manual

Simrad
Simrad RD68 User manual

Simrad
Simrad RS40 User manual