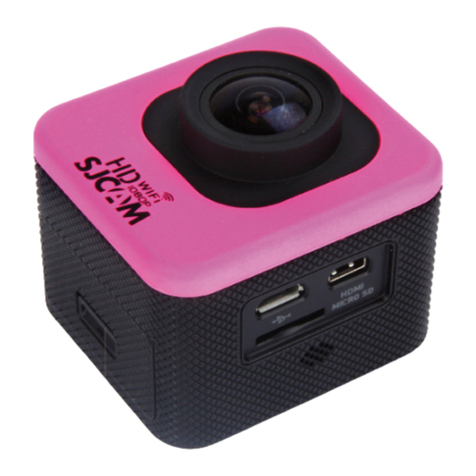
SJCAM M10+ User manual


Warning
1. It is a high-precision product, do not fall or crash.
2. Do not expose the unit to strong magnetic objects, such as magnet and electrical motor. Avoid strong radio waves.
Strong magnetic fields may cause the products breakdown or ima ges and sounds damage.
3. Never leave the products exposed to high temperatures and direct sunlight.
4. Please choose branded Micro SDcard. Neutral cards are not guaranteed to work normally.
5. Do not place Micro SD card near strong magnetic objects to avoid data loss.
6. In case of overheating, smoke, or unpleasant smell in the process of charging, unplug your device immediately to
prevent fire hazard.
7. While it is charging, keep the product out of children’s reach. Power line may cause children accidental suffocation or
electric shock.
8. Keep the device in cool, dry and dust-proof places.
Preface
This product is a high-definition digital motion video recording device tailored to market demand.
It has a variety of industry-leading features including digital video recording, photo shooting, audio
recording, video display and detachable battery, which makes it perfect for vehicle data recording,
photo-shooting, outdoor sports, home security, deep-water probing, etc., allowing you to film at
anytime, anywhere. And it has a variety of patents.
FPV

Product Features
> A water-resistant casing that allows you to film fascinating water sports; water-resistant up to 30 meters under water
>1.5 inch Ultra HD screen
> WIFI
> Detachable battery that is easy to replace and prolongs your camera’s service life
> Vehicle-mounted recording
> 12- megapixel HD wide-angle lens
> HDMI HD output
> Web camera
> Support storage cards up to 32GB maximum
> Multiple video recording formats: 2K 1080P 720P
> Recorded in MP4 format
> Multiple photo shooting modes: Single shot, Snapper
delbanenoitpyrcneoediV>
> AV video output
> Mini appearance, diversified colors available


Operating Instructions
1. Inserting Micro SD Card
Note: Please choose branded Micro SD card and format it on computer before use. Neutral cards are not guaranteed to work normally.
2. Installing and removing batteries
A Press on battery cap to open it.
B Correctly install battery into camera as indicated by +/- symbols and direction of arrows marked on battery until it’s in place.
C Battery Gauge: Please refer to diagram.
D Remove Battery: Open cap to take battery out.
3. Charging
A Charging can be done by either connecting M10+ to computeror power adaptor.
B Charge M10+ on vehicle by connecting it to car charger.
C M10 can record video while charging (Switch into Vehicle-mounted Mode in “Menu”)
Charging of M10+ can be done even when it’s powered off.
4. Vehicle mountedvideo record
A Firstly set up menu, and search vehicle- mounted mode in the menu, then power on(it will automatically and circularly
record video)
B Plug in vehicle-mounted charger, and power on the vehicle, and the machine will automatically start. switch off, the
machine will automatically power off.
5. Switching camera on and off
A Press and hold power switch for 3 to 5 seconds to turn it on / off.
B Switch it on and off by turning display screen on and off.
6. Mode Switching
Switch between video recording / photo shooting / playback / menu by pressing “Power On-Off” button.
recording mode, while photo shooting mode. Symbols are displayed on top of screen. Refers to the function of
video playback.
7. How to record videos and configure recording setting
1 Video Recording

Switch to recording mode icon in the upper left corner of the screen. Press OK
to start recording and the icon in the upper left corner will start t again if you
want to stop and the icon will disappear.
Switch the camera on icon in the
upper left corner of display screen and the camera is in photo
Shooting Pattern: Single shot / Self-timer (3s/5s/10s) / Continuous Shooting
8. WI-FI connection
1. This product can connect a mobile phone with android or IOS system or a panel computer via WIFI, the operation steps are as
following:
A. Install SJCAM ZONE software on a mobile phone or a panel computer (you can search and download on Google Play for android
system, or search and download on APP Store for IOS system.
B. After power on, press WIFI key on the camera, WIFI icon displays on the screen, M10+WIFI WiFi displays.
C. Enable WIFI on a mobile phone or a panel computer, search WIFI account for the camera on IOS system, account:M10+wifi, and
connect, the initial Password word will display on screen, open APP of mobile on Adroid system, the
account: M10+WIFI, then connect,
D. When WIFI connected, WIFI Connection Ready displays on the screen,
E. After SJCAM ZONE software operates on a mobile phone or a panel computer, images recorded by the camera will be real-time
displayed on a mobile phone or a e via related icons related to the software or set function
parameters of the camera
2. WI-FI password change
A. Power on and enter WIFI setting menu, the password can be set as per your requirement.
After you are done recording, use a USB cable to export the videos onto a computer to play. Or you can take
the Micro SD card out and access the image data with a card reader.

Note: Specifications could be subject to modification due to upgrading or updating. Please regard the actual product as the standard form.
Liquid Crystal Display (LCD) 1.5LTPS
snelelgna-ediwDH+A°071sneL
Language Options English / German / French / Spanish / Italian
enapaJ/deifilpmiSesenihC/lanoitidarTesenihC/eseugutroP se / Russian
Resolution of Videos Recorded 2K (2560*1440 ) 30FPS 1080P (1920*1080 ) 60FPS
1080P (1920*1080) 30FPS 720P (1280*720) 120FPS
720P (1280*720) 60FPS 720P (1280*720) 30FPS
Video Format MP4
Compressed Format of Videos H.264
Resolution of Photos 12M/8M/5M
DSorciMegarotS
Shooting Mode Single Shot / Self-timer (3s / 5s / 10s / Continuous Shooting
Frequency of Optical Source 50Hz/60Hz
USB Interface USB2.0
Power Source Interface 5V1A
Video time after WIFI on About 1080P 70 minutes
Video time after WIFI off About 1080P 90 minutes
Battery Capacity 900MAH
Power Dissipation 500mA/4.2V
Recording Time About 1080P/ 90 min.
Charging Time About 3 hours
Operating System (OS) Windows XP/VistaorAbove/Win7/Mac os
Dimension 48.1*43.3*43.4
Note: Specifications could be subject to modification due to upgrading or updating. Please regard the actual product as
the standard form.

Car Bracke
TV Line AV Line Charger Battery
HDMI Line Waist Bandage Car Charger

Waterproof Case
Fixed Base
Helmet Base
Bandage Data Wire 3M Adhesive Manual Wiper
Wiper
Switch Supprt 1 Switch Supprt 2 Switch Supprt 3 Adaper
Bicycle Stand Base 1 Base 2 Clip

Achtung bei der Bedienung
1. lagen ist verboten
2. Lassen Video Kamera entfernt von Artikel mit starkem Magnetismus oder Radiowelle, zum Beispiel Magnet oder Elektromaschine, weil
starkes Magnetfeld vielleicht Produkt-Ausfall machen, oder einflussen Bild oder Stimme.
3. Lassen Video Kamera entfern ur oder direkter Sonneneinstrahlung.
4. Karte aus,weil allegemeine Karte normales Nutzen nic
5. Micro SD Karte in Magnetfeld od liegen ist verboten, um in Micro SD Karte gespeicherte Daten nicht
zu verlieren.
6. richen Sie etwas verbrannt ,bitte ziehen Sie Stecker aus, um
Brandkatastrophe zu vermeiden.
7. In Ladevorgang lassen Sie bitte den Artikel entfernt von Kindern, weil Netzteil vielleicht Kindern Erstickung oder Stromschlag machen
wird.
m, trockenem Ort ohne Staub.
Vorwort
e Audio-
und Videoaufnahme, Fotografieren, Aussprache, Video Display, Ab e beim
Auto-Rekord, Outdoor-Sport, Haushalt-Sicherheit, Wasserforschun lt dieses Produkt eine Reihe von Patente.
FPV

Charakter
> Ein Gehäuse mit wasserdichter Funktion ist geeignet für Ihre Aufnahme von wunderbaren Wassersport -Szenen. Starke
Wasserdichtkeit unter Wasser 30m
> Aufnehmen-Funktion
>1,5 -Zoll Ultra Hoch Definition -Display
> Drahtlose WiFi-Funktion
> Batterie ist abziehbar, einfach zu wechseln und Lebensdauer zu verlängern
> Auto Video Aufnahme Funktion
> Aufnehmen-Funktion mit Stromversorgung
> 12 Millionen HD Weitwinkel-Objektiv
> HDMI HD-Ausgang
> Webcam
> max 32GB Speicherkarte unterstützen
> zahlrei che Aufnahme Format 2K 1080P 720P
> Video mit MP4 Format aufzunehmen
> Verschiedener Fotografieren- Modus, zum Beispiel Einzel.Aufnehmen oder Automatisch-Serie- Aufnehmen
> Video-Dokument ist mit Sperrung
> AV Video Ausgang Funktionen
> Mit Mini-Formgeschaltung und verschiedenen Farbe


Bedienung
1. Micro SD Karte einstecken
Achtung: Bitte die Marke-SD Karte auswählen, die Sie nur nach dem Formatieren bei Computer verwendet werden kann. Es ist nicht
sicher,ob die allgemeine neutrale Karte nutzbar sein.
2. Batterie installieren und entfernen
A. das Akku-Gehäuse hinunter gleiten, dann wird es geöffnet sein.
B. Laut der gezeichneten Anode und Katode, auch der angegebenen Richtung von dem Pfeil legen Sie die Batterie richtig in die
Videokameraein,bis gut installieren.
C. HinweisderLeistungvon Batterie: Bitte sehen Sie die Darstellung.
D. Batterie entfernen: das Gehäuse abzuschieben, dann Akku ausnehmen.
3. Aufladen
A. kann mit Computer oder Adapter anschließen, um aufzuladen.
B. kann einfach mit Auto-Ladengerät aufladen.
C. kann während Aufladengangs Video aufnehmen
D. kann beim Ausschalten auch aufladen.
4. Auto Video Aufnahme
A. Stellen zunächst die Menüeinstellungen , suchen in Menü nach Auto –Modus, einschalten die Lampe, ( das Videobild automatisch
Zyklus aufnehmen)
B. SteckenAuto-Ladegerät, starten Auto- Netzanschluss, nachdem Einschalten automatischeingeschaltet wird.Schalten das Gerät aus ,
nnerhalb von 30 Sekunden werde das Gerät automatisch ausschalten
5. Einschalten und ausschalten

A.Den Schalter für 3-5 Sekunde länger drücken, dann einschalten oder ausschalten.
6. umschalten
Nach dem Start drücken Sie bitte ON/OFF Taste. Dann könnte Aufnehmen /Fotografieren/ Playback/ Menü umschalten.
bedeutet Aufnehmen. bedeutet Fotografieren und es erscheint oben von dem Schirm.. bedeutet
Playback und die letzte Funktion ist Menü-Einstellung..
7. Video aufnehmen,Fotografieren-Option einstellen
1.Videoaufnahme und Einstellung
Kamera kommt in Videoaufnahme Modus, wenn ein Logo in der oberen linken Ecke des Bildschirms erscheint, drücken Sie bitte
die Eingabe-Taste und starten Aufnehmen. Während der Videoaufnahme blinkt das Logo. Drücken Sie bitte die Eingabe-Taste
wieder, da Aufnahme stoppen, dabei wird dies Logo verschwunden.
2. Fotografieren und die Einstellen
Einschalten und die Videokamera in Modus-Taste, wählen Sie die Kamera-Modus. Wenn Logo in der oberen linken Ecke des
Bildschirms erscheint, das bedeutet, Sie komme in Kamera-Modus. Dann drücken Sie bitte die Eingabe-Taste, um Fotografieren zu
starten. Fotografierensweise: Einzel aufnehmen, selbst auslösen(3sec, 5sec, 10sec), seriell aufnehmen.
8. WI-FI Verbindung
1.Die Maschine kann Telefon oder Tablet mit Android oder Apple-Systemen über WIFI-Verbindung, sind wie folgt konkrete Schritte:
A.auf dem Handy oder Tablet insta llieren "SJCAM ZONE-Software (Android-System kann zum Download auf Google Play, kann
Apples System zum Download im App Store zu suchen und unterladen ).

B.Die Kamera eingeschaltet ist, drücken Sie die WIFI-Logo auf der Kamera, wird der Kamera-Bildschirm WIFI-Logo angezeigt wird,
dann gibt M10+ WiFi ...... Modelle
C.Schalten Sie das Telefon oder Tablet-PC WiFi-Funktion, IOS System sucht in WIFI System Kamera WIFI Typ, das Modell ist
M10+wifi .... ..,verbinden, anfängliches Wort: 12345678 . WIFI -Modelle und Passwort werden auf dem Bildschirm der Kamera angezeigt.
öffnen Sie die Telefon-App, Suche Kameras WIFI Kontonummer M10+WIFI ...... dann schließen Sie das Anfangspasswort wird auf
M10+ Host-Bildschirm angezeigt werden. Initial Passwort: 12345678
D.Nach einer erfolgreichen Verbindung auf WLAN, angezeigt auf der Kamera-Bildschirm: WiFi-Verbindung bereit!
E.Auf dem Handy oder Tablet mit der Software "SJCAM ZONE" Nach der Eingabe, erfasst die Kamera Bilder in Echtzeit auf dem
HandyoderTablet angezeigt .Und Sie können die Kamera-Funktion Parameter oder durch softwarebezogenen Symbolen Operationen eingestellt.
2.WiFi Passwort-Änderungen
A. Schalten Sie die Kamera, geben Sie das Setup-MenüWIFI, wird WiFi Passwort nach ihreneigenen Anforderungen einstellen.
9. entation speichern und spielen
Nach der Aufnahme kopieren und spielen Sie die Videos auf Computer mit USB Kabel. Sie können auch die SD Karte ausnehmen und
mit Karte-Leser die Dateien von der Karte lesen.
Tipps:wenn Sie den Produkt falsch operarieren und Betriebuntersuchung bringt, könnten Sie die Akkus entnehmen und
erneut installieren. Dann die Kamera wird normal läufen.
SPTL5.1DCL
Objektiv 170°A+ Klasse, High- Resolution Weitwinkel-Objektiv
Sprache auswählen Englisch/Deutsch/Französisch/Spanisch/Italienisch/
hcsissuR/hcsinapaJ/hcsisenihC/hcsiseigutroP

Aufnahme-Video
1080P (1920*1080) 30FPS
2K (2560*1440) 30FPS
720P (1280*720) 60FPS
720P (1280*720) 120FPS
1080P (1920*1080) 60FPS
720P (1280*720) 30FPS
Video-Format MP4
Video -Kompressionsformat H.264
Foto Auflösung 12M/8M/5M
Speicher-Karte Micro SD
Fotografieren-Modus Einzel aufnehmen, selbst auslösen(3sec, 5sec, 10sec), seriell aufnehmen.
Lichtfrequenz 50Hz/60Hz
0.2BSUBSU
Stromversorgung 5V1A
Energieverbrauch 500mA/4.2V
wifi einschalten Aufnahmezeit etwa 1080P/ 70Minute
wifi auschalten Aufnahmezeit etwa 1080P/ 90Minute
HAM009tätizapaK
nednutS3awtetiezedaL
Bedienungs-System Windows XP/VistaorAbove/Win7/Mac os
4.34*3.34*1.84eßörG
Achtung: Spezifikationen werden geändert wegen der Aktualisierung, bitte sehen Sie das eigentliche
Produkt.

Table of contents
Languages:
Other SJCAM Action Camera manuals

SJCAM
SJCAM C200 User manual

SJCAM
SJCAM SJ5000 wifi User manual

SJCAM
SJCAM M10 Series User manual

SJCAM
SJCAM M20 SERIES User manual

SJCAM
SJCAM SJ8 Series User manual

SJCAM
SJCAM SJ8 AIR User manual

SJCAM
SJCAM SJ4000B User manual

SJCAM
SJCAM X1000 WIFI User manual

SJCAM
SJCAM SJ10 Pro User manual

SJCAM
SJCAM SJ5000 wifi User manual

SJCAM
SJCAM SJ4000 SERIES User manual

SJCAM
SJCAM SJ4000 SERIES User manual

SJCAM
SJCAM SJ5000X-B User manual

SJCAM
SJCAM SJ4000 SERIES User manual

SJCAM
SJCAM SJ7 STAR User manual

SJCAM
SJCAM SJ11 Active User manual

SJCAM
SJCAM M10 Series User manual

SJCAM
SJCAM C300 User manual

SJCAM
SJCAM SJ4000 SERIES User manual

SJCAM
SJCAM SJ4000 SERIES User manual