Skymsen Fleetwood PSA-05 User manual

PSA-05
PSA-05
ETL LISTED
CUS
3146459
CONFORMS TO UL STD 763; NSF STD 8
CERTIFIED TO CSA C 22.2 STD N°195
Meat Grinder / Modeladora de Carne / Hacheur
Model / Modelo / Modèle:
Intructions Manual /
Manual de Instrucciones/
Manuel D’Instruction
Office
Phone: 800 503 7534 / 305 868 1603
Fax: 305 866 2704
Warehouse
Phone: 800 445 6601 / 973 482 5070
Fax: 973 482 0725
TOLL FREE 800 503 7534
UG0028- APRIL/2011


SUMMARY / SOMMAIRE
1. ENGLISH 01
2. ESPAÑOL 13
3. FRANÇAIS 24
PSA-05
PSA-05

SUMMARY
1. Introduction 02
1.1Safety 02
1.2Main Components 03
1.3Technical Characteristics 04
2. Installation and Pre Operation 04
2.1 Installation 04
2.2 Pre Operation 04
2.3 Feeding Procedures 05
3. Operation 05
3.1 Starting 05
3.2 Head Assembling 05
3.3 Cleaning 06
4. General Safety Practices 07
4.1 Basic Operation Procedures 07
4.2 Safety Procedures and Notes Before Switching the
Machine On 08
4.3 Routine Inspection 09
4.4 Operation 09
4.5 After Finishing the Work 09
4.6 Maintenance 10
4.7 Advices 10
5. Analyses and Problem Solving
5.1 Problems, Cause and Solutions 10
5.2 Components Adjustment and Replacement 11
10
5.3 Electrical Diagram 12
01

1. Introduction
1.1 Safety
When not properly used the Meat Grinder Model PSA-05 can be potentially
DANGEROUS. Servicing, cleaning or any other operation shall be made by trained people.
The following instructions must be observed in order to avoid accidents:
1.1.1 Always unplug the machine when cleaning, servicing or when any other operation is
needed.
1.1.2 Never use tools that do not belong to the machine during operation.
1.1.3 Before switching the machine on check if the Head Nº01 (Pic.01) is firm in its position,
if all its internal components are assembled as well as if the Pan Nº04 (Pic.01) is mounted.
The machine does not start if the Pan is out of place.
1.1.4 Never spray water directly at the machine .
1.1.5 Never use loosen clothes specially shirts with loosen sleeves during operation.
1.1.6 Never put your fingers or any other object but the Stomper Nº05 (Pic.01) inside
feeding throat.
1.1.7 Keep hands off turning parts.
1.1.8 Never switch the machine on with wet clothes or wet shoes.
1.1.9 Before using the machine make sure it is properly grounded.
Your equipment is also protected against any eventual failure. Operator and motor's
integrity is maintained under this adverse condition. This protection is possible by means of
a thermal overload switch. In case your equipment suddenly stops wait for a few minutes
and press thermal overload switch button located at rear of machine.
IMPORTANT
This equipment shall not be used by persons (including children) having reduced
mental or physical capabilities, or having faulty experience or knowledge, unless they
have been previously supervised or instructed by a person responsible for the
equipment safety, about how to use it.
IMPORTANT
If the cord is not in good conditions to be used, it has to be changed by the manufacturer
oranAuthorizedTechnicalAssistant.
02

1.2 Main Components:
All components are made with carefully selected materials, in
accordance with Siemsen experience and standard testing procedures.
The Head receives a superficial treatment to isolate and facilitate
cleaning.
Knife and plates are made of hardened material to provide a long
life cutting quality.
Picture – 01
01- Head
02- Motor Housing
03- ON/OFF Switch
04- Pan
05- Stomper
06- Locking Ring
07- Thermal Overload Switch
02
01
03
06
05
04
07
03
SKYFOOD reserves the right to change the design and specifications of its equipment or any related
documentation at any time. The end user is not entitled to upgrades or refunds resulting from these
changes.
Updates
st
These Terms and Conditions were last updated onApril 1 , 2011.
SKYFOOD'S LIMITED WARRANTY
All new products FLEETWOOD by SKYMSEN and SKYMSEN, sold by SKYFOOD EQUIPMENT, LLC.
(“SKYFOOD”), for use only in the continental United States (collectively, “Products” or singularly, “Product”), are
warranted to be free from defects in materials and workmanship for a period of one (1) year from the date of
purchase by the original purchaser/user (“End User”). No warranty is given or implied to a subsequent transferee
or any other third party. This warranty is expressly conditional upon SKYFOOD being notified of any defects in
materials or workmanship within five (5) days of its occurrence, within the warranted time period. If a notice of a
claim under this warranty is timely made by the End User, SKYFOOD or a SKYFOOD's designated service
company (“Service Company”), will repair or replace the Product, at SKYFOOD's discretion, subject to the
additional conditions hereinafter described.
This warranty shall not apply if damage occurs from improper installation or maintenance performed by an
unauthorized service company (“Service Company”), wrong voltage, nor to the extent that Products or parts
have been used other than in conformance with operating and maintenance instructions, subjected to misuse or
abuse or damaged by accident, acts of God, abnormal use or stress or any other matter unrelated to SKYFOOD,
and beyond its reasonable control. In addition, this warranty does not cover normal wear and tear of certain
items, such as, but not limited to, blades, stones, chopper cutting knives, plates, slicing knives, cutting disc,
gaskets, oil changes, sealing tape, heat seal wires, worm gears, self-lubricating bushings, carbon brushes for
electric motors, and other parts expendable by nature and that need to be replaced frequently. THIS
WARRANTY EXCLUDES ALL ORAL, STATUTORY, EXPRESS OR IMPLIED WARRANTIES WHICH MAY BE
APPLICABLE TO SKYFOOD, INCLUDING, BUT NOT LIMITED TO, ANY IMPLIED WARRANTY OF
MERCHANTABILITY AND FITNESS FOR PARTICULAR PURPOSE. Under no circumstances shall
SKYFOOD be liable for loss of use, revenue or profit or for incidental or consequential damages. The sole and
exclusive remedy for breach of any warranty is limited to the remedies provided in the paragraph above.
Products weighing less than seventy (70) lbs must be taken or shipped, shipping charges prepaid, either to
SKYFOOD's facility or a SKYFOOD's designated service company (“Service Company”). SKYFOOD offers a
limited on-site warranty only for products whose weight exceeds seventy (70) lbs, provided they are
installed in a location that is within a thirty (30) mile radius of a Service Company. In this case, warranty
services will be provided during regular business hours.
Per SKYFOOD's discretion, SKYFOOD offers a limited on-site warranty, provided they are installed in a
location that is within a fifty (50) mile radius of a Service Company. End Users are responsible for all
extra travel and mileage rates. Warranty services will be provided during regular business hours.
This warranty shall not take effect unless and until a properly completed and executed WARRANTY
REGISTRATION form has been received by SKYFOOD EQUIPMENT, LLC, within thirty (30) days from the date
of purchase. The WARRANTY REGISTRATION is available either in the Instruction Manual of every Product or
at SKYFOOD's website . The End User must fill out the WARRANTY REGISTRATION form and
send it to SKYFOOD according to the instructions posted on the referred website. Failure to do so will void the
warranty.
www.skyfood.us

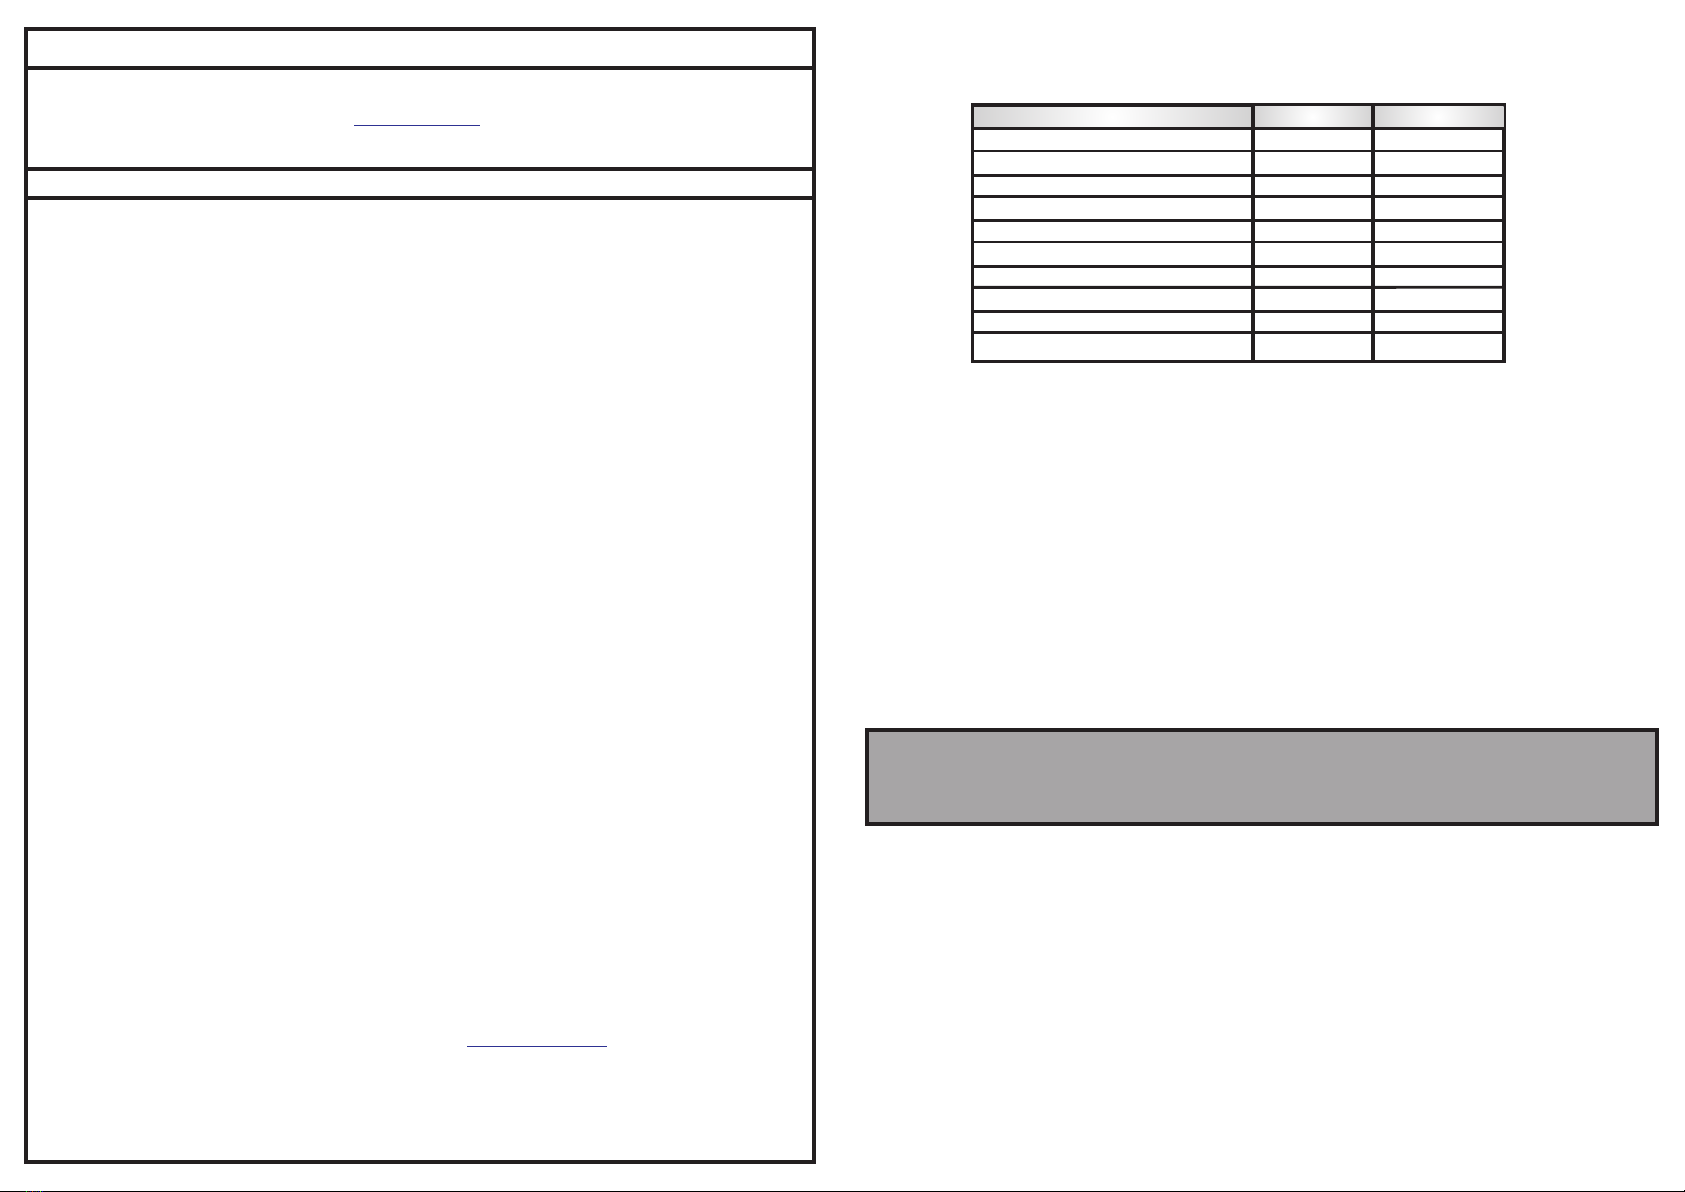
1.3 Tecnical Characteristcs
Table - 01
Avorage Production
Voltage(*)
Power Rating
[kg/h]
[V]
[Hz]
[CV]
[kW/h]
[mm]
[mm]
[mm]
[kg]
[kg]
Frequency(*)
Consumption
Height
Width
Depth
Net Weight
Gross Weight
Characteristics Unit PSA-05
115
60
200
1/1,5
340
212
0,73/1,1
650
29
32
2. Installation and Pre Operation
2.1 Installation
The Meat Grinder must be installed onto a leveled and stable
surface, preferably 850mm high from floor.
Before plugging in the machine check if the voltage of the power supply
source is the same as the machine.
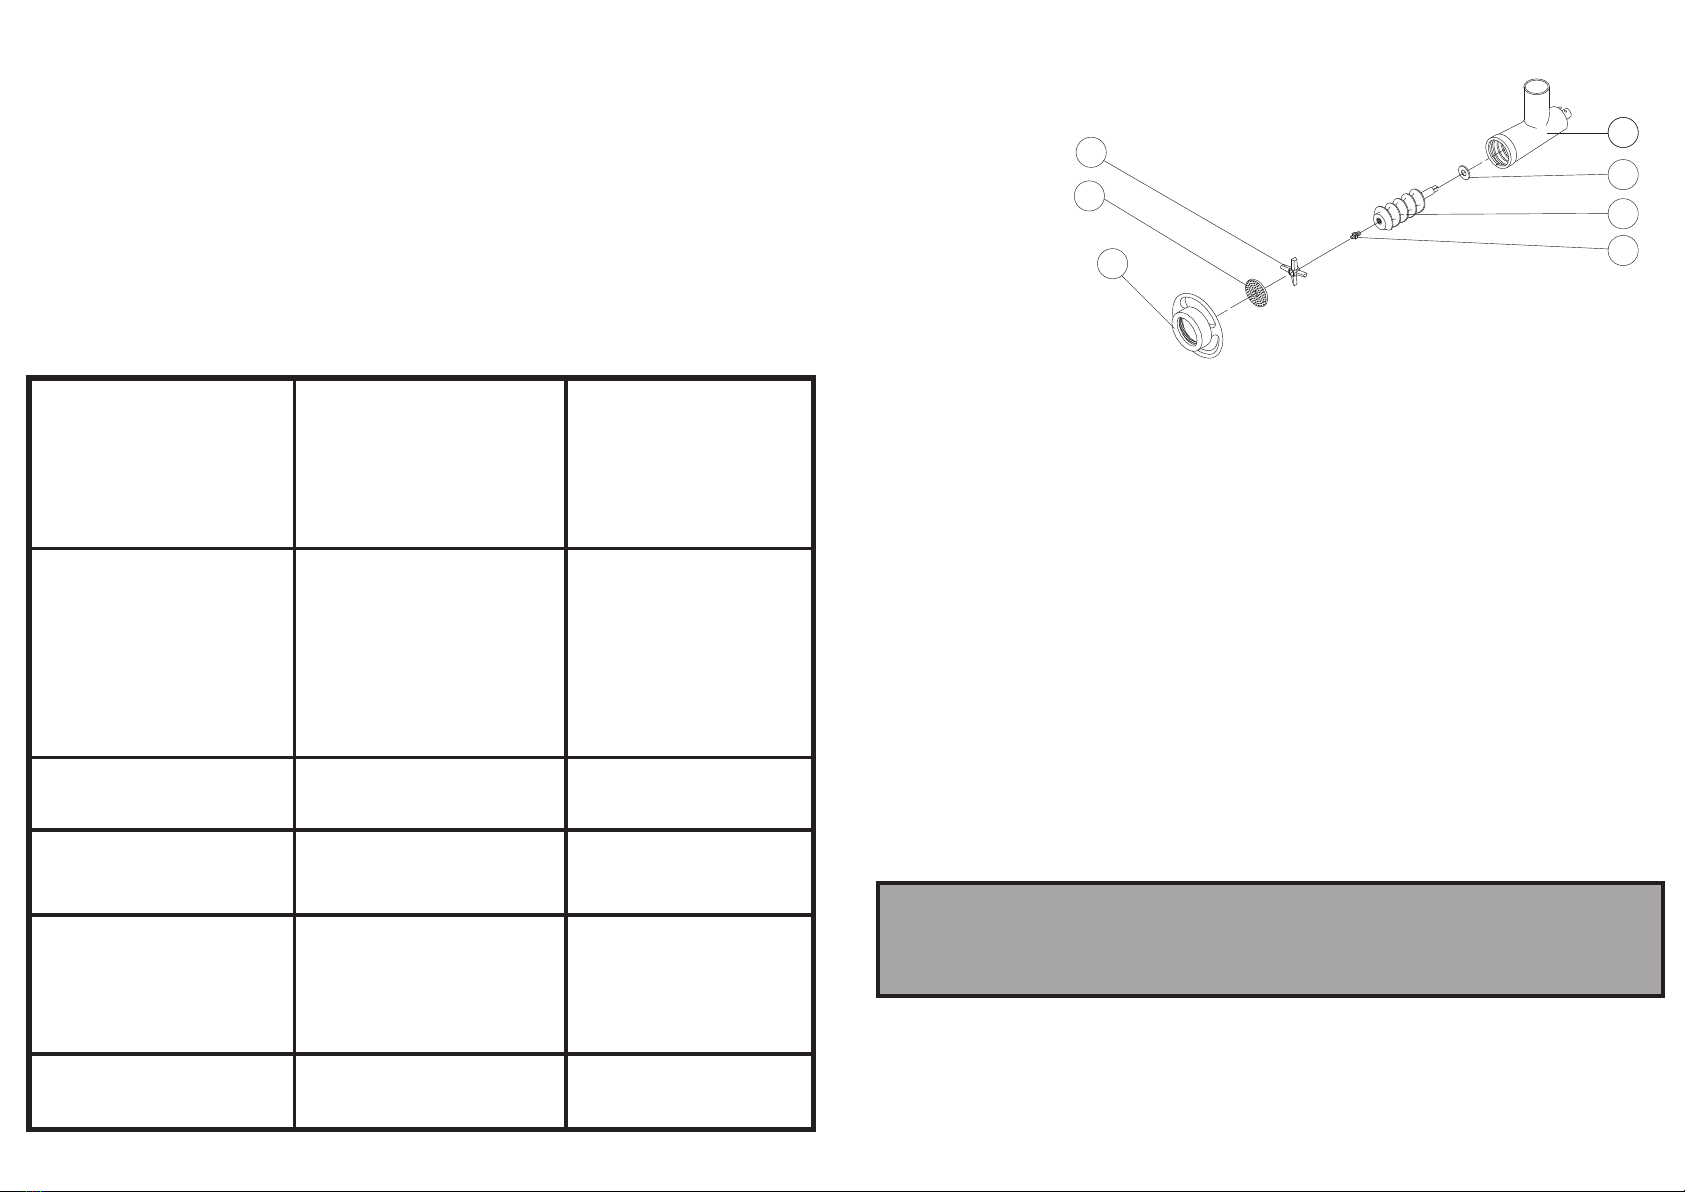
2.2 Pre Operation
IMPORTANT
Do not tighten the Locking Ring too much when assembling the
Head , to avoid the internal components to break or being stuck
First of all check if the machine is firm in its position. Before operation all
parts that get in contact with food must be washed with running water and
neutral soap. For doing that follow the below steps:
2.2.1 Remove Pan Nº04 (Pic.01).to allow to remove the Head
2.2.2 Remove the Locking Ring Nº06 (Pic.01) and then pull out of the
Head all its internal components.
2.2.3 Wash all the internal components and replace them inside the head,
see item 3.2 Pict. 02. 04
SKYFOOD EQUIPMENT LLC - SERVICE
For questions or assistance with products FLEETWOOD by SKYMSEN and SKYMSEN, call SKYFOOD
EQUIPMENT Toll Free: 1-800-503-7534, 24h Customer support, or visit the Customer Service section of
.
TERMS AND CONDITIONS OF SALE
Terms of Sale
Purchase of any products sold by SKYFOOD shall be subject to and expressly limited by the terms and
conditions contained herein. No changes to, waiver of, or addition to any of these terms and conditions shall be
effective unless agreed to in writing and signed by SKYFOOD. Buyer acknowledges and agrees that these terms
and conditions supersede the terms and conditions of any purchase order or other documentation used by Buyer
and, except for delivery and billing addresses, and quantities prices and items ordered, any conflicting or
additional terms are void and have no effect, but that Buyer may place orders by use of purchase orders and
other documentation for its convenience purposes only. Notwithstanding the foregoing, SKYFOOD reserves the
right at any time to amend these terms and conditions, and Buyer shall be deemed to accept such amended
terms and conditions by ordering products herein offered after the date of such amendment. Additional special
terms and conditions of SKYFOOD may be applicable with respect to certain products.
OrdersAcceptance
All orders from Buyers, whether solicited and written by either a SKYFOOD EQUIPMENT, LLC (“SKYFOOD”)
Sales Representative, distributor or dealer, are deemed offerings to purchase until accepted by SKYFOOD.
SKYFOOD reserves the right to accept orders in full or in part. Acceptance may be either by written confirmation
or shipment of the order, in full or in part.
Shipping
TERMS – All prices are FCA (Free Carrier) shipping point. Unless express instructions in writing are received
from the Buyer, SKYFOOD has complete freedom in choosing the means, route and procedure to be followed in
the handling, transportation and delivery of the goods. SKYFOOD will advance the shipping costs on behalf of
the Buyer and charge it accordingly. SKYFOOD shall under no circumstances be liable for any loss,
damage, concealed damage, expense or delay of goods for any reason whatsoever when said goods are
in the custody, possession or control of third parties selected by SKYFOOD to forward, enter, clear,
transport, or render other services with respect to such goods. Please, inspect your unit upon arrival at
the destination and report any transit damage to SKYFOOD and to the shipping company, in order to
initiate a claim with the latter. Claims must be reported to the transportation company within fifteen (15)
days as of the date of the shipping.
Free Shipping
Orders of $4,000.00 or more, with a minimum of 2 pieces (mixed or matched),shipped to the same address in
the continental United States will have free shipping.
Tax Information
Any tax, duty, custom or other fee of any nature imposed upon the products, their sale, transportation, delivery,
use or consumption shall be paid by Buyer in addition to the price quoted or invoiced. If SKYFOOD is required to
prepay any such tax or fee, Buyer will reimburse SKYFOOD. Buyer must provide SKYFOOD with a
resale/exemption certificate in order to avoid the withholding of applicable taxes.
Interest
Past due balances are subject to a interest charge of 1.5% per month or the highest rate permitted by law,
whichever is lower, until paid.
Return Policy
All returns are subject to the prior authorization of SKYFOOD, in its discretion. Buyer must contact Buyer Support
at 305-868-1603, or by fax at 305-866-2704, or via e-mail at in order to request a Return
Authorization number (“RA”) providing, along with the identification of the goods, a specific reason for return.
Buyer Support will either authorize or deny the request for return. Only NEW and UNUSED items are acceptable
for return. Unauthorized returns will be destroyed and no credit issued. All authorized returned goods must be
shipped freight prepaid to SKYFOOD.
All returned goods are subject to a 20% handling/restocking fee. All returns must be returned in their original
packaging and within thirty (30) days from the shipping date.
www.skyfood.us

2.3 Feeding Procedures
IMPORTANT
Under no circumstances use your hands or any other kind of instrument to push
meat into the feeding throat. Use only the Stomper Nº05 (Pic.01) to do this
operation.
The processed meat has the function of lubricating and cooling the Head's internal
components. Therefore do not run the machine without load, as it would warm up
and damage the internal components.
The Meat Grinder Model PSA-05 is a relatively fast machine, therefore they
need equally be fed fast .
To feed the Meat Grinder place pieces of boneless meat on the Pan Nº04 (Pic.01)
and drive them with your hand towards the feeding throat entry only, then use the
Stomper Nº05 (Pic.01) to push them into the feeding throat where they will be naturally
sucked in by the worm.
3. Operation
3.1 Starting
IMPORTANT
Always switch the machine OFFbefore removing the Head. The machine is silent. Do
not leave utensils such as: knives, forks and similar on the Pan.
Be sure that the Head's internal components are assembled correctly as per order
indicated on Picture – 02.
Pushing the ON/OFF Switch Nº03 (Pic.01) to ON position located on the Motor
Housing right hand side activates the machine.
3.2 Head Assembling
IMPORTANT
Note the correct position of each Head's internal components. Assembling the
components in a different order could cause serious damages to the Head.
To assemble or disassemble the Head's internal components follow the below
sequence:
05
5.2 Ajustage et Substitiution des Composants
5.2.1 Aiguisement du Couteau et de la Plaque
Un bon aiguisement des couteaux et des plaques , a comme résultat que la
machine travaille avec moins d' effort et par conséquence augmente la vie utile des
composants. Pourtant , cherchez l' Assistant Téchnique le plus proche pour les
aiguiser correctement .
5.2.2 |Boite à Engrenages
Les Hacheurs Modèle PSA-05 travaillent avec une boite à engrenage
lubrifié avec de l' huile .
Pour obtenir une durabilité prolongée , faites vérifier par un Assistant
Téchnique , á chaque 5000 heures, le niveaux de l' huile .
La quantité d' huile nécessaire dans les Hacheurs Nodèle PSA-05 est de 180
ml, et l'huile recommendée est le UNITRON 140 – CASTROL ou similaire avec una
viscosité ( SAE 140 ,APIGL-4 ,ANP1006 ) .
34
5.3 Electrical Diagram

Picture – 02
01- Head
02- Fiber Washer
03- Worm
04- Worm Pin
05- Double knife
06- Plate 3mm or 5mm
07- Locking Ring
3.3 Cleaning
To clean proceed as follows:
3.3.1 Switch the machine off and unplug the machine from
power supply source.
3.3.2 Remove the Locking Ring Nº07 (Pic.02) and all the
Head's internal components.
3.3.3 Loosen locking knob located on the right hand side of
the machine to be able to remove the Head Nº01
(Pic.01).
3.3.4 Wash all components with warm water and neutral soap.
3.3.5 To assemble the Head follow the above sequence
inversely.
IMPORTANT
Do not store the Head with product inside.
02
01
03
04
07
06
08
06
Table - 02
* La machine s'arréte pendant
le travail.
* .Courant électrique coupé
*
.
Problème dans les circuits
électriques internes ou externes
de la machine
*
.
Verifier si la fléche est dans
sa prise , ou s' il manque de l'
électricité
* Le produit travaillé sort
écrasé . * Un des composants internes de
la Tête de Hachage manque , ou
* Verifier l' assemblage
conformement Figure 02.
* Engrenages usés ou cassés
* Appeler l' assistance
Téchnique
* Appeler l' assistance
Téchnique
* Odeur de brulé ou fumée.
* La machine démarre , mais les
composant internes de la Tête de
Hachage , ne tournent pas tout de
suite .
* Bruits anormaux
* Fuites d' huile de la boite d'
engrenages
*
.
Problème au moteur électrique
, ou d'autres parties électriques de
la machine
* Condensateur de démarrage du
moteur abimé.
* Composants internes de la Tête
de Hachage en mauvaise position
* Système d' étancheité
defectueux
* Engrenages mal ajustés
* Appeler l' assistance
Téchnique
* Appeler l' assistance
Téchnique
* Appeler l' assistance
Téchnique
* Appeler l' assistance
Téchnique
* Appeler l' assistance
Téchnique
*Corriger la position des
composants internes comme
expliqué à la figure 02
PROBLÈME CAUSE SOLUTIONS
5.Analyse et Solution de Problèmes
5.1 Problèmes Causes et Solutions
Les Hacheurs ont été projetés pour que le minimum d' entretient soit
nécéssaire , toutes fois , quelques irrégularités dans leurs fonctionnement peuvent
se produire, suite à l' usage continu de l'equipement .
En cas de problème vérifier la Table No. 02 , où nous décrivons quelques
33

4. General Safety Practices
The following safety instructions are addressed to both the operator of
the machine as well as the person in charge of maintenance. The machine
has to be delivered to the operator in perfect conditions of use by the
Distributor to the user. The user shall operate the machine only after being
well acquainted with the safety procedures described in the present manual.
READ THIS MANUAL WITH ATTENTION.
4.1 Basic Operation Practices
4.1.1 Dangerous parts
Some parts of the electric devices are connected to high voltage points.
These parts when touched may cause severe electrical shocks or even be fatal.
Never touch commands such as buttons, switches and knobs with wet hands, wet
clothes and/or shoes. By not following these instructions operator could be exposed
to severe electrical shocks or even to a fatal situation.
4.1.2 Warnings
The operator has to be well familiar with the position of ON/OFF Switch to
make sure the Switch is easy to be reached when necessary. B e for e a n y
kind of maintenance, physically remove plug from the socket.
Provide space for a comfortable operation thus avoiding accidents.
Water or oil spilled on the floor will turn it slippery and dangerous. Make sure
the floor is clean and dry.
Before giving any manual command (switch, buttons, turn keys or lever) be
sure the command is the correct one. Check this manual for further details if
necessary.
Never use a manual command (switch, buttons, lever) unadvisedly.
If any work is to be made by two or more persons, coordination signs will have to be
given for each operation step. Every step of the operation shall be taken only if the
sign has been made and responded.
4.1.3Advices
In case of power shortage, immediately turn the machine OFF.
Use recommended or equivalent lubricants, oils or greases.
Avoid mechanical shocks as they may cause failures or malfunction.
Avoid penetration of water, dirt or dust into mechanical or electrical components of
the machine.
07
4.4 Opération
4.4.1 Avertissements
Évitez travailler avec des cheveux longs , qui puissent toucher n' importe quelle
partie de la machine , puisqu' ils pourront causer de sérieux accidents . Liez-les derriére
vôtre tête , ou couvrez-les avec un mouchoir .
Seulement des opérateurs entrainés et qualifiés , peuvent opérer la machine .
Ne jamais opérer la machine sans tous ses accessoires de sureté .
4.5 Aprés la Fin du Travail
4.5.1 Précautions
Nettoyez toujours la machine , pour cela ENLEVEZ LAFLÉCHE DE SAPRISE
DE COURANT .
Ne jamais nettoyer la machine avant son complet arrêt .
Replacez tous les composant de la machine à leur place avant de la démarrer à
nouveau .
Verifier tous les fluides .
Verifier la tension de courroies et des chaines , NE PAS placer les doigts entre les
courroies et les poulies , ni entre les chaines et les engrenages .
4.6 Entretient
4.6.1 Dangers
Avec la machine embranché toutes operations d' entretient sont dangereuses .
ENLEVEZ LA FLÉCHE DE SA PRISE DE COURANT , PENDANT TOUT LE
TEMPS DE L' ENTRETIENT .
IMPORTANT
Dans n'importe quel occurence imprévue , enlevez toujours la fléche de sa prise de
courant .
4.7 Avertissements
L' entretient électrique ou mécanique doit ête fait par des personnes dument
qualifiés pour ce genre de travail .
La personne chargé de l' entretient doit s' assurer que la machine travaille dans sa
conditions de TOTALE SÉCURITÉ .
32
IMPORTANT
If any item from the GENERAL SAFETY NOTIONS section is not applicable to
your product, please disregard it.

DO NOT modify original characteristics of the machine.
DO NOT remove, tear off or maculate any labels stuck on the
machine. If any label has been removed or is no longer legible, contact your
nearest dealer for replacement.
READ CAREFULLY AND WITH ATTENTION THE SAFETY OR
OPERATION INSTRUCTIONS LABELS DISPLAYED ON THE MACHINE,
AS WELL AS THE INSTRUCTION MANUAL AND THE TECHNICAL
CHARACTERISTICS WRITTEN INSIDE.
4.2 Safety Procedures and Notes Before Switching Machine ON
IMPORTANT
Carefully read ALL INSTRUCTIONS of this manual before turning the
machine ON. Be sure to be familiar with the instructions and that
you have well understood all information contained in this manual.
If you have any question contact your supervisor or your nearest
Dealer.
4.2.1 Danger
An electric cable or electric wire with damaged jacket or bad
insulation could cause electrical shocks as well as electrical leak. Before
use, check conditions of all wires and cables.
4.2.2 Advices
Be sure ALL INSTRUCTIONS in this manual have been thoroughly
understood. Every function and operational procedure have to be very clear
to the operator. Contact your nearest Dealer for further questions.
Any manual command (switch, button or lever) shall be given only
after being sure it is the correct one.
4.2.3 Precautions
The electric cable has to be compatible with the power required by
the machine. Cables touching the floor or close to the machine need to
be protected against short circuits.
Oil reservoir has to be full up to the required level as indicated. Check
level and add oil if necessary.
08
4.2 Précautions et ObservationsAvant de Démarrerla Machine
IMPORTANT
Lire totalment et avec attention ces INSTRUCTIONS avant dembrancher la machine
. Soyez sur que toutes les informations ont été correctement comprises .
En cas de doute consultez votre superieurou le Revendeur .
4.2.1 Danger
Un cordon d' alimentation électrique ou un fil électrique avec l' isolement endomagé
, peut causer des fuites de courant et provoquer de choques électriques . Avant l' usage
vérifier ses conditions .
4.2.2 Avertissements
Soyez sur que les INSTRUCTIONS de ce manuel aient été parfaitement
comprises. Chaque fonction ou procedé d' opération et d' entretient doit être parfaitemente
claire.
Un commandement manuel ( bouton, clavier, interrupteur, etc ) ne doit être operé
que si on est sur que le commandement est correct .
4.2.3 Précautions
Le cordon d' alimentation électrique doit avoir une section suffisante pour suporter
la puissance consomé .
Les cables électrique sur le sol , auprès de la machine doivent ête protégés pour
éviter des court circuits .
4.3 Inspection de Routine
4.3.1 Avertissement
Quand il soit necessaire de vérifier la tension de courroies ou de chaines , NE PAS
METTRE les doigts entre les courroies et les poulies ou les chaines et ses engrenages .
4.3.2 Précautions
En cas de bruits anormaux , controler les moteurs, courroies, engrenages , et les
parties tournantes de la machine .
Vérifier la tension des courroies et des chaines , changez l' assemblage complet si
quelque courroies , chaine ou engrenage est usé .
Vérifiez les protections et les dispositifs de sureté pour qu'ils soient toujours en
parfait état de fonctionment .
31

4.3 Routine Inspection
4.3.1 Advice
When checking the tension of the belts or chains, DO NOT
introduce your fingers between the belts and the pulleys and nor between
the chain and the gears.
4.3.2 Precautions
Check if motors and sliding or turning parts of the machine produce
abnormal noises.
Check the tension of the belts and chains and replace the set when
belt or chain show signs of being worn out.
When checking tensions of belts or chain DO NOT introduce your
fingers between belts and pulleys, nor between the chains and gears.
Check protections and safety devices to make sure they are working
properly.
4.4 Operation
4.4.1 Advice
Be sure your hair is not loose in order to avoid getting caught by
turning parts which could lead to a serious accident. Tie your hair well up
and/or cover your head with a scarf.
The operation performed by not trained or skilled personnel shall be
forbidden.
Never touch turning parts with your hands or in any other way.
NEVER operate machine without all original safety devices under perfect
conditions.
4.5 After Finishing The Work
4.5.1 Precautions
Always TURN THE MACHINE OFF by removing the plug from the
socket before cleaning the machine. Never clean the machine unless it
has come to a complete stop. Put all components back to their functional
positions before turning it ON again. Check level of oil. DO NOT place
your fingers in between belts and pulleys nor chains and gears.
09
4. Notions Générales de Sécurité
Les notions de sécurité ont été préparés pour orienter et instruir convenablement les
opérateurs des machines , ainsi que ceux qui seront responsables pour leur entretient.
La machine ne doit être remise à son operateur que dans des bonnes conditions de
fonctionement , l' operateur doit être instruit sur l' emploi et la sécurité par le Revendeur. L'
operateur devra employer la machine seulement après avoir pris connaissance de toutes les
précautions applicables , et avoir lu ATTENTIVEMENT LA TOTALITÉ DE CETTE
NOTICE EXPLICATIVE .
4.1 Pratiques Fondamentales pour l' Opération
4.1.1 Dangers
Certaines parties des commandements éléctriques , ont des points avec des hautes
tensions . Si ces points sont touchés , ils peuvent causer des choques électriques graves,
même MORTELS .
Ne jamais toucher un commandement manuel ( bouton , clavier, interrupteur.etc)
avec des mains , des chaussures ou des vetments mouillés . Ne pas observer cette
recommendation , poura aussi provoquer de choques électriques , même MORTELS
4.1.2 Précautions
L' enplacement de Interrupteur doit être bien connu , pour permettre son usage à n'
importe quel moment sans devoir le chercher .
Avant n' importe quelle operation d' entretient , detachez la fléche de sa prise de courant .
Aménager un espace suffisant pour éviter de chutes dangereuses .
De l'eau ou de l' huile pouront rendre le sol glissant et dangereux . Pour éviter des
accidents , le sol doit être propre et sec .
Ne jamais toucher un commandement manuel ( bouton, clavier, interrupteurs, etc ) au
hazard .
Si un travail doit être fait par deux ou plusieurs personnes , des signaux de
coordination doivent être donnés à chaque étape du travail . L' étape suivante ne doit pas être
commencé sans que le signal soit donné et répondu .
4.1.3 Avertissements
En cas de coupure d' énérgie électrique ouvrez immédiatement l' Interrupteur .
Employez des huiles lubrifiants ou des graisses recommandés ou similaires.
Évitez des choques mécaniques , car ils pourraient causer des domages , ou un
fonctionement défectueux .
Évitez que de l'eau , de la saleté ou de la poussiére entre dans les composants
mécaniques ou électriques.
NE PAS ALTÉRER les caractéristiques originales de la machine .NE PAS
SALIR, DECHIRER OU RETIRER LES ÉTIQUETTES DE SURTÉ OU
D'IDENTIFICATION . Si une étiquette est salie ou perdue , demandez une neuve à votre
Assistant Téchnique le plus proche .
30

10
4.6 Maintenance
4.6.1 Danger
Any maintenance with the machine in working situation is
dangerous. TURN IT OFF BY PULLING THE PLUG OFF THE SOCKET
DURING MAINTENANCE.
IMPORTANT
Always unplug the machine when emergency cases arise.
4.7 Advice
Electrical or mechanical maintenance must be done by qualified
personal for such operation.
Person in charge has to be sure that the machine is under TOTAL
SAFETY conditions when working.
5 Analysis and Problems Solving
5.1 Problem, causes and solutions
The Meat Grinders were designed to operate with the need of
minimum maintenance but the natural wearing caused by longer use of
the equipment may occasionally cause some malfunctions.
If such problem occurs with your Meat Grinder refer to Table 02 in which
the most common situations are listed with recommended solutions.
Table - 02
* The processed meat comes
out smashed. * One of the Head’s internal
components is missing or they
are assmbled incorrectly.
* Consult item 5.2.1 in this
manual.
* C h e c k t h e c o r r e c t
assembling order according to
picture-02 .
PROBLEMS CAUSES SOLUTIONS
01. Corps de laTête de Hachage
02. Rondelle de Fibre
03.Vis de Déplacement
04. Cheville de laVis de Déplacement
05. Couteau double
06. Plaque de 3 mm ou 5 mm
07.Volant
Figure - 02
02
01
03
04
07
06
08
3.3 Nettoyage
3.3.1 Détachez l' Interrupteur , et enlevez la fléche de sa prise .
3.3.2 Retirez le Volant No.07 (Fig.02) et tous les composants
internes de laTête de Hachage .
3.3.3 Pour enlever la Tête de Hachage No.01(Fig.01) tenez-la et
desserrez le manipule qui se trouve sur le coté de la machine.
3.3.4 Lavez tous les composants avec de l' eau chaude et du savon
neutre.
3.3.5 Pour remonter la Tête de Hachage , suivez en inverse le
procedé au-dessus.
IMPORTANT
Ne pas ranger laTête de Hachage avec du produit enfermé dedans .
29

11
* The machine stops during
operation.
* Lack of power.
* Problem in the internal or
external electric circuit of the
machine.
* Check if machine is
plugged in and if there is
power at power supply
source.
* Worn uot or broken gears.
* Call technical assistence.
* Burn smell and/or smoke.
* The machine starts but Head’s
internal components take some
time to start turning.
Abnormal noises.
* Oil leaking gear box.
* Motor or other electrical pert
with problem.
* Damaged motor capacitor .
* Head’s inetrnal components
out of place.
* Damaged seal.
* Gears misaligned.
* Assemble head’s internal
c o m p o n e n t s c o r r e c t l y
according to picture-02.
* Call technical assistence.
5.2 Components Adjustment and Replacement
5.2.1 Plate and knife sharpening
Well-sharpened plates and knife will make machine to work with
less effort and consequently all components will last longer. Therefore
call your nearest technical assistant to sharpen plates and knife
periodically.
5.2.2 Gear Box
The Meat Grinder model PSA-05 has gear box lubricated with oil.
To keep your machine in good conditions for a long time check oil
level at every 5.000 hours of use. Take your machine to the nearest
technical assistant to do this job.
Use 125 ml of oil each time you need to refill gear box. The
following oil is recommended: UNITRON 140 – CASTROL, or a similar
one with viscosity: SAE140, APIGL-4 or ANP1006.
2.3 Procédure d'Alimentation
IMPORTANT
Ne jamais utiliser des instruments , ni vos mains, pour pousser le produit à
être travaillé à l' interrieur de la Tête de Hachage . User seulement le
Poussoir No.05(Fig.01) à cet effet .
Le produit à être travaillé à l' interne de la Tête de Hachage a comme effet
lubrifier et refroidir ses composant . Par consequence ne laissez pas la
machine travailler à vide , puisque de cette façon elle se surchauffera , et
abimera ses composants .
Les Hacheurs Modèle PSA-05 , sont des machines qui travallent à haute
vitesse , et pour celà elles doivent être alimentées avec une rapidité égale .
Pour leur alimentation , placez des morceaux de viande sur le Plateau d'
Alimentation No.04(Fig.01) et poussez-les sur le bord de la bouche , à ce moment
usez le Poussoir No.05(Fig.01) pour les introduire dans la bouche , les morceaux de
viande seront happés para la vis de déplacement .
3. Opération
3.1 Démarrage
IMPORTANT
Debranchez la machine chaque fois que vous desirez retirer la Tête de
Hachage.
La machine est silencieuse , n' abandonez pas des ustensiles tel que des
couteau, crochets ou d' autres sur le plateau d' alimentation .
Soyez sûr que l' assemblage des composant de la Tête de Hachage a été fait
suivant la séquence indiqué à la (Fig.02) .
Pour démarrer la machine appuyez sur le bouton de l' Interrupteur
No.03(Fig.01) qui se trouve derièrre la machine .
3.2Assemblage des Composants Internes de laTête de Hachage
IMPORTANT
Observez avec attention la position des composants internes de la Tête de
Hachage , pour que des inversions ne se produisent pas . En cas d'inversion
des dommages irreparables se produiront .
Pour faire l' assemblage et le desassamblage des composants internes de la
Tête de Hachage , suivez les instructions ci dessous : 28

5.3 Electrical Diagram
12
1.3 Caractéristiques Téchniques
Table - 01
Production Moyenne
Tension(*)
Puissance
[kg/h]
[V]
[Hz]
[CV]
[kW/h]
[mm]
[mm]
[mm]
[kg]
[kg]
Fréquence(*)
Consomation
Hauteur
Largeur
Profondité
Poids Net
Poids Brut
Caractéristiques Unité. PSA-05
(*)- La tension et la fréquence seront celles indiquées sur la plaque du moteur .
115
60
200
1/1,5
340
212
0,73/1,1
650
29
32
2 . Installation et Pré Opération
2.1 Installation
Pour réussir une bonne performance dans le travail , le Hacheur doit être
placé sur une surface stable à 850 mm de hauteur au-dessus du sol .
Vérifier la tension du réseau électrique , pour savoir si la tension
disponible est celle de la machine .
2.2 Pré Opération
IMPORTANT
Lors de monter la Tête de Hachage , ne pas serrer trop fort le volant,
evitant ainsi d' entraverou de briser les composants internes .
Verifier si le Hacheur est solidement posé .Avant son usage , laver
les parties qui entreront en contact avec le produit qui sera travaillé, avec
eau et savon neutre , comme suit :
2.2.1 Retirer le Plateau d' Alimentation No.04 (Fig.01) , pour
permetre de retirer laTête de Hachage .
2.2.2 Retirer le Volant No. 06 (Fig. 01), et en suite les composants
internes , en les tirant au-dehors .
2.2.3 Lavez les composants et remontez-les, voir position 3.2
Figure 02
27

SUMARIO
1. INTRODUCCIÓN
1.1 SEGURIDAD
1.2 PRINCIPALES COMPONENTES
1.3 CARACTERISTICAS TECNICAS
2. INSTALACIÓN Y PRE-OPERACIÓN
2.1 INSTALACIÓN
2.2 PRE-OPERACIÓN
2.3 PROCEDIMIENTO PARA ALIMENTACIÓN
3. OPERACIÓN
3.1 ACCIONAMIENTO
3.2 MONTAJE DE LOS COMPONENTES INTERNOS DELCABEZAL
3.3 LIMPIEZA
4. NOCIONES DE SEGURIDAD – GENÉRICO
4.1 PRÁCTICAS BÁSICAS DE OPERACIÓN
4.2 CUIDADOS Y OBSERVACIONES ANTES DE PRENDER LA
MÁQUINA
4.3 INSPECCIÓN DE RUTINA
4.4 OPERACIÓN
4.5 LUEGO DE CONCLUIDO EL DIA LABORAL
4.6 MANTENIMIENTO
4.7 AVISOS
5. ANÁLISIS Y SOLUCIONES DE PROBLEMAS
5.1 PROBLEMAS, CAUSAS Y SOLUCIONES
5.2 AJUSTES Y SUSTITUCIONES DE COMPONENTES
5.3 DIAGRAMA ELÉCTRICO
13
14
14
15
16
16
16
16
17
17
17
17
18
19
19
20
20
21
21
21
21
22
22
23
23
Figure - 01
01 - Tête de Hachage
02 - Cabinet
03 - Interrupteur
04 - Plateau d'Alimentation
05 - Poussoir
06 -Volant
07-Bouton du Prote cteur
Thermique
02
01
03
1.2Composants Principaux
Tous les composants qui font partie de la machine ont été construits avec des
matériaux soigneusement choisis pour leurs fonctions , suivant les manuels d'essais
et l'expérience acquise par Siemsen .
La Tête de Hachage reçoit un traitement superficiel pour isoler la tête et
faciliter le nettoyage .
Le couteau et la plaque sont construit en acier tempéré pour assurer une durabilité
supérieure à la qualité du tranchant .
06
05
04
07
26

14
1. INTRODUCCIÓN
1.1 Seguridad
Cuando usados incorrectamente, la Moledora de Carne Mod.PSA-05, son
máquinas potencialmente PELIGROSAS. Mantenimiento y limpieza o cualquier
otro servicio, solamente deberá ser hecho por personas debidamente entrenadas y
capacitadas y la máquina debe estar desconectada de la toma de corriente
eléctrica.
Las instrucciones a seguir, deberán ser siempre seguidas a fin de evitar
accidentes:
1.1.1 Desconecte la máquina de la toma de corriente eléctrica, cuando necesite
retirar cualquier parte amovible de la máquina, o al hacer la limpieza ó
mantenimiento.
1.1.2 Nunca utilice instrumentos que no hacen parte de la máquina para auxiliarlo
en la operación de la misma.
1.1.3 Antes de prender la máquina, verifique si la boca N°01 (Fig.01) está firme en
su posición y, si todos los componentes internos están montados. Coloque
el plato de seguridad (bandeja) N°04 (Fig.01) en su lugar. La máquina no
prenderá sin que la bandeja esté en su debido lugar.
1.1.4 Nunca utilice chorros de agua directamente sobre la máquina.
1.1.5 Durante la operación, nunca utilice ropas con mangas anchas o largas
demasiadas, principalmente en las muñecas.
1.1.6 Nunca introduzca los dedos o cualquier otro objeto que no sea el
Empujador N°05 (Fig.01), en la abertura de alimentación de la boca.
1.1.7 Mantenga las manos alejadas de las partes amovibles.
1.1.8 Nunca prenda la máquina con ropas o pies mojados.
1.1.9 Al instalar la máquina, no olvide primeramente hacer la conexión a tierra.
Este equipamiento, posee protección extra contra eventual fallo. La
integridad del motor y del operador es mantenida bajo esa condición adversa.
Una de las protecciones ofrecidas, es el protector térmico. Durante la
operación de la máquina, si pasa algo a la maquina y esta parar de pronto,
usted deberá esperar unos minutos y luego deberá presionar el botón del
protector térmico que se encuentra ubicado en la parte posterior de la máquina.
IMPORTANTE
Esta máquina no debe ser utilizada por personas (inclusive niños) con
capacidades físicas o mentales reducidas, o por falta de experiencia o
conocimiento, excepto que tengan recibido una capacitación
supervisada referente al uso de esta máquina.
IMPORTANTE
Si el cable de alimentación no esté en buenas condiciones de uso, deberá
ser sustituido por el fabricante, su servicio autorizado o persona
calificada para que sea evitado accidentes.
25
1.Introduction
1.1 Mésures de Sécurité
LeS HacheurS Modèle PSA-05 si employés incorrectement peuvent être
DANGEREUX . Les opérations d' entretien , de nettoyage ou n'inporte quelle autre
opération devront être faites seulement par des personnes dument entrainées et avec la
machine débranchée de la prise électrique .
Les instructions ci-dessous devront toujours être suivies pour éviter des accidents :
1.1.1 La machine doit être débranché de l'électricité , avant de demonter, d'
enlever des pièces mobiles , pour le nettoyage , l'entretient ou tout' autre service .
1.1.2 Ne pas user des ustensiles qui ne font pas partie de la machine pour
aider l' operation .
1.1.3 Pour garantir votre sureté , avant de brancher la machine , soyez sûr que
la Tête de Hachage No.01(Fig.01) soit bien fixée dans sa position , que tous le composant
internes et le Plateau d'Alimentation No.04(Fig.01) soient à leur place .
1.1.4 Ne pas user des jets d'eau directement sur la machine
1.1.5 Ne pas porter des vetments avec des manches larges principalment aux
poignets .
1.1.6 Ne pas user les doigts ou n' importe quel autre objet pour introduire les
aliments . User le poussoir No 05 ( Fig. 01 ).
1.1.7 Ne jamais toucher les pièces mobiles avec la machine en marche .
1.1.8 Ne jamais démarrer la machine avec des vetments ou des chaussures
mouillés
1.1.9 Toujours s' assurer que la connexion terre soit faite .
L' equipement possède une protection additionnelle contre défaut éventuel . L'
intégrité de l' opérateur et du moteur est maintenue en cas d' adversité .
Cette protection est un protecteur thermique .Si le moteur s' arrète d' un seul coup , attendez
quelques minutes et pressez le bouton du protecteur thermique qui se trouve à l' arrière de la
machine .
IMPORTANT
Cet équipment ne doit pas être usé par des personnes ( enfants inclus) ayant des
capacités physiques ou mentales reduites , ou par manque d' expérience ou de
connaissances, sauf si elles ont réçu une supervision ou une instruction concernant
l' emploi de cet equipement par une personne responsable pour la securité de la
machine .
IMPORTANT
Si le cordon d' alimentation éléctrique n' est pas en bonnes conditions , il devra être
changé para le fabricant , ou par une personne qualifié , pourévitertout accident .

15
Figura - 01
01 – Cabezal
02 – Gabinete
03 – Llave Prende/Desliga
04 – Bandeja
05 – Empujador
06 – Volante
07 – Protector Térmico
02
01
03
1.2 Principales Componentes
Todos los componentes que incorporen la máquina, son construidos con
materiales seleccionados con criterio para cada aplicación, dentro de los padrones
de ensayos y de la experiencia SIEMSEN.
El cabezal, recibe tratamiento superficial para aislar y facilitar la limpieza.
La cuchilla y los discos, son construidos en material templado para
garantizar la calidad del corte por mucho más tiempo.
06
05
04
07
24
SOMMAIRE
1. Introduction 13
1.1 Mésures de Sécurité 13
1.2 Composants Principaux 14
1.3 Caractéristiques Techniques 15
2. Installation et Pré Opération 15
2.1 Installation 15
2.2 Pré Opération 15
2.3 Procédure d' Alimentation 16
3. Opération 16
3.1 Démarrage 16
3.2 Assemblage des Composants Internes de la Tête de
Hachage 16
3.3 Nettoyage 17
4. Notions Générales de Sécurité 18
4.1 Pratiques Fondamentales pour l' Opération 18
4.2 Précautions et Obsérvations Avant de Démarrer
la Machine 19
4.3 Inspection de Routine 19
4.4 Opération 20
4.5 Après la Fin du Travail 20
4.6 Entretien 20
4.7 Avertissements 20
5. Analyse et Solutions de Problèmes 21
5.1 Problèmes, Causes et Solutions 21
5.2 Ajustage et Substitution des Composants 22

16
1.3 Características Técnicas Tabla - 01
Producción Media
Tensión
Poténcia
[kg/h]
[V]
[Hz]
[CV]
[kW/h]
[mm]
[mm]
[mm]
[kg]
[kg]
Frecuencia
Consumo
Altura
Largo
Profundidad
Peso Neto
Peso Bruto
Características Unidad
PSA-05
200
115
60
1 / 1,5
0,73 / 1,1
340
212
650
29
32
2INSTALACIÓN Y PRE OPERACIÓN
2.1 Instalación
Para poder ofrecer más comodidad de trabajo al operador, la
maquina debe estar a una altura de 850mm del piso.
Verifique si la tensión de la red eléctrica a la cual será conectado
el cable de la Moledora de Carnes, está de acuerdo con la tensión de la
máquina.
2.2 Pre operación
IMPORTANTE
Al montar el cabezal completo, no apretar el volante en demasiado,
evitando así el trabamiento o la quiebra de los componentes internos.
Verifique si la maquina está firme, estática.
Antes de iniciar el uso de la máquina, todas las partes del cabezal
completo y la bandeja deben ser lavados con agua y jabón neutro.
Proceder como detallado abajo:
2.2.1 Retire la bandeja N°04 (Fig.01) para posibilitar la retirada de la
boca.
2.2.2 Remueva el volante N.06(Fig.01) y, a seguir, remueva todos los
componentes internos, tirándolos hacia afuera.
2.2.3 Lave los componentes y remóntelos, según el ítem 3.2 (Fig.02).
23
5.3 Diagrama Eléctrico
5.2Ajustes e Sustituciones de Componentes
5.2.1Afilado de los discos y cuchillas
Un buen afilado de los discos y cuchillas hacen con que la maquina trabaje
con menor esfuerzo, aumentando así la vida útil de sus componentes. Para
tanto, procure un Servicio Técnico más cercano para que pueda hacer el filo
correcto.
5.2.2 Caja de Engranajes
La moledora de Carne Modelo PSA-05 es una maquina que trabaja con caja
de reducción, lubricada con aceite.
Para garantizar la vida útil de la maquina por mucho más tiempo, verifique el
nivel del aceite a cada 5.000 horas de trabajo, levando su máquina al
Servicio Técnico o contacte el Importador.
La cantidad de aceite usado en las Moledoras modelo PSEE-09 es de
125ml, siendo recomendado el uso del aceite UNITRO 140-CASTROL o
similar con viscosidad SAE140,APIGL-4,ANP 1006).

17
2.3 Procedimiento para la alimentación
IMPORTANTE
Bajo ninguna circunstancia utilice instrumentos para empujar el alimento a
ser procesado para el interior de la boca, ni mismo las manos.
Utilice el empujador N05 (Fig.01) para hacer esta operación.
El alimento a ser procesado en el interior de la boca, tiene la función de
lubricar y enfriar los componentes de la misma. Por eso, no deje la máquina
prendida en vacío, ya que de esta forma, se calentara demasiado y
damnificará sus componentes.
El Picador de Carne modelo PSA-05, es una maquina que trabaja en alta
velocidad. De siendo así, necesita que la alimentación sea igualmente rápida.
Colocar pedazos de carne sobre la bandeja N°04(Fig.01) y conducirlos con
las manos, solamente hasta llegaren a la entrada de la boca, utilizando la ayuda del
empujador N°05(Fig.01), para empujarlos hacia el interior de la boca.
3 Operación
3.1 Accionamiento
IMPORTANTE
Desligue la máquina de la toma de corriente eléctrica siempre que desear
retirar el cabezal y sus componentes o cuando desear hacer la limpieza.
La maquinas es silenciosa. No dejar sobre la bandeja, utensilios como:
cuchillos, ganchos y similares.
Tenga la seguridad de que los componentes del cabezal estén en la
secuencia correcta de montaje, como indicamos en la Fig.02.
El accionamiento de la maquina es hecho apretando la Llave
Prende/Desliga N°03(Fig.01) ubicada en una lateral de la máquina.
3.2 Montaje de los Componentes Internos de la boca.
IMPORTANTE
Controle la posición de los componentes internos del cabezal completo
para no haber inversión de los mismos, pues caso esto ocurra, daños
irreparables irán ocurrir.
Para hacer el montaje o desmontaje de los componentes internos del
cabezal, proceder como detallamos a seguir:
22
Tabla - 02
*
.
La máquina para durante la
operación
* Falta de corriente eléctrica en
el local.
* Problemas en el circuito
eléctrico interno o externo de la
maquina .
* Verifique si el enchufe está
conectado a la toma de
corriente eléctrica.
*
.
El producto procesado sale
aplastado *
.
Falta uno de los componentes
adentro del cabezal.
* .Discos y cuchillas sin filo * Verifique el ítem 5.2.1 de
este Manual.
* Verifique la secuencia de
montaje según la (Fig.02).
*
.
Engranaje con desgaste o
rota.
* Llame el Servicio Técnico
Autorizado.
* Llame el Servicio Técnico
Autorizado.
* Llame el Servicio Técnico
Autorizado.
* Llame el Servicio Técnico
Autorizado.
* Llame el Servicio Técnico
Autorizado.
* .Olor a quemado ó humo
* La maquina prende, pero
demora para empezar a girar el
gusano en el interior del cabezal.
* .Ruidos anormales
* Vaciamiento de aceite por la
* Problema en el motor
eléctrico.
* Capacitor de partida del motor
damnificado.
*Componentes del cabezal
c o m p l e t o e n p o s i c i ó n
equivocada o mal ajustados.
* Sistema de vedamiento de la
maquina damnificado.
* Falta de ajuste de los
engranajes.
* Llame el Servicio Técnico
Autorizado.
* Verifique la posición de
cada componente.(Fig.02)
PROBLEMAS CAUSAS SOLUCIONES
5 ANALISIS Y RESOLUCIÓN DE PROBLEMAS
5.1 Problemas, Causas y Soluciones
La Modeladora de Carne modelo PSA-05, fue diseñada para que necesiten
un mínimo de manutención. Sin embargo pueden ocurrir algunas irregularidades en
su funcionamiento, debido al desgaste natural causado por su uso.
C aso haya algún problema con su máquina, verifique la Tabla – 02 abajo,
donde están indicadas algunas soluciones recomendadas.
Table of contents
Other Skymsen Meat Grinder manuals

Skymsen
Skymsen PCI-22 User manual

Skymsen
Skymsen PSP-98M User manual

Skymsen
Skymsen PCP-98M User manual

Skymsen
Skymsen PS-10 User manual

Skymsen
Skymsen PSP-98M User manual

Skymsen
Skymsen Fleetwood TC12IHD User manual

Skymsen
Skymsen PSEE-10-N User manual

Skymsen
Skymsen PSA-15HD User manual

Skymsen
Skymsen PSEE-09 User manual

Skymsen
Skymsen PCP-10L User manual