Skyrc iMAX B6 Evo User manual

Printed in China 2020.11
All specifications and figures are subject to change without notice.
7504-1397-01
This content is subject to change.
Latest version can be downloaded
from www.skyrc.com
If you have any question about this document, please contact
SkyRC by sending a message to [email protected]
All Rights Reserved.
Instruction Manual
[Version 1.00]
B6
Evo

Table of Contents
WARNING:
Welcome:
To enjoy your RC activities, you really need a good helper to
charge your batteries well, while SKYRC endeavors to be the one
you can rely on. Hard work pays off: SkyRC iMAX B6 Evo
charger is finally available.
With brand new but simple intelligent firmware in the same
classic design, we hope that this charger will be the right one to
help you have better performance in the RC field.
Features:
The charger supports multi-chemistry batteries, such as LiPo,
LiFe, LiHV, LiIon, NiMH, NiCd and Pb (Including Pb AGM
battery).
The charger's interface is simple: only ten program and system
settings; users can look through the menu quickly within seconds.
Eight of the ten programs are preset for practical applications.
Besides, it can perform as a power supply for other DC
equipment. RC gurus can calibrate their battery voltage as per
their experience or multimeter, maximize their battery
performance.
Pleasure be sure to read the INSTRUCTIONS, WARNINGS and
SAFETY PRECAUTIONS before the first use. Always bear in
mind not to mishandle the batteries or battery chargers to avoid
explosion or fire.
Mishandling batteries and battery
chargers are extremely dangerous,
which may cause fire and explosion.
Introduction
01 ·B6 Evo
Never leave the charger unattended
when charging the battery.
LiPo batteries pose a severe risk of
fire if not properly handled.
Introduction
Buttons
Specifications
Warning and Safety Precautions
Program Flow Chart
Power and Battery Connection
Glossary
Program Descriptions
Program 1-8
Quick Start Guide
Lithium Battery Program (LiPo/LiFe/Lilon/LiHV)
NiMH/NiCd Battery Program
Pb Lead-acid Battery Program
DC / DC Converter
Controlling the Charger Using the App
User Calibration
Battery Voltage Meter
System Setting
Warning and Error Message
FAQ
The Set Contains
Conformity Declaration
Regulatory Information
Commonly Used Terms
Warranty and Service
01
03
03
04
06
08
10
11
12
13
13
15
17
18
20
22
23
24
25
26
27
28
29
30
31

Introduction
· 02 B6 Evo
Temperature
Sensor Port
Output Socket
Balance Lead Socket
Start Charge
Process
Scroll Through
the Main Menu,
Alter Values
See the Status
of Individual Cell
LCD Display
DC Input
11-18V
Stop Any Charge
Processes
Micro USB Port
ESC/STOP Button:
Stop current process or go back to previous step/screen.
DEC Button:
Go through the menu or decrease the parameter value.
INC Button:
Go through the menu or increase the parameter value.
ENTER/START Button:
Confirm the setting or start the process.
DEC+INC Button:
Check the battery voltage.
ESC+DEC Button:
Enter into user calibration interface.
Buttons
STOP
V METER
START
ESC
B6 Evo 03 ·
Specifications
Input Voltage DC 11-18V
60W
Charge Wattage
Charge Current: 0.1A-6.0A
Battery Types/Cells
LiPo/LiHV/LiFe/LiIon
NiMH/NiCd
Pb
1-6cells
1-15cells
6V/12V
Discharge Current 0.1A- .0A1
Discharge Wattage 5W
Balance Current
Case Size
Weight
Max 300mA/cell
115x84x31mm
238g

Warning and Safety Precautions
Never leave the charger unattended when it is connected to power. If
any malfunction, terminate the process at once and refer to the
operation manual.
Please make sure the correct program and settings are chosen and
set. Incorrect program or setting may damage the charger or cause
fire or explosion.
Never charge or discharge any battery having evidence of leakage,
expansion/swelling, damaged outer wrapper or case, color-change
or distortion.
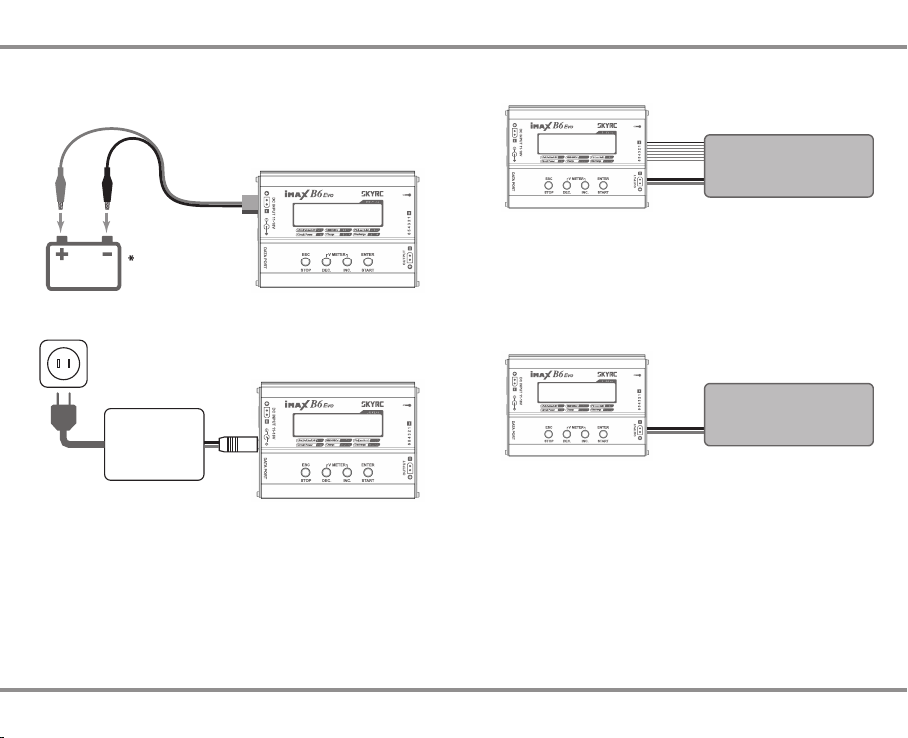
Use the original adapter and cord for power supply. To reduce the
risk of damage to the power cord, always pull by connector rather
than the cord. The allowable DC input voltage is 12-18V DC.
Do not operate the device if it appears damaged in any way.
Do not expose the device to direct sunlight, heating devices, open
flames; Avoid extreme high or extreme low ambient temperature and
sudden temperature changes.
Do not expose the device to rain, water, moisture, high humidity, or
dust due to risk of fire and corrosion. The device should only be used
at normal indoor room conditions.
Operate on a hard flat, heat-resistant, noninflammable, and
nonconductive surface in a well-ventilated area.
Never place the device on a carpet, car seat, or similar. Keep all the
inflammable, volatile substances away from the operating area.
Avoid mechanical vibration or shock as these may cause damage to
the device.
Do not short circuit the components or the device. Do not allow metal
wires or other conductive material into the charger.
Do not touch hot surfaces. The rechargeable batteries or the charger
may become hot at full load or high power charging/discharging.
Warning and Safety Precautions
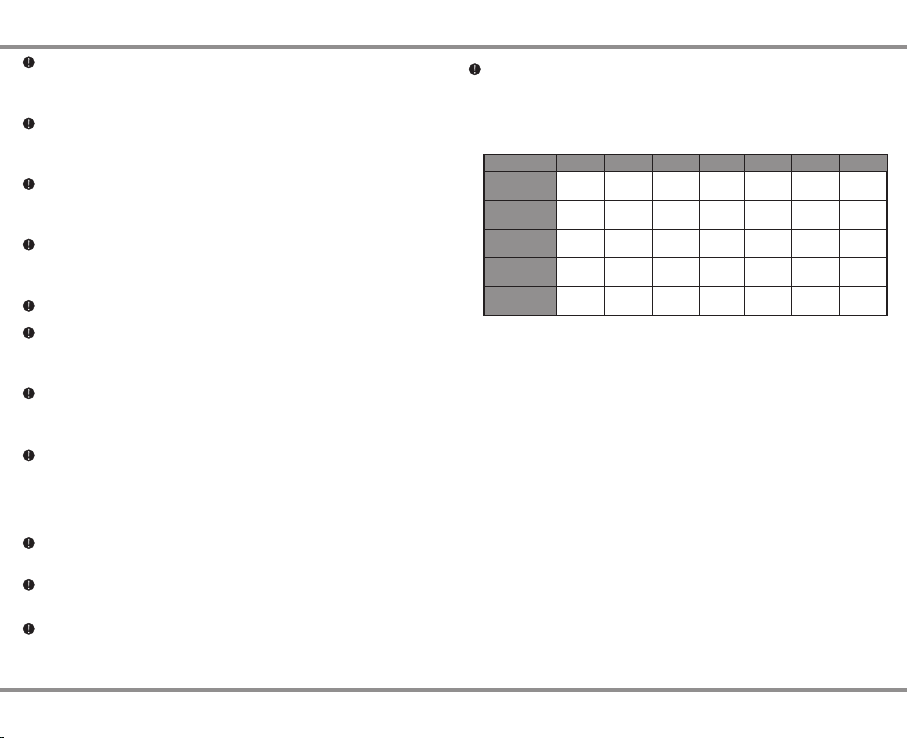
Standard Battery Parameters
3.7V/cell
Nominal
Voltage
Min. Discharge
Voltage
Max Charge
Voltage
Storage
Voltage
Allowable
Fast Charge
3.7V/cell
4.2V/cell
3.8V/cell
≦1C
LiPo LiIon
3.6V/cell
4.1V/cell
≦1C
3.3V/cell
3.6V/cell
3.3V/cell
≦4C
LiFe
3.0-3.3V/cell 2.9-3.2V/cell 2.6-2.9V/cell
1.2V/cell
1.5V/cell
n/a
1C-2C
NiCd
1.2V/cell
1.5V/cell
n/a
1C-2C
NiMH
2.0V/cell
2.46V/cell
n/a
≦0.4C
Pb
0.1-1.1V/cell 0.1-1.1V/cell
1.8V/cell
LiHV
3.7V/cell
4.35V/cell
3.85V/cell
≦1C
3.1-3.4V/cell
Make sure you know the specifications of the battery to charge or
discharge to ensure it meets the requirements of this charger.
Incorrect program settings may damage the battery and charger, or
even worse, cause fire and explosion.
· 04 B6 Evo B6 Evo 05 ·

Program Flow Chart Program Flow Chart
· 06 B6 Evo B6 Evo 07 ·
L i P o Do n e : 2 0: 0 0
C a p : 50 0 m A h
B A T T SE L : 1 / 10
L i P o 7. 4 0 V /2 S
ENTER
M O D E: 2 / 6
Fast Charge
M O D E: 3 / 6
C h a rg e N o B a l
M O D E: 4 / 6
Discharge
M O D E: 5 / 6
Storage
M O D E: 6 / 6
Batt Preset
M O D E: 1 / 6
Balance Charge
ENTER
B A T T PR E S E T 1/ 6
T y p e: L i P o
B A T T PR E S E T 2/ 6
Cells: 7.40V/2S
B A T T PR E S E T 3/ 6
C a p : 50 0 0 m Ah
B A T T PR E S E T 6/ 6
C u t T im e : O f f
B A T T PR E S E T 4/ 6
C H G I : 2. 7 A
B A T T SE L : 2 / 10
L i F e 6. 6 0 V /2 S
ENTER
L i P o 7. 4 0 V /2 S
4.5A Balance CHG
LiPo Balance CHG
9 9 % 8 .3 7 V
L i P o Ba l a n ce C H G
9 9 % 0 .6 A
4 . 1 8 4. 1 9 -- V
-- -- -- V
C a p : 56 m A h
T i m e: 5 : 5 6
B A T T SE L : 3 / 10
L i I on 7 . 2 0 V/ 2 S
B A T T SE L : 4 / 10
L i H v 7. 4 0 V /2 S
B A T T SE L : 5 / 10
N i M H 7. 2 0 V /6 S
ENTER
M O D E: 1 / 5
Charge
M O D E: 2 / 5
Discharge
M O D E: 3 / 5
D & C C yc l e s
M O D E: 4 / 5
Re-peak
M O D E: 5 / 5
Batt Preset
B A T T SE L : 6 / 10
N i C d 7. 2 0 V /6 S
B A T T SE L : 7 / 10
P b 1 2 .0 0 V / 6S
ENTER
M O D E: 1 / 3
Charge
M O D E: 2 / 3
Discharge
M O D E: 3 / 3
Batt Preset
ENTER
B A T T PR E S E T 4/ 5
D I S C I: 0 . 5 A
B A T T PR E S E T 3/ 5
C H G I : 2. 0 A
B A T T PR E S E T 2/ 5
C e l ls : 1 2 . 0V / 6S
B A T T PR E S E T 1/ 5
T y p e: P b
B A T T PR E S E T 5/ 5
C o l d: O f f
P b 1 2 .0 0 V
2 . 0 A Ch a r g e
ENTER
>3s
P b C h ar g e
9 . 8 7V
P b F l oa t C H G
0 . 1 A
C a p : 29 m A h
T i m e: 1 : 4 8
B A T T SE L : 8 / 10
D C O u t 5. 0 V
B A T T SE L : 9 / 10
N o n e
B A T T SE L : 1 0 /1 0
N o n e
B A T T PR E S E T 5/ 6
D I S C I: 0 . 5 A
B A T T PR E S E T 1/ 9
T y p e: N i M H
B A T T PR E S E T 4/ 9
D I S C V: 5 . 0 0 v
B A T T PR E S E T 2/ 9
C H G I : 2. 0 A
B A T T PR E S E T 8/ 9
D & C C yc l e s : 3
B A T T PR E S E T 7/ 9
R e - Pe a k : 1
B A T T PR E S E T 3/ 9
D I S C I: 0 . 5 A
B A T T PR E S E T 5/ 9
- d V : -5 m v
B A T T PR E S E T 9/ 9
T r i ck l e : O ff
B A T T PR E S E T 6/ 9
C u t T em p : O f f
ENTER
M O D E: 1 / 2
D C O u t
M O D E: 2 / 2
Volt Preset
ENTER
5 . 0 0V
0 . 0 0W 0 . 0 0 A
D C O u t 5. 0 0 V
O u t pu t
ENTER
BATT PRESET: 1/2
T y p e: D C O u t
ENTER
STOP
M O D E: 1 / 1
Batt Preset
ENTER ENTER
B A T T ED I T 1 / 1
T y p e: N o n e
STOPSTOP
ENTER
C a p : 29 m A h
T i m e: 1 : 4 8
ENTER
>3s
STOP
N i M H Ch a r g e
9 9 9 mA
N i M H Pr e C H G
9 . 8 7V
NiMH
1 . 0 A Ch a r g e
ENTER
>3s
N i M H Tr i c k le
0 . 0 5A
S Y S TE M S E T TI N G
->
ENTER
S Y S TE M 1 / 8
C H G P ow e r : 5 0W
S Y S TE M 2 / 8
K e y B ee p : O n
S Y S TE M 3 / 8
B u z ze r : O n
S Y S TE M 4 / 8
T e m p Un i t : C
S Y S TE M 5 / 8
S a f e Te m p : 5 0C
S Y S TE M 6 / 8
I n p ut L o w : 1 0. 0 V
S Y S TE M 8 / 8
Reset
ENTER
BATT PRESET: 2/2
V o u t: 5 . 0 0 V
ENTER
长按
STOP
S Y S TE M 7 / 8
V e r s i o n
ENTER

XT60XT60
XT60
Power and Battery Connection
1. Connecting to power source
12V DC Battery / Power Adapter Output DC 11-18V
11-18V
Adapter
4S LiPo Battery Pack
or 12V Pb Battery
Power and Battery Connection
1) Lithium Battery Connection
2) NiMH/NiCd or Pb Battery Connection
2. Connecting the battery
Always remember to connect in the correct polarity. And it is highly
recommended to charge your Lithium battery in balance mode for
better performance and safety reasons.
Please refer to the above wiring diagram, which shows the correct
way for Lithium battery connection in the balance charge mode.
Lithium Battery Pack
NiMH Battery Pack
· 08 B6 Evo B6 Evo 09 ·
XT60

NiMH
NiCd
Batt
Type
Operation
Program Description
LiPo
LiHV
Lilon
LiFe
Charging Program
Depends on different battery type, the operation programs are different.
Program Descriptions
Balance
Charge
Charge the battery and balance the battery cell
voltage during charging
Fast
Charge
Charge
Non Bal Charge the battery without the balance lead connected
Discharge
Storage
Discharge the battery to certain voltage level
Charge or discharge the battery to a certain voltage level
for storage
Pb/
Pb AGM
Charge Charge the battery to the expected voltage
Discharge Discharge the battery to a certain voltage level
D&C Cycle
Re-Peak
(NiMH only)
Peak charge the battery once, twice or three
times in cycle automatically.
Charge
Discharge
· 10 B6 Evo B6 Evo 11 ·
CHG Power = battery charging power, default charging power is
50W.
Temp Unit = temperature unit, Celsius or Fahrenheit is selectable.
Safe Temp = safe temperature.
Input Low = input voltage is low.
CHG I = battery charging current.
DISC I = battery discharging current.
Cut Temp = cutoff temperature.
D&C cycles = discharge/charge cycles or charge/discharge cycles.
DISC V = discharge voltage.
-dV =
Batt Preset = battery information setting, such as battery type, cells,
current etc.
Cut Time = protection cutoff time.
Glossary
Charge the battery to the expected voltage
Discharge the battery to the expected voltage
Cap = capacity or cutoff protection capacity.
delta voltage for NiMH/NiCd battery.
Discharge -> Charge
Charge the battery and speed up on balancing.

Do not overcharge nor over-discharge batteries.
Remove the battery and unplug the charging unit from the power
source when not in use.
Opening, disassembling, modifying, tampering with the unit may
invalidate its guarantee, check warranty terms.
Do not misuse in any way! Use for intended purpose and function
only.
Before charging, always connect the charging leads to the charger
first, then connect to the battery. After charging finishes, remove the
battery first.
As the first 8 programs are occupied and preset, below operation
instructions will be based on empty program, for example, program 9
or 10.
Quick Start Guide
Lithium Battery Program (LiPo/LiFe/Lilon/LiHV)
Click INC/DEC to select one empty program.
Battery No.: 9/10
None
MODE: 1/1
Batt Preset
BATT PRESET: 1/1
Type: None
BATT PRESET: 1/6
Type: LiPo
BATT PRESET: 2/6
Cells: 22.2V/6S
START/ENTER
START/ENTER
ENTER to get the value flash.
Click INC/DEC to select desired Lithium
battery type, for example, LiPo.
ENTER to get the value flash, then click
INC/DEC to select correct Lithium battery cells.
ENTER to confirm.
INC
INC
· 12 B6 Evo B6 Evo 13 ·
Program 1-8
B6 Evo charger minimizes program and system settings to 10 only,
eight of which are preset for practical applications:
2S LiPo for RC car/boat
3S LiPo for fixed wing/multirotor
4S LiPo for fixed wing/multirotor
6S LiPo for EDF/fixed wing
4S LiHV for racing drone
Commonly used program for any NiMH battery
Commonly used program for Pb battery
Battery No.: 8/10
Pb 12.0V/6S
2S LiFe for radio and receiver
Battery No.: 7/10
NiMH AUTO
Battery No.: 6/10
LiFe 6.6V/2S
Battery No.: 5/10
LiHV 14.8V/4S
Battery No.: 4/10
LiPo 22.2V/6S
Battery No.: 3/10
LiPo 14.8V/4S
Battery No.: 2/10
LiPo 11.1V/3S
Battery No.: 1/10
LiPo 7.4V/2S
Please scan and watch the tutorial video for
operational instructions.
Video
Tutorial

NiMH/NiCd Battery Program
Click INC/DEC to select one empty program.
Battery No.: 9/10
None
MODE: 1/1
Batt Preset
BATT PRESET: 1/1
Type: None
START/ENTER
START/ENTER
ENTER to get the value flash.
BATT PRESET: 1/9
Type: NiMH
BATT PRESET: 2/9
CHG I: 2.0A
BATT PRESET: 3/9
DISC I: 0.1A
BATT PRESET: 4/9
DISC V: 0.8V
BATT PRESET: 5/9
-dV: -5mV
BATT PRESET: 6/9
Cut Temp: Off
BATT PRESET: 7/9
Re-Peak: 1
Click INC/DEC to select NiMH or NiCd
Battery Type.
ENTER to get the value flash.
Click INC/DEC to set the Charge Current.
ENTER to confirm.
Set the Discharge Current.
Set the Discharge Voltage.
Set the Delta Voltage, which ranges from
-15mV to -3mV.
Set the Protection Cut-off Temperature.
Set the Re-peak Cycles.
INC
INC
INC
INC
INC
INC
· 14 B6 Evo B6 Evo 15 ·
Lithium Battery Program (LiPo/LiFe/Lilon/LiHV)
BATT PRESET: 3/6
Cap: Off
BATT PRESET: 4/6
CHG I: 4.0A
BATT PRESET: 5/6
DISC I: 0.4A
BATT PRESET: 6/6
Cut Time: Off
MODE: 1/6
Balance Charge
ENTER to get the value flash, then click
INC/DEC to set Capacity protection values
or off. ENTER to confirm.
ENTER to get the value flash, then click
INC/DEC to set the charge current.
ENTER to confirm.
Set the discharge current.
Set the protection cut time or off.
After setting, click ESC to step out of the
current interface, and select the desired
charge/ discharge mode.
If you would like to modify the setting, go back to Batt Preset and
refresh the setting manually.
INC
INC
INC
ESC
Press and hold
START/ENTER for
seconds to start the
program.
Press ESC/STOP to
terminate the current
process when anything
unexpected occurs.

Pb Lead-acid Battery Program
Click INC/DEC to select one empty program.
Battery No.: 9/10
None
MODE: 1/1
Batt Preset
BATT PRESET: 1/1
Type: None
START/ENTER
START/ENTER
ENTER to get the value flash.
BATT PRESET: 1/5
Type: Pb
Click INC/DEC to select Pb or Pb AGM Battery
Type.
INC
BATT PRESET: 2/5
Cells: 12.0V/6S
INC
BATT PRESET: 3/5
CHG I: 2.9A
INC
BATT PRESET: 4/5
DISC I: 0.2A
INC
BATT PRESET: 5/5
Cold: Off
ESC
MODE: 1/3
Charge
ENTER to get the value flash, then click INC/DEC
to select 3 cells or 6 cells. ENTER to confirm.
ENTER to get the value flash, then click INC/DEC
to set the charge current. ENTER to confirm.
Set the discharge current.
Turn the Cold Charge on or off.
After setting, click ESC to step out of the
current interface, and select the desired
charge/ discharge mode.
Press and hold START/ENTER for seconds to start the program.
Press ESC/STOP to terminate the current process when anything
unexpected occurs.
If you would like to modify the setting, go back to Batt Preset
and refresh the setting manually.
· 16 B6 Evo B6 Evo 17 ·
NiMH/NiCd Battery Program
BATT PRESET: 8/9
D&C cycle: 1
BATT PRESET: 9/9
Trickle: Off
MODE: 1/5
Charge
Set the Discharge/Charge or Charge/Discharge
Cycles.
Set the Trickle Current or off.
After setting, click ESC to step out of the
current interface, and select the desired
charge/ discharge mode.
Press and hold START/ENTER for seconds to start the program.
Press ESC/STOP to terminate the current process when anything
unexpected occurs.
If you would like to modify the setting, go back to Batt Preset and
refresh the setting manually.
INC
INC
ESC

MODE: 1/2
DC Out
ESC
DC Out 5.0V
Output
ENTER
Press ESC to step out of current interface.
Press and hold ENTER to confirm the setting,
and enter into the output interface.
DC / DC Converter
· 18 B6 Evo B6 Evo 19 ·
DC / DC Converter
B6 Evo charger is integrated with DC/DC Converter function. The
function is helpful for those who need to power their DC gadget. Its
DC output voltage ranges from 5.0V to 20.0V. Users are free to set
the desired output voltage for their DC tools.
DC Input
(11-18V)
DC Output
(5-20V / 1-6A)
Click INC/DEC to select one empty program.
Battery No.: 9/10
None
MODE: 1/1
Batt Preset
BATT PRESET: 1/1
Type: None
START/ENTER
START/ENTER
ENTER to get the value flash.
Click INC/DEC to select DC Out,
ENTER to confirm.
To activate and enjoy this function, follow below steps:
ENTER to flicker the option, and set the
desired output voltage.
Versatile With the Addition of AGM and Cold Modes
The juice box comes with the charging algorithm for the most
common battery chemistries: LiPo, Li-Ion, LiHV, LiFe, NiMH, NiCD,
and Pb (lead acid).
When it comes to the reliable, lighter and maintenance-free
AGM(Absorbent Glass Mat) battery, you will take the risk of charging
it with a regular charger in the normal Pb mode.
B6 Evo address the AGM battery characteristics with the tailored
algorithm to charge in an optimized way!
o o
Cold weather mode: Use for charging at low temperatures(<-32 F/0 C).
Cold weather mode increases charging voltage.
DC / DC Converter
BATT PRESET: 1/2
Type: DC Out
BATT PRESET: 2/2
Vout: 20.0V

· 20 B6 Evo B6 Evo 21 ·
CONTROLLING THE CHARGER USING THE APP
This feature requires the optional dongle.
CONTROLLING THE CHARGER USING THE APP
The optional Bluetooth dongle allows controlling and monitoring B6
Evo comfortably through an app on a portable device such as
smartphones. Users are free to download the SkyCharger app from
App Store or Google Play. The operation of the APP is self-
explanatory and the same on both iOS and Android.
Download to install SkyCharger, connect SkyRC Bluetooth Dongle to
B6 Evo, then enable Bluetooth on your smart devices, and launch the
app, search for Bluetooth. to connect. When the device named [B-
Dongle-XXXX] appears, tap to connect.
Bluetooth Dongle
STOP START
V METERESC
DC INPUT 11-18V
DATA PORT
* Bluetooth Dongle is optional and
not included in the package.
(SK-600135)
CHARGING with SkyCharger
Connect the battery to B6 Evo, select the correct battery type, cells
and operation mode, click NEXT to set the proper charge current.
After setting, click START.
SCAN TO GO
PROGRAM SYSTEM
HOME
NEXT
DISCHARGER
BAL.CHARGE
5
6
CHARGER
4
LiIon
LiFe
LiPo
15:53
Revo
Operation
Mode
Battery
Type
Battery
Cells
15:53
Revo
LiPo
BAL.CHARGE
6
MoreBack
Operation
Mode
Battery
Type
Battery
Cells
Charge
Current
START
1.1A
1.2A
1.6A
1.5A
1.7A
1.3A
1.4A
STOP
Duration
Capacity
Voltage
Current
Charger
Temperature
Battery Type Battery Cells
Balance Charge
15:53
Revo
00:10:071500
mAh
24.58
VA
4.65
Battery Fuel
Gauge
CF
50 122
LiPo 6
4.09 V4.10 V4.10 V
89
%
0D0E07D5 1
Battery ID No. of charger
4.09 V4.10 V4.10 V

· 22 B6 Evo B6 Evo 23 ·
4.20 4.19 4.19V
4.18 4.18 4.19V
Battery Voltage Meter
B6 Evo enables the user to check the overall battery voltage and
each cell's voltage.
Please connect the battery to the charger with both the main socket
and balance lead connected.
Reference connection as below:
This diagram shows
the correct way to
connect your battery
to check the voltage.
Lithium Battery Pack
After connection, press and hold DEC/INC button simultaneously for
seconds, then release.
The screen will display the total battery voltage and single cell voltage
in rotation automatically.
Any button clicking will take you to exit current battery voltage interface.
User Calibration
Warning: It is highly recommended NOT to do calibration unless
necessary. SKYRC will not be liable for the consequences
caused by calibration.
To maximize their battery performance in competition, RC gurus may
like to calibrate the battery voltage according to their experience or
multimeter.
Please follow the below steps for safe and smooth calibration with
one 6S LiPo battery.
i. Press and hold ESC and DEC button at the same time, then
connect to power source to power up.
ii. The screen will light up and notify you to connect a 6S battery.
The higher the cell voltage, the better the calibration. One almost fully
charged 6S LiPo battery is highly preferred.
iii. After connecting the battery, calibrate the cell voltage cell by cell.
If you would prefer factory calibration, you are free to reset and
have the original calibration in this interface.

· 24 B6 Evo B6 Evo 25 ·
Warning and Error Message
In case of an error, the screen will display the warning and emit an
audible sound.
E R R O R :
BLANCE BREAK
SUPPLY VOLT
T OO L O W
SUPPLY VOLT
T OO H I GH
E R R O R :
C ON N E CT I ON B R E AK
E R R O R :
WRONG BATT TYPE
E R R O R :
R EV E R SE P O LA R I TY
E R R O R :
V OL T E R RO R
INTERNAL TEMP
T OO H I G H
B AT T T E MP
T OO H I G H
OVER CHARGE
C AP A C IT Y L IM I T
OVER TIME LIMIT
The battery connection is interrupted.
Incorrect polarity is connected.
The battery capacity charged is higher than the
preset threshold.
Connection of balance socket is interrupted.
The battery cell value differs from the cells detected.
The charging takes longer than the preset
protection time.
Input voltage is lower than 11V.
Wrong battery voltage.
Battery type selected differs from the battery type
detected.
Input voltage is higher than 18V.
Internal temperature goes higher than the preset
threshold.
Battery external temperature goes higher than the
preset protection threshold.
E R R O R :
C EL L N O T MA T CH
System Setting
S YS T E M 1/ 8
C HG P o w er : 5 0 W
Sound for button touching
The default charge power is 50W,
while full charge power is 60W,
which is available to modify.
Sound for alerts
OFF/ON
It will be operated with the default value of the essential user settings
when it is powered on for the first time. The screen displays the
following information in sequence, and the user can change the value
of the parameter on each screen.
To alter the parameter value, press START/ENTER to make it flash to
change the value with INC or DEC. The value will be stored by
pressing START/ENTER once.
ITEM SELECTION DESCRIPTION
50W / 60W
OFF / ON
The battery's internal chemical
reaction will cause the temperature
to rise. If the temperature limit is
reached, the process will be
terminated.
The temperature unit is selectable
between Celsius and Fahrenheit
S YS T E M 2/ 8
K ey B e ep : O n
S YS T E M 3/ 8
B uz z e r: O n
S YS T E M 4/ 8
T em p U n it : C
S YS T E M 5/ 8
S af e T e mp : 5 0 C
S YS T E M 6/ 8
I np u t L ow : 1 1 .0 V
S YS T E M 7/ 8
V e r s i o n
S YS T E M 8/ 8
R e s e t
Low input voltage value.
An error message will prompt when
DC input voltage is lower than the
preset value.
Hardware and firmware version is
displayed.
Reset all setting, and load factory
default setting.
20 C / 68 F -
80 C / 176 F
C / F

· 26 B6 Evo B6 Evo 27 ·
THESETCONTAINS
Ec3 Charging Cable
SK-600023-13
Dean Charging Cable
SK-600023-15
Tamiya Charging Cable
SK-600023-12
4mm/5mm Bullet
Charging Cable for 2S Battery
SK-600023-14
5mm
4mm
Temperature Sensor
SK-600040-01
RECOMMENDED ACCESSORIES
The Set Contains
1. SKYRC B6 Evo Charger
2. DC Input Cable
3. Dean Charging Cable
4. Bare charging cable
5. Instruction Manual
1
2
5
34
Instruction Manual
[Version 1.00]
B6
Evo
FAQ
The charge current cannot be set at 6A.
There may be 2 reasons:
1) Default charge power is 50W, please visit system setting to change
the power to 60W.
2) When you charge Lithium battery, after selecting the battery type
and cells, the charger will get you the highest current automatically.
How can I detect battery voltage?
When you are at any interface of the 10 battery program, press
DEC/INC simultaneously to detect the battery voltage.
When charging NiMH batteries, battery cells is not selectable.
The firmware is optimized to self-adapt for maximum safety. When
charging NiMH batteries, there may be broken cells that you do not
know. In this case, the charger may keep charging which may result
in danger. While for B6 Evo, it will charge and detect the voltage over
and over again to decide the battery cells.
When charging NiMH batteries, charge current is set at 6A, but it
goes lower and lower.
When charging NiMH batteries, you do not need to select the battery
cells, and B6 Evo will charge and detect the voltage over and over
again. Before deciding the battery cells, the current will decrease at
1/5 one round by one round.

Regulatory Information
FCC Note:
This device complies with Part 15 of the FCC rules. Operation is
subject to the following two conditions:
(1) this device may not cause harmful interference, and (2) this device
must accept any interference received, including interference that
may cause undesired operation.
The manufacturer is not responsible for any radio or TV interference
caused by unauthorized modifications or change to this equipment.
Such modifications or change could void the user's authority to
operate the equipment.
This equipment has been tested and found to comply with the limits
for a Class B digital device, pursuant to part 15 of the FCC Rules.
These limits are designed to provide reasonable protection against
harmful interference in a residential installation. This equipment
generates, uses and can radiate radio frequency energy and, if not
installed and used in accordance with the instructions, may cause
harmful interference to radio communications. However, there is no
guarantee that interference will not occur in a particular installation. If
this equipment does cause harmful interference to radio or television
reception, which can be determined by turning the equipment off and
on, the user is encouraged to try to correct the interference by one or
more of the following measures:
– Reorient or relocate the receiving antenna.
– Increase the separation between the equipment and receiver.
– Connect the equipment into an outlet on a circuit different from that
to which the receiver is connected.
– Consult the dealer or an experienced radio/TV technician for help.
To maintain compliance with FCC's RF exposure guidelines, this
equipment should be installed and operated with a minimum distance
of 20cm between the radiator and your body.
· 28 B6 Evo B6 Evo 29 ·
This symbol means that you must dispose of electrical from the
General household waste when it reaches the end of its useful
life. Take your charger to your local waste collection point or
recycling centre. This applies to all countries of the European Union,
and to other European countries with a separate waste collection
system.
SkyRC B6 Evo meets all relevant and mandatory EC directives and
FCC Part 15 Subpart B.
FCC Part 15, Subpart B Radiated Emission
Conformity Declaration
EN 55014-1:2006
+ A1:2009+A2:2011
Electromagnetic compatibility-Requirements
for household appliances, electric tools and
Similar apparatus – Part 1: Emission
EN 55014-2:1997+
A1:2001+ A2:2008
Electromagnetic compatibility-Requirements
for household appliances, electric tools and
Similar apparatus – Part 2: Immunity-Product
family standard

Warranty and Service
This charger is designed and approved exclusively for use with the types of
battery stated in this Instruction Manual. SkyRC accepts no liability of any
kind if the charger is used for any purpose other than that stated.
We are unable to ensure that you follow the instructions supplied with the
charger, and we have no control over the methods you employ for using,
operating and maintaining the device. For this reason we are obliged to
deny all liability for loss, damage or costs which are incurred due to the
incompetent or incorrect use and operation of our products, or which are
connected with such operation in any way.Unless otherwise prescribed by
law, our obligation to pay compensation, regardless of the legal argument
employed, is limited to the invoice value of those SkyRC products which
were immediately and directly involved in the event in which the damage
occurred.
Liability exclusion
Warranty and service
We guarantee this product to be free of manufacturing and assembly defects
for a period of one year from the time of purchase. The warranty only applies
to material or operational defects, which are present at the time of purchase.
During that period, we will repair or replace free of service charge for products
deemed defective due to those causes.
This warranty is not valid for any damage or subsequent damage arising as a
result of misuse, modification or as a result of failure to observe the procedures
outlined in this manual.
The warranty service is valid in China only.
If you need warranty service overseas, please contact your dealer in the
first instance, who is responsible for processing guarantee claims
overseas. Due to high shipping cost, complicated custom clearance
procedures to send back to China. Please understand SkyRC can't
provide warranty service to overseas end user directly.
If you have any questions which are not mentioned in the manual,
please feel free to send email to [email protected]
Note:
1.
2.
3.
· 30 B6 Evo B6 Evo 31 ·
Commonly Used Terms
Commonly used terms
Final charge voltage: the voltage at which the battery's charge limit
(capacity limit) is reached. The charge process switches from a high
current to a low maintenance rate (trickle charge) at this point. From
this point on further high current charging would cause overheating
and eventual terminal damage to the pack.
Final discharge voltage: the voltage at which the battery's discharge
limit is reached. The chemical composition of the batteries determines
the level of this voltage. Below this voltage the battery enters the deep
discharge zone. Individual cells within the pack may become reverse
polarized in this condition, and this can cause permanent damage.
A, mA: unit of measurement relating to charge or discharge
current.1000 mA = 1 A (A=Ampere,mA=Milliampere)
Ah, mAh: unit of measurement for the capacity of a battery (Amperes
x time unit; h = hour). If a pack is charged for one hour at a current of 2
A, it has been fed 2 Ah of energy. It receives the same quantity of
charge (2 Ah) if it is charged for 4 hours at 0.5 A, or 15 minutes (=1/4
h) at 8 A.
'C'-rating: Capacity is also referred to as the 'C' rating. Some battery
suppliers recommend charge and discharge currents based on the
battery 'C' rating. A battery's '1C' current is the same number as the
battery's rated capacity number, but noted in mA or amps. A 600mAh
battery has a 1C current value of 600mA, and a 3C current value of (3
x 600mA) 1800mA or 1.8A. The 1C current value for a 3200mAh
battery would be 3200mA (3.2A).
Nominal voltage(V): The nominal voltage of the battery pack can be
determined as follows;
-.NiCd or NiMH: multiply the total number of cells in the pack by 1.2. A
8-cell pack will have a nominal voltage of 9.6 volts (8x1.2).
-.LiPo: multiply the total number of cells in the pack by 3.7. A 3-cell
LiPo wired in series will have a nominal voltage of 11.1 volts (3x3.7).
-.LiIo: multiply the total number of cells in the pack by 3.6. A 2-cell LiIo
wired in series will have a nominal voltage of 7.2 volts (2x3.6).
-.LiFe: multiply the total number of cells in the pack by 3.3. A 4-cell LiIo
wired in series will have a nominal voltage of 13.2 volts (4x3.3).
If the nominal voltage of the battery is not printed on the battery's label,
consult your battery manufacturer or supplier. Do not guess the rated
voltage of battery.
Table of contents
Other Skyrc Batteries Charger manuals