Skyrc e660 User manual

Instruction Manual
[Version 1.0]
Multi-Chemistry Charger
Discharger/Power Supply
All specifications and figures are subject to change without notice.
Printed in China 2017.01
This content is subject to change.
Latest version can be downloaded
from www.skyrc.com
If you have any question about this document, please contact
SkyRC by sending a message to [email protected]
All Rights Reserved.
RoHS
7504-0862-01

e660 01 ·
Introduction
Thanks for purchasing SkyRC e660 AC/DC Input Professional Balance
Charger/Discharger/Power Supply. Though this unit is simple to use,
and you may even have years of experience on chargers, SkyRC still
recommend you to read the entire instruction manual completely and
attentively. Doing such reading can assist you to quickly become familiar
with its operations & new functions. It is, therefore, highly recommended
that you read through the Operating Instructions, Warning and Safety
Notes before attempting to use this new charger for the first time. SkyRC
hopes you will have pleasure of using it for years.
This new e660 charger also support PC control software (Charge
Master) and firmware upgrade. Besides that, e660 is able to power DC
equipment such as tire sander, LED pit light and motor checker, etc. The
new features and functions will be listed and explained in detail in the
following pages.
SkyRC e660 is a high-performance, micro processor control charge/
discharge/power supply with battery management suitable for use with
all current battery types. It is with integral equalizer for six-cell Lithium-
Polymer (LiPo), Lithium iron phosphate (LiFe), Lithium-ion (LiIon) and
Lithium High Voltage (LiHV) battery with max. 6A charge current and
60W charge power. This charger can be powered by 11-18V DC or 100-
240V AC power source via the built in switch-mode power supply.
Please BE SURE to read the INSTRUCTIONS, WARNING and SAFETY
NOTES before using this charger for the first time.
Mishandling batteries and battery chargers is extremely dangerous,
which may cause fire and explosion.
Table of Contents
This device is not intended for use by persons (including children)
with reduced physical, sensory or mental capabilities, or lack of
experience and knowledge, unless they have been given
supervision or instruction concerning use of the appliance by a
person responsible for their safety.
Children should be supervised to ensure that they do not play with
the appliance.
Do not recharge non-rechargeable batteries!
WARNING:
Introduction
Special Features
Warning and Safety Notes
Program Flow Chart
Operation
Operating Program
Lithium Battery Program (LiPo/LiFe/Lilon/LiHV)
NiMH/NiCd Battery Program
Pb Lead-Acid Battery Program
DC Power Supply
Battery Memory Set and Call Out
System Setting
Battery Voltage Meter
Battery Resistance Meter
Warning and Error Message
Using the Charge Control Software “Charge Master”
The Set Contains
Recommended Accessories
Specification
Conformity Declaration
Commonly Used Terms
Warranty and Service
01
03
06
10
12
13
15
18
24
27
28
30
32
33
34
35
36
37
38
39
40
41

e660 03 ·e660 · 02
Introduction Special Features
Please read the entire instruction manual completely and attentively
before using. This manual contains a wide range of information on
operation and safety.
Optimized Operating Software
SkyRC e660 features the so-called AUTO function that sets the feeding
current during the charging/discharging process. It can prevent
explosion from overcharging caused by the user, and charging process
will be disconnected automatically once malfunction is detected. Its
entire programs are controlled through two-way linkage and
communication to achieve maximum safety. All the settings are
configurable.
Battery Memory (Data Store/Load)
Up to 10 different charge/discharge profiles can be stored for your
convenience. You can keep the data pertained to the program setting
and call out them at any time without any special procedures for
continuous charging/discharging.
Terminal Voltage Control (TVC)
End voltage is adjustable for professionals only.
PC Control Software “Charge Master”
“Charge Master” will offer you unparalleled operating experience through
a computer. Real-time charging process will be presented as graphs.
You can also monitor pack voltage, cell voltage and other data during
the charging process. Initiating, charging control or firmware upgrade is
available through “Charge Master”, you are free to download on SkyRC
official website (www.skyrc.com).
Internal Independent Lithium Battery Balancer
SkyRC e660 employs an individual-cell-voltage balancer. It's
unnecessary to connect an external balancer for balance charging.
Balancing Individual Cells Battery Discharging
During the charging process, SkyRC e660 can automatically monitor
and balance each individual cell of the battery. Error message will be
indicated and the process will be ended immediately if the voltage of any
single one cell is abnormal.
Output Socket
4mm Banana
Plug
Balance
Lead Socket
Micro USB Port for PC Link
Temperature Sensor Port
LCD Display
AC Socket 100-240V
DC Input / Output
Cooling Fan
Resume or Start
Charge Processes
Scroll Through the Main Menu
Stop Any Charge Processes
Alter Values
See the Status of Individual
Cells in Balance Charge Mode
LED Light

Adaptable to Various Type of Lithium Battery
SkyRC e660 is capable of charging/discharging types of Lithium
batteries, such as LiPo, LiIon, LiFe and high voltage LiPo battery (LiHV).
Fast Charge and Storage Mode of Lithium Battery
Function of the two modes differs from each other. “FAST CHG”
minimizes battery charge time, while “STORAGE” has the capacity to
control the final battery voltage, which is necessary and helpful for a
rarely used battery.
Re-peak Mode of NiMH/NiCd Battery
In RE-PEAK mode, the charger can peak charge the battery once, twice
and three times in a row automatically. This is for confirming the battery
is fully charged.
Delta-peak Sensitivity for NiMH/NiCd
After setting the Delta peak sensitivity, when the battery voltage exceeds
the threshold, charging process will be terminated automatically.
Cycle Charging/Discharging
This charger supports cycle charge>discharger or discharge>charge for
up to 5 times. This function is extremely beneficial to a rarely used
NiMH/NiCd battery, which can help refresh and activate your battery.
Automatic Charging Current Limit
Upper limit of the charging current can be set when charging your
NiMH/NiCd battery. It's useful for a NiMH battery with low impedance
and capacity in the “AUTO” charging mode.
LiPo Voltage Battery Meter
SkyRC e660 supports checking battery total voltage, highest voltage,
lowest voltage and each individual cell voltage without external battery
meter.
Battery Internal Resistance Meter
SkyRC e660 supports checking battery total resistance and each
individual cell resistance without external resistance meter.
Capacity Limit
Charging capacity will increase as the charging goes on. If the charging
capacity exceeds the limit, the charging process will be terminated
automatically when it reaches the limit you set.
Temperature Threshold
Battery internal chemical reaction will cause the battery temperature to
rise. When the temperature limit is reached, the process will be
terminated.
This function is available by connecting optional temperature probe, which
is not included yet.
Safety Timer
Max. charging time can be set to avoid any possible defect caused by
overcharging.
DC Power Supply
Your e660 can supply DC power up to 60 Watts. You can use it to power
devices that require DC power. It converts standard household power
from 100-240V AC to 13.8V DC.
e660 05 ·e660 · 04
Special FeaturesSpecial Features
*

e660 07 ·e660 · 06
Warning and Safety Notes Warning and Safety Notes
Following warnings and safety notes are critically important,
please refer to the instructions for maximum safety; Otherwise the
charger and battery can be damaged or even cause a fire.
Never leave the charger unattended when it is connected to power
source. If any malfunction is found, TERMINATE THE PROCESS
AT ONCE and refer to the instruction manual.
Keep the charger well away from dust, damp, rain, direct sunshine
and vibration. Never drop it.
To reduce the risk of damage to the power cord, always pull by
connector rather the cord. The allowable AC/DC voltage is 110-
240V AC and 11-18V DC respectively.
Operate on a hard flat nice clean smooth heat-resistant
noninflammable nonconductive surface in a well-ventilated area.
Never place the device on a carpet, car seat, or similar. Keep all the
inflammable volatile substances away from operating area.
Avoid mechanical vibration or shock as these may cause damage to
the device.
Never block the cooling fan or the air ventilation holes.
Remove all batteries and unplug the charging unit from the power
source when not in use.
Please make sure to know the specifications of the battery to be
charged or discharged to ensure it meets the requirements of this
charger. If the program is set incorrectly, the charger and battery may
be damaged. Fire or explosion may be caused due to overcharging.
Opening, disassembling, modifying, tampering with the unit may
invalidate its guarantee.
Do not misuse in any way! Use for intended purpose and function
only.
Standard Battery Parameters
Be very careful to choose the correct voltage for different types of
battery otherwise you may cause damage to the batteries. Incorrect
settings could cause the cells to fire or explode.
3.7V/cell
Nominal
Voltage
Min. Discharge
Voltage
Max Charge
Voltage
Storage
Voltage
Allowable
Fast Charge
3.7V/cell
4.2V/cell
3.8V/cell
≦1C
LiPo LiIon
3.6V/cell
4.1V/cell
≦1C
3.3V/cell
3.6V/cell
3.3V/cell
≦4C
LiFe
3.0-3.3V/cell 2.9-3.2V/cell 2.6-2.9V/cell
1.2V/cell
1.5V/cell
n/a
1C-2C
NiCd
1.2V/cell
1.5V/cell
n/a
1C-2C
NiMH
2.0V/cell
2.46V/cell
n/a
≦0.4C
Pb
0.1-1.1V/cell 0.1-1.1V/cell
1.8V/cell
LiHV
3.7V/cell
4.35V/cell
3.85V/cell
≦1C
3.1-3.4V/cell
Never attempt to charge or discharge following types of batteries
A battery pack which consists of different types of cells with different
manufacturers
A battery that is already fully charged or just slightly discharged
Non-rechargeable batteries (Explosion hazard)
Batteries that require a different charge technique from NiCd, NiMH,
LiPo or Gel cell (Pb, Lead acid)
A faulty or damaged battery
A battery fitted with an internal charge circuit or a protection circuit
Batteries installed in a device or electrically linked to other components
Batteries undeclared by the manufacturer to be suitable for the current
the charger delivers
Please bear the following points in mind before commencing
charging:

e660 09 ·e660 · 08
Warning and Safety Notes Warning and Safety Notes
Have you selected the appropriate program for the battery type you are
charging?
Have you set up adequate current for charging or discharging?
Have you checked the battery voltage? Please note that Lithium battery
packs can be wired in parallel or in series, i.e. a 2 cell pack can be 3.7V
(in parallel) or 7.4V (in series)
Have you checked that all connections are firm and secure?
Make sure there are no intermittent contacts at any point in the circuit.
Charging
During charge process, a specific quantity of electrical energy will be fed
into the battery, which is calculated by multiplying charge current. The
maximum permissible charge current differs on different types of battery
and its performance, which can also be found in the information by the
battery manufacturer. Only batteries to be capable of quick-charge are
allowed to be charged at higher rates than the standard charge current.
Connect the battery to the charger terminal, red is positive while black is
negative. Due to the different resistance between cable and connector,
the charger can not detect the battery pack's resistance. To work
properly for a charger, it's essential for its charge lead to be of adequate
conductor cross-section, and high quality gold-plated connectors must
be fitted to both ends.
Please always refer to the manual by battery manufacturer about
recommended ways of charging, charging current and time, especially
for a Lithium battery, which must be charged according to the instruction
strictly.
Special attention must be paid to the Lithium battery connection.
Never attempt to disassemble the battery pack arbitrarily.
Always remember: Lithium battery can be wired in parallel or in series.
In parallel connection, the battery capacity is calculated by multiplying
each individual battery cell capacity with total voltage staying the same.
Voltage imbalance may cause fire or explosion. Lithium battery is highly
recommended to charge in series.
Discharging
The main purpose of discharging is to clean residual battery capacity, or
to discharge the battery to a defined level of voltage. Final discharge
voltage must be set correctly to avoid over-discharging. Lithium battery
can not be discharged to be lower than its required minimum voltage, or
it will cause a rapid loss of capacity or a total failure. Please pay
attention to the minimum voltage of Lithium battery to protect it.
Some rechargeable batteries have memory effect. If they are partly used
and recharged before whole charging is accomplished, they will
remember this and only use that part of capacity next time. Above is
called memory effect. It is said that both NiMH and NiCd batteries suffer
from memory effect, NiCd, however, suffers more.

e660 11 ·e660 · 10
Program Flow Chart Program Flow Chart
BATT/PROGRAM
BATT MEMORY ENTER
[ BATT MEMORY 1 ]
ENTER SET-> ENTER
BATT TYPE
LiPo
BATT VOLTAGE
7.4V ( 2S )
CHARGE CURRENT
4.9A
DISCHG CURRENT
2.2A
DISCHG VOLTAGE
3.0V/CELL
TVC=YOUR RISK
4.20V
ENTER
ENTER
BATT/PROGRAM
SYSTEM SETTING->
Rest Time
CHG>DCHG 10Min
ENTER
Safety Timer
ON 120Min
Capacity Cut-Off
ON 5000mAH
Temperature Unit
Celsius
Key Beep ON
Buzzer ON
Stop
BATT PROG
SAVE PROGRAM
ENTER
SAVE PROGRAM
SAVE….
[ BATT MEMORY 1 ]
LiPo 7.4V (2S )
[ BATT MEMORY 1 ]
C:4.9A D:2.2A
ENTER CHARGER
LOAD……
LiPo BALANCE CHG
4.9A 7.4V(2S)
LiPo CHARGE
4.9A 7.4V(2S)
LiPo FAST CHG
4.9A 7.4V(2S)
LiPo STORAGE
4.9A 7.4V(2S)
LiPo DISCHARGE
2.2A 7.4V(2S)
BATT TYPE
NiMH
BATT VOLTAGE
2.4V (2S)
ENTER
CHARGE CURRENT
3.3A
TRICKLE
100mA
PEAK DELAY
1Min
DISCHG CURRENT
2.2A
DISCHG VOLTAGE
1.1V/CELL
SAVE PROGRAM
ENTER
ENTER
BATT TYPE
Pb
BATT VOLTAGE
4.0V (2P)
CHARGE CURRENT
3.3A
DISCHG CURRENT
1.5A
DISCHG VOLTAGE
1.7V/CELL
SAVE PROGRAM
ENTER
BATT/PROGRAM
Pb BATT ENTER
Pb CHARGE
2.0A 2.0V (1P)
Pb DISCHARGE
0.1A 2.0V (1P)
BATT/PROGRAM
NiCd BATT
NiCd CHARGE
CURRENT 2.0A
ENTER
NiCd DISCHARGE
0.1A CUT: 1.0V
NiCd CYCLE
CHG>DCHG 1
BATT/PROGRAM
NiMH BATT ENTER
NiMH CHARGE
CURRENT 2.0A
NiMH DISCHARGE
0.1A CUT: 1.0V
NiMH CYCLE
CHG>DCHG 1
BATT/PROGRAM
LiPo BATT
LiPo BALANCE CHG
2.0A 7.4V (2S)
LiPo CHARGE
2.0A 7.4V (2S)
LiPo FAST CHG
2.0A 7.4V (2S)
LiPo STORAGE
2.0A 7.4V (2S)
LiPo DISCHARGE
2.0A 7.4V (2S)
ENTER
BATT/PROGRAM
LiFe BATT
Lilo BALANCE CHG
2.0A 7.2V (2S)
Lilo CHARGE
2.0A 7.2V (2S)
Lilo FAST CHG
2.0A 7.2V (2S)
Lilo STORAGE
2.0A 7.2V (2S)
Lilo DISCHARGE
2.0A 7.2V (2S)
ENTER
BATT/PROGRAM
LiIo BATT
LiFe BALANCE CHG
2.0A 6.6V (2S)
LiFe CHARGE
2.0A 6.6V (2S)
LiFe FAST CHG
2.0A 6.6V (2S)
LiFe STORAGE
2.0A 6.6V (2S)
LiFe DISCHARGE
2.0A 6.6V (2S)
ENTER
ENTER
BATT/PROGRAM
BATT METER
NiCd RE-PEAK
1
NiMH RE-PEAK
1
NiMH Auto CHARGE
CURRENT 2.0A
NiCd Auto CHARGE
CURRENT 2.0A
BATT/PROGRAM
BATT RESISTANCE ENTER
5 3 3 mΩ
5 0 0 mΩ
TATAL: 16mΩ
Temp Cut-Off
ON 50°C 122°F
Version
HW:1.00 FW: 1.00
Load Factory Set
Enter
ENTER
ENTER>3Seconds
NiMH Sensitivity
D.Peak 4mV
NiCd Sensitivity
D.Peak 4mV
DC Input Low
Cut-Off 11.0V
SAVE PROGRAM
SAVE…. ENTER
[ BATT MEMORY 2 ]
NiMH 2.4V (2S )
[ BATT MEMORY 2 ]
C:1.0A D:1.0A
ENTER>3Seconds
ENTER CHARGER
LOAD……
NiMH CHARGE
CURRENT 1.0A
NiMH Auto CHARGE
CURRENT 1.2A
NiMH DISCHARGE
1.0A CUT: 2.0V
NiMH RE-PEAK
2
NiMH CYCLE
DCHG>CHG 1
[ BATT MEMORY 2 ]
ENTER SET->
[ BATT MEMORY 3 ]
ENTER SET->
SAVE PROGRAM
SAVE…. ENTER
[ BATT MEMORY 3 ]
Pb 4.0V (2S )
[ BATT MEMORY 3 ]
C:3.3A D:1.5A
ENTER CHARGER
LOAD……
Pb CHARGE
3.3A 4.0V(2P)
Pb DISCHARGE
1.5A 4.0V(2P)
BATT/PROGRAM
LiHV BATT
LiHV BALANCE CHG
2.0A 7.6V (2S)
LiHV CHARGE
2.0A 7.6V (2S)
LiHV FAST CHG
2.0A 7.6V (2S)
LiHV STORAGE
2.0A 7.6V (2S)
LiHV DISCHARGE
2.0A 7.6V (2S)
ENTER
BATT/PROGRAM
DJI Mavic BATT ENTER
LH3S CHARGE
TURN ON BATTERY
LH3S STORAGE
TURN ON BATTERY
4.20 4.19 4.19 V
0.00 0.00 0.00 V
MAIN 12.58V
H4.20V L4.19V
DC SUPPLY: 10W
CHARGE POWER: 50W

e660 13 ·e660 · 12
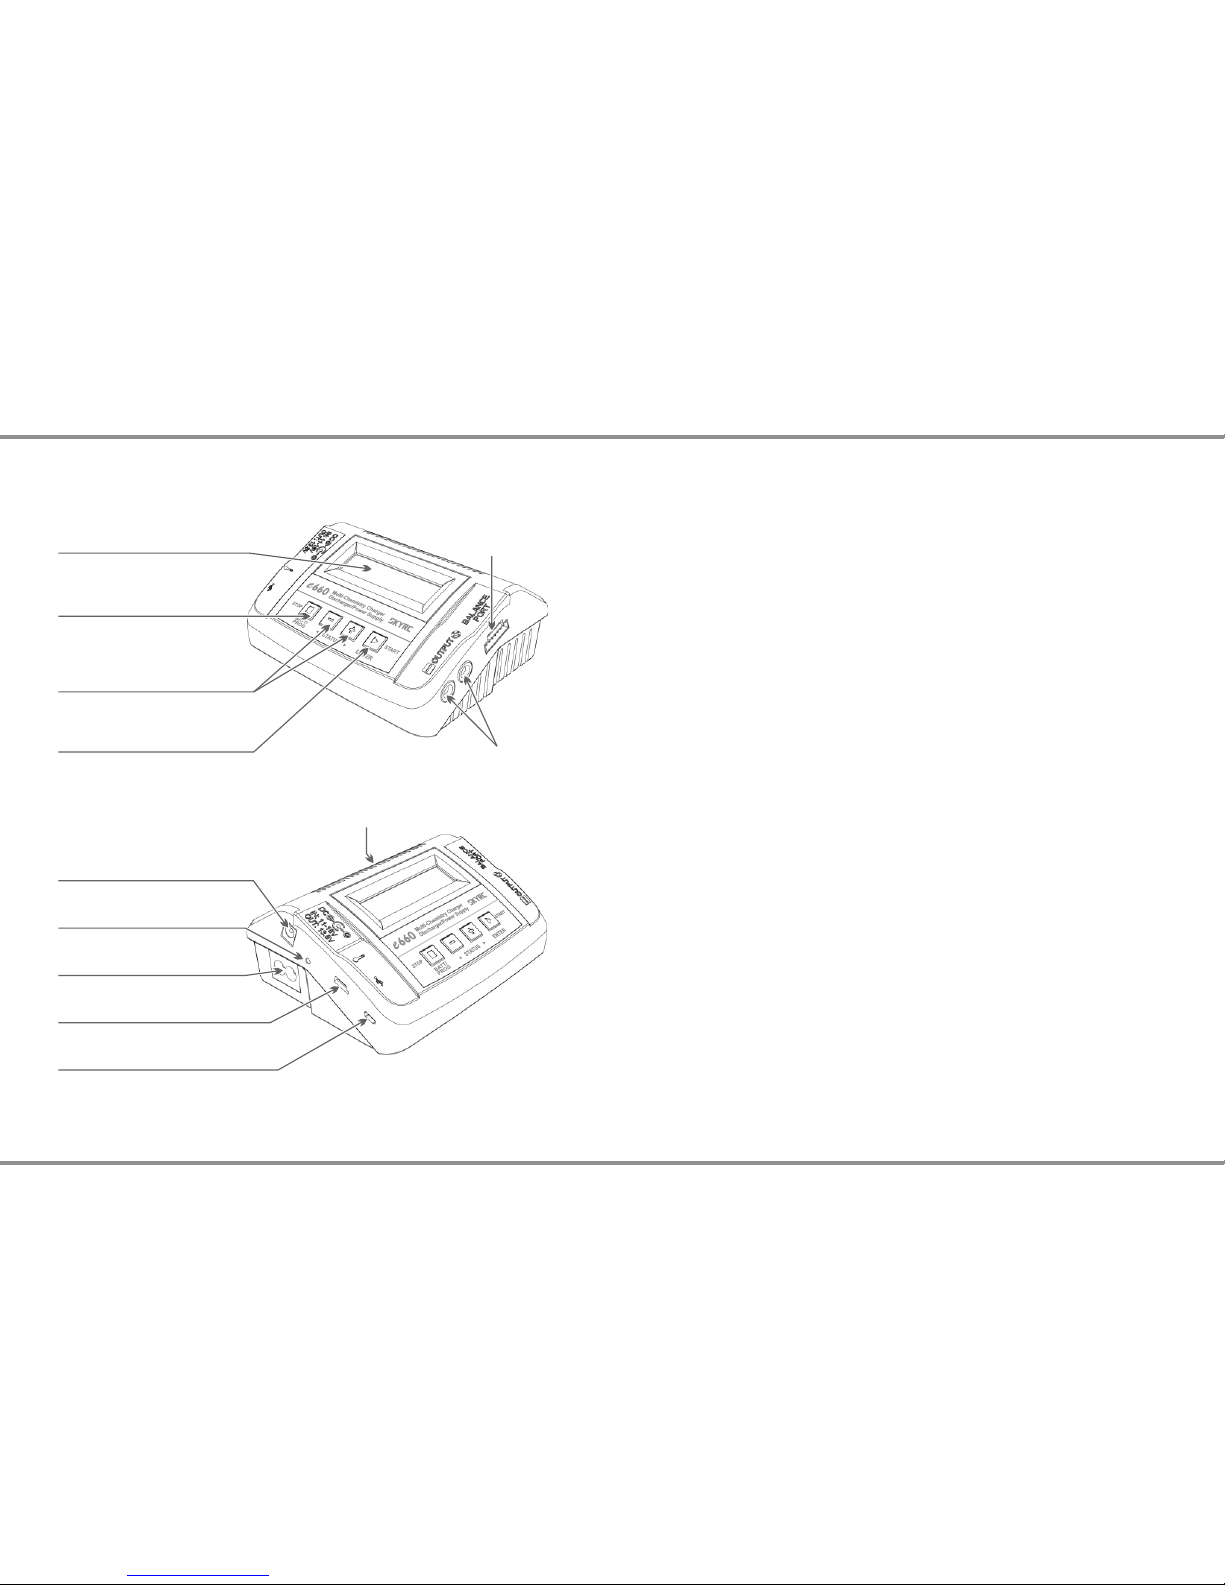
BATT PROG/STOP Button:
It is used to stop the progress or go back to previous step/screen
- Button:
It is used to go through the menus and decrease the parameter value
+ Button:
It is used to go through the menus and increase the parameter value
ENTER/START Button:
It is used to enter parameter or store parameter on screen.
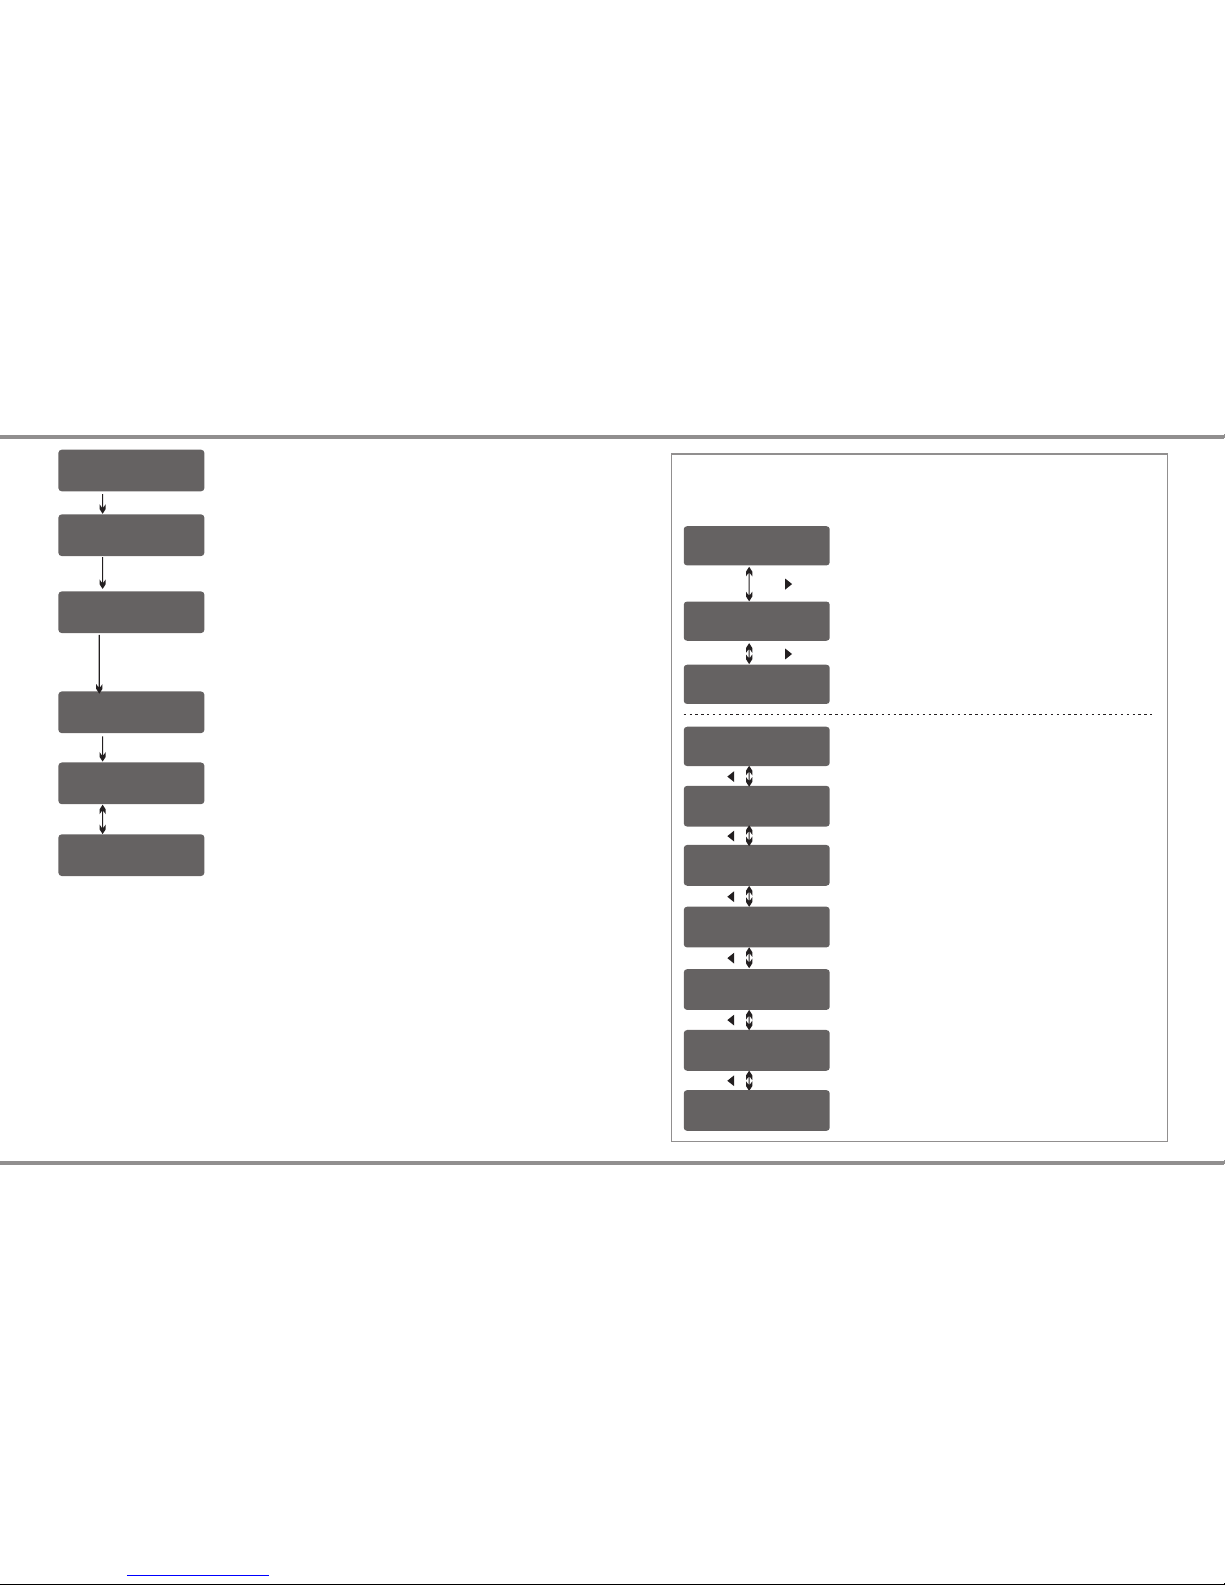
When you need to change the parameter value in the program, press
ENTER button to make it blink, and then press -/+ button to change the
value. After selecting the correct value, re-press the ENTER button to
store it. If there is another parameter to be changed on the same
screen, after confirming the first parameter value, you are free to change
the second when it's blinking.
To start charging after setting, long-press the ENTER button for around
3 seconds. To stop charging or go back to previous step/screen, press
the BATT/PROG button once.
After power on, the charger will enter into LiPo Balance Charge program
directly. You are free to change the modes (balance charge, charge, fast
charge, storage and discharge) or battery types. Select correct battery
type, proper mode and current before charging.
For better service to you, this charger can memorize your last operation.
For example, last time you set at 2.1A to charge a 3S LiPo battery, when
you turn on the charger to do charging once again, the specifications
you selected last time will be remembered and displayed directly. To
ensure the safety, the charging mode will always turn to balance charge
for LiPo batteries. Isn't this function cool enough?
Operation
Below are the procedures for you to follow to make the charger work,
which will take LiPo, NiMH and Pb batteries as the standard.
Connection
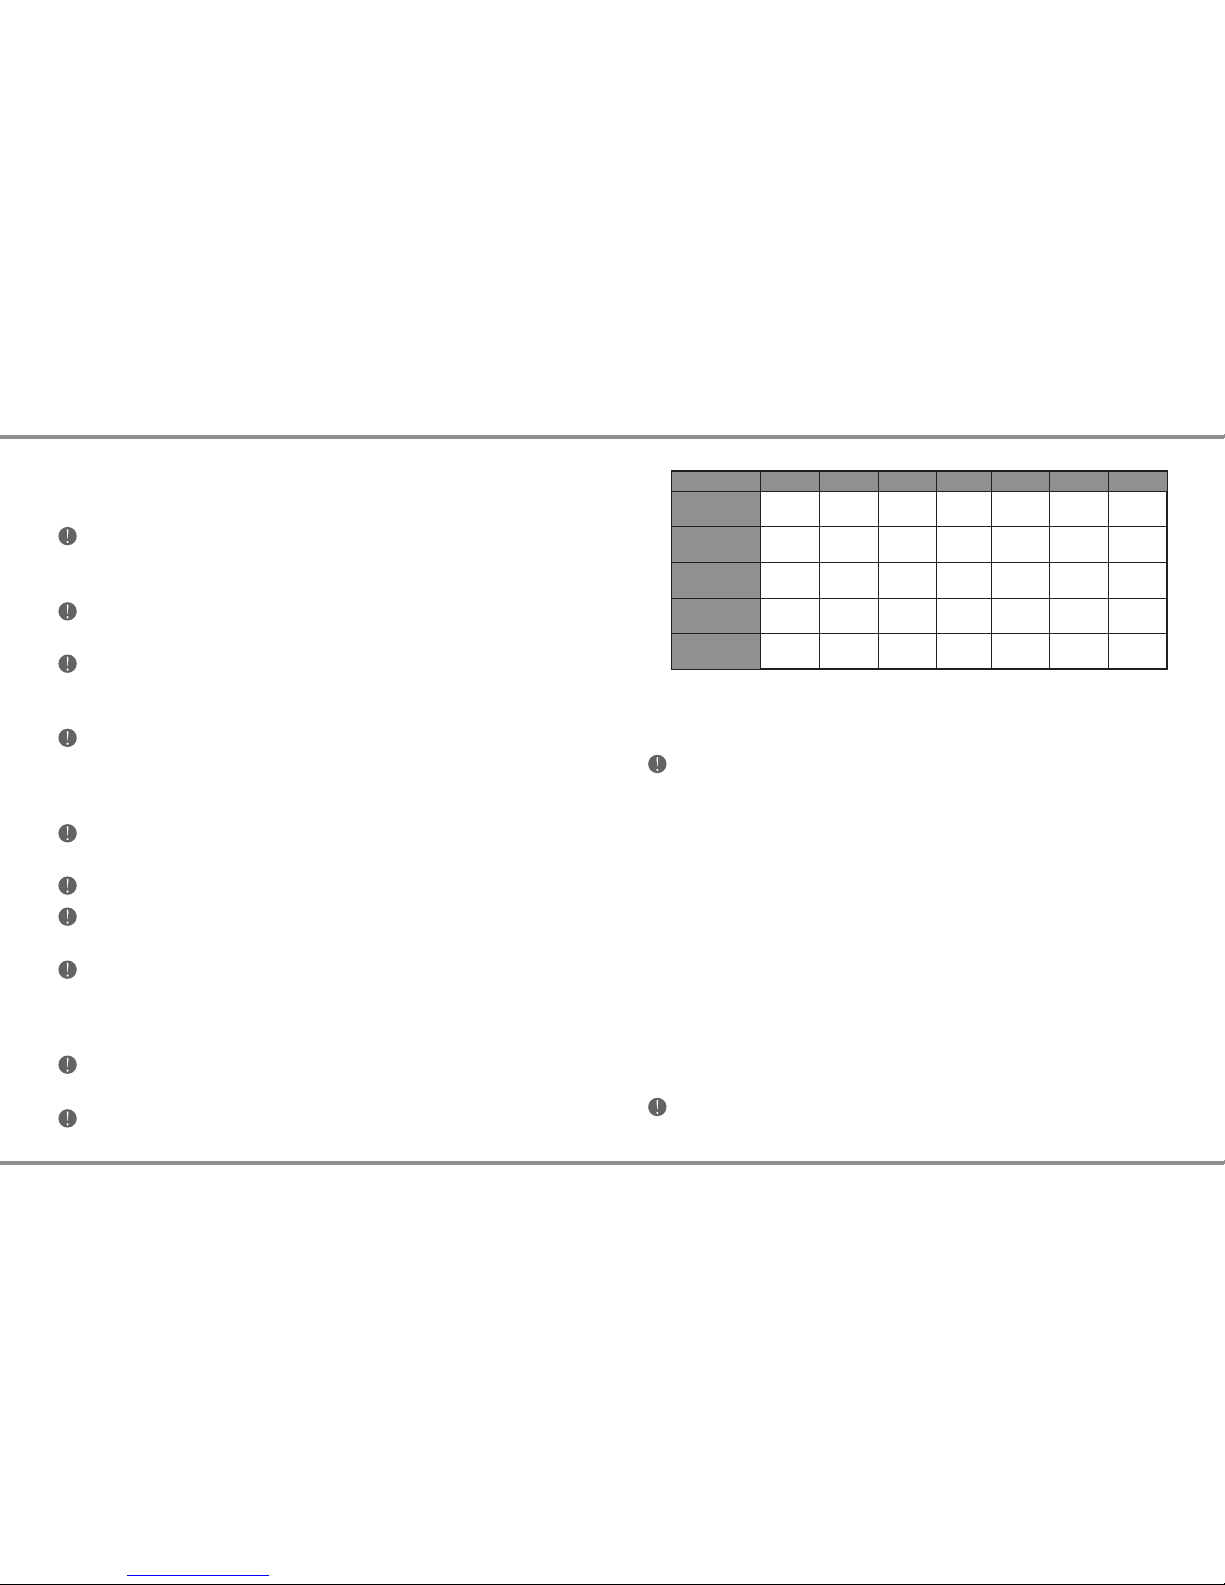
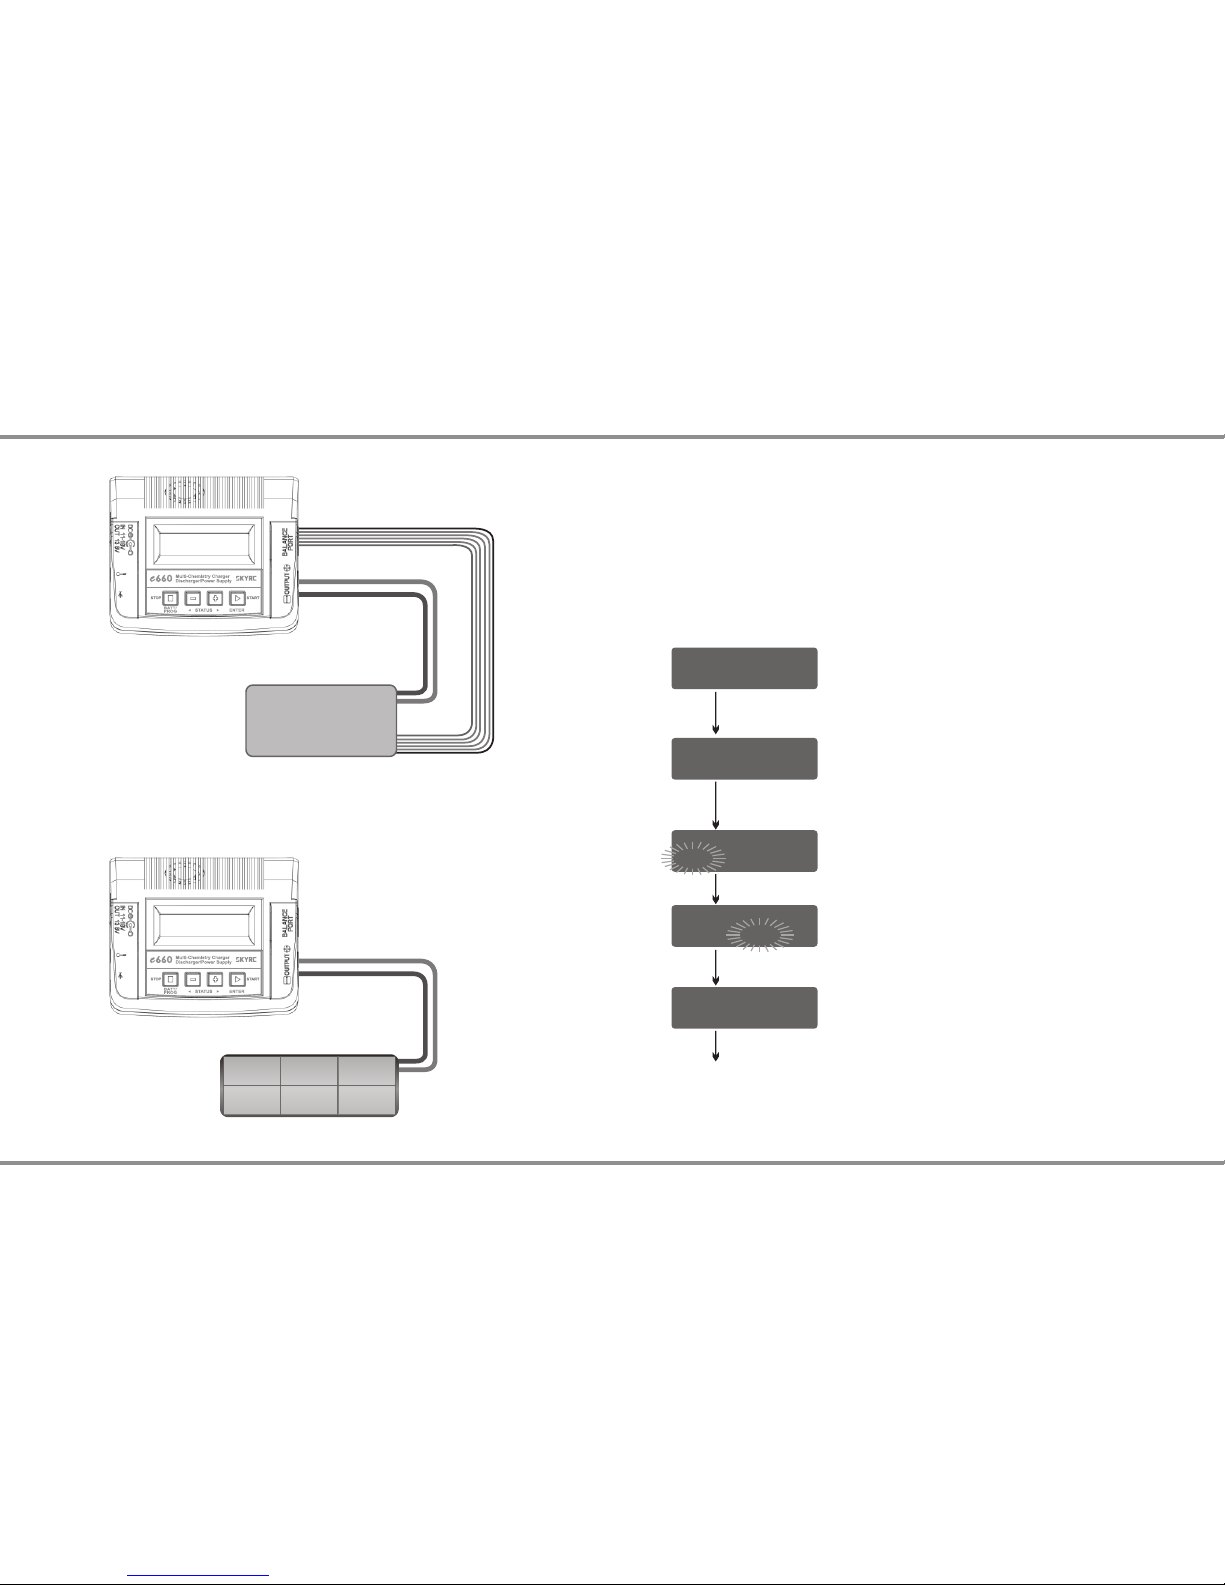
1) Connect to power source
SkyRC e660 comes with built-in power supply, you can connect it to
either AC power source (100-240V) or DC power source (11-18V).
2) Connect the battery
Before connecting, it is extremely important for you to confirm that the
parameters are set correctly. Incorrect setting may damage the battery,
even burst into flames or cause explosion. To avoid short circuits
between the two banana connectors, always remember to connect the
charge leads to SkyRC e660 first, and then get the battery connected to
the leads. Reverse the procedure when disconnecting the pack.
3) Balance socket
It is for Lithium battery in all modes.
The balance wire of the battery must be connected to the charger with
the black wire aligned with the negative mark. Always remember to keep
right polarity in the connection. Please refer to the wiring diagram below,
which shows a correct way for your LiPo battery connection in the
balance charge mode.
Connection

e660 15 ·e660 · 14
Lithium Battery Program (LiPo/LiFe/Lilon/LiHV)
A memory profile is available for setting and storing pertinent
information for up to 40 different program sets; each channel can
store 10 sets. Once a battery program is stored into memory, it will
be retained until changed again manually. Recalling a program
memory number makes the charger instantly ready to go!
If you do not wish to use the battery program memories, this charger
can be manually set before each use.
(1)
(2)
The following flowchart shows how the program is set manually:
BATT/PROGRAM
LiPo BATT
LiPo BALANCE CHG
2.0A 11.1V (3S)
LiPo BALANCE CHG
2.0A 11.1V (3S)
LiPo BALANCE CHG
2.0A 11.1V (3S)
LiPo BALANCE CHG
2.0A 11.1V (3S)
START/ENTER
START/ENTER
START/ENTER
START/ENTER
START/ENTER
> 3 Seconds
BATT/PROGRAM Select
Mode Select
Program Start
Press INC and DEC to go through all the
programs and press START/ENTER to enter
LiPo BATT Program.
Battery Setting
Press INC and DEC to go through all the modes
and press START/ENTER to enter LiPo Balance
Charge Mode.
Press START/ENTER, the present value will
start to blink. Press INC and DEC to change the
value and press START/ENTER to confirm your
setting.
At the same time, the battery pack’s cell count
will start to blink, press INC and DEC to change
the value and press START/ ENTER to confirm
your setting.
Press and hold START/ENTER for 3 seconds to
start the program.
Warning:
Failure to connect as shown above may damage the charger.
Connection
Lithium Battery Connection
NiMH/NiCd Battery Connection
Lithium Battery Pack

VARIOUS INFORMATION DURING THE PROCESS
Press INC or DEC during the charging or discharging process to
view further pertinent information on the LCD screen.
Final voltage when the program ends.
Input voltage.
Safety timer ON and permissible charging time.
Capacity cut-off ON and capacity limit.
Voltage of each cell of the battery pack when
the battery is connected with balance lead.
Internal/External Temperature
Temperature probe is necessary for getting
external temperature
Percentage of growing capacity and average
cell voltage of the battery pack.
Real-time status: battery type, battery cell
count, charge current, battery pack total
voltage, elapsed time and growing capacity.
Cut off temperature.
LP3s 1.5A 12.24V
BAL 000:50 00022
4.07 4.06 4.11 V
0.00 0.00 0.00 V
Fuel= 90%
Cell= 4.10V
INC
INC
LP3s 1.5A 12.24V
BAL 000:50 00022
Ext. Temp: 45°C
Int. Temp: 37°C
DEC
Temp Cut-Off
50C/122F
DEC
DEC
DEC
DEC
DEC
End Voltage
12.6V(3S)
IN Power Voltage
12.56V
Safety Time
ON 200min
Capacity Cut-Off
ON 5000mAh
e660 17 ·e660 · 16
Lithium Battery Program (LiPo/LiFe/Lilon/LiHV)Lithium Battery Program (LiPo/LiFe/Lilon/LiHV)
R:3SER S:3SER
CONFIRM(ENTER)
LP3s 1.5A 12.14V
BAL 000:50 00022
START/ENTER
BATTERY CHECK
..............................
R:3SER S:3SER
CANCEL(STOP)
[ END: FINISHED ]
12.6V 1000mAh
[ Time: 00: 15: 32 ]
12.6V 1000mAh
Charging Status Monitor
During charge process, real-time status will be
shown as seen on the left.
The charger is detecting the battery cell.
R shows the number of cells detected by the
charger and S is the number of cells set by you
on the previous screen.
If the two numbers are not identical, press
STOP to go back to the previous screen to
recheck the number of cells of the battery pack
that you set before going ahead.
Program Complete
Once the battery is fully charged, the screen will
read “END: FINISHED” and the charger will
emit a ringing sound. The charger also displays
battery voltage, charging capacity and elapsed
time.
Program Stop
During the charging process, press STOP to stop the charging process. *

e660 19 ·e660 · 18
NiMH/NiCd Battery ProgramNiMH/NiCd Battery Program
NiMH/NiCd:
This program is only suitable for charging/discharging NiMH/NiCd
batteries. The e660 offers the following NiMH/NiCd charge modes:
Charge, Auto Charge, Discharge, Re-Peak and Cycle.
Selecting the Battery Type:
After powering on the e660, press the INC or DEC button repeatedly
until you reach the appropriate program for the battery type you wish to
charge. For this example we have chosen the “NiMH BATT“ or “NiCd
BATT” program. Now press the ENTER button to enter the desired
program.
BEFORE YOU BEGIN CHARGING YOUR BATTERY, MAKE
SURE YOU ARE CHARGING NIMH/NICD BATTERIES.
CHARGING LIPO BATTERY UNDER NIMH/ NICD BATTERY
PROGRAM WILL CAUSE FIRE.
WARNING!
NiMH/NiCd Charge Mode:
BEFORE YOU BEGIN CHARGING YOUR BATTERY, MAKE SURE
YOU HAVE READ AND UNDERSTOOD ALL OF THE WARNINGS AND
SAFETY INFORMATION CONTAINED ON PAGES 06-08.
After selecting the correct battery type, if the screen does not read
“CHARGE”, use the DEC or INC buttons to change it to the “CHARGE”
mode.
NiMH CHARGE
CURRENT 2.0A
NiMH 2.0A 5.42V
CHG 002:22 00106
Press the ENTER button and the amp rate value
will begin blinking. Use the DEC or INC button to
adjust the value to the desired rate. Follow the
instructions provided on your battery when
setting the charge current.
Press and hold the ENTER button for 3 seconds
to start charging.
Once charging has commenced, the charger will
display the following real-time information:
battery type, charging current, battery voltage,
charging time and charged capacity. Once the
battery is fully charged, the screen will read
"END: FINISHED" and the charger will emit a
ringing sound. You can press the STOP button
at any time during the charging process to stop
charging.
NiMH/NiCd Auto Charge Mode:
In this mode, the charger automatically detects the connected NiMH or
NiCD battery and determines the proper full charge and cut-off
thresholds. Setting the upper charge current limit for safe levels based
on your battery specifications will ensure safe charging of your specific
battery. If you are unsure of the maximum allowable charge rates, set
the charger to a maximum of 1C (battery mAh/1000, e.g. 3200mAh =
3.2A).
NiMH Auto CHARGE
CURRENT 1.3A
After selecting the correct battery type, use the
INC or DEC button to change the charge mode
to the “Auto CHARGE” setting.
Press the START button and the amp rate value
will begin flashing. Use the INC or DEC button
to adjust the value to the desired rate. Follow
the instructions provided on your battery when
setting the upper charge amperage rate.
Press and hold the START button for 3 seconds
to start charging.
Once charging has commenced, the charger will
display the following real-time information:
battery type, charging current, battery voltage,
charging time and charged capacity.
NiMH 1.3A 5.42V
AUT 002:22 00106

e660 21 ·e660 · 20
NiMH/NiCd Battery ProgramNiMH/NiCd Battery Program
NiMH/NiCd Discharge Mode:
After selecting the correct battery type, use the
INC or DEC button to select the “DISCHARGE”
mode. Press the START button and the amp
rate value will begin flashing. Use the INC or
DEC buttons to adjust the value to the desired
discharge rate. Press the START button again
and the voltage cut-off will begin to flash. Use
the INC or DEC button to adjust the value to the
desired rate.
Follow the instructions provided on your battery
when setting the voltage cut-off. The e660 will
stop discharging when the battery has reached
the preset voltage cut-off.
NiMH DISCHARGE
1.3A CUT:9.6V
Press and hold the START button for 3 seconds
to start discharging. Once discharging has
commenced, the charger will display the
following real-time information: battery type,
discharging current, battery voltage, discharging
time and discharged capacity.
NiMH 1.3A 10.42V
AUT 002:22 00106
[ TIME: 00:04:04 ]
9.6V 00640mAh
When discharging is complete, the screen will
read “END: CUTOFF-VOL” and the charger will
emit a ringing sound.
The charger will display the elapsed time, end
voltage and the discharged capacity in mAh.
You can press the STOP button at any time
during the discharging process to stop the
discharge process.
NiMH/NiCd Re-Peak Mode:
Applicable to NiMH and NiCD batteries only, in re-peak mode the
charger can peak- charge the battery once, twice, or three times in a
row automatically. This process is good for confirming that the battery is
fully charged and for verifying how well the battery can accept a fast
charge. A five-minute cool-down delay occurs after each re-peak charge.
IN RE-PEAK MODE, THE e660 USES THE CHARGE AMPERAGE AND
VOLTAGE SETTINGS ENTERED IN CHARGE MODE.
NiMH RE-PEAK
2
NiMH 1.3A 10.42V
RPC 004:04 00686
After selecting the correct battery type, use the
INC or DEC button to select the “RE-PEAK”
mode. Press the START button and the Re-peak
cycle number 1 begins to flash on the screen.
Use the INC or DEC button to scroll through the
cycle count and set a number between 1 and 3.
Press and hold the START button for 3 seconds
to start the re-peak process.
Once the Re-Peak process has begun, the
charger will display the following real-time
information: battery type, charging current,
battery voltage, elapsed time and charged
capacity.
Once the Re-Peak process has completed, the
screen will read “END: RE-PEAK” and the
charger will emit a ringing sound. The e660 will
display the charge/discharge capacity for each
cycle. Using the + and - buttons, you can scroll
through the history data of each cycle.
Once the battery is fully charged, the screen will
read “END: FINISHED” and the charger will emit
a ringing sound. You can press the STOP button
at any time during the charging process to stop
charging.

e660 23 ·e660 · 22
NiMH/NiCd Battery ProgramNiMH/NiCd Battery Program
NiMH/NiCd Cycle Mode:
The e660 makes cycling of NiMH/NiCd batteries easy. The process of
discharging and recharging (cycling) can be performed automatically
with one simple step and will improve the performance of NiMH/NiCd
batteries. We strongly recommend cycling any battery that has been
discharged and stored for a period of time. This will increase the
remaining usable battery life and also improve the battery performance.
After selecting the correct battery type, use the
INC or DEC button to select the “CYCLE” mode.
The Cycle Mode gives you two cycling options:
“DCHG>CHG” or “CHG>DCHG“. The “DCHG>CHG”
option will first discharge the battery and then
recharge the battery.
The “CHG>DCHG” option will first charge the
battery and then discharge the battery. If this
screen does not show your desired cycling
option, press the START button once and this
setting will begin flashing. Use the INC or DEC
button to change this setting.
Pressing the START button again will cause the
cycle count to begin flashing. Use the INC or
DEC button to change this to the number of
cycles you want the e660 to run. The e660 can
cycle the battery a maximum of 5 times
consecutively.
Press and hold the START button for 3 seconds
to start the Cycle Mode.
NiMH CYCLE
DCHG > CHG 2
NiMH CYCLE
CHG > DCHG 5
Once cycling has commenced, the charger will
display the following real-time information:
battery type, charging/ discharging current,
battery voltage, elapsed time and charged/
discharged capacity. You will also see “D>C“ or
“C>D“. This will indicate which cycling order you
have chosen.
Either “D“ or “C“ will be flashing. This flashing
indicates which part of the cycle is currently
being executed.
NiMH 0.5A 9.6V
D > C 004:04 00034
Once the cycling process is complete, the screen will read “END:
CYCLE” and the charger will emit a ringing sound. The e660 will display
the charge/discharge capacity for each cycle. Using the + and - buttons,
you can scroll through this data for each cycle.
Additional NiMH/NiCd Process Information:
During the NiMH/NiCd battery charging/discharging process the e660
can display a variety of information. Using the INC or DEC buttons, you
can also view the following information:
NiMH Sensitivity
D.Peak 4mV/CELL
Ext. Temp 42 C
Int. Temp 37 C
In Power Voltage
12.56V
Delta Peak Voltage
Sensitivity setting
External*/ internal
temperature
Safety Time
ON 200min
Safety timer
setting
Input Voltage
Temp Cut-off
50 C
Temperature
cut-off
Capacity Cut-Off
ON 5000mAh
Capacity limit
setting
This function is available by connecting optional temperature probe(SK-600040-01),
which is not included in the package.
*

e660 25 ·e660 · 24
Pb Lead-Acid Battery ProgramPb Lead-Acid Battery Program
This program is only suitable for charging Pb
(lead-acid) batteries with nominal voltage
ranging from 2 to 20V. Pb (lead-acid) batteries
are significantly different from NiMH/NiCd
batteries. Pb batteries can only deliver a low
current in relation to their capacity. The same
restriction applies to the charging process.
Consequently, the optimum charge current can
only be 1/10th of the capacity. A Pb battery
cannot be used for fast charging. Please follow
the instructions provided by the battery
manufacturer.
The e660 offers the following Pb charge modes:
Charge and Discharge.
Pb (Lead-Acid):
BATT/PROGRAM
Pb BATT
Pb Charge Mode:
After selecting the correct battery type, use the INC or DEC button to
change it to the “CHARGE“ mode.
Press the START button and the amp rate value will begin flashing. Use
the INC or DEC buttons to adjust the value to the desired charge rate.
The amp rate should be set to 1/10th of capacity. For example, if you are
charging a 20Ah battery the charge rate should be set to 2A. Follow the
instructions provided on your battery when setting the amp rate.
Press the START button again and the nominal
battery pack voltage will begin flashing. Use the
INC or DEC button to set the voltage and the
number of cells.
Press and hold the START button for 3 seconds
to start charging.
Pb Charge
1.5A 12.0V(6S)
Once charging has commenced, the charger will
display the following real-time information:
battery type, charging current, battery voltage,
charging time and charged capacity.
When charging is complete, the screen will read “FINISHED” and the
charger will emit a ringing sound.
Pb Discharge Mode:
P-6 1.5A 13.56V
CHG 002:22 00106
After selecting the correct battery type, use the INC or DEC buttons to
change it to the “DISCHARGE“ mode.
Press the START button and the amp rate value will begin flashing. Use
the INC or DEC buttons to adjust the value to the desired discharge
rate. Follow the instructions provided with your battery when setting the
amp rate.
Pb Discharge
1.5A 12.0V(6S)
P-6 1.0A 13.56V
DCH 005:10 00964
Press the START button again and the nominal
battery pack voltage will begin flashing. Use the
INC or DEC buttons to set the voltage and the
number of cells.
Press and hold the START button and
discharging will begin.
Once discharging has commenced, the charger
will display the following real-time information:
battery type, discharging current, battery
voltage, discharging time and discharged
capacity.
When discharging is complete, the screen will
read “FINISHED” and the charger will emit a
ringing sound.
Additional Pb Process Information:
During the Pb battery charging/discharging process the e660 can
display a variety of information. Using the INC or DEC buttons you can
also view the following information:
Capacity Cut-Off
ON 5000mAh
In Power Voltage
12.56V
Capacity cut-
off setting
Temperature
cut-off
Input
voltage
External*/ internal
temperature
Ext. Temp ----
Int. Temp 37 C
Temp Cut-off
50 C
Safety Time
ON 200min
Safety timer
setting

e660 27 ·e660 · 26
DJI Mavic Battery Program
This charger is capable of charging, storage DJI Mavic smart battery.
Click +/- to locate DJI Mavic BATT program
BATT/PROGRAM
DJI Mavic BATT
LH3S CHARGE
TURN ON BATTERY
LH3S CHARGE
TURN ON BATTERY
CONNECTION DIAGRAM
Note: Mavic charging cable is not included in the package
Charging Mode
Connect the battery to the
charger as show on the diagram.
Mavic charging cable(SK-
600023-06) is not included in the
package. You need purchase it
separately.
Turn ON the battery before you
put it in charging mode.
Press the Power Button once Press Again and Hold
for 2 Seconds to Turn On
Click ENTER to get into CHARGE mode
Press and hold START/ENTER for 3 seconds to
start the program.
Storage Mode
BATT/PROGRAM
DJI Mavic BATT
When the battery is idle for more than ten days. It is better to discharge
the battery to 65% of total power in order to prevent swelling. If the
battery level is below 65%(15.6V), you need recharge it to 65%.
LH3S STORAGE
TURN ON BATTERY
Click +/- to locate DJI Mavic BATT program
Press and hold START/ENTER for 3 seconds to
start the program.
Click +/- to locate STORAGE mode
Turn ON the battery before you put it in storage mode.
To use e660 as a power supply, the user must connect it to AC power
source. When the green LED on the left side turns on, then the user is
free to use the power supply, the power of DC output is adjustable from
10W to 60W. The output voltage is 13.8V. The power of DC output is
shared with charger power. When you increase the power of DC output,
the charger power will be decreased accordingly. (DC Power + Charger
Power = 60 Watts)
DC Fan
DC Power Supply
DC Power Supply
DC SUPPLY: OFF
CHARGE POWER: 60W
DC SUPPLY: 25W
CHARGE POWER: 35W
Select the power of DC output.
Press ENTER, the power value will blink, click
+/- to allocate the power.
Caution: The maximum DC Power output is 60 Watts. Please check
your device loading before you allocate the power.
ENTER
BATT/PROGRAM
SYSTEM SETTING->
ENTER
Press the ENTER to enter the DC Power
Supply program
OFF
Green
Yellow
Red
Red Blinking
DC Power Off
0-50% Loading
51-75% Loading
76-100% Loading
Over Load
EXPLANATION OF LED STATUS

e660 29 ·e660 · 28
Battery Memory Set and Call Out
The charger can store up to 10 different charge/discharge profiles for
your convenience, and the stored profiles can be recalled quickly
without having to go through the setup process.
When you are willing to alter the parameter value in the program, press
START/ENTER to make it blink then change the value with INC or DEC.
The value will be stored by pressing START/ENTER once.
Note: All following screen are taking 2S(7.4V) LiPo battery for example.
[ B AT T M EM O R Y 1 ]
E NT E R SE T - >
B AT T T YP E
L i P o
B AT T V OL T S
7 .4 V ( 2 S )
C HA R GE CU R RE N T
4 .9 A
D SC H C UR R E NT
2 .0 A
D SC H V OL T A GE
3 .0 V /C E L L
T VC = YOU R R IS K
4 .2 0 V
Enter the battery memory program.
(10 different charge/discharge profiles can be
stored).
Set the battery type(LiPo/LiFe/LiIon/LiHV/NiMH/
NiCd/Pb).
Set the voltage and number of cells(1S-6S).
Set the charge current(0.1-6.0A).
Set the discharge current (0.1A-2.0A).
Set the discharge voltage(3.0-3.3V/Cell).
Set the terminal voltage(4.18-4.25V).
1. Battery Memory Set
START/ENTER
DEC INC
DEC INC
DEC INC
DEC INC
DEC INC
DEC INC
S AV E P RO G R AM
E NT E R Press ENTER to save program.
START/ENTER
ENTER CHARGER
L O A D
L iP o B A LA N C E CH G
4 .9 A 7 . 4V ( 2 S)
S AV E P R OG R A M
S A V E .
[ B AT T M E MO R Y 1 ]
L iP o 7 . 4V ( 2 S )
[ B AT T M E MO R Y 1 ]
C :4 . 9 A D: 2 . 2A
Indicate the battery type and battery cell of the
saved profile.
Indicate the charge and discharge current of the
saved profile.
Press the START/ENTER for 3 seconds to call
out the memory.
2. Battery Memory Call Out
Load the memory set
Press START/ENTER for 3 seconds to start the
process.
START/ENTER
>3 Seconds
Battery Memory Set and Call Out

ITEM SELECTION DESCRIPTION
N i M HS e n s i t i v i t y
D . Pe a k De f au l t
N i C dS e n s i t i v i t y
D . Pe a k De f au l t
Default:
4mV/Cell
5-15mV/Cell
K e y Be e p ON
B u zz e r ON OFF/ON
The beep sounds at every time
touching the buttons to confirm
your action. The beep or melody
sounded at various times during
operation to alert different mode
changes.
D C I np u t. L o w
C u t- O ff 1 1 .0 V 10.0-11.0V
This program monitors the voltage
of input battery. If the voltage drops
below the value you set the
operation forcibly terminated to
protect the input battery.
L o ad F a ct o ry S e t
E n te r
V e r s i o n
H W :1 . 00 F W : 1. 1 0
This program is for NiMH/NiCd
battery only. When the charger
detects the delta peak value
reaches the value you set, the
charger will say the battery is fully
charged.
Press ENTER to load factory
default setting.
It indicates the hardware and
firmware version.
S a fe t y Ti m er
O N 1 20 M in
R e st T i me
C H G> D CH G 1 0M i n
C a pa c it y C ut - Of f
O N 5 00 0 mA H
T e mp e ra t ur e U ni t
C e ls i us
T e mp C u t- O ff
O N 5 0 C 1 22 F
This program sets the maximum
charge capacity that will be
supplied to the battery during
charge. If the delta peak voltage is
not detected nor the safety timer
expired by any reason, this feature
will automatically stop the process
at the selected capacity value.
When you start a charge process,
the integral safety timer
automatically starts running at the
same time. This is programmed to
prevent overcharge the battery if it
proves to be faulty, or if the
termination circuit cannot detect
the battery full. The value for the
safety timer should be generous
enough to allow a full charge of the
battery.
The battery's internal chemical
reaction will cause the temperature
of the battery to rise. If the
temperature limit is reached, the
process will be terminated.
OFF/
ON
(100-50000
mAh)
ITEM SELECTION DESCRIPTION
OFF/
ON
(1-720 Min)
OFF/
ON
(20 C/68 F -
80 C/176 F)
Celsius
Fahrenheit
1-60Min
A rest time allowing the battery to
cool down between charging/
discharging cycle.
You can choose the temperature
displayed by Celsius or Fahrenheit
as you like.
e660 31 ·e660 · 30
System Setting
It will be operated with the default value of the essential user settings
when it is powered on for the first time.The screen displays the following
information in sequence and the user can change the value of
parameter on each screen.
When you are willing to alter the parameter value in the program, press
START/ENTER to make it blink then change the value with INC or DEC.
The value will be stored by pressing START/ENTER once.
System Setting
D C P OW E R: 6 0 W
C H AR G E PO W ER : 0 W
DC power:
OFF, 10-60W
Charger power:
0-60W
The total power of this device is
60W, When you increase the
power of DC output, the charger
power will be decreased
accordingly. (DC Power + Charger
Power = 60 Watts)

e660 33 ·e660 · 32
The user can check battery's total voltage, the highest voltage, the
lowest voltage and each cell's voltage.
Please connect the battery to the charger main battery lead to battery
socket and balance wires to balance socket.
The user can check battery's total resistance, the highest resistance, the
lowest resistance and each cell's resistance.
Please connect the battery to the charger main battery lead to battery
socket and balance wires to balance socket.
BATT/PROGRAM
B AT T M E TE R
4 .2 0 4 . 19 4 . 1 9 V
4 .1 8 4 . 18 4 . 1 9 V
M AI N 2 5 .1 3 V
H 4. 2 0 0V L 4 . 18 2 V
Press the START/ENTER to enter the Lithium
Battery Meter program.
The screen indicate each cell's voltage.
The screen indicate the total voltage, the highest
voltage and the lowest voltage.
START
ENTER
INC
Press the START/ENTER to enter the Lithium
Battery Resistance program.
The screen indicate each cell's resistance.
The screen indicate the total resistance, the
highest resistance and the lowest resistance.
Start
Enter
B A T T / P R O G R A M
B AT T R E SI S T AN C E
0 12 0 0 5 0 05 mΩ
0 06 mΩ
T A T A L :2 8 mΩ
H :12mΩ L :5 mΩ
INC
Battery Voltage Meter Battery Resistance Meter
This diagram shows the
correct way to connect
your battery to check
the voltage.
4.19 4.15 4.18V
4.15 4.19 4.18V
This diagram shows the
correct way to connect
your battery to check
the resistance.
0 0 5 0 0 3 0 0 3 mΩ
Lithium Battery Pack Lithium Battery Pack

e660 35 ·e660 · 34
In case of an error the screen will display the cause of error and emit an
audible sound.
Incorrect polarity connected.
The battery is interrupted.
C ON N E CT E R R OR
C HE C K M AI N P O RT Thebattery connection is wrong.
The cell number is wrong.
C EL L N U MB E R
INCORRECT
Voltage of one cell in the battery pack is too high.
C EL L E R RO R
H IG H V O LT A G E
Voltage of one cell in the battery pack is too low.
C EL L E R RO R
L OW V O L TA G E
The internal temperature of the unit goes too high.
I NT . T EM P . TO O H I
D C IN T O O L OW Input voltage less than 11V.
Input voltage higher than 18V.
D C IN T O O H IG H
C EL L E R RO R
VOLTAGE-INVALID Voltage of one cell in the battery pack is invalid.
B AL A N CE C O N NE C T
E R R O R Thebalanceconnectiswrong.
The external temperature of the battery goes
too high.
E XT . T EM P . TO O H I
O VE R C H AR G E
C AP A C IT Y L I MI T
The battery capacity is more than the maximum
capacity which the user sets.
B AT T E RY W A S F UL L The battery voltage is higher than the maximum
voltage which the user sets when charging in
balance mode.
O VE R T I ME L I M IT The charging time is longer than the maximum
charging time which the user sets.
N O BA L A NC E C A BL E
D E T E C T E D
Balance connection is suggested for all lithium
process (charge/discharge/storage/fast
charge/balance charge), if your battery comes
without balance lead, push enter to start.
The free “Charge Master” software gives you unparalleled ability to
operate the charger through the computer. You can monitor pack
voltage, cell voltage and other data during the charging, view charge
date in real-time graphs. And you can initiate, control charging and
update firmware from “Charge Master”.
In order to connect the charger to the computer and use the “Charge
Master”, you are required to use a USB cable which is not included in
this package. The cable must be terminated on one end with “A” plug
and the opposite end is terminated with “micro-B” plug which can
connect to charger directly.
The “Charge Master” can be download from www.skyrc.com.
Using the Charge Control Software
“Charge Master”
Warning and Error Message
Using the Charge Control Software “Charge Master”
N O PO W E R
DISTRIBUTED No power allocate to the charger.

e660 37 ·e660 · 36
The Set Contains
1. SKYRC e660 Charger
2. Power Cord
3. XT60 Connector Charging Cable
4. DC Cable with Alligator Clip Connector
5. XH Adaptor
2 3
4 5
Recommended Accessories
JST/BEC charging cable
5201-0043-01
Crocodile clip charging cable
5201-0031-01
Tamiya charging cable
5201-0030-01
DJI Mavic charging cable
SK-600023-06
DC Power Distributor
SK-600114-02
Temperature Sensor
SK-600040-01
EC3 charging cable
5201-0034-01
Dean charging cable
5203-0016-01
1
Table of contents
Other Skyrc Batteries Charger manuals

Skyrc
Skyrc e8 User manual

Skyrc
Skyrc B6AC neo User manual

Skyrc
Skyrc Ultimate Duo 400W AC/DC User manual

Skyrc
Skyrc E6 User manual

Skyrc
Skyrc B6 Nex User manual

Skyrc
Skyrc SK-DIS10100 User manual

Skyrc
Skyrc e6 sk-100052 User manual

Skyrc
Skyrc T200 User manual

Skyrc
Skyrc iMAX B6 mini User manual

Skyrc
Skyrc e6680 User manual

Skyrc
Skyrc 4P3 User manual

Skyrc
Skyrc T6200 User manual

Skyrc
Skyrc T400Q User manual

Skyrc
Skyrc MC3000 User manual

Skyrc
Skyrc Ultimate Duo 1400W / 30A User manual

Skyrc
Skyrc B6 nano User manual

Skyrc
Skyrc NC1500 User manual

Skyrc
Skyrc Q200 User manual

Skyrc
Skyrc iMAX B6 Evo User manual

Skyrc
Skyrc MC6 User manual