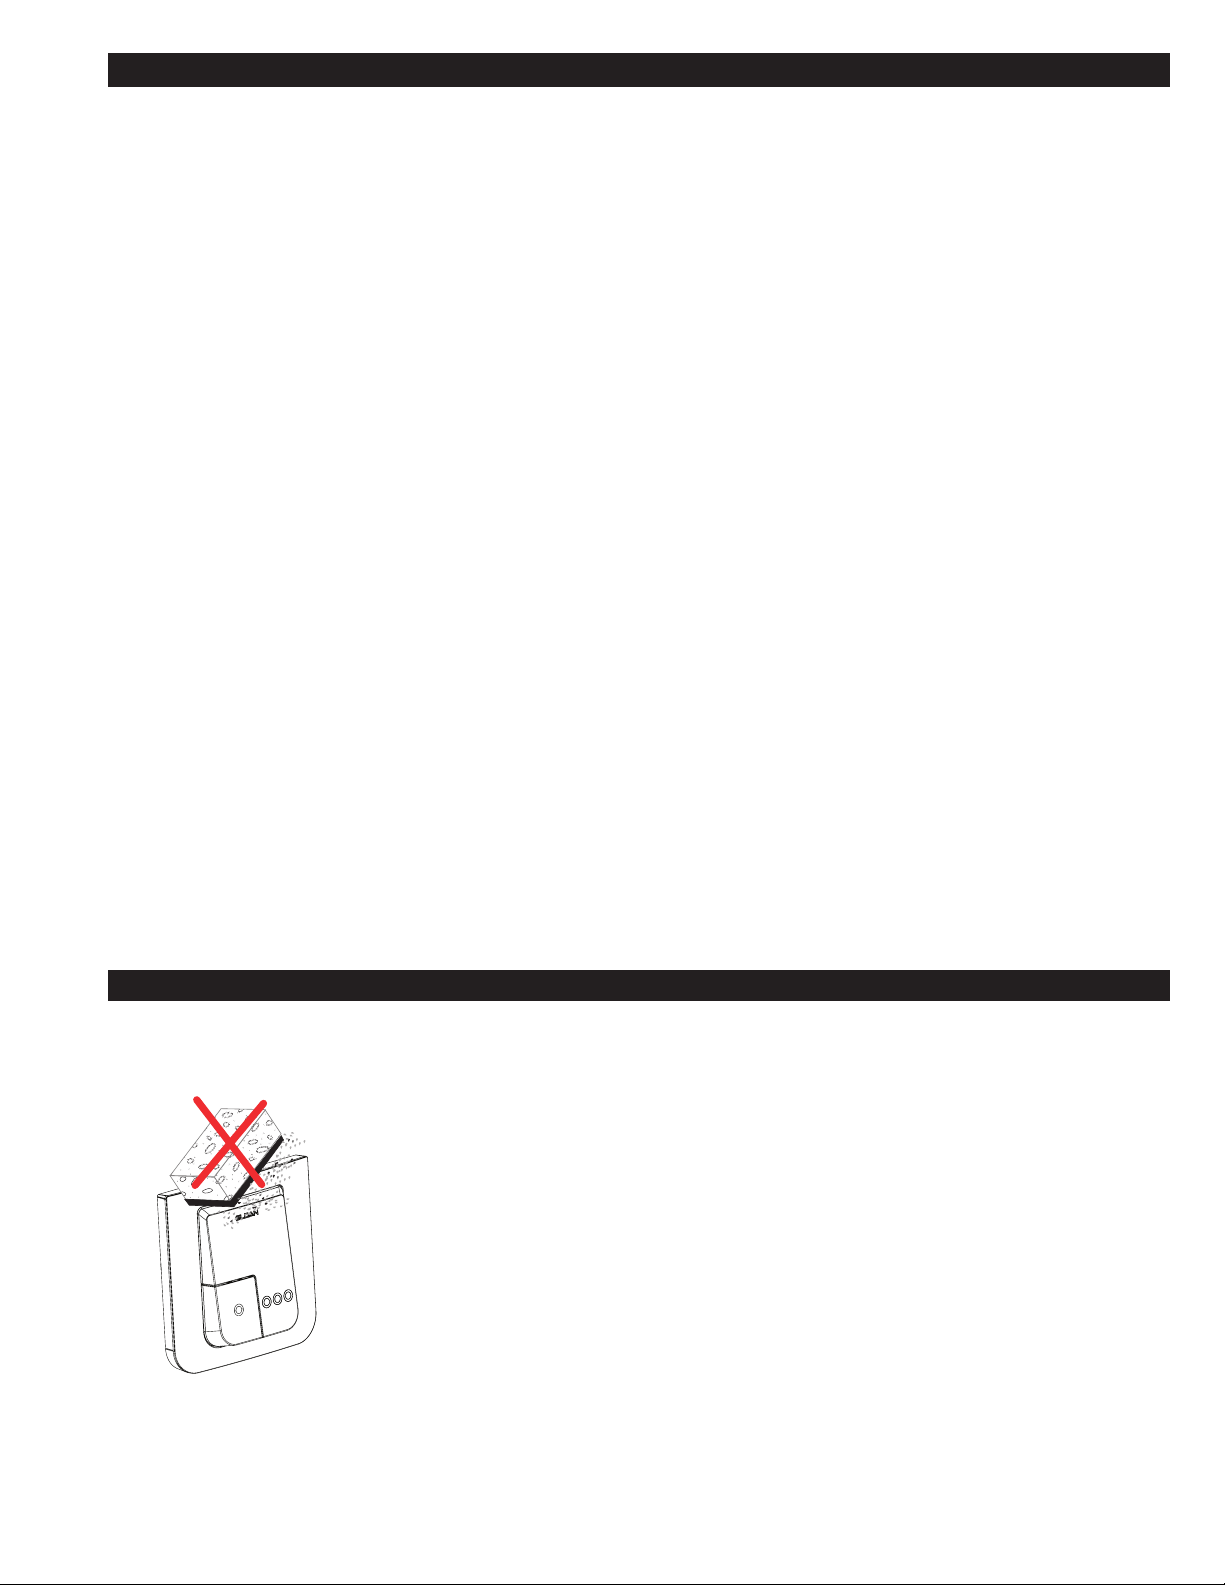
manuals.online logo
Brands
  1. Home
  2. •
  3. Brands
  4. •
  5. Sloan
  6. •
  7. Plumbing Product
  8. •
  9. Sloan TRUFLUSH TRF1000 User manual

Sloan TRUFLUSH TRF1000 User manual

Code No. 08160128
Rev. 0 (01/23)
INSTALLATION INSTRUCTIONS FOR
TRUFLUSH MANUAL DUAL FLUSH WALL PLATE
SLOAN®INDIA PRIVATE LIMITED — LIMITED WARRANTY SUMMARY
Sloan India Private Limited (“Sloan”), warrants its products against defects in materials and workmanship, excluding damage caused by matters beyond Sloan’s reasonable
control. Instructions for filing claims can be found in the Limited Warranty which can be obtained at https://www.sloan.com/company/international/sloanindia or by requesting a
free copy by telephone to Sloan India toll free number 1 800 123 3080 or via Mobile: +91 729 005 0961 or via Landline : +91 124 601 3333. Sloan will repair or replace your
defective product, or provide a refund, as your exclusive remedy.
This is only a general summary of Sloan’s Limited Warranty so it is important to note that the specific terms, conditions, limitations and exclusions, including the duration of
warranty coverage for your particular Sloan product, are contained in the actual Sloan Limited Warranty. The Limited Warranty is subject to applicable laws in your country, state,
province or other jurisdiction—and disputes arising under the Limited Warranty are to be resolved by binding arbitration unless you provide Sloan with an opt-out notice no later
than 30 days after your purchase date. In case of a conflict with this summary, the terms and conditions set forth in the complete Limited Warranty will prevail.
PRIOR TO INSTALLATION
TOOLS REQUIRED FOR INSTALLATION
• Phillips screwdriver • 5/64” hex wrench (supplied) • Wall plate depth setting tool (supplied)
ITEMS INCLUDED WITH THE PRODUCT
1. Wall Plate
2. Button and bracket assembly
3. (3) #10-32 x 2-1/2 screws to secure bracket to valve
4. (2) #8-32 x 7/8 screws to secure plate to valve
5. Depth setting tool
6. M3 screws (M3x16, M3x25, M3x34) and Locking nut
M3 for plunger
7. Hex wrench
8. Installation instructions
1
1. Wall Plate
WALL PLATE BOX 2. Button/Bracket Assembly 3. Bracket to Valve Screws
4. Plate to Valve Screws 6. Locking Nut for Plunger
Screws
8. Instructions
7. Hex wrench
5. Depth Setting Tool
1. INSTALL FLUSHOMETER AND PURGE PLUMBING SYSTEM
Refer to the Valve Assembly Installation Manual (08160127).
Wall must be finished with complete valve assembly installed.
For more information about valve installation, refer to the Valve
Assembly Installation Manual (08160127).
Wall plate opening must be minimum of 4” x 4” (102 x 102 mm) to
maximum of 4.5” x 4.5” (114 x 114 mm). Mud plate is provided and
must accompany valve for proper installation. Mud plate is removed
after wall is finished.
Manual Dual Flush Wall Plate:
TRF1000 Manual Dual Plate ASM CP
Compatible Manual Dual Flush Valves:
TRF1036-N Man Dual Flush
6/3 LPF Valve
TRF1024-N High Efficiency
4-4.5/2-2.5 LPF Valve
2. INSTALL BUTTON / BRACKET ASSEMBLY
2
1. Insert the hex wrench in the hole at the bottom of the wall plate
assembly and push it in to snap open the button and then lift the
button by 90° until button locks in place.
2. Remove the face plate by tilting it up from the bottom and then
pulling it out.
3. Mount the Wall Bracket to valve and secure it using the Bracket
to Valve Screws (supplied).
4. Mount the Face Plate on the black Wall Bracket and secure it
using the Plate to Valve Screws (supplied).
5. 6. Using the depth tool (supplied), adjust depth of plunger screws
until screws touch depth guide (use provided alternate length
screws if necessary), hold screw and secure nuts against
plunger.
7. Rotate the button 90° back to lock it in place. 8. Test flush by pushing button (make sure that button is not
pushing the screws when not being pressed).
Choose one of the three length plunger screws and nut provided
(see Item 6 on first page) and thread into plunger. If the plunger
starts rotating, STOP. This means the screws have reached the
bottom of the hole and overtightening the screws will cause
damage to the plunger. Try the next shorter screw size included
with the product to finish adjustment.
Full flush plunger position
should be horizontal.
Full Flush
Half Flush
3
CARE AND CLEANING
DO NOT use abrasive or chemical cleaners (including chlorine bleach) to clean Flushometers that may dull the luster and attack the chrome or
special decorative finishes. Use ONLY mild soap and water, then wipe dry with clean cloth. While cleaning the bathroom tile, protect the Flushometer
from any splattering off cleaner. Acids and cleaning fluids will discolor or remove chrome plating.
TROUBLESHOOTING GUIDE
1. Flushometer does not function (no water/flush).
A. Ensure water supply to valve is turned on.
B. Shut off sleeve is in closed position. Turn anti-clockwise to open water flow.
C. Ensure activation assembly screws are aligned horizontally.
D. Plunger screws are not adjusted properly. Adjust screws using depth guide.
2. Volume of water is not sufficient to evacuate the bowl.
A. Shut off sleeve is not open wide enough. Adjust shut off sleeve for desired delivery of water volume.
B. Urinal piston parts installed in a Closet flushometer. Replace piston with proper Closet piston (6/3 Lpf or 4-4.5/2-2.5 Lpf).
C. Water supply volume or pressure is inadequate (low). If the fixture does not siphon or evacuate the bowl, steps must be taken to increase the
water supply pressure and/or volume. Contact the fixture manufacturer for minimum water supply requirements of the fixture.
D. Full flush plunger screws (2 outer screws) are not adjusted to the same depth as half flush plunger screw (center screw). Adjust screws using
depth guide.
3. Flushometer closes off immediately.
A. Urinal piston parts installed in a Closet flushometer. Replace piston with proper Closet piston (6/3 Lpf or 4-4.5/2-2.5 Lpf).
B. Piston lip seal may be damaged or worn. Replace with new correct gpf/Lpf piston.
C. Plunger screw not set properly. Adjust screw using depth guide.
4. Length of flush is too short (Short Flush).
A. Incorrect piston is installed in Flushometer; for instance, Urinal assembly inside a Closet Flushometer,
or High Efficiency assembly inside a higher consumption fixture. Determine the flush volume required by the fixture and replace with proper gpf/
Lpf piston. Use valve label and markings on fixture for reference.
B. Piston lip seal may be damaged or worn. Replace with new correct gpf/Lpf piston.
C. Plunger screw is not adjusted properly. Adjust screw using depth guide.
5. Length of flush is too long (Long Flush) or continuous.
A. Metering bypass hole in piston is clogged. Remove the piston from the valve and wash under clean running water. Do not attempt to remove
filter screen. Replace piston if cleaning does not correct the problem.
B. Supply line water pressure has dropped and is not sufficient to close the valve. Close shut off sleeve until pressure is restored.
C. Piston is damaged. Replace with new proper gpf/Lpf piston.
D. Incorrect Piston is installed in Flushometer; for instance, Closet assembly inside a Urinal flushometer. Determine the flush volume required by the
fixture and replace piston. Use valve label and markings on fixture for reference.
6. Chattering noise is heard during flush.
A. Reduce flow pressure by turning shut off sleeve clockwise.
7. Valve leaks through Aspirator when Activated
A. Debris between the umbrella valve and the retainer. Blow air on the aspirator. If this does not correct the problem, remove retainer with 5 mm
Allen Key (not included) and wash it under clean running water. Replace aspirator if cleaning does not correct the problem.
B. Loose Retainer. Hand tight retainer with 5 mm Allen Key (not included). Do not overtight. Replace aspirator if this does not correct the problem.
4
For complete listing of items available for repair,
please consult the Maintenance and Repair Guide.
Valve Assembly Installation Manual (08160127)
available on www.sloan.in
SLOAN INDIA PRIVATE LIMITED • 344, PHASE-II UDYOG VIHAR, GURUGRAM 122015 INDIA
Phone: (+91) 124-6013300/33 • Toll Free: 1800.123.3080 • [email protected] • www.sloan.in
© 2023 SLOAN Code No. 08160128
Rev. 0 (01/23)
Code No. Part No. Description Piston Color*
33400083 GBL-1103-A 6/3 Lpf Piston Assembly Orange/Red
33400064 GBL-1089-A 4-4.5/2-2.5 Lpf Piston Assembly Grey/Black
PARTS LIST
The information contained in this document is subject to change without notice.
Code No. Part No. Description Aspirator Retainer Color*
33400097 GBL-1105-A 6/3 Lpf Activation Assembly Orange/Red
33400098 GBL-1106-A 4-4.5/2-2.5 Lpf Activation Assembly Grey/Grey
TABLE 2 — MANUAL PISTON ASSEMBLY SELECTION GUIDE
TABLE 3 — MANUAL ACTIVATION ASSEMBLY SELECTION GUIDE
1
Filter Screen
DO NOT REMOVE
* Colors may differ. Consult factory to confirm you have the correct piston assembly.
* Colors may differ. Consult factory to confirm you have the correct activation assembly.
ASPIRATOR ASSEMBLY SELECTION GUIDE
Code No. Part No. Description Aspirator Retainer Color*
33400085 GBL-1099-A 6/3 Lpf Aspirator Assembly (6PK) Orange/Red
33400073IN GBL-1095-A 4-4.5/2-2.5 Lpf Aspirator Assembly (6PK) Grey/Grey
* Colors may differ. Consult factory to confirm you have the correct aspirator assembly.
Item No. Part No. Description
1See Table 1 Valve Assembly Less Plate
2See Table 2 Piston Assembly
3See Table 3 Activation Assembly
4TRF 1000 Wall Plate Assembly*
*Consult factory for special finishes.
TABLE 1 — VALVE ASSEMBLY LESS PLATE
SELECTION GUIDE
Code No. Part No. Description
34000006 —6/3 Lpf Manual Valve Assembly
34000007 —4-4.5/2-2.5 Lpf Manual Valve Assembly
2
3
4
Aspirators
Valve
sold separately
Maximum of two (2) free of charge service technician visits are
applicable, one each for pre and post installation guidance of the
product, any further technician visits will incur additional charges.
Please contact your local Sloan representative for more information.
NOTE

This manual suits for next models

2

Other Sloan Plumbing Product manuals

Sloan DOLPHIN Operating manual

Sloan

Sloan DOLPHIN Operating manual

Sloan TRUFLUSH TRF 8036 User manual

Sloan

Sloan TRUFLUSH TRF 8036 User manual

Sloan Wes-115 User manual

Sloan

Sloan Wes-115 User manual

Sloan EFX-3XX SERIES Use and care manual

Sloan

Sloan EFX-3XX SERIES Use and care manual

Sloan ESS-2000 Series User manual

Sloan

Sloan ESS-2000 Series User manual

Sloan TRF 8156-1.6 User manual

Sloan

Sloan TRF 8156-1.6 User manual

Sloan SMOOTH EL-600-A Assembly instructions

Sloan

Sloan SMOOTH EL-600-A Assembly instructions

Sloan BASYS Operating manual

Sloan

Sloan BASYS Operating manual

Sloan Optima ETF-800 User manual

Sloan

Sloan Optima ETF-800 User manual

Sloan Royal 310 User manual

Sloan

Sloan Royal 310 User manual

Sloan Regal 110 User manual

Sloan

Sloan Regal 110 User manual

Sloan Optima EBF-550 Use and care manual

Sloan

Sloan Optima EBF-550 Use and care manual

Sloan OPTIMA I.Q. EAF-150 Series User manual

Sloan

Sloan OPTIMA I.Q. EAF-150 Series User manual

Sloan AER-DEC 81000 Use and care manual

Sloan

Sloan AER-DEC 81000 Use and care manual

Sloan EFP-39-A User manual

Sloan

Sloan EFP-39-A User manual

Sloan Optima ETF-600 User manual

Sloan

Sloan Optima ETF-600 User manual

Sloan Solis EAF-275 Series User manual

Sloan

Sloan Solis EAF-275 Series User manual

Sloan CX Series User manual

Sloan

Sloan CX Series User manual

Sloan EAF-700 Manual

Sloan

Sloan EAF-700 Manual

Sloan 601 User manual

Sloan

Sloan 601 User manual

Sloan VBF-72-A1 User manual

Sloan

Sloan VBF-72-A1 User manual

Sloan OPTIMA I.Q. EAF-100 Series Use and care manual

Sloan

Sloan OPTIMA I.Q. EAF-100 Series Use and care manual

Sloan REGAL XL series User manual

Sloan

Sloan REGAL XL series User manual

Sloan Optima ETF-600 User manual

Sloan

Sloan Optima ETF-600 User manual

Popular Plumbing Product manuals by other brands

Lefroy Brooks C1-4715 installation instructions

Lefroy Brooks

Lefroy Brooks C1-4715 installation instructions

American Standard Town Square Deck-Mount Bath Filler 2555.900 installation instructions

American Standard

American Standard Town Square Deck-Mount Bath Filler 2555.900 installation instructions

Symmons Duro SLC-3612-1.5 Operation & maintenance manual

Symmons

Symmons Duro SLC-3612-1.5 Operation & maintenance manual

baliv WT-630 manual

baliv

baliv WT-630 manual

Moen T6205 Series manual

Moen

Moen T6205 Series manual

Kraus KPF-1612 Installation instruction

Kraus

Kraus KPF-1612 Installation instruction

Toto CW512Y installation guide

Toto

Toto CW512Y installation guide

Fortis GATTINARA installation instructions

Fortis

Fortis GATTINARA installation instructions

Moen 8884 user manual

Moen

Moen 8884 user manual

CALEFFI 574011 manual

CALEFFI

CALEFFI 574011 manual

Omnires SYSY18BL Installation and Maintenance

Omnires

Omnires SYSY18BL Installation and Maintenance

Kalia Preciso BF1802 installation instructions

Kalia

Kalia Preciso BF1802 installation instructions

Geberit Selva Operation manual

Geberit

Geberit Selva Operation manual

Omnires Y1235GC PRO Installation and Maintenance

Omnires

Omnires Y1235GC PRO Installation and Maintenance

Franke MRG AUS 110-39 Installation and user manual

Franke

Franke MRG AUS 110-39 Installation and user manual

Grohe Allure 20 144 manual

Grohe

Grohe Allure 20 144 manual

Pfister LF-WK1-68 installation instructions

Pfister

Pfister LF-WK1-68 installation instructions

KWC GASTRO Z.536.530.145 Installation and service instructions

KWC

KWC GASTRO Z.536.530.145 Installation and service instructions

manuals.online logo
manuals.online logoBrands
  • About & Mission
  • Contact us
  • Privacy Policy
  • Terms and Conditions

Copyright 2025 Manuals.Online. All Rights Reserved.