SMART 35AT User manual

.
Smart Char
g
e
Switch Mode Multi-stage
Battery Charger
BA TT ERY C HA RG ER & P OWE R SU PPL Y
Switch Mode SMART BATTERY CHARGER
EN INSTRUCTION MANUAL – Page 2
Intelligentes Mehrstufen BATTERIELADEGERÄT
DE BEDIENUNGSANLEITUNG – Seite 9
Caricabatterie switching a quattro stadi
IT MANUALE ISTRUZIONI – Page 16
Switch Mode SMART BATTERI LADER
NO BRUKERVEILEDNING – Side 23
Switch Mode BATTERILADERDK BRUGERVEJLEDNING – Side 30
BC-012-5APT, 8APT, 10APT, 15APT, 15AT, 20AT,
BC-012-25AT, 30AT, 40AT, 50AT, 60AT, 70AT
BC-024-5APT, 8APT, 10AT, 15AT, 20AT, 25AT, 30AT, 35AT

EN INSTRUCTION MANUAL
Important Information!
Thank you for purchasing the four-stage Smart Battery Charger.
Please read this instruction manual carefully before operating the
device. Keep this manual in a safe place for future reference. This
instruction manual is part of the product. It must be handed over
along with the device if it is passed on to a third party.
Introduction
The smart battery chargers BC series are equipped with a 4-step
booster and constant-current charge. Unlike with conventional
chargers with IV characteristic, this gives a much faster, efficiency
and more precise charging of up to 100% of the battery capacity.
Thanks to the first step (time controlled charge). This helps activate
the battery status and wake up a weak or flat battery to a suitable
recharging level. This improves the battery life and in turn helps to
save the environment. The batteries are protected for overcharged.
The smart battery charger has a selector switch which allows you to
set the charger for charging sealed “AGM“ / starter / wet batteries,
sealed lead acid “GEL“ batteries, or for the charging of Calcium
batteries. The smart charger can also be used as a power supply to
provide power to DC loads when a battery is not available. For safety
reasons, the input and output of the charger are completely isolated.
Warning!
Risk of electric shock! Do not open the device if it has been
connected to the AC power source.
This device has been CE tested and conforms to the applicable
directives and standards.
2

EN INSTRUCTION MANUAL
Model: BC-012-15AT, 20AT, 25AT, 30AT, 40AT, 50AT, 60AT, 70AT
Model: BC-024-10AT, 15AT, 20AT, 25AT, 30AT, 35AT
BA TTERY C HA RG ER & POW ER SU PPL Y
Key to components (Fig 1)
1. Charging mode indicators 2. Output terminal 3. Power On/Off Switch
4. Battery cable 5. Charger setting 6. Remote display interface 7. AC input socket
Model: BC-012-5APT, 8APT, 10APT, 15APT
Model: BC-024-5APT, 8APT
POWER ON
FLOAT
ABSORPTION
BULK
Key to components (Fig 2)
1. Charging mode indicators 2. Charger setting3. Output terminal
4. Power On/Off switch 5. AC input cable 6. Battery cables
3

EN INSTRUCTION MANUAL
Instruction and normal responses
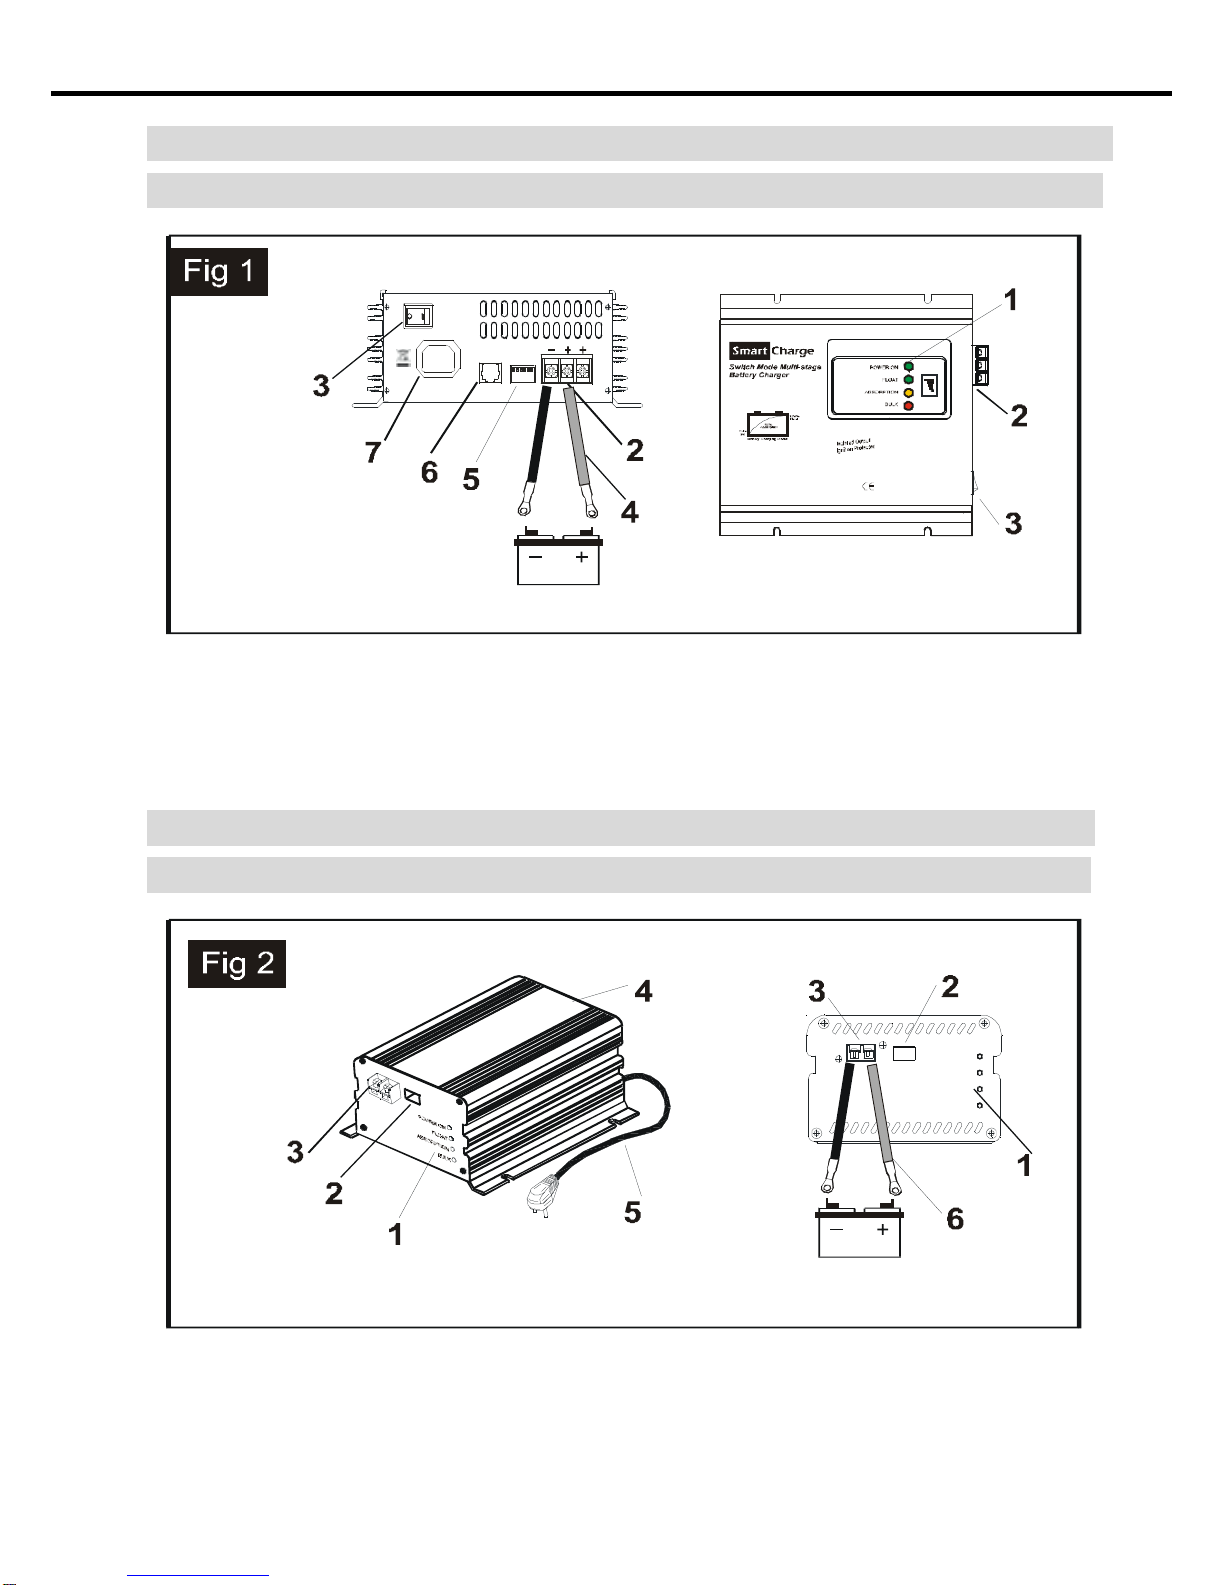
Operation as Smart Charger
Connect the input cable to the DC source. Turn On the Power switch, the
“POWER ON” LED lights up. This indicates the device is ready for charging.
The “BULK” LED lights up. This means the battery charger is beginning at the
1st stage of charging. According to the battery type, adjust the charge setting dip
switch to get the optimum charge.
Connect battery to the DC output terminal. The smart charger will perform the
four-stage charge automatically.
The 1st stage is to ensure battery is
always charged at the maximum
charging condition. This is to boost
up the charging cycle and
particularly wake up a weak battery
to absorb energy.
In about 30 mins, the charger will
switch to 2nd stage, the “BULK” LED
remains ON, the battery is charged
at the maximum charging voltage.
The output charging voltage can be
adjusted by the switch No. 1,2 and
3.
At the 3rd stage, the charger will switch to “ABSORPTION” mode, the red LED
goes out and the yellow LED lights up. The smart charger is delivering
maximum current to the battery.
At the 4th stage, the battery has been charged to about 85% of its rated capacity.
The “ABSORPTION” LED goes out and the “FLOAT” LED lights up. Battery is
now under “FLOAT” constant charging. The charging voltage can be adjusted by
the switch No. 4 and 5.
The cooling fan is thermal controlled. It will switch on and off automatically to
control the internal temperature of the unit.
Operation as Power Supply
The device can be used as a Power Supply. Set the switch No. 6 to ON position.
The device now operates as a power supply unit. The absorption LED goes out.
Switch No. 1,2 and 3 are now disabled. The POWER ON and FLOAT LED light
up. The output voltage can be adjusted by the switch No. 4 and No.5.
4

EN INSTRUCTION MANUAL
Output Voltage Setting Table
SWNo. Battery Selector Float Voltage Power Supply
1 ON OFF OFF
2 *ONFFO
3 **ON
4 ON OFF OFF ON OFF OFF
5 OFF ON OFF OFF ON OFF
6 OFF OFF OFF OFF OFF OFF ON ON ON
12V
Output 15.0 14.6 14.2 13.8 13.5 13.2 13.8 13.5 13.2
24V
Output 30.0 29.2 28.4 27.6 27.0 26.4 27.6 27.0 26.4
Note: Dip-SW No. 1, 2 and 3 are switched off automatically (regardless it is on/off), when Dip-SW No. 6
is switched on.
Float Volt Bulk /Absorption Volt
Battery Type Dip Switch Setting 12V 24V 12V 24V
SLA / GEL SW 3 ON, SW 1,2,4,5,6 OFF 13.2 V 26.4V 14.2 V 28.4V
AGM / wet /
Starter SW 2,5 ON, SW 1,3,4,6 OFF 13.5 V 27.0V 14.6 V 29.2V
Calcium SW 1,4 ON, SW 2,3,5,6 OFF 13.8 V 27.6V 15.0 V 30.0V
Caution!
1) The device is for indoor use, do not use the device near flammable materials
or in any location that may accumulate flammable fumes or gasses.
2) Appliance shall only be used with rated voltage and frequency
3) Hot surface when operating, especially at full load condition.
4) Make sure the polarity is correct
5) Do not locate the device on the top of the battery. Especially Flooded, Wet
type battery. It may generate gas vapor while charging.
6) Do not charge non-rechargeable batteries.
7) Use the appliance only in the described manner.
8) Do not expose the device to a heat source, such as direct sunlight or
heating.
9) Store the device in a dry and cool place
10) Do not open, no user serviceable parts inside.
5

EN INSTRUCTION MANUAL
6
Trouble shooting
Status Possible cause Suggest remedy
No AC input. Check the AC power source.
Over temperature shutdown. Allow charger to cool down.
Bad contact of battery terminal.
No DC output
or charger
can’t startup
Output short circuit. Check the connection between
charger and battery.
AC Input voltage is too low. Keep input voltage within the
acceptable input range.
Battery
charging not
stable Wrong selection of
charging voltage Press correctly.
Battery cable connected to the
battery is too thin. Change cable of proper size.
Charger
cannot
switch to
“FLOAT”. Battery in poor condition. Replace new battery.
Safety operation!
A. If cables have to be fed through walls with sharp edges, always use tubes or
ducts to prevent damage.
B. Do not pull on the cable, fasten the device and cable securely. Lay the cable
so that it cannot be tripped over.
C. Ensure the device is standing firmly that it cannot tip over or fall down.
D. Children should be supervised to ensure that they do not play with the
device.
E. Do not allow water to drip or splash on the device.
F. Make sure the air inlets and outlets of the device are not covered.
G. Operate the device only if you are certain that the housing and the
connection cables are undamaged.
H. Do not reverse the polarity of the connection to the battery.
I. Disconnect the supply before making or breaking the connections to the
battery.
J. WARNING! Risk of Electric Shock! Do not open the device if connected to
AC power.

EN INSTRUCTION MANUAL
Specification
Model BC-12-10APT BC-12-15APT BC-12-15AT BC-12-20AT BC-012-25AT
Input Voltage 230~240VAC +/-10% 50Hz
Bulk / Absorption Charging 14.2V / 14.6 V / 15.5V (selectable)
Float Charging 13.2V / 13.5V / 13.8 V (selectable)
Max. Output DC Current 10A 15A 15A 20A 25A
Max. Battery capacity 150AH 200AH 200AH 300AH 350AH
Output ripple < 50mA at full load
Efficiency up to 87%
Load regulation 1.5% at output current: no load ~ full load
Operating temperature 0 - 40°C
Isolated battery connection 1 1 2 2 2
Ventilation Natural Cooling Fan
Dimensions (mm) 184x115x75 205x115x75 200x215x80 200x215x80 200x215x80
Weight (kg) 1.0 1.2 1.7 1.9 2.1
Model BC-12-30AT BC-12-40AT BC-12-50AT BC-12-60AT BC-012-70AT
Input Voltage 200~240VAC +/-10% 50Hz or 100~120VAC +/-10% 60Hz
Bulk / Absorption Charging 14.2V / 14.6 V / 15.5V (selectable)
Float Charging 13.2V / 13.5V / 13.8 V (selectable)
Max. Output DC Current 30A 40A 50A 60A 70A
Max. Battery capacity 500AH 600AH 800AH 1000AH 1200AH
Output ripple < 50mA at full load
Efficiency up to 87%
Load regulation 1.5% at output current: no load ~ full load
Operating temperature 0 - 40°C
Isolated battery connection 2 2 2 3 3
Ventilation Cooling Fan
Dimensions (mm) 240x235x80 240x235x80 280x235x80 280x260x90 280x260x90
Weight (kg) 2.5 2.8 3.1 3.8 4.2
Specifications subject to change without notice.
7

EN INSTRUCTION MANUAL
Specification
MODEL BC-024-
5APT BC-024-
8APT BC-024-
10AT BC-024-
15AT BC-024-
20AT BC-024-
25AT BC-024-
30AT BC-024-
35AT
Input Voltage 200~240VAC +/-10% 50Hz or 100~120VAC +/-10% 60Hz
Bulk / Absorption Charging 28.4V / 29.2 V / 31.0V (selectable)
Float Charging 26.4V / 27.0V / 27.6 V (selectable)
Max. Output DC Current 5A 8A 10A 15A 20A 25A 30A 35A
Max. Battery capacity 75AH 100AH 150AH 200AH 300AH 400AH 500AH 600AH
Output ripple < 50mA at full load
Efficiency up to 87%
Load regulation 1.5% at output current: no load ~ full load
Operating temperature 0 - 40°C
Isolated battery connection 2 2 2 2 3 3
Ventilation Natural Cooling Fan
Dimensions (mm) 184x115
x75 205x115
x75 200x215
x80 240x235
x80 240x235
x80 280x235
x80 280x260
x90 280x260
x90
Weight (kg) 1.0 1.2 1.9 2.5 2.8 3.1 3.8 4.0
Specifications subject to change without notice.
Warranty only covers the cost of parts and labor for the repair service
within the warranty period. Warranty will not apply where the device has been
misused, altered, neglected, improperly installed, or physically damaged, either
internally or externally or damaged from improper use or use in an unsuitable
environment. We shall not be liable for damages, whether direct, incidental,
special, or consequential, or economic loss even though caused by negligence,
or other fault. If the device requires warranty service, please return it to the place
of purchase along with a copy of the receipt with purchasing date.
Disposal
When the device has become unusable, dispose of it in
accordance with the applicable disposal regulations.
8

DE BEDIENUNGSANLEITUNG
Einführung
Die intelligenten Batterieladegeräte der BC-Serie funktionieren mit einer
vierstufigen Ladefunktion mit Booster-Funktion und konstantem Ladestrom. Das
Ergebnis ist ein sehr viel schnellerer, effizienterer und präziserer Ladevorgang
bis auf 100 % der Kapazität der Batterie, ganz anders als bei konventionellen
Ladegeräten mit Strom-Spannungs-Charakteristik. Und zwar dank der 1. Phase
(zeitgeregelter Ladevorgang). Damit wird die geschwächte Batterie quasi
'aufgeweckt' und aktiviert und in einen optimalen Zustand für den eigentlichen
Ladevorgang gebracht. So wird die Lebenserwartung der Batterie
verlängert - und letztendlich die Umwelt geschont! Die Batterie wird vor
Überladung geschützt.
Das SmartBattery-Ladegerät kann für Bleibatterien, Gelakkus und
AGM-Batterien eingestellt werden. Das Gerät kann aber auch direkt als
"Netzgerät" verwendet werden. Aus Sicherheitsgründen sind Ein- und Ausgang
des Geräts vollständig isoliert.
Garantie
Die Garantie verfällt in dem Moment, in dem das Gerät nicht seiner Bestimmung
nach verwendet wurde oder falsch in Betrieb genommen. Wird das Gerät
missbraucht, modifiziert, nicht ordnungsgemäß eingesetzt oder installiert,
physisch beschädigt, sowohl intern als auch extern beschädigt durch falsche
Anwendung an ungeeigneten Orten erlischt die Garantie ebenfalls Wir sind nicht
haftbar für Beschädigungen, weder direkt noch zufällig, speziell, wirtschaftliche-
oder Folgeschäden hervorgerufen durch Fahrlässigkeit oder anderer Fehler. Falls
das Gerät Reparaturen auf Gewährleistung benötigt, bringen sie das Gerät an
den Ort an dem sie es erworben haben. Legen Sie eine Kopie der Rechnung
mit dem Kaufdatum bei.
Warnung!
Gefahr von elektroschocks, Das Gerät nicht öffnen, wenn es an die
steckdose angeschlossen ist!
Dieses Gerät besitzt das CE-Siegel und wurde Konformitätsprüfungen
unterzogen und entspricht dem entsprechenden Standard.
9

DE BEDIENUNGSANLEITUNG
Modell: BC-012-15AT, 20AT, 25AT, 30AT, 40AT, 50AT, 60AT, 70AT
Modell: BC-024-10AT, 15AT, 20AT, 25AT, 30AT, 35AT
BA TTERY C HA RG ER & POW ER SU PPL Y
Einzelteilebezeichnung (Fig 1)
1. Ladeanzeige 2. Ladegerät Ausgangsklemme 3. Hauptschalter (Ein/Aus)
4. Batteriekabel 5. Ladegeräteinstellungen 6. Fernschnittstelle und –Display
7. Netzanschluss
Modell: BC-012-5APT, 8APT, 10APT, 15APT
Modell: BC-024-5APT, 8APT
POWER ON
FLOAT
ABSORPTION
BULK
Einzelteilebezeichnung (Fig 2)
1. Ladeanzeige 2. Ladegeräteinstellungen 3. Ladegerät Ausgangsklemme
4. Hauptschalter (Ein/Aus) 5. Netzkabel 6. Batteriekabel
10

DE BEDIENUNGSANLEITUNG
Normalbetrieb
Betrieb als Batterieladegerät (Booster)
Eingangskabel an geerdete Wechselstrombuchse anschließen. Hauptschalter
einschalten; die LED "POWER ON" geht an. Damit wird angezeigt, dass das Gerät
für den Ladevorgang bereit ist. Die LED "Bulk-Spannung" geht an. Das bedeutet,
das Ladegerät beginnt mit der 1. Phase des Ladevorgangs. Der Dip-Schalter für den
Ladevorgang muss hier je nach Batterietyp entspr. eingestellt werden, um ein
optimales Ergebnis zu erzielen.
Batterie an die Gleichstrom-Ausgangsklemme anschließen. Dieses intelligente
Ladegerät führt den Ladevorgang in 4 Phasen autom. aus.
Die 1. Phase stellt sicher, dass die
Batterie immer unter optimalen
Bedingungen geladen wird. Der
Ladevorgang wird optimiert, und insb.
wird die schwache Batterie 'aufgeweckt',
um den Strom optimal aufnehmen zu
können.
Nach ca. 30 Min. schaltet das Gerät in
die 2. Phase; die LED "Bulk-Spannung"
leuchtet weiter, die Batterie wird jetzt mit
max. Spannung geladen. Die Spannung
kann mit den Dip-Schaltern SW 1, 2 und
3 eingestellt werden.
In der 3. Phase schaltet das Gerät in de Modus "ABSORPTION"; die rote LED geht
aus, die gelbe LED geht an. Das Ladegerät überträgt jetzt die max. Stromstärke an
die Batterie.
In der 4. Phase wird die Batterie auf ca. 85 % ihrer Kapazität gebracht. Die LED
"Absorptions-Spannung" geht aus, die LED für die "Float-Spannung" geht an. die
Batterie wird jetzt unter Erhaltungsspannung (= "Float") geladen. Die Spannung
kann mit den Dip-Schaltern SW 4 und 5 eingestellt werden.
Das Kühlgebläse ist mit einer Wärmesteuerung ausgestattet. Es wird autom. ein und
aus geschaltet, um so die Innentemperatur des Geräts zu regeln.
Betrieb als Netzteil
Dieses Gerät kann auch als 'Netzteil' (zur Stromversorgung) für ein
Verbrauchergerät verwendet werden. Dafür wird der Dip-Schalter SW 6 auf ON
gestellt. Jetzt funktioniert das Ladegerät wie ein Netzteil. Die LED
"Absorptions-Spannung" gehen aus. Die Dip-Schalter SW 1, 2 und 3 sind außer
Funktion. Die LEDs "POWER ON" und "Float-Spannung gehen" an. Die
Spannungsabgabe kann mit den Dip-Schaltern SW 4 und 5 geregelt werden.
11

DE BEDIENUNGSANLEITUNG
Tabelle Grenzspannungseinstellungen
SW No. Batterietyp Float Spannung Stromversorgung
1 ON OFF OFF
2 * ON OFF
3 * * ON
4 ON OFF OFF ON OFF OFF
5 OFOFFNOFOFF ON OFF
6 OFF OFF OFF OFF OFF OFF ON ON ON
12V Ausgangs
Spannung 15.0 14.6 14.2 13.8 13.5 13.2 13.8 13.5 13.2
24V Ausgangs
Spannung 30.0 29.2 28.4 27.6 27.0 26.4 27.6 27.0 26.4
Hinweis: Dip-Schalter SW 1, 2 und 3 werden automatisch ausgeschaltet (unabhängig von der Ein- /Aus-Stellung),
wenn Dip-Schalter SW 6 auf OFF steht.
Float Spannung Bulk / Absorption
Spannung
Batterietyp Einstellung der
Dip-Schalter 12V 24V 12V 24V
SLA / GEL SW 3 ON, SW 1,2,4,5,6 OFF 13.2 V 26.4V 14.2 V 28.4V
AGM / wet /
Starter SW 2,5 ON, SW 1,3,4,6 OFF 13.5 V 27.0V 14.6 V 29.2V
Calcium SW 1,4 ON, SW 2,3,5,6 OFF 13.8 V 27.6V 15.0 V 30.0V
Achtung!
1) Dieses Gerät wurde für den Gebrauch in geschlossenen Räumen gebaut! Niemals in der
Nähe leicht entzündlicher Materialien oder in explosionsgefährdeten Räumen verwenden!
2) Dieses Gerät darf nur mit der angegebenen Spannung und Frequenz verwendet werden.
3) Vorsicht, das Gerät wird während des Betriebes heiß, vor allem, wenn der Ladevorgang
abgeschlossen ist!
4) Achten Sie auf korrekte Polarität!
5) Stellen Sie das Ladegerät niemals AUF die Batterie! (Vor allem Blei- / Nassbatterien.)
Beim Laden können schädliche Dämpfe entstehen.
6) Versuchen Sie niemals Batterien aufzuladen, die dafür nicht vorgesehen sind!
7) Gerät immer nur so verwenden, wie in der Bedienungsanleitung beschrieben!
8) Setzen Sie das Gerät keiner übermäßigen Wärme aus (z.B. direktes Sonnenlicht oder
Heizkörper).
9) Lagern Sie das Gerät an einem kühlen und trockenen Platz.
10) Versuchen Sie nicht, das Gerät zu öffnen! Im Inneren befinden sich keine Teile, die vom
Besitzer selbst gewartet werden können.
12

DE BEDIENUNGSANLEITUNG
Fehlersuche
Status Mögliche Ursache Abhilfe
Es liegt keine Netzspannung an Netzspannungsversorgung
prüfen
Gerät wurde wegen
Überhitzung . abgeschaltet Gerät abkühlen lassen.
Wackelkontakt an
denBatterieklemmen
Keine
Netzspannung
vorhanden,
oder Ladegerät
schaltet nicht
ein
Kurzgeschlossener Ausgang.
Anschlüsse zwischen Ladegerät
und Batterie prüfen.
Netzspannung ist zu gering. Netzspannung muss innerhalb
des angegebenen Bereichs
liegen
Kein stabiles
Laden "AGM" für wartungsfreie
Batterien oder "FLOODED" für
Nass- elemente gewählt. Richtigen Batterietyp wählen.
Das Batterieanschlusskabel ist
zu dünn. Empfohlenen Kabelquerschnitt
verwenden.
Batterie wird
nicht bis
"FLOAT"
aufgeladen Batterie ist defekt Gegen eine neue Batterie
austauschen.
Sicherheitshinweise!
A. Wo immer Kabel durch scharfkantige Wände geführt werden müssen, sind Schläuche,
Kabelführungen etc. zu verwenden.
B. Niemals an den Kabeln ziehen! Gerät und Kabel ordnungsgemäß sichern. Kabel so
verlegen, dass Personen nicht darüber stolpern können.
C. Achten Sie darauf, dass das Gerät sicher steht und nicht umstürzen oder herunter fallen
kann.
D. Eltern haften für ihre Kinder.
E. Gerät nicht mit Wasser in Berührung kommen lassen.
F. Luftschlitze müssen stets offen bleiben.
G. Verwenden Sie dieses Gerät nicht, wenn Sie nicht 100 % sicher sind, dass Gehäuse und
Kabel in Ordnung sind!
H. Vertauschen Sie nicht die Anschlüsse zur Batterie. (Polarität!)
I. Schalten Sie das Gerät AUS, BEVOR Sie die Verbindung zur Batterie herstellen oder
unterbrechen!
J. WARNUNG! Es besteht die Gefahr von Stromschlägen! Das Gerät darf nicht geöffnet
werden, solange es noch an eine Wechselstromquelle angeschlossen ist!
13

DE BEDIENUNGSANLEITUNG
MODELL BC-12-30AT BC-12-40AT BC-12-50AT BC-12-60AT BC-012-70AT
Eingangsspannung 200~240 VAC +/-10% 50Hz
Hauptladung Bulk/Absorption 14.2V / 14.6 V / 14.8V
Hauptladung Float 13.2V / 13.5V / 13.8 V
Max Ladestrom 30A 40A 50A 60A 70A
Max. Batteriekapazität 500AH 600AH 800AH 1000AH 1200AH
Ausgangsripple < 50mA bei Volllast
Wirkungsgrad bis zu: 87%
Lastausgleich 1.5% des Ausgangsstroms: ohne Last ~ bei Volllast
Arbeitstemperatur 0 - 40°C
Isolierte batterieanschlüsse 2 2 2 3 3
Belüftung Kühlgebläse
Abmessungen (mm) 240x235x80 240x235x80 280x235x80 280x260x90 280x260x90
Gewicht (kg) 2.5 2.8 3.1 3.8 4.2
Alle Daten Können ohne vorherige Ankündigung geändert werden.
Technische daten
MODELL BC-12-10APT BC-12-15APT BC-12-15AT BC-12-20AT BC-012-25AT
Eingangsspannung 200~240 VAC +/-10% 50Hz
Hauptladung Bulk/Absorption 14.2V / 14.6 V / 14.8V
Hauptladung Float 13.2V / 13.5V / 13.8 V
Max Ladestrom 10A 15A 15A 20A 25A
Max. Batteriekapazität 120AH 150AH 200AH 300AH 350AH
Ausgangsripple < 50mA bei Volllast
Wirkungsgrad bis zu: 87%
Lastausgleich 1.5% des Ausgangsstroms: ohne Last ~ bei Volllast
Arbeitstemperatur 0 - 40°C
Isolierte batterieanschlüsse 1 1 2 2 2
Belüftung Natürlich Kühlgebläse
Abmessungen (mm) 184x115x75 205x115x75 200x215x80 200x215x80 200x215x80
Gewicht (kg) 1.0 1.2 1.7 1.9 2.1
14

DE BEDIENUNGSANLEITUNG
Technische daten
MODELL BC-024-
5APT BC-024-
8APT BC-024-
10AT BC-024-
15AT BC-024-
20AT BC-24-0
25AT BC-024-
30AT BC-024-
35AT
Eingangsspannung 200~240 VAC +/-10% 50Hz
Hauptladung Bulk/absorption 28.4V / 29.2 V / 29.6V
Hauptladung Float 26.4V / 27.0V / 27.6 V
Max Ladestrom 5A 8A 10A 15A 20A 25A 30A 35A
75AH 100AH 150AH 200AH 300AH 400AH 500AH 600AH
Max. Batteriekapazität
Ausgangsripple < 50mA bei Volllast
Wirkungsgrad bis zu: 87%
Lastausgleich 1.5% des Ausgangsstroms: ohne Last ~ bei Volllast
0 - 40°C
Arbeitstemperatur
2 2 2 2
Isolierte batterieanschlüsse 3 3
Belüftung Natürlich Kühlgebläse
Abmessungen (mm) 184x115
x75 205x115
x75 200x215
x80 240x235
x80 240x235
x80 280x235
x80 280x260
x90 280x260
x90
Gewicht (kg) 1.0 1.2 1.9
2.5 2.8 3.1 3.8 4.0
Alle Daten Können ohne vorherige Ankündigung geändert werden.
Wichtig!
Danke, dass Sie sich für ein Intelligentes 4-Phasen-Batterieladegerät
entschieden haben! Bitte lesen Sie diese Bedienungsanleitung sorgfältig durch,
bevor Sie das Gerät zum ersten Mal benutzen! Heben Sie die
Bedienungsanleitung an einem sicheren Ort auf, damit Sie und andere Personen
später darauf zurück kommen können. Diese Bedienungsanleitung ist ein fester
Produktbestandteil. Wird das Gerät an Dritte weiter gegeben, ist auch die
Bedienungsanleitung mit zu übergeben!
Umweltgerechte Entsorgung
Wenn dieses Gerät nicht mehr verwendet werden kann, entsorgen
Sie es bitte nach den vor Ort geltenden Bestimmungen!
15

IT MANUALEISTRUZIONI
Informazioni importanti!
Grazie per aver acquistato questo caricabatterie switching a quattro
stadi. Leggete attentamente queste istruzioni prima di utilizzare
l’apparecchio. Conservate il manuale d’uso in un posto sicuro.
Questo manuale d’uso è parte del prodotto e va sempre conservato
per possibili future consultazioni.
Introduzione
I caricabatterie switching serie BC sono dotati di booster 4 step e
carica di corrente costante e forniscono una veloce, efficiente e
precisa carica fino al 100% della capacità della batteria. Grazie al
primo step (carica a tempo controllato) si attiva lo stato della batteria
fino ad ottenere il più adatto livello di ricarica. Ciò migliora la vita
della batteria e contribuisce a salvaguardare l’ambiente. Le batterie
sono protette contro i sovraccarichi. Possono essere commutati per
caricare batterie gel, agm o flooded. Possono inoltre essere utilizzati
come alimentatori. Per ragioni di sicurezza, gli ingressi e le uscite del
caricabatterie sono completamente isolate.
Attenzione!
Rischio di cortocircuiti! Non aprite mai l’apparecchio se collegato
alla rete 230V.
Questo apparecchio è stato testato secondo la Direttiva CE ed
è conforme alle direttive ed agli standard applicabili.
16

IT MANUALEISTRUZIONI
Modello: BC-012-15AT, 20AT, 25AT, 30AT, 40AT, 50AT, 60AT, 70AT
Modello: BC-024-10AT, 15AT, 20AT, 25AT, 30AT, 35AT
BA TTERY C HA RG ER & POW ER SU PPL Y
Indicatori e controlli (Fig 1)
1. Indicatori modo ricarica 2. Terminali di uscita 3. Tasto di accensione/spegnimento On/Off
4. Cavi batteria 5. Selettore di ricarica 6. Presa telecomando 7. Ingresso CA 230V
Modello: BC-012-5APT, 8APT, 10APT, 15APT
Modello: BC-024-5APT, 8APT
POWER ON
FLOAT
ABSORPTION
BULK
Indicatori e controlli (Fig 2)
1. Indicatori modo ricarica 2. Selettore di ricarica 3. Terminali di uscita
4. Tasto di accensione/spegnimento On/Off 5. Cavo di alimentazione CA 6. Cavi batteria
17

IT MANUALEISTRUZIONI
Istruzioni e operazioni di base
Funzionamento come caricabatterie booster
Collegate il cavo di ingresso alla fonte a corrente continua CC. Posizionate il tasto
di accensione su ON; l’indicatore POWER ON si illumina. Ciò sta ad indicare che
l’apparecchio è pronto per la ricarica. L’indicatore LED “BULK” si illumina. Ciò sta
a significare che il caricabatteria ha iniziato il primo stadio di carica. A seconda del
tipo di batteria, regolate il tasto di regolazione carica “dip” per ottenere le migliori
condizioni di carica.
Collegate la batteria ai terminali d’uscita CC. Il caricabatterie booster attiverà
automaticamente i 4 stadi di ricarica.
Il primo stadio assicura che la batteria
sia sempre ricaricata alle massime
condizioni di carica. Ciò al fine di
accrescere il ciclo di ricarica e in
particolare di rivitalizzare batterie
scariche mediante assorbimento di
energia.
Dopo circa 30 minuti il caricabatterie
commuterà sul secondo stadio, il LED
“BULK” rimane acceso, la batteria è
ricaricata alla massima tensione di
carica. Il livello di tensione può essere
regolato con i tasti n. 1, 2 e 3.
Al terzo stadio, il caricabatterie commuta sul modo “ABSORPTION”, il led ROSSO
si spegne ed il led GIALLO si illumina. L’apparecchio fornisce ora la massima
corrente alla batteria.
Al quarto stadio la batteria è stata ricaricata all’85% circa della sua capacità
standard. Il led “ABSORPTION” si spegne e il led “FLOAT” si illumina. La batteria
è ora sotto carica costante “FLOAT”. La tensione di carica può essere regolata
mediante i tasti 4 e 5.
La ventola di raffreddamento è controllata termicamente. Si accende e si spegne
automaticamente per controllare la temperature interna dell’apparecchio.
Funzionamento come alimentatore
Questo apparecchio può essere utilizzato come alimentatore. Posizionate il tasto n.
6 su ON. L’apparecchio funziona ora come alimentatore. I led “ABSORPTION” si
spengono. I tasti 1, 2 e 3 sono ora disabilitati. L’alimentazione si accende e si
illumina il led “FLOAT”. La tensione di uscita può essere regolata con i tasti 4 e 5.
18

IT MANUALEISTRUZIONI
Tavola regolazione tensione d’uscita
Tasto No. Selettore batteria Tensione float Alimentazione
1 ON OFF OFF
2 *ONFFO
3 **ON
4 ON OFF OFF ON OFF OFF
5 OFF ON OFF OFF ON OFF
6 OFF OFF OFF OFF OFF OFF ON ON ON
12V
uscita 15.0 14.6 14.2 13.8 13.5 13.2 13.8 13.5 13.2
24V
uscita 30.0 29.2 28.4 27.6 27.0 26.4 27.6 27.0 26.4
Nota: I tasti dip 1, 2 e 3 vengono automaticamente disinseriti (indipendentemente dal fatto che siano su ON
oppure su OFF) quando il tasto dip 6 è su ON.
Tensione Bulk /
Absorption
Tensione Float
Tipo batteria Selezione tasti dip 12V 24V 12V 24V
Tasto 3 ON, Tasto 1,2,4,5,6 OFF 13.2 V
SLA / GEL 26.4V 14.2 V 28.4V
AGM / wet /
Starter Tasto 2,5 ON, Tasto 1,3,4,6 OFF 13.5 V 27.0V 14.6 V 29.2V
Calcium Tasto 1,4 ON, Tasto 2,3,5,6 OFF 13.8 V 27.6V 15.0 V 30.0V
Attenzione!
1) In previsione di un periodo di inutilizzo o in caso di violenti temporali può essere prudente
scollegare il cavo di alimentazione dalla presa di corrente.
2) Il cavo di alimentazione deve essere steso in modo da evitarne il calpestio o l’aggancio da
parte di oggetti vicini.
3) Non invertire la polarità dei connettori da collegare alla batteria.
4) Qualsiasi riparazione deve essere eseguita da un tecnico / centro di assistenza
autorizzato.
5) Usare l’apparecchio solamente per lo scopo previsto e descritto nel presente manuale.
Non usare accessori diversi da quelli approvati dal produttore.
6) Al fine di prevenire eventuali corto circuiti o principi d’incendio, evitare di esporre questo
apparecchio alla pioggia o ad un’eccessiva umidità ambientale.
7) Questo apparecchio non deve essere utilizzato in prossimità di contenitori d’acqua,
vasche, lavabi, lavandini, su superfici bagnate o accanto ad una piscina.
19

IT MANUALEISTRUZIONI
In caso di problemi
Stato Possibile causa Remedio suggerito
Nessun ingresso CA. Controllate la fonte di
alimentazione CA.
Interruzione per sovratemperatura. Attendete il raffreddamento del
caricabatterie.
Cattivo contatto dei terminali della
batteria.
Nessuna
uscita CC
oppure il
caricabatteri
e non si
avvia Cortocircuito in uscita.
Controllate il collegamento tra il
caricabatterie e la batteria.
La tensione in ingresso CA è troppo
bassa.
Mantenete la tensione d’ingresso
entro il range di ingresso
accettabile.
Carica della
batteria
instabile Errata selezione della tensione di
carica. Premete correttamente.
Il cavo batteria collegato alla batteria
è troppo sottile. Cambiate il cavo con uno di
dimensioni appropriate.
Il
caricabatteri
e non può
commutare
su “FLOAT”. La Batteria è in cattive condizioni. Sostituite la batteria.
Avvertenze di sicurezza!
A. Leggere queste istruzioni.
B. Conservare queste istruzioni.
C. Prestare la massima attenzione a tutte le avvertenze.
D. Non utilizzare l’apparecchio vicino all’acqua.
E. Pulire solamente con un panno asciutto; non utilizzate detergenti o alcool.
F. Non ostruire alcuna apertura di ventilazione.
G. L’apparecchio non deve essere installato in prossimità di fonti di calore
quali stufe, caloriferi o altre apparecchiature in grado di generare calore (ad
esempio amplificatori).
H. Collegare l’apparecchio ad una fonte di alimentazione del tipo indicato nelle
istruzioni o sull’apparecchio stesso.
I. Non inserire o disinserire il cavo di alimentazione con le mani bagnate.
J. Non disinserire l’alimentazione tirando direttamente il cavo in quanto ciò
potrebbe causare danneggiamenti o corto-circuiti.
20
This manual suits for next models
15
Table of contents
Languages:
Other SMART Batteries Charger manuals