manuals.online logo
Brands
  1. Home
  2. •
  3. Brands
  4. •
  5. Smeg
  6. •
  7. Kitchen Appliance
  8. •
  9. Smeg LEV41XV-1 User manual

Smeg LEV41XV-1 User manual

This manual suits for next models

2

Other Smeg Kitchen Appliance manuals

Smeg CVI638RWN2 User manual

Smeg

Smeg CVI638RWN2 User manual

Smeg CVI121G User manual

Smeg

Smeg CVI121G User manual

Smeg SCV115A User manual

Smeg

Smeg SCV115A User manual

Smeg LIFEBOX User manual

Smeg

Smeg LIFEBOX User manual

Smeg CVI638RWN3 User manual

Smeg

Smeg CVI638RWN3 User manual

Smeg Dolce&Gabbana MFF01DGBUK User manual

Smeg

Smeg Dolce&Gabbana MFF01DGBUK User manual

Smeg C90GMXA User manual

Smeg

Smeg C90GMXA User manual

Smeg CVI138LG User manual

Smeg

Smeg CVI138LG User manual

Smeg MFF01 User manual

Smeg

Smeg MFF01 User manual

Smeg LEV-141XV Operating instructions

Smeg

Smeg LEV-141XV Operating instructions

Smeg Gas/Electric Slot-In Cooker SNZ634E User manual

Smeg

Smeg Gas/Electric Slot-In Cooker SNZ634E User manual

Smeg HBF02 User manual

Smeg

Smeg HBF02 User manual

Smeg Classica CVI338LX3 User manual

Smeg

Smeg Classica CVI338LX3 User manual

Smeg SUK91CMX9 User manual

Smeg

Smeg SUK91CMX9 User manual

Smeg A11A-5 User manual

Smeg

Smeg A11A-5 User manual

Smeg SMF02PGUS User manual

Smeg

Smeg SMF02PGUS User manual

Smeg SCV115A User manual

Smeg

Smeg SCV115A User manual

Smeg SMRM01 User manual

Smeg

Smeg SMRM01 User manual

Smeg SCB66MPX5 Instruction Manual

Smeg

Smeg SCB66MPX5 Instruction Manual

Smeg SNZ106VML User manual

Smeg

Smeg SNZ106VML User manual

Smeg KLF05 User manual

Smeg

Smeg KLF05 User manual

Smeg SNZ90MFX User manual

Smeg

Smeg SNZ90MFX User manual

Smeg Universale LZ862AV2 User manual

Smeg

Smeg Universale LZ862AV2 User manual

Smeg SA62MFX5 User manual

Smeg

Smeg SA62MFX5 User manual

Popular Kitchen Appliance manuals by other brands

Tayama TYG-35AF instruction manual

Tayama

Tayama TYG-35AF instruction manual

AEG 43172V-MN user manual

AEG

AEG 43172V-MN user manual

REBER Professional 40 Use and maintenance

REBER

REBER Professional 40 Use and maintenance

North American BB12482G / TR-F-04-B-NCT-1 Assembly and operating instructions

North American

North American BB12482G / TR-F-04-B-NCT-1 Assembly and operating instructions

Presto fountain popper instruction manual

Presto

Presto fountain popper instruction manual

Westmark 1035 2260 operating instructions

Westmark

Westmark 1035 2260 operating instructions

Zanussi ZCG64396XA user manual

Zanussi

Zanussi ZCG64396XA user manual

HOFFEN SM-9302M instruction manual

HOFFEN

HOFFEN SM-9302M instruction manual

Philips HD3133 user manual

Philips

Philips HD3133 user manual

Ronco Beef Jerky User guide and recipes

Ronco

Ronco Beef Jerky User guide and recipes

Hendi 470411 user manual

Hendi

Hendi 470411 user manual

Livoo MEN386 user manual

Livoo

Livoo MEN386 user manual

croydon WR-10313-700 instruction manual

croydon

croydon WR-10313-700 instruction manual

Chefman RJ43-SQ Series user guide

Chefman

Chefman RJ43-SQ Series user guide

Vacmaster VP680 user guide

Vacmaster

Vacmaster VP680 user guide

Jetmaster 900HG operating instructions

Jetmaster

Jetmaster 900HG operating instructions

Küppersbusch EEH 610.0 Instructions for use and installation instructions

Küppersbusch

Küppersbusch EEH 610.0 Instructions for use and installation instructions

HURAKAN HKN-F10 manual

HURAKAN

HURAKAN HKN-F10 manual

manuals.online logo
manuals.online logoBrands
  • About & Mission
  • Contact us
  • Privacy Policy
  • Terms and Conditions

Copyright 2025 Manuals.Online. All Rights Reserved.

MANUALE D’USO
LIEVITATORE mod.LEV41XV-1, LEV141XV-1 e LEV143XV
INSTRUCTION MANUAL
RISING CABINET mod.LEV41XV-1, LEV141XV-1and LEV143XV
MANUEL D’UTILISATION
ETUVES mod.LEV41XV-1, LEV141XV-1 et LEV143XV
IT
EN
FR
Dati tecnici
Alimentazione elettrica: 230V 50/60 Hz
Potenza massima assorbita: 950 W (4,3 A)
Collegamento elettrico
Accertarsi che il voltaggio ed il dimensionamento della linea di alimentazione dell’energia elettrica corrisponda
al voltaggio ed alla potenza indicata sulla targhetta caratteristiche fissata nella parte posteriore dell’apparecchio.
E’ assolutamente necessario effettuare il collegamento a terra dell’apparecchio.
Per questo motivo la spina del collegamento al cavo di alimentazione e la presa alla quale l’apparecchio andrà
collegato dovranno essere dello stesso tipo (conformi alle norme CEI).Prima di eseguire la connessione accertarsi
dell’efficienza dell’impianto di messa a terra.
La Ns/Società declina ogni responsabilità per eventuali danni,derivanti dal mancato collega-
mento o da collegamento difettoso alla linea di terra ed alla scarsa efficienza dell’impianto di
messa a terra.
Modo di utilizzo
Con la manopola termostato è possibile selezionare temperature
del lievitatore fino a 80°C.
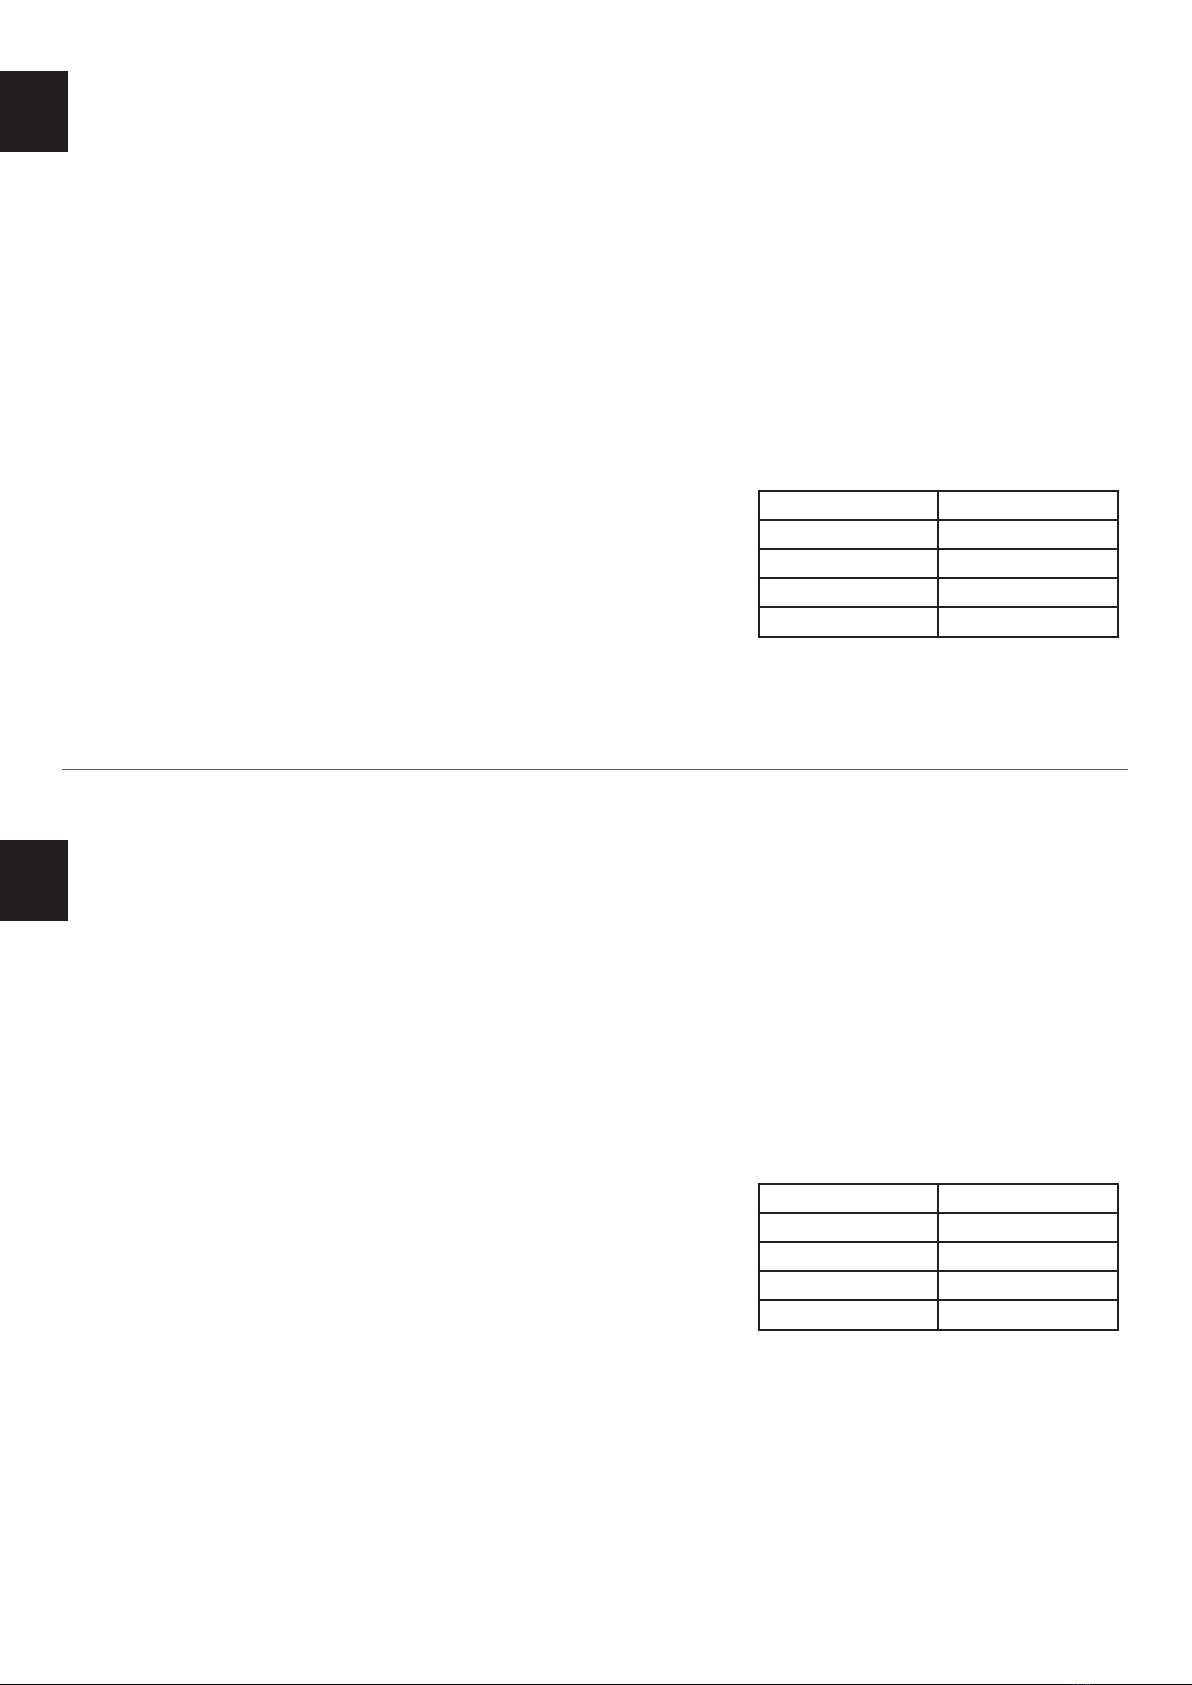
Nella tabella sono indicate le corrispondenze tra i simboli riportati
sulla manopola e la temperatura raggiunta dal lievitatore.
La spia arancione rimane accesa finché non viene raggiunta la
temperatura selezionata. In seguito si riaccenderà ad intermit-
tenza, con l’inserimento dell’elemento riscaldante.
Per spegnere l’apparecchio ruotare le manopole in senso antiorario sulla posizione “ 0 “.
Per aumentare il livello di umidità all’interno della camera lievitante aggiungere manualmente acqua
nell’apposita vaschetta posta nella zona inferiore della camera, facendo attenzione a non farla tracimare.
Technical information
Power supply: 230V 50/60 Hz
Total power installed: 950 W (4,3 A)
Electrical connection
Be sure that voltage and dimensions of the wires meet voltage and power indicated on the markings located on
the back of the appliance. This appliance must be earthed. For this reason the plug connected with the cord and
the socket which the appliance is connected with must be of the same type (complying to EEC standards).Before
connecting check the efficiency of the earthling equipment.
Our company declines any responsibility for damages due to Missing or defective earthling or
bad earthling equipment.
How to use your rising cabinet
By the thermostat knob different temperatures (up to 80° C ) can
be selected. The table shows the temperatures corresponding to
the different position of the knob.
The orange light is on till the selected temperature is reached.
After a while it will be on again, signalling that the heating
element is working again to maintain the desired temperature.
To switch the rising cabinet off, turn the knob anti clockwise to
reach position “ 0 “.To raise the humidity degree inside the rising cabinet, fill the tray located on the base of the
appliance with water in order to maintain it constantly wet.
Posizione manopola Temperatura °C
0 -
Min 25 - 35
Med 35 - 65
Max 65 - 80
Knob position Temperature °C
0 -
Min 25 - 35
Med 35 - 65
Max 65 - 80
Valori variabili in funzione della temperatura esterna
Values are subject to change by external temperature
ITEN
Caractéristiques techniques
Alimentation: 230V 50/60 Hz
Puissance totale installée: 950 W (4,3 A)
Branchement électrique
Contrôler que le voltage et la puissance de la ligne d’alimentation du réseau électrique correspondent à ceux
indiqués sur la plaquette caractéristique fixée à l’arrière de l’appareil . Il faut absolument effectuer la mise à terre
de l’appareil . Pour ce motif, la fiche du câble d’alimentation et la prise à laquelle sera branché seront du même
type (conformes aux normes en voguer).
Avant d’effectuer le branchement, vérifier l’efficacité de la votre mise a terre.
Notre société décline toute responsabilité pour les éventuels dommages dérivants d’un mauvais
branchement ou d’un branchement défectueux à la ligne de terre ainsi que d’une mauvaise effi-
cacité de l’installation de mise a terre.
Utilisation
En tournant le bouton du thermostat , on peut sélectionner
les différentes températures de l’étuve ( jusqu’à 80°C). Sur le
tableau ci-dessous, sont indiquées les correspondances entre la
numérotation indiquée sur le bouton et la température atteinte
dans l’étuve.
Le témoin orange reste allumé jusqu’à quand la température
sélectionnée n’est pas atteinte. Ensuite il clignotera et la rés-
istance s’allumera pour garder la température constante. Pour éteindre l’appareil, tourner le bouton dans le
sens contraire des aiguilles d’une montre sur la position ( 0 ). Pour augmenter l’humidité à l’intérieur de l’étuve,
remplir d’eau le bac en dotation qui se trouve à la base de l’appareil et maintenir l’éponge constamment
mouillé.
Posizione manopola Temperatura °C
0 -
Min 25 - 35
Med 35 - 65
Max 65 - 80
Valori variabili in funzione della temperatura esterna
FR
-XP
L
N
PE
34
-T1
12
-T2
12
34
-L1
U = 230V
ARANCIO
-XPE
- XP Cavo alimentazione con spina termoformata
tipo UNEL 16A
- XPE Morsetto di terra principale
- T1 Termostato di sicurezza
- T2 Termostato di regolazione
- R1 Elemento scaldante
- L1 Spia di funzionamento
-R1
U = 230V
P = 950W
LEV41XV / LEV141XV / LEV143XV
SCHEMA IMPIANTO ELETTRICO
WIRING DIAGRAM
SCHÉMA ÉLECTRIQUE
- XP Supply cable with plug thermoformed
type UNEL 16A
- XPE Main earth terminal block
- T1 Safety thermostat
- T2 Thermostat
- R1 Heating element
- L1 Function lamp
- XP Cordon d'alimentation avec prise thermoformé
Type UNI
- XPE Le pôle de masse principale
- T1 Thermostat de sécurité
- T2 Thermostat
- L1 Lampe de fonction
11/2013 IT. Copyright© Smeg s.p.a. 2013. All rights reserved.
Smeg S.p.A.
Via Leonardo da Vinci, 4 42016 Guastalla (RE) Italy
Tel +39 0522 82 11- Fax +39 0522 82 14 53
www.smegfoodservice.com [email protected]