SnapSafe Super Titan XXL User manual

1
Owner’s Manual
Super Titan XXL
Item No. 75013

1
SNAPSAFE SUPER TITAN XXL
SPECIFICATIONS:
_______________________________
MODEL : SuperTitan XXL
EXTERIOR : 59"H x 46"W x 30"D
(add 3" for handle)
INTERIOR : 53 3/4"H x 41"W x 26 1/5"D
DOOR OPENING : 52"H x 14 ¾"W
LOCKING BOLTS : 14
CAPACITY : 56 Long Guns
WEIGHT : 850 lbs.
SNAPSAFE
SUPER TITAN XXL
FEATURES:
__________________
• Delivered right to your door
• Assembles in minutes
• Sledgehammer and pry-bar
resistant 3/16" solid steel door
• Thick steel exterior walls
• 2300°F one-hour Fire Shield
protection
• Heat activated door fire seals
• 56 slot full gun rack
• EMP Lock
• Fourteen chrome steel live
locking bolts
• Spring-loaded relocker
• Powder coated finish
• Lined interior
• Adjustable lined shelves
• Includes 1 full shelf and full
gun rack and a half gun rack
with 2 half shelves
• Professional grade “non
breach seal” dead bolt door
• Predrilled for floor mounting
• Lifetime warranty
Top and Bottom
Side Front

2
BOLTING DOWN YOUR VAULT
We recommend bolting your vault to the floor using two ¼” wedge anchor
concrete bolts through the predrilled holes in the BOTTOM of the vault.
DOUBLE SAFEGUARDING VALUABLE PAPERS
Your SnapSafe SuperTitan XL Fire Shield protection is rated at 2300ºF for
one-hour. However, we recommend that if you are going to be putting important
papers in the vault, you first put it in a fire resistant document box, and then put it
in the vault.
YOUR COMBINATION CODE
• Your factory preset combination code is 1-2-3-4-5-6.
• It is recorded in a small envelope wired to the door handle of your vault.
Store this combination in a location other than your vault.
LOW BATTERY ALERT
Your lock has a “Low Battery Alert.” If the Entry Keypad beeps repeatedly
during an unlocking, the battery is low and needs immediate replacement.
CARE AND MAINTENANCE
With a little care and maintenance your SnapSafe Modular Vault will last a
lifetime. Keep the door hinge pins lightly greased so that the door opens
smoothly. Vacuum the inside from time to time, and wipe down the outside
with a soft cloth and mild detergent. Never use harsh solvents or abrasives
on any surfaces, as they may damage the exterior finish or interior materials.
SNAPSAFE LIFETIME WARRANTY
Were going to take care of you. Period.
We have built products and a company we are proud of and want you
to be as well.
If you ever experience a fire or attempted break-in we’ll repair or replace
your vault at no charge. (All you have to do is to forward the report from
the proper investigative agency.)¸

3
PARTS LIST
PRODUCT PART DIMENSIONS PART #
1 Exterior Top 42 x 22 770104
2 Exterior Left Side 22 x 59 770103
3 Exterior Right Side 22 x 59 770103
4 Exterior Bottom 42 x 22 770105
5 Exterior Back 46 x 59 770102
6 Double Door Frame 46 x 59 770048
7 Top Interior Panel 42 x 46 770112
8 Left Interior Panel 26 x 54 770111
9 Right Interior Panel 26 x 54 770110
10 Bottom Interior Panel 41 x 26 770113
11 Left Exterior Door 23 x 59 770098
PRODUCT PART DIMENSIONS PART #
12 Right Exterior Door 23 x 59 770099
13 Solid Shelf /Gun Rack 23 x 40 770115
14 Full Solid Shelf 23 x 40 770114
15 Full Gun Rack 23 x 40 770116
16 2 - Half Solid Shelf 13 x 19 770117
17 Divider – 770118
18 2 - Fire Blanket Side – 770108
19 2 - Fire Blanket – 770109
20 M12 x 1.75 Hex Nut – 770032
21 Titan Shelf Clip – 770034
* Dimensions are in inches unless otherwise noted.
1
2
6
11 12
3
4
5

4
7
8 9
10
13
14
16 16
20 21
15
19 19
18
18
17

5
ASSEMBLING YOUR SUPER TITAN XXL
1. Unpack and lay out all parts.
2. Thread DOOR HANDLE SPOKES onto the hub on DOOR (Part 12).
3. Install a fresh high-quality 9V battery in the Entry Keypad (See page 10).
4. Important – Remove temporary door hinge screws from door hinges.
5. Enter the factory combination code and open the DOOR, then lift it off the
DOOR FRAME (Part #6) and set aside.
6. AssembleTop, Bottom and Sides (Parts 1 through 4) first.Then bolt the
entire assembly onto the BACK (Part 5).
7. For additional help watch our “Live Action Assembly Video” on the
“Features” page at www.snapsafe.com.
Notes:
1. Each part is marked with an assembly number, orientation and
instructions.
2. Each part’s orientation e.g.TOP, BOTTOM, FRONT, etc. matches its
orientation in the assembled vault. LEFT and RIGHT are as you face the
front of the vault.
3. For easier assembly, remove the FIRESHIELD blankets from theTOP,
BOTTOM and SIDEWALLS. Stuff them back into place before interior
assembly.
4. Screw on nuts loosely at first. Once all Exterior Panels are aligned and
seated, tighten the nuts.The Fireshield blankets must tuck under edges to
allow interior panels to fit.
5. The INTERIOR SIDE PANELS are designed to fit snuggly. Insert them
through the door opening and then slide into final position by placing
front edge into place and then pressing the back edge against ouside
walls.
6. Insert the INTERIOR BOTTOM PANEL through the door opening between
the front and back shelf strips and then drop into position front-to-back.

6
TOP
RIGHT SIDE
LEFT SIDE
BATTERY
AND
SPOKE
HANDLES
DOOR
FRAME
BOTTOM BACK
BOTTOM
INTERIOR PANEL DIVIDER
GUN RACK
DIVIDER TOP
SHELVES
STAND SAFE UPRIGHT
AND HANG DOOR
NOTE: When inserting interior
panels, tuck front edge in first,
then slide back edge into place.
Firmly
tighten
bolts
Loosely
tighten bolts

7
OPENING AND CLOSING
OPENING:
1. Enter the 6-digit combination code.
2. Rotate 3-spoke handle clockwise into the open position and pull door open.
3. The Entry Keypad relocks in 4 seconds after a valid code has been entered.
4. The Entry Keypad will return to “standby” status with a long beep sound if
there is no operation in 10 seconds after the system has been activated.
5. If you enter an incorrect combination 4-times in a row, the lock will shut
down for 5-minutes.
ELECTRONIC LOCK OPERATING INSTRUCTIONS
The SafeLogic Xtreme comes with the user code set to the factory default of
1-2-3-4-5-6.
TO OPEN THE LOCK WITH A CODE
1. Press 1-2-3-4-5-6.
2. The lock opens.
3. Then relocks after 6 seconds.
TO OPEN THE LOCK WITH A CODE
1. Enter 0-0-0-0-0-0
2. The lock will beep twice indicating that it is ready for programming
3. Enter the existing 6 digit code.The Lock will beep once.
4. Now enter the new 6 digit code.The lock will beep once.
5. Now repeat the new 6 digit code.The lock will beep once indicating that
the change code process is complete. If 3 beeps sound the code has not
been accepted. Repeat the process.
6. Now enter the new code to test the lock.
If the lock does not open using the new code, repeat the change code
process again.
MECHANICAL LOCK OPERATING INSTRUCTIONS
The mechanical combination of SafeLogic Xtreme preset to 50-50-50.
FIRST SPINDIAL COMBINATION OPENING
1. Pull up on the SpinDial Release to disengage
the electronics.
2. Now rotate the SpinDial 4 full revolutions to
the left (or counter clockwise) stop when you
see 50 at the Dialing Index the fourth time.
(The Dialing Index is the small red arrow
pointing to the numbers in the center of the
SpinDial Release as shown below).

8
3. Now rotate the SpinDial to the right until it comes to a stop (within one
revolution).
When the SpinDial comes to a stop the lock is open.
4. Turn your safe handle.
Since all combination numbers are set to “50”, we did not need to dial
the other numbers in the combination, since they were already aligned
correctly allowing the lock to open.
Note: If the lock does not open on 50, try dialing the combination again but
this time to 49 or 51.
The lock will open on 49 or 51, because the DialRing may not be in perfect
vertical alignment with the lock body.
It is important to remember the combination on which the lock opened, as
we will use this number in our change combination process.
CHANGING THE MECHANICAL COMBINATION
1. Write down the number that the lock opened on the first time – for this
example we will assume the mechanical combination is 50 (but perhaps
it opened on 49 or 51).
VERY IMPORTANT: The last number of your new combination cannot
be set between 95 and 99 or between 0 and 20 - this is called the
“Forbidden Zone”. If the last number is set within the Forbidden Zone,
it will cause a condition that prevents the mechanism from operating
correctly.
2. Write down the new combination
you would like to set in the
mechanical combination lock.This
must be 3 numbers, for this example
we will use the combination: 53-23-67.
3. Pull up on the SpinDial Release to
disengage the electronics.
4. Take note of the location of the
Change Index.This is the small red
arrow to the left of the Dialing Index.
5. Rotate the SpinDial 4 times
to the left, stop when you
align the number “50” with
the Change Index.
6. Now on the lock body (on
the back of the safe door)
locate the change key hole.
Change
Index
Change
Index

9
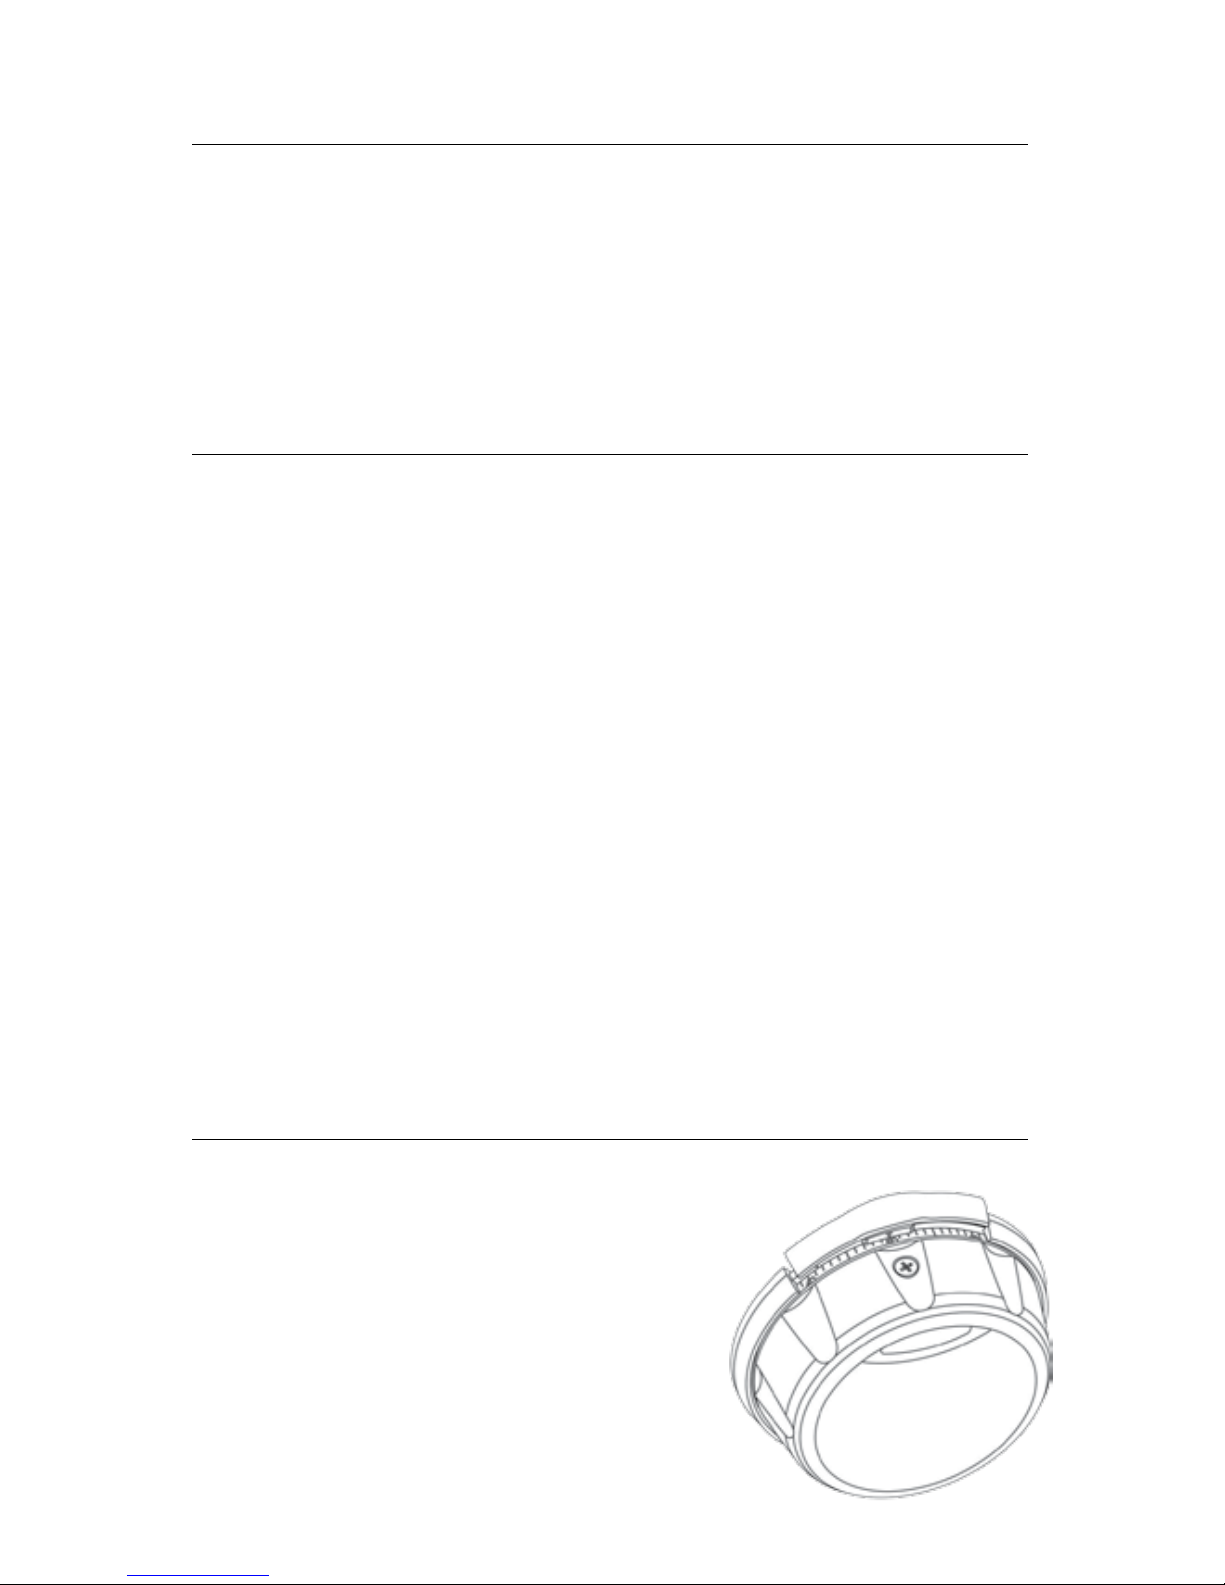
7. Insert the Change Key into the change
key hole until the key reaches the
bottom of the lock case. You may
have to wiggle the change key to get
it to engage all 3 wheels.You will
know that the key is fully inserted
when the Change Key tab is fully
inside the lock case.
8. With the change key fully inserted
through all 3 wheels, rotate the
change key 90 degrees to the left.This
unlocks the wheels and allows you to set a new combination.
9. Now with the change key unlocking the wheels, dial your new
combination to the Change Index as follows:
10. Dial 4 complete revolutions left, until you see the number 53 lined
up with the Change change key unlocking the wheels, dial your new
combination to the Index and stop precisely on the number 53.
11. Now dial to the right until the second number (23) is aligned with the
Change Index for the third time. (So pass the number 23 once, twice
and stop on the third time.) Stop precisely on this number.
12. Now dial to the left until the third number (67) is aligned with the
Change Index for Step 12: Now dial to the left until the third number
(67) is aligned with the Change Index for the second time. (So pass the
number 67 once, and stop on the second time.) Stop precisely on this
number.
13. Now on the lock side, rotate the change key back to the right to lock the
wheels at the new combination numbers.
14. Test this new combination to make sure that it works correctly, before
closing the safe door. See Dialing a Mechanical Combination.
15. Commit the new combination to memory.
OPENING WITH A MECHANICAL COMBINATION
For this example, we will assume the combination is set to 53-23-67.
1. Pull up on the SpinDial Release to disengage the electronics
2. Now rotate the SpinDial 4 full revolutions to the left (or counter
clockwise) stop when you see 53, the first number in our combination,
at the Dialing Index the fourth time. (The Dialing Index is the small red
arrow pointing to the numbers in the center of the SpinDial Release).
3. Now dial to the right until the second number (23) is aligned with the
Dialing Index for the third time. (So pass the number 23 once, twice and
stop on the third time.) Stop precisely on this number.
4. Now dial to the left until the third number (67) is aligned with the Dialing
Index for the second time. (So pass the number 67 once, and stop on
the second time.) Stop precisely on this number.

10
5. Now rotate the SpinDial to the right until it comes to a stop (within one
revolution).
6. When the SpinDial comes to a stop the lock is open.
7. Turn your safe handle.
CHANGING THE LOCK BATTERY
Separate the DialRing from the EntryPad:
1. Pull up on the SpinDial release to disengage the electronics.
2. Rotate the EntryPad 180 degrees to gain access to the EntryPad bolt
which is located at the 6 o’clock position on the EntryPad.
3. Loosen the screw to disconnect the EntryPad from the DialRing.
4. Remove the EntryPad from the DialRing by pulling the EntryPad away
from the DialRing.
Note: The Entrypad and dial ring are held together by magnets to prevent
the Entrypad from falling off when unscrewing.
5. Install a high quality 9V alkaline battery in the back of the EntryPad.
Embossed in the bottom of battery compartment you will see the
battery orientation markings: “+” and “-“. Install the battery with the
correct orientation as indicated by the “+” and “-“.

Customer Service: PO Box 1848, Grand Island, NE 68802-1848
1-877-214-4470 | Email: info@snapsafe.com
SnapSafe®is a Hornady ®Company.
12/2016
Other manuals for Super Titan XXL
1
Table of contents
Other SnapSafe Safe manuals
Popular Safe manuals by other brands

Tracker Safe
Tracker Safe S Series Owner's use and care guide

Harbor Freight Tools
Harbor Freight Tools 93575 Owner's manual & safety instructions

HARTMANN TRESORE
HARTMANN TRESORE Bjork Assembly and operating instructions

BASI
BASI mySafe instruction manual

Phoenix
Phoenix SS0800K Instructions & Guarantee Registration

Amtex
Amtex AM Series instructions