Snom 720 User manual

Your specialist retailer - Ihr Fachhändler -
Votre distributeur - Su distribuidor - Il tuo rivenditore:
© 2013 snom technology AG
V1.1.0
snom technology AG
Wittestr. 30 G
13509 Berlin, Deutschland
Tel. +49 30 39 83 3-0
Fax +49 30 39 83 31 11
snom technology, Inc.
18 Commerce Way, Suite 6000
Woburn, MA 01801, USA
Tel. 781-569-2044
Fax 978-998-7883
infoU[email protected]
snom UK Ltd
Amethyst House, Meadowcroft Way
Leigh Business Park, Leigh
Manchester WN7 3XZ, UK
Tel. +44 169 348 7500
Fax +44 169 348 7509
snom France SARL
6 Parc des fontenelles
78870 Bailly, France
Tel. +33 1 80 87 62 87
Fax +33 1 80 87 62 88
snom technology SRL
Via A. Lusardi 10
20122 Milano, Italia
Tel +39 02 00611212
Fax +39 02 93661864
snom technology Ltd.
Rm. A2, 3F, No. 37, Ln. 258
Ruiguang Rd., Neihu Dist.
Taipei City 114, Taiwan
Tel +886-2-8751-1120
Fax +886-2-8751-1130
User Guide
and the
Using the
with

2
TABLE OF CONTENTS
Copyright, Trademarks, GPL, Legal Disclaimers ......................................................5
Using the phone with snom UC Edition ......................................................................6
Brief introduction to input modes and navigation ...............................................................6
Entering numerals, letters, special characters, and symbols ...........................................6
Logon ....................................................................................................................................7
Using extension number and PIN ...........................................................................................7
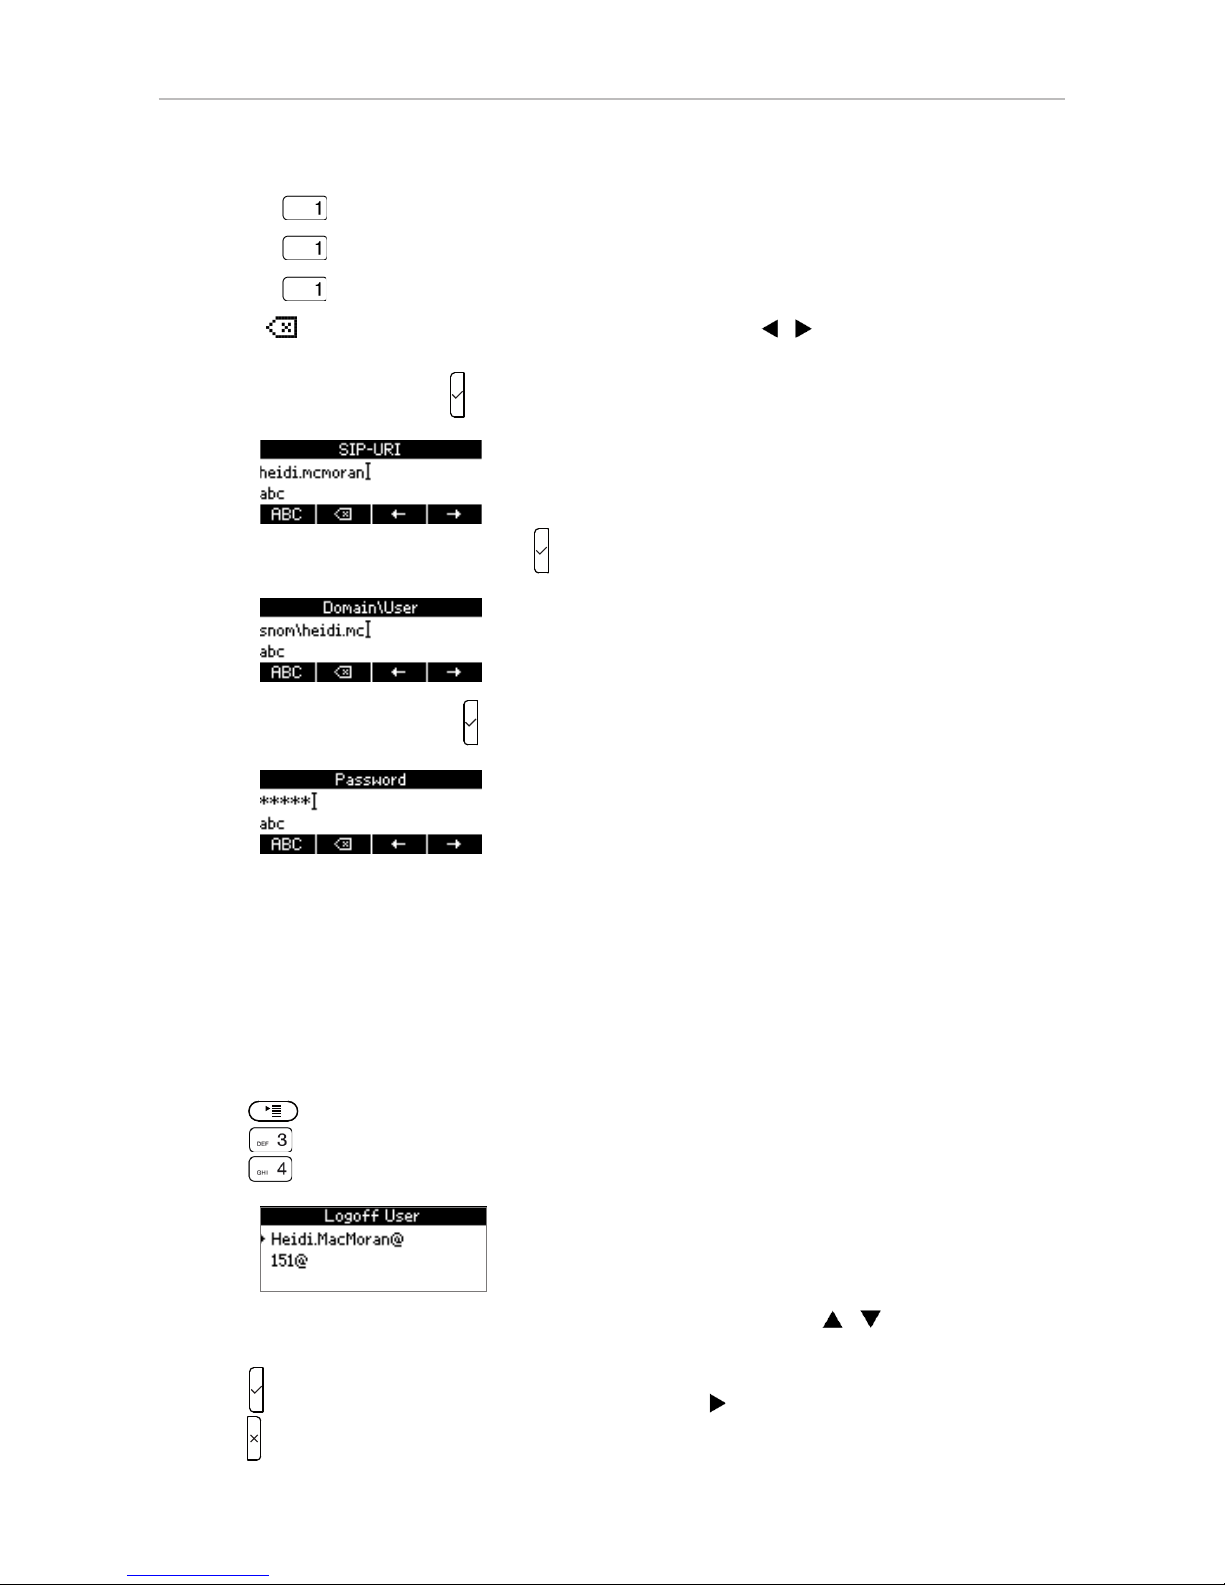
Using SIP URI, domain\username, and password .............................................................7
Logoff ............................................................................................................................................8
Getting to know your phone ..........................................................................................9
Display layout ..............................................................................................................................9
Context-sensitive function keys ..............................................................................................9
Function keys ............................................................................................................................10
Call indicator ............................................................................................................................ 11
Message key ............................................................................................................................. 11
Rebooting the phone .............................................................................................................. 11
Changing your Presence status ..................................................................................12
Configuring presence and speed dial keys ..............................................................13
Presence keys .......................................................................................................................... 13
Using Presence function keys ........................................................................................ 13
Configuring Presence function keys for Contacts ..................................................... 13
Speed dial keys ....................................................................................................................... 14
Using speed dial keys ....................................................................................................... 14
Configuring speed dial keys ............................................................................................ 14
Boss/admin function ......................................................................................................15
Configuring the boss/admin function ................................................................................. 15
Boss ...................................................................................................................................... 15
Selecting the admin/delegate .............................................................................. 15
Putting your delegate on a function key ............................................................ 18
Admin/delegate .................................................................................................................. 19
Using the boss/admin function ............................................................................................ 20
Boss ...................................................................................................................................... 20
Admin/delegate .................................................................................................................. 20
One-touch reactivation of boss/admin function ............................................................... 22
Required setting ................................................................................................................. 22
Turning on call forwarding ................................................................................................ 22
Reactivating simultaneous ringing of boss/admin phones ....................................... 25

3
Calling Contacts and Address Book entries ...........................................................26
Looking up Contacts .............................................................................................................. 26
Address Book Search (ABS) ............................................................................................... 27
Transferring calls .............................................................................................................28
What are the different transfer procedures? .................................................................... 28
Attended transfer ............................................................................................................... 28
Unattended (blind) transfer ........................................................................................... 28
Safe unattended/blind transfer ....................................................................................... 28
Transfer cheat sheet ............................................................................................................... 29
Attended transfer ..................................................................................................................... 30
Transferring calls to manually dialed numbers - attended ........................................ 30
Transferring calls to Presence keys - attended ........................................................... 31
Transferring calls to speed dial numbers - attended ................................................. 32
Transferring calls to Contacts - attended .................................................................... 33
Transferring calls to Directory lookup - attended ....................................................... 34
Unattended transfer ................................................................................................................ 35
Transferring calls to manually dialed numbers - unattended ................................... 35
Transferring calls to Presence keys - unattended ...................................................... 36
Transferring calls to speed dial numbers - unattended ............................................ 37
Transferring calls to Contacts - unattended ................................................................ 38
Transferring calls to Directory lookup - unattended ................................................... 39
Safe transfer ............................................................................................................................. 40
Transferring calls to manually dialed numbers safely ................................................ 40
Transferring calls to Presence keys safely ................................................................... 41
Transferring calls to speed dial numbers safely .......................................................... 42
Transferring calls to Contacts safely ............................................................................. 43
Transferring calls to Directory lookups safely .............................................................. 44
Transferring calls directly to Voicemail ............................................................................... 45
Parking calls and retrieving parked calls .................................................................46
Parking calls ............................................................................................................................. 46
Retrieving calls ......................................................................................................................... 46
Unretrieved calls ringing back .............................................................................................. 47
Call history ........................................................................................................................48
Looking up missed, received, and dialed calls ................................................................. 48
Looking up parked calls ......................................................................................................... 49
Hold .....................................................................................................................................50
One call on hold ...................................................................................................................... 50
Holding multiple calls ............................................................................................................. 50

4
Conference - local conference on phone .................................................................52
Initiating a conference ............................................................................................................ 52
Conference screen navigation ............................................................................................. 52
Speaking to one participant in private ................................................................................ 52
Putting one participant on hold ............................................................................................ 53
Dropping a participant ........................................................................................................... 53
Adding a participant ............................................................................................................... 53
Putting the conference on hold ............................................................................................ 53
Terminating the conference ................................................................................................... 53
Call forwarding .................................................................................................................54
Turning call forwarding on ..................................................................................................... 54
Turning call forwarding off ..................................................................................................... 54
Settings menu ..................................................................................................................55

5
snom UC Edition and snom 720 Copyright, Trademarks, GPL, Disclaimers
Copyright, Trademarks, GPL, Legal Disclaimers
© 2013 snom technology AG. All Rights Reserved.
snom, the names of snom products, and snom logos are trademarks owned by snom technology AG.
Microsoft®and LyncTM are the property of Microsoft Corporation. All other product names and names
of enterprises are the property of their respective owners.
Product specifications are subject to change without notice.
snom technology AG reserves the right to revise and change this document at any time, without being
obliged to announce such revisions or changes beforehand or after the fact.
Texts, images, and illustrations and their arrangement in this document are subject to the protection of
copyrights and other legal rights worldwide. Their use, reproduction, and transmittal to third parties
without express written permission may result in legal proceedings in the criminal courts as well as civil
courts.
When this document is made available on snom’s web page, snom technology AG gives its permission
to download and print copies of its content for the intended purpose of using it as a manual. No parts
of this document may be altered, modified or used for commercial purposes without the express written
consent of snom technology AG.
Although due care has been taken in the compilation and presentation of the information in this
document, the data upon which it is based may have changed in the meantime. snom therefore
disclaims all warranties and liability for the accurateness, completeness, and currentness of the
information published, except in the case of intention or gross negligence on the part of snom or where
liability arises due to binding legal provisions.
Our firmware includes some source code that may be used and modified by anyone and everyone
under the GNU Public License (GPL), provided they, in turn, make it available to everyone else with the
same licensing agreement. Please go to http://www.snom.com/en/support/download/gpl-quellcode/
for the original GPL license and the source code of components licensed under GPL and used in
snom products.

6
snom UC Edition and snom 720 Using the Phone with UC Edition
Using the phone with snom UC Edition
This guide describes the use of phones running snom UC Edition firmware version 8.8.2.12 with
Microsoft LyncTM. As long as the phone is connected to your network and the Lync server, it will use
the data in your Lync account, even when your computer is turned off or when you are not signed in to
Lync on your PC.
For more information on setting up and connecting the hardware and for any other information not
covered in this User Guide for UC Edition, please refer to the snom 720 User Manual which you can
download from snom's web page at www.snom.com.
Brief introduction to input modes and navigation
Directories, call lists,
contact list, favorites
Input modes:
123: Numerals
abc: Small letters
ABC: Capital letters
Deleting character to
the left of the cursor
Current input mode:
Next input mode:
Redialing
Moving cursor to the left
Move cursor to the right
:
:
Changing input mode:
The current input mode is indicated in the information line. Press the left function key underneath the
display to switch to the input mode indicated by the symbol directly above it in the function key line.
Text in Information Line
= current input mode
Press function key to switch to input mode
indicated by symbol in Function Key Line
123
abc
ABC
Entering numerals, letters, special characters, and symbols
When entering letters and special characters, pause briefly after each character until the cursor has
moved forward so that you won't write over the last character you entered. Pausing is not necessary
when entering numerals.
For more information, please refer to the snom 720 User Manual.

7
snom UC Edition and snom 720 Logging on and off
Logon
The data you need to log on depends on the setup of your network and on the Lync server. After
connecting the phone to your network, you will see a screen like the following:
Using extension number and PIN
In the default configuration, the required login data is the extension number and the PIN.
1. Enter the extension number and press .
2. Enter the PIN and press .
3. If this login is successful, the phone will switch to the "signing in" screen and then show the idle
screen with your Lync account.
4. If the login is unsuccessful, either because of a typo or because the network will not accept the
data, the phone will start over at the prompt to press any key and then repeat the prompts for
entering the extension and the PIN.
Using SIP URI, domain\username, and password
If the required data for the logon is SIP URI, domain\username, and password, you can switch to this
logon method by pressing .

8
snom UC Edition and snom 720 Logging on and off
Entering special characters in letter mode:
◦Press once to enter the period ".".
◦Press three times to enter "@".
◦Press twelve times to enter the backslash "\".
◦Use to delete the character to the left of the prompt; use / to move the cursor to the
left/right.
2. Enter the domain\username and press . The format is "test\my.name".
3. Enter the password and press .
4. If this login was successful, the phone will switch to the "signing in" screen and then show the idle
screen with your Lync account. If the login is unsuccessful, either because of a typo or because
the network will not accept the data, the phone will show the "Welcome" screen again and prompt
you to enter the extension number and the PIN.
Logoff
1. Press to open the Settings menu.
2. Press to open the Identity menu.
3. Press to open Logoff User screen.
4. If there is more than one user logged in, use the top and bottom arrows / on the navigation
key to select the one to be logged off.
5. Press to log off the user marked by the preceding arrow . If you have changed your mind,
press to exit without logging off.

9
snom UC Edition and snom 720 Getting to Know Your Phone
Getting to know your phone
Display layout
Date is replaced
by current status
message
Right function key is replaced by "Info"
key when status messages are available
Function key line
When activeIn idle mode
Info & status bar
with date and time
Configured
identities
Context-sensitive function key symbols
Context area
Context-sensitive function keys
In the default configuration of the idle screen the four context-sensitive keys underneath the display
have the following functions:
Contac Contacts list. For more information, see "Looking up Contacts" on page 26.
CHist Call lists (missed, received, dialed, and parked calls). For more information, see "Call
history" on page 48.
CFwd noFwd Forwarding of all incoming calls (on/off). For more information, see "Call
forwarding" on page 54.
Presen Overriding system presence indication and manually setting your presence state. For
more information, see "Changing your Presence status" on page 12.
Fig. 1 Fig. 2
◦When the phone has received new notifications, the presence icon in Fig. 1 is
replaced by the status info icon Info (Fig. 2).
◦To bring the presence icon back onscreen, press the function key underneath Info
to open the status info screen.

10
snom UC Edition and snom 720 Getting to Know Your Phone
◦Press Del to delete the selected item until the next reboot of the phone (Fig. 3 -
5, below).
◦Removing the underlying cause of the notification, for example setting the admin
password, will remove the notification for good.
Fig. 3 Fig. 4 Fig. 5
Function keys
Handset
microphone
Handset
speaker
Freely programmable LED
keys P1 - P16
• Default setting: Line
• Fast-blinking LED: Inco-
ming call. Press key or to
accept
• Steadily lit LED: In call
• Slow-blinking LED: Call on
hold
Outgoing
identity:
Call LED
• Blinking fast: Incoming call
• Steady light: In call OR
• Missed call. Press to turn
off.
Context-sensitive, programmable
function symbols and function keys
Select outgoing identity, incl. inactive identities
Call lists (missed, received, dialled calls)
Forwarding all calls (on/off)
Status information (call forwarding active, passwords not set,
missed calls, etc.)
Press the function key to activate the function, open the list etc. depic-
ted by the symbol above the key.
Alphanumeric
keypad
F
7
F
8
F
9
F
10
F
11
F
12
F
1
F
2
F
3
F
4
F
5
F
6
F
13
F
14
F
15
F
16
F
17
F
18
Labeling keys P5-P16: See
Appendix 3 for instructions.
In the UC Edition firmware, the default setting of all programmable function keys with LEDs is line. See
"Settings menu" on page 58 for the list of functions that can be selected for each key. The above
diagram shows the location of the keys on the phone; the numbers F1 to F18 correspond to the list of
keys in the phone's Preferences menu, submenu Fkeys, fkeys 1 - 18.
A template for labeling the function keys is available at http://wiki.snom.com/Snom720/Documentation.
It can be filled in online; the size of the font is self-adjusting within each individual cell. For more
information please refer to the snom 720 User Manual, Appendix 3.
Mapping presences on function keys: See "Presence keys" on page 13.
Mapping speed dial on function keys: See "Speed dial keys" on page 14.

11
snom UC Edition and snom 720 Getting to Know Your Phone
Call indicator
The bright-red LEDs situated around the upper right corner of the phone indicate incoming, ongoing,
held, and missed calls. The LEDs will do one of the following:
• Blink rapidly when a call is coming in.
• Glow steadily when dialling, when in a call, and when a call is on hold.
• Blink slowly when there was a missed call.
◦Viewing the particulars of the missed call:
1. Press the function key underneath CHist to show the Call History screen. "Missed" calls
is the top item of the list and highlighted.
2. Press to view missed calls and simultaneously turn off the LED. For more information on
call lists, see "Call history" on page 48.
◦Turning off the LEDs after a missed call without viewing the call history: Press .
Message key
The symbol on the message key will show a bright red light when new messages are waiting to
be retrieved. Press the key to retrieve messages.
For more information on the hardkeys, please refer to the snom 720 User Manual, chapter "Getting to
know your phone".
Rebooting the phone
For some settings to take effect, you may to need to reboot the phone.
1. Press to open the Settings menu.
2. Press to open the Maintenance menu (press if your phone is running in administrator
mode).
3. Press to open Reboot? screen, then to confirm and start rebooting.
When the idle screen is back on the display, the reboot is complete.

12
snom UC Edition and snom 720 Changing Your Presence Status
Changing your Presence status
You can manually change the Presence status signaled by the system to one of your own choosing.
For example, if you are scheduled to be in an online meeting, Lync will signal your Presence status as
busy during that time. If you want to be available for incoming phone calls during that time, you can
manually change your status to available.
1. Press Presen to open the Presence State screen. If the key has been replaced by Info ,
see "Context-sensitive function keys" on page 9 on how to make it visible.
2. Use / to select a state. The available options are:
Available
Busy
Do not disturb
Be right back
Away
Reset status
3. Press to change the Presence state signaled by your phone.
4. To revert to the system state, select "Reset Status" and press .
Note: To turn Do not disturb (DND) on and off, you can also use the hardkey
. DND does not affect calls from your admin/delegate, members of your
Team Call, and contacts in your Friends and Family relationship group.
Presence status of your contacts
See "Presence keys" on page 13.

13
snom UC Edition and snom 720 Configuring Presence and Speed Dial Keys
Configuring presence and speed dial keys
Presence keys
You can put the Presence function onto one of the function keys (see diagram on page 10) and
associate that key to one of your contacts. When your contact is available, the LED of the key will
signal the availability with a green light; when your contact is in a call or otherwise unavailable, the LED
signals the unavailability with a red light.
- Presence status: Available
- Presence status: Unavailable (inactive, away, etc.)
- Presence status: Busy (in call, in a meeting, etc.)
Using Presence function keys
You can call your contact by simply pressing the key twice, and you can use the key to transfer calls to
your contact (see "Transferring calls to Presence keys - attended" on page 31, "Transferring calls to
Presence keys - unattended" on page 36, and "Transferring calls to Presence keys safely" on page
41).
Configuring Presence function keys for Contacts
1. Press Contac and use / to select the Contact.
2. Press Detail .
3. Use / to scroll to Assign to Key and press .
4. To select a key, just enter the respective number on the keypad. Alternatively, you can also use /
to scroll to the key , then press .

14
snom UC Edition and snom 720 Configuring Presence and Speed Dial Keys
Speed dial keys
You can use the function keys for speed dialing numbers and contacts.
Using speed dial keys
You can call the number or your contact by simply pressing the assigned key, and you can use the
key to transfer calls to the number or your contact (see "Transferring calls to speed dial numbers -
attended" on page 32, "Transferring calls to speed dial numbers - unattended" on page 37, and
"Transferring calls to speed dial numbers safely" on page 42).
Configuring speed dial keys
1. Press to open the Settings menu. For more information on the Settings menu and its
submenus, see "Settings menu" on page 55.
2. Press to open the Preferences menu.
3. Press to open the Fkey list (list of function keys) (or use / to scroll to it, then press ).
4. To select a key, just enter the respective number on the keypad. Alternatively, you can also use
/ to scroll to the key , then press .
5. Press to select Speed Dial from the Function for key menu (or use / to scroll to it,
then press ).
6. Enter the extension number, the phone number, or the SIP URI and press .
Note: When entering phone numbers, type each phone number
exactly the way it needs to be dialed, i.e., with any required prefixes
(area code, country code, operator/auto attendant, etc.) and without
spaces or punctuation marks between the digits.

15
snom UC Edition and snom 720 Boss/Admin Function
Boss/admin function
The boss/admin function, which is also called boss/delegate or boss/secretary function, means that
the "boss" phone and a second "admin" or "delegate" phone ring simultaneously so that the admin/
delegate can pick up and screen calls ringing on the boss phone. The admin/delegate can also make
calls on behalf of the boss's phone.
The snom UC Edition offers an added feature to the boss/admin function: When simultaneous
ringing of the admin/delegate phone is replaced by forwarding calls (for example, to the boss's home
phone number), the function is not removed from the settings but can be turned on again with one
keystroke on the phone or one click in your Lync account.
Configuring the boss/admin function
The boss/admin function requires configuration of the Lync clients and complementary settings on the
boss's and the admin/delegate's phone.
Boss
Selecting the admin/delegate
If you are the boss, you must first select the admin/delegate whose phone will ring simultaneously with
yours and who will be able to accept your calls.
1. Click on Options in the Tools menu of your Lync client to open the Options window.
2. Click on Call Forwarding in the left sidebar.
3. In the Call Forwarding window, click on Edit my delegate members.

16
snom UC Edition and snom 720 Boss/Admin Function
4. In the Delegates window, click on Add.
5. In the Add contact window, click on the contact you want to add as your delegate, then click
OK.
6. The Delegates window opens again. The contact has been added to your delegate list.
Since you want your delegate's phone to ring simultaneously with yours, do not change the
seconds setting. Click OK.

17
snom UC Edition and snom 720 Boss/Admin Function
7. In the Call Forwarding window, click on Simultaneously ring and select My delegates
from the drop-down list.
8. Click OK. Your admin (delegate) has been added to your Lync Client (Fig. 1), while you have
been added to your admin's (delegate's) group "People I manage calls for" (Fig. 2).
Fig. 1 Fig. 2
Both phones will now ring simultaneously when the boss's phone is called, and the incoming call can
be accepted on both phones.

18
snom UC Edition and snom 720 Boss/Admin Function
Putting your delegate on a function key
1. Press Contac. The Delegates screen (Fig. 1) will appear (if not, press / to scroll to it).
Fig. 1 Fig. 2
2. Press to scroll down to key assignment (Fig. 2, above) and press to open the Fkeys
screen (Fig. 3, below).
Fig. 3
3. Select a key. For keys 1 to 9 just press the number key on the keypad; for keys 10 to 18 use
/ to scroll to the key, then press .
4. You may need to reboot your phone for the setting to take effect.
You can now view your admin's call status by pressing the key once (Fig. 4), and you can call your
admin by pressing the key a second time.
Fig. 4
Note: When you look at the configurations of the Fkeys (Settings menu >
Preferences > Fkeys), the entry "boss/admin" without being followed by a name
indicates that this is your admin (Fig. 5). The entry "boss/admin" followed by a
name indicates that this is your boss (Fig. 6).
Fig. 5 Fig. 6

19
snom UC Edition and snom 720 Boss/Admin Function
Admin/delegate
If you are the admin/delegate, you will be notified that you were added as a delegate for the boss's
phone. The boss is automatically added to the group People I Manage Calls For, both in your Lync
client and on your phone.
To be able to view the boss's contact card and call status and make calls on behalf of the boss's
phone, you need to put the function onto one of the function keys with LEDs.
1. Press Contac and use / to scroll to the screen "People I manage calls for".
2. Press Detail .
3. Use to select "Assign to key" and press .
4. Select a key and press . For keys 1 to 9 you can use the number keys on the keypad; use
/ to scroll to keys 10 to 18.

20
snom UC Edition and snom 720 Boss/Admin Function
5. Select "boss/admin" and press .
6. You may need to reboot your phone for the setting to take effect.
You can now view the boss's contact card and call status and make calls on behalf of the boss's phone
by pressing the key. When the boss has activated the function, your display and your call LED will
signal incoming calls for the boss phone.
Note: When you look at the configurations of the Fkeys (Settings menu >
Preferences > Fkeys), the entry "boss/admin" without being followed by a name
indicates that this is your admin. The entry "boss/admin" followed by a name
indicates that this is your boss.
Using the boss/admin function
Boss
The red LED on the boss/admin key will glow or blink to indicate one of the following:
◦Blinking indicates a call on hold. Press the key twice to connect to the held call.
◦The steadily glowing LED indicates that your admin has accepted or is making a call on your
behalf.
Note: If you turn on Do not disturb (DND), incoming calls will ring on your
admin's phone. DND does not affect calls from your admin/delegate, members
of your Team Call, and contacts in your Friends and Family relationship group.
They will ring on both phones even when DND is on.
Admin/delegate
The red LED on the boss/admin key will glow or blink to indicate one of the following:
• The steadily glowing LED indicates that your boss is in a call.
• Blinking indicates a call on hold. Press the key twice to connect to the held call.
Other manuals for 720
7
Table of contents
Other Snom IP Phone manuals