Solo SOLO2 User manual

2
USER
MANUAL

2
Using This Manual
This manual contains important instructions for the safe use and
operation of the scooter.
Please fully read the manual before using the scooter.
Package Contents
1x Scooter quality checklist
1x SOLO2 electric scooter
1x SOLO2 charger
2x Handlebar grips
1x Brake lever
1x Locking hook
3x Screws
1x Allen key
1x Safety manual

Disclaimer
At present, electric scooters are not to be used on public roads, footpaths and cycle
lanes in the United Kingdom. It is the complete responsibility of the owner to ensure
that you operate your electric e-scooter within all DFT guidelines.
The owner assumes all liability and risk associated with the use of electric scooter
products and holds SOLO-E Ltd and its owners free from any liability or injury caused
by their use.
2

Specifications
Specification
Top speed
Speed modes
Accelerator type
Range
Brake type
Lights
Motor
Battery
Weight limit
Tyres
Puncture sealant
Weight
Water resistance
Suspension
Description
30kmh / 18.6 mph
3; Eco, Comfort, Sport
Foot controlled
Up to 30km / 18.6miles*
Disc
Front and Rear Brake
350W
36V 7.8Ah
150kg / 23.6 stone
Front 10” Pneumatic - Rear 10.5” Tubeless
Standard
12.5kg
IP54 Frame; IP67 Electrics
N/A
2
* Note - Actual ranges achieved will vary based on factors including riding style, rider weight, environment and road surface.

The scooter’s current speed mode is indicated by the number that is lit:
LED Dashboard
Battery
charge
display
Speed/range
display
Speed
mode
Light
(on when
lit)
Bluetooth
2
Speed
(when lit)
Range
(when
stationary
and lit)
Speed Modes
1 = Eco speed mode
2 = Comfort speed mode
3 = Sport speed mode

Dashboard
In addition to the LED display; the dashboard
includes the power and headlight buttons:
Press the power button to turn the
scooter on
Press and hold the power button for
one second to turn the scooter off
Press the headlight button to turn the
headlight on and off
2

Assembly & Tyre Inflation
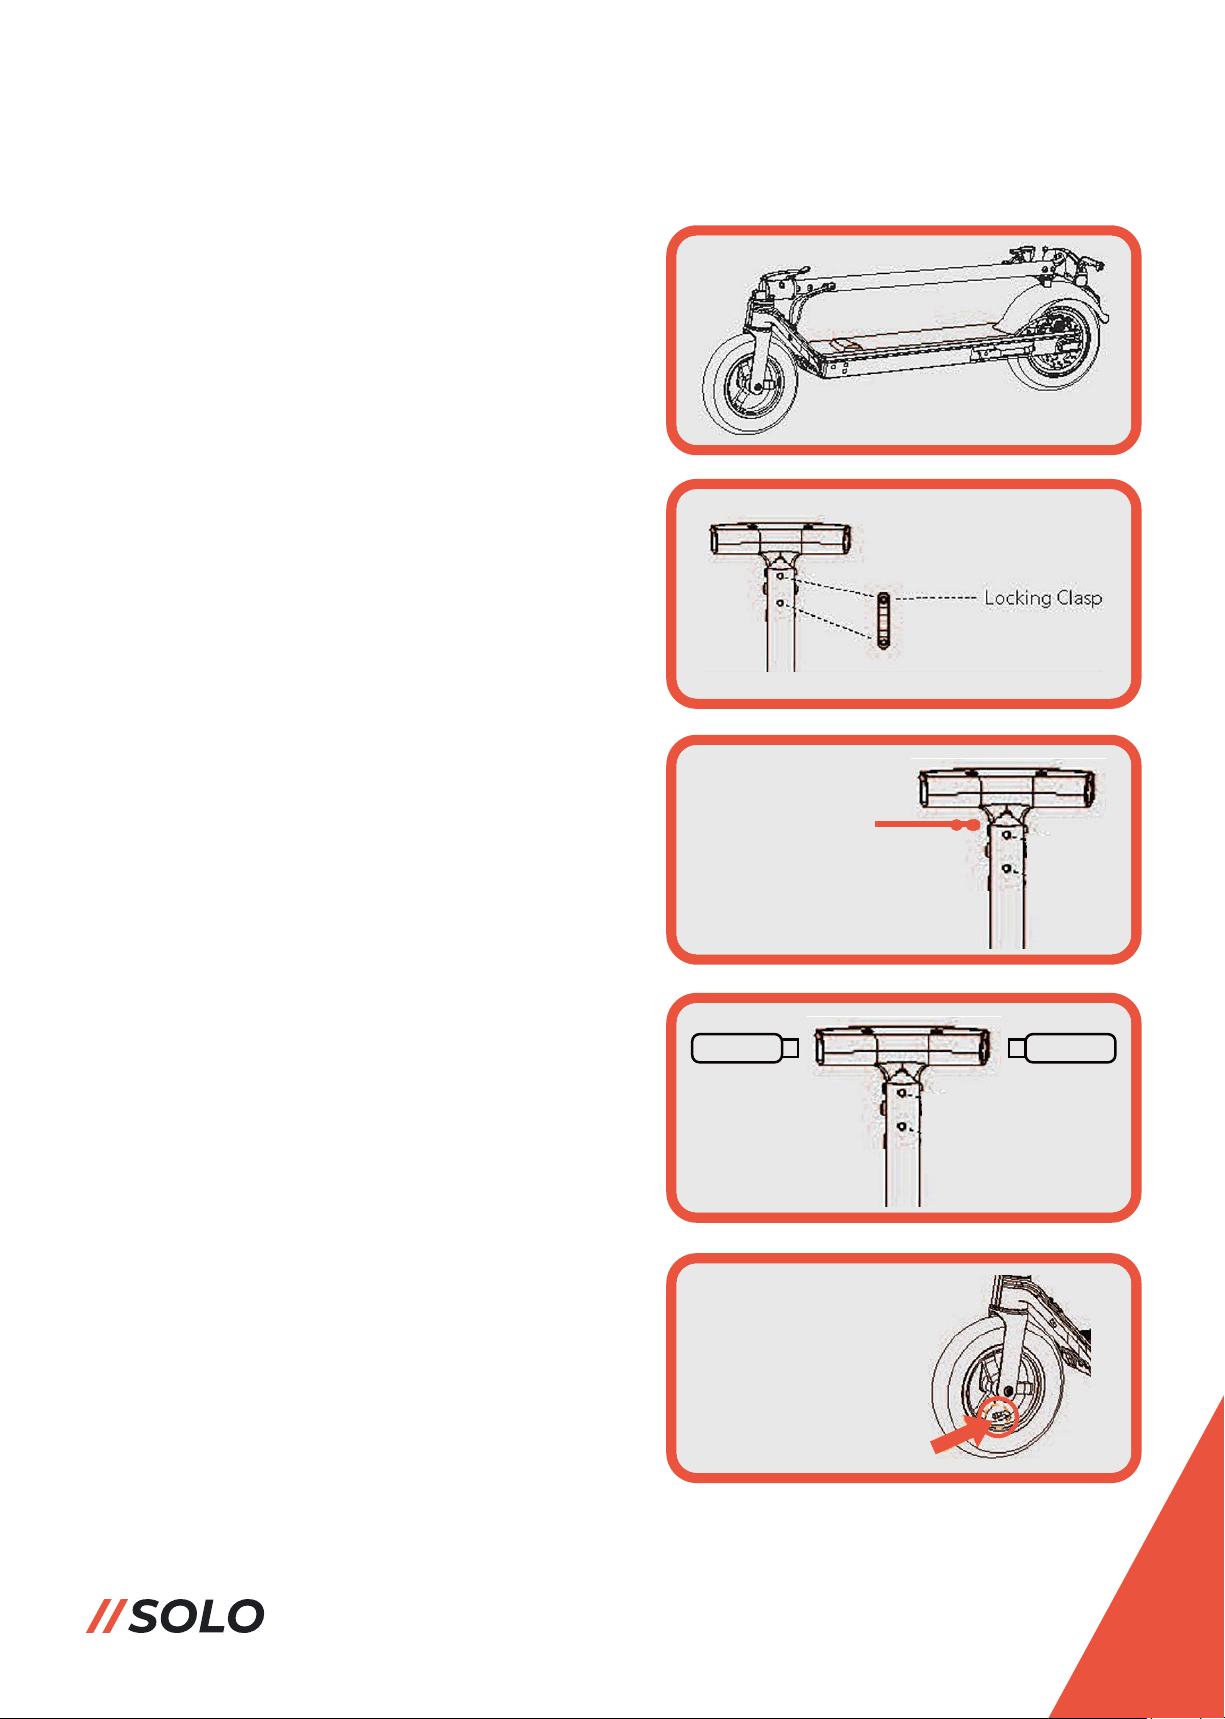
Step 1 - Check the package contents
carefully, making sure all parts are in good
condition; then take the scooter out of the
box in its folded state with the kickstand
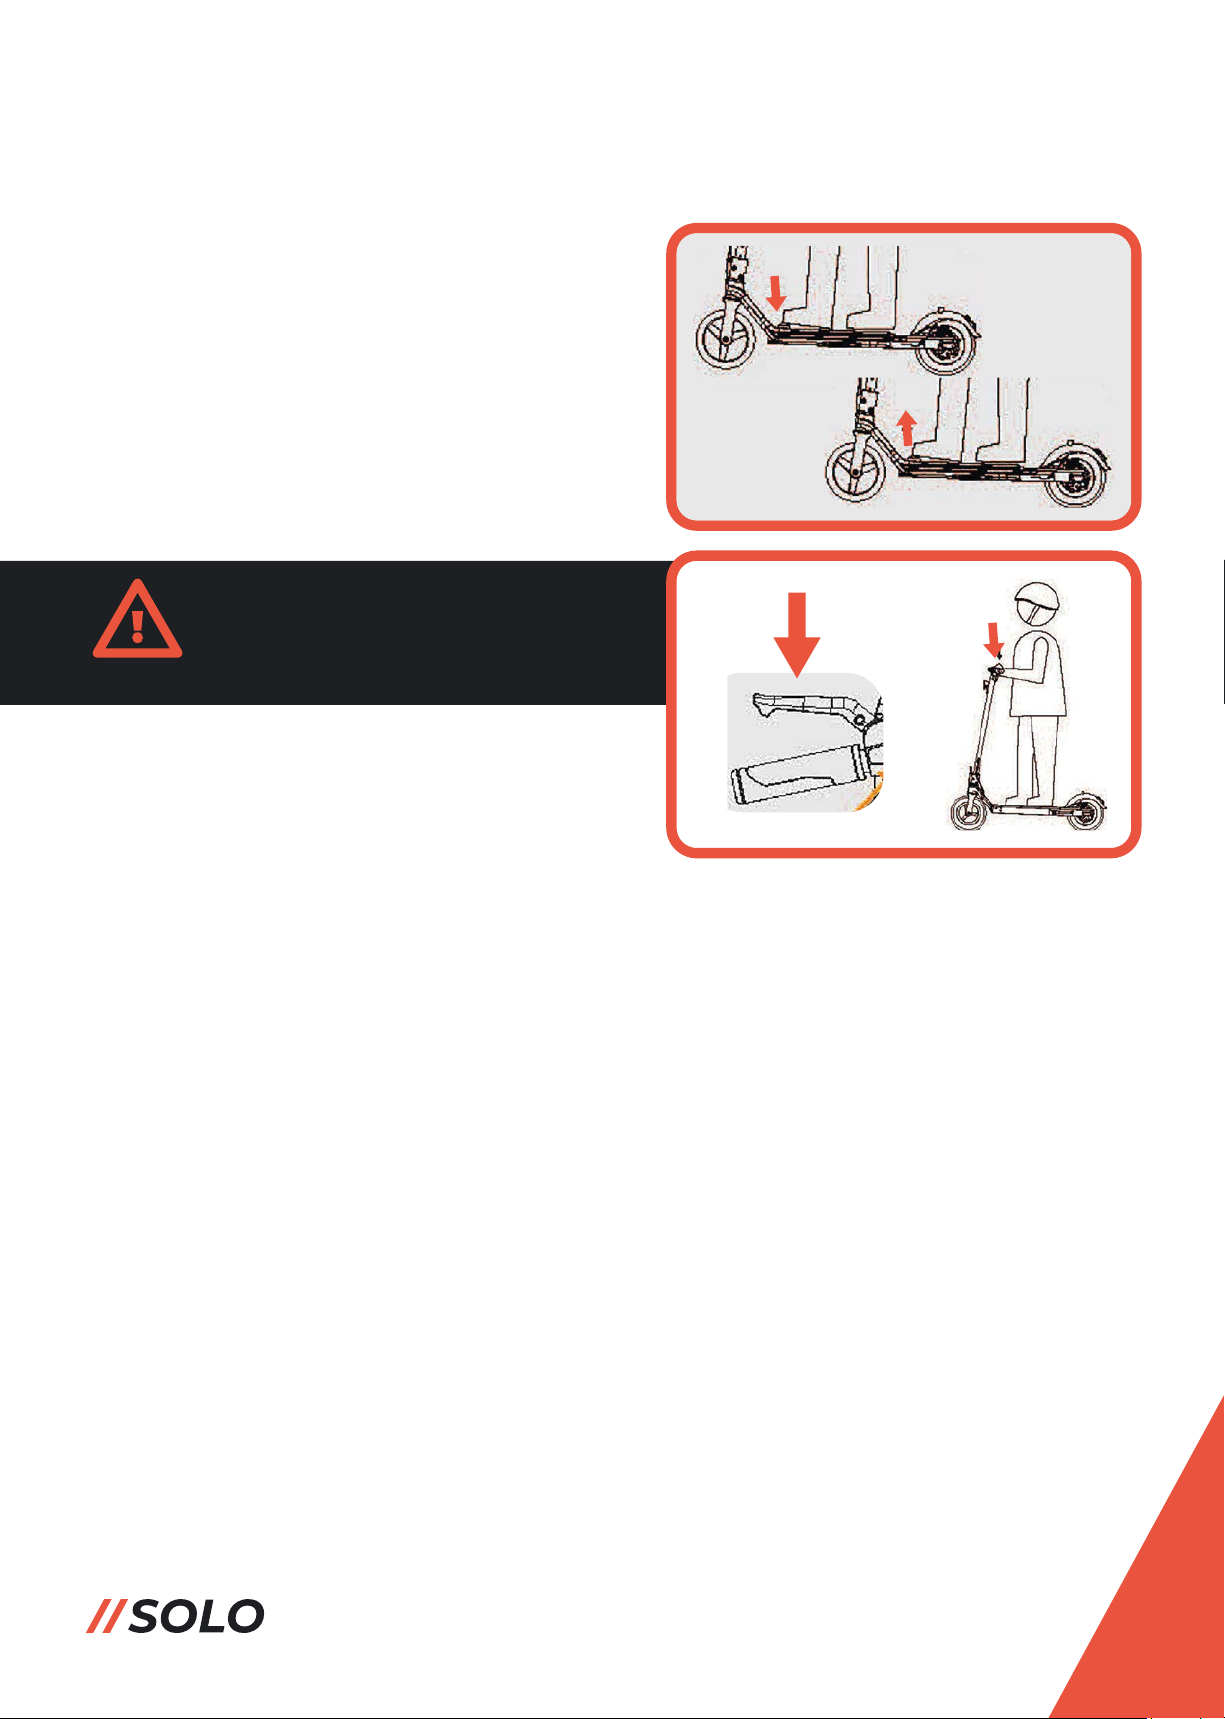
down.
Step 2 - Screw the handlebar locking clasp
with an allen key until secure.
2
Step 3 - Screw the brake lever into place
with the included allen key until secure.
Brake lever
Step 4 - Insert the left handle into position
turning it clockwise to tighten; repeat with
the right handle, tightening in an
anti-clockwise direction.
Step 5 - Check the front tyre pressure is
correct. Your scooter has had puncture
sealant treatment added before sending
out to you. We inflated the tyre to the
following tyre pressure (2.5bar / 250KPA /
36PSI)
Front wheel valve

Always make sure the locking
mechanism has clicked into
place before riding or placing
any weight on the scooter.
Unfolding The Scooter
Step 1 - Gently raise the handlebar up and
to the left, until the handlebar comes loose
from the hookon the rear mudguard.
Step 2 - Turn the handlebar slightly to the
left or right to avoid hitting the safety lock.
Put your foot on the foot pad and then
push the steering column forward to the
final position until you hear a click (this is
the locking mechanism functioning).
2
*CLICK!*

Collapsing the Scooter
2
Step 1 - Turn the steering column slightly
to the left or right until the folding button
is completely away from the safety lock,
then press the folding button down.
Step 2 - Turn the handlebar slightly to the
left or right to avoid hitting the safety lock;
put your foot on the foot pad and then
push the steering column back and down
to the rear wheel.
Step 3 - Turn the handlebar so as to lock
the handle into the locking hook on the
rear fender, securing the scooter closed.

Avoid pressing the accelerator
pedal and brake lever at the
same time otherwise the rider
may lose control of the scooter
Using The Throttle & Brake
Gently press the accelerator pedal on the
deck to move; the harder you press the
pedal, the faster the scooter will go.
To slow down or stop the scooter, release
the accelerator pedal, and gently pull the
brake lever.
2

Only operate the scooter in areas where legally permitted and
safe to do so.
Do not ride the scooter on public highways or in built-up areas
that pose a risk of danger or injury to the rider or bystanders.
Riding The Scooter
Step 1 - Press the power button on the
dashboard to power up the scooter.
Step 2 - Hold the handle bar with both
hands with one foot on the deck and push
the scooter with the other foot to start
moving forwards.
Gently press the accelerator pedal to speed
up the scooter and maintain balance, place
the second foot on the deck when
comfortable.
Step 3 - Gently turn the handle bar to steer
the scooter in the desired direction while
maintaining balance.
2

Always follow local guidance and highway laws when using
the scooter at all times.
Be wary of your environment, pedestrians and traffic at all
times.
Scooter Safety
It is ultimately the rider’s sole responsibility for the safety
of themselves and others while using the scooter.
The manufacturer and associated parties accept no
responsibility for any damage or injury caused through
improper, inconsiderate or careless use of the scooter.
Read this manual in full before riding the scooter for the first time.
Prior to riding, check that the battery is charged, and there are no defects or
damage that may affect the safety of the scooter.
Always wear protective equipment including a helmet, gloves, knee and
elbow pads when using the scooter.
The scooter is recommended for use only by persons aged 16 or over.
Only use the scooter for short, local journeys or recreation in areas where
there is sufficient space to do so safely.
The scooter should only be used by one rider at any time.
Do not ride or use the scooter under the influence of alcohol, drugs or other
substances.
Do not use personal mobile devices or other items that may cause
distractions or inhibit full control of the scooter.
Ride with respect to your surroundings - In busy or built up areas, ride at a
slower speed or get off the scooter.
2

Always follow local guidance and highway laws when using
the scooter at all times.
Be wary of your environment, pedestrians and traffic at all
times.
Scooter Safety
Use common sense and be courteous at all times when riding the scooter.
Use both hands on the handlebars all times when riding the scooter.
Always maintain an upright standing position while riding the scooter.
Do not power off the scooter while riding.
Do not ride the scooter on wet, icy, oily or rough surfaces; if necessary, slow
down or get off the scooter if doing so.
Avoid sudden acceleration or braking on slippery surfaces.
Do not ride the scooter through standing water more than 3cm deep.
Do not ride the scooter up or down stairs or escalators.
Do not ride the scooter in temperatures below -5°.
Do not ride the scooter on gradients of more than 15°.
Do not ride the scooter in areas of poor light or visibility.
When the battery charge is running low, ride at a slower, conservative speed
and recharge the battery as soon as possible.
Only carry the scooter from the handle bars or steering column, do not carry
of lift it by any other parts of the scooter.
It is ultimately the rider’s sole responsibility for the safety
of themselves and others while using the scooter.
The manufacturer and associated parties accept no
responsibility for any damage or injury caused through
improper, inconsiderate or careless use of the scooter.
2

Cleaning
Clean the scooter using a soft, damp cloth only; for stains that cannot be wiped off,
use a drop of toothpaste and a toothbrush to gently polish the stain away, wiping
with a soft, damp cloth to finish.
Do not use alcohol, solvents, petrol, spirits or other corrosove or volatile chemicals
to clean the scooter, otherwise irreparable cosmetic or physical damage may be
caused.
Do not use high pressure brushes or washers to clean the scooter.
Before cleaning the scooter ensure it is powered off, unplugged
and away from the charger unit and the charging port cap is
securely closed to prevent risk of injury or damage through
electrical shock or short circuiting.
The kickstand is only for structural support - Avoid standing on
the scooter while the kickstand is in use, as this can cause the
stand to break
Storage
Store the scooter indoors in a cool, dry place.
Storage outdoors, in direct sunlight or extreme heat may cause irreversible
cosmetic damage and reduced battery life.
2

Battery Maintenance
Ensure the scooter is stored in a cool dry place, ensuring the battery is away from
direct sunlight, moisture, extreme heat or cold otherwise this can cause reduced
battery effectiveness.
Avoid charging the battery from a fully discharged state; it is recommended to
recharge the battery after every use to maintain effectiveness.
Shorter mileage ranges may be experienced from a charged state when riding in
colder temperatures.
In the event of a significant loss in range between charges, the battery should be
replaced - Please contact your authorised dealer for more information.
In the event of long storage the scooter should be charged every 2 months to
prevent over-discharge.
Damage caused to the battery and internal electrics cause by
over-discharging are unrepairable and are not covered by warranty.
Do not disconnect the battery for any reason as this can cause
injury or damage due to electric shocks or short circuiting.
In the event of a battery issue, please contact your authorised
dealer for further advice and support.
2
If disposing the product, please do so responsibly by
disposing at a local recycling facility and not general
waste - For further information please contact your
authorised dealer for further advice and support.

Regular Checks & General Maintenance
Tyres
If the tyres show any signs of cracking,
punctures or wear, the tyres should be
replaced as soon as possible; please
contact your authorised dealer if you
require replacement parts and/or
installation.
2
Disc Brake
Check and adjust the disc brake regularly
to ensure the scooter brakes effectively and
under control. The tightness of the brake
can be adjusted manually:
Step 1 - Loosen the fitting screw on the
brake shaft.
Step 2- Adjust the length of cable; shorten
the excess cable to loosen the brake,
lengthen the excess cable to tighten the
brake.
Step 3 - Tighten the fitting screw back up
and test the brake response; readjusting by
repeating these steps until the desired
tightness is achieved.
1
2
3

2
Table of contents
Other Solo Scooter manuals